Tuesday, 30 June 2020

How to Speed up Your WordPress Site with WP Rocket

WP Rocket Course on WP101

New Course: Speed up Your WordPress Site in a Few Clicks with WP Rocket

Does your WordPress site load slowly? Do you want to learn how to speed up your WordPress site with just a few clicks? If so, you’re in the right place!


WordPress is the most popular web publishing software on the planet. But if you visit many WordPress websites, you’ll quickly notice that they often load very slowly. And did you know that more than half of your visitors will leave if your website doesn’t load within ​three seconds?

Making matters worse, a slow-loading site will also impact your ranking in search engine results. If your site loads slowly, it’ll rank lower, and that means fewer visitors to your site. If you run an e-commerce site, that means less revenue.

Over the years, one of the most frequent questions we’ve heard from our members is, “How do I make my WordPress site load faster?”

That used to be tricky to answer. You could speed up your WordPress site by adding more resources to your web server, or migrating to a better Managed WordPress host. Or, you can use a CDN, a more lightweight theme, or remove any large images from your site. Maybe then your WordPress site would load more quickly. Right? But how realistic is that?

Thankfully, that’s where WP Rocket comes in.

Speed up Your WordPress Site with WP Rocket


WP Rocket is the best caching plugin for WordPress, and the ​easiest​ way to make your WordPress site load faster, with just a few clicks. And, unlike other caching plugins, you don’t need to be a rocket scientist to get up and running. In fact, you can set up WP Rocket in less than 3 minutes!


You don’t have to waste hours of your time, testing dozens of complicated settings. As soon as you activate the WP Rocket plugin, it ​automatically​ applies 80% of web performance best practices, ​even before you’ve enabled any options!

With WP Rocket activated on your WordPress site, you’ll notice instantly faster page load times. But you can also dive in a little deeper and customize the settings to get the absolute best performance for your site.

Oh, and there’s one more important thing to note about WP Rocket. Most Managed WordPress hosts block you from installing caching plugins on your WordPress site, because most of them interfere with their own server-level caching. But not WP Rocket. It’s the only caching plugin accepted by the top Managed WordPress hosts. That’s why today we only use and recommend one caching plugin for WordPress: WP Rocket

In fact, check out our page speed test results before & after activating WP Rocket on this site:

WP101 Page Speed Test Before Activating WP Rocket

Actual page speed test results of this site before activating WP Rocket.

WP101 After Activating WP Rocket

Page speed test results for this site after activating WP Rocket. Still some work to do on mobile, but what a huge improvement!


Last year, we partnered with the WP Rocket team to create this 10-part video tutorial series, and today, we’re thrilled to make it available to our members!

In this easy, 30-minute course, you’ll learn:

  • Why WP Rocket is the best caching plugin for WordPress.
  • How to download, install, and configure WP Rocket.
  • The best settings to speed up your WordPress site with WP Rocket.
  • How to test that WP Rocket is caching your site.
  • How to measure the speed of your site.
  • How external content slows your site down.
  • How to troubleshoot display issues with WP Rocket.
  • How to exclude certain JavaScript files from being cached.
  • How to set up the Cloudflare add-on in WP Rocket.
  • How preloading works in WP Rocket your site load faster.
  • Plus, much more!

Check out the introductory video…


Best of all, this new course is FREE for All-Access Pass members!

If you already have an All-Access Pass, first log into your account, then visit the WP Rocket 101 course description page, then click the large, green button that says, “Take This Course.” That’s it! You don’t need to purchase anything else. Once you’ve enrolled in the new course, it will appear in your My Courses page.

Don’t have an All-Access Pass yet?

Purchase an All-Access Pass today and you’ll get this new course, plus all of our other courses! In addition to WordPress basics, you’ll also learn how to optimize your site for search engines, sell products from your website, create custom forms, and much more. Get your All-Access Pass today!

Check out the WP Rocket 101 course outline:

View Course Outline

How to Speed up Your WordPress Site with WP Rocket appeared first on WP101.com


from WordPress Tutorials by WP101 https://ift.tt/38gBgME
Https://mwktutor.com/

How to Create a Custom Instagram Photo Feed in WordPress

Recently, one of our readers asked if it was possible to add a customized Instagram photo feed to their site?

Specifically, they wanted to customize the Instagram photo feed to only show select photos instead of all photos from their profile.

In this article, we’re going to show you exactly how to create a custom Instagram photo feed in WordPress.
Creating a custom Instagram feed for your WordPress site

Why Include an Instagram Feed on Your WordPress Site?

Adding an Instagram feed on your WordPress site lets you add fresh content without a lot of work. It also encourages readers to follow you on Instagram.

Instead of adding photos manually to your site, you can simply upload them to Instagram, and they’ll appear on your website. You can also include other people’s photos by using a hashtag feed.

This could be a great way to show people using your products, providing valuable social proof that could help you make more money online.

How to Create a Custom Instagram Photo Feed in WordPress

To set up a custom Instagram photo feed on your site, you’ll need to install and activate the Smash Balloon Instagram Feed plugin. For more details, see our step by step guide on how to install a WordPress plugin.

This is the premium version of the free Instagram feed plugin which is used by over 1 million websites.

After you’ve installed the plugin, go to Instagram Feed » Settings page in your WordPress admin and click the License tab to enter your license key. You can find this in your Smash Balloon account.

Don’t forget to click the ‘Save Changes’ button at the bottom after activating your license key.

Adding your Instagram Feed license

Once you’ve activated your license, go to the ‘Configure’ tab and click the ‘Connect an Instagram Account’ button.
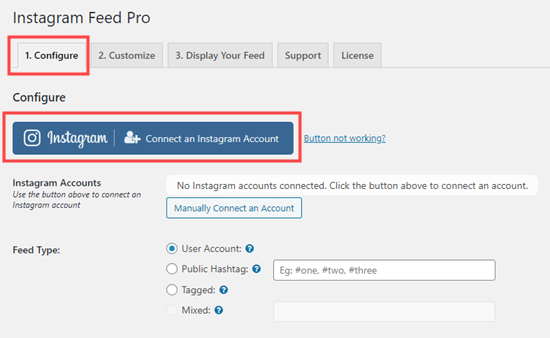
Connecting your Instagram account

You’ll then see a popup asking you to choose whether you’re using a Personal or Business Instagram profile.
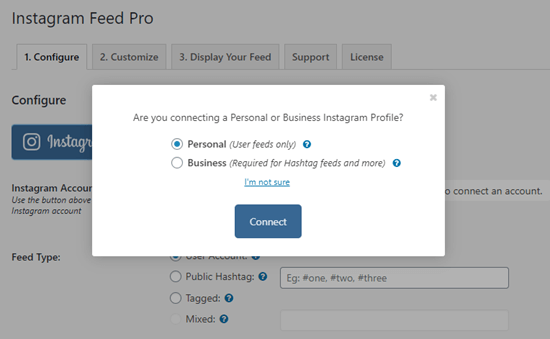
Select whether you're using a personal or business Instagram account

If you simply want to display a feed of your photos, you can use a Personal Instagram account. However, if you want to show a hashtag feed, you’ll need a Business Instagram account.

Tip: Don’t have a Business Account? To convert your Personal Instagram account into a Business Account, you can follow Smash Balloon’s step by step instructions.

It’s free to create a Business Account with Instagram. You can switch back at any time in the Instagram app.

When you click the ‘Connect’ button in the WordPress dashboard, you simply need to follow the prompts and connect your account.

After that, you’ll see your account listed next to the ‘Instagram Accounts’ like this:
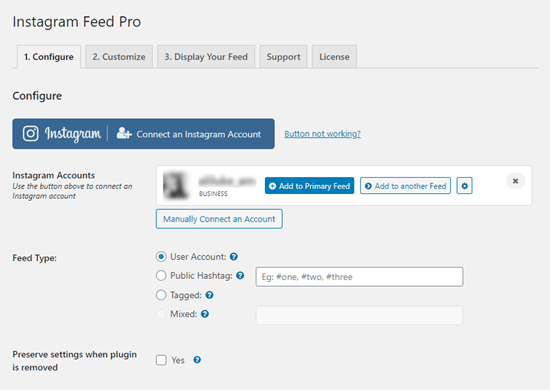
The Instagram Feed plugin is now connected to your Instagram account

Note: You can connect more than one account. Later in this tutorial, we’ll look at how to show several different Instagram feeds on your site.

Showing a Feed of Your Instagram Photos in WordPress

If you want to keep your WordPress site looking fresh and up to date, it’s easy to add a feed of your latest Instagram photos. We’ll take a look at the basic method first, then cover how to customize your feed.

First, click the ‘Add to Primary Feed’ button next to your connected Instagram account:
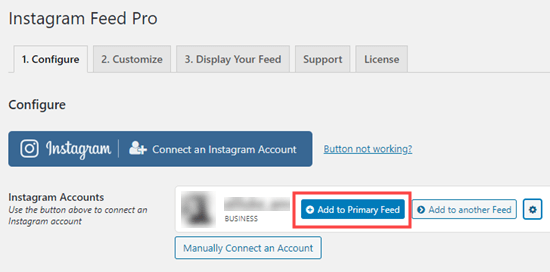
Add your Instagram posts to your primary feed

After that, you can open up a post or page where you’re going to add your feed. Alternatively if you prefer, you can add it in a sidebar widget.

We’re going to create a new page under Pages » Add New for our feed.

Click the (+) symbol to add a new block, then select the ‘Instagram Feed’ block from the Widgets section:
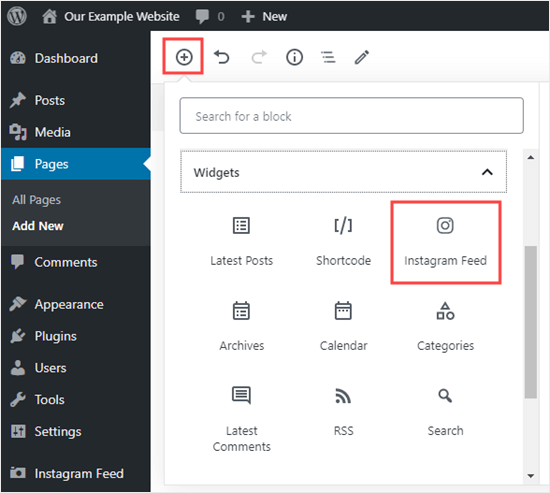
Adding an Instagram feed block to your page

Your Instagram feed will be instantly added to your page, with a Follow button:

Viewing your Instagram photos on your site

If you are using the classic editor, then simply enter the shortcode [instagram-feed] where you want your feed.

You can use the shortcode or the Instagram Feed widget to add your Instagram posts in your sidebar or footer, too. Just go to Appearance » Widgets and drag the Instagram Feed widget to wherever you like.
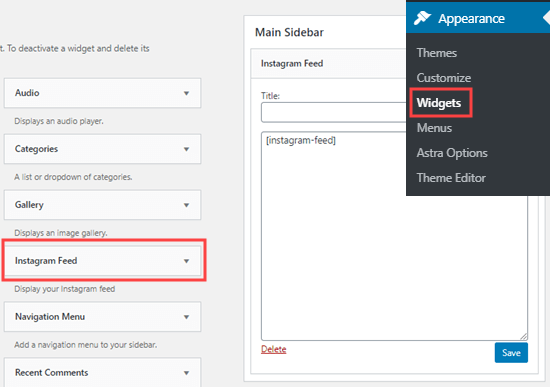
Adding the Instagram Feed widget to your sidebar

Customizing Your Instagram Feed Style in WordPress

By default, your Instagram photos will be displayed in a four column grid. To begin with, users will see 20 photos from your account, but they can click ‘Load More’ to see additional photos.

The Instagram Feed plugin gives you full control over these settings.

To change how your Instagram Feed looks, go to Instagram Feed » Settings » Customize.

Here, you can change the width and height of your feed, switch the layout, change the number of photos, columns, and more.

To change the Layout, simply click on the option you want. We’re going to use a Highlight layout for our Instagram photos, with every 3rd photo highlighted.

You can also choose how many columns to split the photos into, and how many to display to begin with. We’ve chosen to have 6 photos in 3 columns.
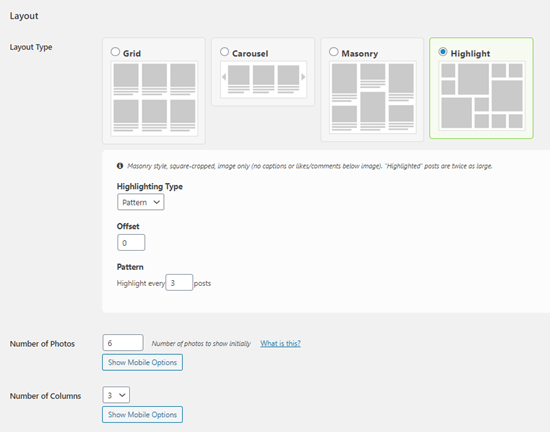
Changing the layout of your Instagram photos

Make sure you click the ‘Save Changes’ button at the bottom of the screen after making any changes.

Here’s how the Instagram feed now looks on our website:
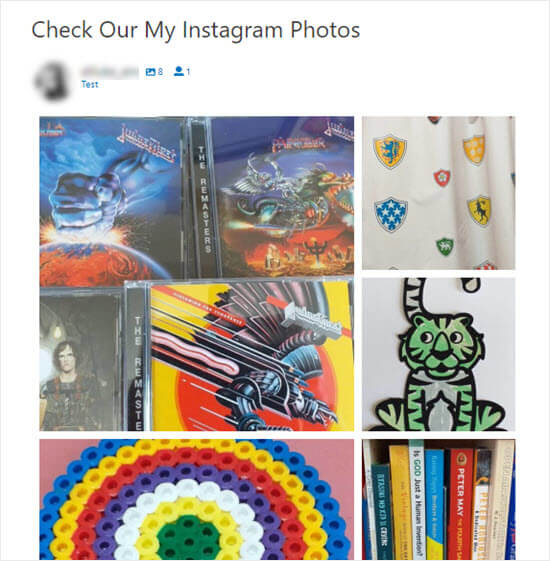
The Instagram photos on the site, arranged in a Highlight layout

Displaying a Hashtag, Tagged, or Mixed Instagram Feed in WordPress

Instagram Feed defaults to showing the most recent posts from your connected Instagram account.

In some cases, you might want to show something different. For instance, you might want to display Instagram posts from any account so long as they use a specific hashtag. This could be a great way to showcase photos from an event or conference.

You can change your feed type by going to Instagram Feed » Configure. Under Feed Type, you can switch to a hashtag or tagged feed. You can click the (?) icon next to an option for more information.

We’re going to switch to a hashtag feed by using the Public Hashtag option. We’ll order it by most recent posts:
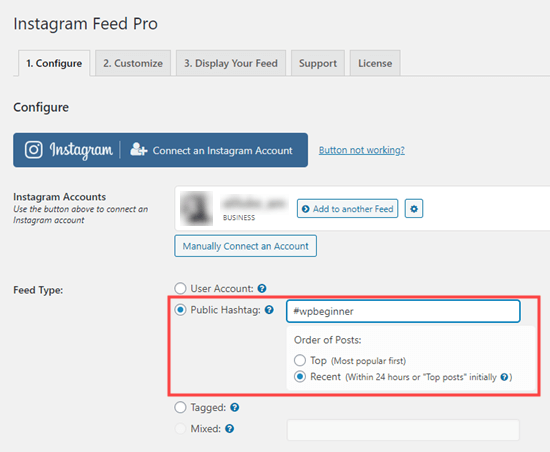
Switch to a hashtag feed of posts

Note: You can’t create a mixed feed here. A mixed feed is one that combines different types, such as photos from a user account plus photos from a hashtag. You can follow the instructions in the next part of the tutorial to create a feed like that.

Here’s how the feed now looks on our site:
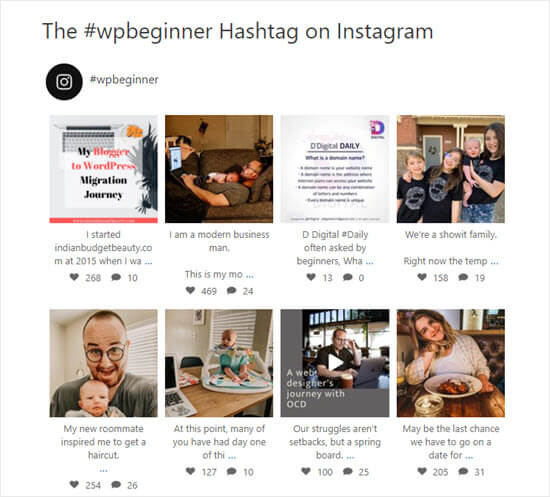
The #wpbeginner hashtag feed

Creating Multiple Instagram Feeds in WordPress

What if you want to include several different Instagram feeds on your WordPress site? That’s possible as well with few simple configurations.

First, go to Instagram Feed » Settings and click on the ‘Display Your Feed’ tab.

You’ll see a number of different settings that you can use within the [instagram-feed] shortcode.

Tip: If you only want to create one feed for your site, then you can change these settings under the Configure tab, as shown above.

If you have several user accounts connected, you can use [instagram-feed type="user" username="wpbeginner"] to specify an account. Change wpbeginner to the username you want.

You can also choose to create feeds based on hashtags here. In this case, you’ll need to use [instagram-feed type="hashtag" hashtag="#wpbeginner"] where #wpbeginner is your chosen hashtag.

Another option is to create a feed that has tagged a specific user account. This option is only available if your connected Instagram account in the plugin settings is a business account.

You can even use shortcodes to create a mixed feed that combines different feed types, such as your Instagram user account plus all photos with a specific hashtag.

If you’re using the Instagram Feed block in the WordPress visual editor, you don’t need to create the whole shortcode. You can simply add your shortcode settings in the block’s settings:
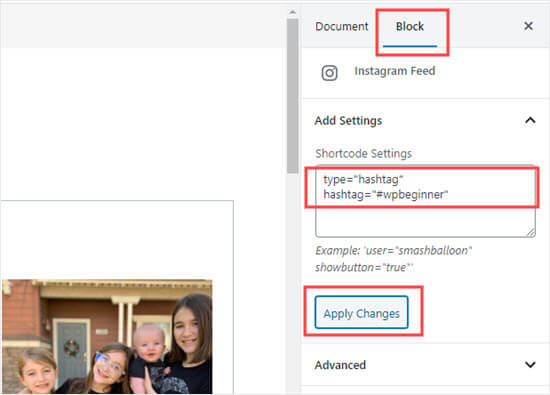
Adding the shortcode settings for the Instagram Feed block

Make sure you click the ‘Apply Changes’ button after making changes here.

Other Popular Instagram Feed Settings in WordPress

You might be perfectly happy with the default display of your photos, as Instagram Feed does a great job without any customizations.

However, there are some common tweaks you may want to make depending on how you want to display your Instagram photos.

For instance, you might want to display just the photos without the captions. This is especially helpful if you’re adding the photos in a fairly narrow sidebar:
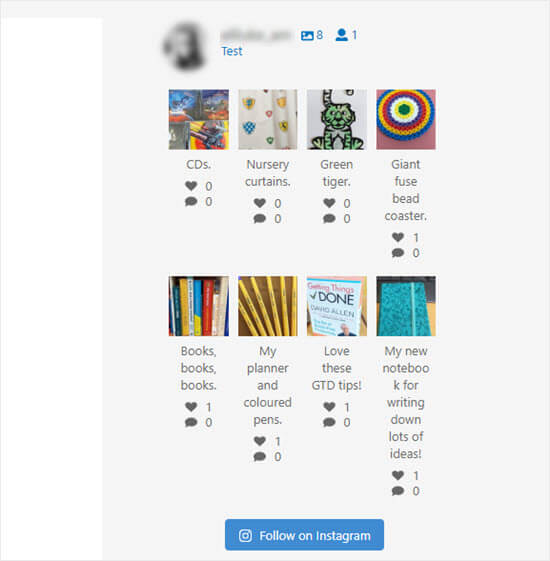
The Instagram Feed in the sidebar, with captions

You can switch the captions off by adding showcaption="false" to your shortcode. Then, your photos will display like this:
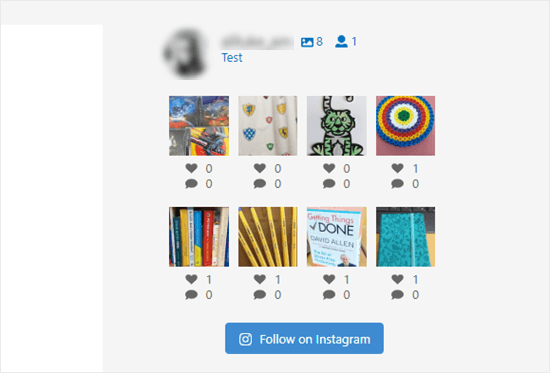
The Instagram photos in the sidebar without captions

You may want to filter posts if you’re using a hashtag feed. For instance, you might want to avoid posts that mention one of your competitors or posts that use rude words in the caption.

You can use excludewords="competitor, rude" in your shortcode. This will exclude any posts that use any of the words within the list of comma-separated words. Change “competitor” and “rude” to whatever words you want to exclude.

Another option you may want to use is to change the text of the Load More button. You can do this adding buttontext="See More Photos" to your shortcode. Simply replace “See More Photos” with the text you want to use.

There are lots of other settings you can use. Smash Balloon’s Instagram Feed plugin lets you tweak everything about how your Instagram photos display on your site.

If you want to see all the possible settings, just go to Instagram Feed » Settings » Display Your Feed to get the full list:
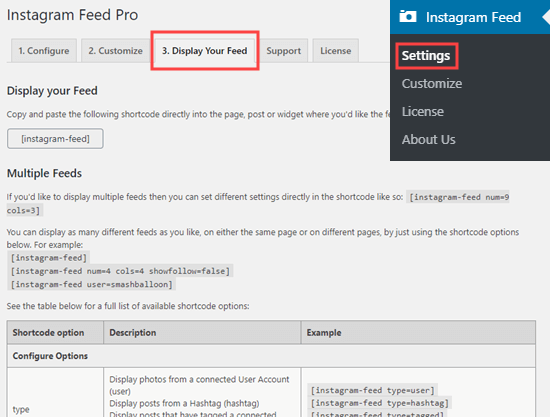
Instagram Feed Pro's display settings

We hope this article helped you learn how to create a custom Instagram feed in WordPress. You might also want to see our comparison of the best WordPress giveaway plugins to grow your social following, and best email marketing services to increase your website traffic.

If you liked this article, then please subscribe to our YouTube Channel for WordPress video tutorials. You can also find us on Twitter and Facebook.

The post How to Create a Custom Instagram Photo Feed in WordPress appeared first on WPBeginner.


from Tutorials – WPBeginner https://ift.tt/2BnCdXz
More View at https://mwktutor.com

How to Create a Custom Instagram Photo Feed in WordPress

Recently, one of our readers asked if it was possible to add a customized Instagram photo feed to their site?

Specifically, they wanted to customize the Instagram photo feed to only show select photos instead of all photos from their profile.

In this article, we’re going to show you exactly how to create a custom Instagram photo feed in WordPress.

Creating a custom Instagram feed for your WordPress site

Why Include an Instagram Feed on Your WordPress Site?

Adding an Instagram feed on your WordPress site lets you add fresh content without a lot of work. It also encourages readers to follow you on Instagram.

Instead of adding photos manually to your site, you can simply upload them to Instagram, and they’ll appear on your website. You can also include other people’s photos by using a hashtag feed.

This could be a great way to show people using your products, providing valuable social proof that could help you make more money online.

How to Create a Custom Instagram Photo Feed in WordPress

To set up a custom Instagram photo feed on your site, you’ll need to install and activate the Smash Balloon Instagram Feed plugin. For more details, see our step by step guide on how to install a WordPress plugin.

This is the premium version of the free Instagram feed plugin which is used by over 1 million websites.

After you’ve installed the plugin, go to Instagram Feed » Settings page in your WordPress admin and click the License tab to enter your license key. You can find this in your Smash Balloon account.

Don’t forget to click the ‘Save Changes’ button at the bottom after activating your license key.

Adding your Instagram Feed license

Once you’ve activated your license, go to the ‘Configure’ tab and click the ‘Connect an Instagram Account’ button.

Connecting your Instagram account

You’ll then see a popup asking you to choose whether you’re using a Personal or Business Instagram profile.

Select whether you're using a personal or business Instagram account

If you simply want to display a feed of your photos, you can use a Personal Instagram account. However, if you want to show a hashtag feed, you’ll need a Business Instagram account.

Tip: Don’t have a Business Account? To convert your Personal Instagram account into a Business Account, you can follow Smash Balloon’s step by step instructions.

It’s free to create a Business Account with Instagram. You can switch back at any time in the Instagram app.

When you click the ‘Connect’ button in the WordPress dashboard, you simply need to follow the prompts and connect your account.

After that, you’ll see your account listed next to the ‘Instagram Accounts’ like this:

The Instagram Feed plugin is now connected to your Instagram account

Note: You can connect more than one account. Later in this tutorial, we’ll look at how to show several different Instagram feeds on your site.

Showing a Feed of Your Instagram Photos in WordPress

If you want to keep your WordPress site looking fresh and up to date, it’s easy to add a feed of your latest Instagram photos. We’ll take a look at the basic method first, then cover how to customize your feed.

First, click the ‘Add to Primary Feed’ button next to your connected Instagram account:

Add your Instagram posts to your primary feed

After that, you can open up a post or page where you’re going to add your feed. Alternatively if you prefer, you can add it in a sidebar widget.

We’re going to create a new page under Pages » Add New for our feed.

Click the (+) symbol to add a new block, then select the ‘Instagram Feed’ block from the Widgets section:

Adding an Instagram feed block to your page

Your Instagram feed will be instantly added to your page, with a Follow button:

Viewing your Instagram photos on your site

If you are using the classic editor, then simply enter the shortcode [instagram-feed] where you want your feed.

You can use the shortcode or the Instagram Feed widget to add your Instagram posts in your sidebar or footer, too. Just go to Appearance » Widgets and drag the Instagram Feed widget to wherever you like.

Adding the Instagram Feed widget to your sidebar

Customizing Your Instagram Feed Style in WordPress

By default, your Instagram photos will be displayed in a four column grid. To begin with, users will see 20 photos from your account, but they can click ‘Load More’ to see additional photos.

The Instagram Feed plugin gives you full control over these settings.

To change how your Instagram Feed looks, go to Instagram Feed » Settings » Customize.

Here, you can change the width and height of your feed, switch the layout, change the number of photos, columns, and more.

To change the Layout, simply click on the option you want. We’re going to use a Highlight layout for our Instagram photos, with every 3rd photo highlighted.

You can also choose how many columns to split the photos into, and how many to display to begin with. We’ve chosen to have 6 photos in 3 columns.

Changing the layout of your Instagram photos

Make sure you click the ‘Save Changes’ button at the bottom of the screen after making any changes.

Here’s how the Instagram feed now looks on our website:

The Instagram photos on the site, arranged in a Highlight layout

Displaying a Hashtag, Tagged, or Mixed Instagram Feed in WordPress

Instagram Feed defaults to showing the most recent posts from your connected Instagram account.

In some cases, you might want to show something different. For instance, you might want to display Instagram posts from any account so long as they use a specific hashtag. This could be a great way to showcase photos from an event or conference.

You can change your feed type by going to Instagram Feed » Configure. Under Feed Type, you can switch to a hashtag or tagged feed. You can click the (?) icon next to an option for more information.

We’re going to switch to a hashtag feed by using the Public Hashtag option. We’ll order it by most recent posts:

Switch to a hashtag feed of posts

Note: You can’t create a mixed feed here. A mixed feed is one that combines different types, such as photos from a user account plus photos from a hashtag. You can follow the instructions in the next part of the tutorial to create a feed like that.

Here’s how the feed now looks on our site:

The #wpbeginner hashtag feed

Creating Multiple Instagram Feeds in WordPress

What if you want to include several different Instagram feeds on your WordPress site? That’s possible as well with few simple configurations.

First, go to Instagram Feed » Settings and click on the ‘Display Your Feed’ tab.

You’ll see a number of different settings that you can use within the [instagram-feed] shortcode.

Tip: If you only want to create one feed for your site, then you can change these settings under the Configure tab, as shown above.

If you have several user accounts connected, you can use [instagram-feed type="user" username="wpbeginner"] to specify an account. Change wpbeginner to the username you want.

You can also choose to create feeds based on hashtags here. In this case, you’ll need to use [instagram-feed type="hashtag" hashtag="#wpbeginner"] where #wpbeginner is your chosen hashtag.

Another option is to create a feed that has tagged a specific user account. This option is only available if your connected Instagram account in the plugin settings is a business account.

You can even use shortcodes to create a mixed feed that combines different feed types, such as your Instagram user account plus all photos with a specific hashtag.

If you’re using the Instagram Feed block in the WordPress visual editor, you don’t need to create the whole shortcode. You can simply add your shortcode settings in the block’s settings:

Adding the shortcode settings for the Instagram Feed block

Make sure you click the ‘Apply Changes’ button after making changes here.

Other Popular Instagram Feed Settings in WordPress

You might be perfectly happy with the default display of your photos, as Instagram Feed does a great job without any customizations.

However, there are some common tweaks you may want to make depending on how you want to display your Instagram photos.

For instance, you might want to display just the photos without the captions. This is especially helpful if you’re adding the photos in a fairly narrow sidebar:

The Instagram Feed in the sidebar, with captions

You can switch the captions off by adding showcaption="false" to your shortcode. Then, your photos will display like this:

The Instagram photos in the sidebar without captions

You may want to filter posts if you’re using a hashtag feed. For instance, you might want to avoid posts that mention one of your competitors or posts that use rude words in the caption.

You can use excludewords="competitor, rude" in your shortcode. This will exclude any posts that use any of the words within the list of comma-separated words. Change “competitor” and “rude” to whatever words you want to exclude.

Another option you may want to use is to change the text of the Load More button. You can do this adding buttontext="See More Photos" to your shortcode. Simply replace “See More Photos” with the text you want to use.

There are lots of other settings you can use. Smash Balloon’s Instagram Feed plugin lets you tweak everything about how your Instagram photos display on your site.

If you want to see all the possible settings, just go to Instagram Feed » Settings » Display Your Feed to get the full list:

Instagram Feed Pro's display settings

We hope this article helped you learn how to create a custom Instagram feed in WordPress. You might also want to see our comparison of the best WordPress giveaway plugins to grow your social following, and best email marketing services to increase your website traffic.

If you liked this article, then please subscribe to our YouTube Channel for WordPress video tutorials. You can also find us on Twitter and Facebook.

The post How to Create a Custom Instagram Photo Feed in WordPress appeared first on WPBeginner.


from WPBeginner https://ift.tt/2BnCdXz
More links is https://mwktutor.com

Monday, 29 June 2020

How to Raise Your Rates, and Not Lose Clients in the Process

As you gain more work experience, it's only natural you will want to raise your rates. With a regular job, wage increases are usually part and parcel of employment. However, this takes on a different scope if you're a freelancer or self-employed. As such, you'll need to negotiate raises directly with clients, which sometimes might mean losing them.

from CodeinWP https://ift.tt/2NFF14M
More View at https://mwktutor.com

How to Change the “Just Another WordPress Site” Text (Easy Way)

Does your site have the text “Just another WordPress site” in the header or title bar?

Often beginners don’t know how to change this tagline. But leaving it in place doesn’t look good. Luckily, it’s really easy to change this to something else or even remove it altogether.

In this tutorial, we’ll show you how to change the “just another WordPress site” text, step by step.

Changing the 'Just another WordPress site' tagline text

What is a WordPress Site’s Tagline?

A tagline is a WordPress site’s slogan or description. Many websites use a catchy phrase as their tagline to describe their website and brand.

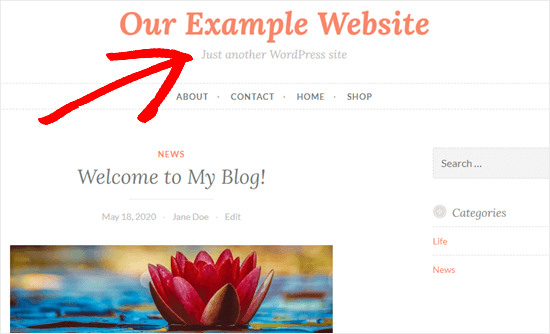
By default, WordPress uses “Just another WordPress site” for your website’s tagline when you first create a website. Not all themes display the tagline, but many will.

An example of the 'Just another WordPress site' text displaying on a website

You should definitely change this text from the default. In fact, doing so is on our list of the key things you should do after installing WordPress.

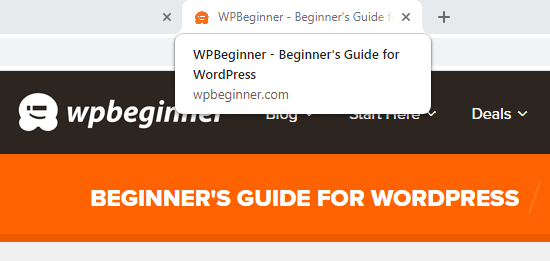
Here on WPBeginner, we use “Beginner’s Guide for WordPress” as our tagline. You can see it just below our navigation menu. It’s also in our site’s title tag in your browser.

WPBeginner's tagline shown in the title tag

You don’t have to have a tagline for your site at all.

Your site’s topic or mission might be clear from its domain name.

However, if your domain name isn’t clearly linked to your blogging niche, then adding a catchy tagline could be a good idea.

Method #1: Changing Your Tagline in WordPress’s Settings

The simplest way to change the “Just another WordPress site” tagline is in your WordPress site’s settings.

First, you’ll need to go to your WordPress dashboard. You can normally do this by adding /wp-admin to the end of your website’s domain name.

For instance, if your site is called example.com, then your WordPress dashboard is at example.com/wp-admin.

If you’re not already logged in, then WordPress will prompt you to log in.

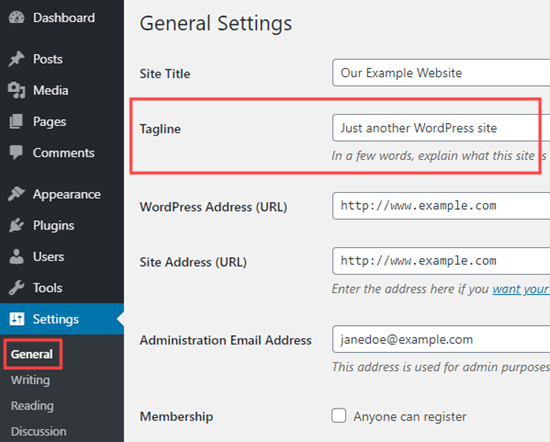
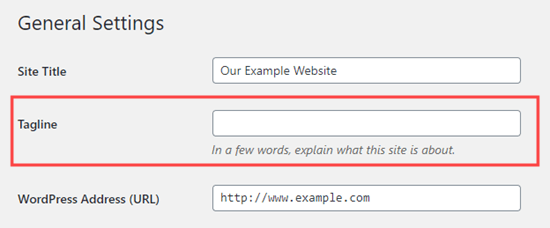
Once logged in, you need to go to Settings » General in your dashboard, and you’ll see the tagline field there.

Changing your tagline under Settings - General in WordPress

You can either change the tagline, or remove it entirely by clearing out the box.

Removing the tagline completely in WordPress

For our example, we’re going to use ‘WordPress tips and tricks’ for our example website.

Once you’ve changed that, scroll down to the bottom of the page and click the ‘Save Changes’ button.

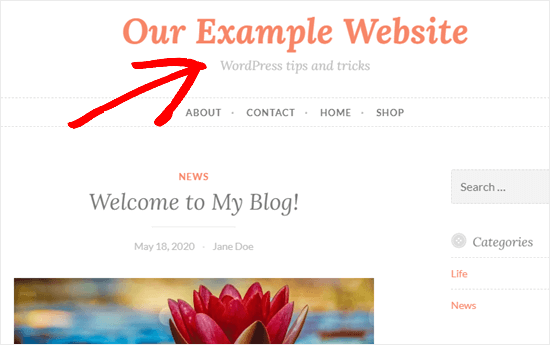
Now, you can visit your site and see your new tagline in place:

The new tagline in place on the site

Method #2: Changing Your Tagline in WordPress’s Theme Customizer

You can also change your tagline in the WordPress Theme Customizer.

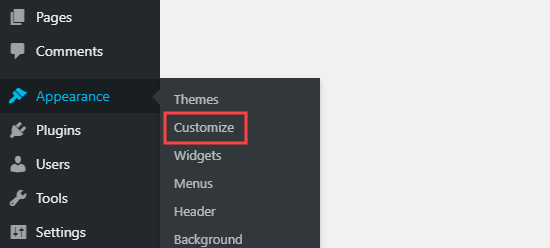
To do so, go to Appearance » Customize in your WordPress dashboard.

The Appearance - Customize option in WordPress

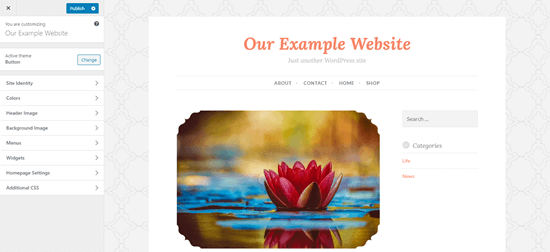
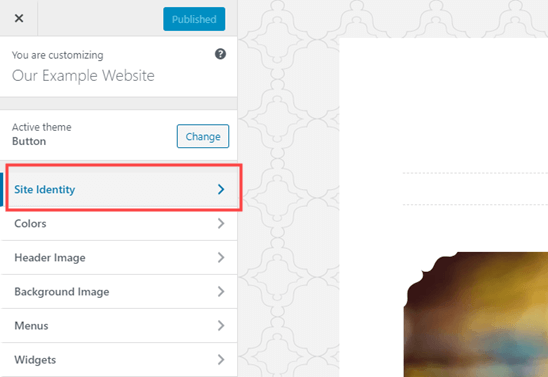
The main part of your screen shows a preview of your website. Down the left hand side, you have a series of tabs that let you customize different aspects of your website.

The Theme Customizer in WordPress

First, you’ll need to look for a tab labeled Site Identity. This will normally be at or near the top.

The Site Identity tab in the WordPress Theme Customizer

Note: If you can’t see the Site Identity tab, expand other tabs to see if it’s nested under them. For instance, Site Identity is within the Header tab in the Astra theme.

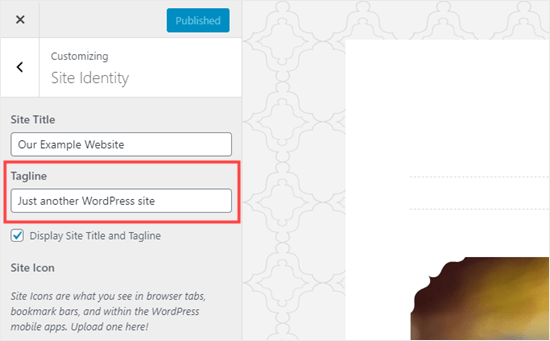
Click on the Site Identity tab to expand it, and you’ll see a box where you can change your tagline.

In the theme we’re using, Button, we also have the option to turn off the display of the site’s title and tagline.

Changing the 'Just another WordPress site' text in the theme customizer

The theme customizer options are determined by the WordPress theme you’re using, so you may see different options here.

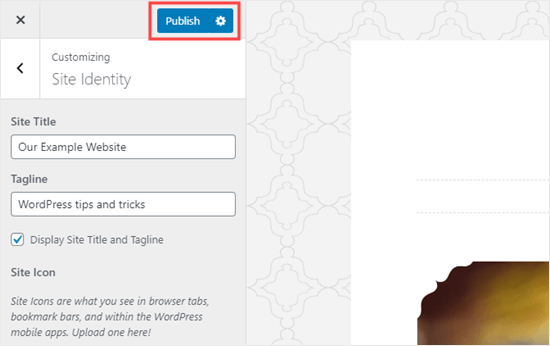
Once you’ve changed the tagline to whatever you want to use, click the ‘Publish’ button at the top of the screen.

Publishing your changes after making alterations in the Theme Customizer

Troubleshooting Your Tagline

Normally, changing your tagline goes smoothly. But what if you changed your tagline and the “Just another WordPress site” text is still showing up?

Wrong Tagline on Your Own Site

First, check that you actually saved your changes. Go back to Settings » General and see if your tagline is correct there. If necessary, change it again and click ‘Save Changes’ at the bottom of the page.

If the “Just another WordPress site” text is still appearing on your site itself, then try clearing your cache.

You could also try looking at your site on a different device or in a different browser to see if it’s a browser cache issue.

If the problem still persists, then you need to reach out to your WordPress hosting support for help.

Wrong Tagline on Google

What if the “Just another WordPress site” text is no longer on your website, but it still shows up in a Google search?

The best way to fix this is to with a Google Search Console account.

Simply type your homepage URL into the search bar at the top. Click the magnifying glass or press Enter on your keyboard to run the search.

Search for your homepage URL in Google Search Console

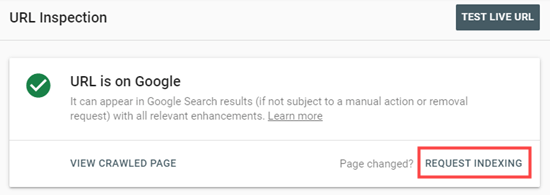
You’ll now see details about the URL. Click the ‘Request Indexing’ link.

Click the Request Indexing link in Google Search Console

Google will then recrawl your page within the next few days, and then it should show the correct tagline, not the “Just Another WordPress Site” text.

Wrong Tagline on Facebook

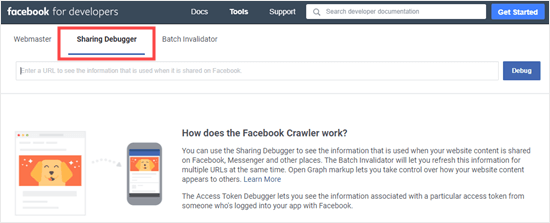
If the “Just another WordPress site” text is still showing up on your Facebook posts, you may need to clear your Facebook cache. You can do this by going to the Sharing Debugger tool.

Simply enter the URL of your site and click the ‘Debug’ button.

The Facebook Sharing Debugger tool

You should see a section headed ‘When and how we last scraped the URL’. Click the ‘Scrape Again’ button at the top of this section. This should refresh the information that Facebook stores about your site.

Facebook showing when the URL was last scraped, with a 'Scrape Again' button

Your website’s tagline should now display correctly when you share posts on Facebook.

We hope this article helped you learn how to change the “Just another WordPress site” text. If you’re just getting started with blogging, we recommend reading our beginner’s guide to the most common WordPress mistakes to avoid, and our expert pick of the must have WordPress plugins for all websites.

If you liked this article, then please subscribe to our YouTube Channel for WordPress video tutorials. You can also find us on Twitter and Facebook.

The post How to Change the “Just Another WordPress Site” Text (Easy Way) appeared first on WPBeginner.


from WPBeginner https://ift.tt/3dDvTIp
More links is https://mwktutor.com