Are you looking to add a contact form on your WordPress site?
Every website needs a contact form, so visitors can easily contact you about your products and services. By default, WordPress does not come with a built-in contact form, but there is an easy way to add contact forms to your site.
In this WordPress tutorial, we’ll show you how to easily create a contact form in WordPress (step by step) without touching a single line of code.

Why Do You Need a Contact form?
You might be wondering why do I need a contact form? Can’t I just add my email address on my website, so people can email me?
That’s a very common question from beginners because they are afraid that adding a contact form requires code knowledge.
The truth is you don’t need to know any code. This step by step guide to adding a contact form is written for absolute beginners.
Below are the top 3 reasons why a contact form is better than pasting your email address on a page.
- Spam Protection – Spam bots regularly scrape websites for the mailto: email address tag. When you post your email address on the website, you will start to receive a lot of spam emails. On the other hand, when you use a contact form, you can get rid of almost all spam emails.
- Consistent Information – When emailing, people don’t always send you all the information that you need. With a contact form, you can tell the user exactly what information you’re looking for (such as their phone number, budget, etc).
- Saves Time – Contact forms help you save time in more ways than you can imagine. Aside from consistent information that we mentioned above, you can also use form confirmations to tell the user what are the next steps. Such as watch a video or wait up to 24 hours to get a response, so they don’t send you multiple inquires.
Below is an example of a WordPress contact form that we will create in this tutorial.
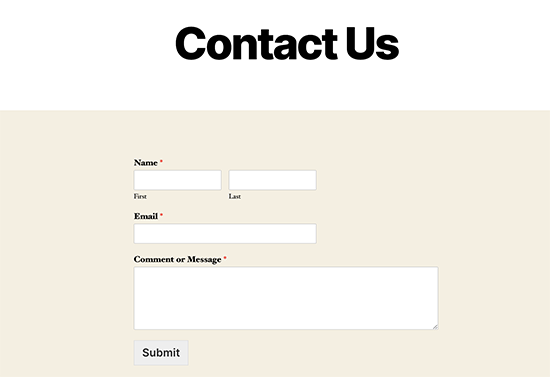
After creating the form above, we will also show you how you can easily add it on your contact page, or in your site’s sidebar using a WordPress contact form widget.
Sounds good? Ok so let’s get started.
Video Tutorial
If you prefer written instructions, then please continue reading.
Step 1. Choosing the Best Contact Form Plugin
The first thing you need to do is choose a WordPress contact form plugin.
While there are several free and paid WordPress contact form plugins you can choose from, we use WPForms on our site and believe it’s the best option in the market.
Below are the three reasons why we think WPForms is the best:
- It is the most beginner friendly contact form plugin available. You can use the drag & drop builder to easily create a contact form in just a few clicks.
- WPForms Lite is 100% free, and you can use it to create a simple contact form (over 3 million sites use it).
- When you are ready for more powerful features, then you can upgrade to WPForms Pro.
Now that we have decided on the contact form plugin, let’s go ahead and install it on your site.
Step 2. Install a Contact Form Plugin in WordPress
For this contact form tutorial, we will use WPForms Lite because it’s free and easy to use.
You can install this plugin on your site by logging into your WordPress dashboard and going to Plugins » Add New.
In the search field, type WPForms and then click on the Install Now button.
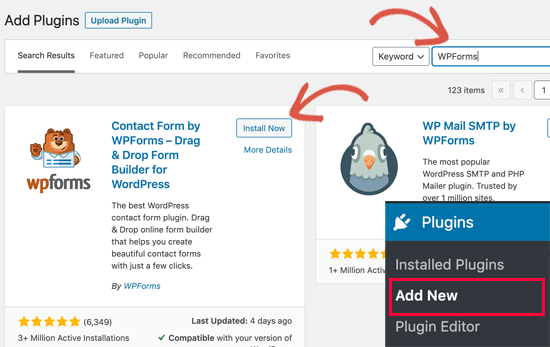
After the plugin is installed, make sure you activate the plugin.
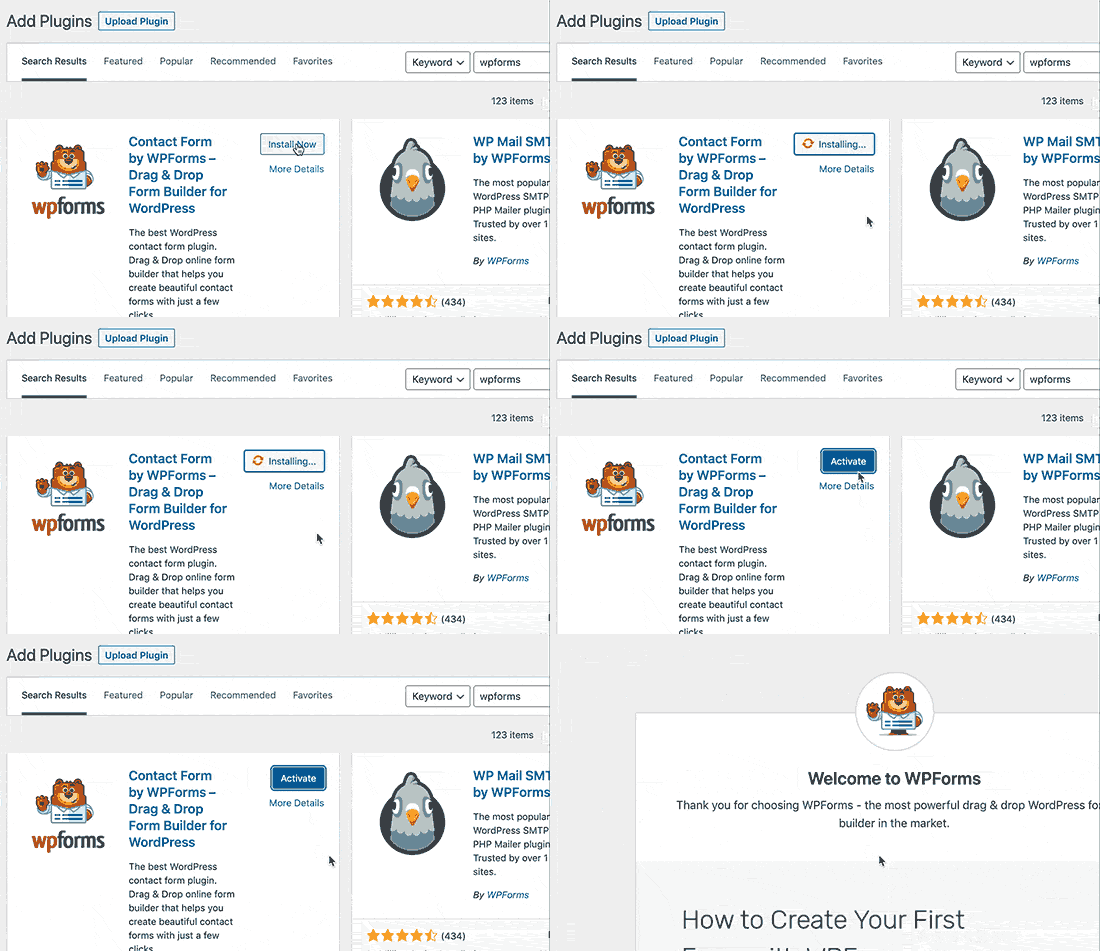
If you don’t see the plugins menu or want more detailed instructions, then please refer to our step by step guide on how to install a WordPress plugin.
Step 3. Create a Contact Form in WordPress
Now that you have activated WPForms, you are ready to create a contact form in WordPress.
In your WordPress dashboard, click on the WPForms menu and go to Add New.
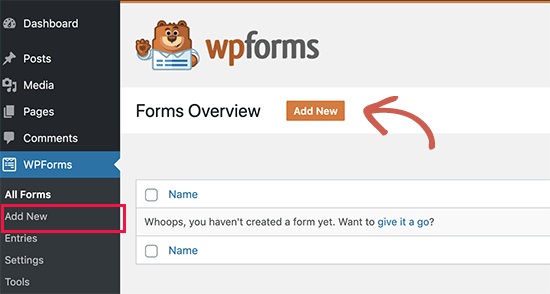
This will open the WPForms drag and drop form builder. Start by giving your contact form a name and then select your contact form template.
WPForms Lite only comes pre-built form templates such as Blank, Simple Contact Form, etc. You can use these to create just about any type of contact form you like.
For the sake of this example, we will go ahead and select Simple Contact Form. It will add the Name, Email, and Message fields.
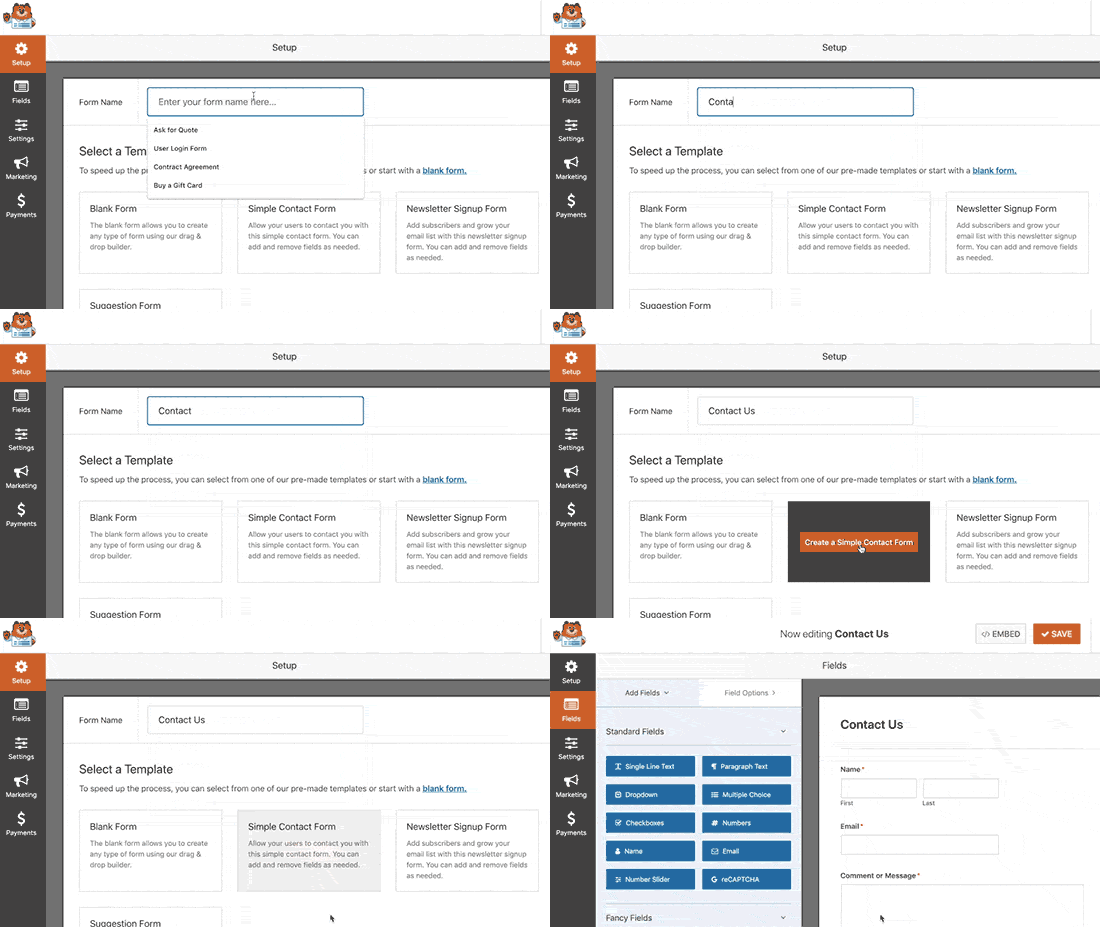
You can click on the fields to edit them. You can also use your mouse to drag and drop the field order.
If you want to add a new field, simply select from the available fields on the left sidebar.
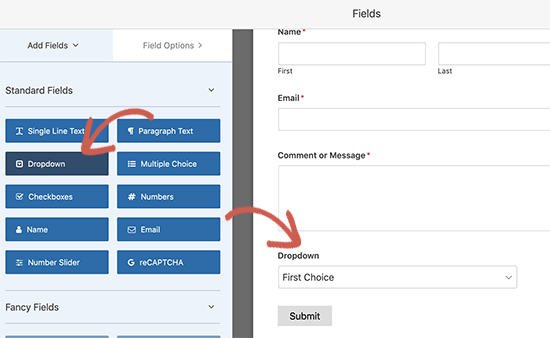
When you’re done click on the Save button.
Step 4. Configuring Form Notification and Confirmations
Now that you have created your WordPress form, it’s important that you properly configure the form notification and form confirmation.
Form confirmation is what your website visitor sees after they submit the form. It could be a thank you message, or you can redirect them to a special page.
Form notification is the email you get after someone submits the contact form on your WordPress site.
You can customize both of those by going to the Settings tab inside the WPForms form builder.
We usually leave the form confirmation as default Thank You message. However, you can change it to redirect to a specific page if you like.
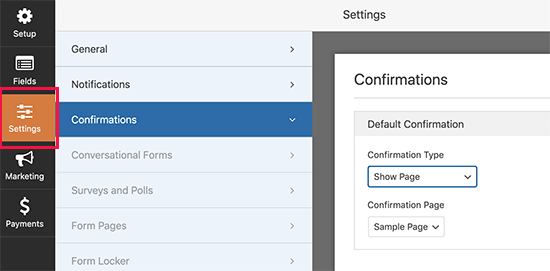
The best part about WPForms is that the default settings are ideal for beginners. When you go to the notification settings, all fields will be pre-filled dynamically.
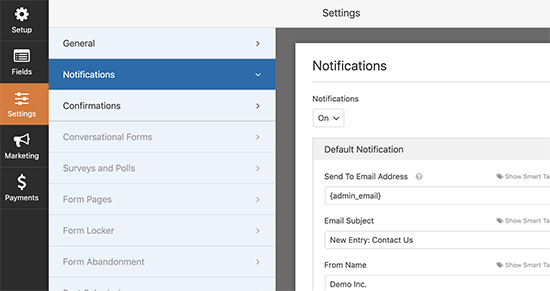
The notifications by default are sent to the Admin Email that you have set up on your site.
If you want to send it to a custom email address, then you can change that. If you want to send the notification to multiple emails, then just separate each email address by a comma.
The email subject is pre-filled with your form name. The from name field is automatically populated with your user’s name. When you reply to the inquiry, it will go to the email that your user filled in the contact form.
We have a detailed guide on how to setup custom form notifications, so you can send forms to multiple recipients or different departments.
Step 5. Adding WordPress Contact Form in a Page
Now that you are done configuring your WordPress contact form, it’s time to add it to a page.
The first thing you need to do is either create a new page in WordPress or edit an existing page where you want to add the contact form.
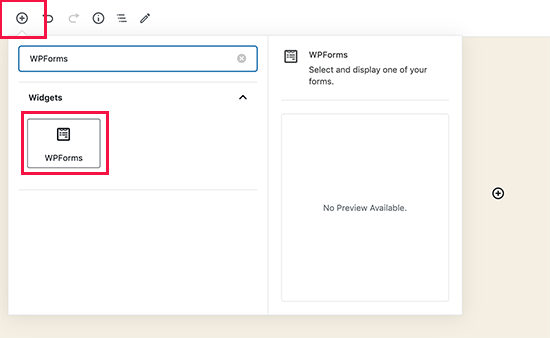
We will be using the WPForms block to add the form in a page. Simply click on the add new block button to look for WPForm and then click to add it to your page.
WPForm block will now appear in the content area of your page. You need to click on the drop down menu to select the form you created earlier.
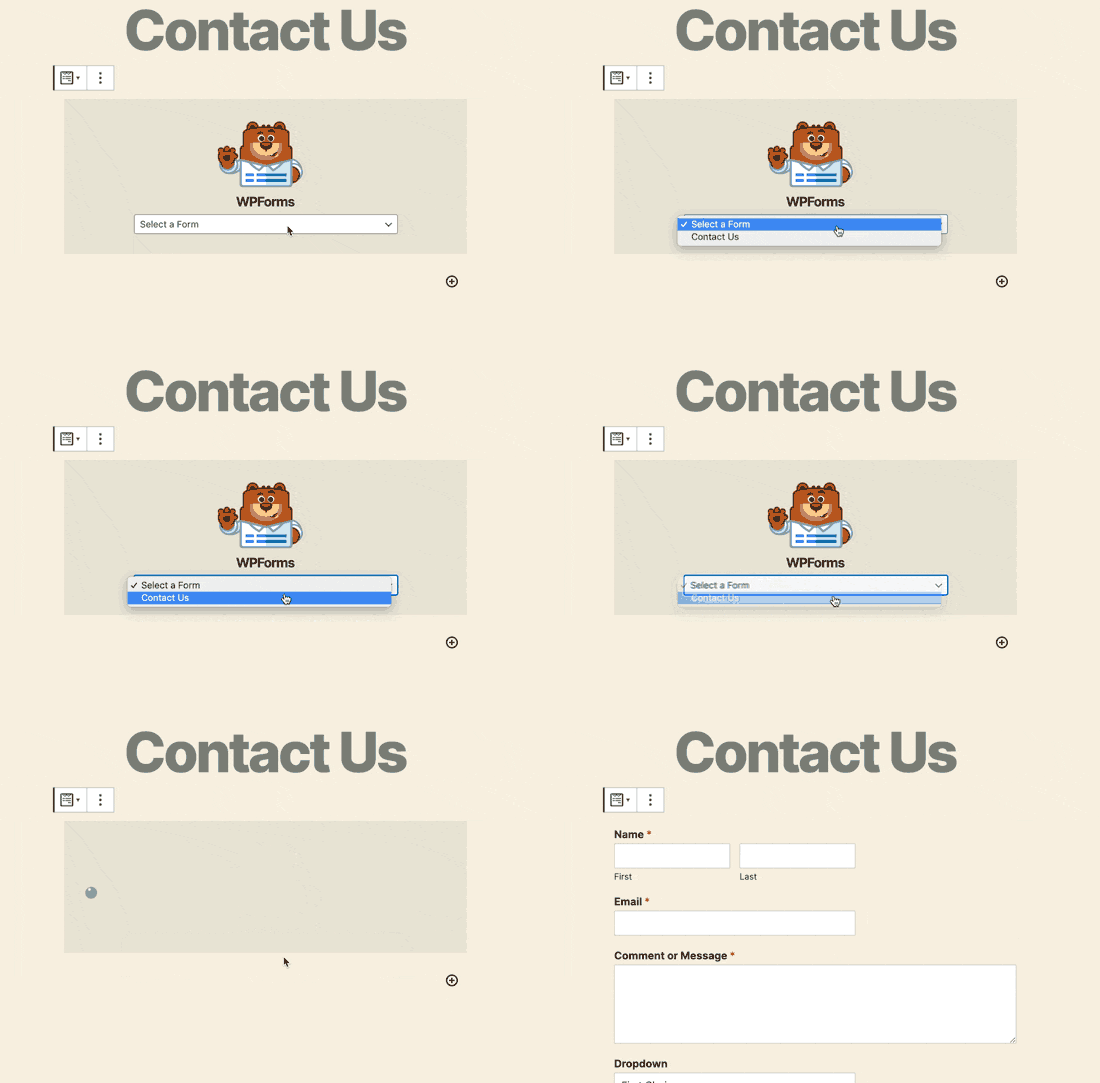
WPForms will load your contact form preview inside the editor. You can now save or publish your page and visit your website to see it in action.
Here’s what the form would look like on a sample WordPress page:

If you only wanted to add the contact form on page, then you’re done here. Congratulations.
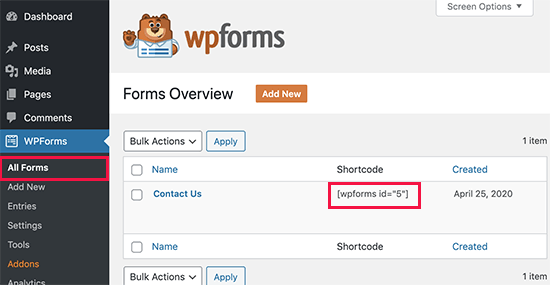
WPForms also comes with a WordPress contact form shortcode. You can copy the contact form shortcode by visiting WPForms » All Forms page and then paste it in any WordPress post or page.
If you want to add a contact form on a sidebar or another widget ready area, then go to step 6.
Step 6. Adding WordPress Contact Form in a Sidebar
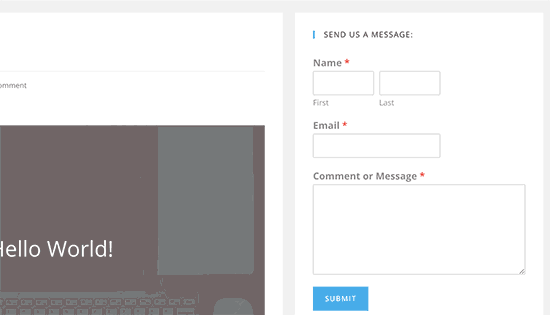
WPForms come with a WordPress contact form widget that you can use to add your contact form in a sidebar or basically any other widget-ready area in your theme.
In your WordPress admin area, go to Appearance » Widgets. You will see a WPForms widget that you can easily drag into any widget-ready areas of your theme.
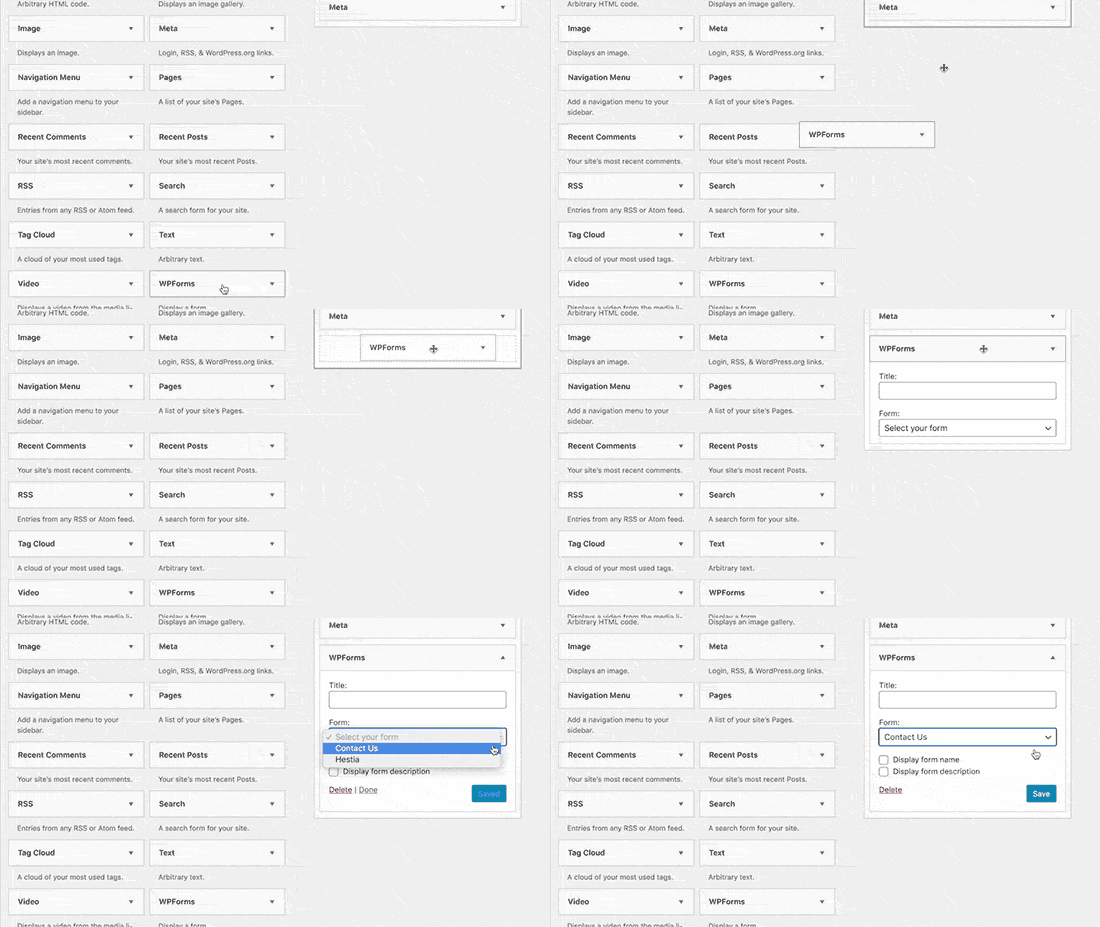
Next, add the title for your widget and select the form you want to display. Save the settings, and visit your website for the preview.
We hope this article helped you create a simple contact form in WordPress. You may also want to check out our comparison of the best WordPress backup plugins and our guide on how to fix WordPress not sending email issue.
If you liked this article, then please subscribe to our YouTube Channel for WordPress video tutorials. You can also find us on Twitter and Facebook.
The post How to Create a Contact Form in WordPress (Step by Step) appeared first on WPBeginner.
from WPBeginner https://ift.tt/3cEdVFZ
More links is https://mwktutor.com
No comments:
Post a Comment