September was the month WordPress plugins really started talking to AI assistants in a serious way. You can now manage backups, forms, online stores, and fundraising campaigns just by asking Claude or ChatGPT, and there’s a good chance you already have some of these plugins… Read More »
You can manage a WordPress site with ChatGPT or Claude using WPVibe. It’s a free plugin that connects both AI tools directly to your site. We tested it by connecting Claude to our demo travel site and giving it real tasks. Within a few minutes,… Read More »
Ever wished you could update every WordPress site you manage without logging into each one? When you manage multiple WordPress sites, even a simple update becomes a repetitive task. You have to log into each site, check which plugins and themes need updating, run the… Read More »
August was a big month for WordPress. WordPress 7.1 arrived on schedule, and WordCamp US brought four days of AI-focused talks to Phoenix. WPVibe doubled its install base in a single month. There is also a brand-new screen recording tool that we think you will… Read More »
WordPress 7.1 is finally here 🥳, and we have been closely following its development.
The new version launched on August 19, 2026, timed with WordCamp US. Its focus is on how you collaborate, style, and manage media on your WordPress website, and it fixes a long list of everyday annoyances along the way.
Whether you run a small blog or a large multi-author site, WordPress 7.1 has changes that will affect how you work every day.
The Notes feature arrived in WordPress 6.9 as a simple way to leave comments on blocks. WordPress 7.1 turns it into a proper feedback system.
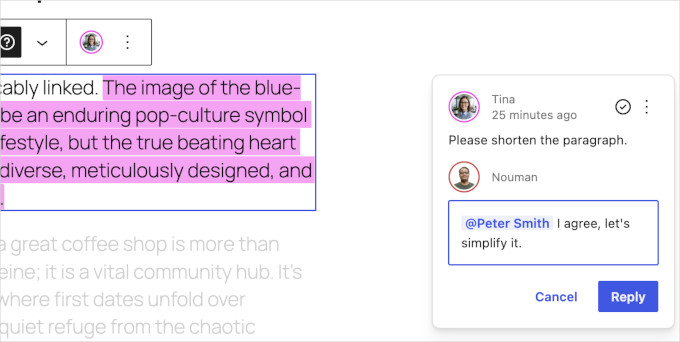
The most useful addition is @mentions. You can type ‘@’ inside a note to bring up a searchable list of collaborators and tag someone directly.
Even better, WordPress now sends an email notification to the person you tagged. This addition landed late in the release cycle, and it completes the feature.
Your teammate no longer needs to keep the editor open to know that feedback is waiting. The email brings them straight back to the right post.
You can also leave inline notes. Instead of attaching a comment to an entire block, simply select a specific sentence or phrase and leave a note on just that text.
The selection stays highlighted, so everyone can see exactly which words the note refers to. In our testing, this removed a lot of guesswork from editorial feedback.
Other Notes improvements include:
Multiple threads: You can start more than one conversation on the same block.
Text formatting: Notes now support bold, italic, code, links, and emoji.
Show more / show less: Long notes collapse by default to keep the sidebar tidy.
Private by design: WordPress stores notes as a special comment type, and 7.1 now excludes them from your public comment feeds.
These changes make Notes genuinely useful for teams, agencies, and multi-author blogs. It is a solid step toward a better editorial workflow inside WordPress itself.
Share a Link to Any Revision
Visual revisions, which were introduced in WordPress 7.0 have been improved as well. They now include a new feature to share links to individual revisions.
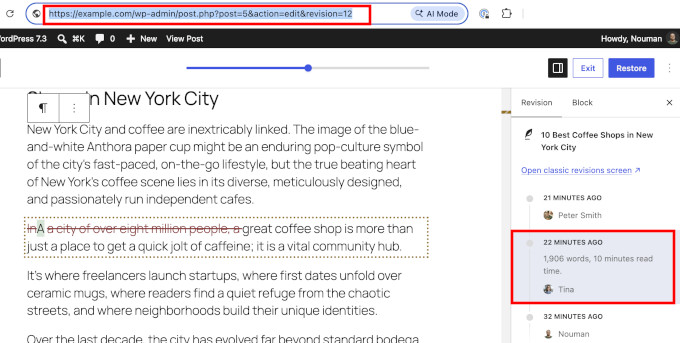
For example, let’s say that you want to show a team member which changes were made to an article. You can now open the revisions screen, pick the exact version, and copy the link from your browser toolbar.
You can then share that link and when opened, the link will take users to the exact revision with changes highlighted.
Visual revisions also get a new picker layout in this release. It makes browsing your edit history easier, with color-coded changes carried over from WordPress 7.0.
Responsive Styling Without Writing CSS
This is the feature we are most excited about. Responsive styling has been one of the longest-standing requests in the block editor, and WordPress 7.1 finally delivers a first version.
You can now define how a block looks at different screen sizes directly in the editor. For example, you can set a smaller font size for headings on mobile without writing a single line of CSS.
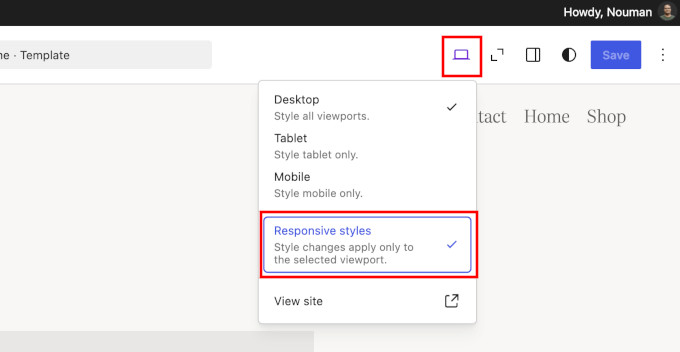
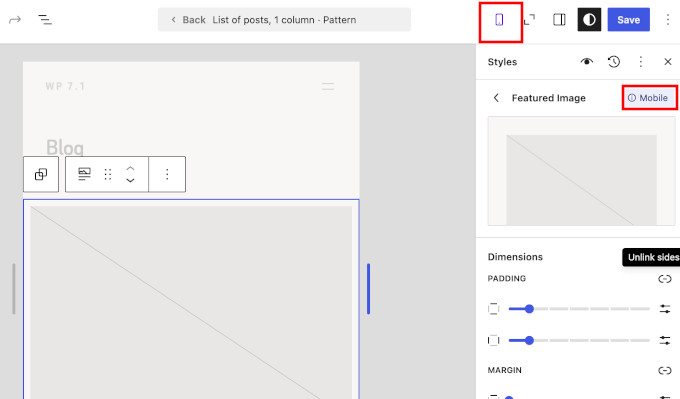
Here is how it works: Click the device preview icon in the editor’s top toolbar and turn on the new ‘Responsive styles’ option.
Now, switch the preview to Tablet or Mobile. From this point, any style change you make applies only to that screen size.
During testing, we selected a smaller font size for a button in the Tablet view, and the desktop design stayed untouched. WordPress also shows a small badge in the block settings panel, so you always know which viewport you are styling.
It works on two levels. You can set responsive styles in Global Styles, which apply to every instance of a block across your site, or you can style an individual block on a specific page.
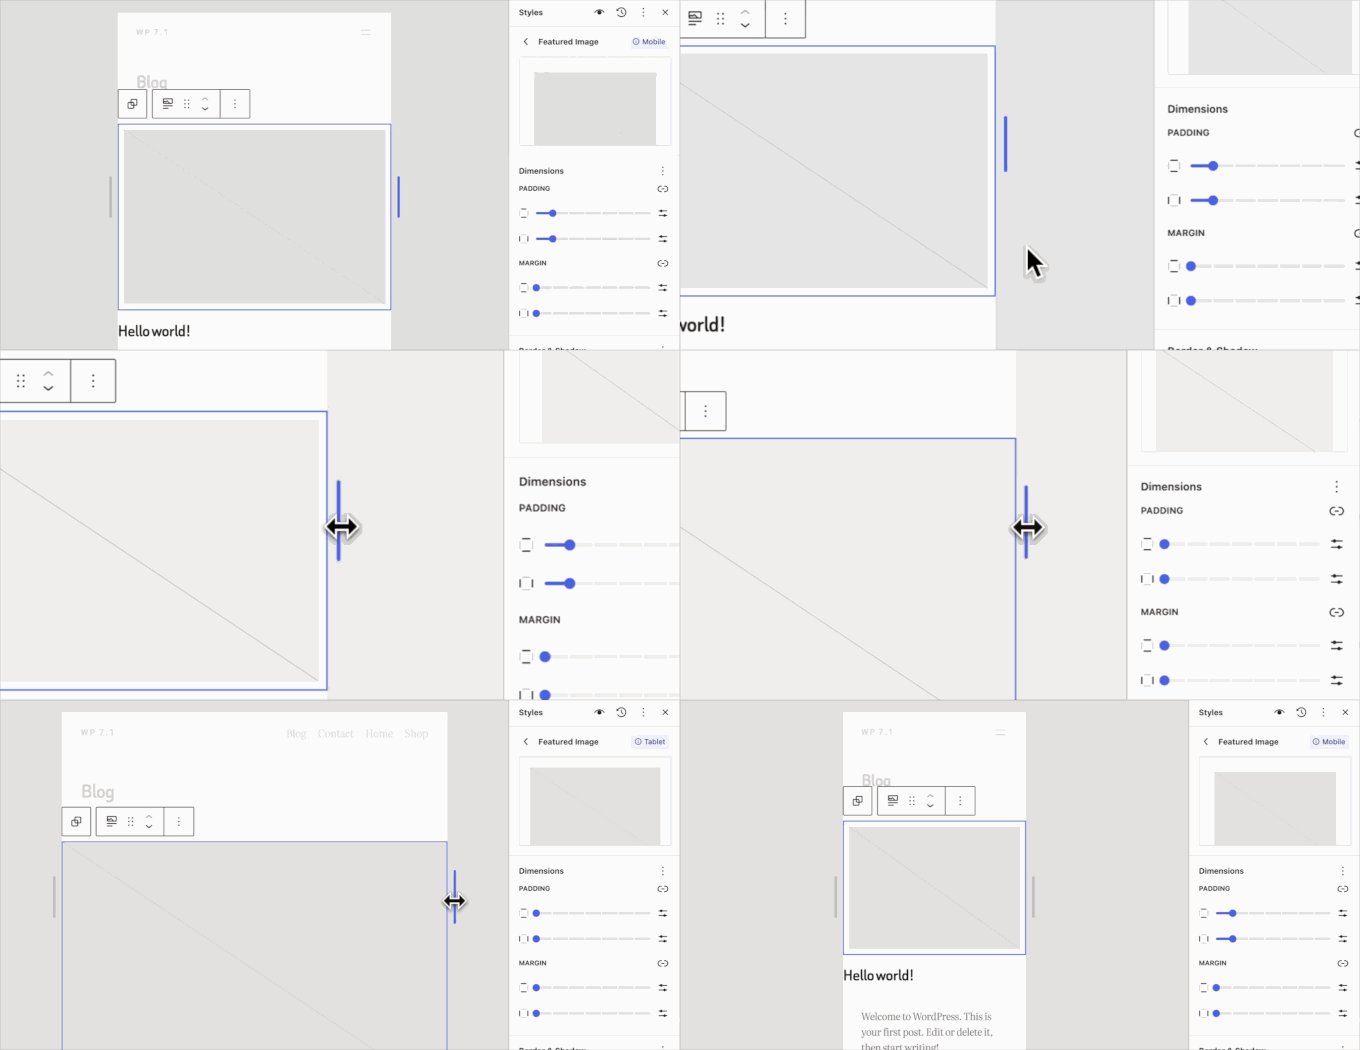
The editor canvas is also more flexible. Instead of being limited to the Desktop, Tablet, and Mobile presets, you can drag the canvas to any width and watch your blocks respond in real time.
Theme developers can even define their own breakpoints in theme.json. That way, the preview widths match the theme you are actually using.
Style Hover and Focus States for Buttons
Alongside responsive styling, WordPress 7.1 introduces interactive state styling.
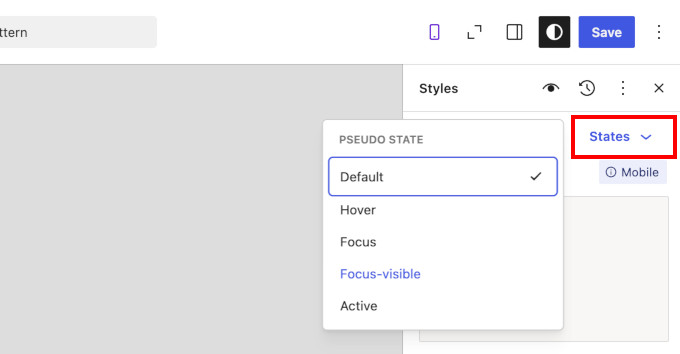
A new ‘State’ dropdown lets you visually style how blocks respond to interaction. For example, you can set a different background color for a button’s hover, focus, or active state and preview the change live in the editor.
Previously, changing a button’s hover color required adding a custom CSS snippet. Now, it can be easily done inside the editor itself.
There is also a thoughtful refinement when you apply local style changes globally. WordPress now shows a quick review step, so you can choose exactly which modified styles to apply across your site and keep the rest as local overrides.
New Tabs Block
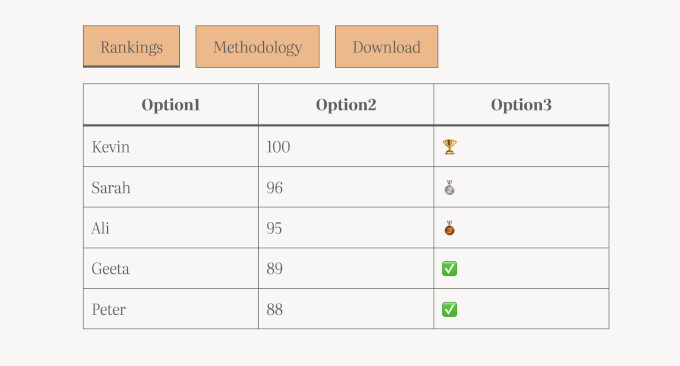
WordPress 7.1 adds a Tabs block that many users have been asking for.
Tabs let you organize content into clickable panels instead of showing everything at once. They are great for product specifications, FAQs, or comparing options without making a page feel long.
The final release has also added toolbar buttons for reordering tabs, which was a rough edge we noticed during the beta. Previously, you had to add tabbed content using a plugin, so it’s great to see this functionality now available as a core WordPress block.
We also like that accessibility was not an afterthought here. The block follows the W3C ARIA Authoring Practices Guide, which means it works properly with keyboards and screen readers out of the box.
New Playlist Block
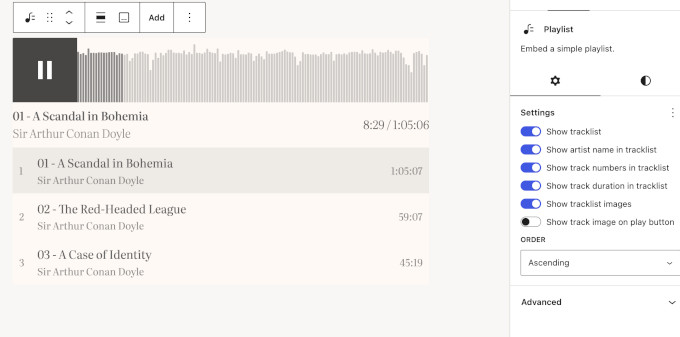
The second new block in WordPress 7.1 is the Playlist block. It lets you add a collection of audio files to any post or page, complete with track metadata, artwork, and a waveform visualization.
This is a nice upgrade for musicians, churches, educators, and anyone who publishes audio. If you run a podcast with WordPress, you can now list recent episodes in a clean player without a separate plugin.
A New Image Editor in WordPress 7.1
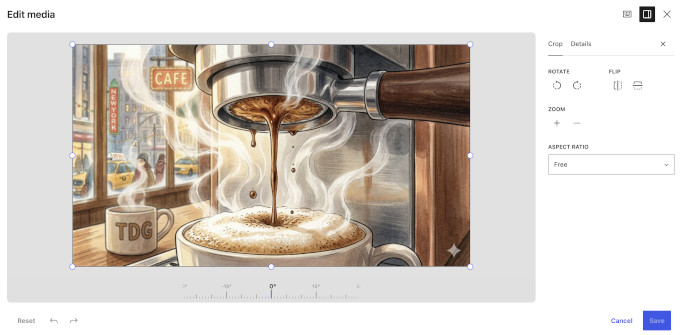
WordPress 7.1 replaces the old inline cropping tool with a dedicated Media Editor modal.
The entry point stays familiar. You still click the Crop button on an Image block, but now a full editing modal opens with freeform cropping, aspect-ratio presets, flip and rotate controls, and metadata editing in one place.
In our testing, the magnified crop view was the standout. It makes fine adjustments much easier, and the crop handles snap cleanly to pixels.
The new editor also works with the Cover block, so you can crop a background image right where you use it.
This will not replace a full photo editor. However, for the basic image editing most site owners need, being able to make them directly in the editor is a big usability win.
Smoother and Smarter Media Handling
WordPress 7.1 continues the client-side media processing work that started in WordPress 7.0. In simple terms, your web browser does the heavy lifting of processing images before they reach your server.
This release expands format support in a meaningful way. WordPress can now handle HEIC photos, which is the default format on iPhones, along with UltraHDR, AVIF, and WebP.
Until now, iPhone users often needed a HEIC to JPG conversion plugin just to upload their photos. With 7.1, that friction mostly disappears.
Uploads are also more resilient. If your internet connection drops mid-upload, then the upload queue pauses and automatically resumes when you are back online.
There are also several tiny improvements that make everyday WordPress tasks a little easier:
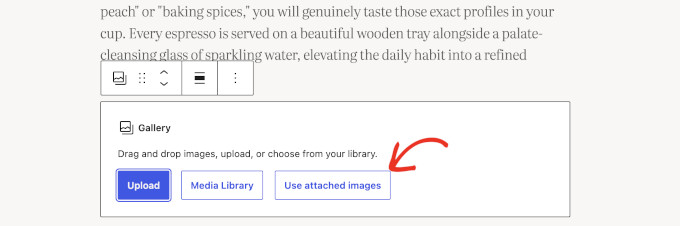
Smarter galleries: A new dynamic Gallery mode can automatically pull in and sort media already attached to the current post.
Attached images in the inserter: After you upload images to a post, they appear in a new ‘Attached images’ section, so you do not have to dig through the whole Media Library.
Infinite scrolling: The Media Library grid now loads more items automatically as you scroll. WordPress turns this on by default, and you can bring back the old page-by-page view from your user settings if you prefer it.
Together, these changes mean fewer upload errors and less load on your server. That is especially good news if you are on a budget WordPress hosting plan.
The Admin Toolbar Now Stays Visible When Editing
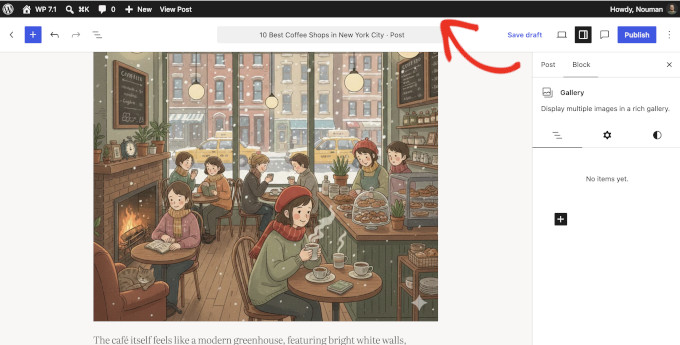
WordPress 7.1 makes the admin toolbar persistent. It now remains visible in the Site Editor and the Block Editor, instead of disappearing when you start editing.
The toolbar itself has also gotten a design cleanup as part of this change:
A clear back button (chevron) replaces the confusing W logo that used to double as a back button.
Your site icon now appears in the toolbar, and your profile avatar is a circle instead of a square.
Modern SVG icons replace the old Dashicons.
In our testing, this made moving between the editor and the rest of the admin feel much more predictable. Each icon now means one thing everywhere.
The ‘Howdy’ greeting survived another release. The core team discussed removing it during this cycle, but the change did not make it into 7.1.
If you prefer a clean writing canvas, then don’t worry. The toolbar stays hidden in Distraction Free mode.
A More Personal And Easily Navigable Admin
Beyond the toolbar, WordPress 7.1 includes a set of smaller admin improvements that add up.
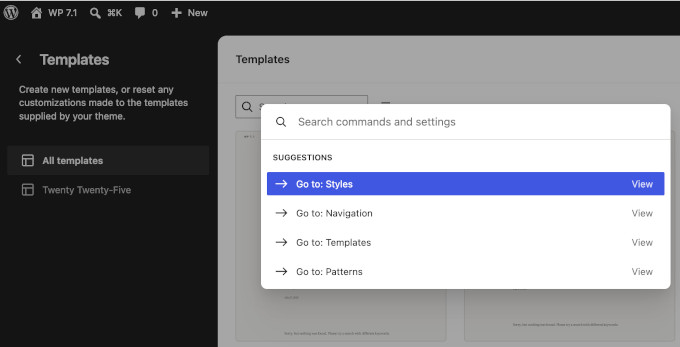
Command palette improvements. The Command Palette (Ctrl+K on Windows, Command+K on Mac) now groups results into Recent, Matching, and Suggestions sections. WordPress saves your recently used commands to your preferences, so they persist across sessions.
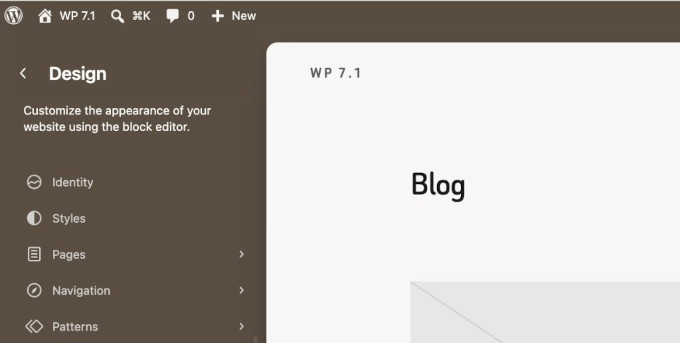
Your admin color scheme in the Site Editor. The Site Editor reflects your chosen admin color scheme instead of always using a fixed dark sidebar. It is a small thing, but it makes the whole admin feel consistent.
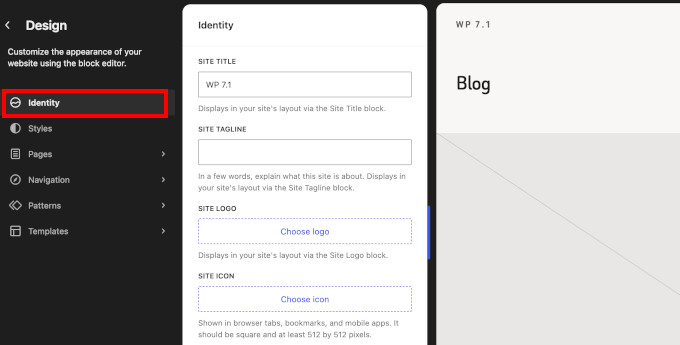
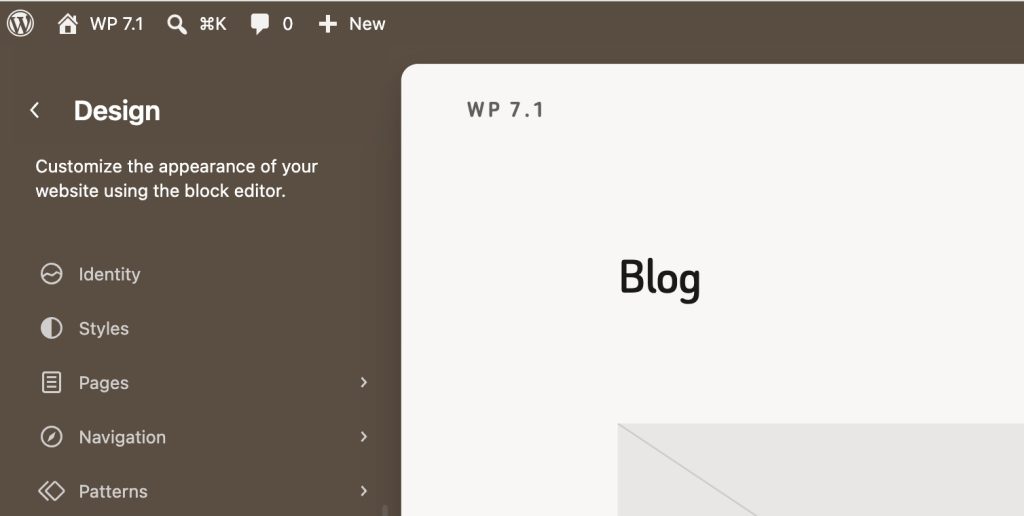
A dedicated Identity section. Site identity settings like your title, tagline, logo, and site icon now live in their own Design » Identity section in the Site Editor. You no longer need to hunt through Settings and templates to update these basics.
Excerpts in the Posts list. The Posts list view now shows a short excerpt for each entry, making it easier to tell similar posts apart.
Select many items at once. In the Site Editor’s list views, you can now click one item, hold Shift, and click another to select the whole range. If you manage hundreds of pages or media files, then this saves you time on bulk actions.
Change a comment’s parent. The Edit Comment screen adds an editable ‘In reply to’ control, so you can finally fix comments that ended up as replies in the wrong place.
Block Improvements in WordPress 7.1
Several existing blocks get meaningful upgrades in this release:
Background gradients and images work together. You can now layer a gradient over a background image on the Group block and several other blocks. This is handy for keeping text readable over hero images.
Text shadows in Global Styles. Themes and users can now configure text shadows through theme.json and Global Styles.
Editable content inside the HTML block. The HTML block supports editable nested blocks. This is especially useful when working with AI-generated layouts, which often arrive as custom HTML.
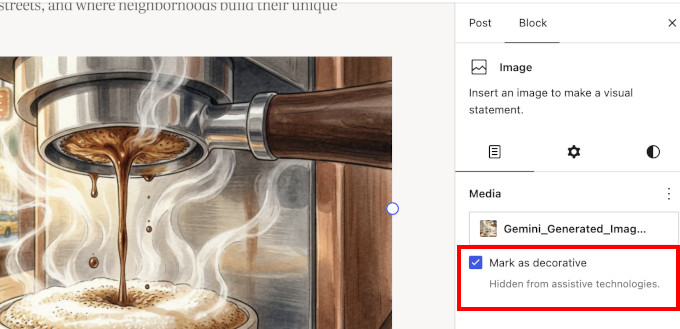
Mark images as decorative. A new toggle on the Image block lets you mark purely decorative images so that screen readers skip them. Decorative images with meaningless alt text are one of the most common accessibility mistakes, and this makes the fix easy.
Smarter shortcode handling. Pasting or converting an embed shortcode now creates a proper Embed block instead of leaving raw shortcode text behind.
Icon block upgrades. The Icon block now includes controls to flip or rotate icons, starts with a sample icon instead of an empty placeholder, and includes an icon picker organized by collections. Plugins and themes can now register their own icon sets, so expect branded icon libraries from your favorite plugins.
Grid transforms. Columns and Gallery blocks can now transform into Grid layouts while preserving their content.
Query Loop exclusion. The Query Loop block gets an option to exclude the current post, so your “related posts” section never recommends the post the visitor is already reading.
Changes to Look Out for Before the Update
Most sites can update to WordPress 7.1 without drama. However, if you run a large site with many plugins, then a few under-the-hood changes deserve your attention before you click update.
The editor is now always iframed. WordPress 7.1 completes a multi-year effort to place the editing canvas inside an iframe, and this now applies even when plugins register older-style meta boxes.
In simple terms, the editor content is loaded in a separate frame from the rest of the WordPress admin screen. This keeps admin styles and scripts from affecting the editing canvas as easily, which can make the editor more consistent and stable.
Most users won’t notice the iframe itself. Instead, you’ll mainly benefit from a more predictable editing experience.
There is a compatibility consideration, though. Older plugins that add custom scripts or styles to the editor may not work as expected with the iframe. Blocks also need to use Block API version 3 to render correctly inside the iframe.
WordPress 7.1 updates jQuery UI to version 1.14.2. jQuery UI is a JavaScript library that many older admin plugins use for things like date pickers and drag-and-drop screens. If a plugin on your site has not seen an update in years, then test it on staging first.
WordPress now enforces multisite upload limits everywhere. On WordPress multisite networks, space quotas now also apply when a plugin imports media from a URL (a process called sideloading). Previously, this route quietly bypassed the per-site storage limit, so network admins can expect quotas to hold from now on.
Our advise remains the same: always create a complete backup of your website before hitting update.
What Didn’t Make It Into WordPress 7.1?
A few features we covered during the beta cycle did not ship in the final release.
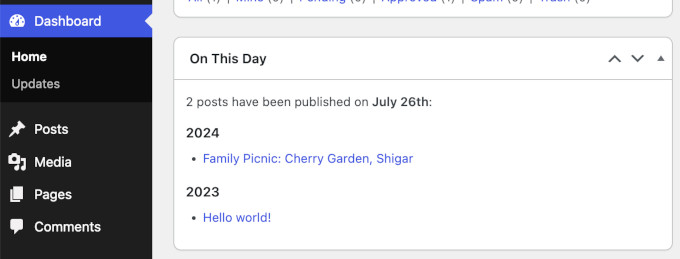
The core team cut the ‘On This Day’ widget. We previewed this dashboard widget in our beta coverage, and we liked it. The team decided it needs more work, so it may return in a future release.
Real-time collaboration is still in development. Google Docs-style co-editing received a lot of testing during the 7.1 cycle, but the team held it back to keep working on conflict handling and compatibility. You can try an early version in the Gutenberg plugin.
The Classic block stays in the inserter. The team originally planned to hide the Classic block from the block inserter in this release. After community feedback, they reverted the change, so nothing changes for sites that still rely on it.
The team also pulled Unicode email address support during beta testing. That work continues in a community plugin for broader compatibility and security testing before it lands in core.
We think this caution is the right call. A collaboration feature that loses someone’s work would be far worse than a delayed one.
Under the Hood (Developer & Performance Updates)
WordPress 7.1 also ships several technical improvements for developers and site performance:
Faster editor startup: WordPress now preloads the REST API requests the editor needs on load, so the editor opens faster, especially on content-heavy sites. (#65636)
Icons API goes public: New functions like wp_register_icon_collection(), wp_register_icon(), and wp_get_icon() let plugins and themes register custom icon sets with server-side rendering and REST API endpoints. WordPress sanitizes SVGs against a strict allowlist. (Dev note)
Abilities API expansion: The machine-readable registry of WordPress capabilities, introduced in WordPress 6.9, gains filtering for wp_get_abilities(), execution lifecycle hooks, a unified public exposure flag, and client-compatible JSON Schema output. These are the plumbing that AI agents and external tools use to work with your site safely. (Dev note)
Block Bindings for List Items: Block Bindings now extend to the List Item block, so more content can connect to dynamic data sources like custom fields. (Details)
Speculative loading configuration: Hosts and developers can now configure speculative loading defaults (loading pages in the background before a visitor clicks) through environment variables and constants. (#65624)
Accessible tooltips: Core introduces a shared mechanism for accessible tooltips, replacing pointer-only title attributes in several screens. It is part of a 46-ticket accessibility push in this release. (Dev note)
Design system maturity: The wordpress/theme package introduces design tokens and a stable React ThemeProvider for consistent UI theming. (Dev note)
Author notification control: The notify_post_author filter now has the final say on post author notifications, which makes custom editorial notification setups more predictable. (Dev note)
We have been following WordPress 7.1 from development to the final release. It may not have a single blockbuster feature, but it fixes a long list of everyday annoyances, and that matters more for most website owners.
Our favorite additions are the upgraded Notes and responsive styling. Tagging a teammate on an exact sentence, and knowing they will get an email about it, makes WordPress modern collaboration tool.
And styling blocks for mobile without touching CSS removes one of the last big reasons beginners needed custom code.
If you haven’t updated yet, then we recommend backing up your WordPress site first. Once you are in, set aside a few minutes to explore Notes, the revisions sharing, and the responsive styling options. They are easy to miss but genuinely useful.
If you liked this article, then please subscribe to our YouTube Channel for WordPress video tutorials. You can also find us on Twitter and Facebook.
The main theme of this month’s WordPress news is measurement. Most of what shipped in July shows you something that your site was already doing without telling you.
WPForms can now show which form field people abandon, and AIOSEO can tell you the day a plugin sets your homepage to noindex. On top of that, WPVibe crossed 5,000 installs, and HelpJet launched as a new AI support chatbot.
Let’s take a look at what’s new in the world of WordPress for July.
WPBeginner Spotlight brings you a monthly roundup of the most important WordPress news, updates, and community happenings. 📅✨
Got something to share? Whether it’s a new product launch, a significant update, or an exciting event, reach out to us through our contact form, and your news could be featured in the next edition!
WPForms Launches Built-In Analytics to Track Form Performance
If visitors abandon your WordPress forms before submitting them, you’re usually left guessing what went wrong. Until now, there was no easy way to identify where people dropped off or why.
WPForms 2.0 changes that with WPForms Analytics, a built-in form tracking suite that lets you see where users abandon your forms right from your WordPress dashboard.
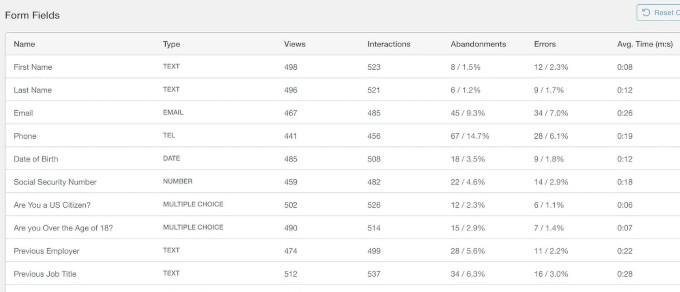
The most powerful feature is the field-level analytics. A field-by-field table shows interactions, time spent, errors, and abandonment for every part of your form. That tells you the exact point where people give up.
That might be a phone number field people do not want to fill, or an address field that throws errors. Once you know which one it is, the fix is usually simple: remove the field, reword it, or make it optional.
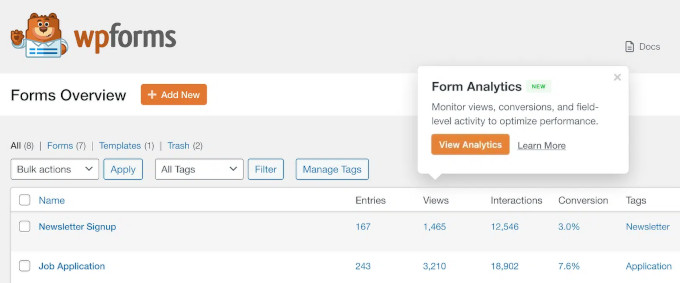
Your All Forms page now shows views, entries, and conversion rate for every form.
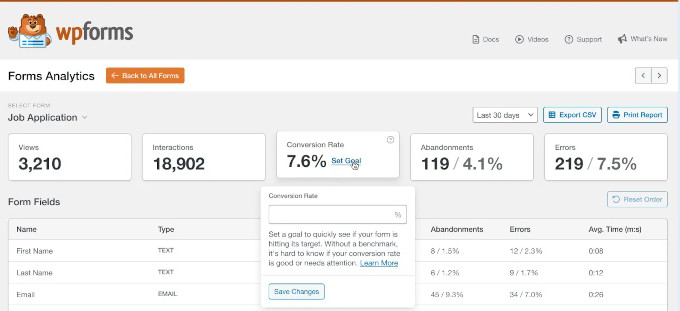
Each form also gets its own dashboard, with filters for the last 7, 30, or 90 days.
There is a built-in AI chat as well. You can ask it what is hurting your conversions, and it reads your form data and tells you what to fix first.
WPVibe Passes 5,000 Installs and Adds Page Builder Integrations, AI Code Snippets, and Memory
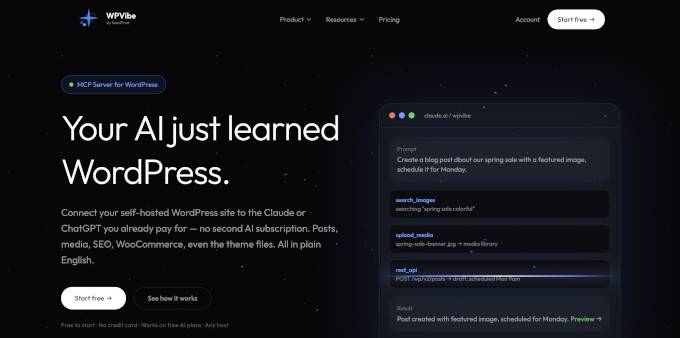
WPVibe, the WordPress MCP server built by SeedProd, has crossed 5,000+ active installs on WordPress.org.
WPVibe lets you manage your WordPress site by simply chatting with your favorite AI assistant. Instead of clicking through admin screens, you describe what you want, and the AI does it for you. It works with Claude, ChatGPT, Codex, Cursor, and more.
Here is what arrived in the last few weeks:
Page builder integrations: Your AI assistant can now automate tasks in Elementor, Divi, SeedProd, and Beaver Builder.
AI code snippets: Ask AI to write custom code for your site. That removes one of the most intimidating parts of WordPress for non-developers.
Memory: WPVibe remembers how you like to run your site, so you don’t have to repeat yourself.
AI recipes in your dashboard: WPVibe suggests ready-made automation ideas picked for your site.
We believe that WPVibe is one of the more practical answers to the question of what AI can actually do for WordPress users. It handles the repetitive admin work, and you stay in control.
WordPress Ships Major Security Fixes
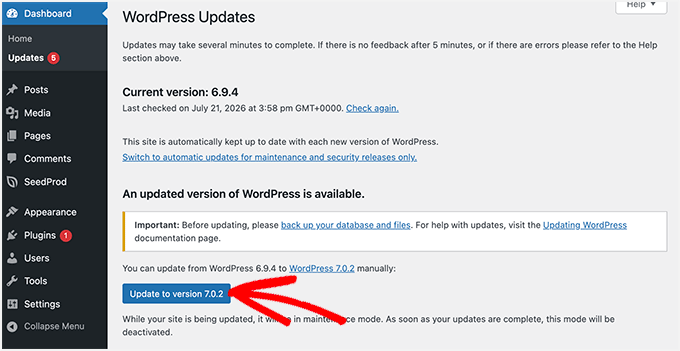
WordPress 7.0.2 came out on July 17 as a security release that fixed one critical and one high severity issue. Because of the severity, the WordPress.org team turned on forced updates for affected sites, so many sites are already patched.
The two security issues allow code to run on a default install without anyone logging in. Both are now in CISA’s catalog of known exploited vulnerabilities, so it is worth confirming your version rather than assuming.
Head over to Dashboard » Updates and check the version you are on. If it reads 7.0.2, 6.9.5, or 6.8.6, then your website is fine. Otherwise, we recommend updating your website now.
7.0.2 also includes the earlier 7.0.1 maintenance release and its 31 bug fixes across Core and the Block Editor, so a single update gets you both.
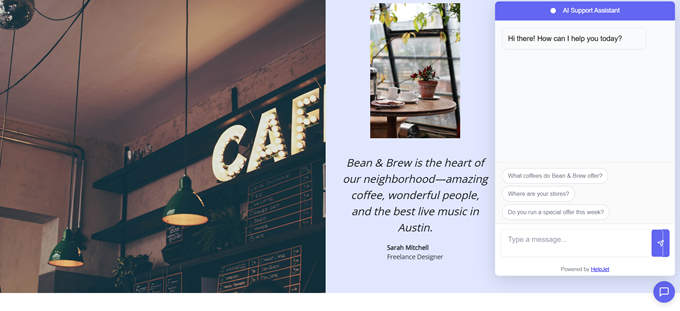
HelpJet: The AI Chatbot That Answers Your Customers’ Questions in Seconds
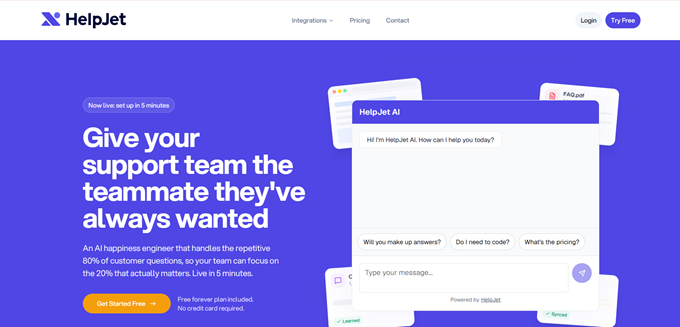
HelpJet is a new AI support chatbot built by the team at HeroThemes, a WPBeginner Growth Fund company. It learns your help documentation and answers customer questions from it, 24/7, without needing anyone on your team to be online.
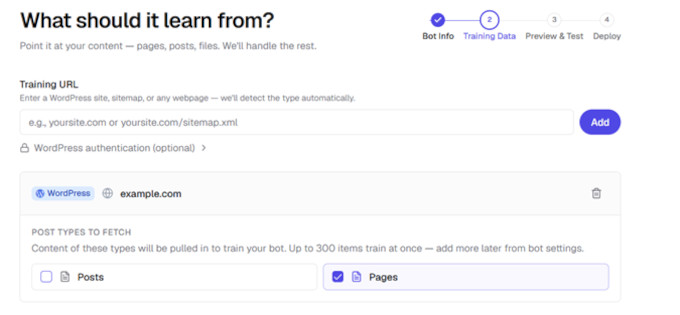
Setup is simple. You add your help articles, URLs, and even private standard operating procedures, and the chatbot is ready in about five minutes.
From there, it takes the repetitive questions off your team’s queue. Anything it cannot answer is passed to a human. HelpJet then learns from that reply, so it can handle the same question next time.
On a WooCommerce store, it can also read your product data, including variations, stock levels, and shipping and tax rules. So a shopper asking about a specific product gets a real answer, not a link to your policy page.
You can customize the chatbot and display it with no code required. It also runs on Shopify and Squarespace.
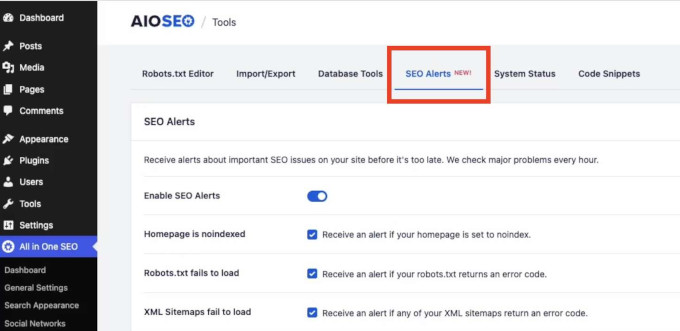
AIOSEO Introduces SEO Alerts: An Early Warning System for Site Issues
Serious SEO problems rarely announce themselves.
For example, a plugin update can quietly set your homepage to noindex, which tells search engines not to list it. Or your robots.txt file may stop responding after a server migration, and Google pauses crawling until it can read the file again.
To solve this, All in One SEO, one of the most popular WordPress SEO plugins, has introduced SEO Alerts, which checks three things every hour: whether your homepage is set to noindex, whether your robots.txt file is reachable, and whether your XML sitemap is loading.
You can receive alerts by email or Slack. You configure it once, and AIOSEO monitors your site from there, so you hear about a problem within the hour instead of weeks later. SEO Alerts is free on every plan, including the free AIOSEO Lite version.
AIOSEO has also introduced Event and Job posting schema, available in all paid plans, starting with Basic. This schema is code that helps search engines show your events and job listings directly in search results.
ActiveLayer Launches for Easy Digital Downloads
ActiveLayer, the new AI spam protection service, has launched its Easy Digital Downloads integration. It checks product reviews and new customer registrations as they are submitted, and blocks the ones it scores as spam.
That matters most for reviews, since spam ones drag down the star rating shoppers see in Google. Reviewers who already bought the product skip the check, and checkout is not affected.
ActiveLayer also covers WordPress comments, the major form plugins, and signups on WooCommerce and membership platforms.
In Other News
404 to 301 is a complete and free redirect manager and 404 error monitor for WordPress. You can build custom redirects with exact, prefix, or pattern-based (regex) matching, send every remaining 404 to a page you choose, and keep a full log of broken links hitting your site. Optional email alerts tell you the moment a URL starts getting hit.
WooCommerce 11.0 is now scheduled for release on August 4. The team postponed the original July 28 date after finding a fatal error during release-candidate testing. The update brings performance improvements for larger stores, better customer account and email flows, and improved reporting.
SearchWP improves WordPress faceted search through a new WPFilters integration. Filtering now happens before ranking, so visitors can narrow results by category or post type while SearchWP keeps its relevance ordering intact.
Advanced Coupons adds WordPress Abilities API support in version 4.7.4. You can connect an AI assistant like Claude Desktop and manage your WooCommerce coupons with plain-language requests, and the integration is included in the free plugin.
WordPress.tv is now on Apple TV. Automattic released a free app that brings thousands of WordCamp talks, tutorials, and community sessions to the big screen. It is a relaxed way to learn WordPress from the people who built it.
AIOSEO’s Broken Link Checker now detects dead YouTube and Vimeo videos on its paid plans, not just broken URLs. A deleted video still returns a healthy status code, so standard link checkers never notice, while your visitors see a black box where a tutorial used to be.
WordCamp US 2026 is heading to Phoenix, Arizona, on August 16-19. Tickets include Contributor Day, Showcase Day, and two conference days with more than 50 talks and workshops.
SaveTo Wishlist added a WooCommerce Gift Registry extension, so shoppers can turn any wishlist into a shareable registry for weddings and baby showers. A separate update brings default wishlists for new customers, Abilities API support, and on-demand analytics syncing.
WooCommerce shared its plans to focus most of its product and engineering teams on the core plugin for the next three months. The team is re-reviewing a backlog of over 2,300 open issues and 500 pull requests, most of them filed by merchants and developers.
WordPress 7.1 Beta 4 is ready for download and testing. As always, use a staging or local site rather than a production website. The final release is expected on August 19 at WordCamp US. For a detailed overview, see our article What’s coming in WordPress 7.1.
New Tools & Plugins
HelpJet: An AI support chatbot that trains on your docs and answers customer questions 24/7. Works with WordPress, WooCommerce, Shopify, and more.
ActiveLayer: AI-powered, server-side spam protection, now with native support for Easy Digital Downloads reviews and registrations. No CAPTCHAs required.
WPVibe: Connect your WordPress site to Claude, ChatGPT, Cursor, and other AI assistants. Now with page builder integrations, AI code snippets, and memory.
LedgerPort: A QuickBooks connector for WooCommerce and Shopify stores that matches your books to the payouts that actually hit your bank account.
That’s everything for this month. A security update to install, smarter analytics to explore, and a few new AI tools worth testing on a staging site.
If there is a story or a plugin you think we should cover in the next issue, then we would love to hear about it. Reply and let us know, and we will see you in the next Spotlight.
If you liked this article, then please subscribe to our YouTube Channel for WordPress video tutorials. You can also find us on Twitter and Facebook.
WordPress 7.1 beta is now available for testing, and we have been running it on our test sites for the past week.
The official release is scheduled for August 19, 2026, timed with WordCamp US.
While WordPress 7.0 rebuilt the admin and introduced the AI Client, 7.1 turns to the editor. For the first time, you can design for tablets and phones, and style hover and focus states, without writing a line of CSS.
Let’s take a look at what’s coming in WordPress 7.1, with screenshots and examples of how each feature works.
TL;DR: What’s coming in WordPress 7.1
Notes get a major upgrade with @mentions, the ability to add notes to specific text, support for multiple discussion threads, and rich formatting.
Responsive styling lets you control how blocks look on tablets and phones, directly in the editor, without custom CSS.
A new image editor and smarter media handling, including HEIC support and uploads pause if your connection drops, then continue when you are back online.
New Tabs and Playlist blocks, plus the admin toolbar now stays visible while you work in the editor.
Note: This beta release is for testing and development only. So, please do not install, run, or test this version of WordPress on your live website.
Instead, we recommend using a staging site or a local site. You can test WordPress 7.1 Beta by installing and activating the WordPress Beta Tester plugin.
WordPress 7.1 will be released on August 19, 2026, which is the final day of WordCamp US 2026. The date is still marked tentative on the official WordPress release schedule, so it could shift if testing uncovers a serious bug.
Before then, WordPress 7.1 will go through two release candidates, on August 5 and August 12. Those are near-final builds, so you will know exactly what is in the release by early August.
Collaborate Better With the Upgraded Notes
The Notes feature arrived in WordPress 6.9 as a simple way to leave comments on blocks. WordPress 7.1 will turn it into a proper feedback system.
The most useful addition is @mentions. Typing ‘@’ inside a note brings up a searchable list of collaborators to tag directly. This makes it much easier to direct feedback to the right person on your team.
Inline notes are new too. Instead of attaching a comment to an entire block, you can select a specific sentence or phrase and leave a note on just that text. The selection stays highlighted, so everyone can see exactly what the note refers to.
This removes a lot of guesswork. Previously, a note saying “please rephrase this” could apply to anything in a long paragraph. Now, it points at the exact words.
Other Notes improvements include:
Multiple threads: More than one conversation can run on the same block, instead of folding every comment into a single thread.
Text formatting: Notes now support bold, italic, code, links, and emoji.
Show more / show less: Long notes collapse by default to keep the sidebar tidy.
These changes make Notes genuinely useful for teams, agencies, and multi-author blogs.
Responsive Styling Without Writing CSS
You can now define how a block looks at different screen sizes directly in the editor.
For example, a smaller font size for headings on mobile, or different spacing for tablets, without writing a single line of CSS.
When you switch the editor preview to Tablet or Mobile, any style change you make applies only to that screen size.
WordPress also shows a small badge in the block settings panel, so you always know which screen size you are styling.
It works on two levels. Responsive styles set in Global Styles apply to every instance of a block across your site. Styles set on a single block apply only to that page.
The editor canvas is also more flexible. Instead of being limited to the Desktop, Tablet, and Mobile preview presets, you can drag the canvas to any width and watch your blocks respond in real time.
In our testing, this felt natural very quickly. Theme developers can even define their own breakpoints in theme.json, so the preview widths can match the theme you’re actually using.
If you style one block and then decide you want that look everywhere, applying the change to Global Styles brings up a quick review step. You can choose exactly which modified styles to apply globally and keep the rest as local overrides.
Style Hover and Focus States for Buttons
Alongside responsive styling, WordPress 7.1 will introduce interactive state styling. A new ‘States’ dropdown lets you visually style how blocks respond to interaction.
The most common use case is buttons: you can now set a different background color for hover, focus, or active states and preview the change live in the editor.
Until now, changing a button’s hover color meant writing custom CSS, even though it’s a tiny change. Now, it’s a built-in design option.
New Tabs Block
WordPress 7.1 will add a Tabs block that many users have been asking for.
Tabs let you organize content into clickable panels instead of showing everything at once. They are great for product specifications, FAQs, or comparing options without making a page feel long.
Previously, you had to add tabbed content using a plugin. Just keep in mind that tabs you already built with a plugin will not convert to this core block automatically.
New Playlist Block
The second new block in WordPress 7.1 will be the Playlist block. It lets you add a collection of audio files to any post or page. You can also show your track’s title, artist, and cover art, plus a waveform graphic of the audio.
This is most useful for musicians, churches, educators, and anyone else who publishes audio. If you run a podcast with WordPress, then you can add a set of episodes to one player on a page.
Block Improvements in WordPress 7.1
Several existing blocks will get meaningful upgrades in this release:
Background gradients and images work together: You can now layer a gradient over a background image in the Group block (and several other blocks) without the two conflicting. This is handy for keeping text readable over hero images.
Text shadows: Themes can now set a text shadow through theme.json, either globally, on specific blocks, or on elements like links. For now it only works in theme.json, so there is no setting in the editor yet.
Editable content inside the HTML block: The HTML block now supports editable nested blocks. This is especially useful when working with AI-generated layouts, which often arrive as custom HTML.
Mark images as decorative: A new toggle on the Image block lets you mark purely decorative images so that screen readers skip them. This is an easy accessibility win, because decorative images with meaningless alt text are one of the most common accessibility mistakes.
Smarter shortcode handling: Pasting or converting an embed shortcode now creates a proper Embed block instead of leaving raw shortcode text behind.
Grid transforms: Columns and Gallery blocks can now transform into Grid layouts while preserving their content.
Icon block upgrades: The Icon block, added in WordPress 7.0, now lets you flip and rotate icons. It also starts with a default icon instead of an empty placeholder, and the picker groups icons into collections so you can browse them more easily. Plugins and themes can now register their own icon sets, so expect branded icon libraries from your favorite plugins.
A New Image Editor in WordPress 7.1
WordPress 7.1 will replace the old inline cropping tool with a dedicated Media Editor modal.
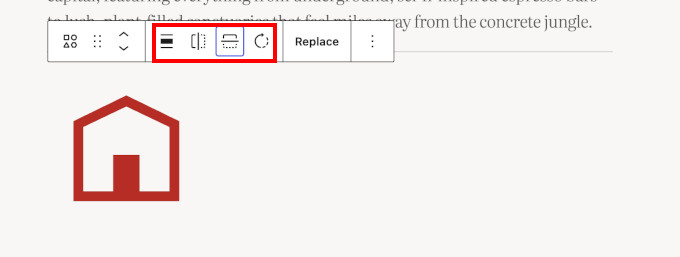
The entry point stays familiar. You still click the Crop button on an Image block.
But instead of the cramped inline controls, a full editing modal opens with freeform cropping, aspect-ratio presets, flip and rotate controls, and metadata editing in one place.
The new editor also works with the Cover block, so you can crop a background image right where you use it.
This won’t replace a full photo editor. However, for the basic image editing most site owners actually do, it is a big usability win.
Smoother and Smarter Media Handling
In WordPress 7.1, your web browser does most of the work of processing images before they are uploaded to your server. It resizes, compresses, and converts them, and creates the smaller thumbnail sizes that WordPress needs.
There are two benefits. Your server does much less work, which means fewer failed uploads on limited hosting plans. And WordPress can now handle more image formats, including HEIC, which is the default format on iPhones, plus UltraHDR, AVIF, and WebP. It can also convert animated GIFs into more efficient videos.
HEIC is the biggest change here. Until now, HEIC uploads depended on your web host, because WordPress needed a recent enough version of the image software on the server. Some iPhone users had to convert HEIC to JPG before uploading.
With 7.1, your browser does the converting instead. This works in Chrome and Edge, and Safari can handle iPhone photos too. In Firefox, WordPress still passes the job back to your server. Uploads are also more reliable. If your internet connection drops mid-upload, the queue pauses and resumes automatically when you are back online. A progress indicator keeps you informed for batch uploads.
There are smaller everyday improvements too:
Smarter galleries: A new dynamic Gallery mode can automatically pull in and sort media already attached to the current post.
Attached images in the inserter: After you upload images to a post, they appear in a new ‘Attached images’ section, so you don’t have to dig through the whole Media Library.
Infinite scrolling: The Media Library grid now loads more items automatically as you scroll. You can turn this off in your user profile.
Together, these changes mean fewer upload errors and less load on your server. That’s especially good news if you’re on a budget WordPress hosting plan.
The Admin Toolbar Now Stays Visible When Editing
WordPress 7.1 will make the admin toolbar stay visible in the Site Editor and the Block Editor, instead of disappearing when you start editing.
The toolbar itself is also getting a design cleanup as part of this change:
A clear back button (chevron) replaces the confusing W logo that used to double as a back button.
Your site icon now appears in the toolbar, and your profile avatar is a circle instead of a square.
The old Dashicons icons are replaced with modern SVG icons.
The toolbar stays hidden in Distraction Free mode, so you still get a clean writing canvas.
A More Personal, More Navigable Admin
Beyond the toolbar, WordPress 7.1 will include a set of smaller admin improvements that add up.
Command Palette improvements: The Command Palette (Ctrl+K on Windows, Command+K on Mac) now groups results into Recent, matching, and Suggestions sections. Your recently used commands are saved to your preferences, so they persist across sessions.
Your admin color scheme in the Site Editor: The Site Editor now reflects your chosen admin color scheme instead of always using a fixed dark sidebar. This is a small thing, but it makes the whole admin area feel consistent.
A dedicated Identity section: Site identity settings like your title, tagline, logo, and site icon now live in their own clearly labeled Design » Identity section in the Site Editor. You no longer need to hunt through Settings and templates to update these basics.
On This Day widget: A new dashboard widget resurfaces what you published on this date in past years. It’s a fun nudge for long-running blogs, and useful for finding old content worth updating.
Change a comment’s parent: The Edit Comment screen will add an editable ‘In reply to’ control, so you can finally re-thread a comment that ended up under the wrong reply. It works within a single post, not across posts.
What Didn’t Make It Into WordPress 7.1?
We want to be upfront: real-time collaboration will not ship in WordPress 7.1. If you followed our WordPress 7.0 coverage, then you may remember that Google Docs-style real-time collaboration has been in development for a while.
The feature is enabled in the Gutenberg plugin, where multiple people can already edit the same post together.
However, the core team is still working through big decisions, including how collaboration data should be stored and whether to ship the full feature or just the underlying architecture first.
There is a dedicated community testing effort that will continue beyond the 7.1 cycle to get collaborative editing ready. Until it lands in core, you can add collaboration to the block editor with a plugin.
We think that caution is the right call. A collaboration feature that loses someone’s work would be far worse than a delayed one.
Similarly, support for Unicode (non-Latin) email addresses was originally planned for 7.1 but was pulled during beta testing. That work will continue in a community plugin for broader compatibility and security testing before it lands in core.
Under the Hood (Developer & Performance Updates)
WordPress 7.1 will also ship several technical improvements for developers and site performance:
The post editor is always iframed: In WordPress 7.1, the editing area always runs inside an iframe. Until now, WordPress turned this off if the page contained a block built on an older version of the Block API This means the editing canvas is isolated from admin styles in every case. Blocks using Block API v2 or lower should be updated to v3 for compatibility, and until a third-party block’s developer does that, it may not look or behave the same inside the editor. (Details)
Icons API goes public: New functions like wp_register_icon_collection(), wp_register_icon(), and wp_get_icon() let plugins and themes register custom icon sets with server-side rendering and REST API endpoints. SVGs are sanitized against a strict allowlist. (Dev note)
Design system maturity: The wordpress/theme package introduces design tokens and a stable React ThemeProvider for consistent UI theming. (Details)
Connectors authentication: The Connectors framework will support username and application-password login in addition to API keys. (Details)
We are looking forward to the release of WordPress 7.1. It may not have a single blockbuster feature, but it fixes a long list of everyday annoyances, and that matters more for most website owners.
Our favorite additions are the upgraded Notes and responsive styling. The ability to tag a teammate on an exact sentence brings WordPress much closer to a modern editorial tool.
If you liked this article, then please subscribe to our YouTube Channel for WordPress video tutorials. You can also find us on Twitter and Facebook.
If you run a WordPress site, then you know that spam is a real annoying problem whether it comes to contact forms, WordPress comments, or user registrations.
The good news is that stopping spam in WordPress is a lot easier than you probably think, and you don’t need expensive tools either.
We have spent over 16 years testing anti-spam plugins, tools, and refining strategies to keep WPBeginner and our other business websites safe from daily spam attacks.
In this ultimate guide, we’ll walk you through how to block each type of WordPress spam, step by step from the basics to advanced modern automated spam protection. These are the exact methods we’re using to protect our own websites.
We’re covering a lot of ground in this ultimate guide, so use the quick links below to jump straight to the section you want to learn about first:
WordPress comes with several anti-spam options that can protect your site against spam. These built-in options won’t stop every bot, but they will remove the easiest targets right away.
We always recommend turning these settings on first, because they cost nothing and take only a few minutes to set up.
Tighten Your WordPress Discussion Settings
To prevent comment spam, the built-in discussion settings in WordPress act as your first line of defense. They allow you to control who can post, what kind of links are permitted, and how much control you have over the conversation.
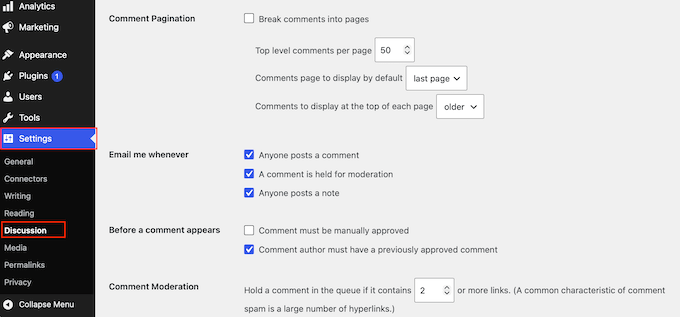
To configure these anti-spam controls, go to Settings » Discussion in your WordPress dashboard.
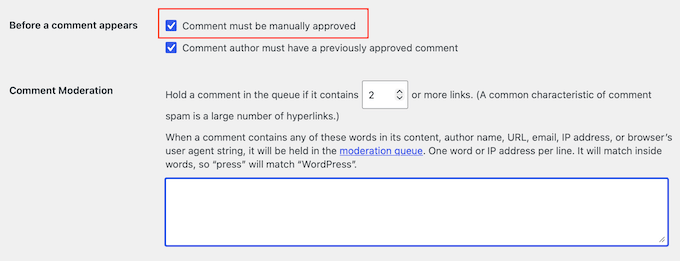
The most useful tool on this screen is the comment moderation queue. This tool acts as a holding area that keeps submissions hidden from the public until you have a chance to look them over.
Because nothing goes live automatically, spam never reaches your visitors, even if it manages to get past your other filters.
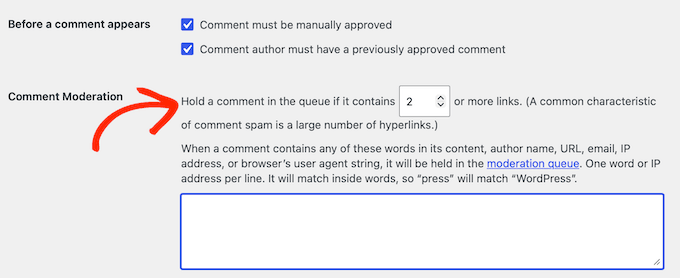
To turn this on, scroll down to the ‘Before a comment appears’ section and check the box next to ‘Comment must be manually approved.’
If you want, you can also enable ‘Comment author must have a previously approved comment.’ This lets returning commenters post without waiting for approval. However, be sure to review your published comments regularly since they won’t appear in your moderation queue.
After that, scroll to the ‘Comment Moderation’ box, where you’ll find a setting that limits links. Because spam comments almost always contain web addresses, WordPress can automatically hold any submission that includes too many links.
The field labeled ‘Hold a comment in the queue if it contains [X] or more links’ is set to 2 by default. Lowering that number to 1 will help you catch even more junk.
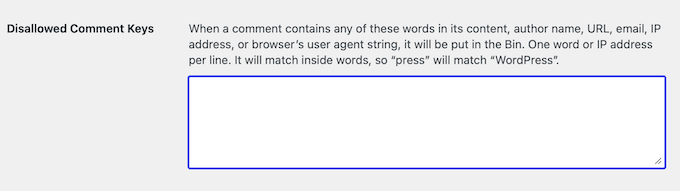
On the same screen, you can use the comment blocklist to automatically filter out unwanted content. This tool looks for specific words, names, email addresses, or web addresses and sends any matching comment straight to the trash.
In the ‘Disallowed Comment Keys’ box, you can paste your own trigger words, putting one on each line, and then save your changes.
Require a Name and Email, and Hold First-Time Commenters
Healthy discussions start with real people. Requiring commenters to enter a name and email encourages more thoughtful conversations and discourages anonymous drive-by comments.
Most genuine visitors won’t mind providing these details, and it helps create a more welcoming and trustworthy community around your website.
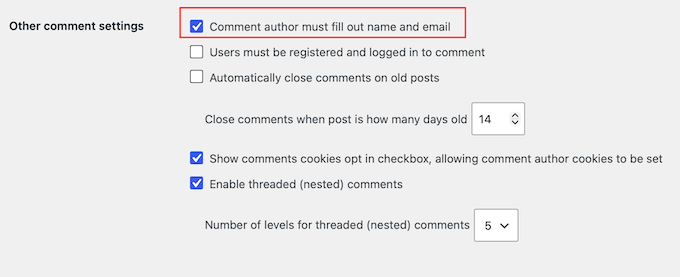
To enable this, scroll to the ‘Other comment settings’ section and check the box next to ‘Comment author must fill out name and email.’
Depending on the type of website you have, you may not need a comment section at all. If that’s the case, then you can simply disable comments entirely and that’ll get rid of the WordPress comment spam problem once and for all.
The most thorough option is the code method, which disables comment support across your entire site at once. It’s safest to add the snippet with a free code snippets plugin like WPCode rather than editing your theme’s files directly, so a theme update can’t undo it.
add_action('admin_init', function () {
    // Redirect any user trying to access comments page
    global $pagenow;

    if ($pagenow === 'edit-comments.php') {
        wp_safe_redirect(admin_url());
        exit;
    }

    // Remove comments metabox from dashboard
    remove_meta_box('dashboard_recent_comments', 'dashboard', 'normal');

    // Disable support for comments and trackbacks in post types
    foreach (get_post_types() as $post_type) {
        if (post_type_supports($post_type, 'comments')) {
            remove_post_type_support($post_type, 'comments');
            remove_post_type_support($post_type, 'trackbacks');
        }
    }
});

// Close comments on the front-end
add_filter('comments_open', '__return_false', 20, 2);
add_filter('pings_open', '__return_false', 20, 2);

// Hide existing comments
add_filter('comments_array', '__return_empty_array', 10, 2);

// Remove comments page in menu
add_action('admin_menu', function () {
    remove_menu_page('edit-comments.php');
});

// Remove comments links from admin bar
add_action('init', function () {
    if (is_admin_bar_showing()) {
        remove_action('admin_bar_menu', 'wp_admin_bar_comments_menu', 60);
    }
});
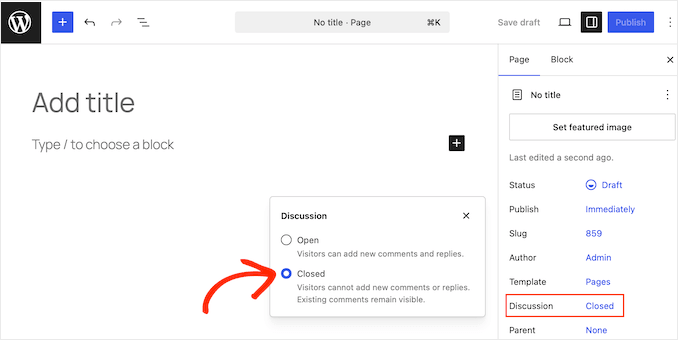
If you’d rather not go site-wide, you can also turn comments off on individual pages. This is handy when you only want them gone on specific pages, like your Contact or About pages, which rarely need a comment section.
To do this, open the page in the WordPress content editor. Then click the ‘Discussion’ option in the right-hand sidebar and select ‘Closed.’
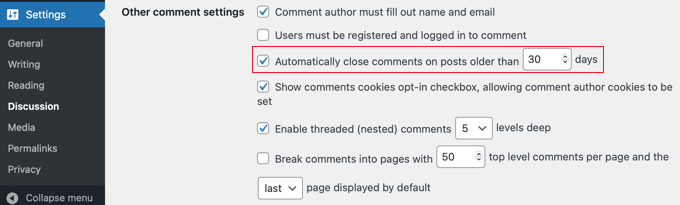
You can also stop spam from piling up on older content without touching your newer posts. If you don’t expect comments on old posts, then WordPress can close them automatically after a set number of days.
This gives spam bots fewer chances to target your archived content.
To set this up, head to Settings » Discussion and find the ‘Other comment settings’ section. Check the box next to ‘Automatically close comments on posts older than [X] days’, then set a sensible limit such as 30 or 90 days.
Disable Trackbacks and Pingbacks
Trackbacks and pingbacks notify you when another website claims to have linked to one of your blog posts.
While they were originally designed to help bloggers connect conversations across different websites, they’re now commonly abused by spammers to send fake link notifications.
Turning this feature off completely removes a whole category of junk notifications from your dashboard.
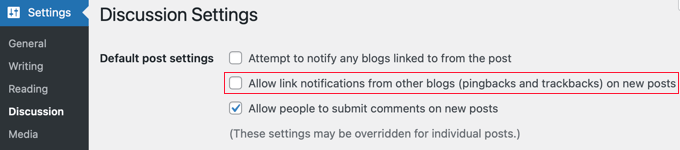
To disable these notifications, go to the Settings » Discussion screen in your WordPress dashboard. Here, uncheck the box next to ‘Allow link notifications from other blogs (pingbacks and trackbacks) on new posts.’
With that done, don’t forget to click ‘Save Changes’ at the bottom of the screen.
Just be aware that changing this option only protects the posts you publish from this moment forward. If you want to clean up the content you’ve already published in the past, you can follow our step-by-step guide on how to disable trackbacks and pings on existing WordPress posts.
2. Set Up Modern AI-Powered Spam Bot Protection for WordPress
In the era of AI where automated spam is increasing, the best defense against it is a modern AI-powered spam protection for WordPress.
These spam filtering solutions automatically detect and block spam on your WordPress comments, contact forms, and user registrations without the use of CAPTCHA which can hurt conversions.
On WPBeginner, we use ActiveLayer for this. It is AI-powered and runs server-side, so it stops spam invisibly, without a CAPTCHA and it’s GDPR compliant.
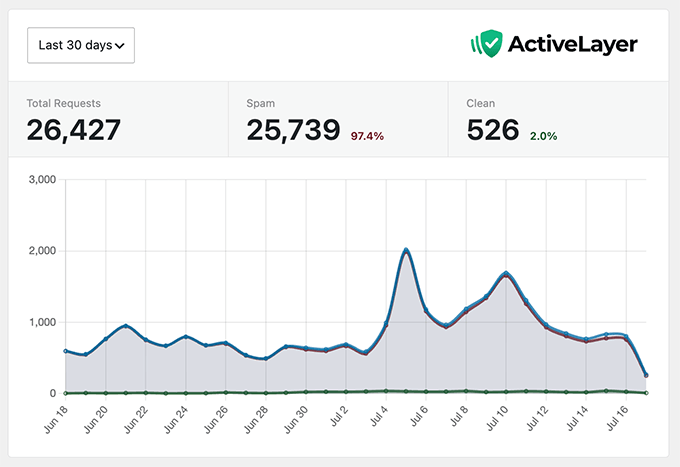
In the last 30 days, it has blocked over 25,739 spam comments and contact form submissions on our website. It even shows you a confidence score, and the reason behind every submission it flags, not just a pass-or-fail verdict when you look at their logs.
The free plan includes 1,000 spam checks with no credit card, and paid plans start at around $4 per month billed yearly.
The two other popular spam filtering plugins for WordPress you could try are Akismet or CleanTalk.
Akismet is very popular and still is a good fit for personal blogs, where its “name your price” plan can be free for non-commercial sites. But they have raised their prices significantly for commercial sites which is quite expensive for smaller businesses. For a business site, we would point you to either ActiveLayer or CleanTalk.
Whichever tool you choose, stick to just one, because running two spam filters at once can conflict and block real visitors. The benefit of these spam protection plugins are that they integrate with all other popular contact form plugins by default.
3. Power-User Tips for Stopping WordPress Comment Spam
So far we’ve configured the built-in spam prevention settings in WordPress, and an automated spam filtering plugin for WordPress. The combination of these two should block most spam.
However if you are not able to set up modern AI spam protection due to costs or another reason, then you can use one of these tips below to combat comment spam in WordPress.
Add a Free CAPTCHA to Your Comment Form
CAPTCHA is a simple test that most human visitors pass without any effort, while automated scripts fail it. We recommend adding Cloudflare Turnstile CAPTCHA to your WordPress comments because it’s free and fairly straight forward to set up.
To set it up, install and activate the free Simple Cloudflare Turnstile plugin. You will be asked to create a free account on Cloudflare’s website and connect it with the plugin.
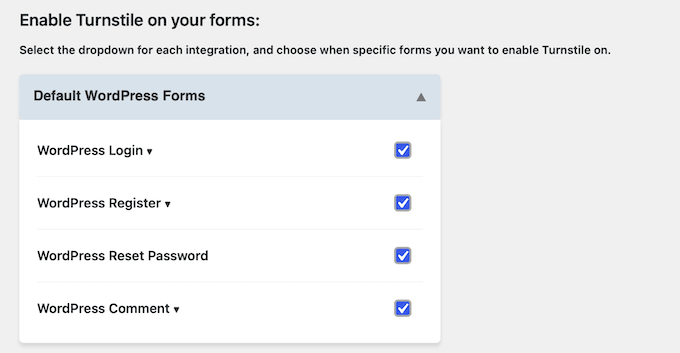
Once that’s done, you can scroll to the ‘Enable Turnstile on your forms’ section. Simply check the boxes to protect all your WordPress forms and click ‘Save Changes’.
Google reCAPTCHA is another option, which you can add with the Advanced Google reCAPTCHA plugin. We no longer recommend it because Google has capped their free tier at 10,000 assessments per month for your entire organization whereas Cloudflare Turnstile stay free without limits.
Limit or Require Login to Comment
Another really effective way to stop comment spam in WordPress is to control who’s allowed to participate in comments.
If your comment section is open to everyone, then spammers can continuously flood your forms with automated links. Restricting comments to registered account holders ensures that only verified users can post. This forces a level of accountability that most bots will not bother trying to bypass.
Because it requires readers to go through the extra step of creating and logging into an account, this approach is best suited for membership sites, online forums, and private communities.
If you run an open, public blog, then we’d recommend using an automated filtering service or a reader challenge instead as those add less friction.
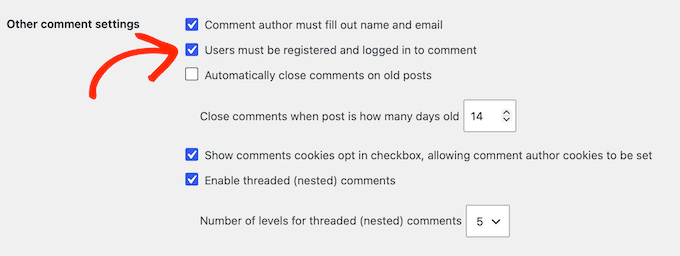
If you do decide to turn this restriction on, go to Settings » Discussion in your WordPress dashboard. Under the ‘Other comment settings’ section, check the box next to ‘Users must be registered and logged in to comment.’
As always, don’t forget to save your changes.
Use Antispam Bee for Free Keyword and Pattern Filtering
Some spam slips through basic checks by mimicking human writing. This is where a dedicated filtering plugin can help protect your site.
Antispam Bee is an excellent free, privacy-friendly anti-spam plugin that doesn’t require an API key or account registration. Installing Antispam Bee gives you a powerful set of local rules to analyze comment data before it even hits your database.
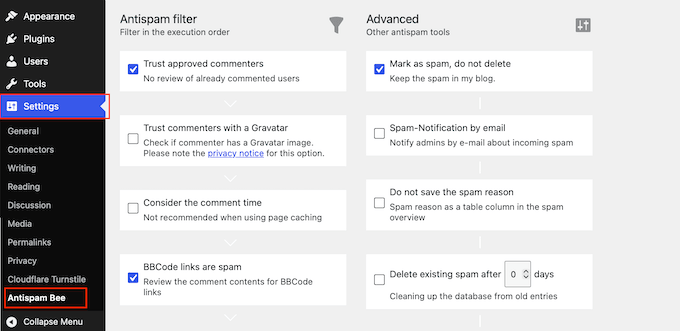
Once it’s activated, you can configure your rules by going to Settings » Antispam Bee.
We recommend enabling the options to:
Trust approved commenters.
Mark as spam.
Do not delete.
Use regular expressions (which allows the plugin to scan for known text and link patterns).
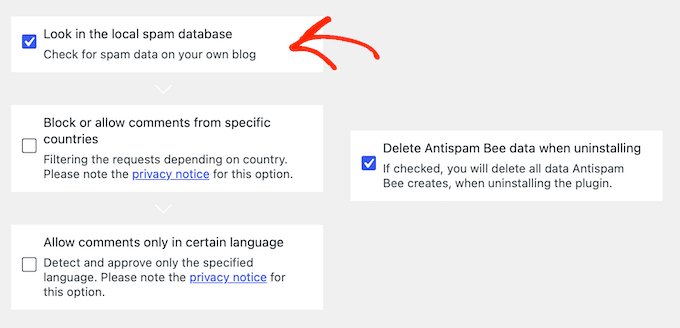
You should also check the box to ‘Look in the local spam database.’ This allows Antispam Bee to cross-reference new submissions against previous spam history on your site.
Under ‘Advanced,’ you can set Antispam Bee to delete existing spam after a set number of days, which keeps your database tidy without any manual effort.
We highly recommend leaving the email notifications for spam turned off in this section. A busy website can attract hundreds of automated submissions a day, and these alerts will quickly flood your inbox.
If you want to try one more free tweak, then you can remove the website address field from the comment form.
4. Stopping WordPress Contact Form Spam (Best Practices)
Contact and lead forms are among the most attacked parts of any WordPress site. We know this firsthand because we once had to combat more than 18,000 spam entries flooding a single form.
We use WPForms to build forms on WPBeginner, and it’s a popular form builder plugin used by over 5 million websites. Their free version includes smart anti-spam protection, CAPTCHA integrations with Google / Cloudflare Turnstile, and the paid plans add the filtering options we cover below.
Other popular form builders like Gravity Forms and Fluent Forms have similar anti-spam settings, so check the options in whichever form builder plugin you use. We will show WPForms here because it’s what we use and consider the best fit for beginners.
Enable Default Anti-Spam Token (or Similar HoneyPot)
To combat lead form spam, WPForms silently attaches a unique, time-sensitive token to your form on every page load. The anti-spam token blocks automated scripts, which means spam entries are blocked before they reach your inbox.
It’s turned on by default for new forms, but it’s worth confirming.
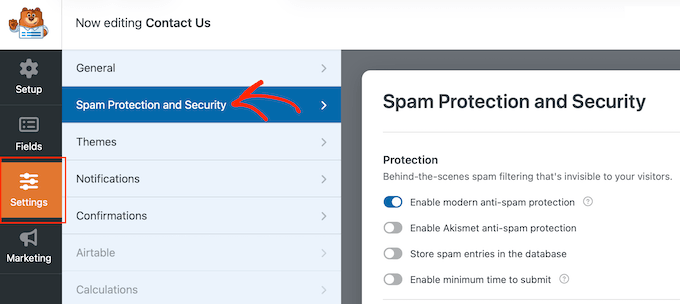
Open your form, go to Settings » Spam Protection and Security, and make sure ‘Enable modern anti-spam protection’ is switched on.
This is a modern version of the Honeypot technology which most WordPress form plugins come with, so it may be labeled as Honeypot in another form tool that you might be using.
Enable a CAPTCHA on Your Contact Form
More aggressive bots mimic human browsing and slip past the invisible token. Adding a visible CAPTCHA field stops them by forcing a challenge they can’t read or solve.
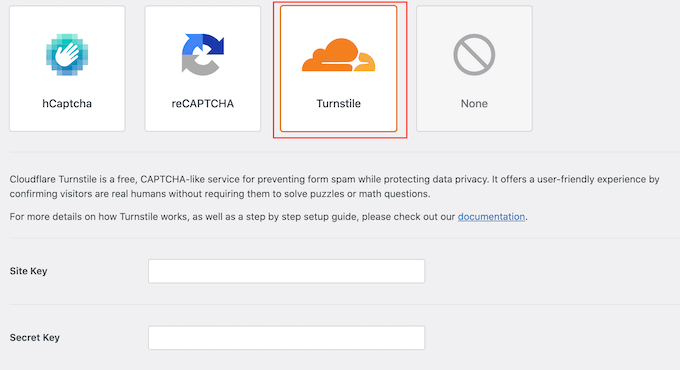
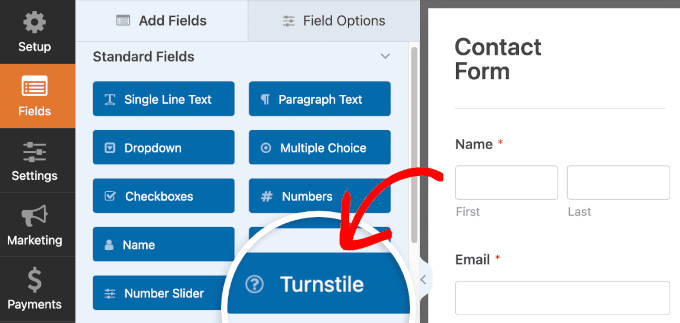
WPForms has both Cloudflare Turnstile and Google reCAPTCHA built in, and we default to Turnstile here. It’s free for everyone and runs its checks in the background, so most real visitors pass without solving a puzzle.
To set it up, go to WPForms » Settings » CAPTCHA and choose ‘Cloudflare Turnstile’.
Google reCAPTCHA is also selectable on that same WPForms » Settings » CAPTCHA screen. We default to Turnstile because it’s free without limits, but reCAPTCHA still works if you prefer it.
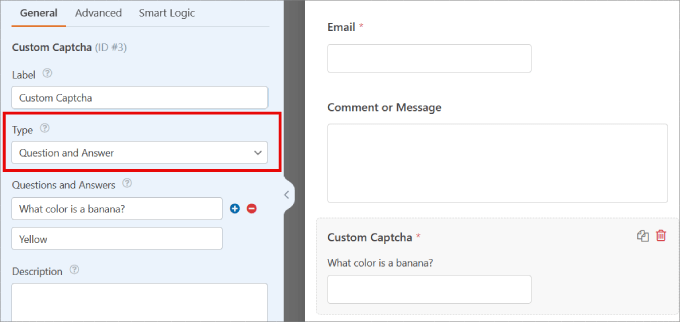
If you’d rather not send visitor data to Google or Cloudflare, then WPForms’ Custom Captcha field (available on any paid plan) builds the challenge on your own server instead.
Add the field, then set it to a random math problem or your own question and answer.
Use Time-Based Behavioral Checks to Stop Contact Form Spam
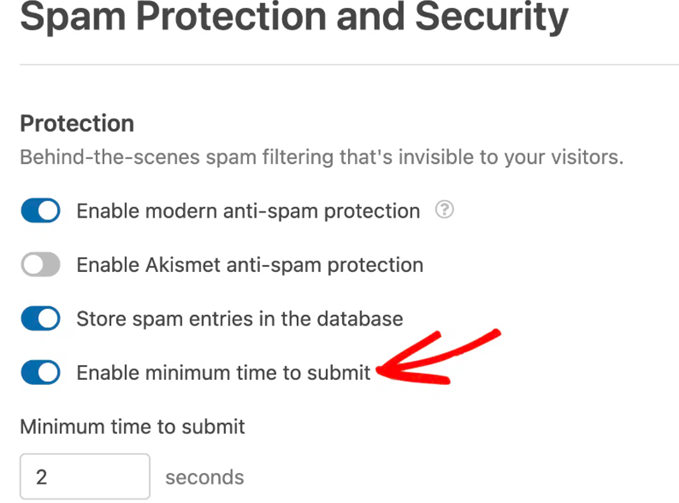
A real person needs several seconds to read a question and fill out a form, while a bot submits in a fraction of a second. Time-based checks flag those impossibly fast submissions without changing anything the visitor sees.
With WPForms, the ‘Enable minimum time to submit’ option is enabled by default with a minimum time to submit of 2 seconds. However, you can update the minimum time to any value you like.
Block Form Submission by Country, IP, Email Address, and More
Some spam form submissions still gets through unless you screen the content itself. In the Pro version, WPForms lets you block entries by specific email address, by keyword, and by country or IP address.
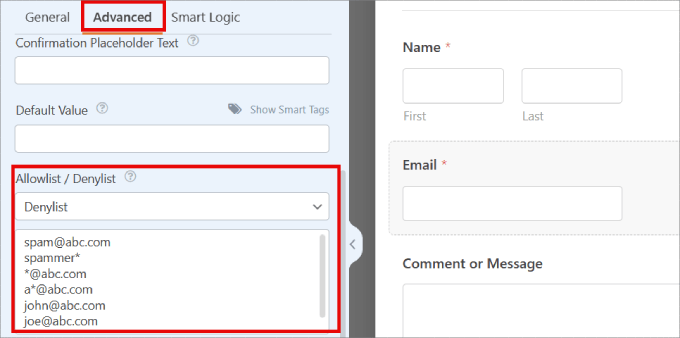
To block a sender, open your form, select the Email field, open the Advanced tab, choose Denylist, and enter the addresses or domains to ban. A wildcard like *@example.com blocks an entire domain.
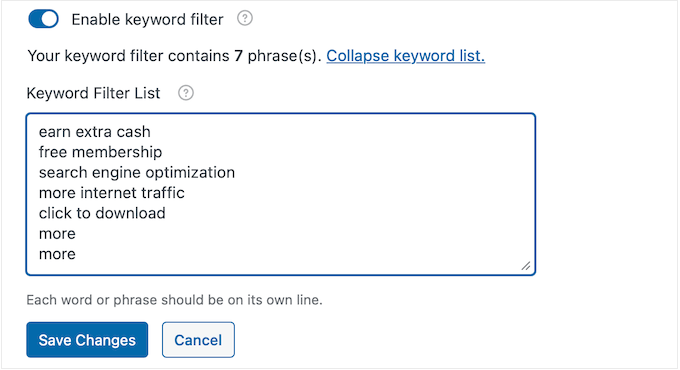
To block spammy phrases, go to Settings » Spam Protection and Security.
Turn on ‘Enable keyword filter’, open ‘Edit keyword list’, and add each term on its own line.
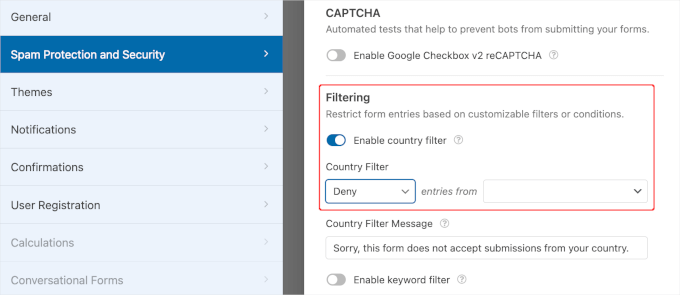
And if you only serve certain regions, turn on ‘Enable country filter’ on the same screen to allow or deny locations.
5. Stopping Spam User Registrations in WordPress (Best Practices)
On a membership site or WooCommerce store, spam registrations are more than a nuisance. Fake accounts clog your user database and skew your customer and email metrics.
Here’s what you can do to prevent spam user registrations in WordPress.
Turn Registration Off When You Do Not Need It
If you’re not running a membership site or an eCommerce store, then you likely don’t need to allow user registration. The easiest thing to prevent user registration spam there is to turn it off.
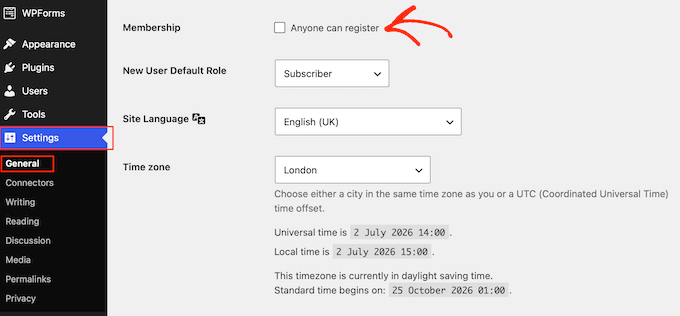
Simply go to Settings » General in your WordPress admin area, and uncheck the ‘Anyone can register’ box.
Require Email Confirmation Before an Account Activates
If you do need open registration, then the goal is to let only real people in while keeping spam bots out. The setting that stops the most fake signups is requiring a confirmed email address, or a manual review, before an account goes live.
Where that control lives depends on what plugin you’re using to manage user registration in WordPress. You will want to start with your platform’s default setting instead of bolting a general form plugin onto a system that already handles this.
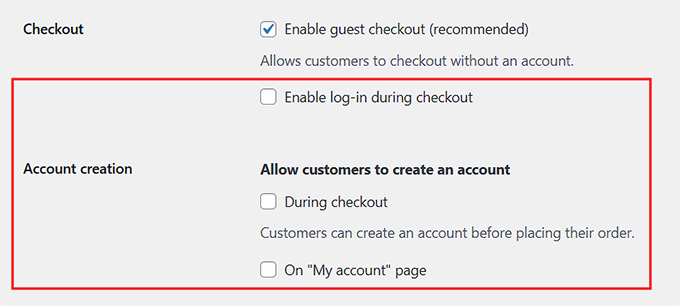
If you run a WooCommerce store, then go to WooCommerce » Settings » Accounts & Privacy. This is where you decide whether shoppers can create an account at all, limit account creation to checkout, or keep guest checkout on so no account creation is needed.
WooCommerce core doesn’t add a separate email-confirmation step on its own. If you want one, then you’ll need a custom email verification extension or the custom signup form covered below.
Other membership and course platforms handle account verification in their own settings, so start there:
BuddyPress and BuddyBoss: email activation is built in, so new members stay inactive until they click the activation link. Enable registration under Settings » General (BuddyPress) or BuddyBoss » Settings » Login & Registration. See BuddyPress documentation and BuddyBoss documentation for more details.
LearnDash: registration runs on WordPress’s own user system, so there’s no native email-confirmation step. An account goes live the moment someone signs up. To hold new accounts until the email is verified, add that check at the WordPress or form level, using a user verification plugin or the custom WPForms registration form covered below.
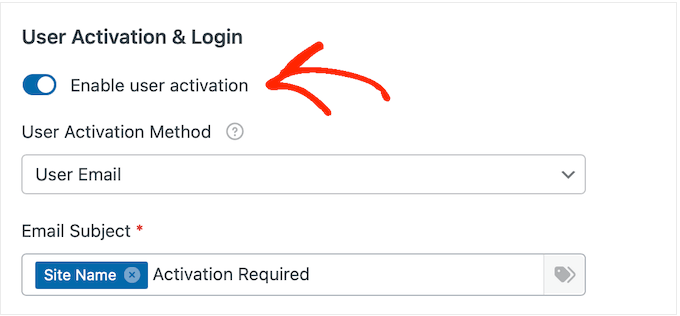
If you’re building a custom registration form rather than using one of the systems above, then you can use WPForms User Registration addon which lets you turn on email activation under the form’s User Registration settings, with either an email confirmation link or manual admin approval.
Similar options are available in Gravity Forms, WSForm, and other popular WordPress form plugins. For the full walkthrough, see our guide on how to moderate new user registrations.
Add CAPTCHA and Honeypot to WordPress Signup Form
The same tips that protect your WordPress contact forms also work on WordPress signup form. Since you already set up Cloudflare Turnstile earlier, you can switch it on for your registration form in a click.
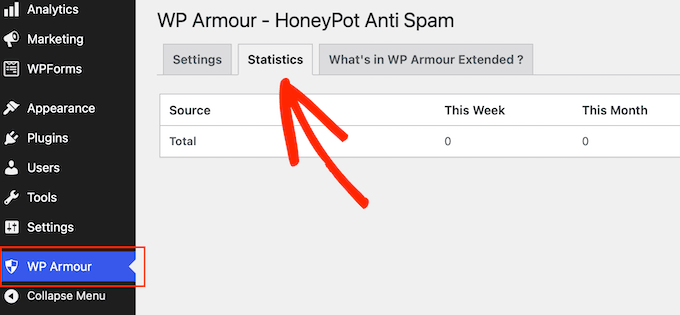
If you’re using the default WordPress registration page, then you can add hidden honeypot fields to your registration form with the free WP Armour plugin. The plugin logs every bot it blocks under WP Armour » Statistics.
Use AI-Powered Tools for Blocking WordPress Registration Spam
Honeypots and CAPTCHAs stop obvious bots, but they can’t spot someone signing up with a throwaway email or from a known-bad IP address.
That’s where automated detection helps. It screens each new signup against live reputation data and blocks the ones that look fraudulent.
ActiveLayer and CleanTalk both offer this for WordPress registrations, and you can switch it on for your signup form the same way you did for your contact forms.
6. Add a Site-Wide WordPress Firewall
A Web Application Firewall (WAF) screens every visitor and blocks malicious requests before they reach your site. Since most form spam is automated, a good firewall can stop a lot of it at the perimeter.
We recommend a DNS-level firewall, which filters traffic on the provider’s network before it touches your server.
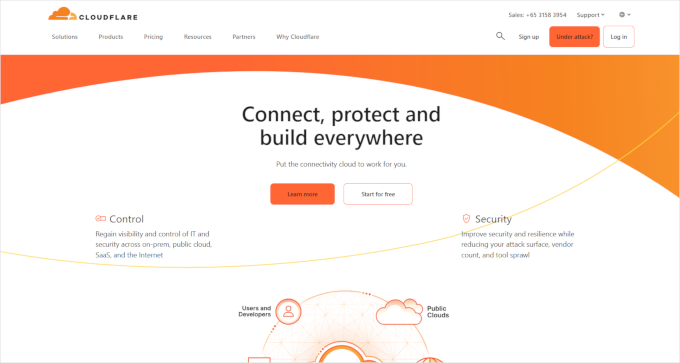
On WPBeginner, we use Cloudflare, which has a free plan with basic firewall protection (setup requires pointing your domain’s nameservers to Cloudflare).
Stopping new spam is only half the job. If you’re like most websites, you already have a backlog of old junk that needs cleaning up.
A quick cleanup keeps your database tidy and helps your new tools run at their best.
🚨 Always create a complete WordPress backup before deleting anything in bulk. These actions permanently wipe data, with no undo button if you make a mistake.
Bulk-Delete Existing Spam Comments
WordPress spam filter flags junk comments but doesn’t delete them, so they can build up in your spam folder and take up database space until you clear them out.
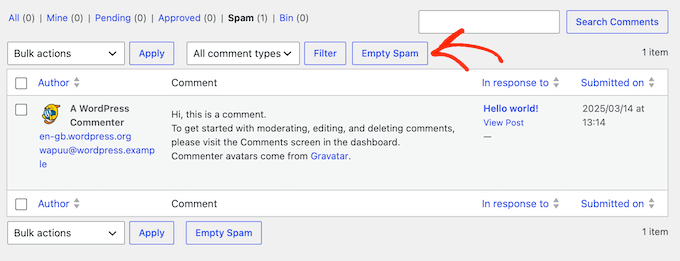
In your dashboard, go to Comments, click the ‘Spam’ filter at the top, and hit ‘Empty Spam’ to permanently clear everything your filters caught.
If you have thousands of junk comments, the dashboard can freeze or time out. A free plugin like WP Bulk Delete is faster and more reliable for big backlogs.
Leaving bot profiles in your database is a security risk and skews your analytics. That’s why it’s important to clean out these fake accounts.
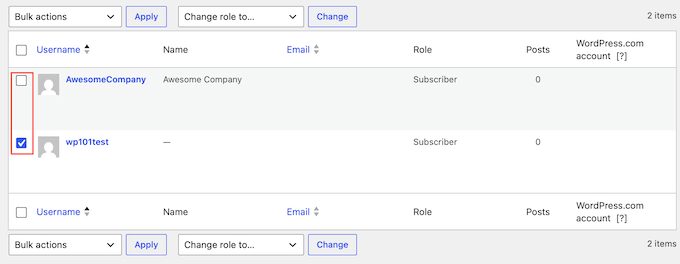
For a handful, go to Users » All Users, click the ‘Subscriber’ user role filter (the role almost all registration bots use), select the fake accounts, and choose Delete from the ‘Bulk actions’ menu.
⚠️ Be very careful to select only fake Subscriber accounts, and never an Administrator account.
For thousands of accounts, the free WP Bulk Delete plugin can remove users by role, inactivity, or registration date in one sweep.
No filter is perfect, so never auto-delete your spam folder without a quick glance first.
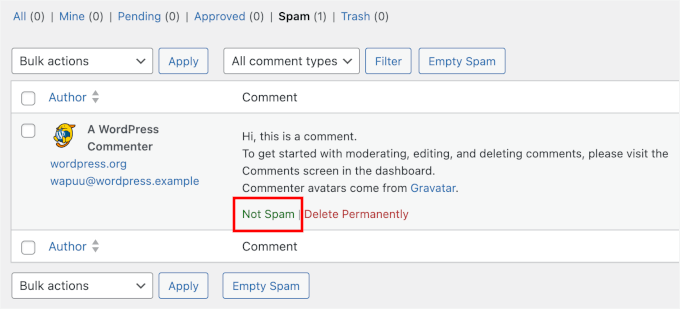
In Comments » Spam, hover over a legitimate comment and click ‘Not Spam’. That also teaches your filter to recognize similar comments as safe in the future.
Set a Monthly Anti-Spam Review Routine
A few minutes each month keeps spam from piling back up. Add these three checks to your maintenance routine:
Scan for false positives: skim your spam comment folder and form entries so no real messages were caught by accident.
Empty your spam folders: once you’ve rescued anything real, clear them to keep your database lean.
Check your user list: glance at new registrations for gibberish usernames or suspicious email domains that slipped through.
Key Takeaways
Here is a summary of the best practices we have covered to completely protect your WordPress website from spam:
Start with free WordPress settings: turn on comment moderation, tighten your link limits, build a comment blocklist, and disable trackbacks. These cost nothing and clear out the easiest spam.
Use automated, invisible filtering: a server-side tool like ActiveLayer, Akismet, or CleanTalk blocks bots in the background without making real visitors solve puzzles.
Layer your contact form defenses: honeypots alone no longer stop modern bots, so combine them with timing checks, token validation, and an automated filter.
Secure your registrations: require email confirmation for new accounts and screen every signup with an automated tool.
Add a site-wide firewall: a DNS-level firewall like Cloudflare blocks a lot of automated spam at the perimeter, before it ever reaches your forms.
Run regular cleanup: bulk-delete old spam comments and fake accounts, then spend a few minutes each month checking for false positives.
Frequently Asked Questions About WordPress Spam Protection
Is free Akismet-style filtering enough, or do I need
more?
For a small personal blog with only comment spam, a single free filter like Akismet is usually enough. Once you add contact forms, signup forms, or user registration, you’ll want a service that protects those too, like ActiveLayer or CleanTalk.
Will adding a CAPTCHA hurt my form conversions?
It can. The extra step causes some real visitors to give up on the form. This is why we prefer invisible, server-side detection that blocks bots without asking anyone to solve a puzzle.
Why am I still getting spam after installing an anti-spam
plugin?
Usually because the plugin only guards one entry point. If it protects your
comments but not your signup or contact forms, bots just move to those
instead, and older tricks like basic honeypots no longer stop modern bots. The
fix is a layered setup: your built-in WordPress settings, an automated
filter, and a firewall working together.
How do I stop fake user registrations without turning off signups
completely?
Turn on email confirmation so new accounts stay inactive until the person
clicks a link in their inbox, which bots can’t do. Pair it with a honeypot and
an automated filter, and real people can still sign up freely.
Can spam actually hurt my SEO or get my site
blacklisted?
It can, but it depends on where the spam is. Comment spam sitting in your moderation queue is never published, so search engines never see it and your SEO stays safe.
Published spam is the real risk, because it can slowly pull down your rankings. WordPress does tag comment links as nofollow, which limits the damage.
We hope this article helped you learn how to protect your WordPress website against spam. You may also want to check out our ultimate WordPress security guide to improve your website security.
If you liked this article, then please subscribe to our YouTube Channel for WordPress video tutorials. You can also find us on Twitter and Facebook.