Do you want to add conversion tracking features to your WordPress website?
Conversion tracking helps you measure the impact of your marketing efforts and makes it easier to understand how users interact with your website.
In this guide, we will show you how to add conversion tracking in WordPress and track your conversions like a total pro.
This is a comprehensive WordPress conversion tracking guide, so we have divided it up into different sections. Here is what we’ll cover in this guide:
What is Conversion Tracking?
Conversion tracking is the ability to track and measure the success of your various marketing efforts.
Depending on your business, the conversion is the desired action you want users to perform on your website.
- For an online store / eCommerce website, a conversion could be a successful purchase.
- For a news/blog site, the conversion could be a successful subscription of the email newsletter.
- For a professional services website, a conversion could be a user filling up a contact form.
Simply put, conversion tracking shows you how many of your website visitors successfully perform the desired action.
Why is Conversion Tracking Important?
Conversion tracking is important because it helps you make data-driven decisions to grow your business.
For instance, it shows you that users coming from a specific traffic source are more likely to convert. You can then focus your attention on getting more traffic from that particular source.
Conversion tracking also helps you uncover the users who are not converting so well.
For instance, you may learn that users open the contact page but many abandon before submitting the form. You can then make your form easier by removing unnecessary fields, make it conversational, change colors, setup partial form submission, etc.
Basically, you need conversion tracking to measure your success and failures and then improve upon them to grow your online business.
That being said, let’s take a look at what tools we’ll need to set up conversion tracking in WordPress.
Most conversion optimization experts rely heavily on Google Analytics. It is a free tool provided by Google that helps you track your website traffic.
It shows where your users are coming from, and what they do while on your website.
If you are running Google AdWords, Facebook Ads, Twitter Ads, to promote your business, then you’ll need to set up those as well for conversion tracking.
This may sound complicated, but you’ll only have to set it up once, and we’ll walk you through every step of the way.
Ready? Let’s get started.
Setting up Conversion Tracking in Google Analytics
First, you need to install Google Analytics on your website.
The easiest way to do this is by using MonsterInsights. It is the best Google Analytics plugin on the market that comes with enhanced eCommerce tracking, form tracking, and other conversion tracking tools built-in.
You’ll need the PRO version of the plugin to access eCommerce and other conversion tracking features. For basic tracking, the free version works as well.
Simply install and activate the MonsterInsights plugin. For more details, see our step by step guide on how to install a WordPress plugin.
Upon activation, you need to visit the Insights » Reports page in WordPress admin area. You’ll be prompted to setup MonsterInsights by launching the setup wizard.
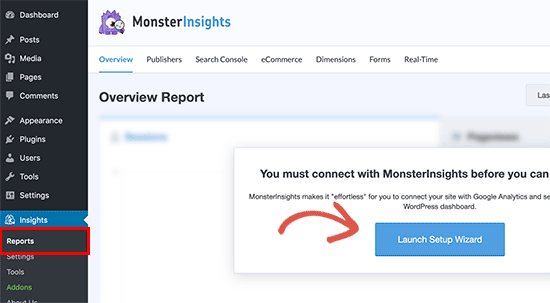
Follow the on-screen instructions to connect your WordPress site to Google Analytics using MonsterInsights. For more details, see our guide on how to install Google Analytics in WordPress.
Now that you have installed Google Analytics, let’s set up conversion tracking on your website.
Turning on Enhanced Ecommerce Conversion Tracking
Ecommerce tracking helps you see which products are doing well on your site, which products are being looked at but not purchased, and what’s bringing you the most revenue.
Google Analytics comes with enhanced eCommerce tracking which works for most eCommerce websites including WooCommerce. However, you’ll need to manually enable it for your website.
Step 1. Turn on Enhanced Ecommerce in Google Analytics
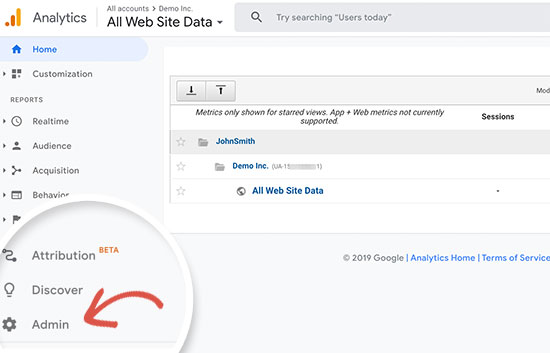
First, you need to enable enhanced eCommerce tracking in your Google Analytics account. Go to your Google Analytics dashboard and select your website.
From here, you need to click on the Admin button located at the bottom left corner of the screen.
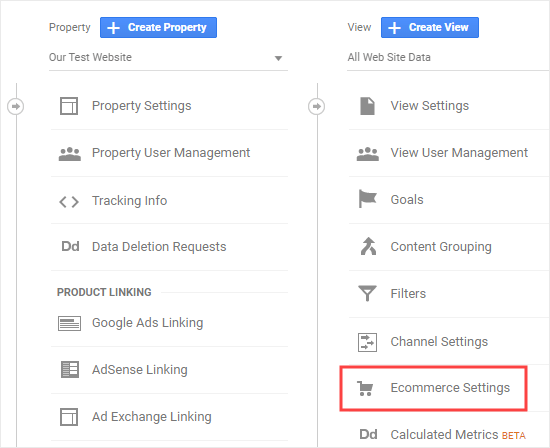
On the next screen, you’ll see different Google Analytics settings. Under the ‘View’ column, click the ‘Ecommerce Settings’ link:
After that, you need to turn on ‘Enable eCommerce’ and ‘Enable Enhanced Commerce’ options.
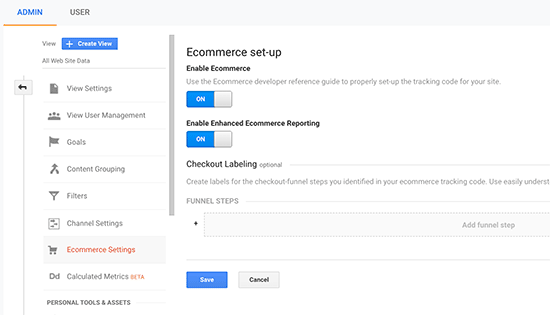
Google Analytics will now turn on the eCommerce reporting feature for your account.
Step 2. Turn on eCommerce Tracking in MonsterInsights
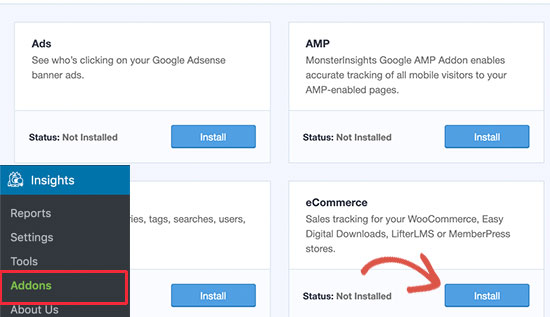
MonsterInsights come with an eCommerce addon that allows you to properly set up eCommerce conversion tracking in Google Analytics.
It works with all top eCommerce platforms for WordPress including WooCommerce, MemberPress, LifterLMS, and Easy Digital Downloads.
First, you need to visit the Insights » Addons page to install and activate the eCommerce addon.
After that, you need to visit the Insights » Settings page and switch to the eCommerce tab. From here, you need to turn on the ‘Use Enhanced Ecommerce’ option.
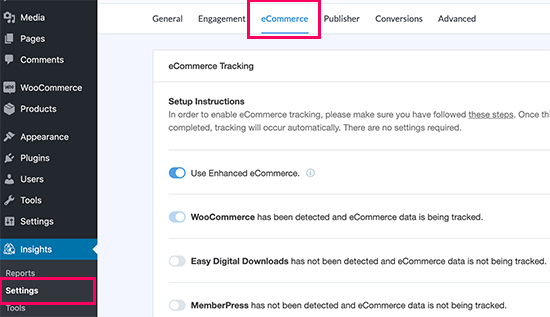
MonsterInsights will automatically detect your eCommerce software and enable advanced eCommerce tracking for your store.
Note: the manual process for adding eCommerce conversion tracking has a lot of room for errors, so we strongly recommend that you use a plugin like MonsterInsights.
Viewing Ecommerce Conversion Tracking Reports
Now that you have enabled eCommerce conversion tracking on your website. Let’s see how to view these reports and use them to make informed decisions about your business.
Ecommerce Conversion Reports in MonsterInsights
Simply go to the Insights » Reports page inside WordPress admin area and then switch to the eCommerce tab.
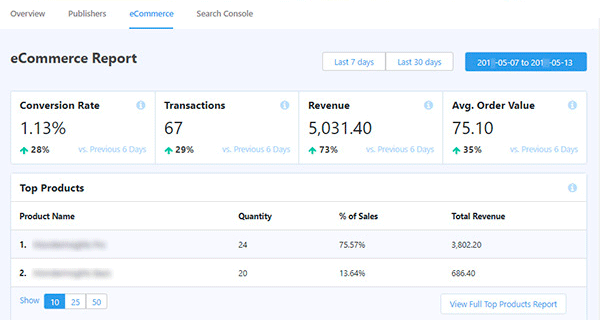
At the top, you’ll see your most important conversion metrics the conversion rate, transactions, revenue, and average order value.
Below that you will see a list of your top products with quantity, sale percentage, and total revenue. This shows you which products are doing well in your store.
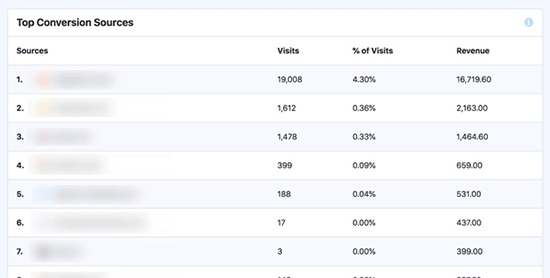
Next, you’ll see your top conversion sources with the number of visits, conversion share, and revenue. You can see which sources are bringing you more revenue and which traffic sources are not very effective.
MonsterInsights will also show you shopper behavior reports with the number of times products were added to and removed from the cart.
That’s not all the data. You can drill down these reports even further inside Google Analytics.
Ecommerce Conversion Reports in Google Analytics
Simply visit your Google Analytics dashboard and click on the Conversions » Ecommerce from the left column.
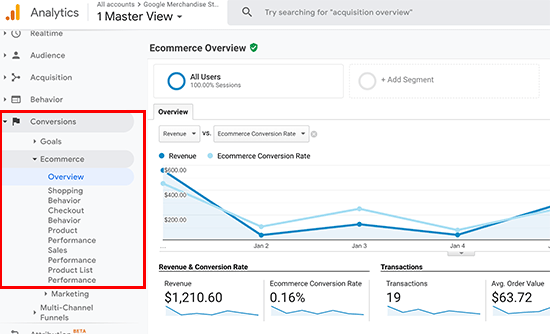
The overview section offers the most important stats such as revenue, conversion rate, transactions, and average order value.
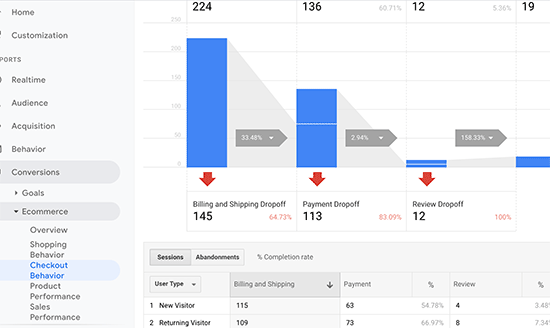
You can further drill down to view different reports. For example, you can switch to shopping and checkout behavior reports to see how users reach to the conversion page. You can also figure out what stopped them at the last minute from completing the transaction.
Not all websites use an eCommerce platform to conduct business. For instance, a restaurant website may use an order delivery form, or a salon may use a booking form.
Many businesses use contact forms to capture leads from their website. A lot of news and blogs use an email newsletter to convert website visitors into subscribers.
To track them, you need to enable form conversion tracking in Google Analytics.
MonsterInsights come with a Forms addon which allows you to easily track form conversions on your WordPress site. It works with all popular WordPress form plugins including WPForms, Gravity Forms, Contact Form 7, and more.
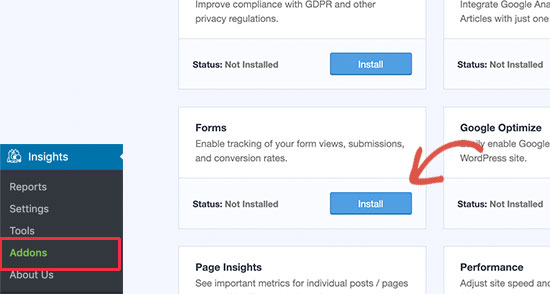
Simply go to the Insights » Addons page. Scroll down to the ‘Forms’ addon, and then click on the Install button.
Upon activation, you need to visit Insights » Settings page and switch to the ‘Connversions’ tab.
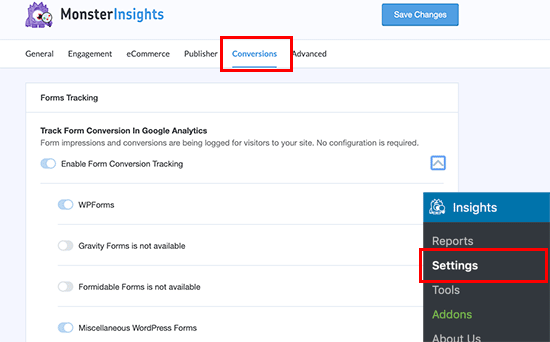
MonsterInsights will automatically detect your WordPress form plugin and will also start tracking miscellaneous WordPress forms on your site.
Viewing Your Form Conversion Reports
You can now view your form conversion reports inside your WordPress admin area.
Head over to Insights » Reports page and switch to the ‘Forms’ tab.
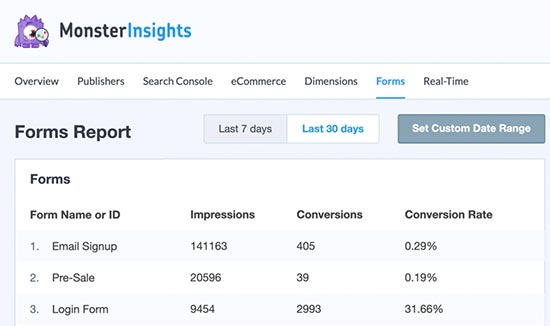
You’ll see a list of forms on your website with their impressions, conversion, and conversion rates.
You can also click on the ‘View full forms report’ button which will take you to the Google Analytics website. It will show all your form conversions as individual events.
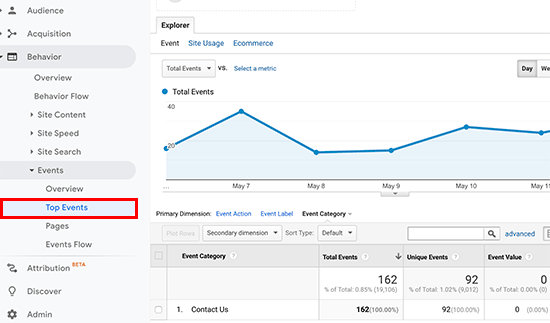
Setting up Goals for Conversion Tracking in Google Analytics
So far we have covered how to track eCommerce and form conversions.
What if you wanted to manually set up conversion goals and track them in Google Analytics?
For instance, you may want to consider users visiting a specific page as a conversion. Since it is not a form submission or an eCommerce transaction it will not appear as a conversion in your reports.
Google Analytics allows you to create your own goals and track their conversion. Let’s see how to set them up and track them on your website.
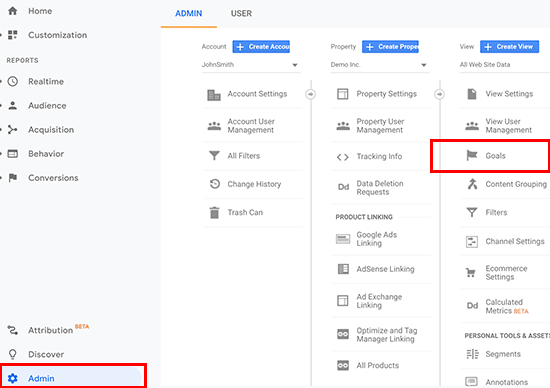
Go to the Google Analytics dashboard and click the ‘Admin’ tab on the bottom left. Then, in the View column, click on Goals.
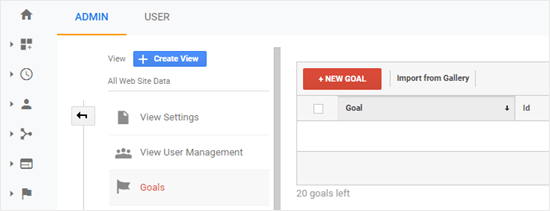
Now, you need to click on the + New Goal button to set up a new goal.
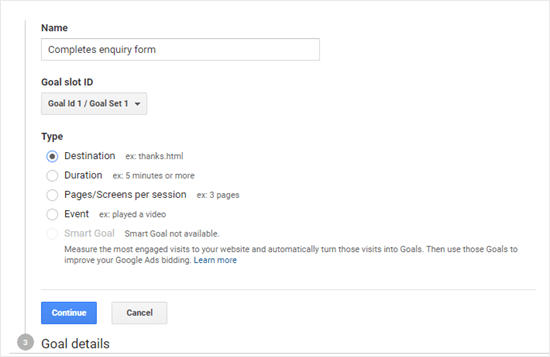
If you previously selected industry for your website, then you may see a template section here. You can skip this and click on the Custom radio button beneath. Then click Continue.
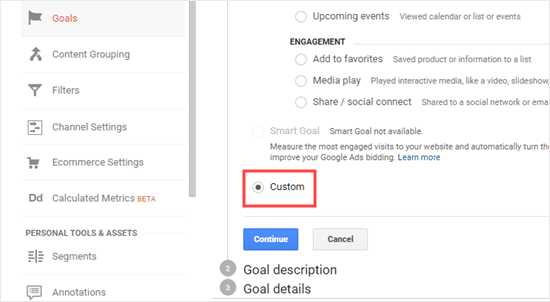
- Destination: this tracks whether a visitor went to a specific page. This could be a thank you page, or any conversion page on your site.
- Duration: this tracks how long a visitor spent on your website. More time spent on website means more engagement.
- Pages/Screens per session: this tracks how many pages an average visitor looks at on your site.
- Event: this can track all sorts of things, like button clicks, video plays, and downloads. It requires a bit more setup than the other options.
Destination and Event types are the most commonly used goal types for most businesses.
For this tutorial, we are going to create a ‘Destination’ goal to track visitors who view our thank you page after filling out a form.
First, provide a name for your Goal. It needs to be something meaningful so that you can easily identify it in your Google Analytics reports. Choose ‘Destination’ as your goal type and click on the continue button.
Now you can simply provide the last part of the URL that you want to track as the destination.
For instance, if your page is:
https://ift.tt/3gwAH5a
Then you should enter:
/thank-you-for-booking/
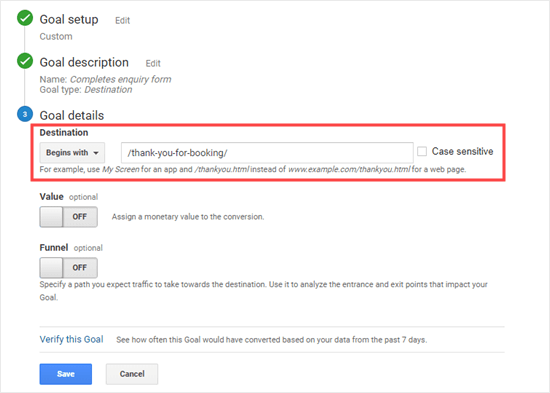
Below that, you can optionally add a value for the conversion. This makes sense if people are completing a payment form, or if you know how much each lead is worth to you on average.
If you want to track a funnel, such as a customer moving through a checkout process, then you can also do this as part of the destination goal. This can help you pinpoint areas you might want to improve.
Once you’re happy with your goal, click the Save button. You should then see your goal listed in a table. You can edit it, switch it off and on, or create more goals here.

Viewing Your Goal Conversions in Google Analytics
Now that you have created your goal allow Google Analytics to collect some data. After that, you can view your Goal Conversion report under the Google Analytics dashboard.
Simply, go to the Conversions » Goals and then click on the overview.
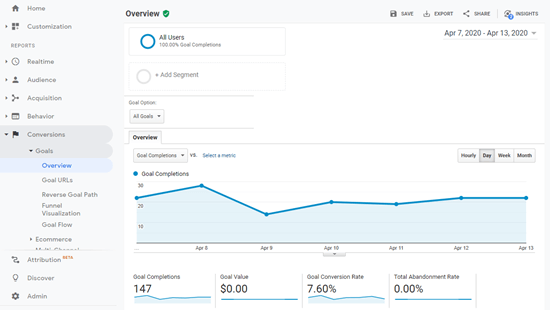
Like all Google Analytics reports you can drill down to view visitor journey and get deeper insights.
For more details, see our complete guide on setting up goals in Google Analytics
Google Ads Conversion Tracking in Google Analytics
If you run Google Ads (formerly, Google AdWords), to bring targetted traffic to your website, then you may want to track those conversions.
It is a bit complicated to set up but we will walk you through it step by step.
Step 1. Link Google Ads to Your Analytics Account
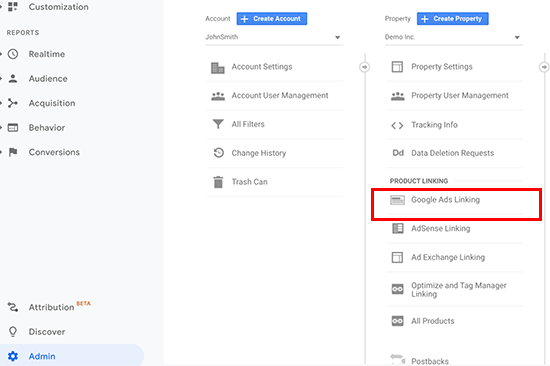
Login to your Google Analytics dashboard and click on the admin button at the bottom left corner of the screen. Next, click on the ‘Google Ads Linking’ under the ‘Property’ column.
Next, you’ll be asked to select your Google Ads account. The Google account you are using for your Analytics should also have access to your Google Ads account.
Under the ‘Link configuration’ section, provide a title for this link group and then turn on the All Website Data.
Finally, you can also check the box next to ‘Share my Analytics data with linked Google Ads accounts’ option. This will allow you to track your Google Analytics goals in Google Ads.
Click on the link account button to save your changes.
Once you have linked to your Google Ads account, analytics will automatically begin tracking your Google Ads.
Step 2. Enable Conversion Tracking in Google Ads
If you running an eCommerce store then you would also want to enable conversion tracking in your Google Ads account. This helps you compare your ads budget with the revenue generated by those ads.
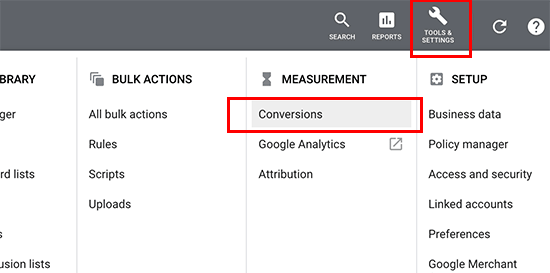
Login to your Google Ads account and click on the ‘Tools & Settings’ button at the top bar. From here, you need to select the ‘Conversions’ link under the Measurement section.
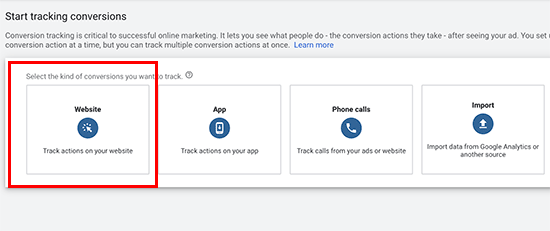
Next, you need to select ‘Website’ when asked what do you want to track.
After that, you will be asked to configure your conversion tracking. There are a bunch of options available. For instance, you can track purchases, add to cart, leads, sign ups, and so on.
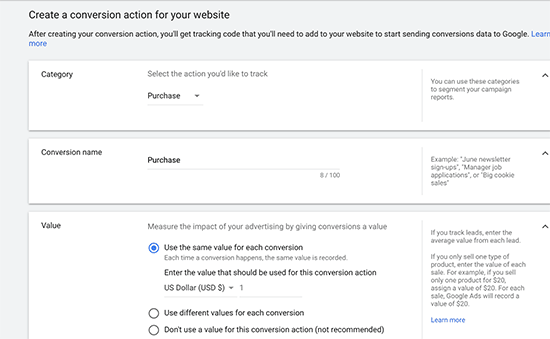
You can also provide a fixed value for each conversion or an average value.
Once you are happy with your settings, click on the ‘Create and Continue’ button.
Next, you will be asked to install the tracking code on your website. You need to select ‘Install the tag yourself’ option.
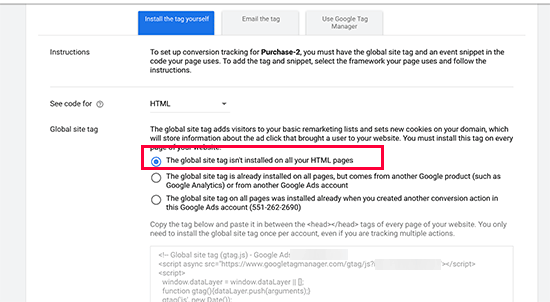
From here, you need to choose the option ‘The global site tag isn’t installed on all your HTML pages’ option.
After that, copy the code you see on the screen and paste it in a text editor like Notepad.
Next, you need to install and activate the Insert Headers and Footers plugin. For more details, see our step by step guide on how to install a WordPress plugin.
Upon activation, you need to visit Settings » Insert Headers and Footers page. From here, you need to paste the code you copied earlier in the header section.
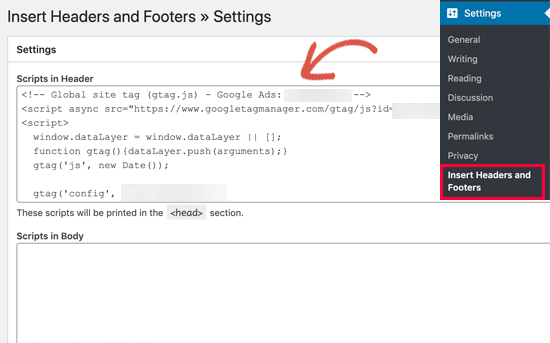
You can now click on the Save button to store your settings. Your Google Ads account has now conversion tracking enabled.
Viewing Google Ads Conversion Reports in Google Analytics
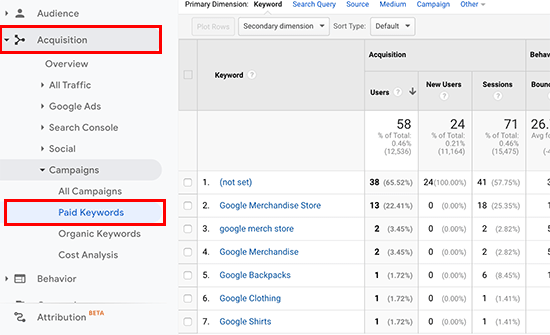
Your Google Ads conversion tracking will now start appearing in your Google Analytics reports. You can view them under Acquisation » Campaigns » Paid Campaigns section.
Use UTM Parameters for Conversion Tracking in Google Analytics
UTM parameters are special tags that you can add to URLs to pass along important information to Google Analytics.
For instance, if you want to track users coming from a particular ad, then you can add UTM parameters to your ad URL like this:
https://yourwebsite.com/special-offer/?utm_source=ads&utm_medium=cpc&utm_content=bfad
You can also use UTM parameters anywhere you want to share your URLs. For instance, your email newsletter, Tweets, SMS campaigns, and more.
https://yourwebsite.com/special-offer/?utm_source=newsletter&utm_medium=email&utm_campaign=jan_sale
MonsterInsights makes it super easy to build URLs with UTM parameters. Simply head over to Insights » Tools page and add your URL under the URL builder.
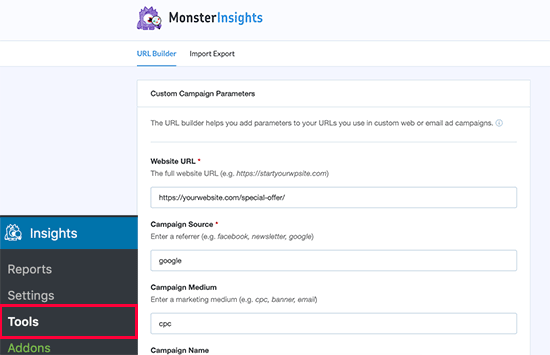
Simply enter the UTM parameters you want to use and it will automatically generate the URL which you can then use in your campaigns.
Viewing UTM Parameter Reports in Google Analytics
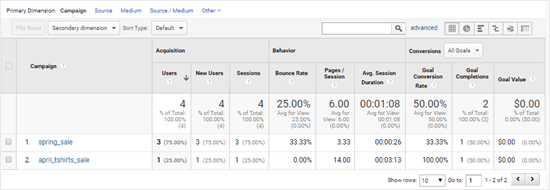
You can now track conversions of your campaigns under your Google Analytics dashboard. Simply switch to the Acquisation » Campaigns » All Campaigns report.
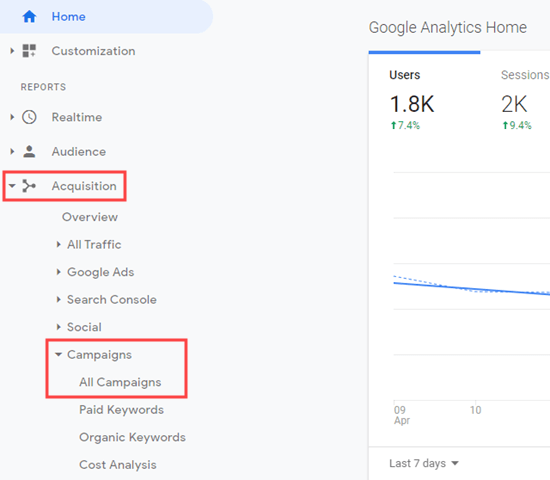
Your campaigns will appear here and you can click on any of them to further drill down.
Setting up Facebook Conversion Tracking in WordPress
Facebook is the largest social media website on the planet with billions of active users. This is why Facebook ads are sometimes the easiest way to reach a very niche audience.
Now, if you are running Facebook ads then you may want to see how well your ads are doing by implementing conversion tracking for your Facebook ads.
Let’s set up Facebook conversion tracking on your WordPress website.
Installing the Facebook Pixel in WordPress
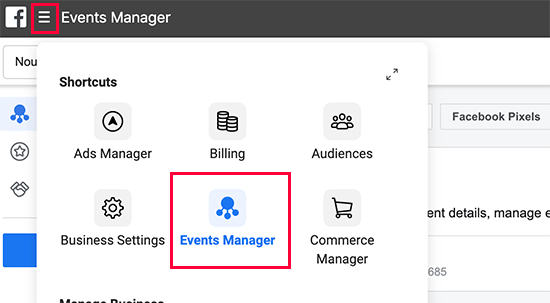
First, you need to visit the Facebook Ads Manager website and select the ‘Event Manager’ option from the top menu.
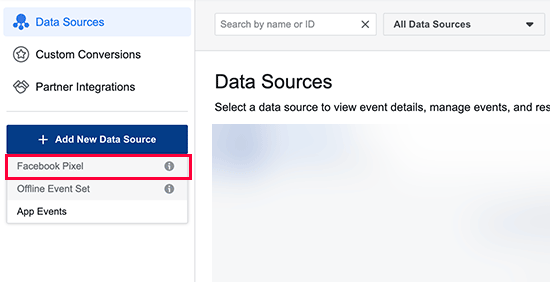
Next, you need to click on the ‘Add New Data Source’ button from the left column and then select ‘Facebook Pixel’.
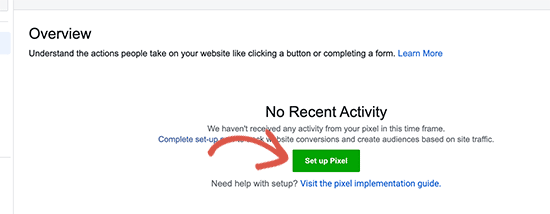
Facebook Ads Manager will now create a unique Pixel for your ad account. You now need to click on the ‘Set up Pixel’ button to continue.
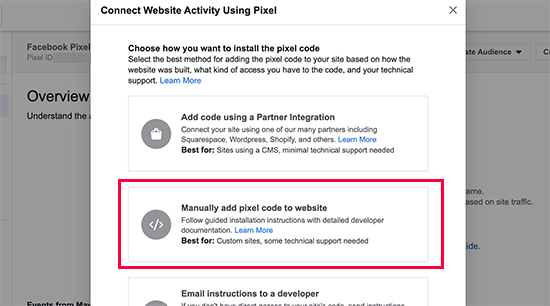
This will bring up a popup where you need to select ‘Manually add pixel code to website’ option.
Next, you’ll see a code snippet that you need to copy and paste in a plain text editor like Notepad.
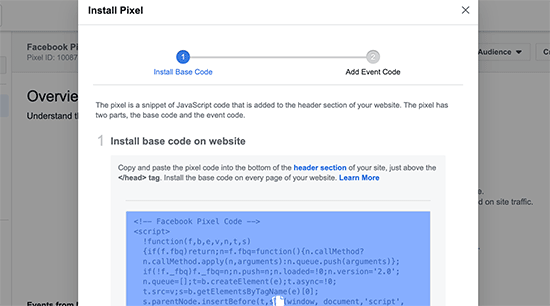
Now you need to leave this browser tab open and access your WordPress site’s admin area in a new tab.
Next, you need to install and activate the Insert Headers and Footers plugin. For more details, see our step by step guide on how to install a WordPress plugin.
Upon activation, you need to visit Settings » Insert Headers and Footers page. From here, you need to paste the Facebook Pixel base code in the header section.
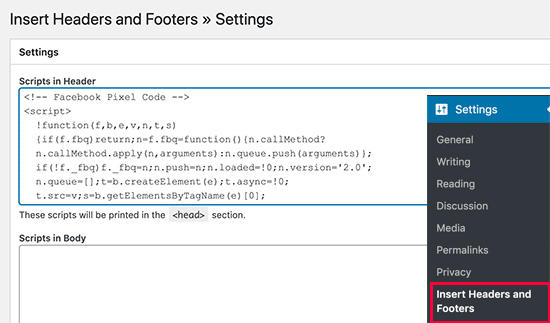
You can now click on the Save button to store your settings.
Once you have installed the Facebook pixel base code, switch back to the Facebook Pixel set up tab.
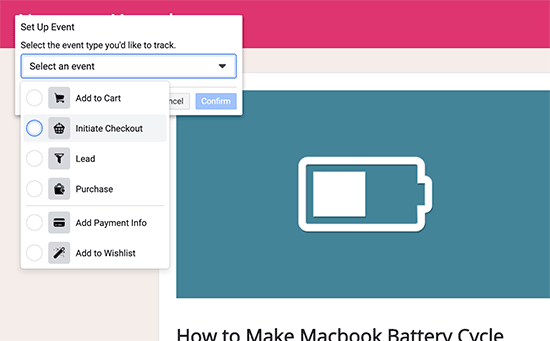
You can now click on the continue button to get the next code. The easiest way to do this by simply entering your website URL and then choose which events you want to track.
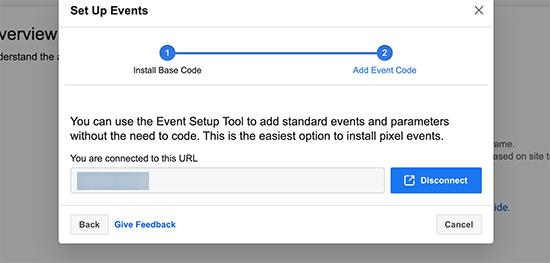
Facebook will now open your website in a new browser tab. You can follow the on-screen instructions to set up events you want to track.
Viewing Facebook Conversion Tracking Reports
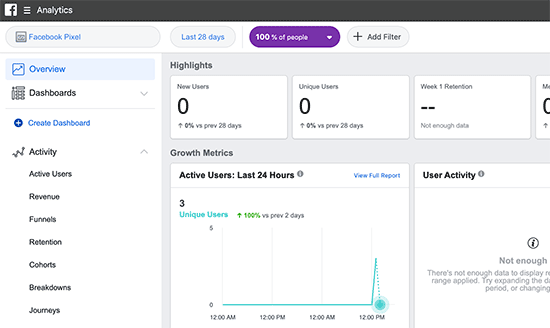
Facebook offers in-depth analysis for your ads and the Facebook pixel. Simply visit the Facebook Analytics website and select your Facebook pixel to view conversion reports.
If you run Twitter Ads to promote your business, then you’ll need to setup Twitter conversion tracking to measure the success of your ads.
Simply log in to your Twitter Ads account and click on the Tools » Conversion tracking link.
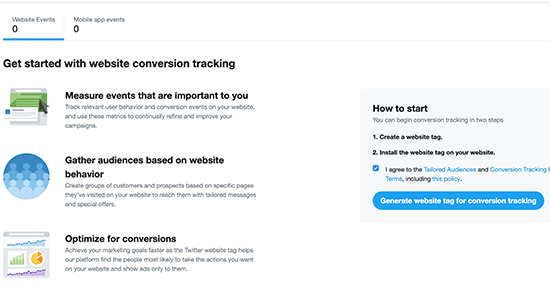
This will bring you to the conversion tracking set up for your Twitter Ads. Click on the ‘Generate website tag for conversion tracking’ button.
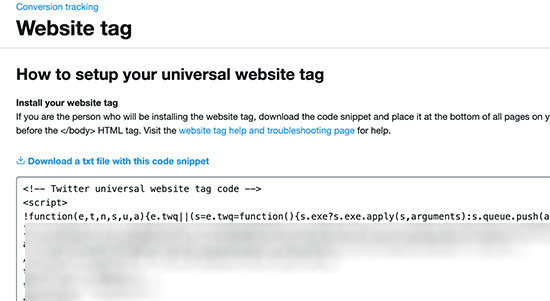
On the next screen, you will see the website tag code. You need to copy this code and paste it in a text editor like Notepad.
Now, you need to switch back to your WordPress website’s admin area.
If you haven’t already done so, then go ahead and install and activate the Insert Headers and Footers plugin.
Upon activation, you need to visit Settings » Insert Headers and Footers page. Now you can paste the Twitter conversion tracking code into the body section.
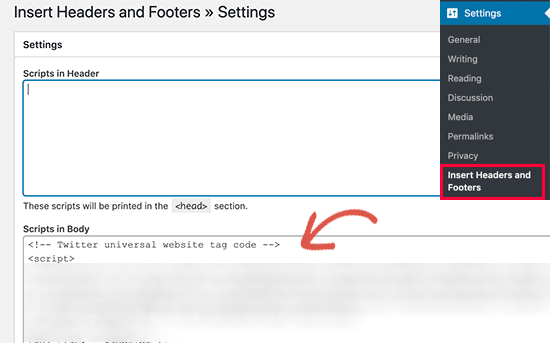
Don’t forget to click on the ‘Save’ button to store your settings.
Once you have successfully installed the conversion tracking code, you will be able to view reports under the conversion tracking page on your Twitter Ads account.
Optimizing Conversion Rates to Boost Sales
Once you start tracking conversions on your website, the next step is to make improve those conversion rates.
You’d be surprised how little things can make huge impact on your business.
The best way to improve your conversions is by using OptinMonster. It is the best conversion optimization software on the market and helps you convert more visitors into customers.
OptinMonster comes with tools like lightbox popups, fullscreen welcome mats, countdown timer, slide-in boxes, and more.
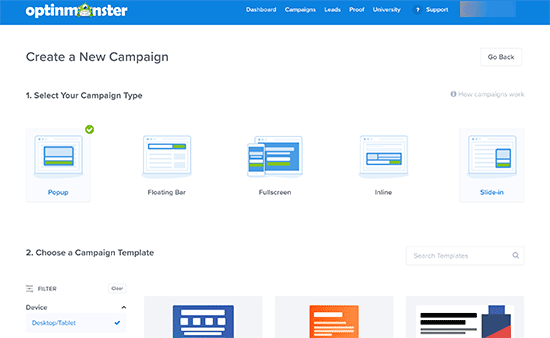
It integrates with any email marketing service and works with all popular eCommerce platforms.
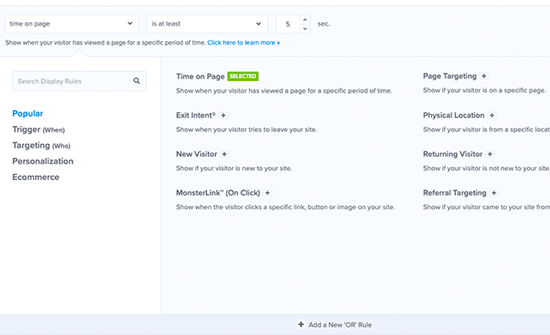
OptinMonster’s display rules allow you to show targetted messages to your customers at the precise time and nudge them into making a buying decision.

For instance, if you notice that customers are leaving a product page without taking any action, then you can offer them a discount when they are about to exit.
Similarly, you can run time-sensitive campaigns to trigger FOMO effect and give customers a nudge in the right direction.
For more practical tips, see our guide on how ways to recover WooCommerce abandoned cart sales.
We hope this guide helped you set up conversion tracking in WordPress. You may also want to see our comparison of the best business phone services and best drag & drop page builders for WordPress.
If you liked this article, then please subscribe to our YouTube Channel for WordPress video tutorials. You can also find us on Twitter and Facebook.
The post WordPress Conversion Tracking Made Simple: A Step-by-Step Guide appeared first on WPBeginner.
from WPBeginner https://ift.tt/3gvbiIW
More links is https://mwktutor.com
