Tuesday, 31 March 2020

What’s New in WordPress 5.4 (Features and Screenshots)

WordPress 5.4 was released earlier today, and it is the first major release of 2020.

This new release is packed with a lot features, many of them are focused around the WordPress block editor. This release will massively improve the way you create content on your websites.

In this article, we’ll share what’s new in WordPress 5.4, and which features you should try after updating your websites.
What is new in WordPress 5.4

WordPress 5.4 is a major release, and unless you are on a managed WordPress hosting service, you’ll have to manually initiate the update.

Important: Don’t forget to create a complete WordPress backup before starting the update.

New and Improved Block Editor in WordPress 5.4

WordPress 5.4 is focused on improving the content editor. This includes new features, enhancements, and new blocks.

Let’s start with the enhancements first.

Fullscreen Editor will be Default in WordPress 5.4

WordPress 5.4 displays the block editor in the fullscreen mode by default.
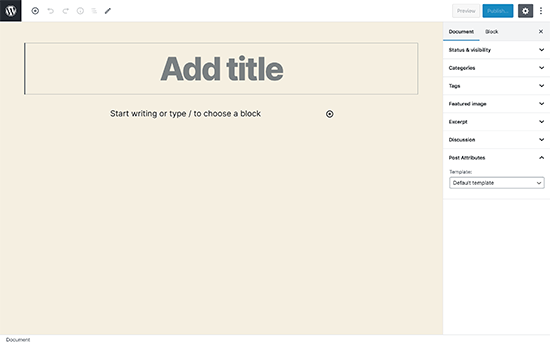
WordPress fullscreen editor

This change will be noticeable on new WordPress installations, or if you are accessing the WordPress admin area from a new device, browser, or in the incognito mode.

If you are upgrading from WordPress 5.3 using the same browser and device that you regularly use, then your editor will open with the last mode you had enabled.

You can exit the fullscreen mode by clicking on the Editor settings and unchecking the ‘Fullscreen mode’ option.
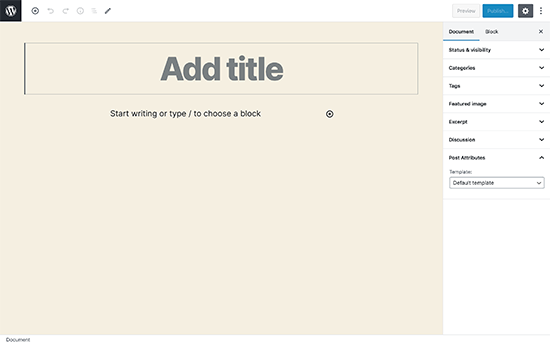
Turn off fullscreen mode in WordPress

New Blocks in WordPress 5.4

WordPress 5.4 brings two new blocks for you to use while writing content.

1. The Social Icons Block

As the name suggests, the Social Icons block allows you to add social media icons in your posts and pages.

Social Icons block in WordPress 5.4

After that, you can click on the add button and select a social network that you would like to add. You can then click on the social network icon and provide the link to your profile.
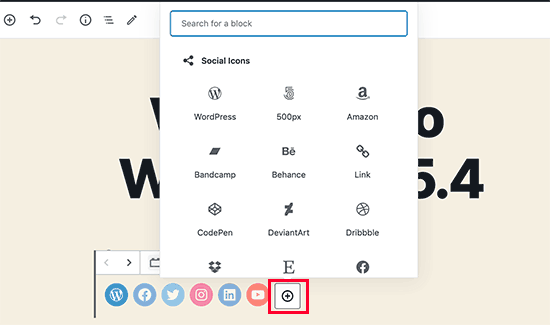
Adding a social network

Social Icons block only allows you to add social media icons with links to your profiles. It does not add social sharing buttons. For that, you’ll still need a social media plugin with sharing features.

2. The Buttons Block

WordPress 5.4 introduces the Buttons block which will replace the Button block. As you can guess from the name of the new block, it allows you to add multiple buttons side by side.
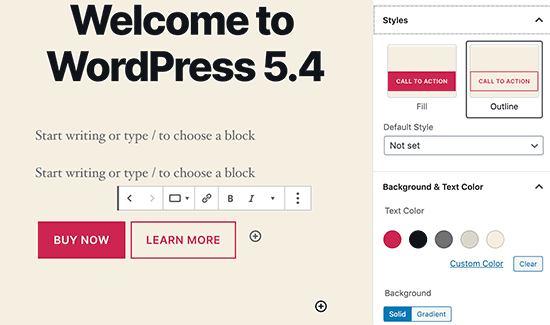
Buttons in WordPress 5.4

You can select the background or gradient colors for each button and choose from two different styles.
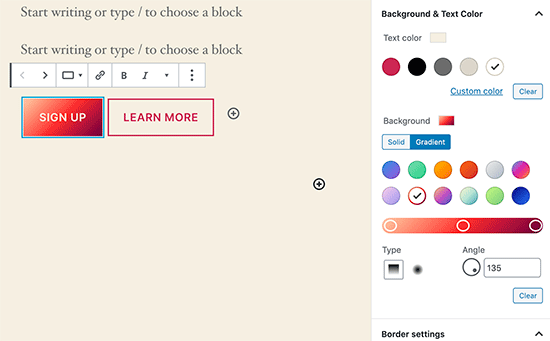
Gradient buttons in WordPress 5.4

Improved Blocks Your Should Try in WordPress 5.4

Several blocks in WordPress 5.4 are improved with new enhancements. Here are the top changes that will make a big difference in your writing experience.

More Color Options for Blocks

WordPress 5.4 offers new color options for multiple blocks. This allows you to create more engaging layouts for your posts and pages.

Previously users were only able to change the color of all text in a paragraph. With WordPress 5.4, you can now change the color of any text inside a paragraph block.
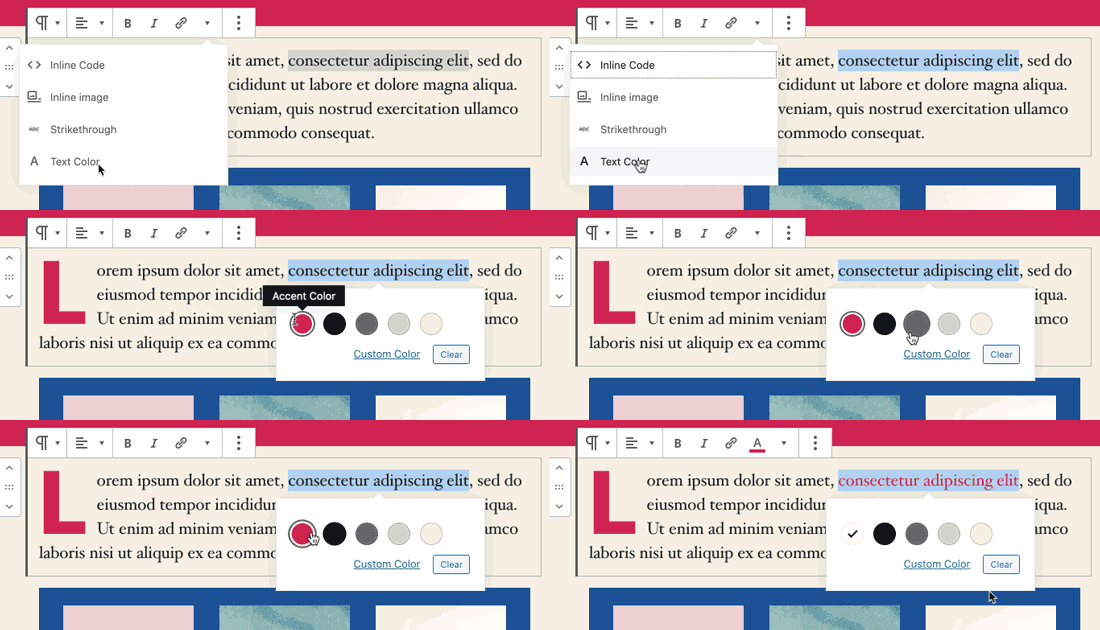
Change text color in a paragraph block

You can also choose text and background colors with gradients for cover block, and you can even choose background and text colors for all the blocks inside a group block.
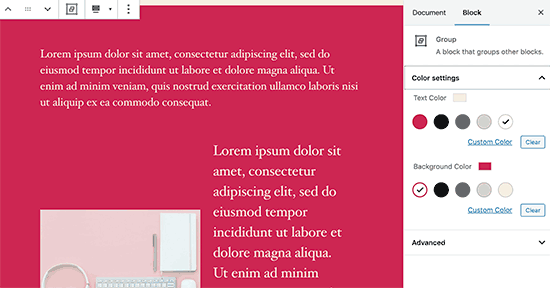
Using background colors for all blocks in a group

If you regularly use the Columns block, then you can also use colors for separating columns from regular paragraphs.
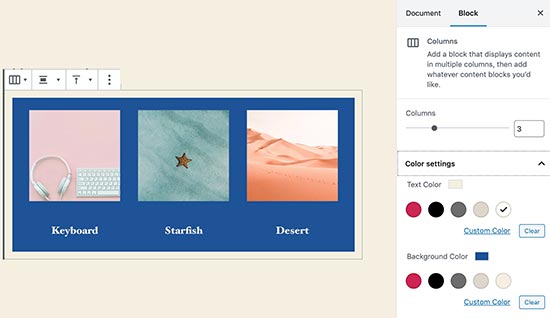
Column colors in WordPress 5.4

Block Selection Tool

A new button in the toolbar now allows you to easily select blocks. This is a really useful tool particularly when you have nested blocks inside a group block.
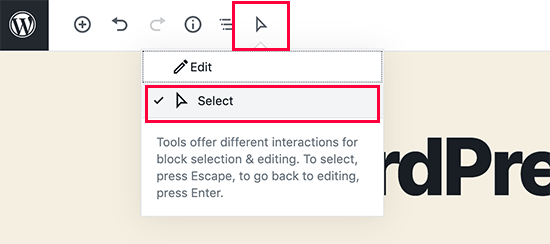
Select block tool in WordPress 5.4

Simply click on the select tool and then take your mouse to the block you want to select.
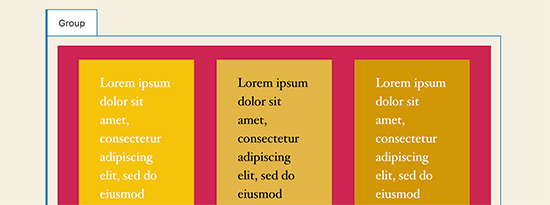
Selected block

Drag and Drop to Add Featured Image

Previously, you needed to manually select to upload and set the featured image. This didn’t match the drag and drop ability of the content editor.

Now with WordPress 5.4, you can simply drag and drop an image to the featured image section.
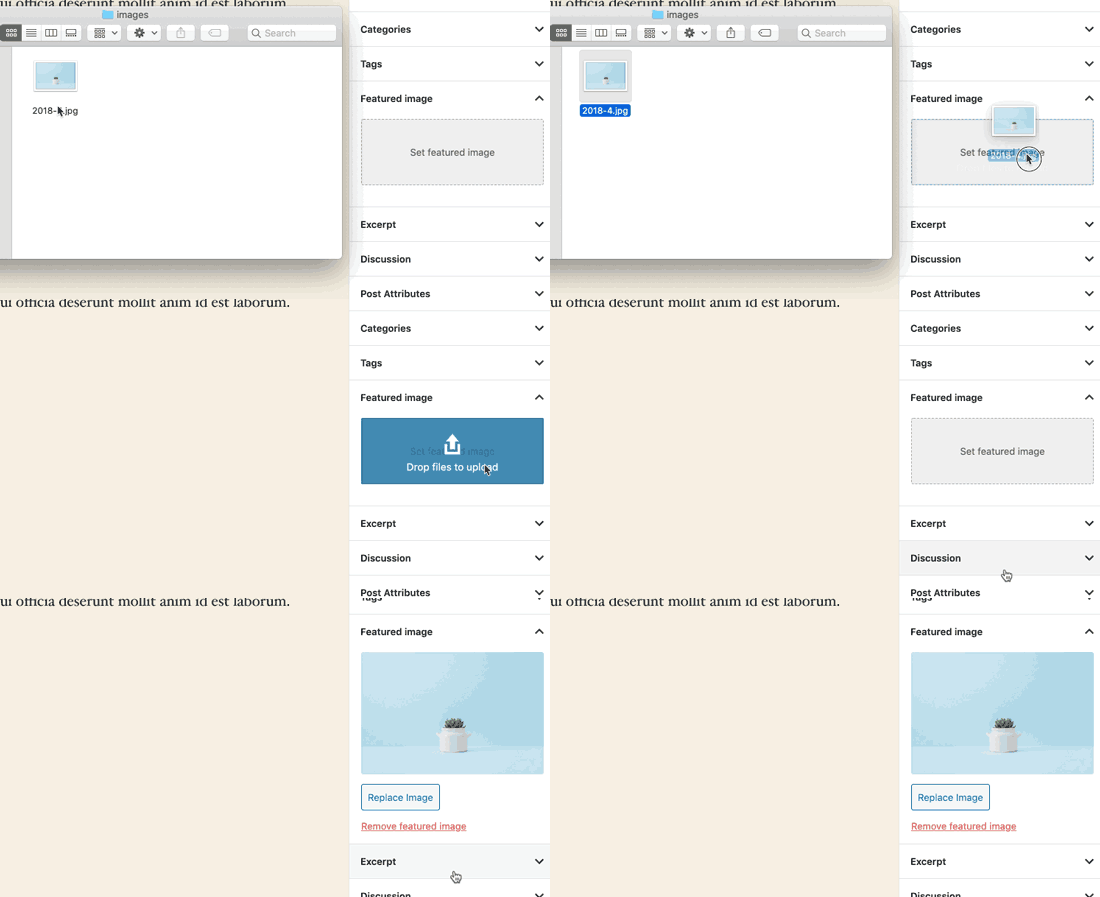
Drag and drop featured image

Better Mobile Toolbar for Block Editor

Previously, if you had to edit a blog post using a mobile device, then you may have noticed how the block settings toolbar moved around.

This made it quite difficult to use the editor on mobile devices. WordPress 5.4 has fixed this with a fixed toolbar on the top.
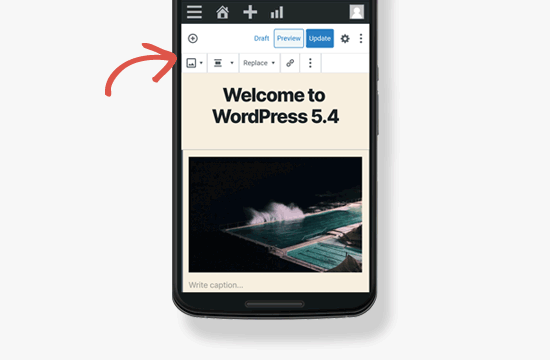
Mobile toolbar in WordPress 5.4

Select Image Sizes in the Gallery Block

Previously you were not able to select image sizes for images in the image gallery block. Now, you can select image size directly in the gallery block settings.
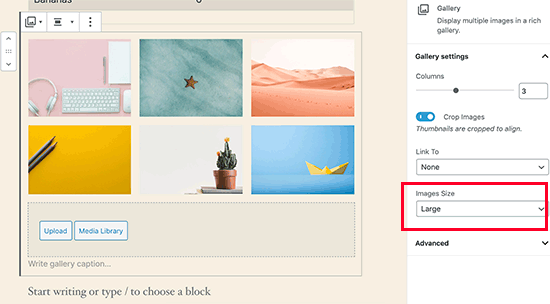
Gallery image sizes

Improved Latest Posts Block

Previously, the Latest Posts block didn’t include the featured images. You can also choose the size and alignment for the featured image. This makes the Latest Posts block a lot more engaging and useful.
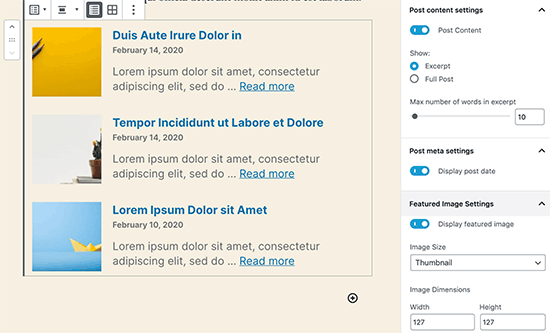
Latest Posts block

You Can Now Embed TikTok Videos in WordPress

WordPress 5.4 includes oEmbed support for TikTok videos. Basically, you can now add TikTok videos to your WordPress posts and pages just like you would embed YouTube videos.
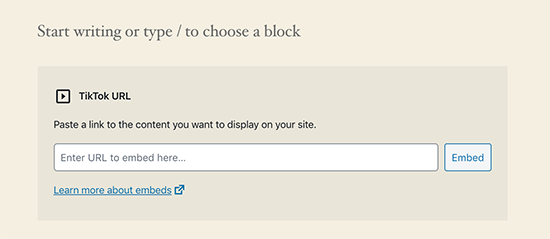
TikTok embed in WordPress 5.4

Simply paste the video URL and WordPress will automatically embed it.

Updated Privacy Tools in WordPress 5.4

WordPress 5.4 brings improvements to the built-in privacy tools. Personal data exports now include session tokens, community events location, and custom user meta.
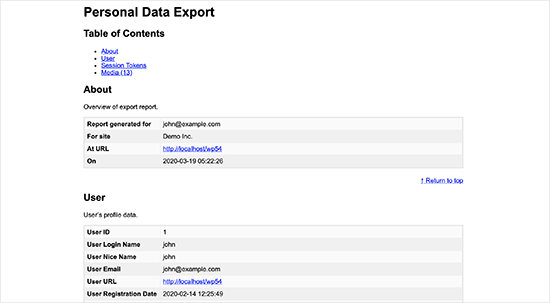
Personal data export file

Personal data export now comes in two files in HTML and JSON. The HTML file includes a table of contents at the top for easier navigation.

Developer Changes in WordPress 5.4

WordPress 5.4 has several improvements for developers. These enhancements affect theme and plugin developers mostly.

New hooks in WordPress 5.4 allow developers to add custom fields to navigation menu items. (Details)

Developers can now add keyboard shortcuts to the block editor. (Details)

WordPress 5.4 changes the HTML output for the Calendar widget. It moves the navigation links to a <nav> HTML element right after the <table> element in order to produce valid HTML. (#39763)

A new apply_shortcodes() function is now available as an alias to the do_shortcode() function. (#37422)

Some unused customizer classes are now formally deprecated in WordPress 5.4. (#42364)

We hope this guide helped you learn about what’s new in WordPress 5.4. We are excited about the new features and enhancements in the block editor particularly color options and buttons block.

What’s your favorite feature in WordPress 5.4? Let us know in the comments below.

If you liked this article, then please subscribe to our YouTube Channel for WordPress video tutorials. You can also find us on Twitter and Facebook.

The post What’s New in WordPress 5.4 (Features and Screenshots) appeared first on WPBeginner.


from WPBeginner https://ift.tt/2xAlKwW
More links is https://mwktutor.com

Learn How to Use BigCommerce for WordPress to Sell Products on Your Site

BigCommerce Video Tutorials by WP101®

First, a personal note:

Like you, we’re navigating these unprecedented times to the best of our ability. We’re staying home and everything is on lockdown right now, while we continue to monitor the ongoing health crisis and do our part to help out in any way we can.

Thankfully, our team has always been remote, so we’re continuing to create courses and answer your questions in our WordPress help forum. We’re continually looking for ways to help you make the most of this quarantine time.

So, today we’re happy to release a brand new course that will help you sell products from your WordPress site. If there is anything else we can do to help you during this time, please feel free to reach out anytime.

New Course! BigCommerce for WordPress

Do you want to start selling products on your WordPress website without bogging down your page load times, or buying dozens of expensive add-ons? Looking for an alternative to WooCommerce? In our newest course, we’ll show you how to use BigCommerce for WordPress so you can start selling products on your WordPress site in about 30 minutes.


BigCommerce Product Backend

WordPress is the most popular content management system on the planet, and it provides a fantastic way to manage your website. But WordPress wasn’t designed for ecommerce. And with dozens of ecommerce plugins available for WordPress, where do you begin? It’s easy to become overwhelmed with decisions about how to manage your inventory, accept payments, process orders, handle shipping, security, hosting, performance… and the list goes on.

That’s where BigCommerce for WordPress comes in.

BigCommerce Logo

BigCommerce is a specialized ecommerce platform. BigCommerce handles all the heavy lifting so you can focus on growing your business. And, with BigCommerce for WordPress, you can bring all this power directly to your WordPress site.


Once the plugin is installed, BigCommerce takes care of all the important aspects of ecommerce for your WordPress site. Right out of the box, you get a robust set of tools to help you sell products from your site, without having to worry about complicated PCI compliance, processing credit cards, or slowing down your website!

With BigCommerce for WordPress, you can focus on creating content and a stellar customer experience, while BigCommerce works in the background, making sure your store always runs at its best.

Blazing fast ecommerce that doesn’t slow down your site.

Displaying products to your site visitors and processing concurrent orders shouldn’t slow down your site. But this is the #1 problem for ecommerce site owners, and it can be costly. BigCommerce solves this problem by offloading the most intensive processes to their dedicated servers, freeing your own web server’s resources so you can handle high traffic, without slowing down your WordPress site.

With BigCommerce for WordPress, you get a powerful, PCI-compliant, ecommerce platform that loads incredibly fast, whether you’re selling one product — or thousands. BigCommerce handles the checkout process, so you don’t have to worry about security or PCI compliance.

We partnered with BigCommerce to create this simple, 13-part introduction to BigCommerce for WordPress.

In this easy, 30-minute course, you’ll learn:

  • Why BigCommerce is the best ‘headless’ ecommerce solution for WordPress.
  • How to download, install, and configure BigCommerce for WordPress.
  • How to add products to your BigCommerce store.
  • How to import a list of existing products into BigCommerce.
  • How to display your product catalog on a page or post.
  • How to customize the colors and layout of the product catalog.
  • How to create custom child templates for BigCommerce.
  • How to launch your BigCommerce store.
  • The major differences between WooCommerce vs. BigCommerce.
  • How to migrate from WooCommerce to BigCommerce.
  • Where to get expert help for BigCommerce.
  • Plus, much more!

Check out the introductory video…


Best of all, this new course is FREE for All-Access Pass members!

If you already have an All-Access Pass, first log into your account, then visit the BigCommerce 101 course description page and click the large, green button that says, “Take This Course.” That’s it! You don’t need to purchase anything else. Once you’ve enrolled in the new course, it will appear in your My Courses page.

Don’t have an All-Access Pass yet?

Purchase an All-Access Pass today and you’ll get this new course, plus all of our other courses! In addition to WordPress basics, you’ll also learn how to optimize your site for search engines, sell products from your website, create custom forms, and much more. Learn more and get your All-Access Pass today!

Check out the BigCommerce 101 course outline:

View Course Outline

Learn How to Use BigCommerce for WordPress to Sell Products on Your Site appeared first on WP101.com


from WordPress Tutorials by WP101 https://ift.tt/3bGHQMS
Https://mwktutor.com/

9 Best Church Website Builders of 2020 (Easy for Beginners)

Have you been tasked with creating a website for your church? If you’re not a professional web designer or developer, this can be a daunting task.

The good news is that there are plenty of ways to create a church website that looks great and does everything you need it to do.

In this guide, we’re going to compare the best church website builders that you can use to build a church website without writing any code.

Best church website builders (easy for beginners)

How to Find the Best Church Website Builder for You

When you’re considering which church website builder to pick, you’ll want to look for features that help you accomplish key tasks.

Creating a calendar: You’ll need to list your regular services, and perhaps other activities, on your website.

Uploading sermons: If you plan to put sermon recordings on your website, then you’ll want an easy way to do this.

Different user accounts and permissions: You’d probably want to have certain church members (volunteers) be able to update the website when needed, without giving them access to everything.

Allowing members to register and login: You might want to have some content, like the minutes of church meetings, only available to registered church members.

Taking donations: If you plan to take donations through your website, then you need to make sure that your church website software will support this.

Design and Templates: You should pick a website builder that has a wide variety of church website templates. You also want it to have an easy design customizer that lets you customize the design, add images, update colors and more, so you can create a church website that matches your church’s brand.

With that said, let’s take a look at the pros and cons of the most popular church website builders, so you can choose the best software for your need.

1. WordPress

WordPress

WordPress.org is the #1 software for building church websites. It’s the most popular website builder in the world and powers over 35% of all websites on the internet.

Note that WordPress.org, also called “self-hosted WordPress”, is different from WordPress.com (mentioned later in the article). If you’re keen to know how they’re different, take a look at our guide that compares WordPress.org vs. WordPress.com.

WordPress is a completely free website builder that gives you full control and all the features you’ll need to build a website. But since it’s self-hosted, you will need to have a domain name and web hosting to build a website with WordPress.

Pros:

  • WordPress has hundreds of different church templates and layouts (themes) that you can use, both free and paid. Here’s our expert pick of the best church themes for WordPress.
  • There are plugins available to cover any feature your church website is likely to need. For instance, you might want the Sermon Manager plugin and one of these donation and fundraising plugins for your church website.
  • WordPress has over 55,000+ free WordPress plugins which are like apps for your website that lets you add additional functionality like contact forms, photo galleries, image sliders, and more.
  • You can use popular WordPress page builder plugins like Divi, Elementor, or Beaver Builder to create completely custom church websites without writing any code.
  • WordPress lets you create as many user accounts as you want. These can be set up with different roles and permissions, so you can limit full admin access to just one or two people.
  • With WordPress, you fully own your website. You don’t have to worry about ads appearing on your site as they do with some other free or cheap website builders.
  • There’s a huge supportive community around WordPress, making it easy to get help when you need it. We even run our own free Facebook group called WPBeginner Engage where you can find lots of encouragement and support.

Cons:

  • You’ll need to handle updates, backups, and security yourself. There are lots of WordPress plugins that can help with this, though.
  • WordPress can sometimes be a bit daunting when you’re just starting out. You may find there’s a bit of a learning curve.

Pricing:

WordPress itself is free, but you’ll need to pay for a domain name and web hosting. The cost of a domain name is normally around $9 – $15/year and web hosting normally starts around $7.99 / month.

Luckily, Bluehost, a popular web hosting company, has agreed to offer WPBeginner readers a free domain name and a generous 60% discount on hosting. Basically, you can start a church website for $2.75 per month.

→ Click Here to Claim This Exclusive Bluehost Offer ←

Once you have setup your domain and hosting, please see our guide on how to make a WordPress website (step by step).

Note: you can use WordPress with all major hosting providers. If for some reason, you want a different hosting provider, then we recommend SiteGround or any of these top WordPress hosting companies.

2. Constant Contact Website Builder

Constant Contact's website builder

The Constant Contact Website Builder is one of our top choices for an all in one website solution. They provide web hosting, so you don’t need to buy that separately.

The Constant Contact website builder is powered by AI (artificial intelligence). This makes it very easy and quick for you to build a church website.

Pros

  • You can get started with the Constant Contact website builder completely free. This is a great option for small churches or those on a very tight budget.
  • It’s very quick to create your church website. Just type in “church” for the type of site and you’ll be shown appropriate stock images you can use. You can then click a few options to finish creating your site.
  • There’s support available 24/7. You can contact their team by email or live chat even on the free plan. We found that the live chat team was helpful and quick to respond.
  • Your site layout and design can be customized in almost any way you can imagine. Constant Contact has a huge library of images (over 550,000) to choose from. Of course, you can also upload your own images.
  • Although there isn’t a specific donations feature, you can create and sell products even on the free website plan. You could create a product that’s called “Donation” or similar. Donors can’t set their own amount, however.
  • All plans, including the free one, come with an SSL certificate. This allows your site to use the secure https protocol instead of http.
  • You can connect Constant Contact websites with their powerful email marketing service to send regular newsletters.

Cons

  • You can’t create multiple users for your site, even if you’re on one of the paid plans. If you want other people to be able to edit the site, you’ll need to give them your login. This could lead to security breaches or someone accidentally deleting pages from the site.
  • If you want to use a custom domain name, rather than one ending in constantcontactsites.com, you’ll need to upgrade to a free plan. These start from $10/month. However, you do get your domain name for free on that plan.
  • Your site will show ads on the free plan. You’ll need to upgrade to get rid of these.
  • Constant Contact takes 3% commission on website sales on the Free and Starter plans, meaning it’s not an ideal platform for taking donations.

Pricing

The Constant Contact website builder has a free plan. If you want to remove ads and use your own domain name, you’ll need to pay $10/month for the Starter plan.

The Business Plus plan, at $20/month, could be useful if your church wants to sell products, event tickets, or anything else online.

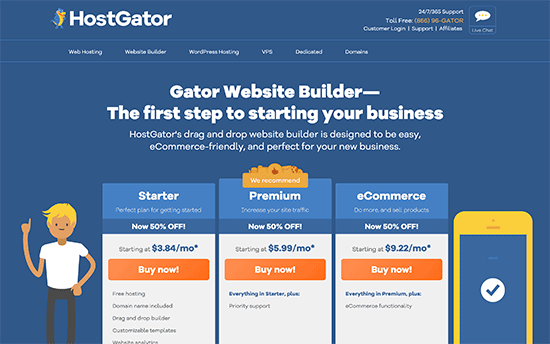
3. Gator by HostGator

Gator website builder

Gator is another all in one website builder, making it a great option if you want to keep things as simple as possible. You can choose from different website templates to create your site.

It’s fully hosted for you by HostGator, one of the biggest web hosting platforms in the world.

Pros

  • You’ll have unlimited pages, space, and bandwidth for your site. This means you don’t need to worry about running out of space or getting charged if your site gets a lot of traffic.
  • A domain name is included for free (for 12 months) regardless of which plan you’re on. Alternatively, if you’ve already bought a domain name from a different domain name registrar, you can simply connect it to your site.
  • There’s support available 24/7 through live chat, phone, and email.
  • There are over 200 different templates available. You can customize these, though you can’t later switch templates completely.

Cons

  • Unlike Wix, WordPress, or Constant Contact, Gator does not have free plans, and there’s no free trial available either.
  • There’s no easy way to accept donations through your website unless you pay for the eCommerce plan.
  • The pricing isn’t very transparent. Your site might end up costing you quite a bit more than you’re expecting as time goes by.

Pricing

The cheapest Gator plan costs from $3.84/mo, which requires you to pay upfront for two years. If you want to pay monthly, it’s $4.99/month.

Note that all the listed prices are for your site’s “first term” only. So if you opt for the $4.99/month option, you’ll be paying $9.99 from your second month onward.

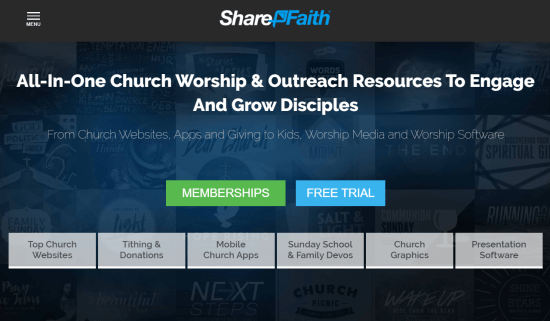
4. Sharefaith

Sharefaith website builder for churches

Sharefaith is a popular website builder designed specifically for churches. It is a dedicated platform and comes with a support team to help you get started.

Pros

  • There are plenty of different church website templates to pick from. All of these are specifically designed for churches, so you won’t find yourself skipping through lots of irrelevant ones.
  • You can view and try out the website builder without paying anything. Just pick a template that you want to demo.
  • Sharefaith will migrate your old site for free (so long as you pay for a yearly plan).
  • There are loads of different images, like website banners, you can choose from. You can also upload your own images to use on your site.
  • You can easily add the audio or video recording of sermons to your website. With these, you can select who preached the sermon and what series it was in.
  • There’s a built-in calendar feature so you can list services and other events.
  • With your website, you’ll also get Sharefaith Giving. This makes it easy for you to accept donations and tithes through your website.
  • Membership includes access to the full Sharefaith media library, with over 90,000 graphics, images, videos and so on.
  • You can add additional users to your Sharefaith website using the ‘Advanced’ tools.

Cons

  • Sharefaith definitely isn’t the cheapest website builder out there and probably won’t suit churches on a very tight budget.
  • You’re restricted to the functionality that Sharefaith has. Unlike WordPress, you don’t have access to the same level of plugins or extensions.

Pricing

Sharefaith costs $45/month if you pay annually or $50/month if you pay monthly for their “media + web” plan. That plan is the minimum you can purchase if you want to create a website.

This could well be worth it for you if you want to use lots of the specialist functionality, like the ability to upload sermons.

5. Ministry Designs

Ministry Designs website builder for churches

Ministry Designs is another website that specialises in providing sites just for churches.

Pros

  • There are lots of gorgeous templates to choose from, all of which are fully responsive. That means they’ll look great on mobile devices as well as on computers.
  • There’s unlimited training, and your assigned “Ministry Success Representative” will use screen-sharing technology to show you exactly how to build your website.
  • You’ll get an hour-long initial phone call, plus as much support as you need after that to build your site.
  • Ministry Designs is very geared up for churches, with features where you can upload sermons, create a calendar, and even create and manage an email list.
  • You can have multiple user accounts for your site. You can have 3 users for free, or more if you pay extra.
  • The support team was very responsive and friendly. You can contact them through the website’s live chat without signing up for anything.

Cons

  • You’ll be paying a large upfront fee. The ongoing hosting isn’t super-cheap, either.
  • The templates aren’t necessarily any better or more advanced than those that you could use on other (much cheaper) website builders.
  • Ministry Designs doesn’t actually create or design your website for you. They just walk you through the process of using their templates.

Pricing

Ministry Designs charges $1,000 upfront for their software and support. You’ll then be paying $20/month for ongoing hosting.

It’s a lot to pay. You may find it’s worth it if your church needs a website but doesn’t have a volunteer with the technical skills to create one without a lot of hands-on support.

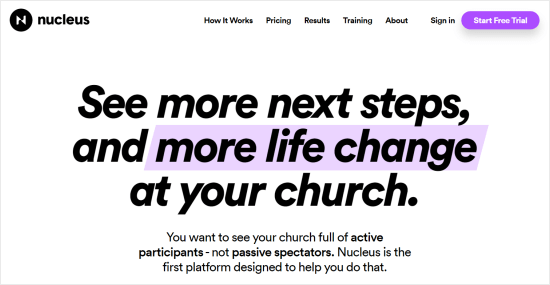
6. Nucleus

Nucleus website builder for churches

Nucleus is an all in one church website builder, with a bunch of useful features like the ability to upload sermons and create email lists.

Pros

  • There’s a 30 day free trial, which doesn’t require any credit card details. If you find that you need longer to evaluate the website builder, just contact Nucleus and they can give you extra time.
  • Nucleus offers “scholarships” for smaller churches and startups. It’s worth enquiring about these if your church would struggle to afford the regular Nucleus payment plans.
  • There’s lots of helpful documentation, plus support available through live chat.
  • Nucleus is designed to be a “central hub” for your church. There’s a particular focus on signup forms so that you have a single place you can point people to.
  • There’s a Facebook group you can join to talk about church website building with other people who are using Nucleus too.
  • When you sign up for Nucleus, you also get access to their library of video footage clips. Note that only a small number of these are available during your free trial.
  • There are lots of pre-created social media posts that you could use on your social media channels. These are all images with text overlayed and come with suggested captions.

Cons

  • The support team are only available from 9am to 5pm EST, which could mean waiting quite a while for a reply at some points.
  • If you want to take donations, you need to pay a flat fee for this service from RebelGive. It could well be worth it if you get a lot of donations through your website, though.
  • Currently, you can’t have multiple users for your website. When we asked the support team, they said this feature would be added in the future.

Pricing

Nucleus costs $125/month if you pay monthly or $99/month if you pay upfront for a year.

You don’t need to pay more if your website grows. It’s a single flat fee that gives you access to all their features.

7. WordPress.com

The WordPress.com website builder

WordPress.com is an all in one hosted platform that’s based on the same underlying code as WordPress.org.

It’s easy to get confused about the difference between WordPress.org and WordPress.com. The key thing to know is that WordPress.com is a commercial offering whereas the WordPress.org software is free and open-source.

There are restrictions on what you can do with WordPress.com and the free plan is quite limited, which is why we normally recommend WordPress.org instead. However, WordPress.com can be the right choice in some situations.

Pros

  • WordPress.com is hosted for you, so you don’t need to worry about backups, updates, or security. It’s all handled on your behalf.
  • There are hundreds of different themes (designs) that you can choose from for your website. This includes many options, both free and premium, that are suitable for churches.
  • The paid plans are fairly cheap if you’re on a tight budget.
  • It’s quite straightforward to move from WordPress.com to WordPress.org in the future. This helps keep your options open.

Cons

  • You can’t customize your site to the same degree as you can with many other website builders.
  • WordPress doesn’t have a drag and drop interface like some other website builders, so it can be harder to get to grips with.
  • The free plan is very limited and doesn’t provide any support.

Pricing

The paid plans are fairly cheap, starting at just $4/month (billed annually) for a custom domain name and 24/7 support.

If you want more features, the Premium plan is $8/month (billed annually).

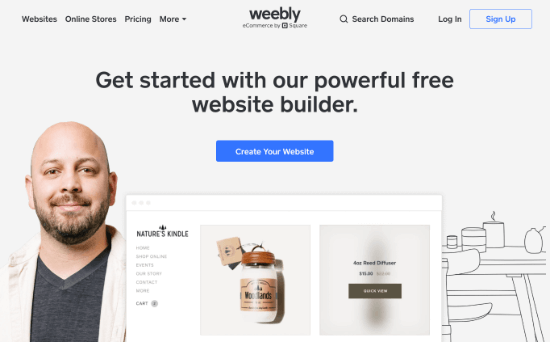
8. Weebly

Weebly website builder

Weebly is another all in one website builder. Most people find it really easy to use, and it comes with lots of designs that you can use as a starting point for your website.

Pros

  • All of Weebly’s designs are fully editable using the drag and drop interface. It’s very beginner-friendly and easy to use even if you’ve never created any sort of website before.
  • There’s built-in eCommerce support, which you could use to take donations. However, Weebly charges a 3% transaction fee on sales through your website.
  • There’s an App Center that you can use to add extra features to your site. There are a number of different audio players you could add, for instance, if you want to put sermons on your site.
  • The support team are available 24/7 through email, and during extended business hours (6am to 6pm PST) by live chat. If you’re on the Pro plan or higher, you can also call them on the phone.
  • If you’re on the Pro plan or higher, you can create a membership area for your site. This means you can protect information that you only want church members to be able to view.

Cons

  • Unlike other website builders such as Constant Contact, Weebly doesn’t have an AI creation process. This means it may take you a bit longer to create your site.
  • The apps you can install are limited and you won’t be able to get such relevant features as you could with other website builders. There isn’t a specific “sermon” app, for instance.

Pricing

Their paid plans start from $6/month (billed annually), but this won’t let you remove ads. You’ll need to pay for the $12/month Professional plan if you want to remove ads and have unlimited storage.

9. Squarespace

The Squarespace website builder

Squarespace is a very popular website builder that again offers an all in one platform.

It’s easy to use and allows for multiple users, which could be really handy if you want to have several people working on your church’s site.

Pros

  • It’s simple to add images, videos, and audio files using Squarespace’s block editor. This could be particularly handy if you want to upload sermons to your site.
  • There’s a good number of different templates available on Squarespace.
  • You can take a free trial without needing to enter your credit card details.
  • There are a huge number of fonts available with Squarespace, which could be helpful if you want to match your website fonts to specific ones you’re using in printed materials.
  • You can add contributors (other users) to your website and you have some degree of control over what permissions they have. The Personal plan only lets you have 2 contributors, but the other plans are unlimited.
  • Squarespace handles images well, making it easy for your images to look great on different devices. You can browse and pick free images from Unsplash within Squarespace itself.
  • If you’re on the Business plan or higher you can take donations through your website, using the ‘Donations’ block on any of your pages.

Cons

  • There aren’t any Squarespace templates specifically designed for churches. The “Community & Non-Profits” templates might make a good starting point but you’ll likely want to modify them a lot.
  • There are some third-party extensions available for Squarespace, but not nearly as many as you could get with a different platform like WordPress.
  • If you’re on the Business plan rather than an eCommerce plan, Squarespace charges a 3% fee on donations. This is in addition to the fee charged by the payment processor.

Pricing

The Personal website plan is $12/month (if you pay annually).

We’d recommend going for the Business plan, at $18/month (also billed annually). This gives you access to premium blocks and extensions, as well as the ability to take donations.

Expert Pick: Which is the Best Church Website Builder?

WordPress is hands down the best website builder for churches. There’s a reason why it’s the most popular website builder in the world powering over 35% of all websites on the internet.

It comes with dozens of church templates and design customizer options that you can use to build your church website without writing any code.

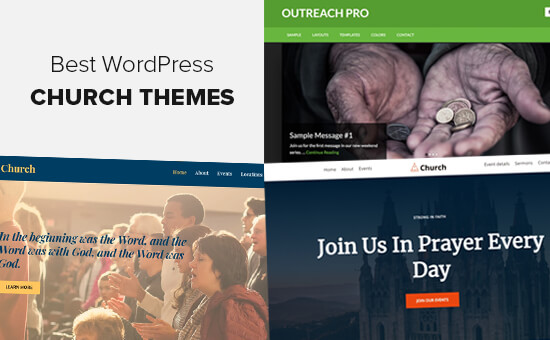
Best Church WordPress Themes

From a cost perspective, it’s the most affordable with the Bluehost web hosting offer that includes a free domain and free SSL.

You can also quickly add any feature like donations, sermons, contact form, photo galleries, membership, email marketing and so much more with popular WordPress plugins.

To create your church website, you can follow our step by step guide on how to make a website with WordPress (video included).

If you want a WordPress alternative, then we recommend using Constant Contact’s website builder. The free plan lets you create a full website for your church even if you’re on a very tight budget. It seamlessly integrates with their marketing automation platform, so you can send email newsletters to your community members.

We hope this article helped you learn about the best church website builders. You may also want to take a look at our list of the best WordPress plugins for non-profits.

If you liked this article, then please subscribe to our YouTube Channel for WordPress video tutorials. You can also find us on Twitter and Facebook.

The post 9 Best Church Website Builders of 2020 (Easy for Beginners) appeared first on WPBeginner.


from WPBeginner https://ift.tt/3dHv3Mb
More links is https://mwktutor.com

Monday, 30 March 2020

Beginner’s Guide: How to Find Your WordPress Login URL

“How do I login to WordPress?” is one of the most common WordPress questions that we get asked.

Beginners often have a hard time finding their WordPress login page URL, and this prevents them from working on their website.

In this article, we will show you how to find your WordPress login URL. We’ll also show you different ways to log into your WordPress admin area.

How to find the WordPress Login Page URL

Why do you need the login URL?

The login page is the door between your website and the management dashboard of your site also known as the admin area. Once logged in, you can create new posts, add new pages, change your design, add plugins, etc.

Video Tutorial

If you prefer text instructions, then please continue reading.

How to Find the WordPress Login link?

On a typical WordPress install with a good WordPress hosting provider, all you need to do is add /login/ or /admin/ to the end of your site URL.

For example:

www.example.com/admin/
www.example.com/login/

Don’t forget to replace example.com with your own domain name.

Both of these URLs will redirect you to the WordPress login page.

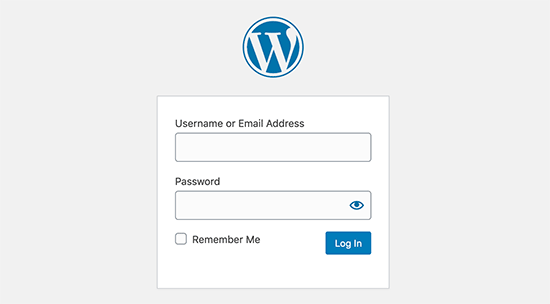
WordPress login page

If for some reason, your WordPress login URL is not working properly, then you can easily access the WordPress login page by going to this URL:

https://ift.tt/12fdRXe

Now if you installed WordPress in a subdirectory such as /wordpress/, then you would need to access your WordPress blog login page like this:

https://ift.tt/1us8E87
https://ift.tt/1us8E8a

If you installed WordPress on a sub-domain, then you can access the WordPress admin login page like so:

subdomain.example.com/login/
subdomain.example.com/wp-login.php

Once you are logged in, you will be redirected to the WordPress admin area of your site which is located in the wp-admin folder.

You can directly access your admin area by entering the website URL like this:

www.example.com/admin/
https://ift.tt/KOWx3o

This URL checks if you were previously logged in, and if your session is still active.

If both are true, then you will be redirected to the WordPress dashboard. If your session has expired, then you will be redirected back to the WordPress login page.

How to Remember the WordPress Login Page in WordPress

If you find it difficult to remember your WordPress login link, then we recommend you add a bookmark to your browser’s bookmark bar.

Alternatively, you can add your WordPress login link on your website footer, sidebar, or in the menu. There are two very easy ways to do this.

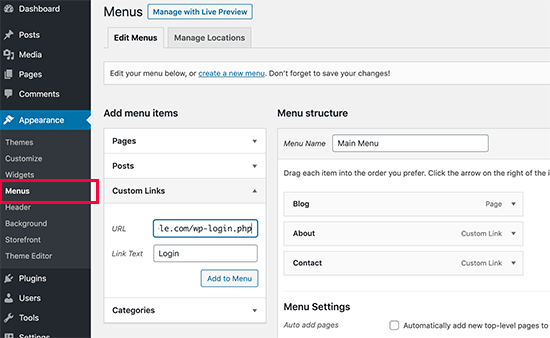
First option is adding your WordPress login link to your menus. Simply login to your WordPress admin area and go to Appearance » Menus.

Next click on the Link tab to expand it and add your WordPress login link and text. Once you are done, click on the Add to Menu button to add this link to your menu. Also don’t forget to click on the Save Menu button.

Add link to the login page in navigation menu

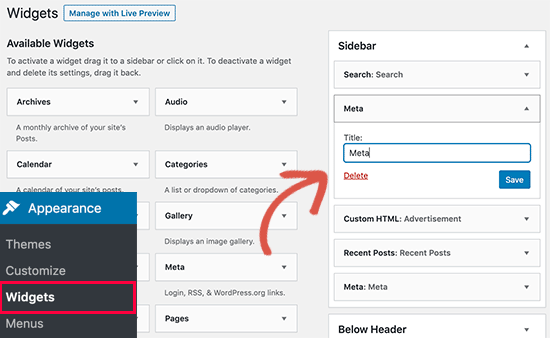
Second option is to use the default widget called Meta. This widget adds a link to the login page, links to your site’s RSS feeds, and a link to WordPress.org website.

Start by going to Appearance » Widgets and drag the meta widget to your website’s sidebar or widget-ready area. If you don’t want to use the Meta widget, then you can use the Menu widget here as well.

You can add the WordPress login link in the footer, sidebar, or basically any other widget-ready area in your theme.

Adding meta widget to WordPress sidebar

Use Remember Me to Bypass Login Page in WordPress

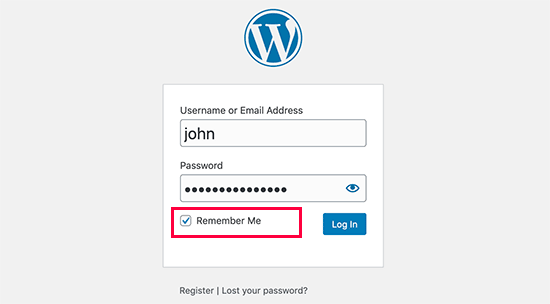
On your WordPress login page, there is a checkbox labeled Remember me. When you check this box before you login, it will allow you to directly access the admin area without a login on your subsequent visits for 14 days or your browser’s cookie settings.

Remember me checkbox

If you keep forgetting to check the ‘Remember me’ option during login, then you can install Always Remember Me plugin. It will automatically check the remember me checkbox every time you login to WordPress.

How to add A Custom WordPress Login Form in WordPress

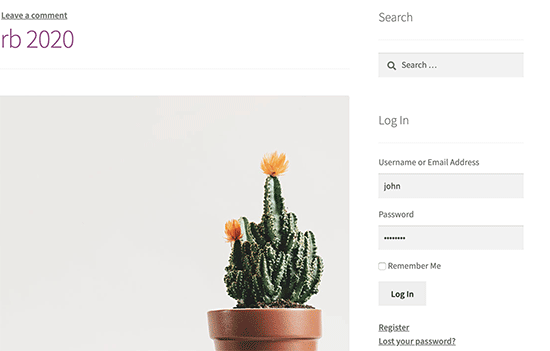
Sidebar login form

If you have multiple users on your WordPress site, then it makes sense to add the WordPress login form in your sidebar or create a custom login page that matches your site’s design and theme.

There are multiple ways to do that, but we recommend using Theme My Login plugin.

It allows you to create custom login pages and also comes with a sidebar login widget. You can simply add the widget to your website’s sidebar and it will display a login form.

You can also use WPForms to create your own custom login forms. It is the best WordPress contact form plugin and allows you to easily create login forms and add them anywhere on your website.

For detailed instructions, see our article on how to add front-end login page and widgets in WordPress.

Log in WordPress from Your Web Hosting Dashboard

Many WordPress hosting companies provide easy shortcuts to directly access your WordPress admin area and skipping the WordPress login page altogether.

Here is how to log into WordPress via popular hosting dashboards.

1. WordPress Login Shortcut in Bluehost

Bluehost is one of the biggest hosting companies in the world. They offer a beginner-friendly dashboard with quick shortcuts to manage your WordPress site.

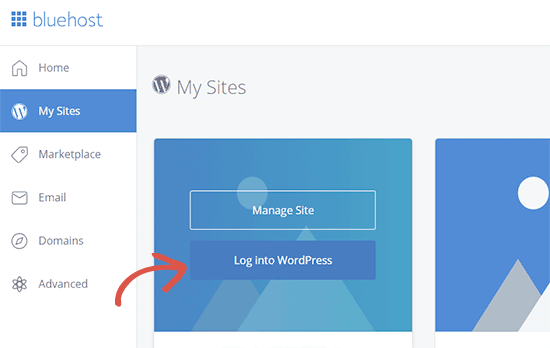
Simply login to your Bluehost dashboard and switch to the ‘My Sites’ tab. From here, you’ll see all the WordPress sites you have installed on your hosting account.

Log into WordPress

Take your mouse over to the site you want to log in and then click on the ‘Log into WordPress’ button.

2. WordPress Login Shortcut in SiteGround

SiteGround also has a quick shortcut to log into your WordPress site.

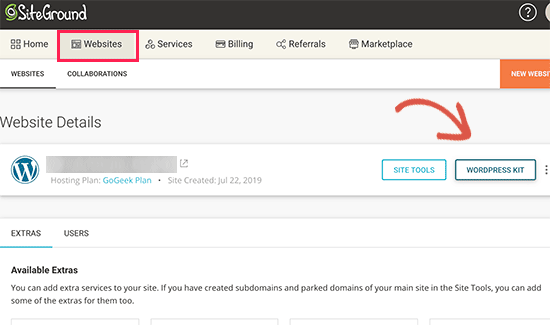
Simply log into your SiteGround hosting dashboard and then click on the ‘Websites’ tab on the top. From here, you’ll see a list of websites you have installed under your hosting account.

Click on the ‘WordPress Kit’ button next to the website you want to log in.

SiteGround dashboard

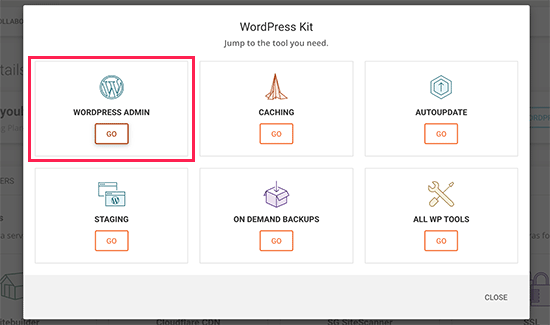
This will bring up a popup, where you’ll see a button to log in to the WordPress admin area.

SiteGround WordPress login button

3. WordPress Login Shortcut in WP Engine

WP Engine is the best managed WordPress hosting companies. They also have a WordPress login shortcut which sends you to the WordPress login URL but does not automatically log you in.

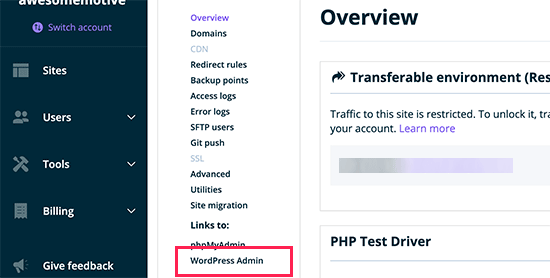
Visit your WP Engine dashboard and then select your website. On the site overview page, you’ll see the WordPress login page shortcut in the left column.

WP Engine WordPress login shortcut

Further WordPress Login Customizations and Resources

We have written a great deal of articles about WordPress login customization and fixing common errors.

If you are looking to create a custom WordPress login page with your branding, then check out our guide on how to customize WordPress Login Page (no HTML/CSS required).

WordPress login forms can be abused by brute force attacks. If you are facing such attacks on your website, then you can add a CAPTCHA to WordPress login and registration form to protect your site.

Troubleshooting WordPress Login Errors

Sometimes, you may encounter weird errors related to the WordPress login page. We have covered several of them in details along with troubleshooting tips:

We hope this article helped you learn how to find your WordPress login link. You may also want to see our step by step WordPress security guide and our ultimate guide on how to speed up WordPress.

If you liked this article, then please subscribe to our YouTube Channel for WordPress video tutorials. You can also find us on Twitter and Facebook.

The post Beginner’s Guide: How to Find Your WordPress Login URL appeared first on WPBeginner.


from WPBeginner https://ift.tt/2Y6heC9
More links is https://mwktutor.com

15+ Ways to Prevent Burnout (Today and in the Future)

When you’re suffering from burnout, it can feel endless. You might feel like there is no cure for your exhaustion, like it is a permanent condition you must accept. But there are numerous ways to cope with burnout, heal from it, and even prevent burnout from happening again.

from CodeinWP https://ift.tt/2WUKxX2
More View at https://mwktutor.com
How to Create an Online Order Form in WordPress (Step by Step)

Several of our readers have been asking how to create an online order form, so customers can easily place their orders on the website.

If you’re running a business like a restaurant or a physical store, you might not want to create a whole online shop. However, you may want to offer an easy way for customers to order food or other goods for you to deliver.

In this post, we’re going to show you how to create an online order form in WordPress. This will allow you to easily collect customer orders without adding a full-fledged eCommerce software to your website.

Creating an online order form in WordPress

Creating an Online Order Form in WordPress

Perhaps you decided to start a website for your business recently, and you’re feeling a bit overwhelmed.

Many businesses start an online store to not only collect orders but also accept payments and manage inventory. However, not all businesses need a complete eCommerce website.

If you only want customers to be able to fill an online order form, then you can create that much easily without a shopping cart solution.

A simple online order form gives you the option to either accept payments online, upon order pickup, or on delivery.

In this tutorial, we will be using WPForms to create an online order form because it allows you to do that easily with their drag & drop interface.

WPForms is the best WordPress form builder plugin on the market. Over 3 million websites use WPForms to easily create any kind of online form and add it to their website (no coding skills required).

First, you’ll need to install and activate the WPForms plugin. Need help installing the plugin? See our guide on how to install a WordPress plugin for detailed instructions.

Plugins are like apps for your WordPress website. If you are new to WordPress, then take a look at our article on what are WordPress plugins and what you can do with them.

Once you have activated the WPForms plugin, you’ll see a new WPForms tab in the admin sidebar of your WordPress dashboard.

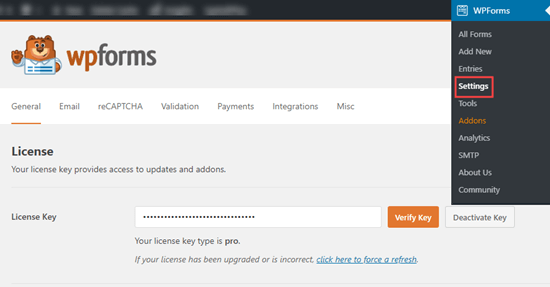
You need to visit WPForms » Settings page to enter your license key. You can find this information under your account on the WPForms website.

Enter your license key for WPForms

Now you are ready to create your online order form.

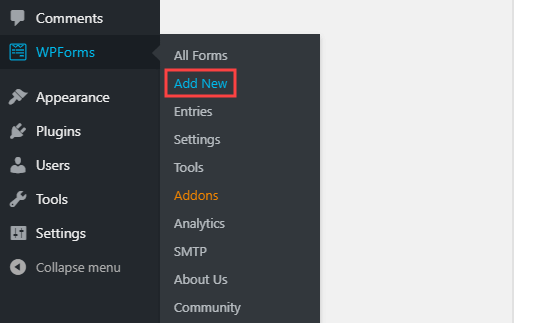
Simply head over to WPForms » Add New page to create your first form.

Creating a new form using WPForms

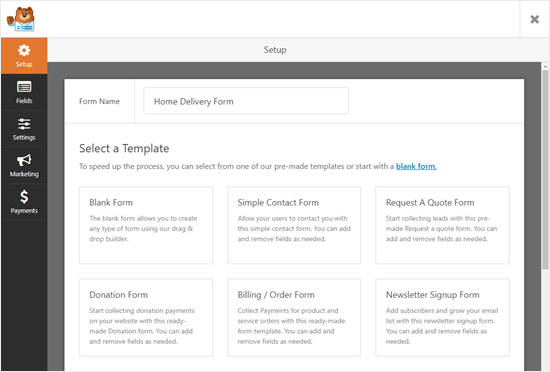
Now, you’ll see the form creation screen. Type in a name for your form and choose a template. We recommend the ‘Billing / Order Form’ template.

Select the 'Billing / Order Form' template to get started

Simply move your cursor over the template description and click the ‘Create a Billing / Order Form’ button.

Click on the 'Create a Billing / Order Form' button to create your form

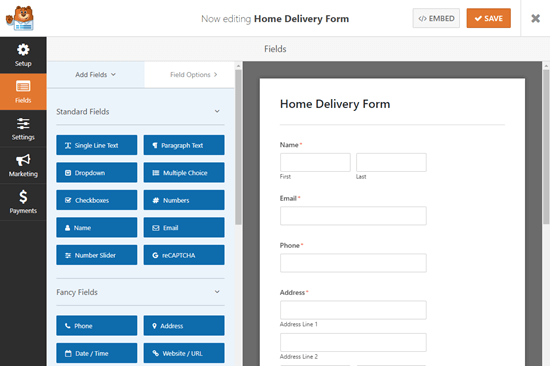
Your form will automatically be created for you, and you’ll be taken straight into the WPForms form editor.

Your newly created online order form

You can now edit your online order form however you want. The different parts of the form are called “fields”. You can change, add, or remove fields on your form with a single click.

The default template already includes fields for most of the information you’re likely to need, such as name, address, and phone number. However, you’ll need to list your actual products.

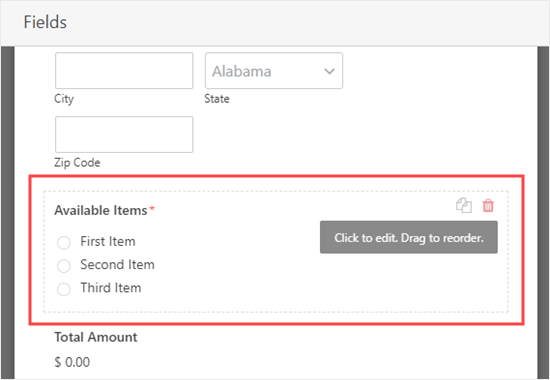
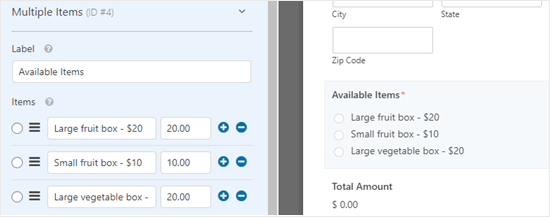
Click on the ‘Available Items’ field to edit it.

Editing the 'Available Items' field of your online order form

Type in the name and price of each of the items that customers can order from you. The price won’t automatically display on the form, so you may want to add this into the item name.
Editing the 'Available Items' field to change the names of the items

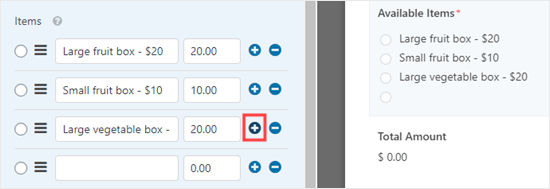
To add more options, simply click the (+) icon wherever you want to add the extra items.

Adding more items to your online order form

Note: You can add as many items as you want. However, customers will only be able to select one option from this field.

If you have several categories of options, then you may want to copy the field to create groups.

You can copy the ‘Available Items’ field by clicking the ‘Copy’ icon that appears when you run your cursor over it, or when it’s selected.

Copy the 'Available Items' field to create a new field on your order form

Make sure you change the ‘Label’ of the fields to something appropriate to each group, too.

If you want customers to be able to select two or more options within a single field, you’ll need to use a different type of field.

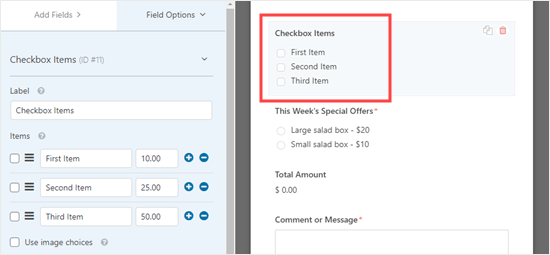
Click on the ‘Add Fields’ tab then scroll down to ‘Payment Fields’ where you’ll find a ‘Checkbox Items’ field. Drag and drop this into position on your form.

Adding a checkbox field so customers can select multiple items at once

You can now edit that field as before, entering names and prices for your items. Customers can check as many items as they want to order.

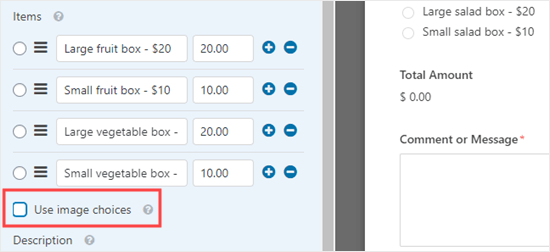
If you want to show images of your products, that’s really easy too. Simply click the ‘Use image choices’ box:

Adding images of your products to your online order form

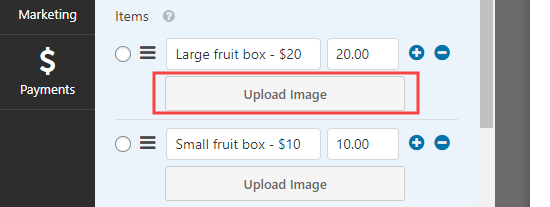
For each item, click the ‘Upload Image’ button to add images either from your computer or from your WordPress Media Library.

Uploading an image for a product that you offer

Your images won’t be resized or compressed by WPForms, so it’s important to upload them at the right size. They should all be the same size and no more than 250×250 pixels.

Ideally, you should also optimize your images for the web.

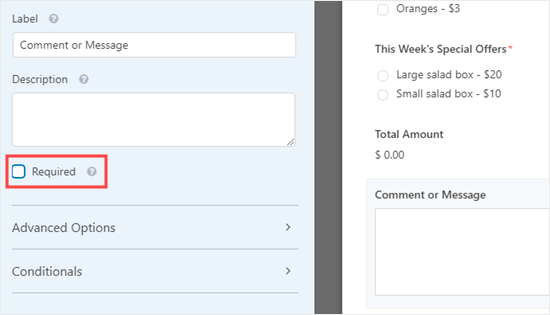
Finally, you may want to edit the ‘Comment or Message’ field at the bottom of the form, so that it’s not required. Not all users will want to add a message.

Simply click on the field and then uncheck the ‘Required’ box on the right to make this field optional.

Making the 'Comment / Message' field optional rather than required

You can follow this process for any field that you want to be optional. You can tell which fields are required because they’ll have a red asterisk next to the field’s label.

Once you’re happy with the design of your form, you can move on to configuring its settings. It’s a good idea to save the form first by clicking the ‘Save’ button at the top of the screen:

The WPForms 'Save' button appears is on the top right of your screen

Configuring the Notifications Your Order Form Will Send Out

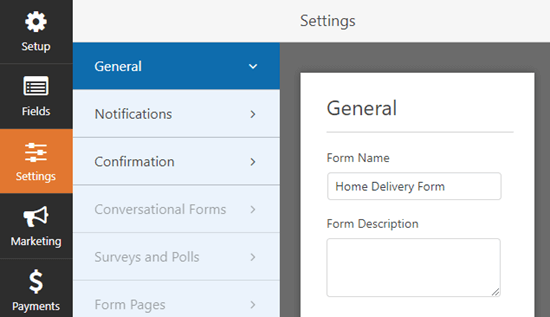
First, click the ‘Settings’ tab on the left-hand side of your screen. This will open up your form’s settings.

The 'Settings' tab in WPForms

Next, click the ‘Notifications’ tab to change your form’s email notifications. By default, completed order forms will be emailed to the admin address for your WordPress site.

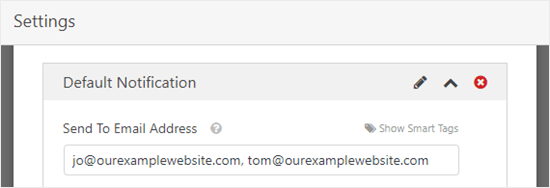
You may want to change this or have the order forms copied to more than one address. You can simply type the email address or addresses in the ‘Send To Email Address’ box. If you’re entering more than one email address, separate them with a comma.

Enter the email addresses you want the form to be sent to, separated with commas

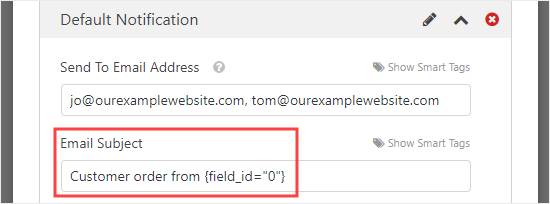
You might also want to change the subject line, so that it’s not the same for every order. This could make it easier to keep track of orders in a crowded email inbox.

Here, we’ve changed the subject line of the emails to read “Customer order from” and then the customer’s name. We used ‘Show Smart Tags’ to insert the name field in the subject line.

Changing the subject line on the notification email to add the customer's name

You can change any other details you want too.

We also strongly recommend setting up an email notification for your customers. This gives them a reminder of what they’ve ordered and lets them know that you’ve received their order.

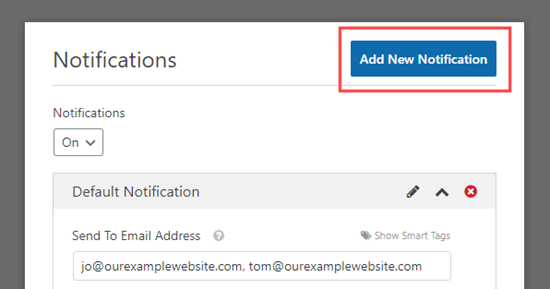
To set up a new email notification, click the ‘Add New Notification’ button.

Click the 'Add New Notification' button to create a new notification

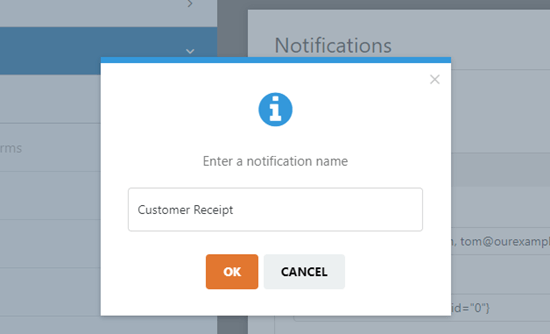
You’ll be prompted to type in a name for the new notification. You can call it whatever you want, as customers won’t see this name. We suggest something like ‘Customer Receipt’ or ‘Customer Email Confirmation’.

Entering a name for the notification that'll be sent to the customer

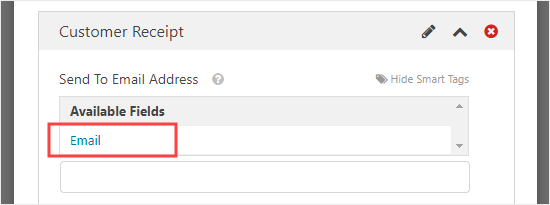
You’ll want the ‘Send To Email Address’ to be your customer’s email account. Delete {admin_email} from this box. Click the ‘Show Smart Tags’ and select the ‘Email’ field.

Setting up the customer receipt so that it will be emailed to the customer

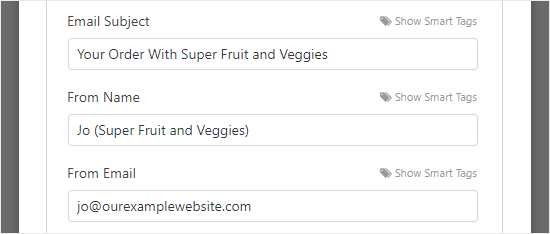
You’ll also want to enter other details for the email. We suggest using a subject line such as “Your order with” and the name of your company.

Entering the 'From' name and email address for the customer's receipt

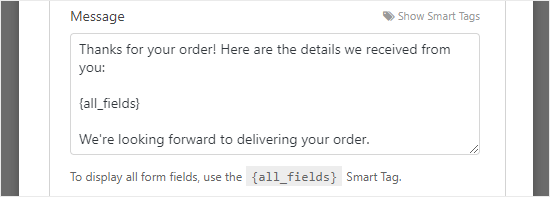
In the ‘Message’ field, you’ll probably want to add a message to your customer. The {all_fields} tag will give all the information the customer entered on the form.

Editing the email address that your customer will receive

What if you only want to include some of the customer’s information in the email? Or what if you want to put their order details first and include their delivery details at the end of the email? You can simply use Smart Tags to add any form fields into your form.

Once you’ve finished setting up the notifications, click the ‘Save’ button at the top of the screen.

Tip: To get back to the first notification you were editing, just scroll down the screen.

Setting the Confirmation Message for Your Customers

Along with sending your customers an email receipt, you’ll want to show them an on-screen confirmation, so they know that their order has been sent.

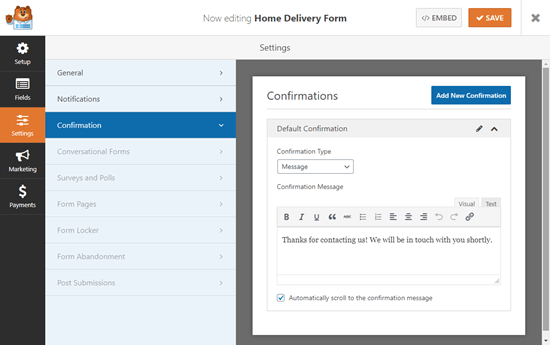
You can do this under Settings » Confirmation tab.

The default confirmation reads “Thanks for contacting us! We will be in touch with you shortly.”

Your online order form's default confirmation message

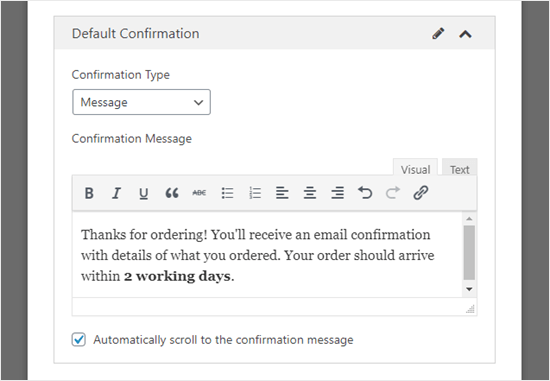
You can change this to anything you want, and you can use the visual editor here to format your text too.

Customizing the confirmation message that your customer will see on their screen

Alternatively, you can redirect customers to a “Thank you” page on your website, or even to another website altogether.

Once you’ve set up the confirmation message, click ‘Save’ at the top of the screen.

Integrating Payment with Your Order Form (Optional)

If you want to take payment through your order form, then you’ll need to integrate it with a payment processor.

WPForms integrates very easily with two popular payment processors, PayPal and Stripe. Customers can pay either through their PayPal account or by entering their credit card details.

We’re going to use PayPal in this tutorial, but the process for Stripe is similar.

First, you’ll need to exit the form builder. You can do this by clicking the ‘X’ at the top right. You’ll be prompted to save your form if you have unsaved changes.

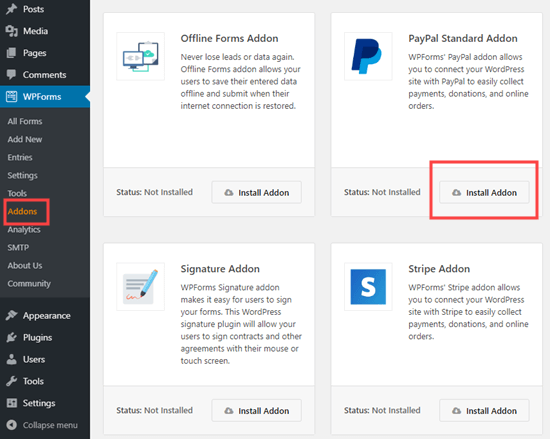
Next, go to WPForms » Addons page in your WordPress dashboard. Scroll down to the ‘PayPal Standard Addon’ and click the ‘Install Addon’ button beneath it.

Installing the PayPal addon for WPForms

The addon will then install and activate automatically.

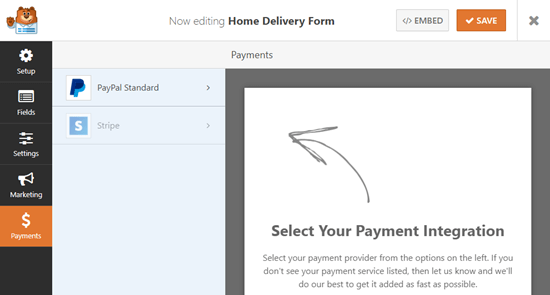
Go back to your form, which you can find under WPForms » All Forms. Now, click on the ‘Payments’ tab.

Select the payment service(s) to integrate with your form

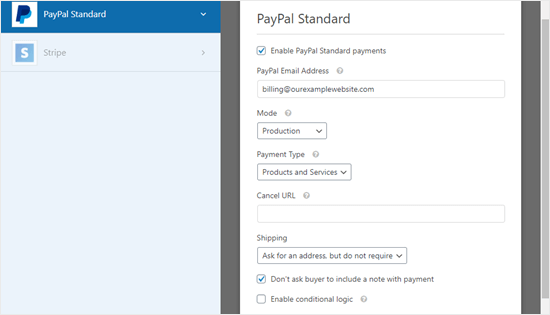
Click on ‘PayPal Standard’ then fill in the details of the form. First, you’ll need to check the ‘Enable PayPal Standard payments’ box and enter your business’ PayPal email address.

Leave the ‘Mode’ dropdown set to ‘Production’ and leave ‘Payment Type’ set to ‘Products and Services’.

The PayPal payment settings page for your form

If you’re collecting the delivery address through the order form, then you can change ‘Shipping’ to ‘Don’t ask for an address.’

You don’t need to enter a ‘Cancel URL’, but you may want to create a page on your website for customers to be sent to if they don’t complete the checkout process.

Click the ‘Save’ button once you’ve finished.

Now, when the user submits the form, they’ll be automatically directed to PayPal to pay. You don’t need to add any extra fields to your form or do anything else.

Adding the Order Form to Your Website

The final step is to add your order form to your website.

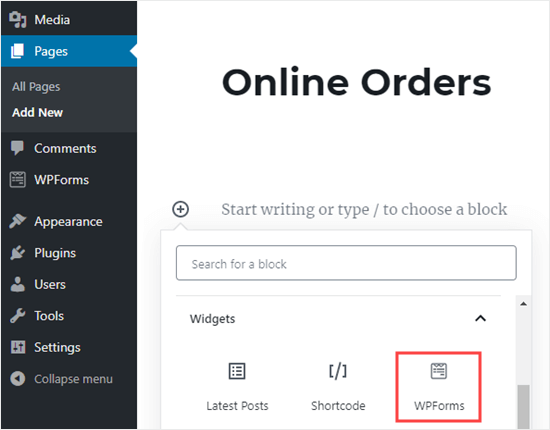
Simply choose the page you want to add your form to, or create a new page under Pages » Add New.

Next, click on the (+) icon to add a new block (wherever you want your form) and find the ‘WPForms’ block. It’s located under the ‘Widgets’ section of blocks, or you can simply type ‘WPForms’ into the search bar to find it.

Adding your online order form to a page on your website

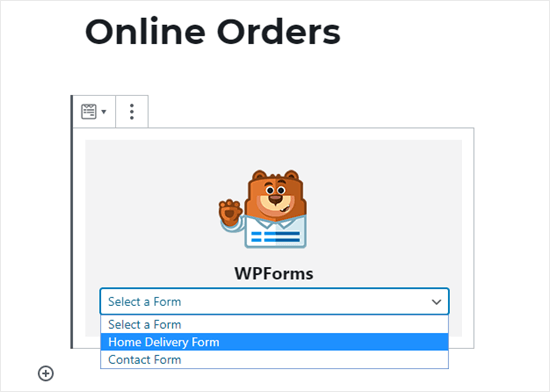
You’ll see a WPForms block. Click the ‘Select a Form’ dropdown and choose your form.

Selecting your online order form from the the WPForms dropdown list

You’ll then see a preview of the form itself in the WordPress editor.

When you’re ready, save and publish (or update) your page. You can view it live on your site to see your form in action. Before sharing it with customers, we recommend testing out the form to ensure that it works as you expected.

It’s also a good idea to check that you receive the email notification when the form is submitted. If not, check out our post on how to fix the WordPress not sending email issue.

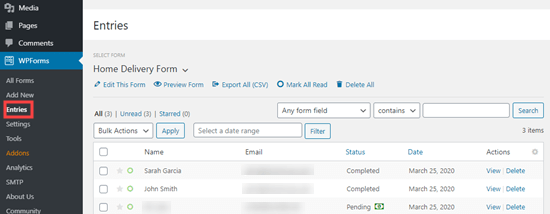
Even if you do miss an email or accidentally delete it, WPForms saves form data in the WordPress database. You can find all your orders by going to WPForm » Entries in your WordPress dashboard.

Click on the name of your form, and you’ll then see a list of entries. You can click ‘View’ next to any of these to see the details.

Viewing completed order forms in your WordPress dashboard

That’s it! We hope this article helped you learn how to create an online order form in WordPress. You might also like our guide on the best business phone services, and the must have WordPress plugins for small businesses.

If you liked this article, then please subscribe to our YouTube Channel for WordPress video tutorials. You can also find us on Twitter and Facebook.

The post How to Create an Online Order Form in WordPress (Step by Step) appeared first on WPBeginner.


from WPBeginner https://ift.tt/2JlzRJf
More links is https://mwktutor.com