Do you want to add text to speech feature in WordPress?
Text to speech feature allows you to add an audio version of your articles using artificial intelligence. This is particularly useful for long reads and helping users who prefer audio content while exercising or traveling.
In this article, we’ll show you how to easily add text to speech in WordPress.

What is Text to Speech in WordPress?
Text to speech is a technology that uses artificial intelligence to convert any text into natural-sounding speech. It is provided as a cloud-based service by several companies including Google Cloud and Amazon AWS.
You can add it to your WordPress website and allow users to listen to your articles. This is helpful for the visually impaired as well as many others who may find it easier to listen to a longer article instead of reading it on a smaller screen. Here’s an example of what it looks like:

For this tutorial, we will be using Amazon’s AWS Polly TTS (text to speech) service.
It offers a free-tier for 12 months with a very generous limit of up to 5 million characters per month for the first year. After that, the pricing begins at $4.00 per 1 million characters.
You’ll also have the option to save audio files to your website or Amazon S3 storage. This means you will not be reusing the API for every request.
If you are running a WordPress blog or a small business website, then you are less likely to run out of free credits.
With that said, let’s get started.
Setting up AWS Account for Text to Speech in WordPress
For this tutorial, you’ll need an Amazon Web Services account. Amazon offers a basic free plan for a year with generous limits. After that, you’ll be charged according to your usage.
First, you need to visit the Amazon Web Services website and sign up for a free account.

During the signup, you’ll be asked to verify your phone number and enter credit card information.
After that, login to your account dashboard called AWS console. From here, you need to create an IAM user and policy. This will be the user account with permission to make API calls from your WordPress website.
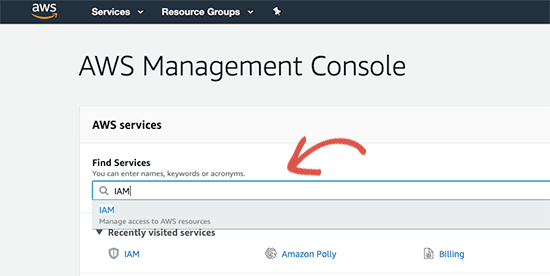
Simply search for IAM in the services search box and then select it.
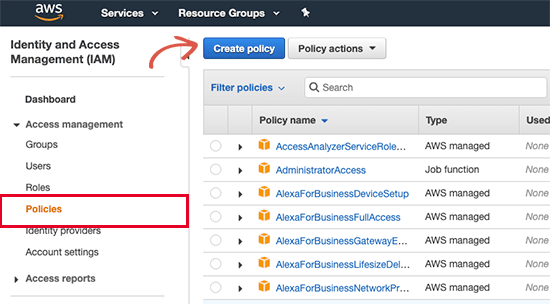
This will launch the IAM (Identity and Access Management) interface. From here, you need to switch to the ‘Policies’ tab and then click on the ‘Create Policy’ button at the top.
On the next screen, switch to the JSON tab and delete everything inside the text box. After that, copy and paste the following code inside the JSON box.
{
    "Version": "2012-10-17",
    "Statement": [
        {
            "Effect": "Allow",
            "Action": "acm:DeleteCertificate",
            "Resource": "*",
            "Condition": {
                "StringEquals": {
                    "aws:RequestedRegion": "us-east-1"
                }
            }
        }
    ]
}
It should look like this:
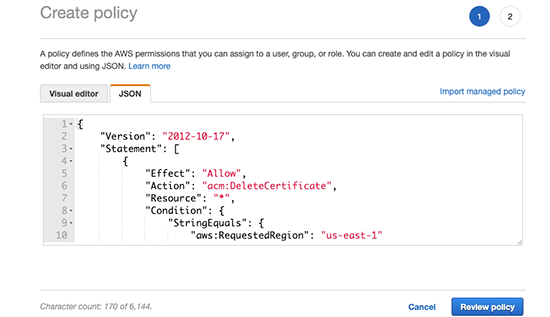
Next, click on the ‘Review Policy’ button to continue.
On the next step, you need to enter ‘AWSForWordPressDeleteCert’ in the Name field and click on the ‘Create Policy’ button to save your changes.
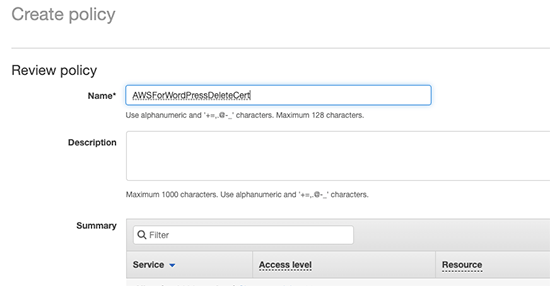
IAM will now save this policy in your AWS account.
Next, you need to create an IAM user account that will be used for your WordPress website.
From the IAM screen, switch to the ‘Users’ tab and then click on the ‘Add User’ button at the top.

On the next screen, you need to enter ‘AWSForWordPressPlugin’ as the user name and select ‘Programmatic Access’ under the access type.
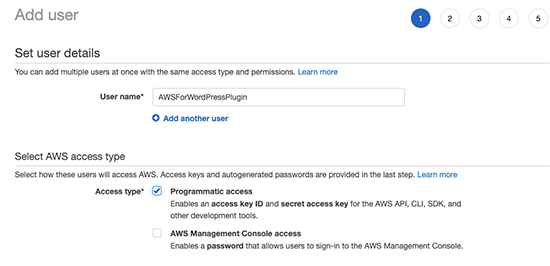
Click on the ‘Next: Permissions’ button to continue.
On the Set permissions page, select the ‘Choose Attach existing policies directly’ option and then type WordPress in the search bar.
Make sure to check the box next to AWSForWordPressPolicy and AWSForWordPressDeleteCert options.
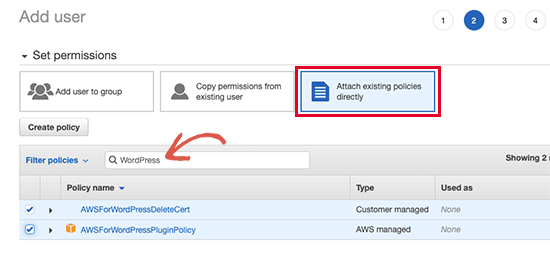
Click on the ‘Next:Tags’ button to continue.
You don’t need to add any tags here, go ahead and click on the ‘Next:Review’ button. You’ll now see user details and policies attached to the user account. Go ahead and click on the ‘Create User’ button to save your changes.
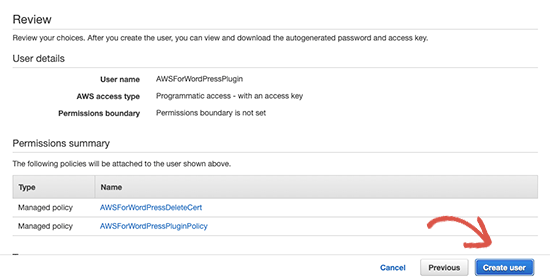
On the next screen, you’ll see your IAM user account details with Access and Secret Keys. You need to click on the Download.csv button to store these credentials on your computer.
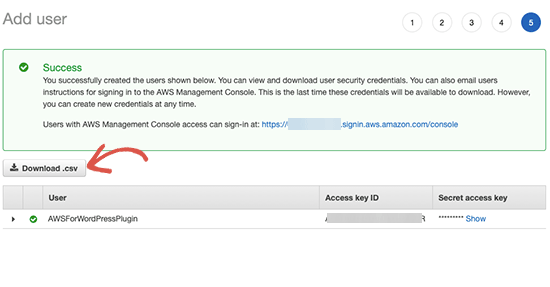
You can later open the CSV file in a spreadsheet app like Google Sheets or Microsoft Excel. You can also open it in a plain text editor like Notepad.
Setting up Amazong Polly Text to Speech in WordPress
Now that you have set up your AWS account, you can use it to connect your WordPress site to Amazon’s cloud platform.
First, you need to install and activate the AWS for WordPress plugin. For more details, see our step by step guide on how to install a WordPress plugin.
Upon activation, you need to visit AWS » General page and enter your AWS access and secret keys. You can find them inside the CSV file you downloaded earlier.
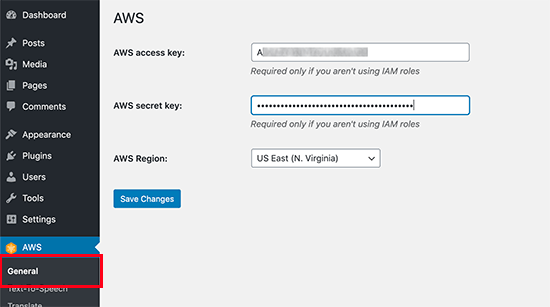
Don’t forget to click on the ‘Save Changes’ button to save your credentials.
Next, you need to visit AWS » Text-to-Speech page. From here, you can select the language of your content and then check the box next to ‘Enable text-to-speech support’ option.
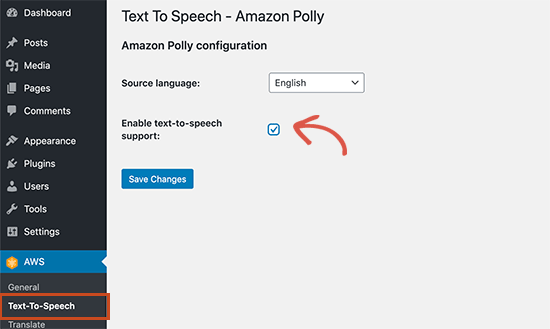
Don’t forget to click on the ‘Save Changes’ button to store your settings.
The plugin will now reload the text-to-speech settings page. You’ll now be able to see options to set up Amazong Polly text to speech on your WordPress site.
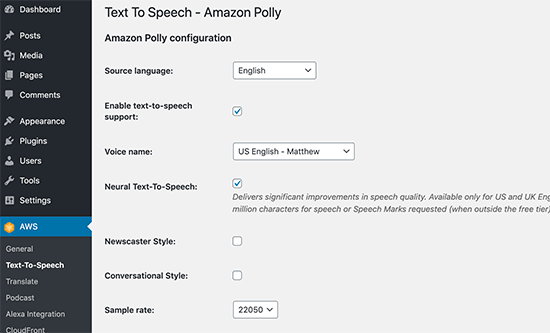
You can select the language, voice type, audio quality, narration style, and more.
Below that, you can select how you want to display the audio player. You can show it before or after the content.

Additionally, you can tell the plugin to automatically enable text-to-speech for newer articles. If you disable this option, then you will have to manually enable it for posts where you want to display text to speech option.
Scroll down further and you can choose where you would like to store the audio files. The plugin allows you to automatically store audio files on the Amazon S3 cloud storage (your free account gives you 5 GB of storage).
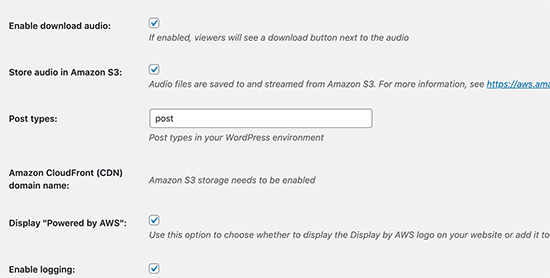
You can also store them on your WordPress hosting account, but this would slow down your website and also increase your WordPress backup size.
Once you are finished, don’t forget to click on the ‘Save Changes’ button to store your settings.
Displaying Text to Speech Player in WordPress Posts
Depending on your settings, the plugin will automatically display a text-to-speech audio player for newer articles.

For your older articles, you’ll have to edit the post / page and enable text to speech option located below the post editor.

Don’t forget to save / update your post and clear WordPress cache after enabling text to speech manually.
We hope this article helped you learn how to easily add text to speech to your WordPress site. You may also want to see our guide how to create an email newsletter to grow your traffic, and how to get a virtual business phone number for your website.
If you liked this article, then please subscribe to our YouTube Channel for WordPress video tutorials. You can also find us on Twitter and Facebook.
The post How to Add Text to Speech in WordPress appeared first on WPBeginner.
from WPBeginner https://ift.tt/39BapvG
More links is https://mwktutor.com
No comments:
Post a Comment