Are you looking for a way to filter products by attribute in your WooCommerce store?
Filtering your WooCommerce products by attribute makes it easier for customers to locate the item they want to purchase. It helps save customers’ time and makes the shopping experience more seamless.
In this article, we will show you how to use WooCommerce filter by attribute settings in your online store.

Why Filter WooCommerce Products by Attribute?
Filters make it super easy for customers to browse products in your WooCommerce store.
They allow shoppers to narrow down their search based on different attributes, including color, price range, fabric, size, and more. Rather than scrolling through your entire collection of products, users can simply browse the products they are interested in.

Adding filters can help enhance user experience, improve search functionality, and reduce bounce rates in your online store.
They can also increase sales by enabling customers to see all of the available options for the products they are interested in, helping them make more informed purchases.
That being said, let’s see how you can easily filter the products on your WooCommerce store. We will show you how to filter WooCommerce products by attribute and custom attribute.
How to Filter WooCommerce Products by Attribute
If you are looking for a quick and easy way to filter WooCommerce products, then this method is for you. We will show you how to set up a simple WooCommerce filter by attribute settings.
First, you need to install and activate the YITH WooCommerce Ajax Product Filter plugin. For more instructions, please see our step-by-step guide on how to install a WordPress plugin.
Note: There is also a free version of the YITH WooCommerce Ajax Product Filter plugin. However, we will be using the premium version of the plugin for this tutorial.
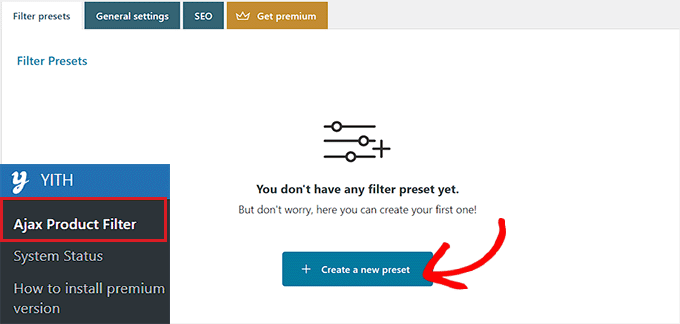
Upon activation, head to the YITH » Ajax Product Filter page from the WordPress admin sidebar.
From here, click the ‘+ Create a new preset’ button to start creating a filter preset.
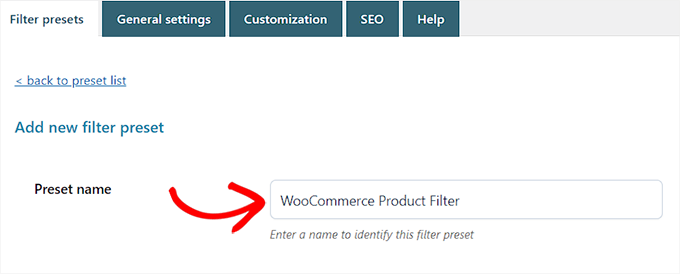
Once you are there, you can start by typing a name for the filter into the ‘Preset name’ box.
Keep in mind that the preset name won’t be displayed in your store and is only there for your reference.
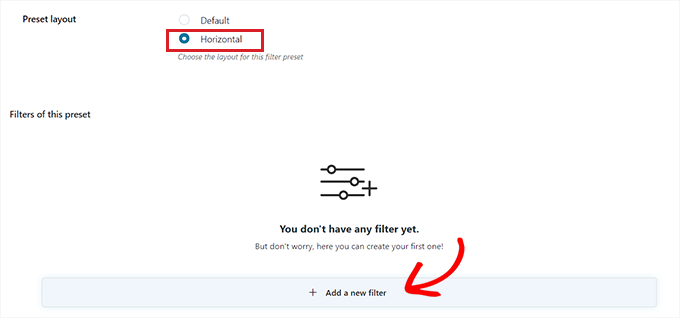
Next, simply choose ‘Horizontal’ as the preset layout and then click on the ‘+ Add a new filter button’ at the bottom.
If you are using the free version of the plugin, then this option won’t be available for you. Instead, you will have the ‘Default’ preset layout.
You can now start creating a filter for your WooCommerce products.
Create a Filter for WooCommerce Products
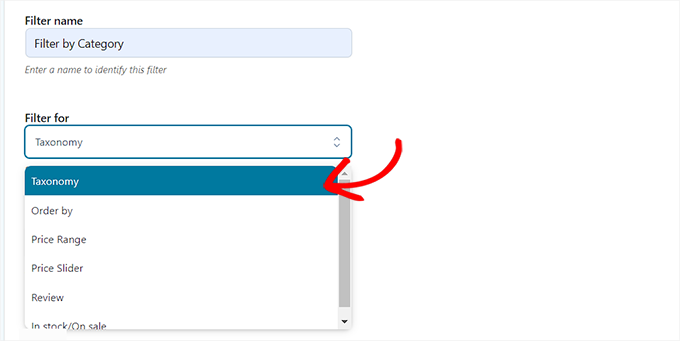
First, you will need to type a filter name next to the ‘Filter Name’ option.
For instance, if you are creating a filter that will help customers sort through product categories, then you can name it ‘Filter by Category’.
Next, you can select the parameters for the filter from the ‘Filter for’ dropdown menu. Keep in mind that the free version of the plugin only offers filters for product categories and tags.
To learn more about the differences between these options, you can read our guide on how to add tags, attributes, and categories to WooCommerce.
If you are creating a filter to sort products by different price ranges, then you must choose the ‘Price Range’ option. Similarly, if you want to sort products by popularity or average rating, then you need to choose the ‘Order by’ option.
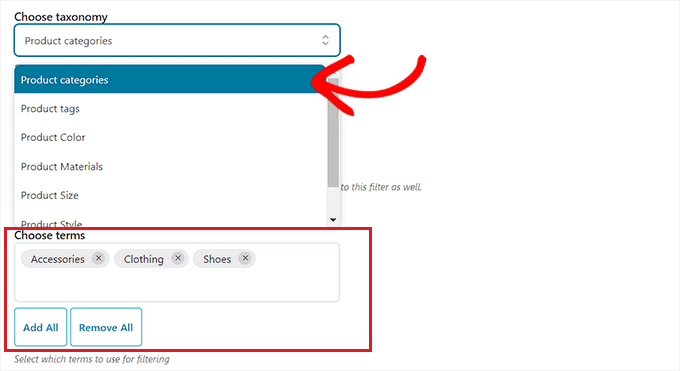
You can also choose the ‘Taxonomy’ option if you want to filter product tags, categories, colors, sizes, materials, styles, and more. For this tutorial, we will be going with this option.
After you have done that, you must choose from the taxonomy options for the filter. For instance, if you want to filter products by color, then you will need to choose that option from the dropdown menu.
As we are creating a filter for product categories, we will be selecting the ‘Product categories’ option.
Next, you must type all the product categories on your website in the ‘Choose Terms’ section.
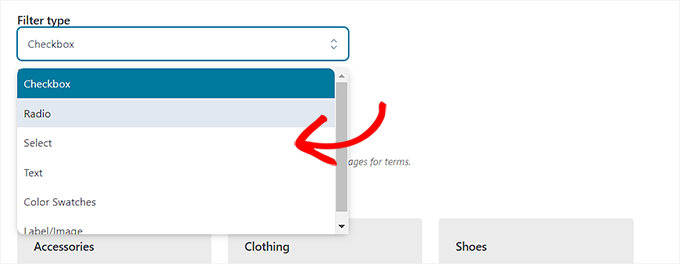
After that, you can choose how you want the filter to display on the front end of your store from the ‘Filter type’ dropdown menu.
You can display the filter as a checkbox, dropdown menu, text, color swatches, and more. For this tutorial, we will be choosing the ‘Select’ option to add a dropdown menu.
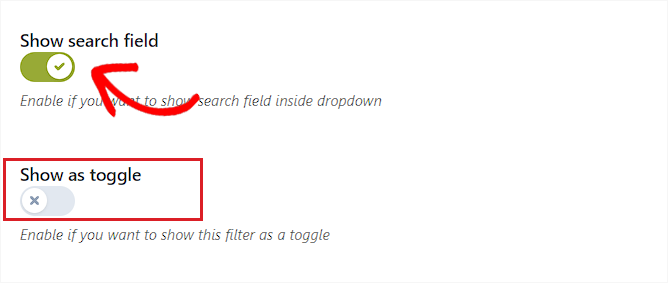
Next, you need to toggle the ‘Show Search Field’ switch if you want to enable a search box within the dropdown menu.
You can also display the filter you are creating as a toggle by activating the ‘Show as toggle’ switch. Then, customers will be able to toggle the filter on and off.
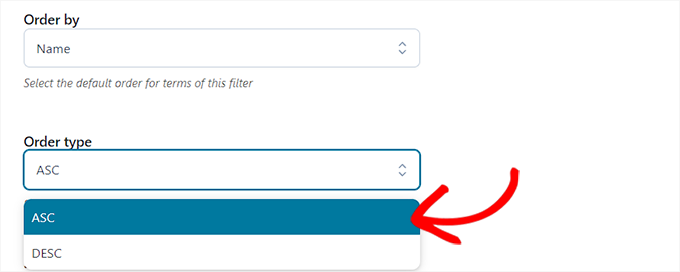
Once you have done that, just choose a default order for the filtered terms from the ‘Order by’ dropdown menu. The filter categories will be displayed in the order that you choose.
You can sort the filter categories using the name, term count, or slug. You can also choose the ‘Order type’ for the filtered terms in ascending (ASC) or descending (DESC) order.
Finally, click the ‘Save Filter’ button at the bottom to save your filter.
Now, repeat the process to create multiple filters.
After you have done that, go back to the top and switch to the ‘General Settings’ tab to configure some settings.
Configure the General Settings
Here, you have to start by choosing a ‘Filter mode’ option. You can select if you want to apply filters in real-time using AJAX or if you want to show an ‘Apply Filters’ button on your site.
Next, you must also make a choice between showing a save button or displaying filter results immediately.
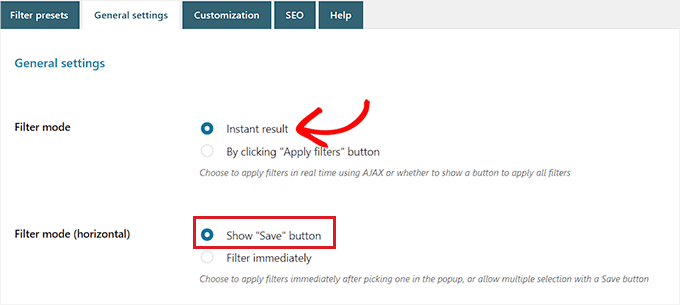
Once you have done that, choose if you want to show the filter results on the same page using AJAX or if you want to reload the results on a new page.
Next, you need to scroll down to the ‘Hide empty terms’ option and toggle the switch on if you don’t want to display filter terms that are empty.
For instance, if you have added a ‘Mugs’ category in your WooCommerce store, but it currently has no items in it, then it won’t be displayed in the ‘Filter by Category’ list.
After that, go ahead and toggle the ‘Hide out of stock products’ switch if you don’t want to display out-of-stock products in the results.
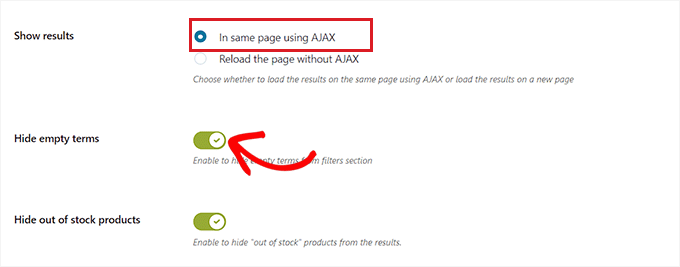
You can leave the other settings as default or configure them to your own liking.
After making your choices, click the ‘Save options’ button to store your changes and switch to the ‘Customization’ tab at the top.
Configure the Customization Settings (Premium Plugin Only)
Note: The ‘Customization’ tab won’t be available if you are using the free version of the plugin.
From here, you can choose your WooCommerce filter’s label style color, textual term color, color swatch size, filter area color, and more.
Adding colors can help your WooCommerce filter look more aesthetically pleasing and match your online store’s branding.
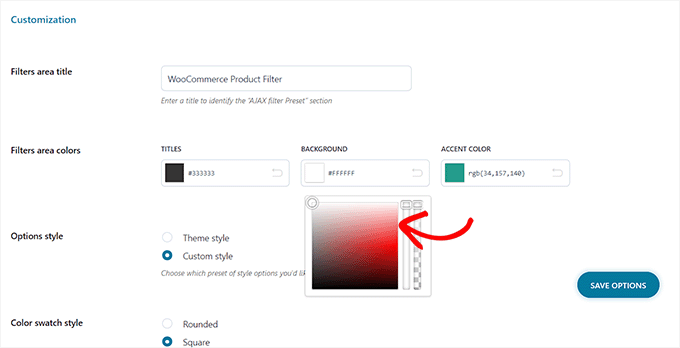
Once you have made your choices, click on the ‘Save Options’ button and switch to the ‘SEO’ tab from the top.
Configure the SEO Settings
Once you are there, toggle the ‘Enable SEO option’ switch to activate the settings.
Now you can add meta tags from the dropdown menu to use on your filtered pages. This will improve the SEO of your site.
For more details, you may want to read our article on WordPress metadata and meta tags.
You can also automatically add the nofollow attribute to all the filtered anchors by toggling on the ‘Add “nofollow” to filter anchors’ switch. This will tell search engines not to use the filter anchors when ranking your page.
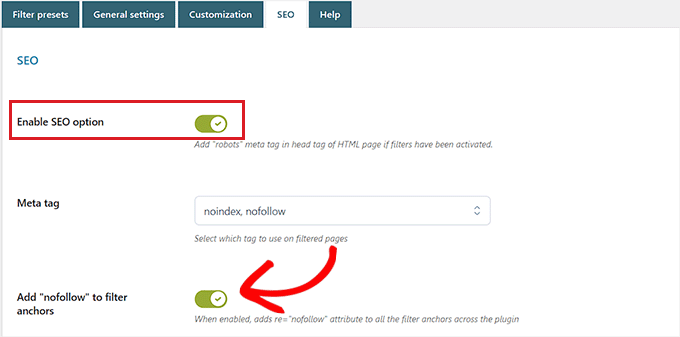
Once you are happy, click the ‘Save Options’ button to store the settings.
Add the WooCommerce Filter to the Products Page
To add the filters that you have just created to your WooCommerce products page, you need to switch to the ‘Filter presets’ tab from the top.
Once you are there, simply copy the shortcode of the filter preset that you just created.
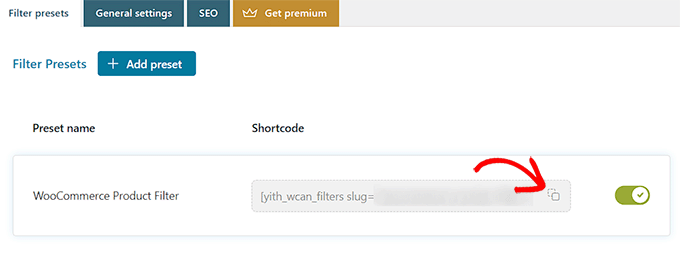
Next, simply open up your WooCommerce products page in the block editor from the WordPress admin sidebar.
Once you are there, click the Add Block ‘(+)’ button in the top left corner to find the Shortcode block.
Now simply paste the filter preset shortcode that you copied into the Shortcode block.
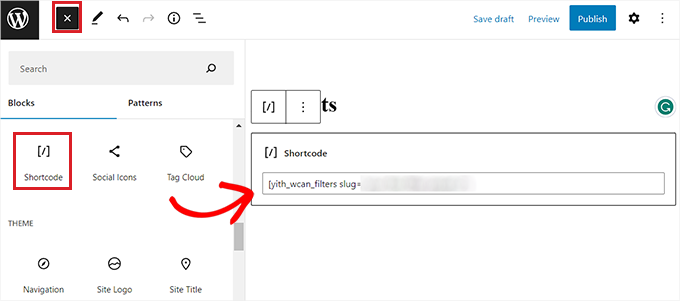
Finally, click on the ‘Publish’ or ‘Update’ button to save your changes.
You can now visit your website to see the WooCommerce filter by attribute feature in action.

How to Filter WooCommerce Products by Custom Attribute
If you want to create a WooCommerce products filter using custom attributes, then this method is for you.
Create a Custom Attribute
To create a custom attribute, you will need to visit the Products » Attributes page from the WordPress admin sidebar.
Once you are there, start by entering a name and slug for the attribute.
For instance, if you want to create a filter for a specific product material, then you can name the attribute ‘Filter by Material’.
Next, you must check the ‘Enable Archives’ box if you want to display all the items that share that attribute on a single page.
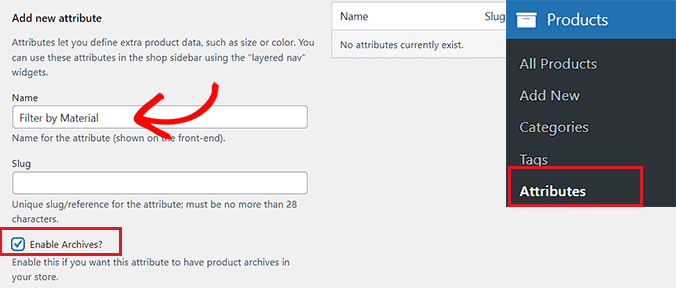
After that, click the ‘Add Attribute’ button at the bottom.
Once the attribute has been created, click on the ‘Configure Terms’ link to add terms to the attribute.
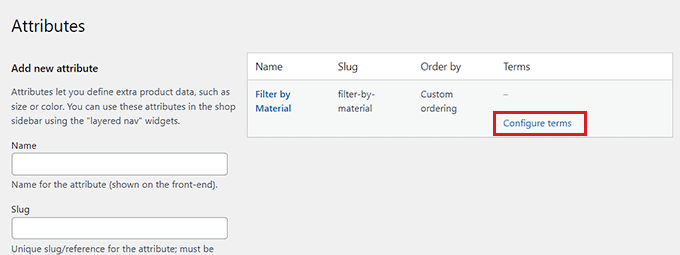
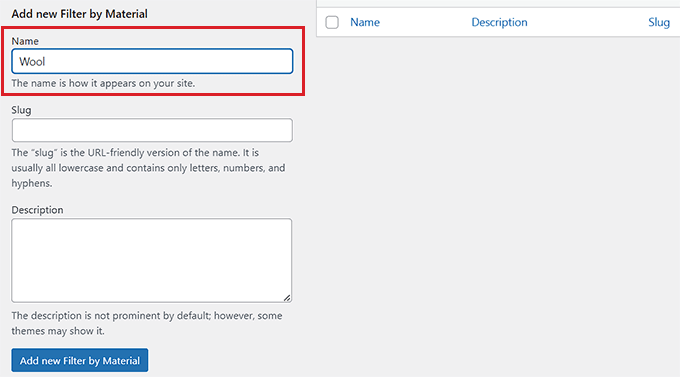
This will direct you to a new screen, where you must type a term into the ‘Name’ box.
For example, if you created an attribute called ‘Filter by Material,’ then you can add the individual materials as terms, such as wool. You can add as many terms as you want to an attribute.
Once you are done, click on the ‘Add new filter by Material’ button to save the term.
Add the Custom Attribute to a Product
After creating an attribute, you will need to add it to individual WooCommerce products.
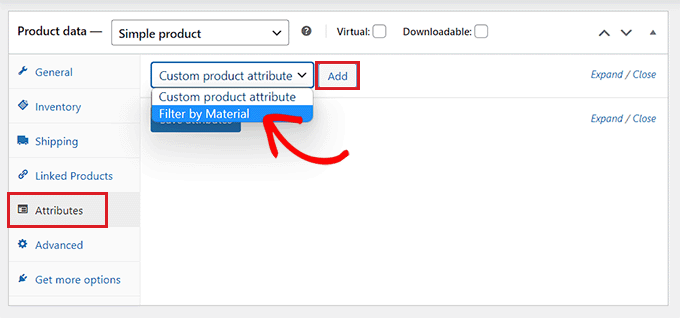
For this, you will have to open the product page that you want to edit. From here, scroll down to the ‘Product data’ section and switch to the ‘Attributes’ tab.
Next, simply open up the ‘Custom Product Attribute’ dropdown menu and select the custom attribute you just created.
Now, go ahead and click the ‘Add’ button.
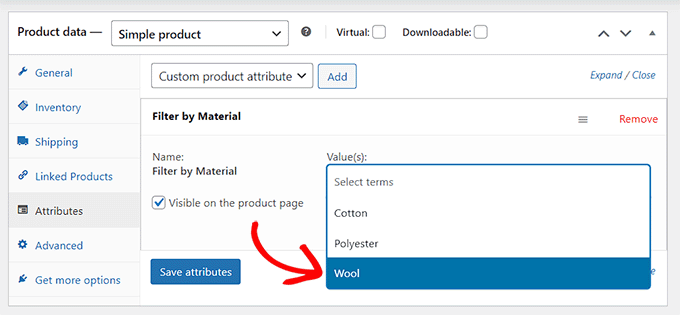
Now that the custom attribute has been added, simply search for the term that matches the product in the ‘Select Terms’ option.
For instance, if you created an attribute for material and the product you are editing is made of wool, then you will need to choose ‘Wool’ from the dropdown menu.
Once you are done, click the ‘Save attributes’ button.
Next, click the ‘Update’ or ‘Publish’ button at the top to save your changes.
You will now have to repeat the process for all the products that share the same attribute.
Create a Custom Attribute Filter Using a Plugin
Next, you will need to install and activate the YITH WooCommerce Ajax Product Filter plugin. For more instructions, please see our guide on how to install a WordPress plugin.
Note: You can use the free or premium version of the plugin to create a custom attribute filter for WooCommerce.
Upon activation, head to the YITH » Ajax Product Filter page from the WordPress admin sidebar.
From here, go ahead and click on the ‘+ Create a new preset’ button.

Next, you have to type a name for the preset that you are creating into the ‘Preset name’ box.
Once you are done, click the ‘+ Add a new filter button’ at the bottom to start creating a WooCommerce custom attribute filter.
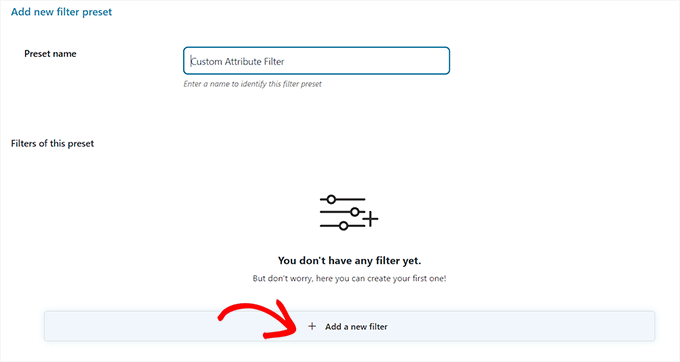
First, you will have to type a name into the ‘Filter Name’ box.
For example, if you are creating a filter that will help customers sort through different material options, then you can name it ‘Filter for Material’.
Next, simply select ‘Taxonomy’ from the ‘Filter for’ dropdown menu. If you are using the free version of the plugin, this option will be chosen for you by default.
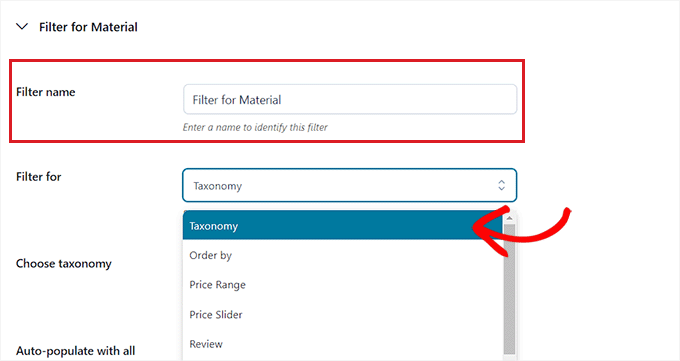
Now, the custom attribute that you created will already be available in the dropdown menu next to the ‘Choose taxonomy’ option.
Go ahead and choose the custom attribute from the dropdown list and type the attribute terms into the ‘Choose terms’ box.
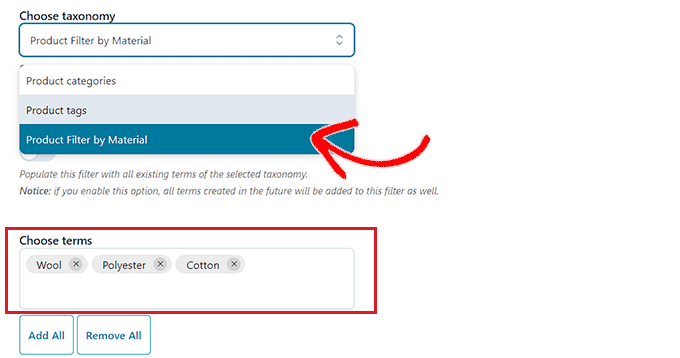
Next, you must choose how you want the filter to be displayed on the front end of your store from the ‘Filter type’ dropdown menu.
The filter can be displayed as a checkbox, dropdown menu, text, color swatches, and more.

Once you have done that, choose a default order for the filtered terms from the ‘Order by’ dropdown menu.
You can sort the filter categories using the name, term count, or slug. You can also select the ‘Order type’ for the filtered terms in ascending (ASC) or descending (DESC) order.

Finally, click on the ‘Save Filter’ button at the bottom to save your custom attribute filter.
Next, you need to switch to the ‘General Settings’ tab from the top. From here, you can choose a filter mode, hide empty terms, and configure other settings according to your needs.

Once you are done, click the ‘Save options’ button to store your changes and switch to the ‘Customization’ tab at the top.
Note: If you are using the free version, then the customization settings won’t be available.
From here, you can customize how your filter preset will look on the front end of your website.
For instance, you can choose the label style color, textual term color, color swatch size, filter area color, and more.

After you have made your choices, click on the ‘Save Options’ button and switch to the ‘SEO’ tab from the top.
From here, toggle the ‘Enable SEO option’ switch to activate the settings.
You can add robots meta tags from the dropdown menu to use on your filtered pages. This will improve the SEO of your site.

You can also toggle the ‘Add “nofollow” to filter anchors’ switch to automatically add the nofollow attribute to all of the filter anchors.
Once you are satisfied, click the ‘Save Options’ button to store the settings.
Add the Custom Attribute Filter to a WooCommerce Products Page
To add the custom attribute filter to a WooCommerce products page, you will need to switch to the ‘Filter presets’ tab at the top.
From here, copy the shortcode of the custom attribute filter.

Next, open up your products page in the block editor from the WordPress admin sidebar.
Here, click the Add Block ‘(+)’ button in the top left corner to find and add the Shortcode block.
After that, simply paste the filter preset shortcode that you copied into the block.

Finally, click on the ‘Publish’ or ‘Update’ button to save your changes.
You can now visit your website to see the WooCommerce custom attribute filter in action.

We hope this article helped you learn how to filter WooCommerce products by attribute and custom attribute. You may also want to see our article on how to add fuzzy search to your website to improve search results and our top picks for the best WooCommerce themes.
If you liked this article, then please subscribe to our YouTube Channel for WordPress video tutorials. You can also find us on Twitter and Facebook.
The post How to Filter WooCommerce Products (Step-by-Step Tutorial) first appeared on WPBeginner.
from WPBeginner https://ift.tt/3Yb2RNv
More links is https://mwktutor.com
No comments:
Post a Comment