Do you want to create a responsive slider for your WordPress website?
Sliders are commonly used on the front page of websites to showcase your most important products, services, testimonials or other content in an interactive way.
In this article, we will show you how to add a responsive slider to your WordPress website.
Why Add a Responsive WordPress Slider to your Website?
A slider or slideshow is a great way to highlight your most popular WooCommerce products, latest YouTube videos, customer reviews, and more.
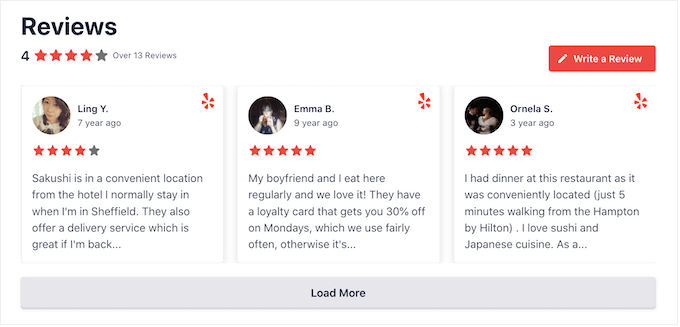
Some sliders autoplay, so they move between slides automatically. This allows you to display lots of information in a small space, which leaves plenty of room to show other content.
For this reason, many websites use sliders on their most important pages, such as a landing page, home page, or sales pages.
Even if a slider is set to autoplay, visitors can typically move between slides manually by clicking on navigation buttons. In this way, a slider encourages visitors to interact with your site, which makes it more engaging.
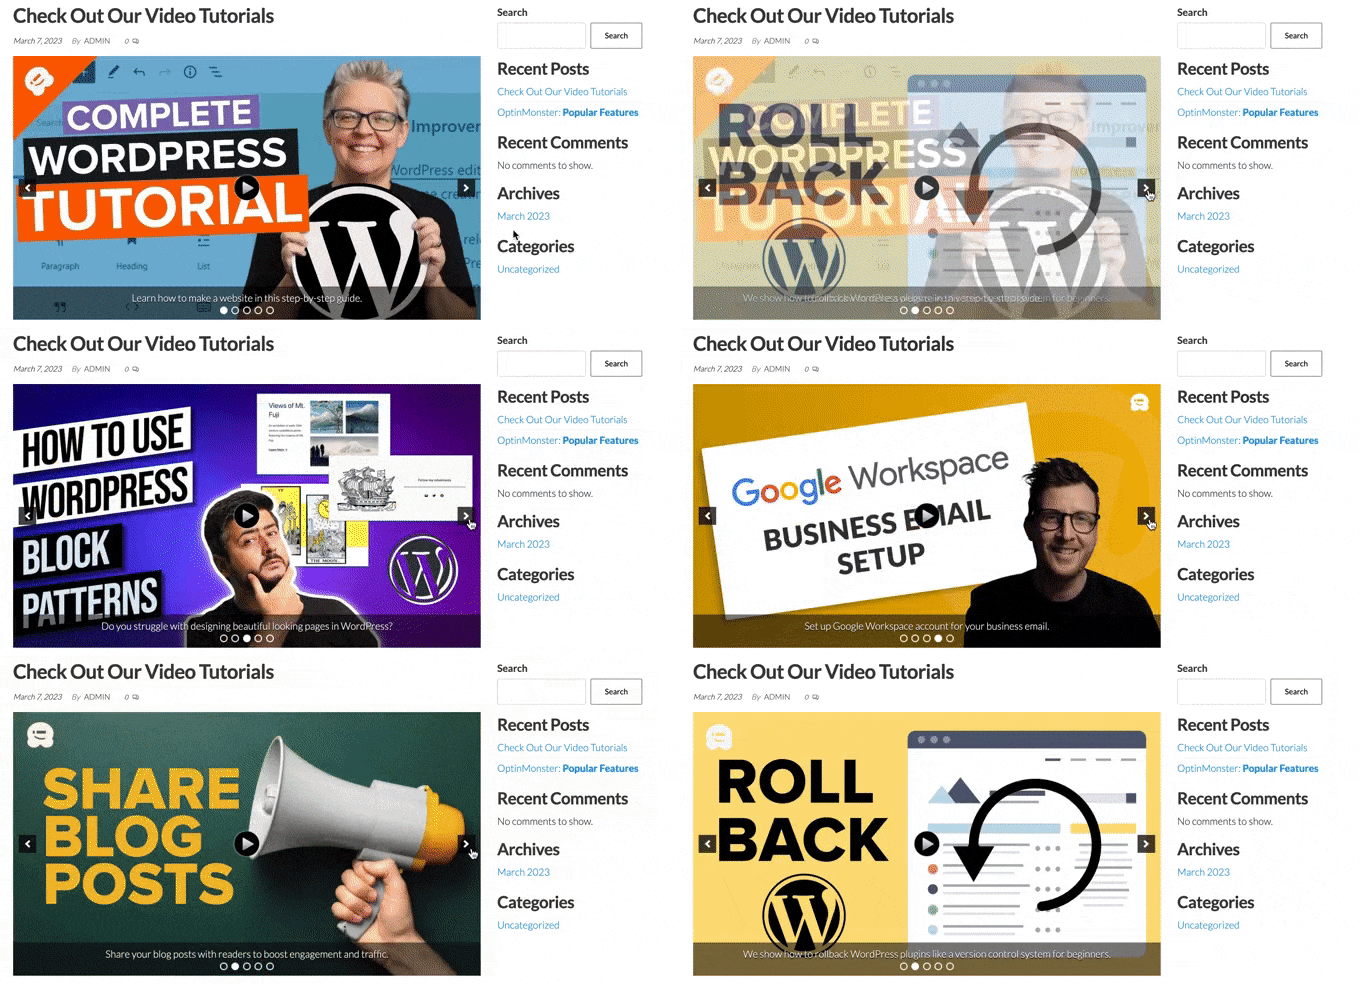
You can see in the GIF below how dynamic a slider can make a page.
With that said, let’s see how you can easily create a responsive slider in WordPress. Simply use the quick links below to jump straight to the method you want to use.
Method 1. Create a Responsive WordPress Slider Using a Plugin (Quick and Easy)
If you want to create a simple slider that looks good on desktop and mobile, then we recommend using the Soliloquy plugin.
This WordPress slider plugin lets you create slides using images from your media library and can also show videos hosted on third-party platforms like YouTube.
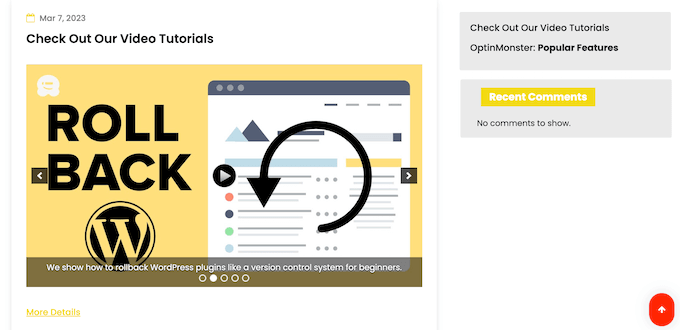
You can also add alt text and captions to each slide, which is great for WordPress SEO.
First, you’ll need to sign up for a Soliloquy account. After that, you can install and activate the Soliloquy plugin on your website. For more details, you can follow our guide on how to install a WordPress plugin.
Upon activation, go to Soliloquy » Settings in the WordPress dashboard and enter your license key.
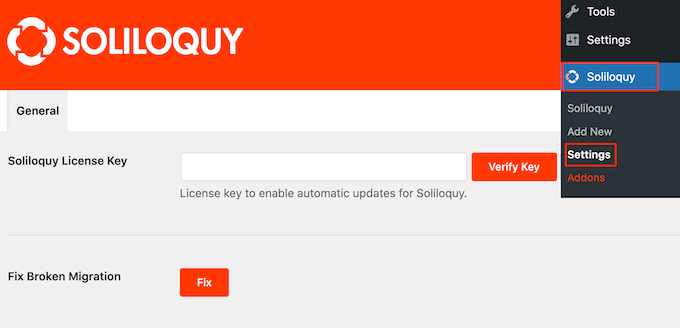
You can find the key by logging into your account on the Soliloquy website. After entering this information, click on the ‘Verify Key’ button.
With that done, you can add a new slider to your WordPress website by going to Soliloquy » Add New.
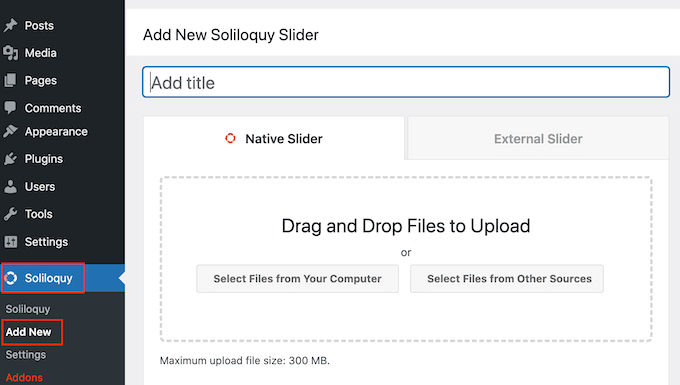
You can start by typing in a title. This is just for your reference so you can use anything that helps you identify the slider in your WordPress dashboard.
Next, it’s time to add images and videos to the slider. You can either drag and drop files onto the editor, or click ‘Select Files From Other Sources.’
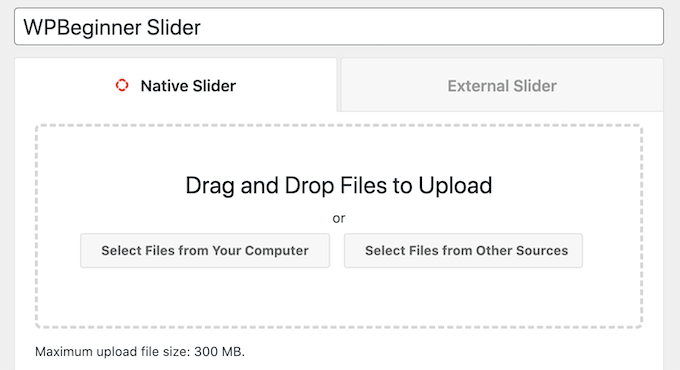
If you want to use images, then you can add those files in exactly the same way you add images in the WordPress block editor.
If you want to include videos, then we recommend uploading them to a video hosting site like YouTube or Vimeo. Uploading videos directly to your website is not a good idea, as it can slow down your website and take up a lot of storage.
Meanwhile, platforms like YouTube are optimized for video, so you can show high-resolution videos in your sliders without negatively affecting your website.
After choosing a video hosting platform, you’ll need to upload all the videos you want to include in the WordPress slider. If you’re not sure how to upload videos, then we recommend reading the official documentation or user manual for your chosen video platform.
With that done, simply click on the ‘Select Files from Other Sources’ button and then select ‘Insert Video Slide.’
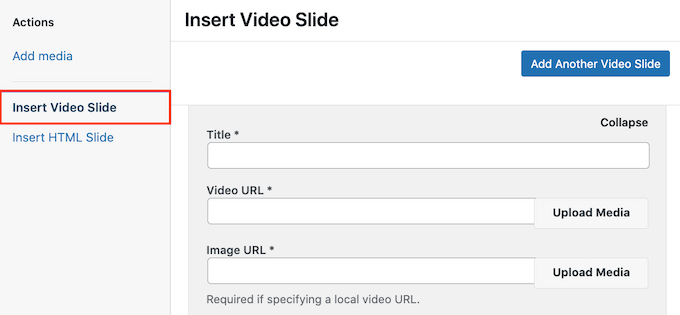
You can now go ahead and paste the video’s URL into the ‘Video URL’ field.
Soliloquy shows all the supported link formats along the right-hand side, so make sure your link uses one of these formats.
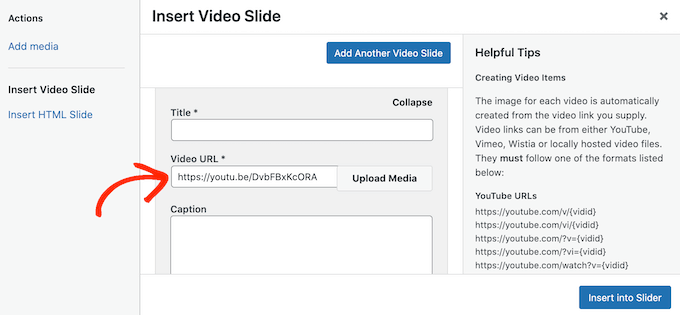
With that done, you can go ahead and type a title into the ‘Title’ field. This is just for your reference so you can use anything you want. You can also add alt text, which will help the search engines understand what this slide is all about.
After that, you can type an optional caption into the ‘Caption’ field. This will be shown in a grey bar along the bottom of the video before the visitor presses ‘Play.’
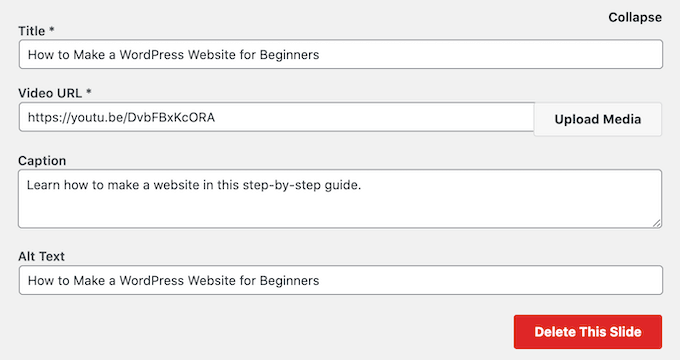
If you don’t want to show this bar, then simply leave the ‘Caption’ field empty.
When you’re happy with the information you’ve entered, you can create more slides by clicking on ‘Add Another Video Slide.’
To configure this new slide, simply follow the same process described above.
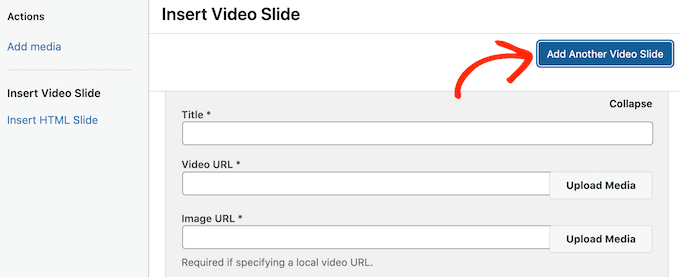
Once you’ve created all your slides, go ahead and click on ‘Insert into Slider.’
You’ll now see all your slides in the ‘Currently in Your Slider’ section.
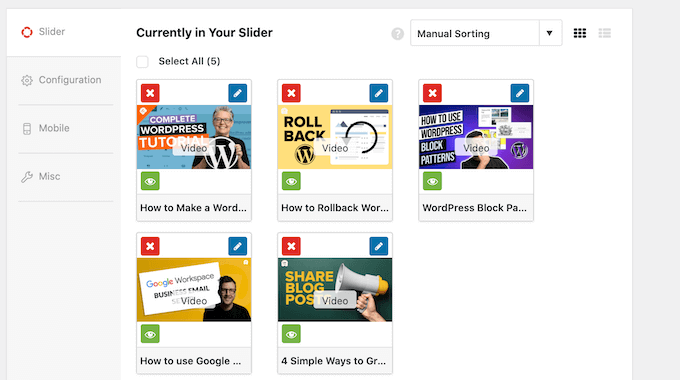
Next, you can click on the ‘Configuration’ tab and change the slider display settings. For example, there are options to choose a new slider theme, change the image size, and change the position of the slider and captions.
You can also customize the slider arrows and the pause/play button, adjust the transition speed, change the delay time, and more.
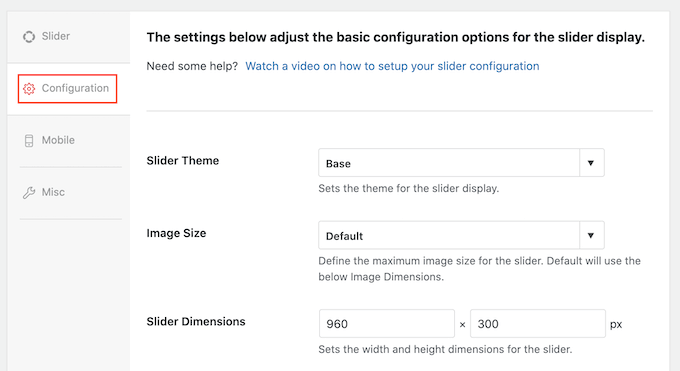
Next, you’ll want to make sure your slider looks just as good on mobile devices, as it does on computers and laptops.
That said, click on the ‘Mobile’ tab and check the box next to ‘Create Mobile Slider Images.’
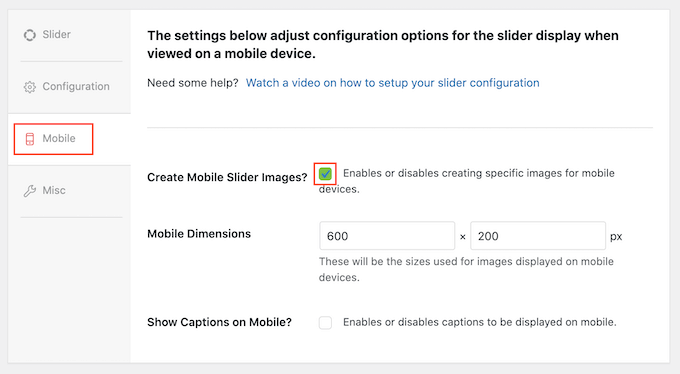
You can then type in the sizes you want to use for the images and videos on mobile devices. When making these decisions, it may help to view the mobile version of your WordPress site on desktop.
By default, Soliloquy will hide captions for mobile users. Often, this helps the slides fit more comfortably on the smaller screens typically used by smartphones and tablets.
For that reason, we recommend leaving this setting disabled, but you can check the box next to ‘Show Captions on Mobile’ if you prefer.
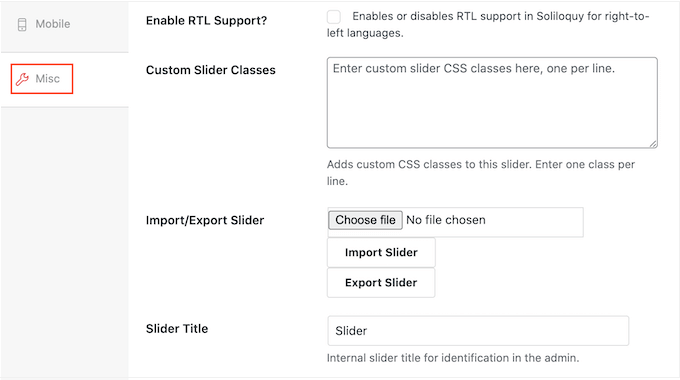
With that done, click on the ‘Misc’ tab. Here, you can add custom CSS to your slider, edit the slider title and slug, and export the slider.
When you’re happy with how the slider is set up, go ahead and click on the ‘Publish’ button.
Soliloquy will automatically create a shortcode that you can add to any page, post, or widget-ready area.
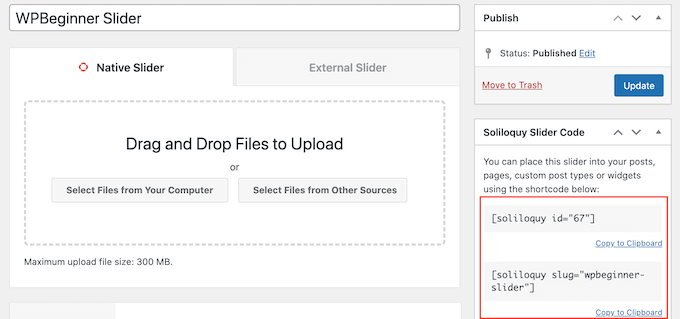
For more information on how to place the shortcode, please see our guide on how to add a shortcode in WordPress.
You’ll also notice some code snippets that you can add to your WordPress theme.
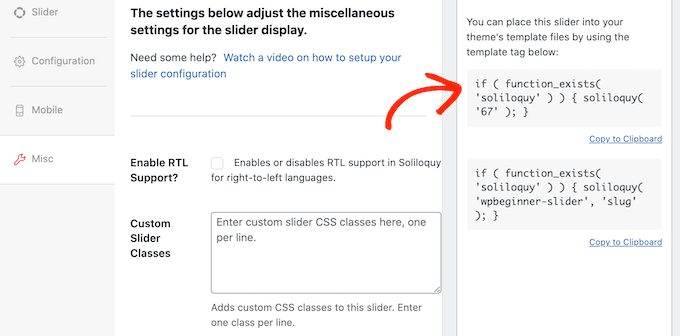
For step-by-step instructions, see our guide on how to easily add custom code in WordPress.
The easiest way to add the slider to your site is by using the Soliloquy block. Simply go to the page or post where you want to show the slider and then click on the ‘+’ button.
In the popup that appears, type in ‘Soliloquy.’
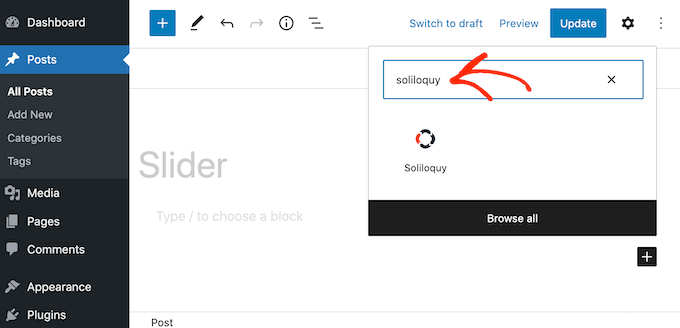
When the right block appears, click to add it to your WordPress blog or website.
After that, open the Soliloquy block and select the slider you just created.
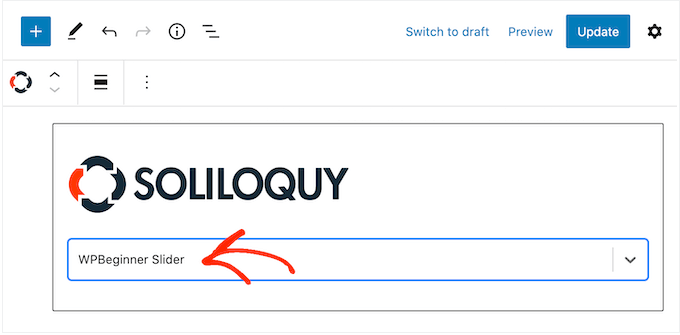
You can now click on the ‘Update’ or ‘Publish’ button to make the slider live.
Method 2. Create a Responsive Slider Using a Page Builder (More Customizable)
If you want to create a simple slider, then a plugin such as Soliloquy is a good choice. However, if you want to add an advanced slider to landing pages, custom home pages, or even your WordPress theme, then we recommend using a page builder plugin instead.
SeedProd is the best drag-and-drop WordPress page builder. It allows you to design custom landing pages and even create a custom WordPress theme without having to write a single line of code.
It also has an Image Carousel block that you can use to create stunning sliders.

You can simply drop this ready-made block anywhere on a page and then customize it using the powerful drag-and-drop editor.
First, you need to install and activate the SeedProd plugin. For more details, see our step-by-step guide on how to install a WordPress plugin.
Note: There is a free version of SeedProd that lets you create professional designs no matter what your budget. However, we’ll be using the premium SeedProd plugin since it comes with the Image Carousel block. If you’re creating a slider to promote your products or services, then the premium plugin also integrates with WooCommerce and all of the best email marketing services.
After activating the plugin, SeedProd will ask for your license key.
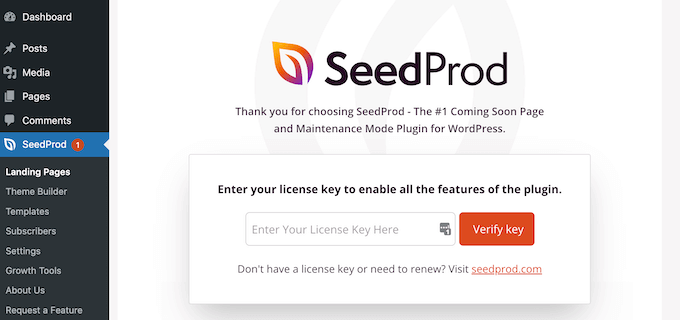
You can find this license key under your account on the SeedProd website. After entering the information, click on the ‘Verify Key’ button.
With that done, go to SeedProd » Landing Pages in your WordPress dashboard.
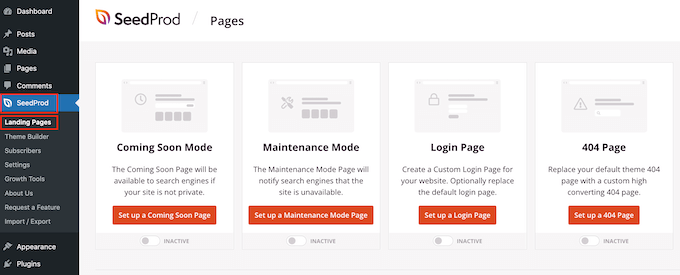
SeedProd comes with over 180 professionally designed templates that are grouped into categories. Along the top you’ll see categories that let you create beautiful coming soon pages, activate maintenance mode, create a custom login page for WordPress, and more.
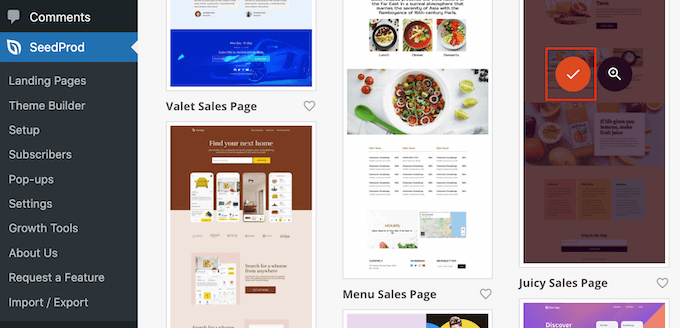
All of SeedProd’s templates are easy to customize, so you can use any design you want. When you find a template you like, simply hover your mouse over it and click on the checkmark icon.
You can now type a name for your landing page into the ‘Page Name’ field. SeedProd will automatically create a ‘Page URL’ using the page name.
It’s smart to include relevant keywords in this URL wherever possible, as this will help search engines understand what the page is about. This can often improve your WordPress SEO.
To change the page’s automatically-generated URL, simply type into the ‘Page URL’ field.
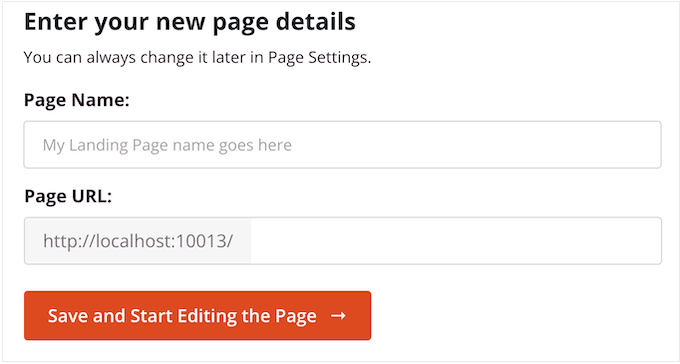
When you’re happy with the information you’ve entered, click on ‘Save and Start Editing the Page.’ This will load the SeedProd page builder interface.
This simple drag-and-drop builder shows a live preview of your page design to the right. On the left is a menu with all the different blocks and sections you can add to the page.
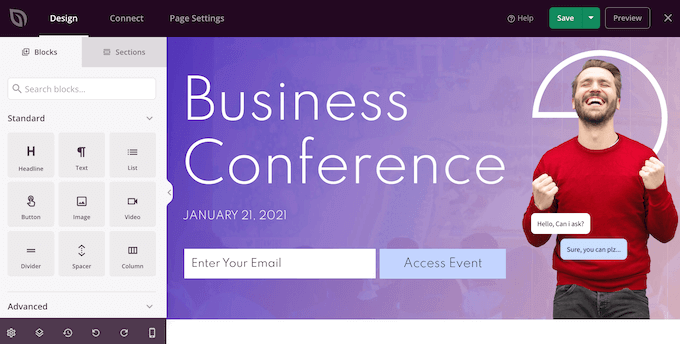
When you find a block you want to add, simply drag and drop it onto your template.
To customize a block, just click to select that block in the SeedProd editor. The left-hand menu will now update to show all the settings you can use to customize it.
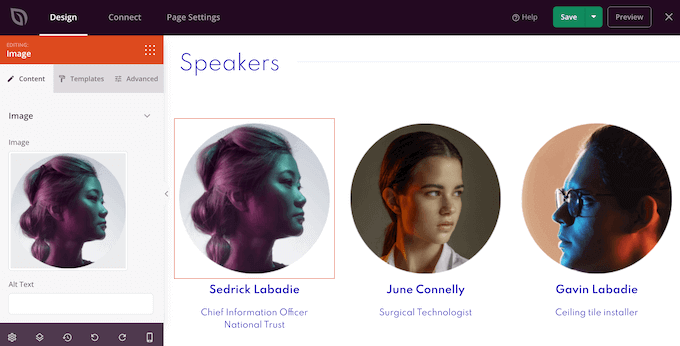
As you’re building the page, you can move blocks around your layout by dragging and dropping them. For more detailed instructions, please see our guide on how to create a landing page with WordPress.
To create a responsive slider using SeedProd, simply find the Image Carousel block in the left-hand menu and then drag it onto your layout.
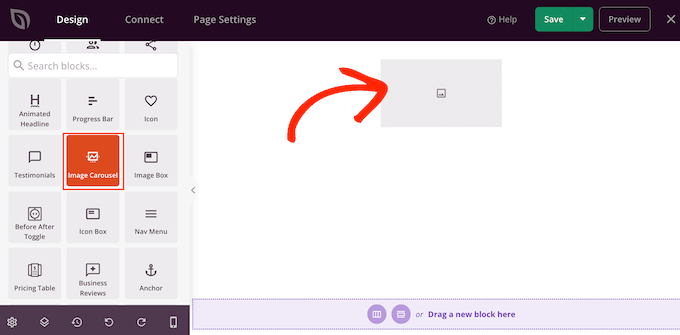
Next, click to select the Image Carousel block in the page editor.
You can now go ahead and add all the images you want to show in the slider. To start, click on the ‘Image 1’ item that SeedProd creates by default.
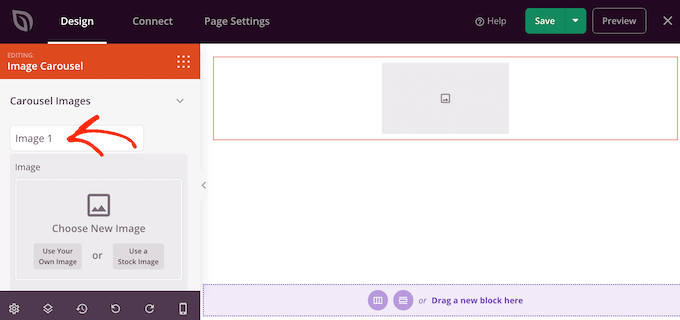
You can now either use a photo from SeedProd’s built-in library, or click on ‘Use Your Own Image’ and choose a file from the WordPress media library.
After choosing an image, you can add a caption that will appear below that image. SeedProd doesn’t display captions by default, but we’ll show you how to enable them later in this post.
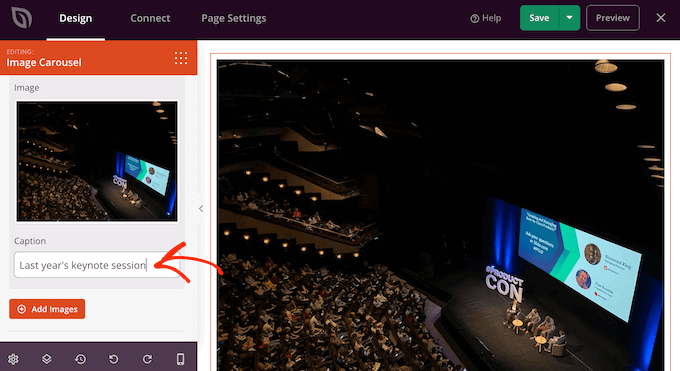
When you’re happy with how the slide is configured, click on the ‘Add Images’ button to create another slide.
To add more slides, simply follow the same process described above.
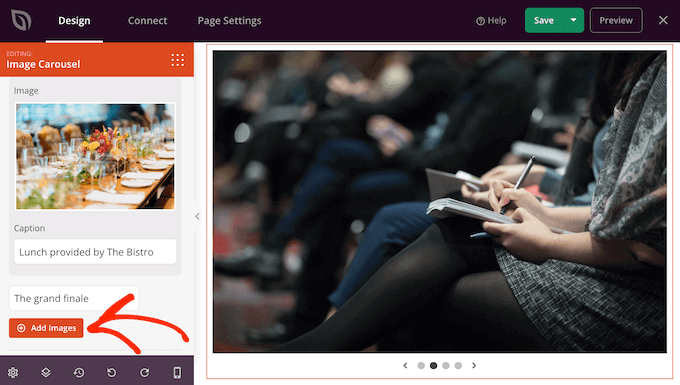
After adding all the images to your slider, it’s time to customize how that slider looks and acts.
In the left-hand menu, click to expand the ‘Carousel Settings’ section.
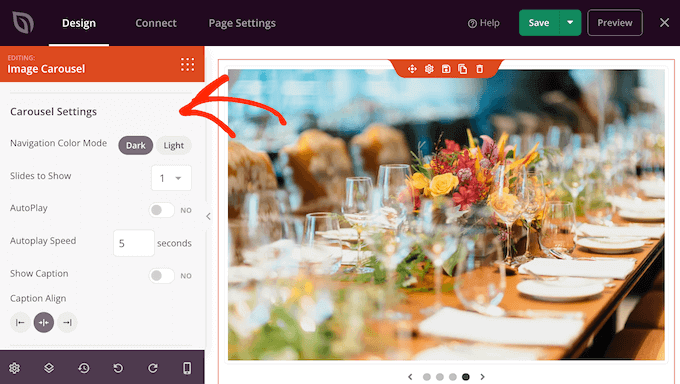
To start, you can switch between light and dark modes for the slider’s navigation buttons.
To try these different modes, click on the buttons next to ‘Navigation Color Mode.’ The live preview will update automatically so you can see which mode you like the best.
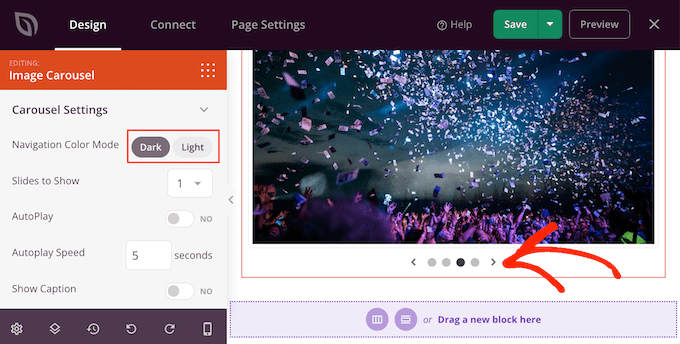
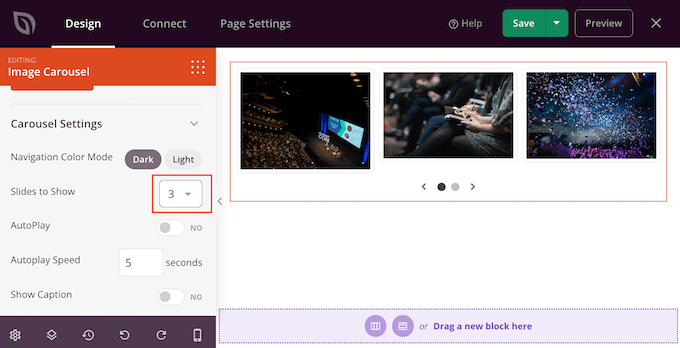
By default, the carousel shows a single slide, and visitors will need to use the navigation controls to see more content.
However, you may want to show multiple slides at once by opening the ‘Slide to Show’ dropdown and choosing a number from the list. This can be useful if the slider has lots of content and you’re worried visitors might not click through all the slides.
By default, visitors will need to click to see the next slide. With that in mind, you may want to enable autoplay, as this often increases how many slides a visitor sees.
To do this, click to enable the ‘Autoplay’ switch and then specify how long each slide should stay onscreen by typing a number into ‘Autoplay Speed.’
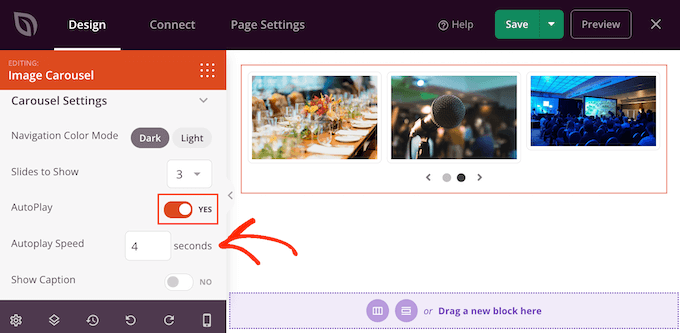
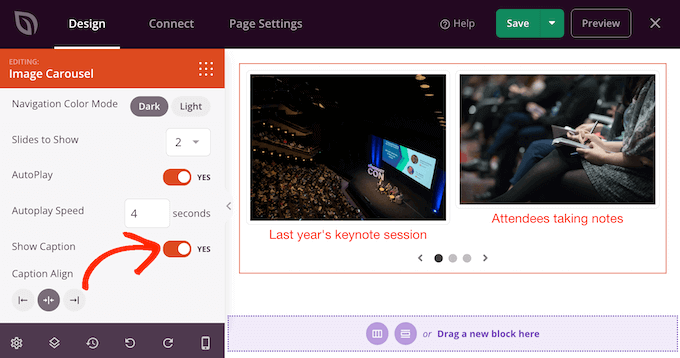
If you added captions to your images, then make sure you click on the ‘Show Caption’ slider to turn it from ‘No’ to ‘Yes.’
You can also change the caption alignment.
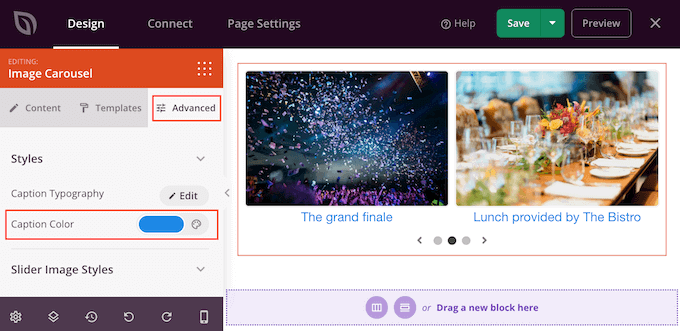
Depending on the background color, you may need to change the caption color before they’re visible to visitors.
To do this, click on the ‘Advanced’ tab and then use the ‘Caption Color’ settings.
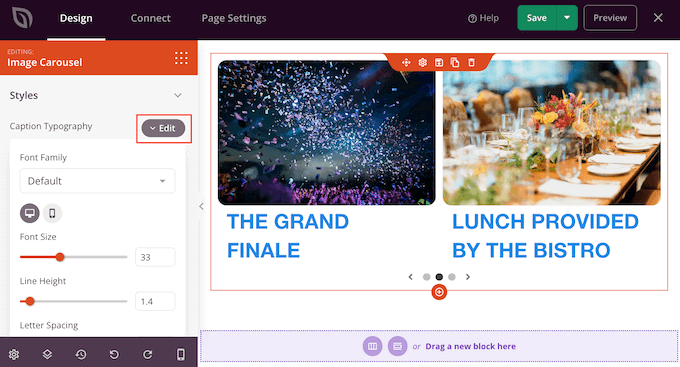
You can further style the text by clicking on the ‘Edit’ button next to ‘Caption Typography.’
This adds some settings where you can change the font size, line height, spacing, and more.
When you’re happy with how the captions look, you can add different box shadows to the slides using the ‘Slider Image Styles’ dropdown.
These shadows can really make the slides stand out, so it’s worth trying different shadows to see whether they fit your page design.
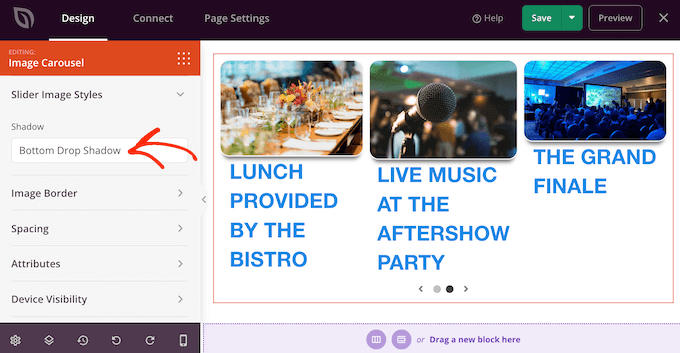
In the ‘Advanced’ tab you’ll also find settings that let you add a border, change the spacing, and even create an entrance animation.
Most of these settings are self-explanatory so it’s worth looking through them to see what different kind of effects you can create.
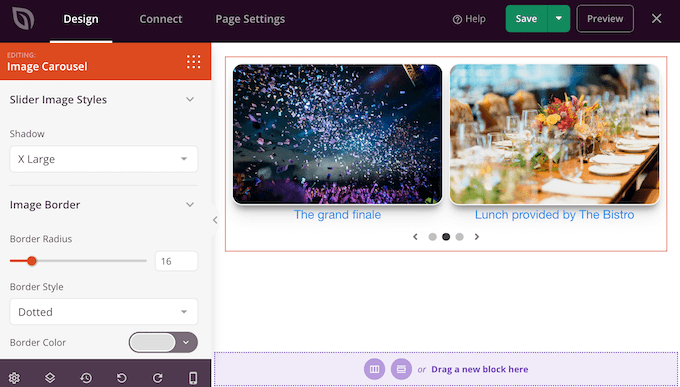
When you’re happy with how the slider looks, you can continue working on the rest of the page. Simply drag blocks onto your design and then customize them using the settings in the left-hand menu.
If you want to delete a block, then simply hover over it and then click on the trash can icon when it appears.
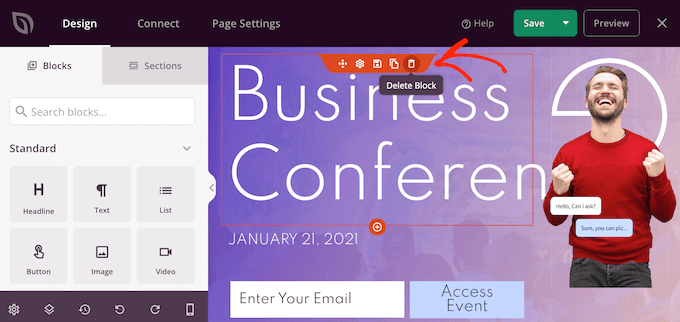
When asked, go ahead and click on ‘Yes, delete it.’
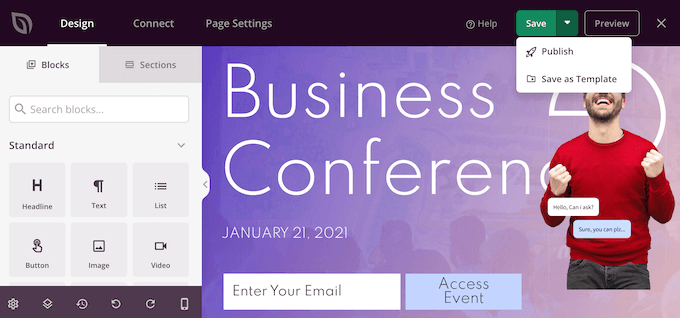
When you’re happy with how the page looks, it’s time to make it live by clicking on the ‘Save’ button. Finally, select ‘Publish’ to make your slider live.
Method 3. Create a Slider Using Smash Balloon (Best For Social Posts and Reviews)
We’re more likely to try things that we see other people buying, using, or recommending. With that being said, it’s a good idea to show social proof on your website including customer reviews, testimonials, or even positive comments you’ve got on social media.
The easiest way to show social proof on your site is by using Smash Balloon. Smash Balloon has plugins that allow you to embed content from Instagram, Facebook, Twitter, and YouTube.
It also has a Reviews Feed plugin that you can use to display reviews from Facebook, Tripadvisor, Yelp, and Google.
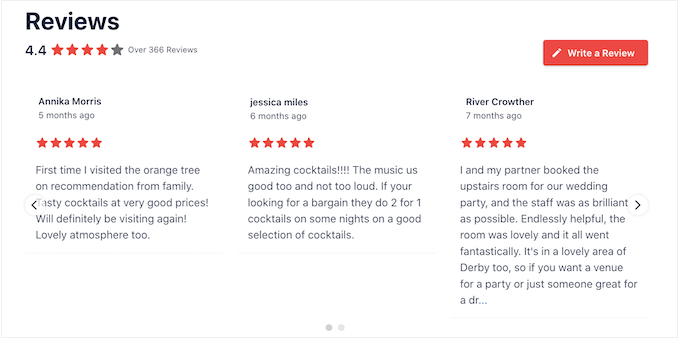
However, showing lots of positive comments and reviews on your online store or website can take up a lot of space.
That’s why Smash Balloon comes with built-in carousel layouts and templates that you can use to create responsive sliders. This allows you to create social media and review slideshows with just a few clicks.
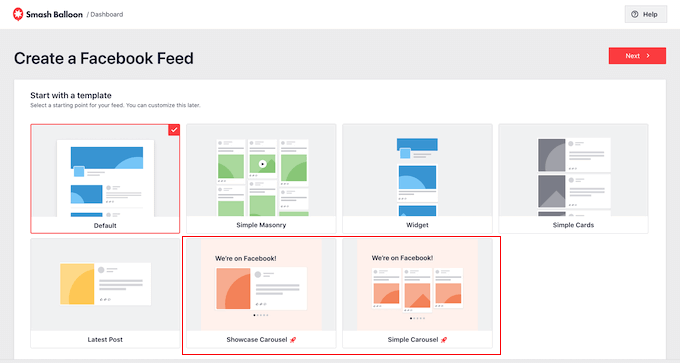
Even better, Smash Balloon will fetch new content automatically so the slider will always show the latest posts.
Another option is showing the content from your own social media accounts.
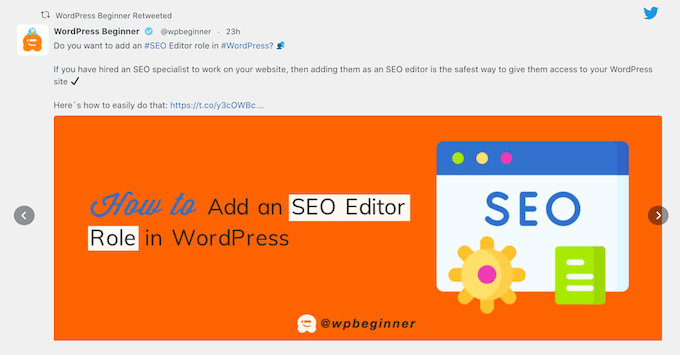
If visitors like what they see, they might decide to follow you on social media.
To help you get more followers, Smash Balloon comes with ready-made call to action buttons that you can add to your sliders.
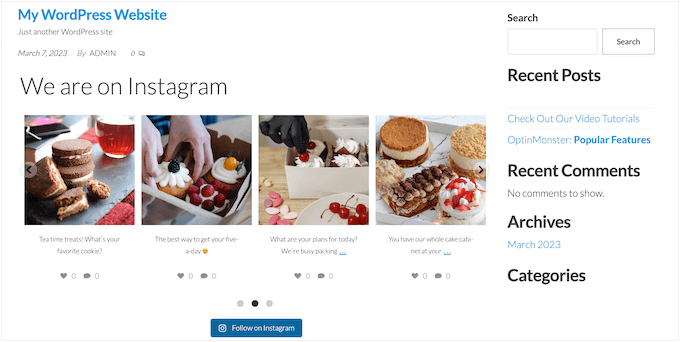
For detailed step-by-step instructions, please see our guides on how to add social media feeds to WordPress, and how to show Google, Facebook, and Yelp reviews in WordPress.
We hope that this article helped you learn how to easily create a responsive WordPress slider. You may also want to check out our guide on how to choose the best design software, or see our expert pick of the best live chat software for small businesses.
If you liked this article, then please subscribe to our YouTube Channel for WordPress video tutorials. You can also find us on Twitter and Facebook.
The post How to Easily Create a Responsive Slider in WordPress first appeared on WPBeginner.
from WPBeginner https://ift.tt/wd1eocp
More links is https://mwktutor.com
No comments:
Post a Comment