Do you want to prevent clients from accidentally deactivating WordPress plugins?
If you build websites for other people, then you probably have a few important plugins that you install on every client site. If a client accidentally deactivates one of these essential plugins, then it could break their site completely.
In this article, we’ll show you how to stop clients from deactivating WordPress plugins.
Why Prevent Clients from Deactivating WordPress Plugins?
If you create websites for other people, then you may have a list of must-have WordPress plugins that you install on every site. These might be security plugins that protect the client against hackers and malicious code.
You might even use plugins to automate crucial WordPress maintenance tasks such as creating regular backups or deleting spam comments.
If the client accidentally deactivates one of these plugins then it could make their website vulnerable to attack, or affect how it works. In the worst-case scenario, it might even break their website completely.
Even though this isn’t your fault, it’s still a bad client experience and could damage your reputation. With that being said, let’s see how you can stop clients from accidentally deactivating plugins in WordPress.
Simply use the quick links below to jump straight to the method you want to use.
Method 1. Using the Default WordPress User Roles (No Plugin Required)
WordPress comes with a simple but powerful user management system where each user has different capabilities based on their assigned role.
When you install WordPress, it creates the following user roles automatically:
By default, only the Administrator has permission to manage plugins, which includes deactivating plugins.
With that in mind, we recommend creating a single admin account for your clients so they have a way to manage their sites. You can then create non-admin accounts for anyone else who needs access but doesn’t require admin privileges.
Without admin rights, this means the majority of your clients won’t be able to deactivate plugins.
You can use any role for the non-administrator accounts. However, we recommend using Editor as it allows users to create, edit, publish, and delete content, including content created by other people. They just won’t have access to the higher-level WordPress features.
It’s also a good idea to give the Admin account to someone who has experience with WordPress and understands how to manage a WordPress website.
To create an account for one or more clients, go to Users » Add New in the WordPress dashboard. You can then type in some information about the person including their name and email address.
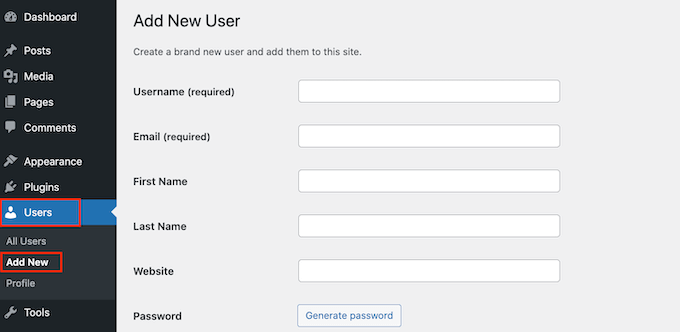
With that done, open the Role dropdown and choose the role you want to assign this user, such as Admin or Editor.
When you’re happy with the information you’ve entered, click on ‘Add New User.’

To create more accounts, simply follow the same process described above. For more on this topic, please see our guide on how to add new users to your WordPress blog.
Method 2. Using the Members Plugin (Create a Custom Client Role)
Sometimes you may need to stop clients from deactivating plugins without restricting their access to other areas.
With that being said, the built-in user roles may not be right for your website. For example, Editors can’t deactivate plugins, but they also can’t add new users or install WordPress themes, which may be a problem for your clients.
If the default user roles aren’t quite right for your client, then you can create a custom role. This role can have exactly the permissions and capabilities the client needs. You can even create different roles for different teams, or even individual employees.
The easiest way to create custom roles is by using the free Members plugin. This plugin allows you to create new roles and then add and remove capabilities to those user roles, including the ability to activate and deactivate WordPress plugins.
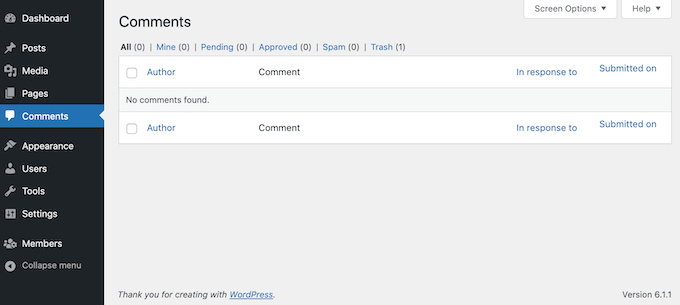
This permission removes the Plugins setting from the left-hand menu, as you can see in the following image.
The first thing you need to do is install and activate the Members plugin. For more details, see our step-by-step guide on how to install a WordPress plugin.
Upon activation, go to Members » Add New Role.
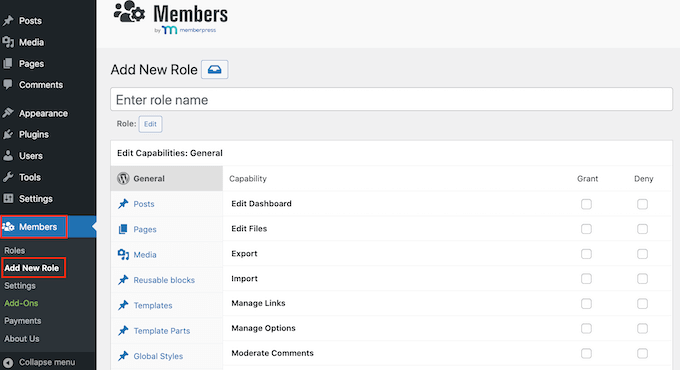
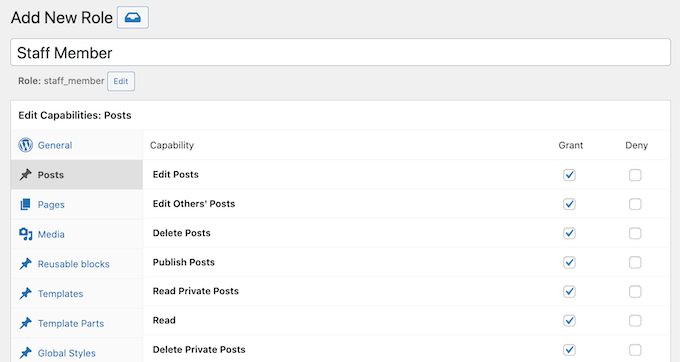
In the ‘Enter role name’ field, type in the name you want to use. This will be visible to anyone who has access to the WordPress dashboard.
After that, it’s time to grant and deny permissions.
The left column shows all the different types of content such as reusable blocks and WooCommerce products. Simply click on a tab and you’ll see all the permissions for that content type.
You can then go ahead and check the ‘Grant’ or ‘Deny’ box for each permission. For more detailed instructions, please see our guide on how to add or remove user capabilities.
To stop clients from deactivating plugins, click on the ‘Plugins’ tab on the left.
On this screen, check the ‘Deny’ box on the line that says ‘Activate Plugins.’
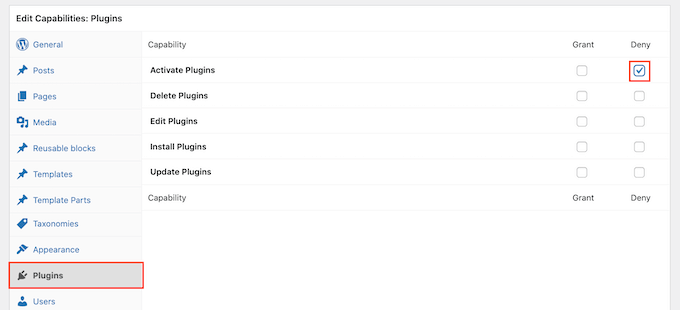
When you’re happy with how the user role is set up, click on ‘Add Role.’
You can now assign this role to any user, following the same process described in Method 1.
Method 3. Using Custom PHP (Prevent Clients From Deactivating Specific Plugins)
If you want to stop clients from deactivating all plugins, then you can use one of the methods mentioned above.
However, sometimes you may want to protect essential plugins only, while still giving clients the freedom to deactivate and delete non-essential software.
The best way to protect specific plugins is by adding custom code in WordPress. This allows you to remove the ‘Deactivate’ link for specific plugins.
This is an advanced method, so we don’t recommend it for beginners.
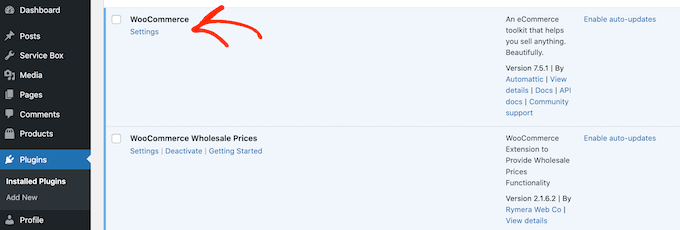
Note: Just be aware that clients can still deactivate any plugin using the Bulk Actions dropdown menu, or with an advanced tool like FTP or phpMyAdmin. However, removing the ‘Deactivate’ link makes it much more difficult for clients to accidentally deactivate an essential plugin.
To start, you’ll need to know the plugin’s file name and where it lives on your server. Typically, these files use the plugin’s name followed by .php, and live inside a folder named after the plugin. For example, the WooCommerce file is named ‘woocommerce.php’ and lives inside a ‘woocommerce’ folder.
However, it’s still worth checking, especially if the plugin has a long, complicated name or multiple words. For example, if you’re using the SR Product 360° View plugin to add interactive 360-degree images in WordPress, then its file is named ‘sr.php.’
You can check the file name and location by connecting to the site’s server using an FTP client such as FileZilla, or you can use the file manager of your WordPress hosting cPanel.
If this is your first time using FTP, then you can see our complete guide on how to connect to your site using FTP.
After that, go to /wp-content/plugins/. Here, you’ll see all the different plugins on your site.
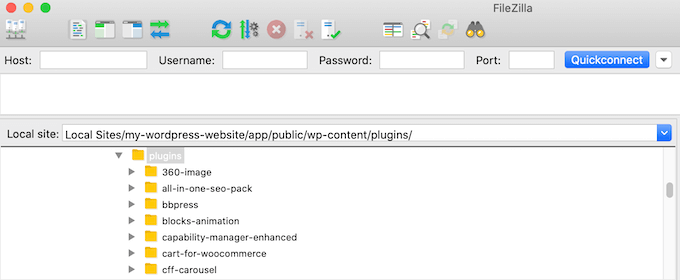
Simply find the plugin that you want to protect, and open its folder.
After that, find the .php file.
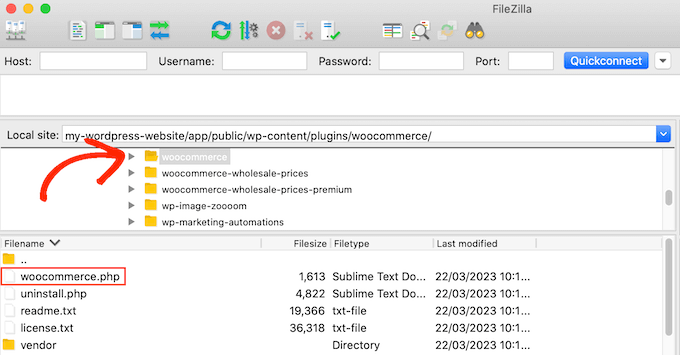
Now, make a note of the folder name and .php file, as you’ll be using this information in your code. Simply repeat this process for every plugin you want to protect.
With that done, it’s time to add a code snippet to your site. Often, you’ll find guides asking you to add code to the site’s functions.php file.
However, this isn’t recommended as simple errors can cause countless common WordPress errors. You’ll also lose the custom code when you update your WordPress theme.
That’s where WPCode comes in.
WPCode is the best code snippets plugin used by over 1 million WordPress websites. It makes it easy to add custom CSS, HTML, PHP, and more.
The first thing you need to do is install and activate the free WPCode plugin. For more details, see our step-by-step guide on how to install a WordPress plugin.
Upon activation, head over to Code Snippets » Add Snippet.
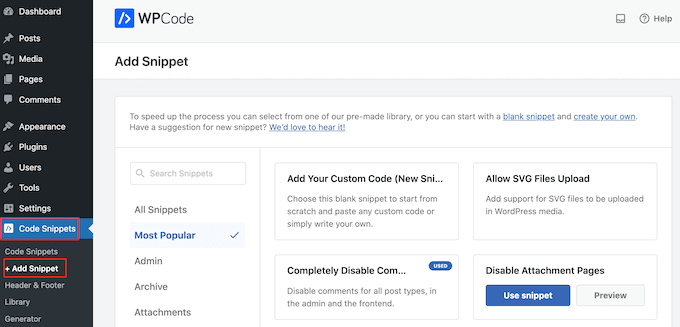
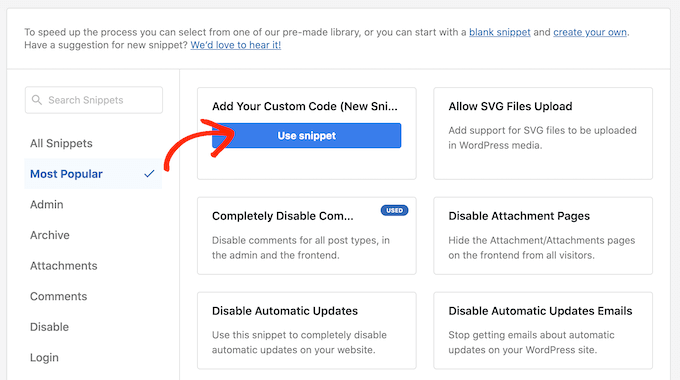
Here, hover your mouse over ‘Add Your Custom Code.’
When it appears, click on ‘Use snippet.’
To start, type in a title for the custom code snippet. This can be anything that helps you identify the snippet in the WordPress dashboard.
After that, open the ‘Code Type’ dropdown and select ‘PHP Snippet.’
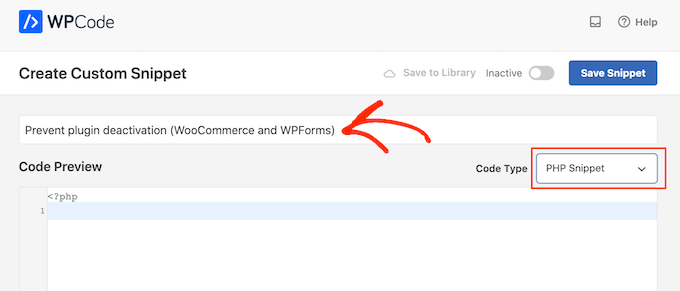
Now, you’re ready to add the custom PHP. The exact code will vary depending on the plugins you’re protecting, but here’s an template you can use:
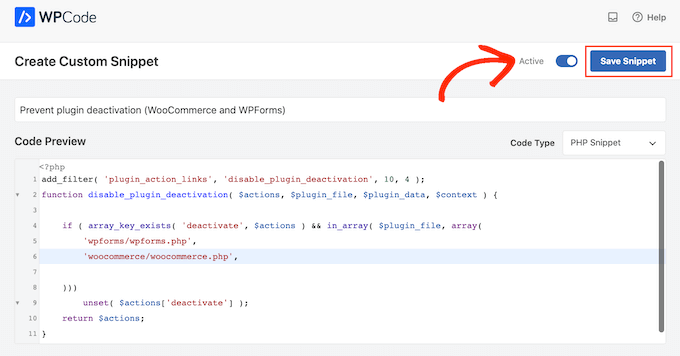
add_filter( 'plugin_action_links', 'disable_plugin_deactivation', 10, 4 );
function disable_plugin_deactivation( $actions, $plugin_file, $plugin_data, $context ) {

        if ( array_key_exists( 'deactivate', $actions ) && in_array( $plugin_file, array(
                'wpforms/wpforms.php',
                'woocommerce/woocommerce.php'
        )))
                unset( $actions['deactivate'] );
        return $actions;
}
This snippet disables deactivation for WPForms and WooCommerce. To protect other plugins, simply replace ‘wpforms/wpforms.php’ and ‘woocommerce/woocommerce.php’ with the folders and file names you got in the previous step.
To disable deactivation for more plugins, simply add them to the code. For example:
  'wpforms/wpforms.php',
        'woocommerce/woocommerce.php',
                'service-box/service-box.php'

    )))
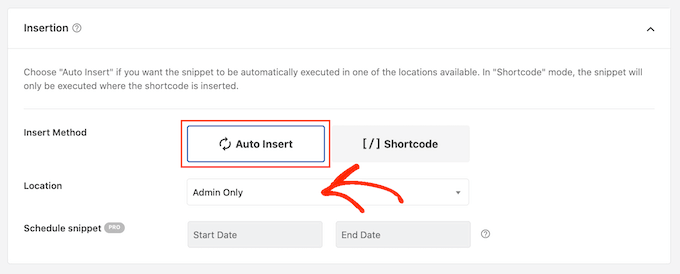
After that, scroll to the ‘Insertion’ section. WPCode can add your code to different locations, such as after every post, frontend only, or admin only.
We only need to use the PHP code in the WordPress admin area, so click on ‘Auto Insert’ if it isn’t already selected. Then, open the ‘Location’ dropdown menu and choose ‘Admin only.’
After that, you’re ready to scroll to the top of the screen and click on the ‘Inactive’ toggle, so it changes to ‘Active.’
Finally, click on ‘Save Snippet’ to make the PHP snippet live.
Now, if you select Plugins from the left-hand menu, you’ll see the ‘Deactivate’ link has been removed for those plugins.
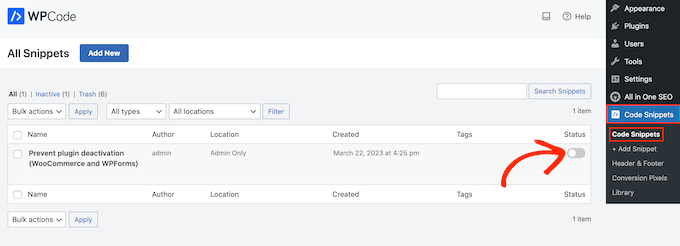
If you need to restore the ‘deactivate’ links at any point, then you can disable the code snippet. Simply go to Code Snippets » Code Snippet and click the switch next to your snippet to turn it from blue (enabled) to grey (disabled).
You can now deactivate these plugins by heading over to the Plugins menu.
You can also deactivate protected plugins using phpMyAdmin or an FTP client. This may be a good solution if you want to remove a specific plugin, but don’t want to completely disable the code snippet and leave all your protected plugins vulnerable.
To learn more, please see our guide on how to deactivate all plugins when not able to access WP-Admin.
We hope this article helped you learn how to prevent clients from deactivating WordPress plugins. You may also want to see our ultimate guide on how to boost WordPress speed and performance or the best phone services for small businesses.
If you liked this article, then please subscribe to our YouTube Channel for WordPress video tutorials. You can also find us on Twitter and Facebook.
The post How to Prevent Clients from Deactivating WordPress Plugins first appeared on WPBeginner.
from WPBeginner https://ift.tt/Y8DNo5V
More links is https://mwktutor.com
No comments:
Post a Comment