We are often asked, how do I check if my WordPress site has been hacked?
There are some common telltale signs that may help you figure out if your WordPress is hacked or compromised.
In this article, we’ll share some of the most common signs that your WordPress site is hacked and what you can do to clean it up.
1. Sudden Drop in Website Traffic
If you look at your analytics reports and see a sudden drop in traffic, even though Google Analytics is set up properly, then this could be a sign that your WordPress site is hacked.
A sudden drop in traffic can be caused by different factors.
For instance, malware on your website may be redirecting non-logged-in visitors to spam websites.
Another possible reason for the sudden drop in traffic could be that Google’s safe browsing tool is showing warnings to users regarding your website.
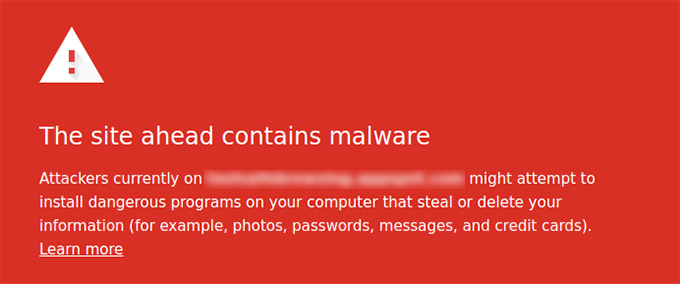
Each day, Google blacklists around 10,000 websites for malware and around thousands more for phishing. That’s why every website owner needs to pay serious attention to their WordPress security.
Data injection is one of the most common signs of a hacked WordPress. Hackers create a backdoor on your WordPress site which gives them access to modify your WordPress files and database.
Some of these hacks add links to spammy websites. Usually these links are added to the footer of your website, but they could be anywhere. Deleting the links doesn’t guarantee that they won’t come back.
This is probably the most obvious one as it is clearly visible on the homepage of your website.
Most hacking attempts do not deface your site’s homepage because they want to remain unnoticed for as long as possible.
However, some hackers may deface your website to announce that it has been hacked. Such hackers usually replace your homepage with their own message. Some may even try to extort money from site owners.
4. You are Unable to Login into WordPress
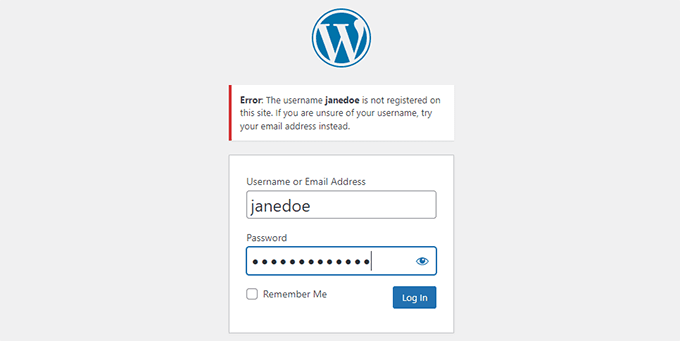
If you are unable to login to your WordPress site, then there is a chance that hackers may have deleted your admin account from WordPress.
Since the account doesn’t exist, you would not be able to reset your password from the login page.
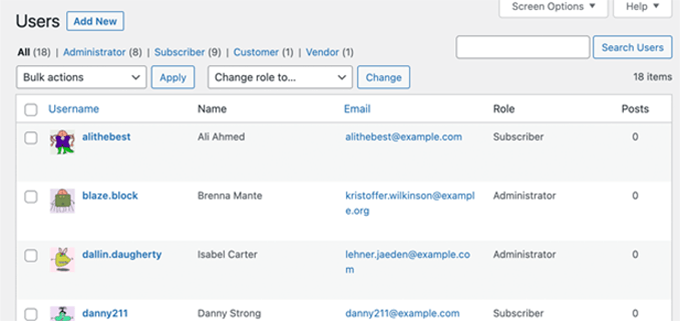
If your site is open to user registration, and you are not using any spam registration protection, then spam user accounts are just common spam that you can simply delete.
However, if you don’t remember allowing user registration and still seeing new user accounts in WordPress, then your site is probably hacked.
Usually the suspicious account will have the administrator user role, and in some cases you may not be able to delete it from your WordPress admin area.
6. Unknown Files and Scripts on Your Server
If you’re using a site scanner plugin like Sucuri, then it will alert you when it finds an unknown file or script on your server.
To find the files, you need to connect to your WordPress site using an FTP client. The most common place where you will find malicious files and scripts is the /wp-content/ folder.
Usually, these files are named similarly to WordPress files so that they can hide in plain sight. To recognize them yourself, you will need to audit the file and directory structure. However, deleting these files will not guarantee that they won’t return.
7. Your Website is Often Slow or Unresponsive
All websites on the internet can become the target of random denial of service or DDoS attacks. These attacks use several hacked computers and servers from all over the world using fake IP addresses.
Sometimes they are just sending too many requests to your server, while other times they are actively trying to break into your website.
Any such activity will make your website slow, unresponsive, and unavailable. You can check your server logs to see which IPs are making too many requests and block them, but that may not fix the problem if there are too many or if the hackers change IP addresses.
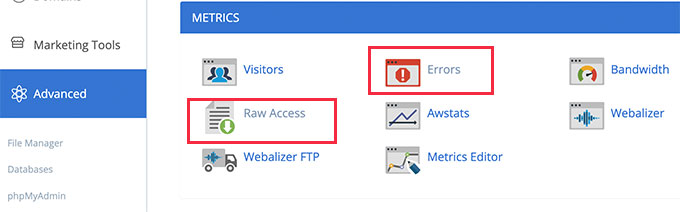
Server logs are plain text files stored on your web server. These files keep record of all errors occurring on your server as well as all your internet traffic.
You can access them from your WordPress hosting account’s cPanel dashboard under Statistics.
These server logs can help you understand what’s going on when your WordPress site is under attack.
They will also indicate server errors that you may not see inside your WordPress dashboard and may be causing your website to crash or be unresponsive.
9. Failure to Send or Receive WordPress Emails
Hacked servers are commonly used for sending spam. Most WordPress hosting companies offer free email accounts with your hosting. Many WordPress site owners use their host’s mail servers to send WordPress emails.
If you are unable to send or receive WordPress emails, then there is a chance that your mail server is hacked to send spam emails.
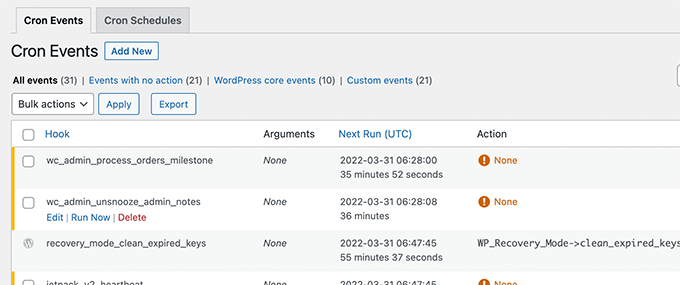
10. Suspicious Scheduled Tasks
Web servers allow users to set up cron jobs. These are scheduled tasks that you can add to your server. WordPress itself uses cron to setup scheduled tasks like publishing scheduled posts, deleting old comments from trash, and so on.
A hacker can exploit cron jobs to run scheduled tasks on your server without you knowing it.
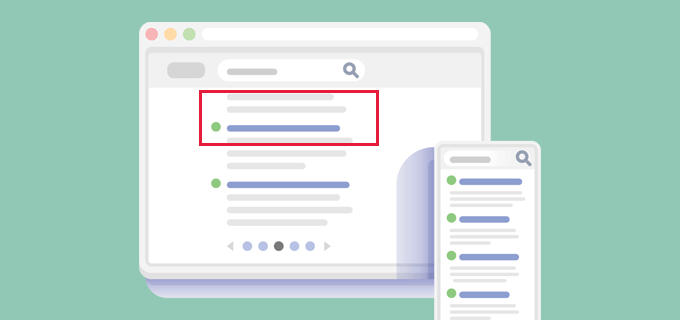
If the search results from your website show incorrect titles or meta descriptions, then this is a sign that your WordPress site is hacked.
Looking at your WordPress site, you will still see the correct title and description.
The hacker has again exploited a backdoor to inject malicious code which modifies your site data in a way that it is visible only to search engines.
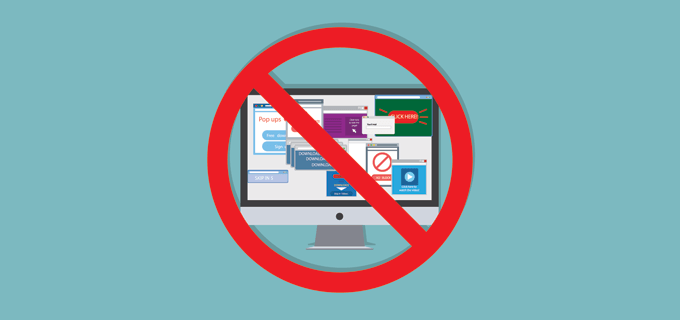
12. Popups or Pop Under Ads on Your Website
These types of hacks are trying to make money by hijacking your website’s traffic and showing them their own spam ads.
These popups do not appear for logged in visitors or visitors accessing a website directly.
They only appear to the users visiting from search engines. Pop-under ads open in a new window and remain unnoticeable by users.
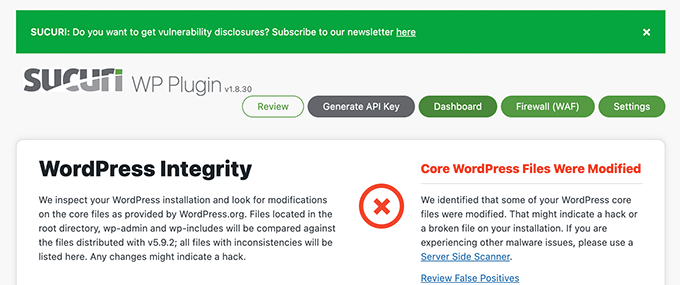
13. Core WordPress Files Are Changed
If your core WordPress files are changed or modified in some way, then that’s an important sign that your WordPress site is hacked.
Hackers may simply modify a core WordPress file and place their own code inside it. They may also create files with names similar to WordPress core files.
The easiest way to track those files is by installing a WordPress security plugin that monitors the health of your core WordPress files. You can also manually check your WordPress folders to look for any suspicious files or scripts.
14. Users Are Randomly Redirected to Unknown Websites
If your website is redirecting visitors to an unknown website, then that’s another important sign that your website may be hacked.
This hack often goes unnoticed as it does not redirect logged-in users. It may also not redirect visitors accessing the website directly by typing the address in their browser.
These types of hacks are often caused by a backdoor or malware installed on your website.
Securing and Fixing Your Hacked WordPress Site
Cleaning up a hacked WordPress site can be incredibly painful and difficult. This is why we recommend you let experts clean up your website.
It comes with 24/7 website monitoring and a powerful website application firewall, which blocks attacks before they even reach your website. Most importantly, they clean up your website if it ever gets hacked.
Keeping Your WordPress Website Secure from Future Attacks
Once your website is clean, you can make secure it by making it extremely difficult for hackers to gain access to your website.
Securing a WordPress website involves adding layers of protection around your website. For instance, using strong passwords with 2-step verification can protect your WordPress admin area from unauthorized logins.
Similarly, you can block access to important WordPress files to protect them or set WordPress files and folder permissions correctly.
For more details, see our ultimate WordPress security guide which will walk you through all the steps you should take to make your WordPress site secure.
We hope this article helped you learn the signs to look for in a hacked WordPress site.
Are you looking for a way to fix ‘Error 521’ with WordPress and Cloudflare?
If you’re seeing this error message, then so is everyone who tries to visit your website. This is bad news for the visitor experience and your conversion rates. It may even cost you your search engine rankings.
In this article, we will show you how to fix the 521 error with WordPress and Cloudflare.
What Causes Error 521 with WordPress and Cloudflare?
If you see a 521 error when trying to visit your WordPress website, this means your browser is connecting to Cloudflare successfully, but Cloudflare isn’t connecting to the server that hosts your website.
Often this is because your server is offline.
There’s also a chance your WordPress hosting server may be online, but it’s blocking Cloudflare. Typically this WordPress error happens when a server mistakes Cloudflare for a security threat. This is usually due to a problem with how your server or Cloudflare is set up.
But don’t worry, we have five troubleshooting steps that you can follow to fix this error quickly.
If you’re unsure what’s causing your 521 error, then we recommend starting with step 1 and working your way through the each step. If you prefer to jump straight to a particular step, then you can use the links below.
When you get a 521 error, there are steps you can take to fix the problem yourself. However some of them can be time-consuming and technical.
With that in mind, the easiest way to fix a 521 error is by contacting your WordPress hosting provider. A good web host should be able to tell you why you’re getting this error. They may even be able to fix the problem for you.
If you’re unsure how to contact support, then head over to your hosting provider’s website. You can then look for any Contact Us or Support pages.
To help you fix this problem as quickly as possible, we recommend choosing live support options where available. For example, live chat or business phone support is almost always faster than ticketing portals or email.
If you’re unable to get support from your hosting provider right away, then you can try the following steps.
2. Check Whether Your Server Is Offline
When you get a 521 error, it’s always worth checking whether your server is online.
If it’s still online, then you can try other troubleshooting steps.
To do this, you’ll need to know your server’s IP address. This is a string of numbers that identifies a piece of hardware on a network.
You can use this IP address to ‘ping’ the physical server that hosts your WordPress website. If the server responds, you’ll know that it’s online.
If it doesn’t respond, then your server is offline and this is what’s causing your 521 error.
To get your IP address, you’ll need to log into your website’s control panel. This is usually supplied by your hosting provider, and is typically either cPanel or a custom panel.
Once you’re logged in you can look for any settings labeled ‘IP address.’
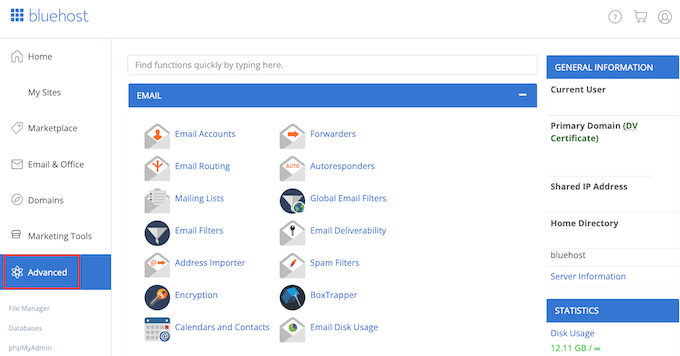
If you’re a Bluehost customer, then you just need to log into your cPanel dashboard. You can then click on Advanced in the left sidebar.
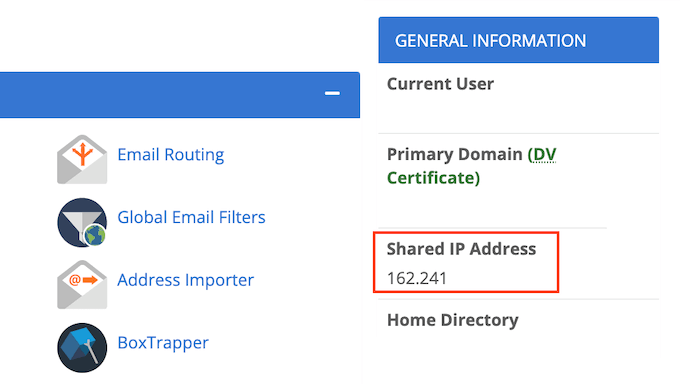
On this screen, find the General Information section.
Bluehost will show your server’s IP address under ‘Shared IP address.’
If you’re struggling to find this IP address, it’s always worth checking your hosting provider’s website or online documentation. Many web hosts have detailed tutorials showing you how to find your IP address.
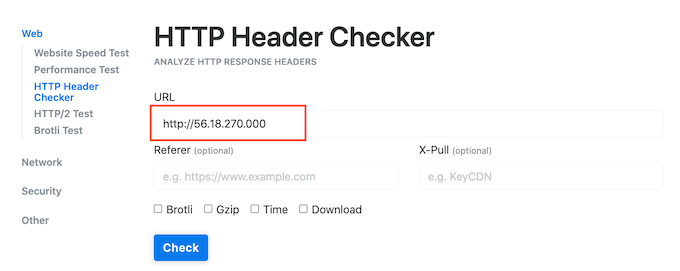
Once you have this information, head over to the HTTP Header Checker tool. You can use this tool to ‘ping’ your website’s server and see whether it responds.
To do this test, simply paste your IP address into the ‘URL’ field.
Then add ‘http://’ in front of your IP address. This turns this string of numbers into a web address. For example:
56.18.270.000
Becomes:
http://56.18.270.000
Next, click on the Check button. HTTP Header Checker will now try to talk to your server.
If your server is offline, then you’ll see a message such as ‘Failed to connect’ or ‘Host Not Found.’
This explains why you’re getting the 521 error. In this case, you’d need to contact your hosting provider to fix it.
If your server is online, HTTP Header Checker will show a ‘2XX’ status code. You may also see a ‘3XX’ status code if your server is online but is temporarily redirecting to a new location.
If your server is online, then an outage or server downtime isn’t causing your 521 error. In that case, you can continue following this guide to fix the error.
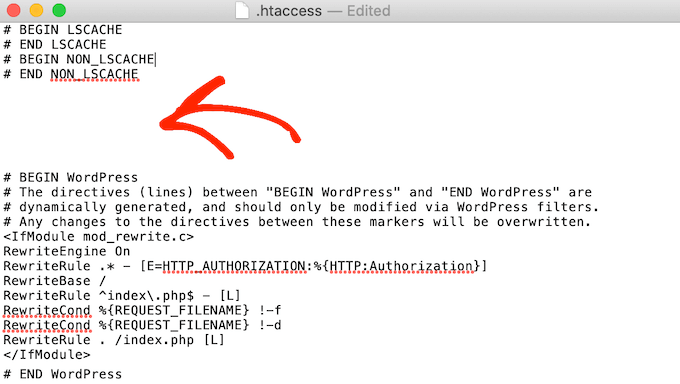
3. Whitelist All of Cloudflare’s IP Addresses
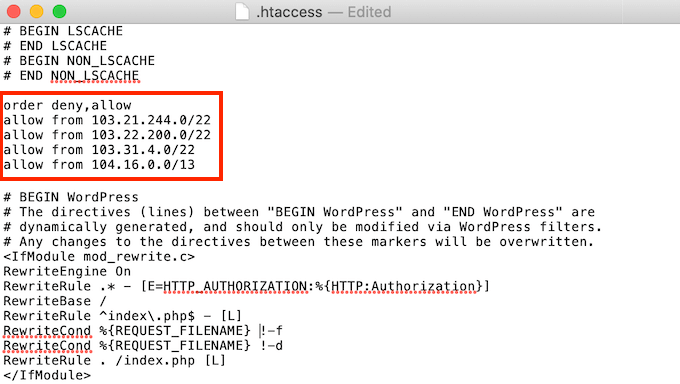
Your server may be online, but blocking Cloudflare’s IP addresses. This can cause the 521 error when you try to visit your WordPress website.
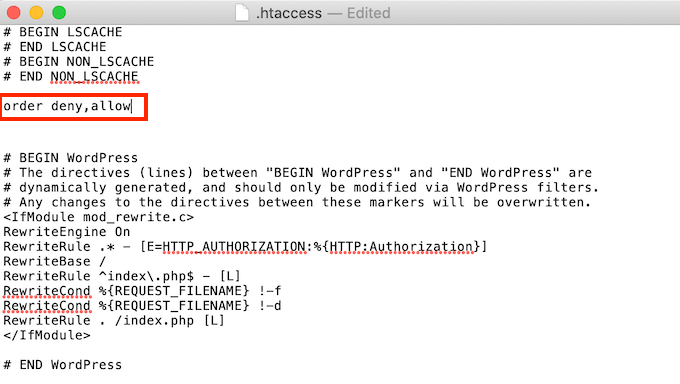
The solution is to whitelist all the IP addresses that Cloudflare uses. By whitelisting an IP address, you’re telling your server to allow all requests coming from that address.
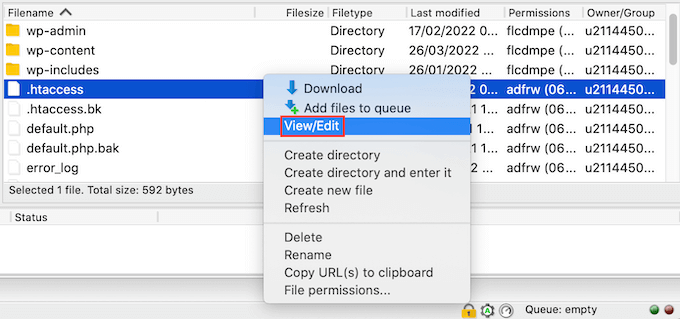
You can add whitelisted IPs to your website’s .htaccess file. This is an important configuration file that tells the server how it should act.
If you haven’t used an FTP client before, you may want to see our guide on how to use FTP. This post shows you how to connect to your server using an FTP client.
Once you’re connected to your server, you’ll need to open your website’s root folder. To reach it, simply open the folder that shows your website’s address.
Next, open the ‘public_html’ folder.
You should now see your website’s .htaccess file.
Some FTP clients hide sensitive files by default. If you don’t see an .htaccess file, then you’ll need to enable the ‘show hidden files’ option in your FTP client.
If you’re using FileZilla, just select Server from the toolbar. Then click on ‘Force showing hidden files.’
Did you switch to Full or Full (Strict) mode, right before getting the 521 error? This may have caused the problem.
When Cloudflare is in Full or Full (Strict) mode, it needs access to port 443. However, some servers prevent Cloudflare from accessing this port, which will trigger the ‘Error 521′ error.
The solution is to enable port 443 on your server.
This process will vary depending on your hosting provider and your server’s settings. With that in mind, we recommend contacting your hosting provider and asking them to enable port 443 for you.
5. Create and Upload a Cloudflare Origin Certificate
Even with port 443 enabled, you may still get the 521 error when using Cloudflare’s Full or Full (Strict) mode.
This is because some servers only allow connections on port 443 if you have a valid Cloudflare Origin Certificate. This certificate encrypts the traffic between Cloudflare and your web server.
If you don’t provide an Origin Certificate, you may get an ‘Error 521.’
The good news is that Cloudflare can walk you through the process of creating this certificate, step by step.
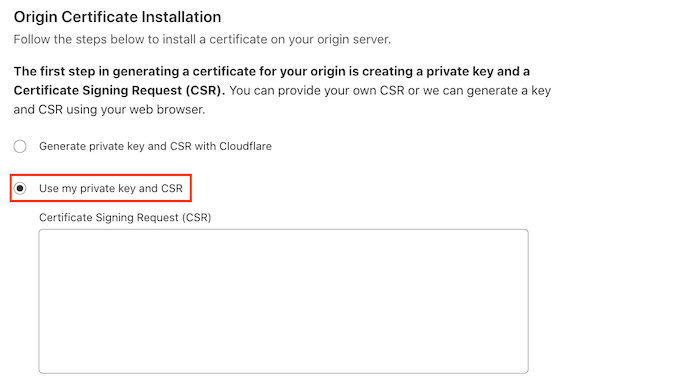
Cloudflare will now ask for a private key and a Certificate Signing Request (CSR).
Do you already have a private key and CSR? Then simply select the ‘Use my private key and CSR’ checkbox.
You can now type your CSR into the ‘Certificate Signing Request (CSR)’ box.
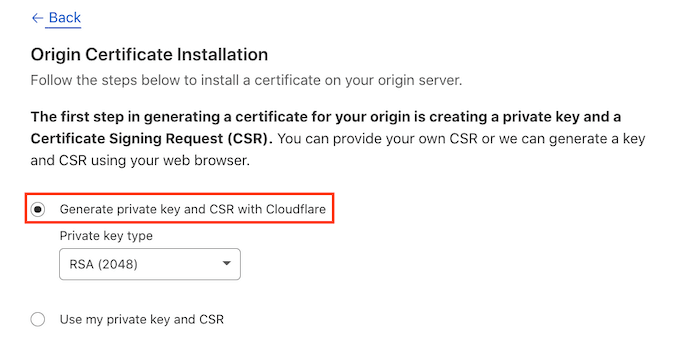
If you don’t have a CSR and key, don’t panic! Cloudflare can create these two things for you.
To get started, select ‘Generate private key and CSR with Cloudflare.’
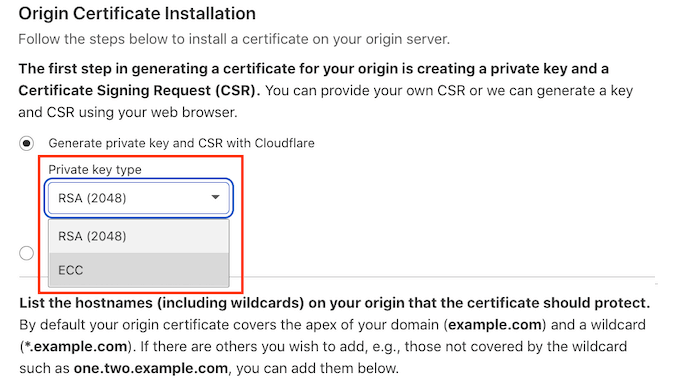
You can now choose whether to create an RSA key or an ECC key.
Most security experts agree that ECC and RSA are equally secure. However, ECC has a shorter key length. This means that ECC keys are faster.
For this reason, we recommend you create an ECC key.
Once you’ve made your decision, open the ‘Private key type’ dropdown. You can then select either RSA or ECC.
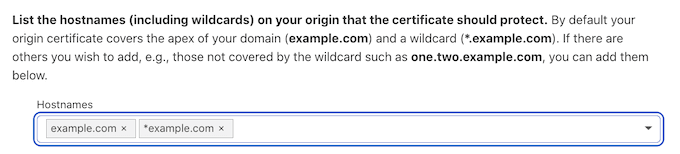
Next, scroll to the Hostnames field. Here you can add all the hostnames that you want to protect. This may sound complicated, but Cloudflare does a lot of the work for you.
You’ll see that Cloudflare has already added your root domain name.
Cloudflare also automatically adds a wildcard, which is your website’s domain plus a * symbol. This is a ‘catch-all’ that makes sure your subdomains are properly protected. For example, if your root domain is ‘www.example.com’ then this wildcard will ensure your ‘store.youurwebsite.com’ subdomain is also protected. For more details, see our complete guide to subdomains.
These default values should be enough to protect most websites. However, if you need to add more hostnames then you can just type them into the ‘Hostnames’ field.
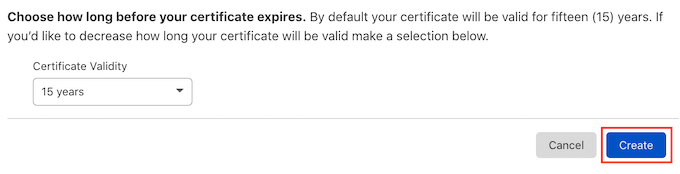
Next scroll to the ‘Certificate validity’ section.
Your certificate will be valid for 15 years by default.
Need more time? Then just open the ‘Certificate validity’ dropdown and choose a new value.
When you’re happy with all the information you’ve entered, click on the Create button.
Cloudflare will now create your certificate.
Cloudflare will then show an Origin Certificate and Private Key. You’ll need to copy this information into separate files.
NOTE: You won’t be able to see the Private Key again after leaving this screen. With that in mind, make sure you store this key somewhere safe.
You can now upload your Origin Certificate to your web server. The steps may vary depending on your hosting provider and server.
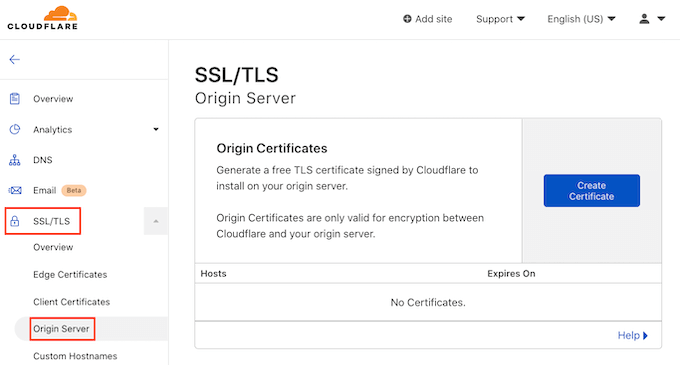
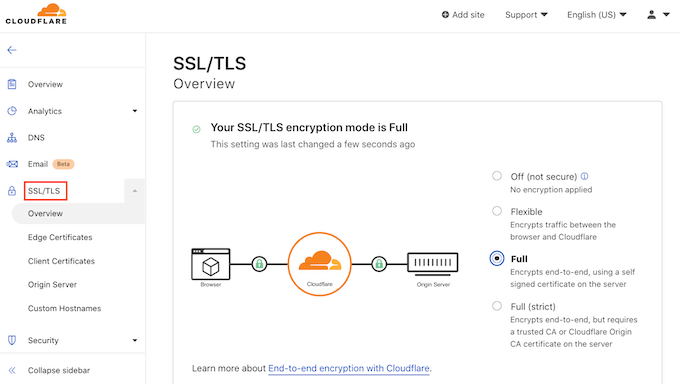
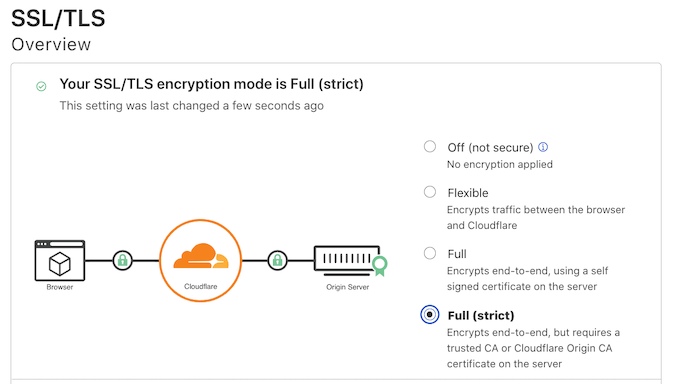
Once you’ve installed the Origin Certificate on your server, the final step is updating your SSL/TLS encryption mode.
In your Cloudflare dashboard, go to SSL/TLS.
Now find the ‘SSL/TLS encryption mode’ section.
In this section select ‘Full (strict).’
Cloudflare is now using your Origin Certificate. You can now check your site to see whether this has fixed the ‘Error 521’
We hope this article helped you learn how to fix ‘Error 521’ with WordPress and Cloudflare. You may also want to see our guide on best managed WordPress hosting if you’d like your hosting company to deal with the technical details, or see our roundup of the best business VoIP providers for small businesses.
If you liked this article, then please subscribe to our YouTube Channel for WordPress video tutorials. You can also find us on Twitter and Facebook.
Do you want to accept recurring payments on your WordPress website?
Recurring billing lets you charge your customers at a set time interval such as weekly, monthly, quarterly, annually, or even at custom intervals.
In this article, we will show you how to easily accept recurring payments in WordPress using multiple methods.
Why Should You Accept Recurring Payments in WordPress?
There are many benefits to adding recurring billing on your WordPress website.
First, it helps automate the billing process and can save you time. With recurring payments, you don’t have to spend time manually sending invoices and waiting for payments from your customers.
Since you’re not bothering your customers with payment requests, automated billing can also improve their experience and help you retain your customers.
That being said, let’s take a look at how to accept recurring payments in WordPress. Simply use the quick links below to jump straight to the method you prefer.
Method 1. Accept Recurring Payments Using WPForms Stripe Addon
One way to accept recurring payments is by adding a form to your website. This method is recommended for beginners and small businesses, as it’s quick and easy to set up.
To create a recurring payment form, you’ll need a user friendly and flexible form builder plugin.
WPForms is the best WordPress form builder plugin on the market. It allows you to create any type of form for your site including forms that collect recurring payments.
For this guide, we’ll be using WPForms Pro because it gives you access to the Stripe Payments addon. This addon makes it easy to collect recurring payments using Stripe.
Stripe is a popular payment processor that lets you accept credit card payments on your website without the hassle of setting up a separate merchant account.
If you don’t already have a Stripe account, don’t worry. WPForms will guide you through the process of creating an account, step by step.
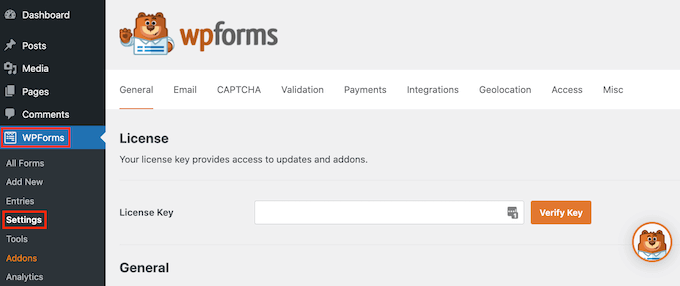
After activating the WPForms plugin, go to WPForms » Settings and enter your WPForms license key.
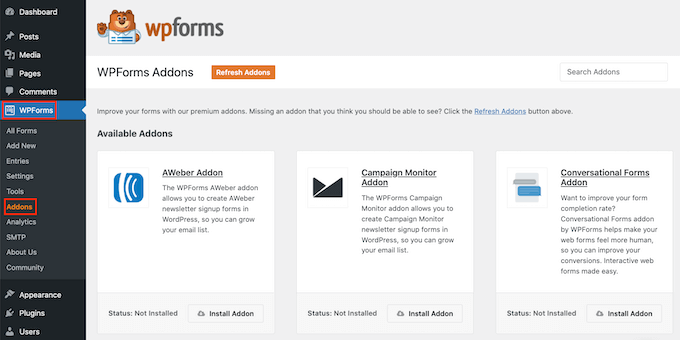
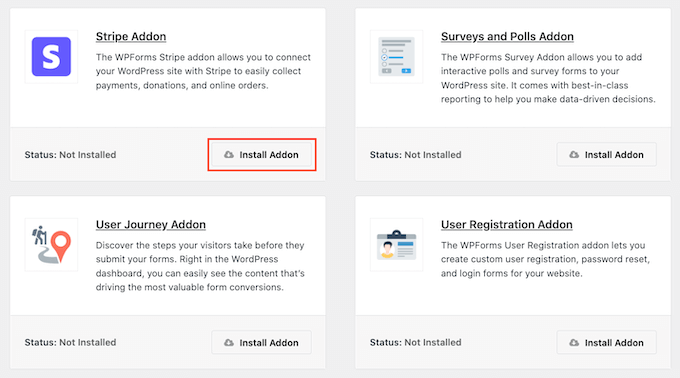
After that, you’ll want to go to WPForms » Addons. This screen shows all the addons that you can install.
Simply scroll until you find the ‘Stripe Addon.’
Then, click on its ‘Install Addon’ button.
Once you’ve activated the Stripe addon, your next task is connecting Stripe to your WordPress website.
To do this, head over to WPForms » Settings » Payments.
On this screen, find the ‘Connect with Stripe’ button and give it a click.
WPForms will now guide you through the process of signing into your Stripe account, or creating a new account.
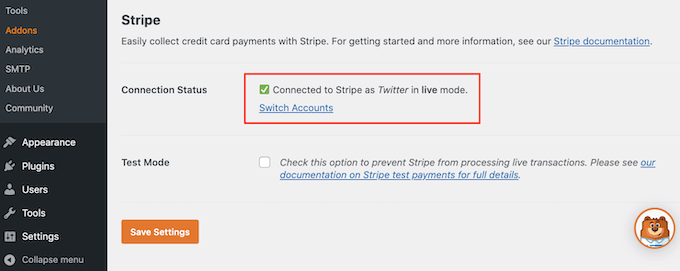
Once you’ve done that, you will be redirected to the WPForms ‘Settings’ page.
The ‘Connect Status’ should now have a green checkmark, to show that WPForms is connected to your Stripe account.
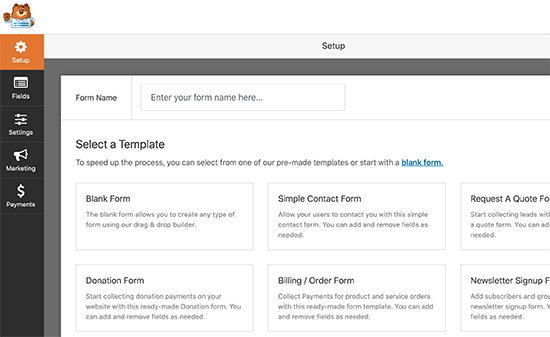
The next step is creating an online order form and enabling the Stripe recurring payment option. First we’re going to navigate to WPForms » Add New.
This will open the WPForms editor.
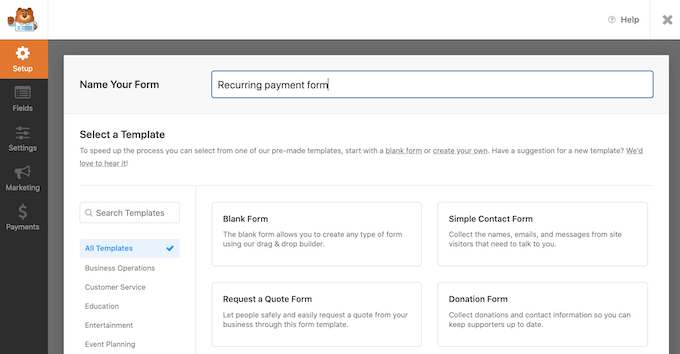
You can now type a name for your recurring payment form into the ‘Name Your Form’ field.
Your site visitors won’t see the name so it’s just for your reference.
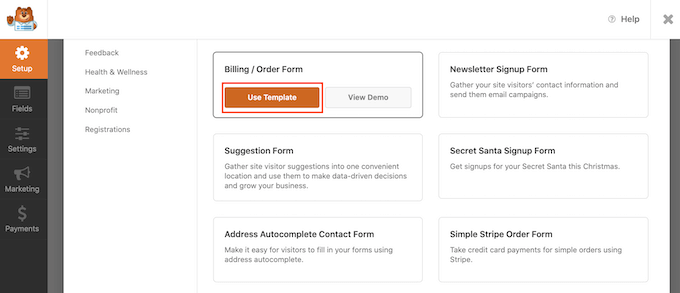
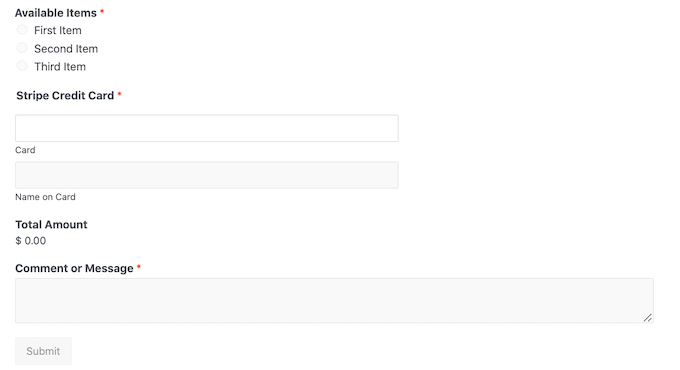
WordPress will now show all the ready-made WPForms templates that can help you get started. For this guide we’ll use the ‘Billing / Order Form’ template.
To choose this template, hover your mouse over it. Then, you just need to click on the ‘Use Template’ button.
WPForms will open this template in the form builder.
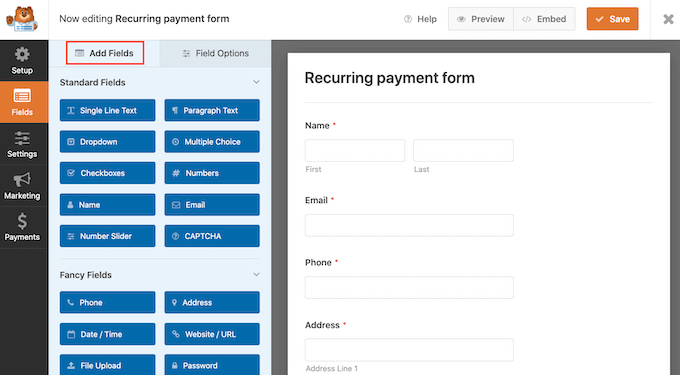
You can now customize all of this template’s fields according to your needs. To edit a field, simply give it a click.
The left-hand menu will then show all the settings for your chosen field.
Once you’ve finished customizing these fields, you’ll need to add a Stripe Credit Card field to your form. This field allows you to collect recurring payments from your customers.
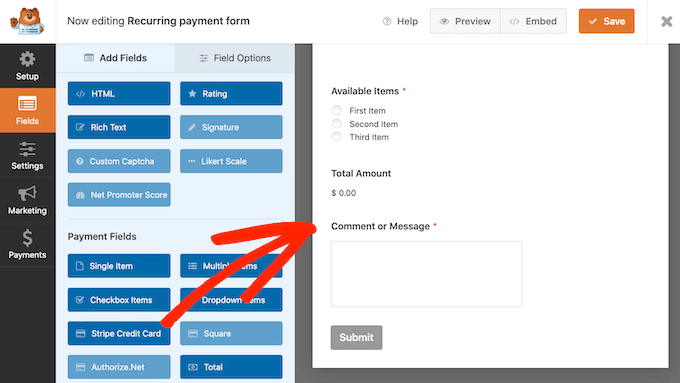
In the left-hand menu, select the ‘Add Fields’ tab.
Then scroll to the ‘Payment Fields’ section.
After that we’re going to drag and drop the ‘Stripe Credit Card’ field onto your form.
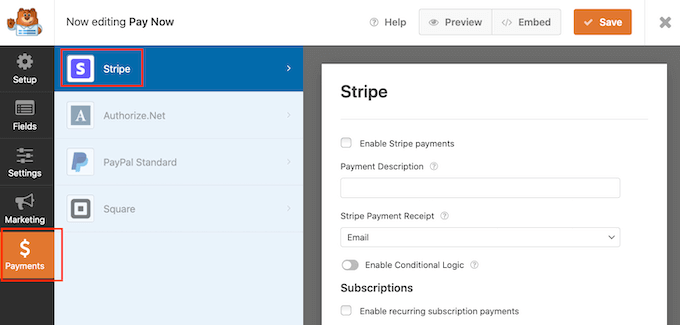
Once you’re happy with how your form looks, it’s time to set up recurring payments by selecting the ‘Payments’ tab.
Then, just click on ‘Stripe.’
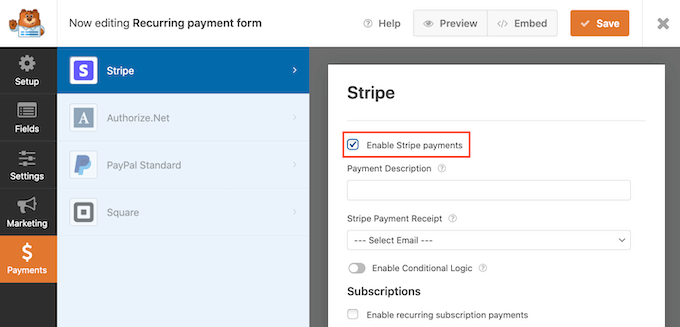
Next, check the box next to ‘Enable Stripe payments.’
Your form is set up to accept payments using Stripe.
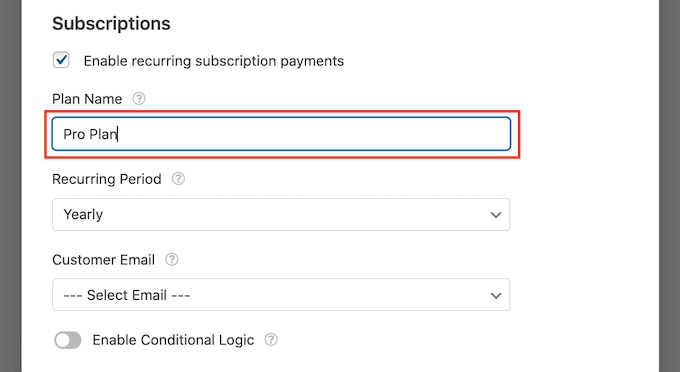
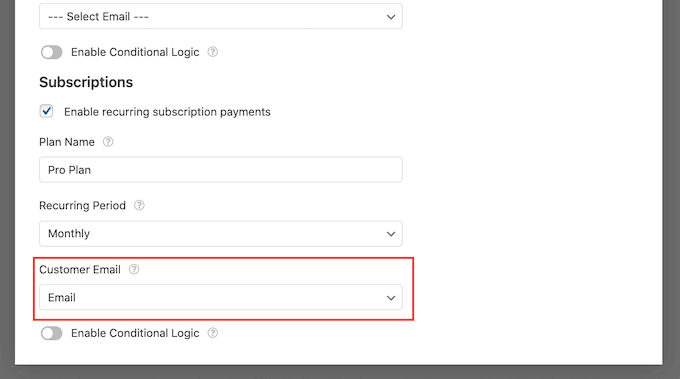
Once you’ve done that, scroll to the ‘Subscriptions’ section.
You can then check the box that says ‘Enable recurring subscription payments.’
You can now create a plan name, which will appear in your Stripe transactions. This helps you see where each payment came from.
You can type this name into the ‘Plan Name’ field.
If you leave this field empty, then WPForms will use the form’s name as your plan name.
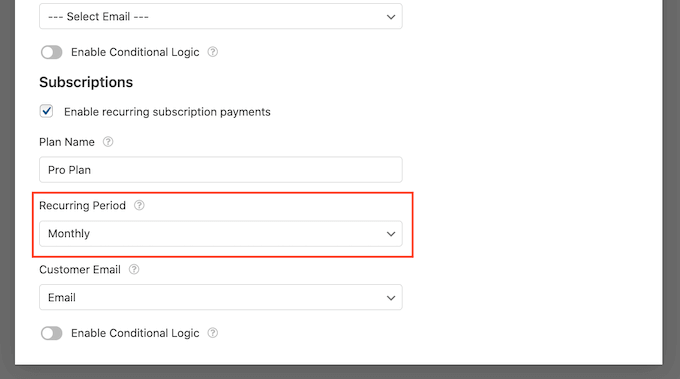
Next, choose how frequently you’ll charge your customers using the ‘Recurring Period’ dropdown menu.
You can select anything from daily recurring payments, right through to yearly payments.
If you want to sell recurring payments using Stripe, then you must provide Stripe with the customer’s email address. This gives Stripe a way to let customers know about any problems with their payment.
To give Stripe access to this information, simply open the ‘Customer Email’ dropdown and choose ‘Email.’
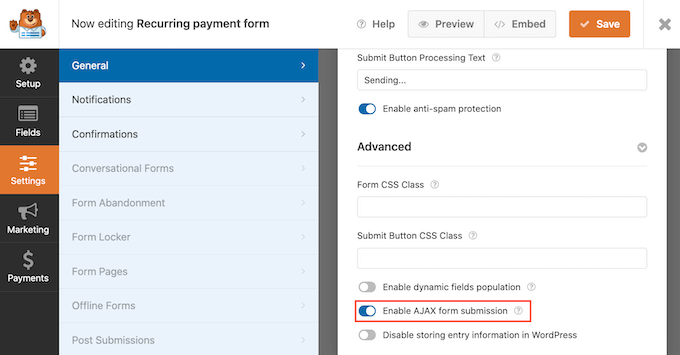
Next, you will need to enable AJAX form submissions. This allows your customers to submit the recurring payment form without having to reload the entire page. This will improve the customer experience.
To enable AJAX form submissions, head over to Settings » General.
Here, you can click to expand the ‘Advanced’ section.
Now we’re ready to check the ‘Enable AJAX form submission’ box.
Once you’re done with that, click on the ‘Save’ button to save your form settings.
Add the Recurring Payment Form to Your Website
WPForms makes it easy to add forms anywhere on your website or WordPress blog.
To publish your recurring payment form, simply open up the page or post where you want to show this form.
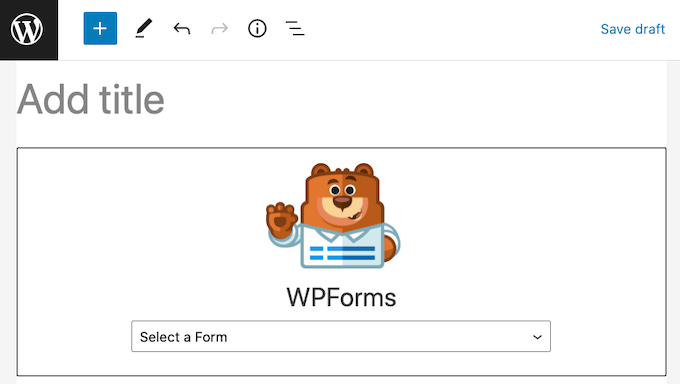
Once you click on the WPForms block, WordPress will add this block to your page or post.
Next you need to open the dropdown menu and select the form you created earlier.
You will now see a preview of your form right inside the WordPress editor.
If you’re happy with how the form looks, then you can publish or update this page.
Now, you can visit your website to see your recurring payment form live.
After publishing any form, it’s a good idea to monitor its stats to find out what’s working and not working. For more details, please see our complete guide to WordPress conversion tracking made simple.
Method 2. Accept Recurring Payments Using MemberPress
Are you creating a membership site and want to set up recurring payments for your subscribers?
First, you will have to create a membership website. You can follow our step by step guide on creating a WordPress membership site to get started.
Once you’ve created a membership site, you need a way to collect recurring payments.
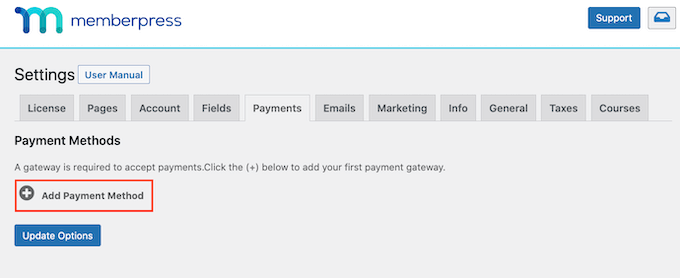
To set up your payment options, go to MemberPress » Settings. Then, just click on the ‘Payment’ tab.
To set up recurring payments you’ll need to add at least one payment gateway.
To add a payment option, click on the ‘Add Payment Method’ button.
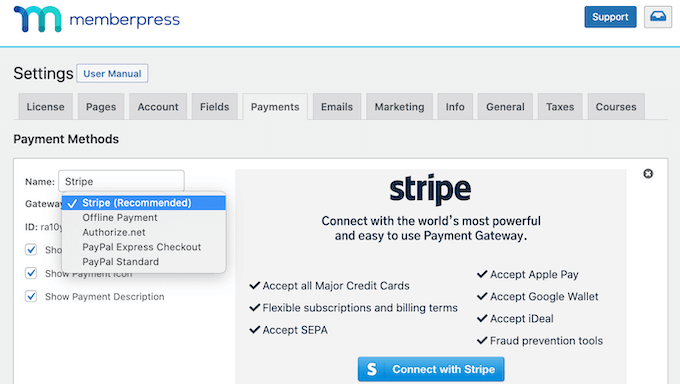
You can now type a name for this payment gateway into the ‘Name’ field.
After that, open the ‘Gateway’ dropdown and choose ‘Stripe (Recommended)’ as your payment gateway.
MemberPress will now show some new options that you can use to set up Stripe.
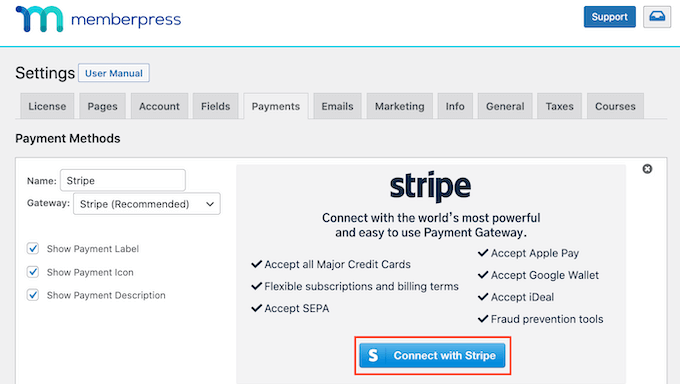
To get started, click on the ‘Connect with Stripe’ button.
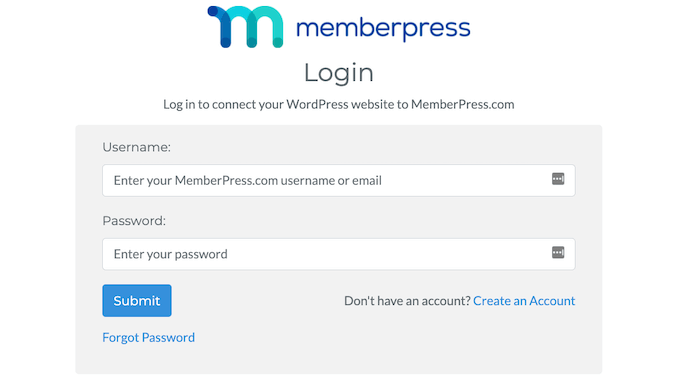
You’ll now be asked to log into your MemberPress account.
After typing your username and password, click on the ‘Submit’ button.
Once you’re logged into your MemberPress account, you’re ready to connect MemberPress to Stripe.
If you don’t already have a Stripe account, don’t worry. MemberPress will walk you through the process of creating an account, step by step.
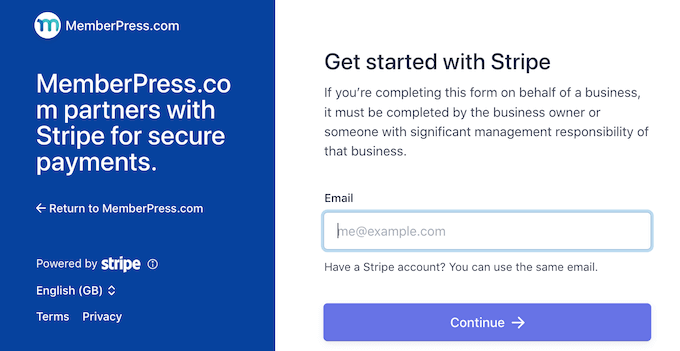
On the next screen, MemberPress will ask for an email address.
If you already have a Stripe account, then it’s important to type the email address that’s linked to your account.
Don’t have a Stripe account? Then you can just type the email address that you want to use for your new Stripe account.
Once you’ve done that, click on the ‘Continue’ button.
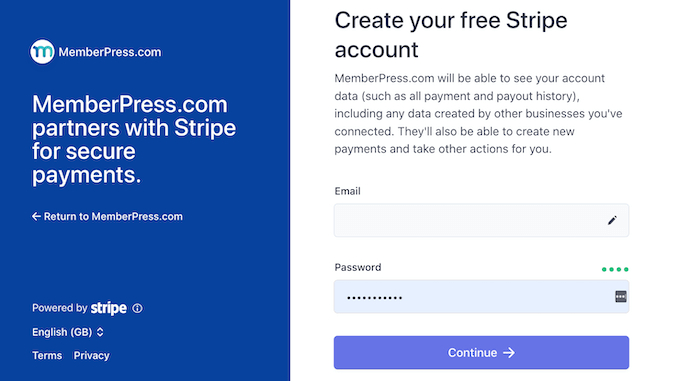
MemberPress will now check whether there’s a Stripe account linked to your email address.
If it finds an account, then MemberPress will ask for your Stripe password. You can type this into the ‘Password field’ and then click on ‘Continue.’
If MemberPress doesn’t find a Stripe account for your email address, then the setup wizard will help you create an account.
After completing the setup wizard, you will be redirected to your WordPress dashboard.
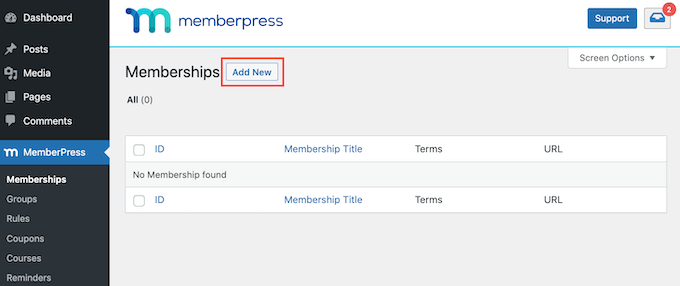
Next, you’ll need to create at least one membership that will collect a recurring payment.
In your WordPress dashboard go to MemberPress » Memberships. You can then click on the Add New button.
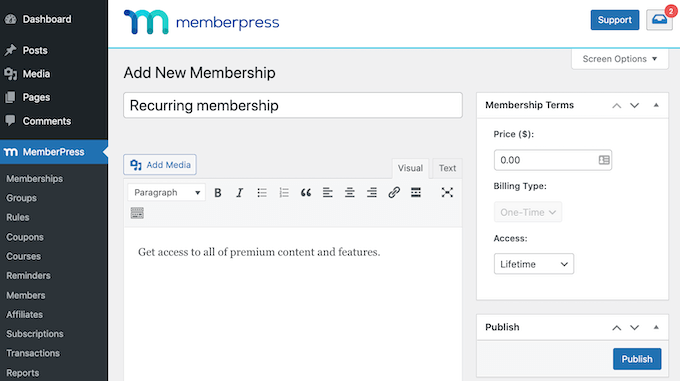
After that you’ll need to type a name for this membership level into the ‘Add title’ field.
This screen also has a text editor where you can add images and text.
All of this content will be displayed on your WordPress website, so this is your chance to promote your membership level. For example, you might want to talk about the exclusive content and features that members will get access to.
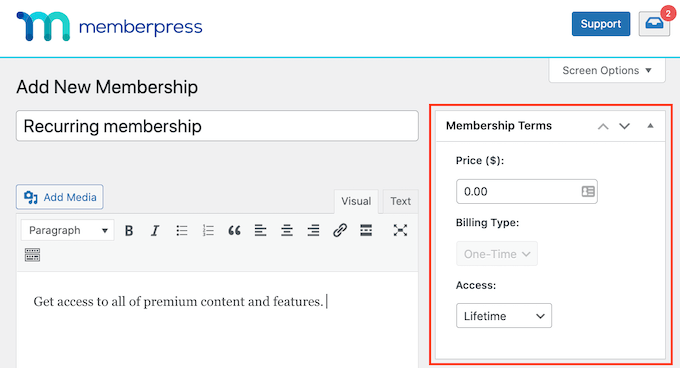
Once you’ve done that, find the ‘Membership Terms’ section towards the right-hand side of the screen.
This is where you’ll enter all the payment details for this recurring membership subscription.
To start, type how much this membership will cost into the ‘Price’ field.
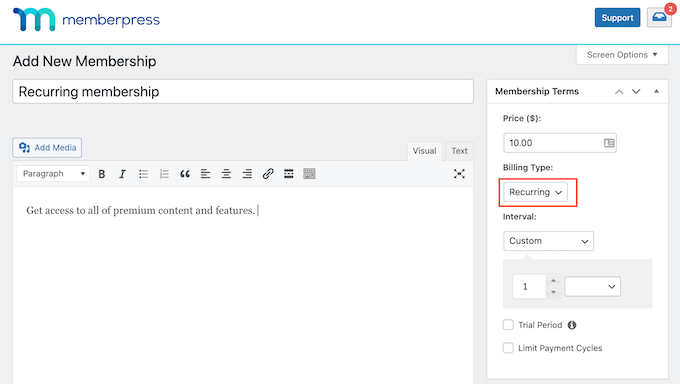
You can then open the ‘Billing Type’ dropdown and choose ‘Recurring.’
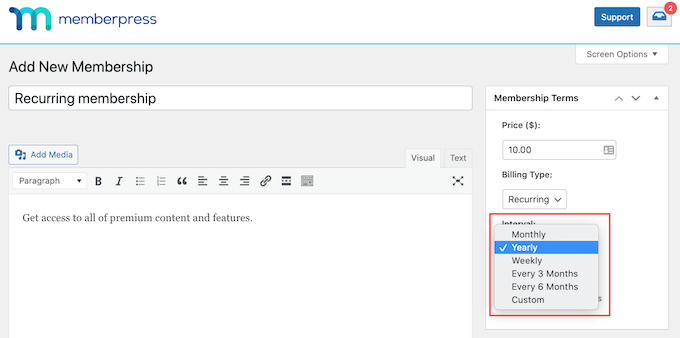
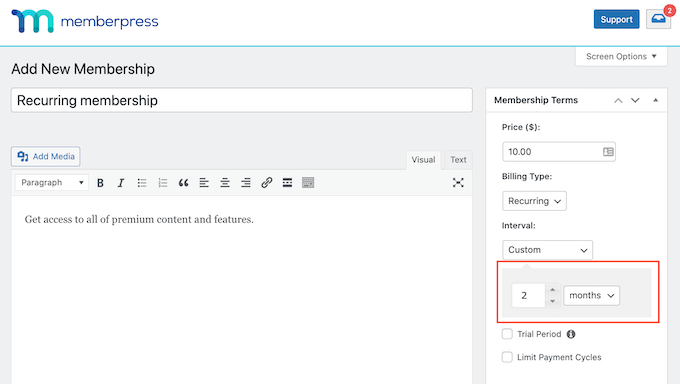
Next you need to set the billing interval for this recurring payment. This is how often your members will be charged.
To see your options, open the ‘Interval’ dropdown. Now simply click to choose an option from this list, such as a monthly or yearly billing interval.
Want to use a different interval? Then simply select ‘Custom’ instead.
WordPress will now add some controls that you can use to create a custom interval.
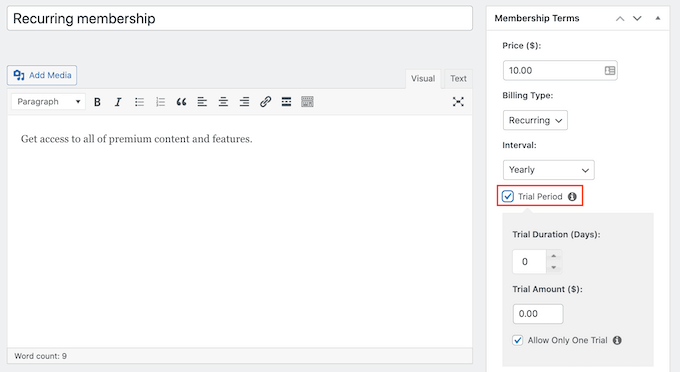
Many membership websites have a free trial. This gives potential new customers a chance to preview the content and features they will get by buying a membership.
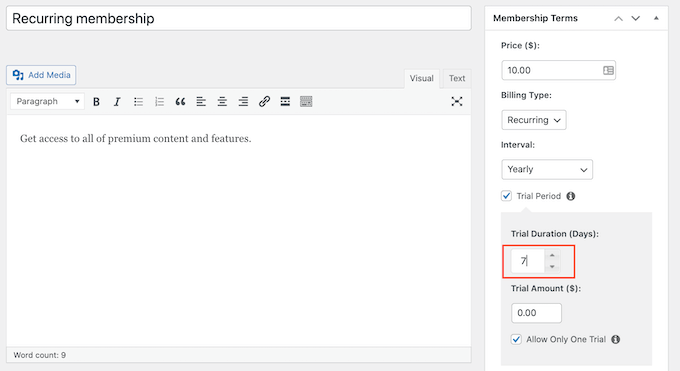
If you decide to offer a free trial, then check the ‘Trial Period’ box.
You can now specify how long this trial will last using the ‘Trial Duration (Days)’ settings.
Simply click the arrows to make your free trial longer or shorter.
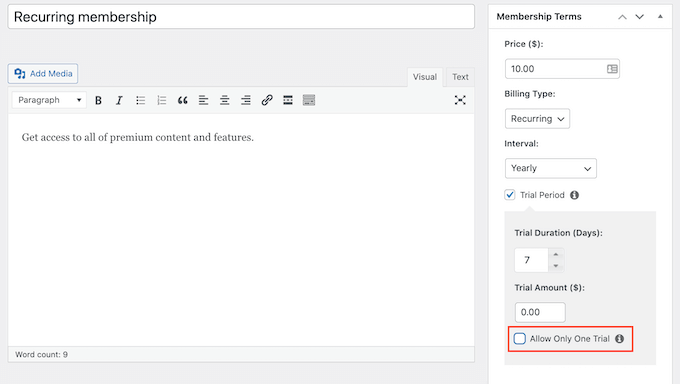
By default MemberPress only offers one free trial to each customer.
If a member cancels their subscription and then tries to re-subscribe, they won’t get a second free trial.
Another option is to remove this restriction and offer unlimited free trials to every customer. To do this, uncheck the ‘Allow Only One Trial’ box.
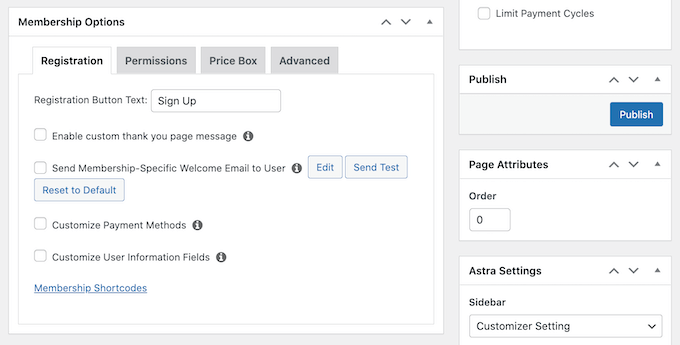
After that, you can scroll down and enter the membership options in the meta box below the post editor.
Here you can change the text that WordPress shows on your membership registration button, and customize the emails that you send to your members.
You’ll want to make sure all the emails sent from your membership website go to the member’s email inbox and not to the spam folder.
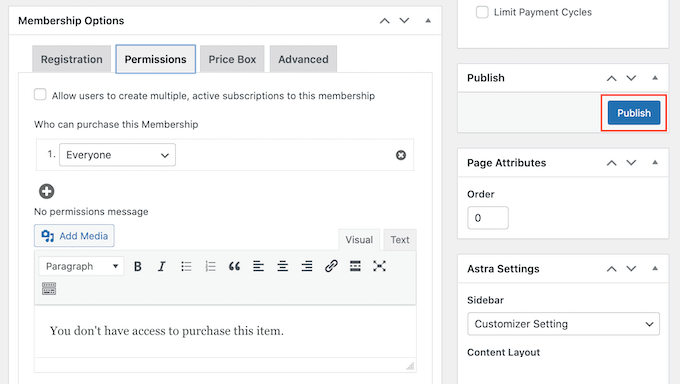
Once you’re happy with how this membership level is set up, you can go ahead and publish your level.
Simply click on the ‘Publish’ button. The people who visit your website can now sign up for a recurring membership.
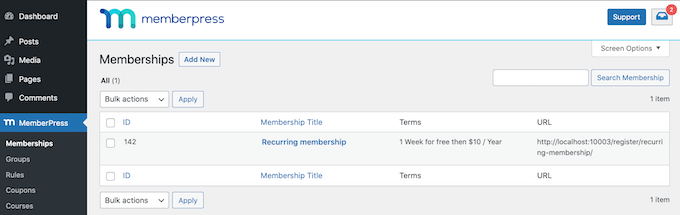
To see how your new membership registration will look to the people who visit yor website, simply go to MemberPress » Memberships.
On this screen you’ll see the membership level you just created.
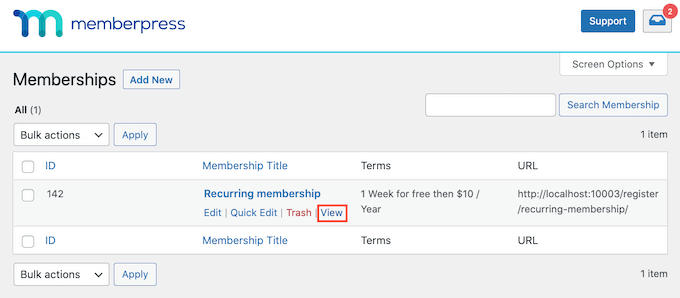
You can now hover your mouse over this membership level.
Then, just click on the ‘View’ link.
WordPress will now show your membership signup form in a new tab.
Want to offer your visitors a choice of recurring memberships? Simply follow the same process above to create more membership levels.
Once you’ve created a recurring membership, you’ll want to encourage visitors to become members. To get more sign ups you may want to offer perks such as exclusive giveaways and contests, a members-only email newsletter, or extra episodes from your podcast.
Method 3. Accept Recurring Payments Using WP Simple Pay
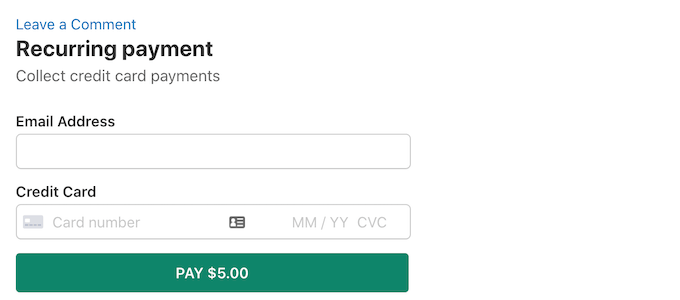
Another method of accepting recurring payments on your WordPress site is through WP Simple Pay.
WP Simple Pay is the best WordPress Stripe payments plugin on the market. As you can see in the following image, you can use WP Simple Pay to create a simple recurring payment form. You don’t even need to install an eCommerce or membership plugin.
First, you’ll need to purchase the WP Simple Pay plugin.
After buying this plugin, you’ll get an email containing your license key and a link to download your plugin.
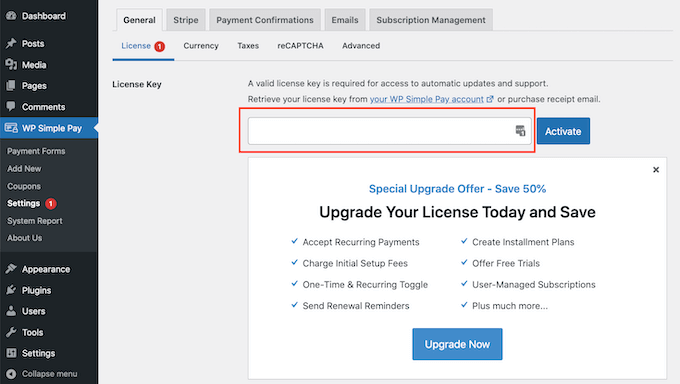
Upon activation, the first step is adding your license key.
To get started, head over to WP Simple Pay » Settings. You can now either type or copy/paste your key into the Licence Key field.
You’ll find this key in your purchase confirmation email.
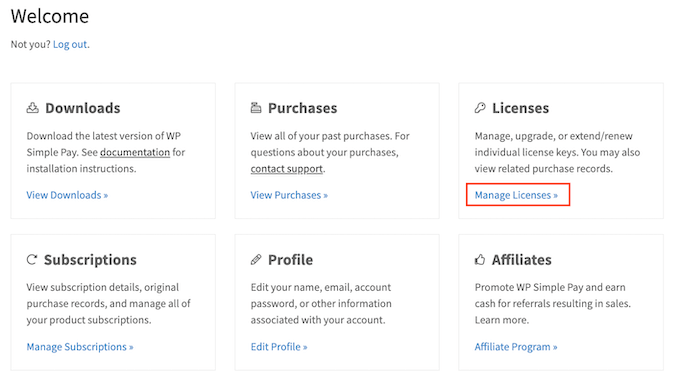
You can also get the license key by logging into your WP Simple Pay account. Once inside your account, click on the Manage Licenses link.
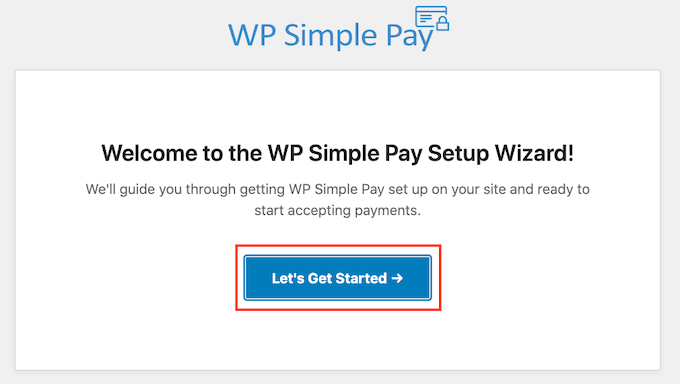
After entering your license key, WP Simple Pay will automatically launch the setup wizard.
Now just click on the ‘Let’s Get Started’ button.
The next step is connecting WP Simple Pay to your Stripe account.
If you don’t already have a Stripe account, then WP Simple Pay will walk you through the process of creating a new account, step by step.
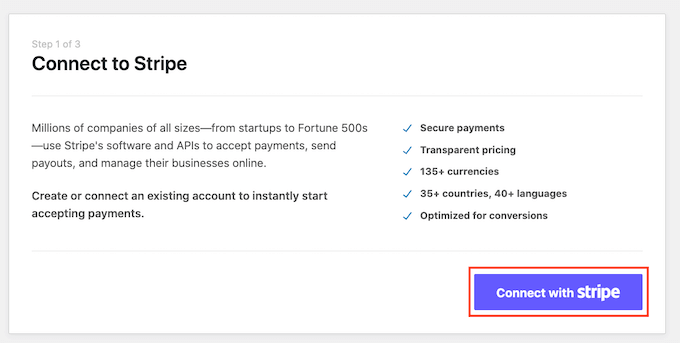
To get started, click on the ‘Connect with Stripe’ button.
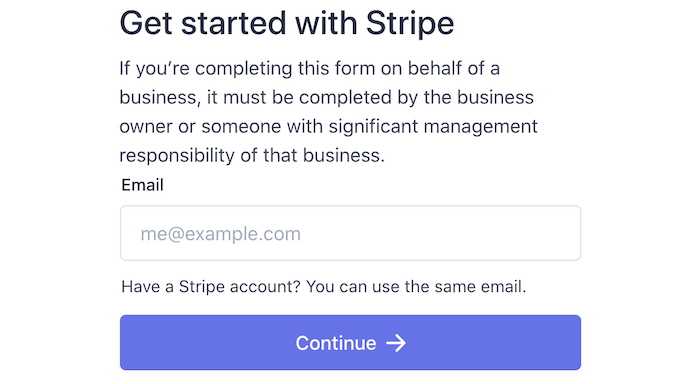
On the next screen, WP Simple Pay will ask for an email address.
If you’re already registered with Stripe, then make sure you type the email address that’s linked to your Stripe account.
You can now follow the onscreen instructions to connect WP Simple Pay to Stripe.
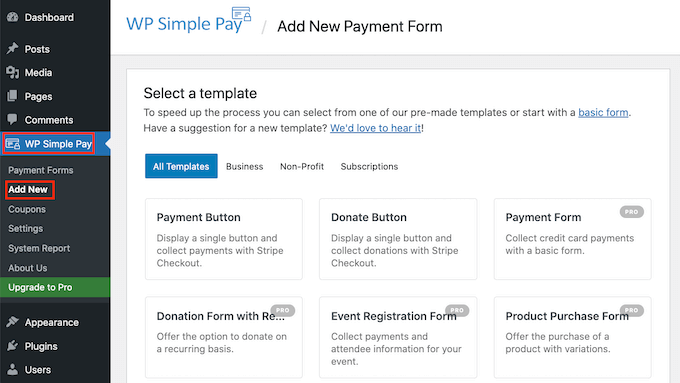
Once you’ve done that, it’s time to create your recurring payment form by going to WP Simple Pay » Add New.
Now hover your mouse over ‘Payment Form.’
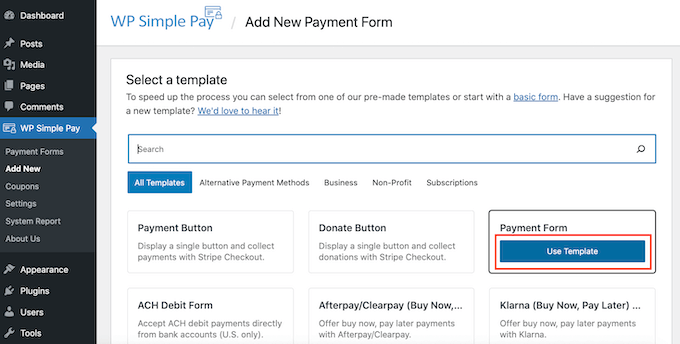
After a few moments, you will see a new ‘Use Template’ button. Give this button a click.
This template will now open in the WP Simple Pay editor, ready for you to customize.
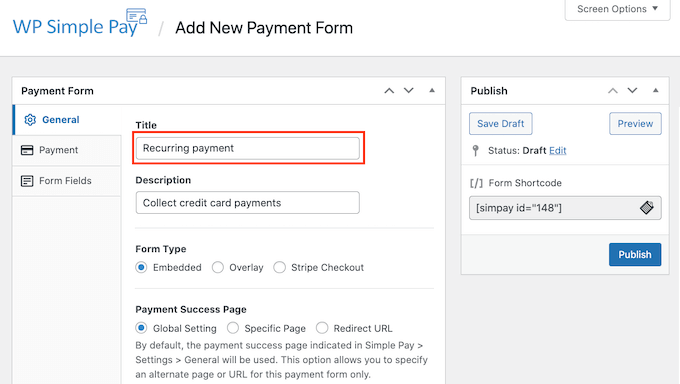
To start, type a name for this payment form into the ‘Title’ field. Your site visitors won’t see this name since it’s for your own reference only.
Once you’ve done that, click on the ‘Payment’ tab in the left-hand menu.
By default WP Simple Pay will create this form in test mode. While it’s in this mode, WP Simple Pay won’t actually process any payments when the form is submitted.
After you’re done testing, to make sure your form can collect and process payments, click on the ‘Live Mode’ button.
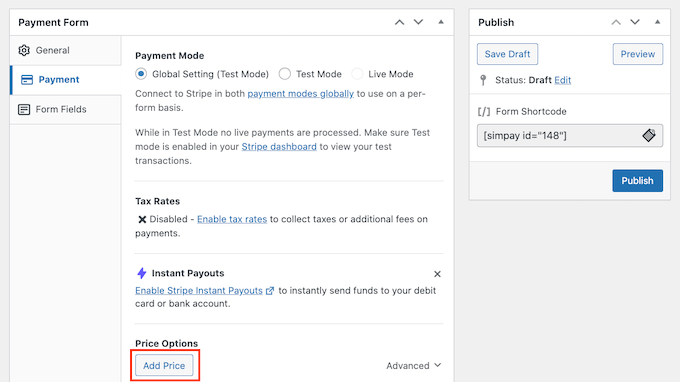
After that, scroll to the Price Options section.
Here, you just need to click on the Add Price button.
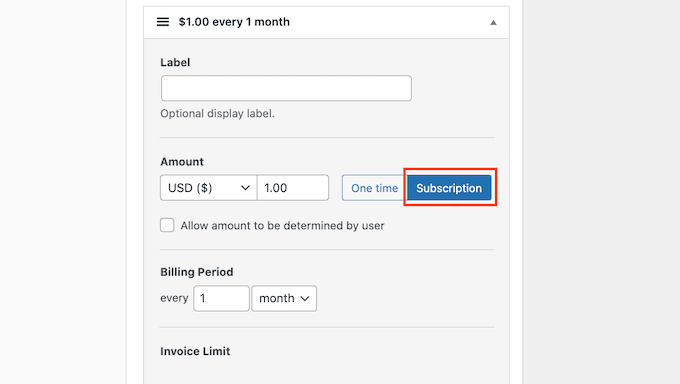
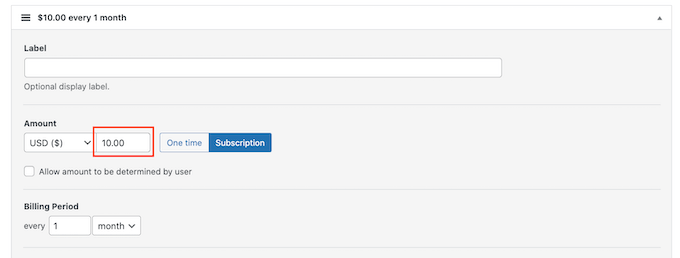
This adds a new ‘Amount’ section.
The default setting is ‘USD ($) 1.00,’ which is a one-time payment. Since we’re creating a recurring payment form, click on the ‘Subscription’ button.
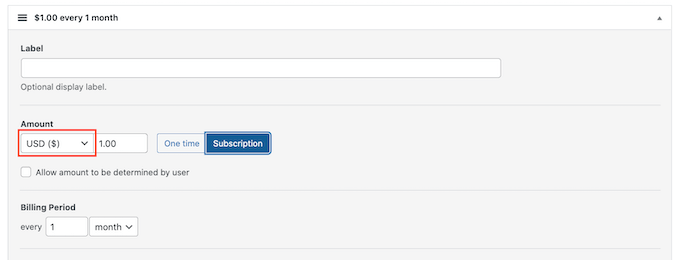
WP Simple Pay collects its payments in US dollars by default.
If you want to get your payments in a different currency, just click on the ‘USD ($)’ field. You can now choose a new currency from the dropdown menu.
In the ‘Amount’ field type how much this recurring product or service will cost.
This is the amount your customers will be charged during each billing period.
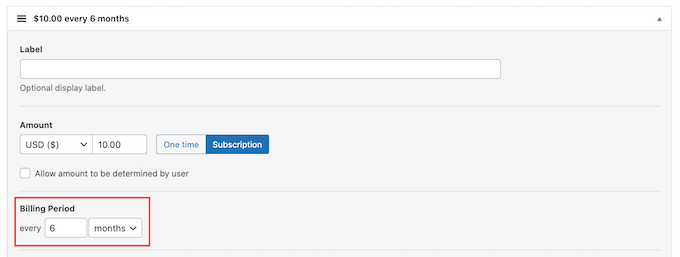
Next, move to the ‘Billing Period’ section. Here you can specify how often WP Simple Pay will collect this amount from your customers.
For example, you might charge your customers $10 per month or $100 once a year.
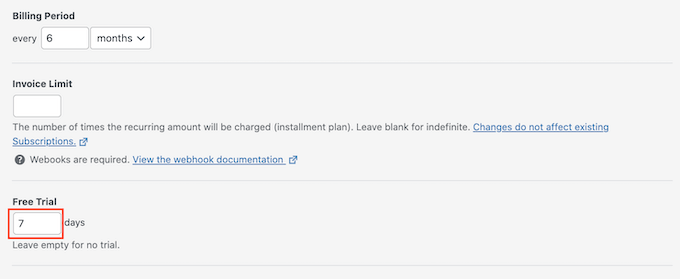
Free trials can be a smart offer to encourage visitors to give your products or services a chance. If you want to offer a free trial, then scroll to the ‘Free trial’ section.
You can now type how many days your free trial will last.
If you don’t want to offer a free trial, just leave this field blank.
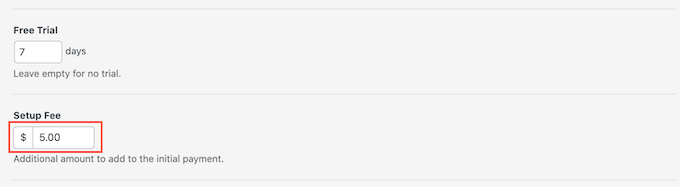
Sometimes you may want to charge new subscribers a one-time setup fee. If this is the case, you can type this charge into the ‘Setup Fee’ box.
Once you’re happy with your settings, it’s time to build your recurring payment form.
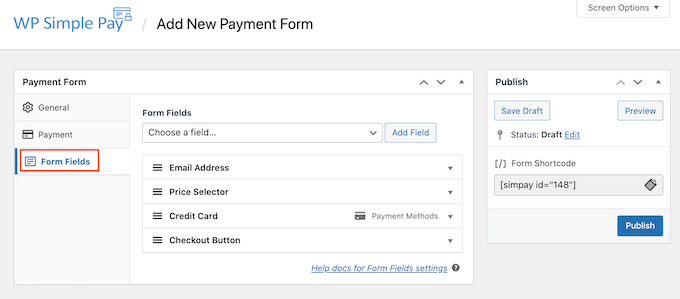
Simply click on the ‘Form Fields’ tab to launch WP Simple Pay’s form builder.
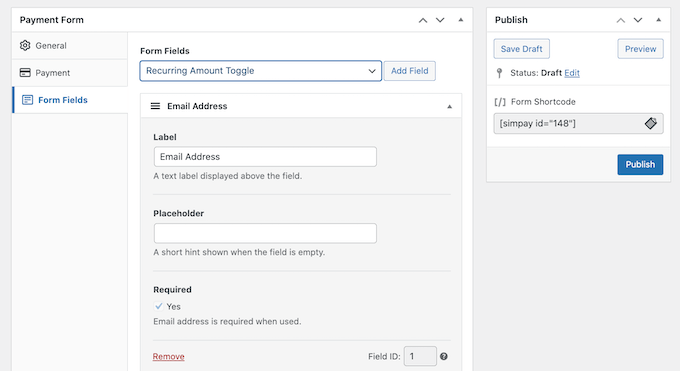
You can now customize any of the form’s default fields.
To edit a field, simply give it a click. This section will now expand to show all the settings that you can customize, such as changing the field’s label or adding some placeholder text.
You can also remove fields from your recurring payment form.
To delete a field, simply click on its ‘Remove’ link.
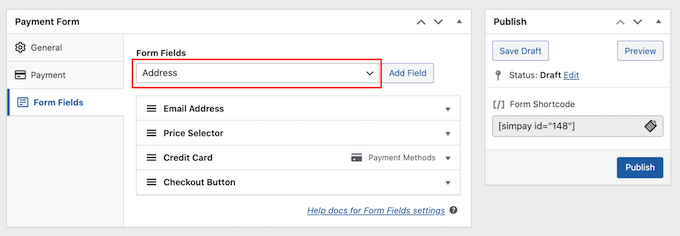
You can also add more fields to your recurring payment form by clicking on the ‘Form Fields’ dropdown menu. For example, you could ask for your customers’ shipping address or phone number.
Then, simply choose a field from the dropdown menu.
After selecting a field, go ahead and click on the ‘Add Field’ button. WordPress will now add this field to your recurring payment form.
Finally, you can change the order fields appear in your form using drag and drop.
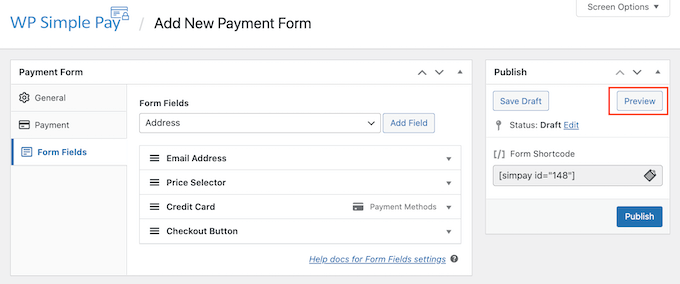
As you’re customizing your form, you may want to check how it will look to your visitors. To do this, click on the ‘Preview’ button in the upper-right corner.
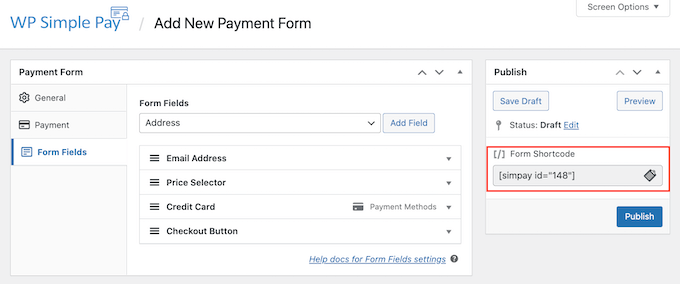
When you’re happy with how your form looks, click on ‘Publish.’
You can now add this form to your website by copying the ‘Form Shortcode’.
Now you just need to paste this shortcode into any page, post, or widget where you want to show the recurring payment form.
Method 4. Accept Recurring Payments Using WooCommerce
WooCommerce is the world’s largest eCommerce platform. It is one of the best eCommerce plugins for WordPress because it’s cost-effective, easy to manage, and you can use it to sell physical goods, services, and subscriptions.
If you already have a WordPress website, then you can simply install and activate the WooCommerce plugin.
When it comes to WooCommerce hosting, we recommend using Bluehost.
Bluehost is an official WordPress recommended hosting provider, and they are offering WPBeginner users a free domain name, a free SSL certificate, and a generous discount on WooCommerce hosting.
To sign up, go to the Bluehost website and then click on the ‘Start Your Store’ button.
Next, select a plan of your choice. If you are just starting out, then we recommend opting for the Starter plan.
After that, you can enter a domain name for your WooCommerce store.
Bluehost will then ask for your account and package information. It will also suggest some optional package extras that you can add to your order.
If you’re unsure whether you need these extras, then just leave them for now. You can always add them to your hosting account in the future.
Lastly, enter your payment information, agree to the terms of service, and click the ‘Submit’ button at the bottom of the page.
Once you’ve signed up for Bluehost, you’ll get an email with details about how you can log into cPanel, which is Bluehost’s web hosting control panel.
The best part about using Bluehost is that WordPress comes pre-installed.
When you first log in to your cPanel account, you’ll get a popup message. Just click on the ‘log in to your site’ button and cPanel will take you to the WordPress admin area.
By default, WooCommerce doesn’t offer Stripe as a payment option. However, you can accept recurring payments using Stripe by installing the WooCommerce Stripe Payment Gateway.
First, you’ll need to download, install and activate the WooCommerce Stripe Payment Gateway. If you need help, then please see our guide on how to install a WordPress plugin.
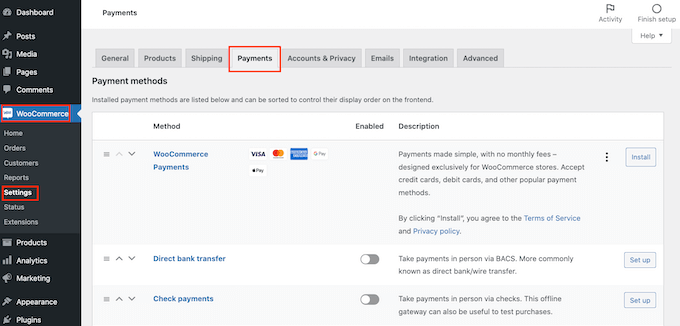
After activating this plugin, go to WooCommerce » Settings. Then click to select the ‘Payments’ tab.
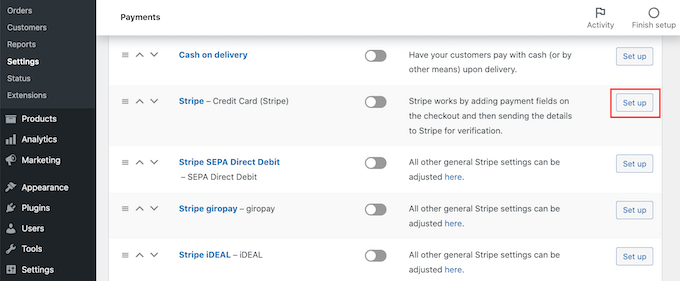
Now scroll to the ‘Stripe – Credit Card’ option.
Here, click on the ‘Set up’ button.
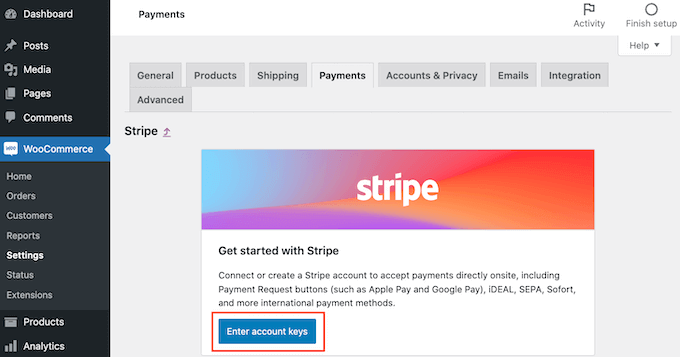
This launches a set up wizard that will show you how to connect WooCommerce to Stripe.
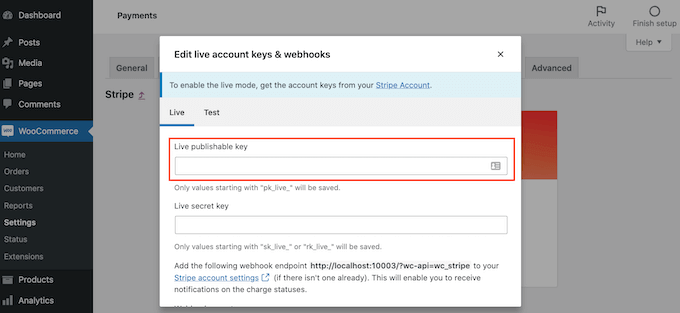
On the next screen, click on the ‘Enter account keys’ button.
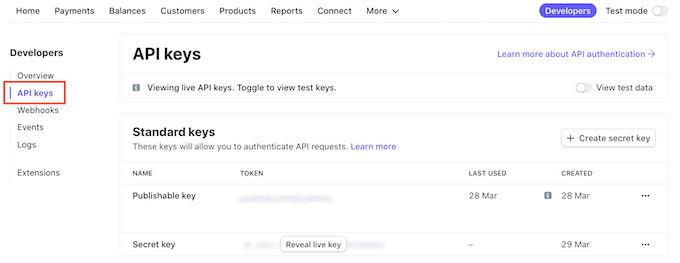
WooCommerce will now ask for your Stripe account keys. To get this information, log into your Stripe dashboard in a new tab.
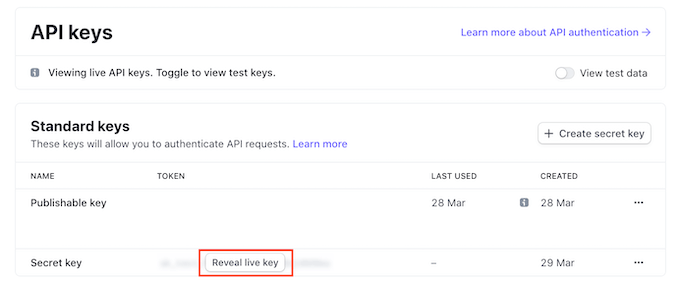
Inside the Stripe dashboard, select ‘API keys’ from the left-hand menu.
You can now copy the ‘Publishable key.’
Then, switch back to your WordPress dashboard and paste this key into the ‘Live publishable key’ field.
Once you’re done with that, switch back to your Stripe dashboard and click on the ‘Reveal live key’ button.
This will show your secret key.
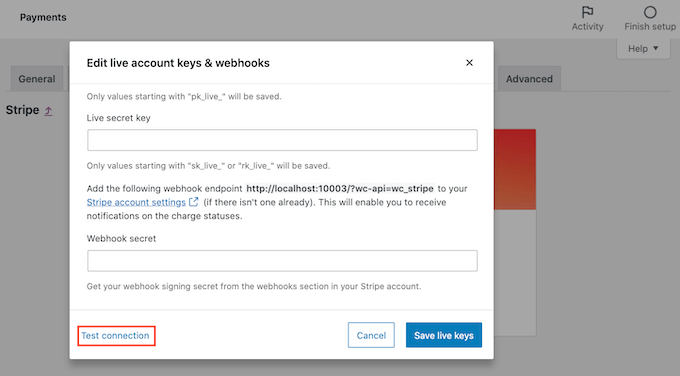
You can now head back to your WordPress dashboard and paste this key into the ‘Live secret key’ field.
After that, just click on a the ‘Test connection’ link.
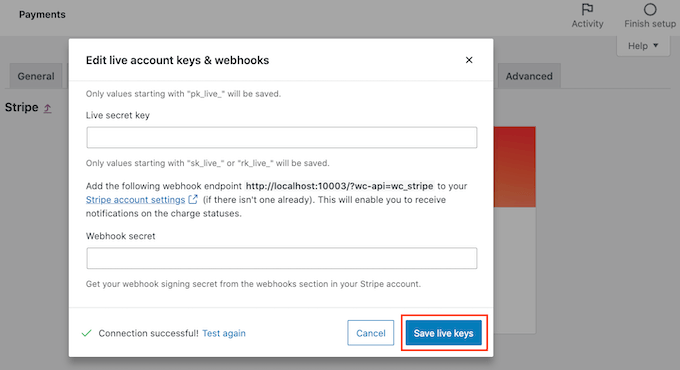
After a few moments, you will see a ‘Connection successful’ message. This means that WooCommerce is now connected to your Stripe account.
You can now go ahead and click on the ‘Save live keys’ button.
This will take you to the Stripe ‘Settings’ screen.
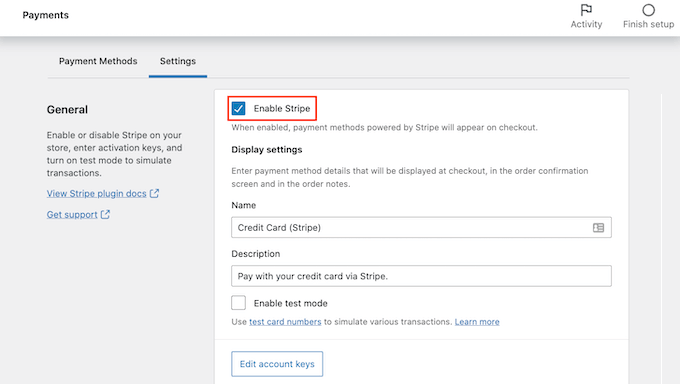
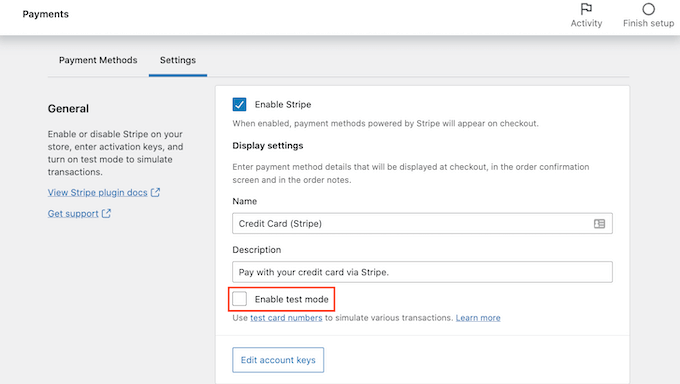
On this screen, check the ‘Enable Stripe’ box.
You’ll also want to uncheck the ‘Enable test code’ box.
This takes your Stripe connection out of test mode, so you can start accepting payments from your customers straight away.
Next, scroll to the very bottom of the screen and click on the ‘Save changes’ button.
After that, you’ll need to install and activate the WooCommerce Subscriptions extension. You can install this extension just like any other WordPress plugin. For details, see our step by step guide on how to install a WordPress plugin.
WooCommerce Subscriptions is a paid extension, and will cost you $199 per year.
Once you have downloaded and activated the extension, you can add recurring payments to any WooCommerce product.
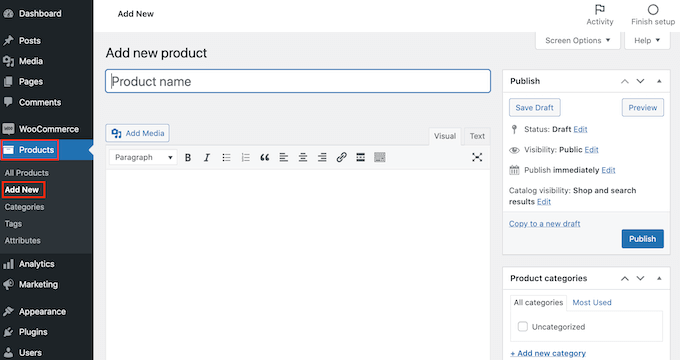
Let’s see how you can create a new product with a recurring payment. In your WordPress dashboard go to Products » Add New.
Then scroll to the ‘Product Data’ box.
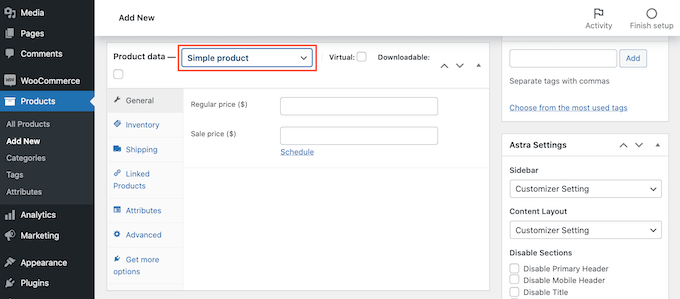
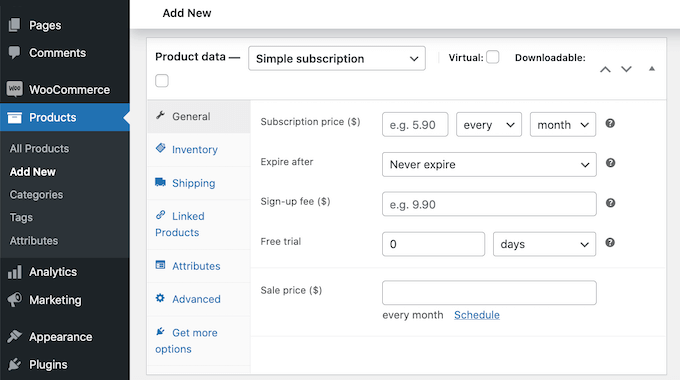
You can now click to open the ‘Product Data’ dropdown. In this dropdown menu you’ll see two new options: ‘Simple subscription’ and ‘Variable subscription.’
If you select ‘Simple subscription’ then WordPress will show fields where you can set your subscription price and billing interval.
You can also choose the expiration period, and add an optional sign up fee.
To encourage people to buy a subscription you may also want to offer a free trial.
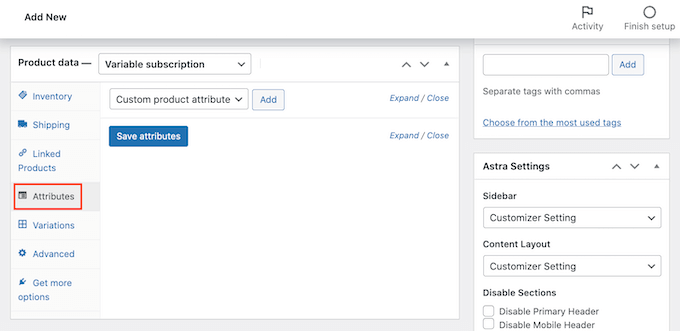
Another option is to choose ‘Variable subscription’ from the dropdown menu. These variable subscriptions are similar to WooCommerce’s variable products.
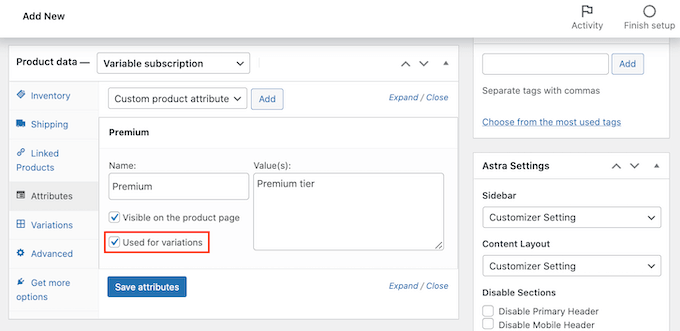
If you select ‘Variable subscription’ then you’ll need to create product variations. To do this, click on the ‘Attributes’ tab.
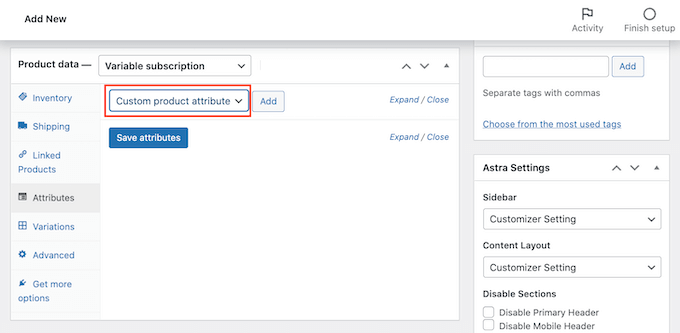
If you’ve already created some product attributes, then you can click on the ‘Custom product attribute’ dropdown.
You can then choose any attribute from the dropdown menu.
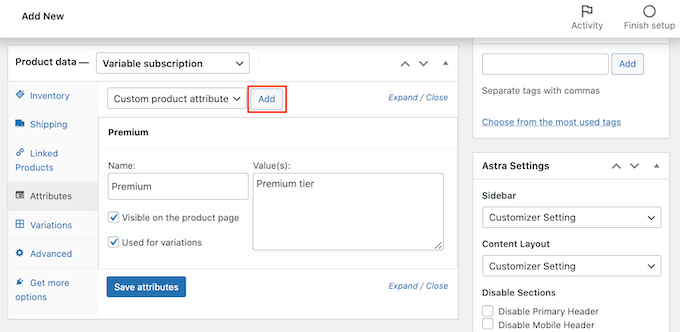
Another option is to create a new attribute and add it to your variable subscription.
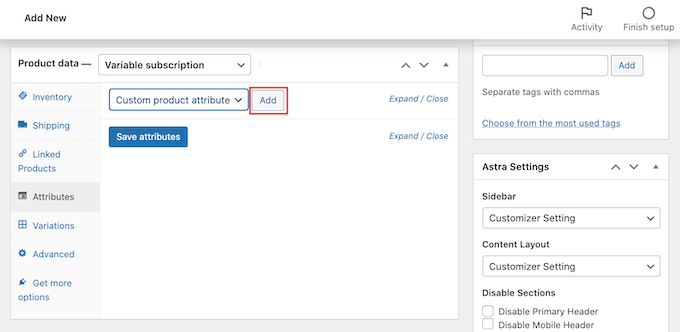
To create an attribute, click on the ‘Add’ button.
You will now see a new section where you can create your product attributes.
You’ll want to add these attributes to your product variations. With that in mind, make sure you check the ‘Used for variations’ box.
Once you’ve entered all the information for this attribute, click on ‘Add.’
To create more attributes, simply follow the same process described above.
When you’re happy with your new attributes, click on ‘Save attributes.’
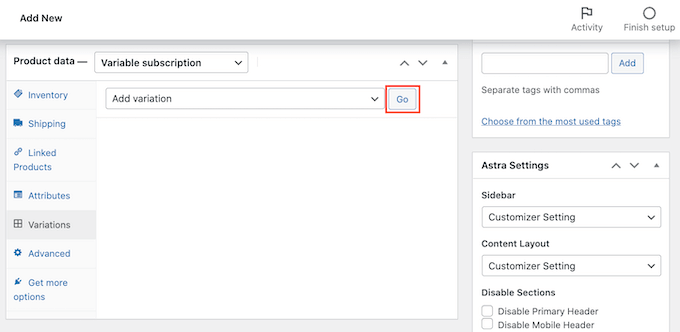
Next click on the ‘Variations’ tab followed by the ‘Go’ button.
WooCommerce will now add a new section.
You can use these new settings to create subscription variations using the attributes you added in the previous step.
Once you are happy with the product’s settings, click on the ‘Publish’ button.
Now, you can visit your website to see this new WooCommerce product live.
Once you’ve successfully added recurring payments to your WooCommerce site, you’ll want to drive people to your product pages.
Which is the Best WordPress Recurring Payment Plugin?
The best WordPress recurring payment plugin depends on your business goals and needs. If you just want to accept recurring payments without the hassle of a full shopping cart plugin, then both WPForms and WP Simple Pay are good choices.
On the other hand, if you want to selling subscription-based memberships, then MemberPress is the best solution. This plugin lets you accept recurring payments, and even comes with a built-in online course builder that you can use to create and sell digital courses.