Do you want to add call to action buttons in your WordPress posts or pages?
Buttons are a great way to boost conversions. They are highly noticeable which makes them excellent at redirecting user’s attention to a desired interaction.
For example, you can use a call to action button to navigate users to a transactional page like pricing page, product page, services page, and others on your website.
You can also use call to action buttons to promote special offers, new products, or affiliate links that point to partner websites.
In this article, we will show you how to easily add beautiful call to action buttons in WordPress without writing any code.
Note: This article is for adding custom call to action buttons in WordPress. If you want to add social share buttons, then please see our guide on how to add social share buttons in WordPress.
Adding Buttons in WordPress Posts and Pages (Step by Step)
WordPress makes it super easy to add buttons with a built-in ‘Button’ block.
It is a new feature introduced in WordPress 5.0, along with the new Gutenberg WordPress block editor.
In this article, we will show you three different ways to add call to action buttons in WordPress blog posts and pages. You can pick the solution that best suits your needs.
Feel free to use the table of content below to navigate through this article easily.
Table of Contents:
- Adding Buttons in WordPress Posts / Pages Using Default Editor
- Creating a WordPress Button in Classic Editor
- Adding a Click-to-Call Button in WordPress
Adding Buttons in WordPress Posts / Pages Using Default Editor
This method is easier and recommended for most users. It uses the built-in Button block in the new WordPress editor. If you are still using the older classic editor, then you can skip to the next section.
First, you need to create a new post or edit an existing one where you want to add a button.
On your post edit screen, click on the ‘+’ icon to add a New Block and select the Button block under the Layout Elements section.
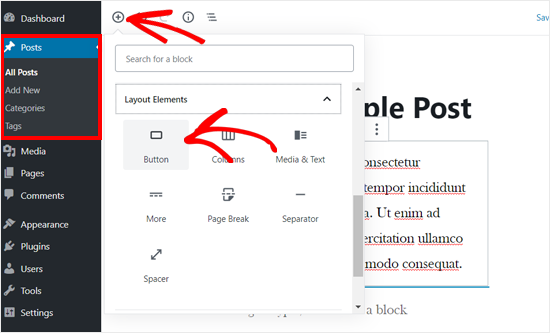
Next, you should be able to see the button block added to the content editor
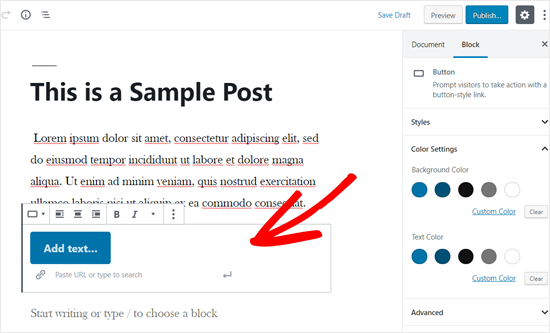
Simply click on the ‘Add text…’ area and enter your button text.
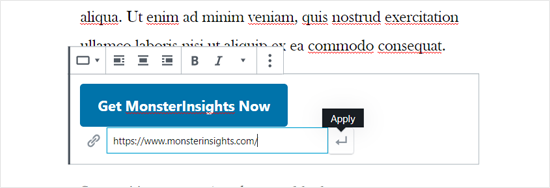
After that, you need to paste the URL of the page you want to link in the ‘Paste URL or type to search’ field below the button.
Once done, click on the Apply icon.
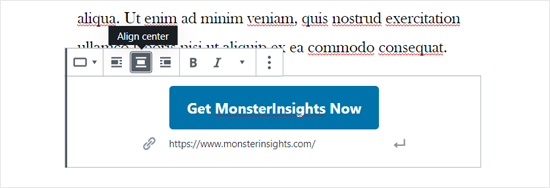
If you want to display the button in the center, then you can click on the Align Center icon in your block toolbar above.
Next, you can customize your button style, change background color, and change text color from the block settings panel on the right side.
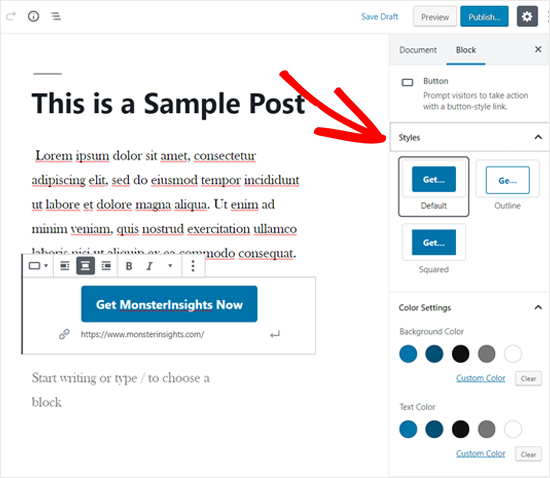
There are three button styles you can choose from: default, outline, and squared. You can try each one by clicking on them and choose the one that looks best.
The Color Settings section includes five color variations for both button background and button text. Not only that, but you can also use a custom color of your choice by clicking on the Custom Color option.
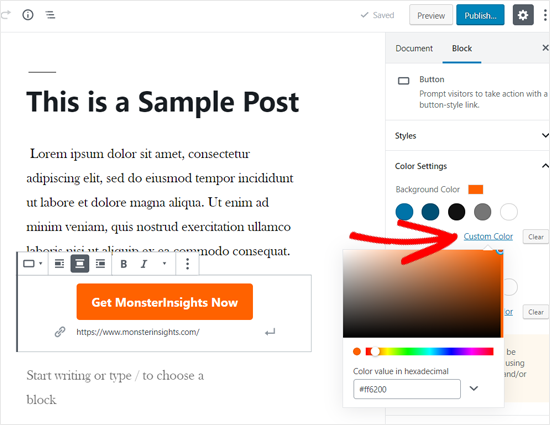
Once you are happy with the button design, you can save your post or publish to see a live preview.
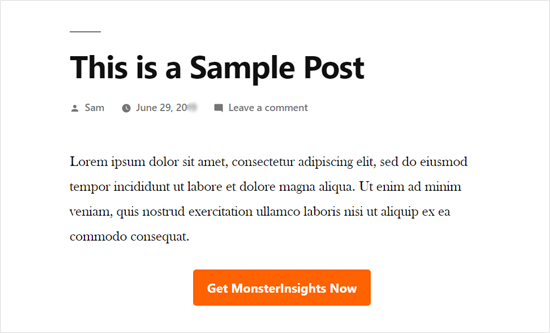
Here is how it looked on our demo website.
Bonus: If you want to see how well your buttons are performing, then you should use MonsterInsights. It has built-in event tracking for affiliate links, outbound links, and custom events, so you can see how well your buttons are performing. For more details, see important marketing metrics that you must track in WordPress.
Creating a WordPress Button in Classic Editor
Although Gutenberg block editor is faster and easier, many users still prefer the old Classic WordPress editor. If you are one of them, then you need to find an alternative solution to add buttons on your WordPress site.
There are mainly three options available for adding buttons in WordPress Classic Editor.
- Add button in WordPress with HTML / CSS code.
- Add button in WordPress with WordPress button shortcode plugin.
- Add button in WordPress without using shortcodes.
Of the three options, the first one is the coding method. You will need to write HTML / CSS code and add to your website wherever you need a button. It is not beginner-friendly.
The second option is the most commonly used method. That’s because most of the WordPress button plugins provide shortcodes for adding buttons.
The third option is the best because it allows you to easily add buttons to your posts and pages without having to remember shortcode.
Let’s take a look at how to add buttons in WordPress without using shortcodes.
First thing you need to do is install and activate the Forget About Shortcode Buttons plugin. For more details, see our step by step guide on how to install a WordPress plugin.
Once you have activated the plugin, create a new post, or edit an existing one. In the editor, you will see a new button in the Visual Editor labeled Insert Button.
![]()
To insert a new button in your post, you need to click on the Insert Button. This will bring up a popup window where you can design your new button.
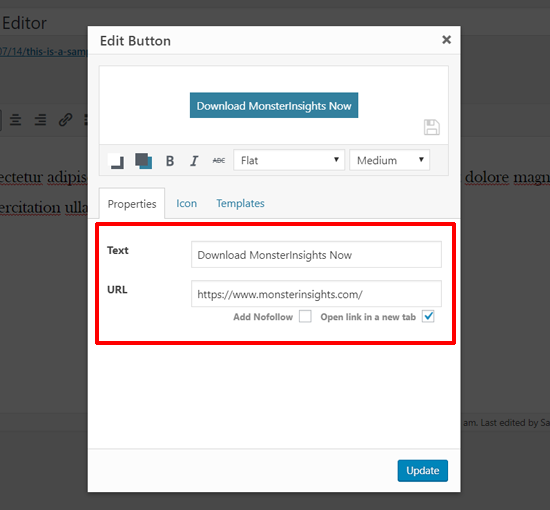
First, you need to add your button text and URL. As you add your button text, you can see a live preview in the box below.
Next, you can add nofollow tag to your link and open the link in a new tab by clicking on the checkbox options below.
After that, you can select an icon for your button. If you click on the Icons tab, then you will be able to see the icons that you can add before or after the text in your buttons.
![]()
These icons are actually icon fonts (learn how to use icon fonts in WordPress post editor).
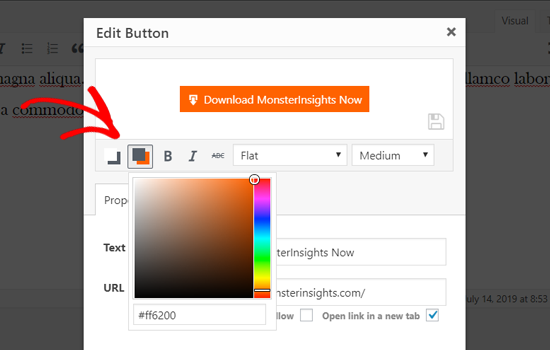
Next, you can choose text color and background color for your button by clicking on the Color box icon.
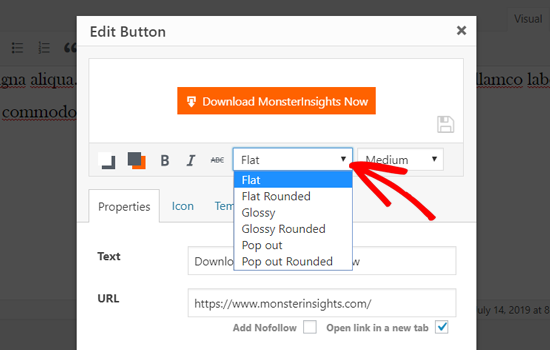
After that, click on the drop-down menu to choose the button style. There are eight different button styles ready for use.
Similarly, you can also choose the button size from extra small to extra large.
Once you are satisfied with the look, simply click on the Update button.
You will be able to see your button as it would appear in your post, right inside the post editor.
You can also set button alignment by simply selecting the button text and using the toolbar buttons in the classic editor.
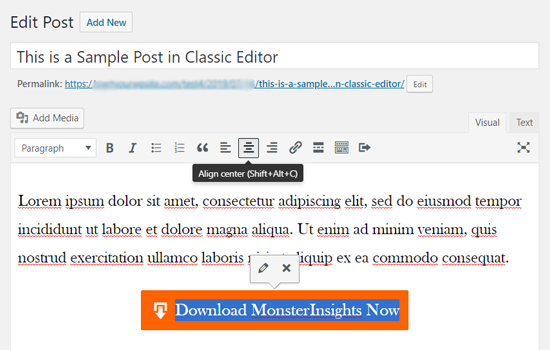
Double-clicking on the button will bring up the Insert Button popup, and you can re-edit your button if you like.
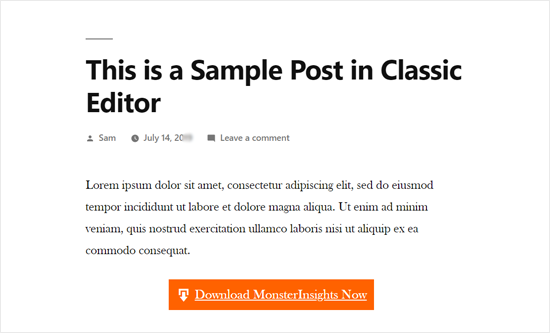
Once you are happy with its design, you can publish or update your post and see it in action. This is how the fancy button appeared on our demo WordPress website.
Adding a Click-to-Call Button in WordPress
In addition to the usual call to action buttons, you can also add click-to-call buttons on your website to boost leads and conversions.
A click-to-call button is a specific type of call to action button which allows your users to make a phone call to your team with just a tap.
Using the tap-to-call buttons, your site visitors can instantly talk to your team in person and get the information they need. Whether discussing a quote request, pre-sale information, or support issue, phone calls are quick.
As the number of smartphone users is growing, adding call now buttons are even more relevant nowadays.
If you don’t have a business phone, then you may want to look into getting a virtual business phone number.
With that said, let’s take a look at how to add click-to-call buttons in WordPress step by step.
First thing you need to do is install and activate the WP Call Button plugin. For detailed instructions, you can see our step by step guide on how to install a WordPress plugin.
Upon activation, you need to visit Settings » WP Call Button page to configure the plugin settings and design your click-to-call button.
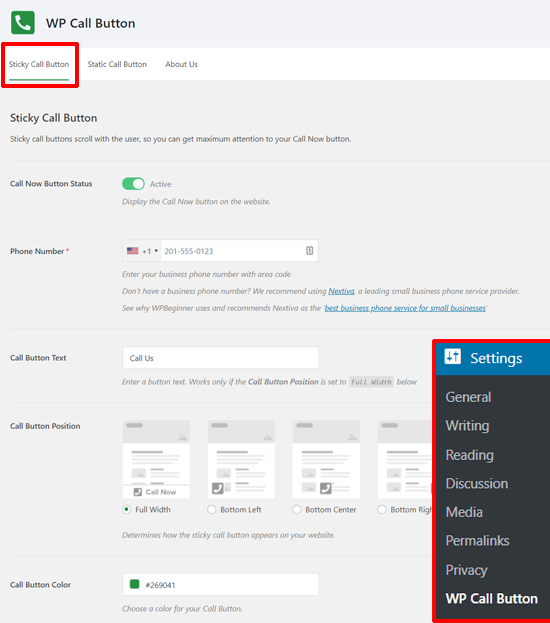
At first, you will see the Sticky Call Button settings. The sticky call button is a conversion optimized feature which moves the call button along with users as they browse your site.
You can start by activating the Call Now Button Status. Simply click on the switch toggle to activate that.
After that, you need to enter your phone number. WP Call Button has a smart phone number field with your country code. Simply select your country and enter your business phone number.
If you don’t have a business number, then you can get one from Nextiva. It is a trusted business VoIP provider.
Next, you can edit your call button text, choose the call button position, and color.
Also, you can select where to show the sticky call button on your website. By default, it shows the call button on all pages and on all devices. You can choose to show or hide the button on certain pages, and show only on mobile devices.
Once you review all the options, you can click on the Save Changes button at the bottom. After that, you can visit your website and see the sticky call now button in action.
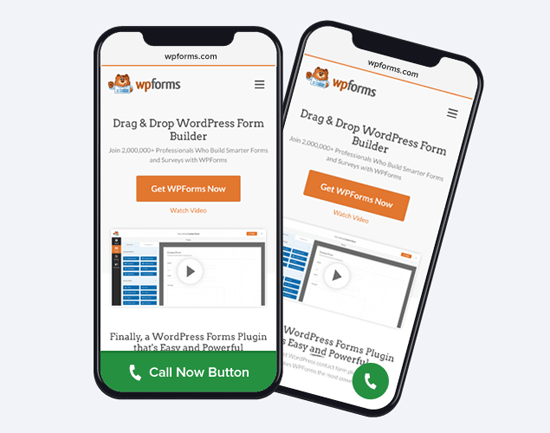
Aside from the sticky call buttons, you can also add static call buttons on your WordPress pages, posts, and sidebars using this plugin.
If you are using the new WordPress block editor, then you can easily add the call now button on your pages using the WP Call Button block.
Create a new page or edit an existing page and add the WP Call Button block on your page editor.
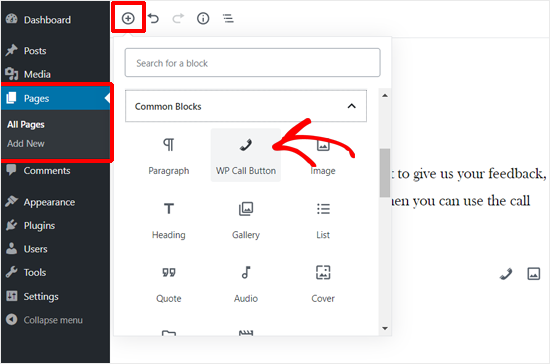
After that, you can customize the button text, button color, text color, font size, and show or hide the phone icon.
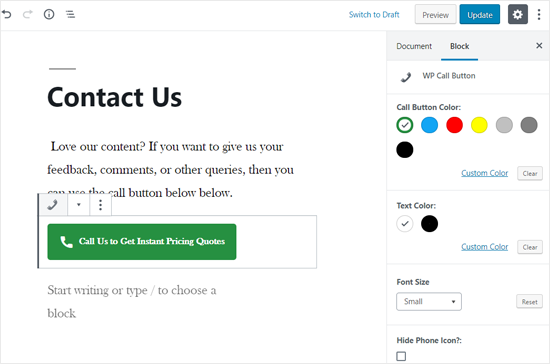
Once you are happy with its design, you can publish or update your page.
If you are using Classic WordPress editor, then you need to use the Static Call Button generator to get a shortcode. Go to Settings » WP Call Button and click on the Static Call Button menu on the top.
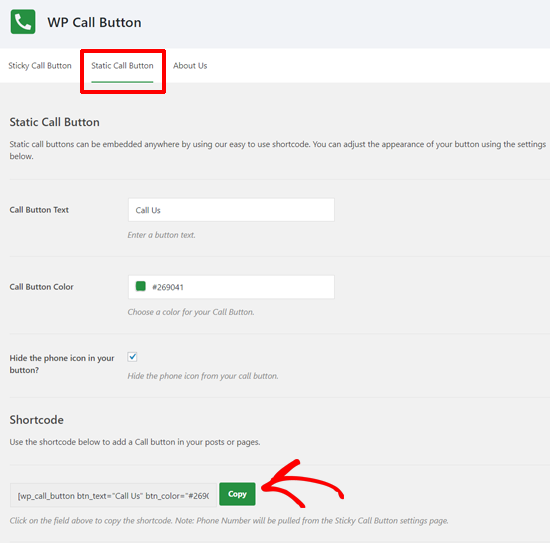
Simply customize the button options and then copy the shortcode. After that, you can use the shortcode in any post or page on your website.
WP Call Button plugin also allows you to add the call button on your WordPress sidebar and other widget-ready areas.
Simply go to Appearance » Widegts and drag the WP Call Button widget to a widget ready area where you want to show the call button.
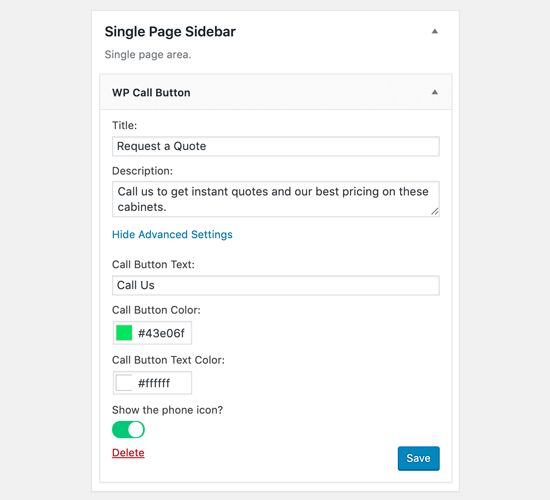
Now you can add a title, description, and customize the call button from the Advanced Settings section. Once done, save your widget.
That’s it! If you want to see a more detailed tutorial, then you can check our step by step guide on how to add a click-to-call button in WordPress.
Bonus Tip for Adding Custom Buttons in WordPress
If you want to add completely custom call to action buttons in WordPress, then you’re likely looking for a solution that also allows you to add custom sections as well as custom buttons in your website header, menus, and other areas.
In that case, we recommend using a drag and drop WordPress page builder plugin like Beaver Builder or Divi.
These page builders will help you create custom landing pages with fancy call to action buttons exactly how you want it.
Whatever you do, its important that you track how your buttons are performing because guessing isn’t the best business growth strategy.
We recommend using MonsterInsights. It has built-in event tracking for affiliate links, outbound links, and custom events, so you can see how well your buttons are performing. For more details, see important marketing metrics that you must track in WordPress.
We hope this article helped you to learn how to add buttons in WordPress easily. You may also want to see our list of the best WordPress plugins and best email marketing services for small businesses.
If you liked this article, then please subscribe to our YouTube Channel for WordPress video tutorials. You can also find us on Twitter and Facebook.
The post How to Add Call to Action Buttons in WordPress (without Code) appeared first on WPBeginner.
from WPBeginner https://ift.tt/2noOPGr
More links is https://mwktutor.com
No comments:
Post a Comment