There are several WordPress eCommerce plugins that allow you to add a shopping cart to your website. However, if you want to keep your eCommerce store separate for better speed and security, then your options are quite limited.
BigCommerce is an all-in-one eCommerce platform that allows you to create a powerful online store without dealing with the technical hassle.
In this article, we will show you how to easily create a shopping cart in WordPress with BigCommerce, step by step.
Understanding BigCommerce for WordPress
BigCommerce is a highly scalable and fully-hosted eCommerce platform.
It is an all-in-one solution which provides you with everything you will need to create and run an online store, including hosting, design, content, payment solutions, and marketing tools.
WordPress on the other hand is the most popular content management system (CMS) used by over 34% of all websites online. You can use it to create a content-focused blog, a business website, or even an online store.
You can now integrate these two powerful platforms together and enjoy the best of both worlds.
Using BigCommerce as your eCommerce plugin in WordPress gives you the following advantages:
- Smooth content-and-commerce integration: BigCommerce for WordPress lets you enjoy the industry-leading eCommerce capabilities without compromising the powerful content management features of WordPress.
- Minimum usage of server resources: You can use BigCommerce as your eCommerce backend for things like catalog management, processing payments, and managing fulfillment logistics, and more. This means that your eCommerce store will have minimal impact on your WordPress hosting server resources.
- High scalability: BigCommerce lets you scale your online business without losing speed or uptime.
- Enhanced eCommerce security: BigCommerce takes care of all your eCommerce security needs. It gives you a secure PCI compliant checkout experience.
- Built-in payment options: You can use popular payment options like PayPal powered by Braintree at the lowest credit-card processing rates.
- Sell across multiple channels: Each website works as a ‘channel’ in BigCommerce. You can connect a BigCommerce account with multiple WordPress sites (channels), multi-site network, or social accounts and sell your products.
Wondering how BigCommerce stacks up against WooCommerce? Take a look at our article on BigCommerce vs WooCommerce for a side by side comparison.
With that said, let’s go ahead and see how to create a shopping cart in WordPress with BigCommerce.
Getting Started with BigCommerce
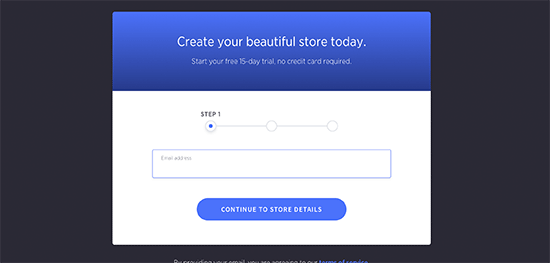
First, you need to visit the BigCommerce website and click on the ‘Get Started’ button.
This will bring up a signup form. Follow the on-screen instructions to complete the process.
Once you have signed up, you’ll reach the BigCommerce dashboard where you will be asked to connect your WordPress website.
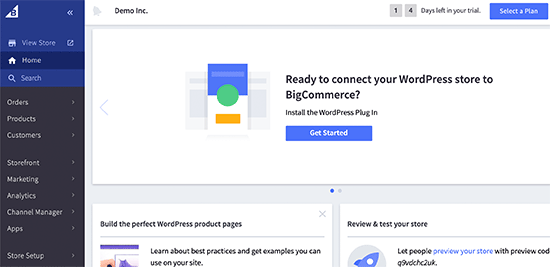
Your BigCommerce store is now ready, let’s connect it to your WordPress website.
Creating a Shopping Cart in WordPress Using BigCommerce
First thing you need to do is install and activate the BigCommerce for WordPress plugin. For detailed instructions, see our guide on how to install a WordPress plugin.
Once the plugin is installed and activated, a new navigation menu labeled BigCommerce will be added to your admin panel, and the setup wizard will open. First, it will ask you to connect your account or create a new account.

Click on the ‘Connect My Account’ button to continue.
This will bring up a popup where you’ll be required to login to your BigCommerce account. After that, you will be asked to confirm that you want the plugin to connect with your BigCommerce account.
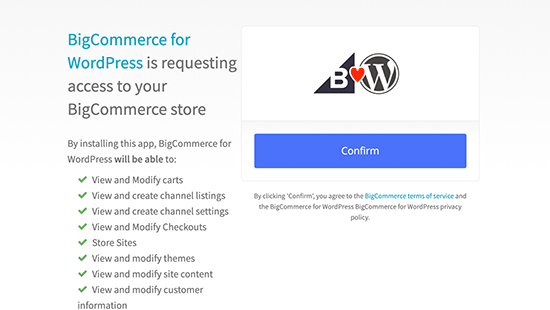
Click on the ‘Confirm’ button to continue.
This will close the popup, and you will see a new BigCommerce screen on your WordPress site. From here you need to set up BigCommerce for WordPress.
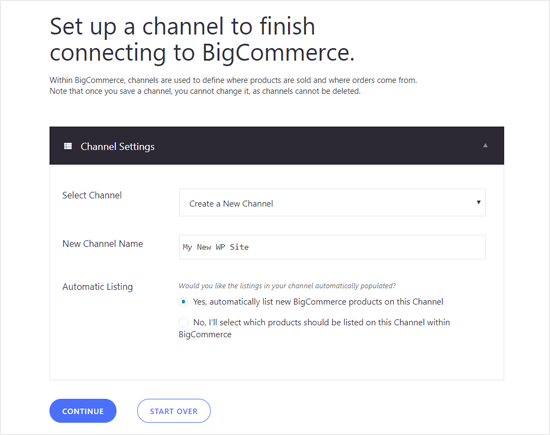
Enter a channel name, select an automatic listing option, and click on the Continue button. If you choose ‘Yes, automatically list new BigCommerce products on this channel’, all new products will automatically sync and appear on your WordPress site.
On the next screen, you can choose how you want to use BigCommerce for WordPress. You can select ‘Full Featured Store’ if you’re going to transform your WordPress site into a full-fledged store. Alternatively you can choose ‘Simple Blogging’ if you only want to add a shopping cart page in your blog. The Simple Blogging mode also allows you to add individual products into posts and pages.

Next, you will see the BigCommerce Settings page on your screen. It includes all the settings you can configure from your WordPress dashboard.
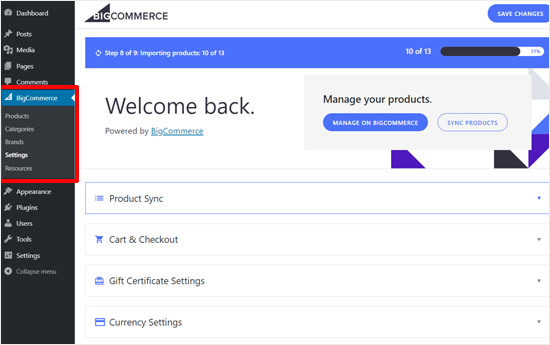
First, it will sync your BigCommerce products automatically depending on the option you chose in the earlier step. In the screenshot above, the plugin is syncing all of our sample products.
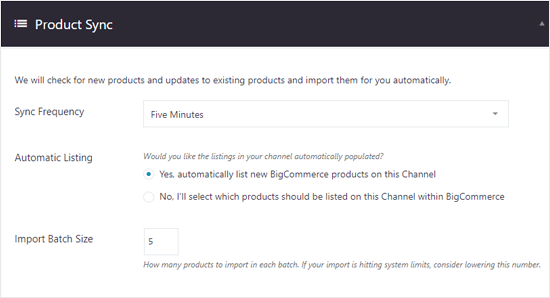
The first option in your WordPress BigCommerce is Product Sync. You can click on it to choose the sync frequency, automatic listing, and import batch size.
Next, you can configure Cart and Checkout options. Simply check the Enable Cart option to allow your users to add products to the cart. You can also enable embedded checkout if you want to show checkout form in WordPress.
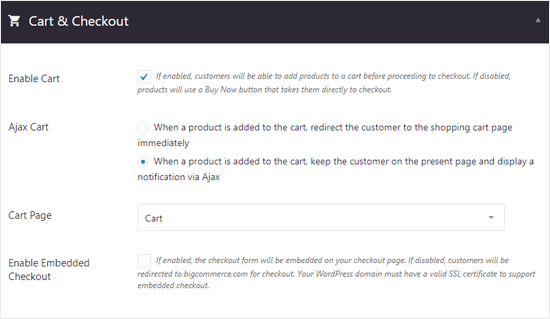
As shown in the screenshot above, the cart page is selected by default. It is because the plugin automatically creates required pages, including the cart page during the setup process.
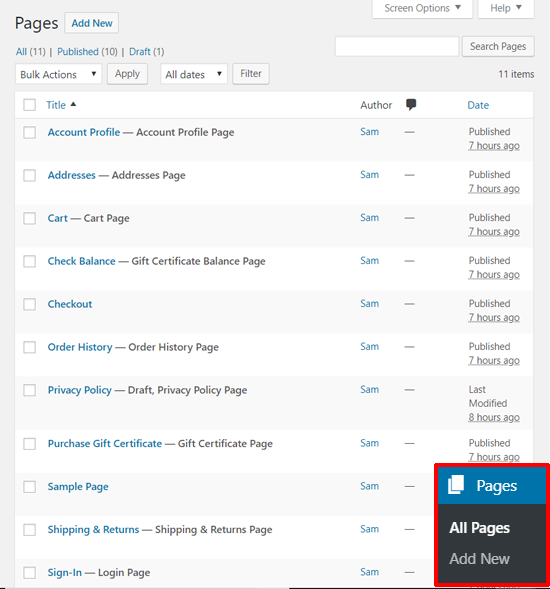
You can view the default pages by going to Pages » All Pages from your dashboard.
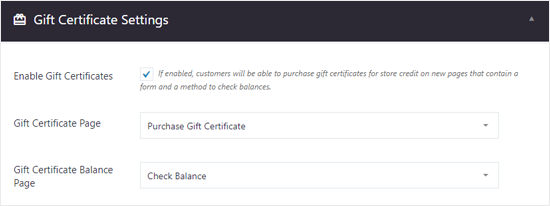
Next, you can see Gift Certificate Settings. You can enable gift certificates if you want to let your users purchase gift certificates for store credit.
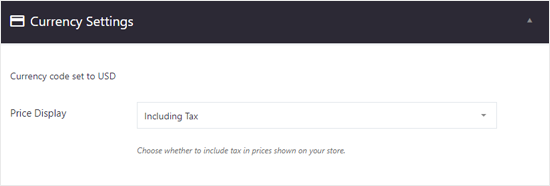
The Currency Settings let you see the default currency, and price display option, including or excluding tax.
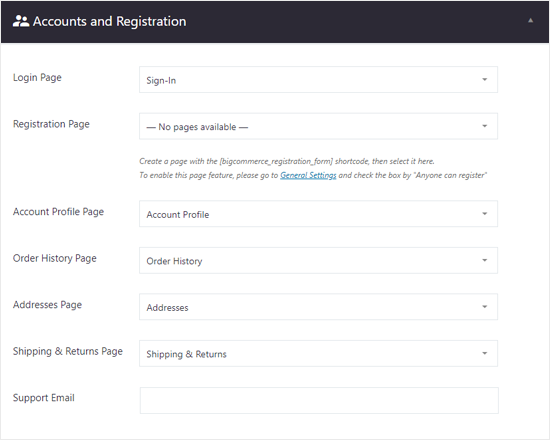
Next, you will see Account and Registration settings. Login page, account profile page, an order history page, and other important pages are selected by default. You can add a support email as well.
There are more options for Analytics settings, product reviews, API credentials, channel, and diagnostics. You can configure them now or skip them to set up later.
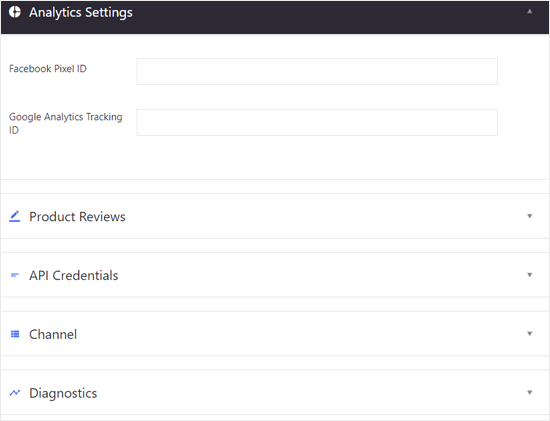
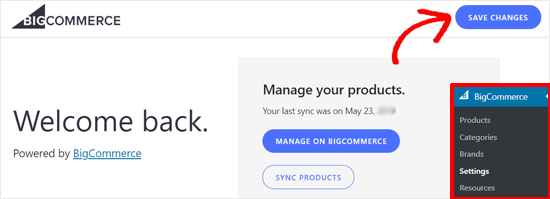
After that, don’t forget to click on the ‘Save Changes’ button at the top right corner.
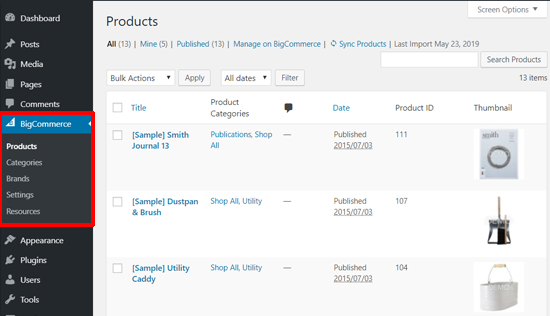
Now you can go to BigCommerce » Products to view the sample products added to your website by default.
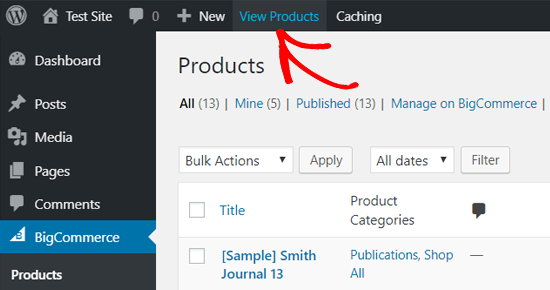
You can also preview your Products page in the frontend by clicking on the ‘View Products’ link at the top.
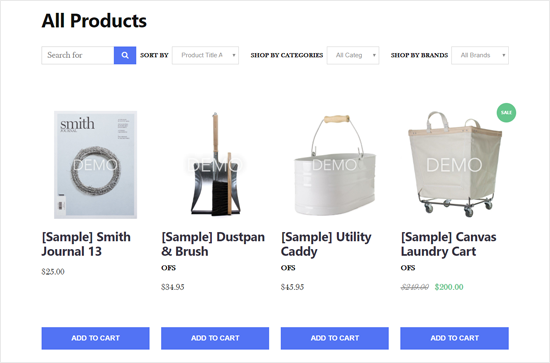
Here’s how your BigCommerce shopping cart would look in WordPress with the default Twenty Nineteen theme.
Managing Your Products in BigCommerce
The account that we created above is a free trial account with sample products. So the next step is to configure your store settings and add real products in BigCommerce.
1. Adding Products to Your BigCommerce Store
You can add and manage your BigCommerce products from the Products menu. There you will see the sample products added to your store by default.
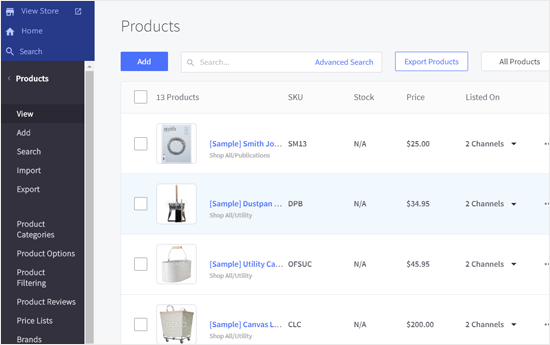
You can delete or replace these products with your actual product details. To add new products, click on the ‘Add’ button at the top.
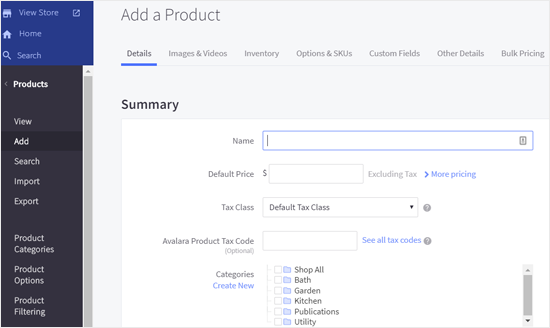
Add the name of your product, price, tax details, choose product categories, product type, and more information. You can also add the product description, shipping details, and availability options from the sections below.
Once done, save your product. After that, you can add your product images and videos by clicking on the Images & Videos link.
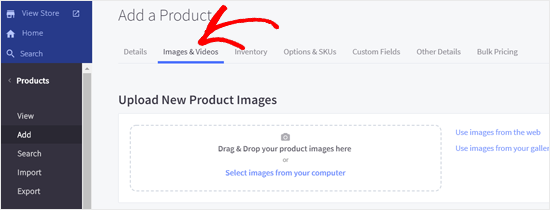
Similarly, you can review more options like Inventory, Options & SKUs, Custom Fields, etc. from the options on the top. Once done, don’t forget to save your product.
The Products menu also lets you import or export products, manage product categories, product filtering, brands, Product SKUs, etc.
Once you add new products, categories, brands, etc. in your BigCommerce store, they will be automatically synced to your WordPress site.
2. Setting Up Payment Options
BigCommerce has built-in payment options. Visit Store Setup » Payments to configure your payment settings.
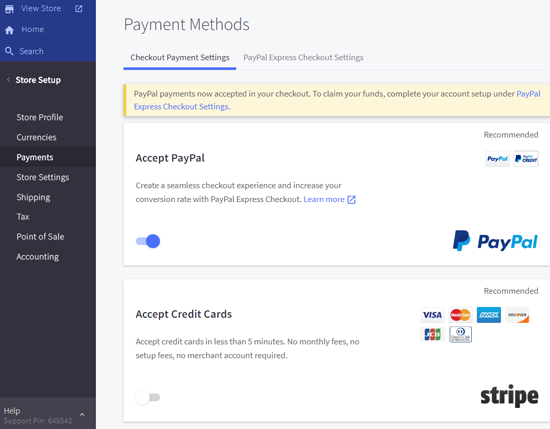
You can quickly set up PayPal, credit cards, offline payment methods like bank deposit, other online payment methods like 2Checkout, Amazon Pay, and also set up digital wallets.
3. Select a Plan and Upgrade Your BigCommerce Account
BigCommerce is primarily a paid platform for building online stores. The free trial version expires in 15 days, so you should upgrade your account before it expires.
Go to the ‘Select a Plan’ button at the top right corner and click on that.
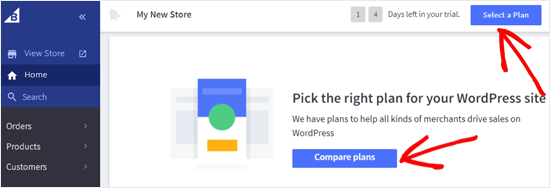
After that, you will see the available pricing options.
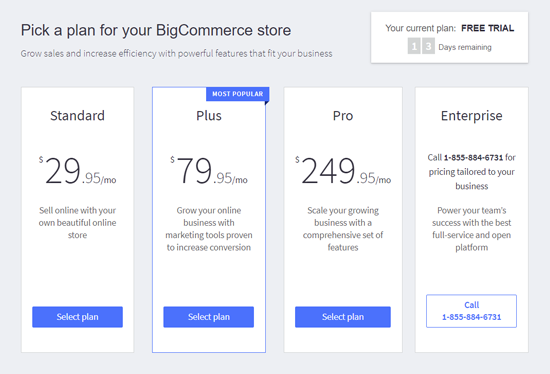
The BigCommerce Standard plan is available for $29.95 per month.
Displaying Your BigCommerce Products in Your WordPress Site
Now that you have added products and set up the store options in BigCommerce, you can display products in your WordPress site and start selling.
There are multiple ways you can add your BigCommerce products to your WordPress site. We will show you two of the easiest methods below.
1. Add Your Products Page to Menu
The easiest way to show your BigCommerce products page in WordPress is by adding the page to your WordPress menu. Visit Appearance » Menus and create a new menu.
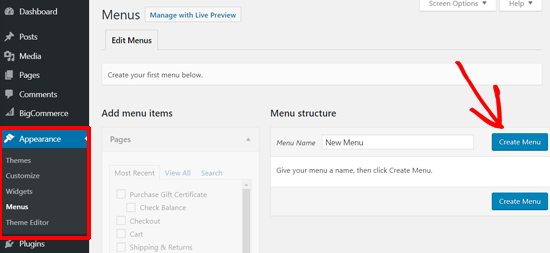
For detailed instructions, see our beginner’s guide on how to add a navigation menu to WordPress.
After that, you can click on the Custom Links option and enter your Products listing page URL.
You can find this page by going to BigCommerce » Products » View Products from your dashboard. The page URL usually is your domain name with /products/ at the end. For example, https://ift.tt/w3xNDn.
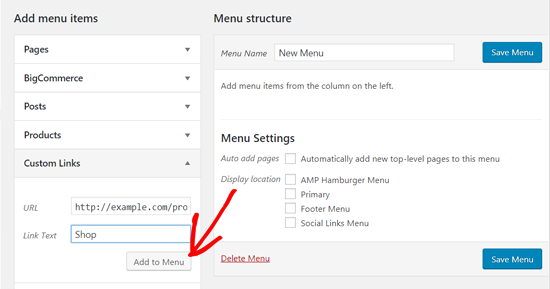
Next, enter a link text, and click ‘Add to Menu’ button. You can also add the Cart page to the menu.
After that, select Display location for your menu and save the menu.
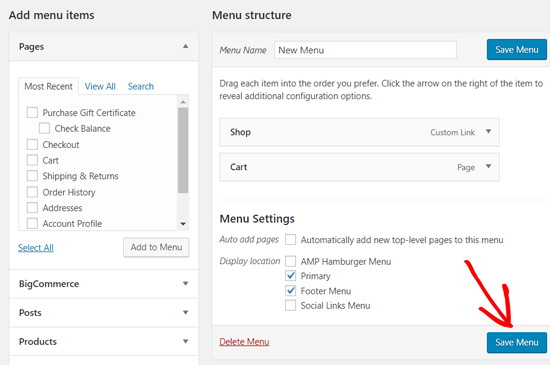
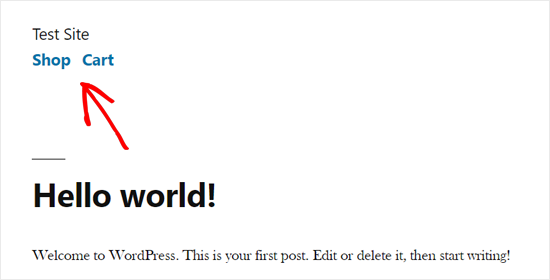
Once done, visit your website to see new menu items in action.
2. Embed Your Products to Your Posts in WordPress
Another simple way to add your BigCommerce products to your WordPress blog is to embed individual products in posts and pages.
This approach is more suitable when you only have a couple of products, and you want to add them to your landing pages or blog posts.
Open your WordPress post editor and click on the Add New Block icon. After that, you can select the BigCommerce Products block.
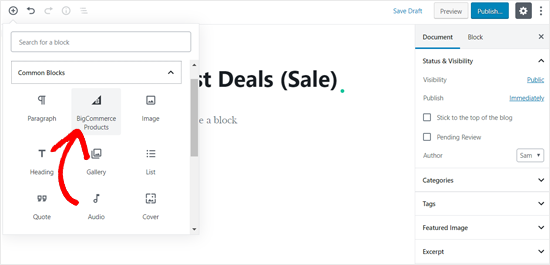
Once done, your BigCommerce store products will appear in your post editing area.
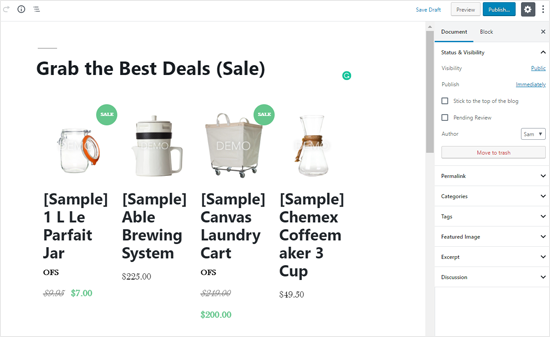
You can customize your block, add content, and publish your post.
Final Thoughts
BigCommerce is an excellent eCommerce platform for WordPress, and a powerful alternative for WooCommerce.
Often users ask us to compare BigCommerce with Shopify, and in our eyes BigCommerce is a better platform because it provides a robust integration with WordPress whereas Shopify does not.
However for full WordPress integration, WooCommerce is our go-to pick. You can see our step by step tutorial on how to start an online store in WordPress for more details.
We hope this article helped you learn how to create a shopping cart in WordPress with BigCommerce. You may also want to see our guide on the best email marketing services and the best WordPress plugins for business websites.
If you liked this article, then please subscribe to our YouTube Channel for WordPress video tutorials. You can also find us on Twitter and Facebook.
The post How to Create a Shopping Cart in WordPress with BigCommerce appeared first on WPBeginner.
from WPBeginner https://ift.tt/31tE70r
More links is https://mwktutor.com
No comments:
Post a Comment