Do you want to create an email newsletter for your website, blog, or eCommerce business?
An email newsletter helps you stay in touch with your users, bring them back to your website, and convert them into customers.
The challenge is that many beginners find it difficult to start an email newsletter. Mainly because they feel that it would be too technical or time-consuming.
That used to be the case 10 years ago, but now creating an email newsletter is so easy that even a non-techy can do it!
Having built an email newsletter with over 1 million subscribers, we have decided to create an ultimate guide on how to start an email newsletter with step by step instructions.
Our goal is to help you walk through the process and set up your email newsletter the RIGHT way.
Since this is a comprehensive guide, we have included a table of content for easier navigation.
- What is an email newsletter
- Why start an email newsletter
- Who should start an email newsletter
- How to start an email newsletter
- Creating an email list
- Setting up your email list settings
- Adding newsletter signup forms to get more subscribers
- Sending your first newsletter email
- Tips to get more email subscribers
- How to make money from your email newsletter
- Keeping your newsletter emails out of spam
What is an Email Newsletter?
An email newsletter is a form of online communication that allows you to send news, tips, and updates about your product, business, or non-profit.
In order to receive these updates, people need to join your email list by providing their email address. These users are referred to as subscribers, leads, or contacts.
Organizations and individuals use email newsletters in many different ways. For example, businesses use email newsletters to send users product information, new arrivals, and latest updates.
Websites and blogs use email newsletters to send content updates, increase traffic, and building a loyal following.
Why Start an Email Newsletter?
Did you know, that more than 75% of people visiting your website today will never find it again?
It is not your fault, it’s just that the internet is so huge and there is a lot of content out there.
Starting an email newsletter will allow you to convert those website visitors into subscribers. Once they join your email newsletter, you will be able to stay in touch and bring them back to your website.
Basically without an email newsletter, you are losing potential subscribers and customers every day.
Now you may be thinking, ‘ What if we ask users to follow us on social media? Wouldn’t that provide a way to contact those users?’
It will, and you should definitely build a social media following. However, you don’t own those social media platforms.
Social media giants like Facebook and Twitter limit your audience’s reach. More importantly, most of your users may not be checking their social feeds as often.
On the other hand, people tend to check their email inbox several times every day. Most users use a mobile device with notifications turned on for emails.
For more on this topic, see our article on why building an email newsletter is so important.
Who Should Start an Email Newsletter?
Many of our users often ask us if they should make a newsletter for their business, blog, or organization. Our answer is always ‘Yes’.
Even if you are just starting out, you should start building your newsletter from day 1. Each day you are not doing this, you are losing money, subscribers, and potential customers.
Email marketing is a win-win situation regardless of your industry, business, or website traffic.
1. Email Marketing for Small Businesses
Business websites, regardless of their industry or size, can always benefit from creating a newsletter.
It is the most cost-effective way to stay in touch with your existing customers, website visitors, and potential customers.
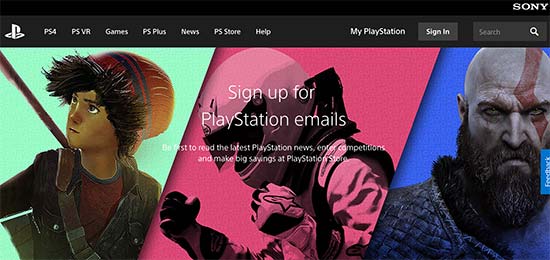
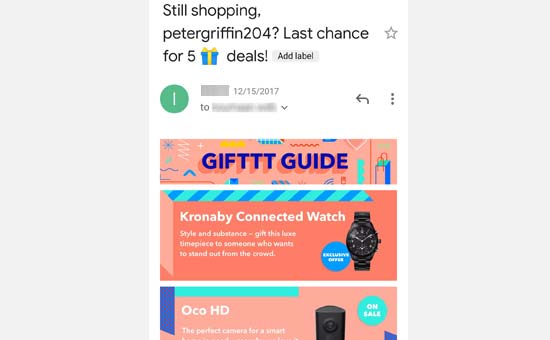
2. Email Newsletter for Ecommerce Websites
A study found that more than 44% of email recipients have made at least one purchase because of a promotional email.
If you run an online store, then email marketing is the most effective tool to convert abandoned carts into paying customers.
For a long time, eCommerce giants have been effectively using email to convert casual visitors into buyers.
3. Email Newsletter for Non-Profits
Non-profit organizations need to reach out to their supporters for donations, support, events, and more. Other mediums like social media, phone, and physical mailing all cost a lot more money than email marketing.
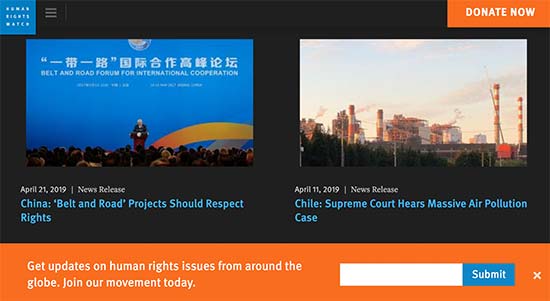
Creating an email newsletter allows non-profits to stay in touch with the general public, supporters, and donors.
Users are more likely to open emails from a non-profit that they support. In fact, 49% of millennials prefer to get updates from the organizations they support via email.
To learn more, see this article on why email marketing is essential for non-profits.
4. Email Newsletter for Blogs and News Websites
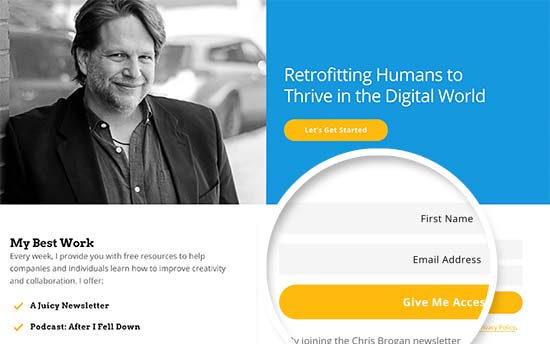
If you want to start a blog or make a content-driven news site, then email marketing is the best way to build your audience. You will see that all popular internet marketers, influencers, and famous bloggers actively build their email lists.
Here is why:
- You get to send email updates to users who would otherwise never return to your website again.
- You build a steady audience of loyal readers without relying on third-party platforms like search and social media.
- You don’t control search engines or social media. Your search rankings can drop and your social media profiles can get suspended for no reason. On the other hand, you own your email list and have complete freedom to use it.
5. Email Newsletters for Education
Educational institutions need support from an engaged community of students, faculty, parents, and local businesses. Whether it is for fundraising, admissions, events, or other activities; Email is the cheapest and most direct way for schools and colleges to reach out.
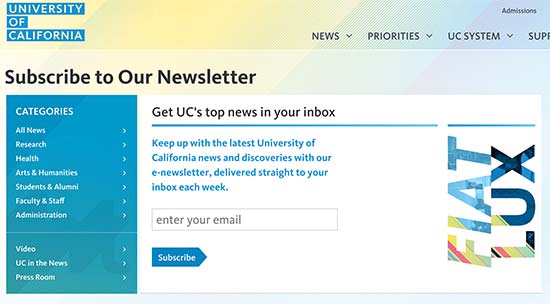
These are just a few examples of how email newsletters can benefit businesses, individuals, and non-profits. There are many more examples out there, which is why most marketers believe that email marketing is crucial for being successful online.
That being said, let’s take a look at how you can easily start an email newsletter to grow your own business and brand.
Step 1. Starting an Email Newsletter
The most important thing you’ll need to start your email newsletter is an email marketing service provider. These are companies that allow you to collect email addresses and send mass emails.
There are literally hundreds of email marketing services in the world including Constant Contact, SendinBlue, AWeber, Drip, ConvertKit, and many more.
After trying out almost every popular email marketing service, we recommend our users to use Constant Contact. They are one of the most popular email marketing service providers in the world, and their support is great in helping people get started.
Constant Contact offers a beginner friendly email marketing platform with simple drag and drop tools to help you quickly get started. They also have advanced email list growth tools, marketing automation, eye catching templates, and more.
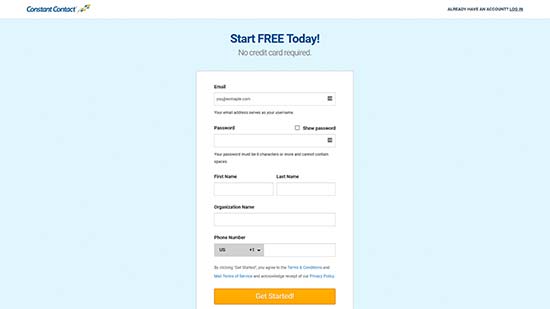
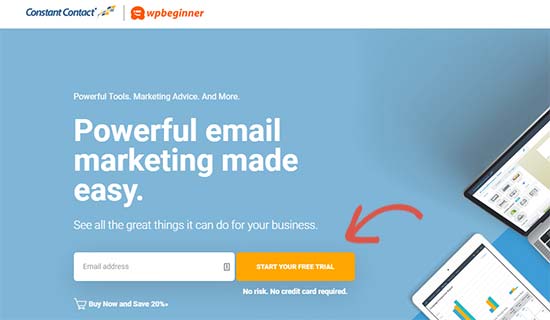
First, you need to visit the Constant Contact website and click on the signup button. They have a 60 day free trial (no credit card required).
Once you click the button, it will bring you to the signup page where you need to provide the information to create your account.
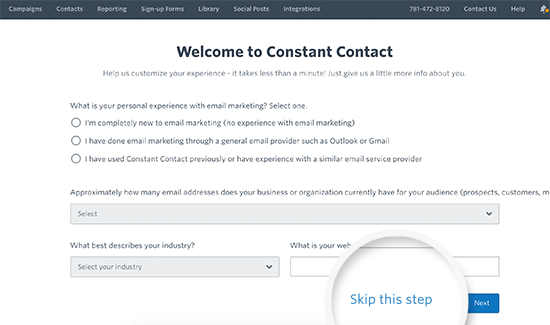
After you complete the signup, you will be redirected to Constant Contact guided set up. Click on the ‘Skip this step’ below as we will show you how to set it up later in this article.
You will now reach your Constant Contact dashboard. This is where you will manage your email lists, subscribers, and send your email newsletter.
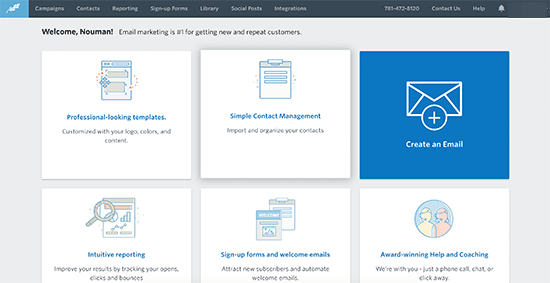
Note: Constant Contact free trial account only allows you to send up to 100 emails. You will need to purchase their paid plan to access all the powerful features. WPBeginner users can get a special 20% off when using our Constant Contact coupon code.
Step 2. Creating an Email List
An email list is basically a contact list of your subscribers. Think of it as a contact book containing email addresses of all the users who sign up to receive your email newsletter.
To keep your contacts organized, you need to create an email list.
Simply click on the ‘Contacts’ link from the top menu and then click on the Email List link in the sidebar.
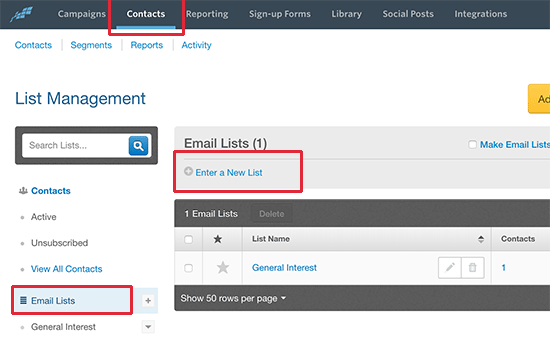
This page will show all your email lists. By default, Constant Contact creates an email list for you labeled ‘General Interest’. You need to click on the ‘Enter a new list’ link to create a new email list.
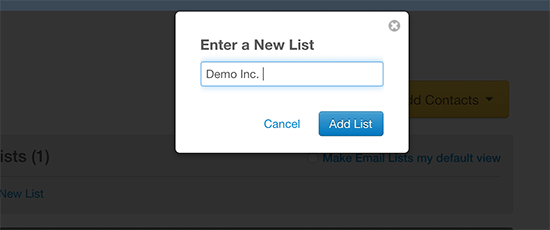
You’ll be asked to enter a name for your list. You can enter anything here that helps you easily identify the list.
Next, click on the ‘Add list’ button, and Constant Contact will create the list for you.
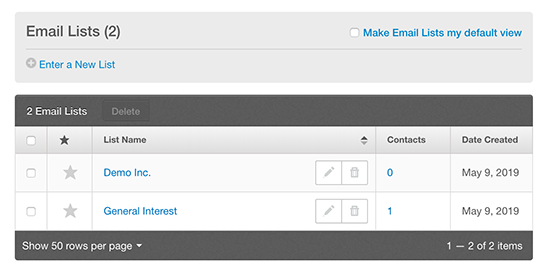
In order to start using this email list, you need at least one contact added to it. You can manually add a contact to your list by visiting the ‘Contacts’ page and clicking on the ‘Add Contacts’ button.
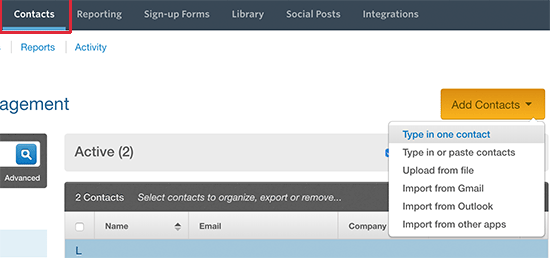
This will show you a drop-down menu, asking how you would like to add contacts. You need to select ‘Type in one contact’ to continue.
On the next screen, you need to enter contact information. You can add one of your own email addresses here. This will allow you to test your email campaigns.
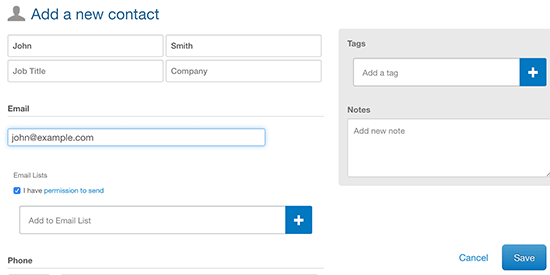
After entering your contact information, click on the save button to add it. Your email list is now ready to be used.
Now that you have created an email list, it is time to set up some basic list settings.
Step 3. Setting up Your Email List Settings
The first thing you would want to set up is a welcome email. This is the email message sent to your users when they join your email newsletter.
Let’s get started.
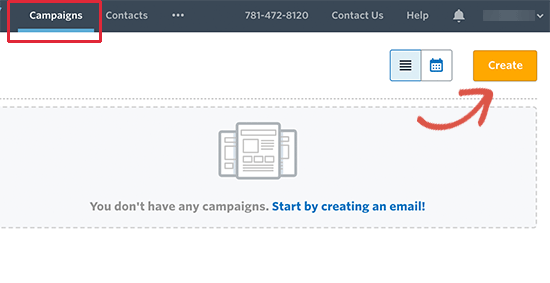
First, you need to click on the ‘Campaigns’ link from the top menu and then click on the ‘Create’ button.
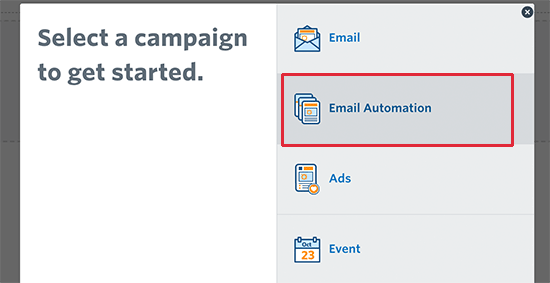
This will bring up a popup where you will be asked to select an email campaign type. Click on the ‘Email Automation’ to continue.
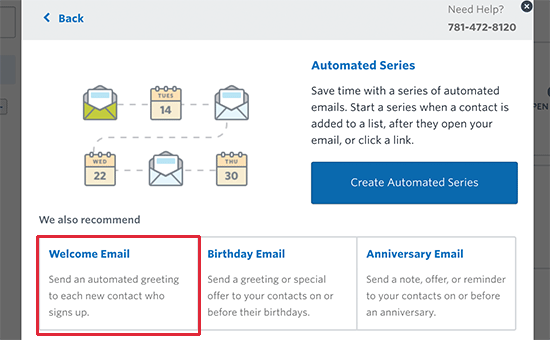
After that, you need to choose the email automation type. Click on the ‘Welcome email’ option to continue.
Next, you will be asked to select a template for your email. The builder will automatically show you ‘Welcome email’ templates that you can use as a starting point.
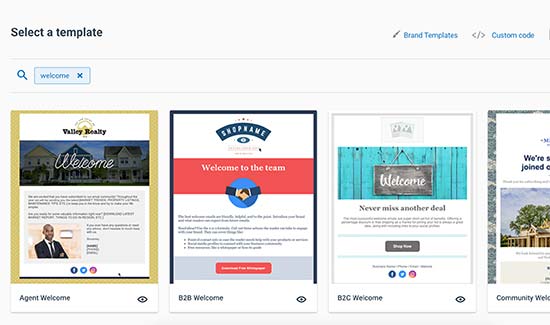
Simply click on a template to select and open it in Constant Contact’s drag and drop email builder.
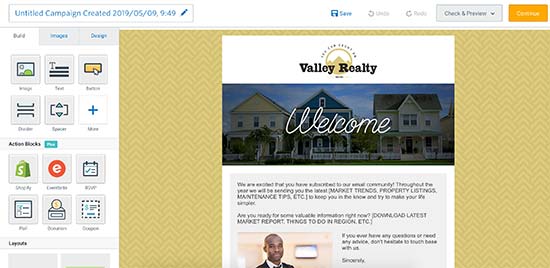
From here, you will design your welcome email newsletter template.
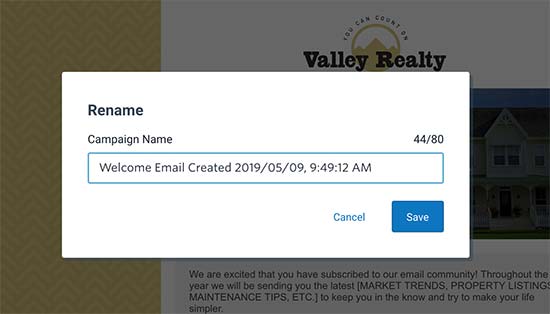
You can start by giving your campaign a proper title, this will help you identify the campaign when you need to edit or change it in the future.
Click on the ‘Untitled…’ link at the top left corner to edit it. Now enter a name for your campaign, for example, welcome email, new user signup, introduction, etc.
After that, you can start editing the email template. It is a drag-and-drop editor, so you can simply drag elements from the left column and drop them on the canvas. You can also point and click anywhere in the email to edit it.
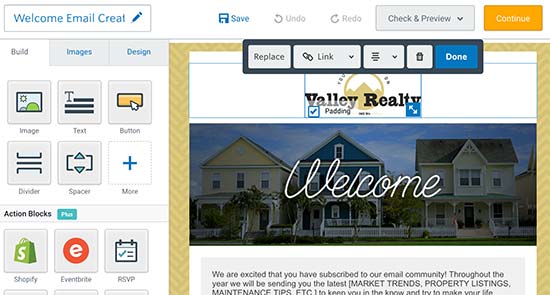
You can replace the logo with your own, add your own header image to match your branding, customize the email subject and message text to fit your needs.
Once you are satisfied with the design, click on ‘Save’ to store your email and then click the ‘Continue’ button.
The email builder will now ask you to select an email list. Go ahead and select the list you created in the earlier step. After that, fill out the physical address form.
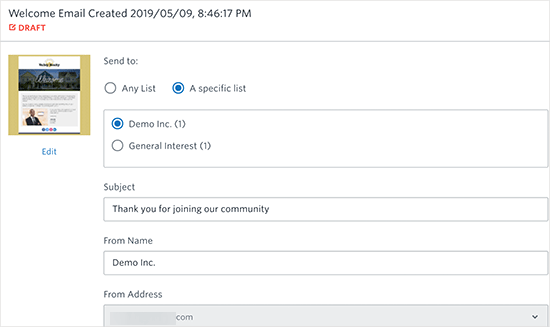
Due to the anti-spam laws in many countries, you need to include physical address information in each newsletter email. This can be your business address or a P.O. box.
Lastly, click on the ‘Activate’ button at the top right corner of the screen to save and activate your welcome email.
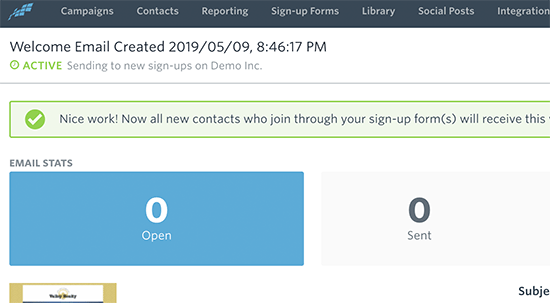
You have successfully set up a ‘Welcome email’ campaign. From now on, all new users joining your newsletter will receive this email upon sign up.
Some tips on writing an effective welcome email
Welcome emails have an average open rate of 50% which is higher than any other email newsletter you send.
It will be the first thing new subscribers will hear from you. This is your opportunity to impress them, so they look forward to your next email newsletter.
- Say thanks and let your users know that you appreciate them sharing their contact information with you.
- Next, you would want to introduce yourself, your business, and what you do. Keep it short and simple.
- Let your users know how often you’ll email them and what kind of content and offers they should expect.
- If you promised users an incentive to join your email list, then include that information in your welcome email.
- The best way to introduce users to your brand is by sending them to the most useful content on your website. It helps them discover content and builds engagement.
For more tips, see this guide on how to write the perfect welcome email for new subscribers.
Step 4. Setting up Newsletter Signup Forms to Get More Subscribers
Now that you have signed up with an email marketing platform and set up your email list. It is time to start promoting it.
The easiest way to get more subscribers is by adding the newsletter sign up forms to your website. Usually, your email marketing service would have ready-made sign up forms that you can add to your website.
However, these signup forms don’t look good and sometimes don’t fit in the container where you want to place them.
Let’s take a look at how to easily add newsletter signup forms to your WordPress site. We will show you two methods, and you can choose one or both of them together.
1. Add Newsletter Signup Form Using WPForms Lite (Free)
WPForms is the best drag & drop WordPress from plugin in the market. They have a free version called WPForms lite which includes built-in support to connect with your Constant Contact account.
This allows you to use WPForms’ drag and drop form builder to create your newsletter sign up form.
The first thing you need to do is install and activate the WPForms Lite plugin. For more details, see our step by step guide on how to install a WordPress plugin.
Upon activation, you need to visit WPForms » Settings page and click on the ‘Integrations’ tab.
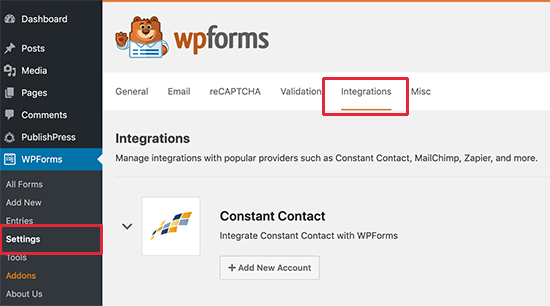
You will see Constant Contact integration listed there. You need to click to expand it and then click on the ‘Add Account’ button.
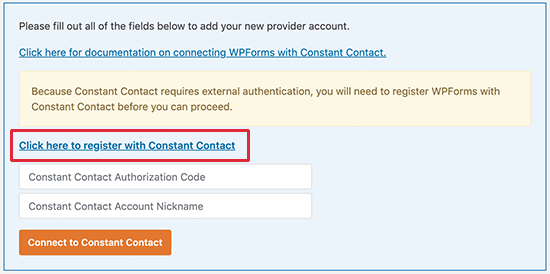
This will show you the information needed to connect your Constant Contact account to WPForms. Click on the link that says ‘Click here to register with Constant Contact’.
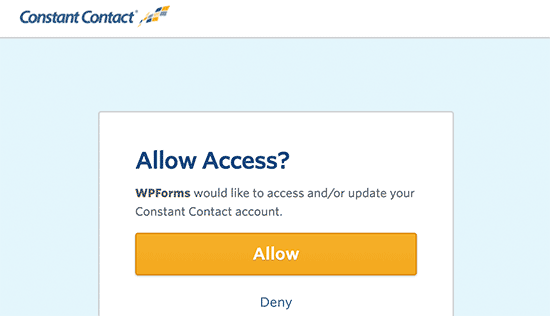
This will bring up a popup which will take you to the Constant Contact website. Click on the ‘Allow’ button to give WPForms access to your Constant Contact account.
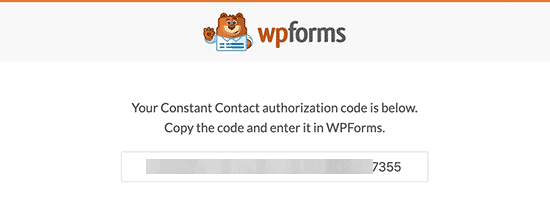
Next, you will see an authorization code which you need to copy.
Switch back to the WPForms settings page and enter the authorization code you copied earlier. You also need to provide a name for this integration.
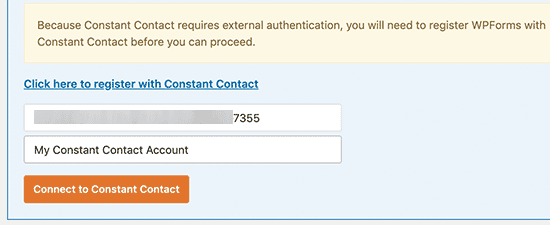
Finally, click on the ‘Connect to Constant Contact’ button.
WPForms will now connect to your Constant Contact account. You will see a ‘Connected’ label appear next to the integration.

Now you are ready to create your newsletter sign up form using WPForms.
Simply head over to WPForms » Add New page to launch the WPForms builder interface.
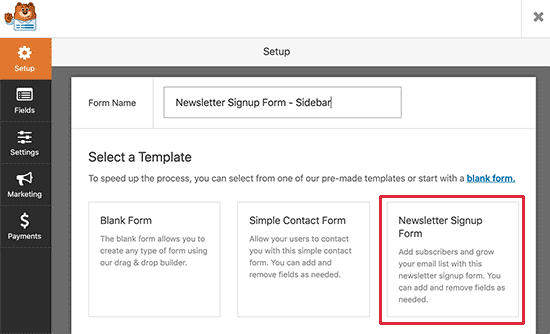
Provide a title for your form and then click on the ‘Newsletter signup form’ template.
This will load up a read-made signup form with required fields already added to the form.
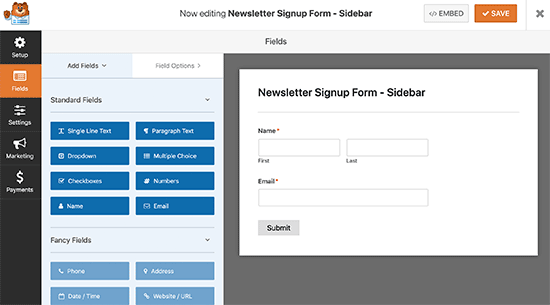
You can point and click to edit form fields, change fields labels, and add more fields from the left column if needed.
Once you are satisfied with the form, you need to click on the Marketing tab to integrate it with Constant Contact.
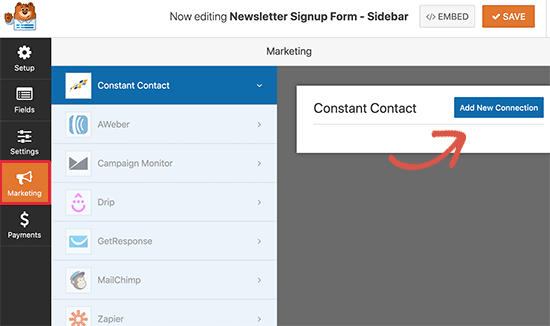
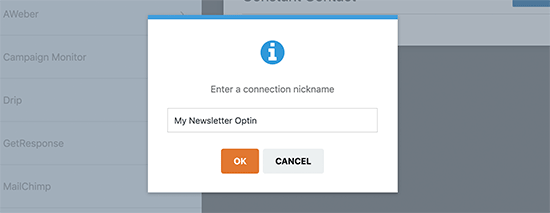
Click on the Constant Contact tab and then click on the ‘Add Connection’ button. You will be asked to provide a title for this connection. You can enter anything here and then click OK button.
Next, you will see the settings for this connection. It will automatically detect your Constant Contact account and show it under the Select Account field.
Below that you need to select the email list. Click on it to select the email list you created earlier.
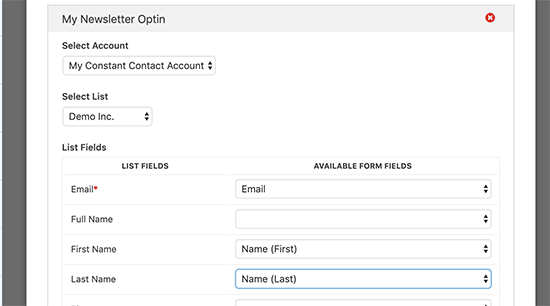
After that, you need to map your WPForms form fields to the Constant Contact fields. Once done, you can click on the ‘Save’ button at the top to save your sign up form.
WPForms also makes it super easy to add your newsletter signup form anywhere on your website.
If you want to add the form to your website’s sidebar, then visit Appearance » Widgets page and add WPForms widget to a sidebar.
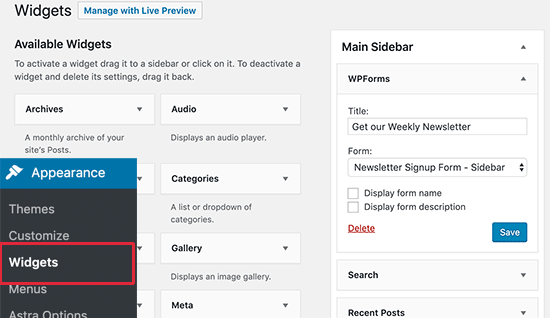
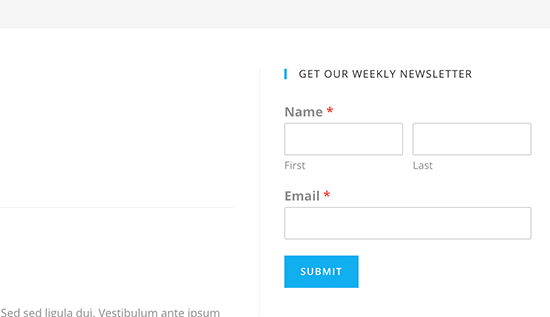
Provide a title for your widget and then select the signup form you created earlier. Don’t forget to click on the ‘Save’ button to store your settings.
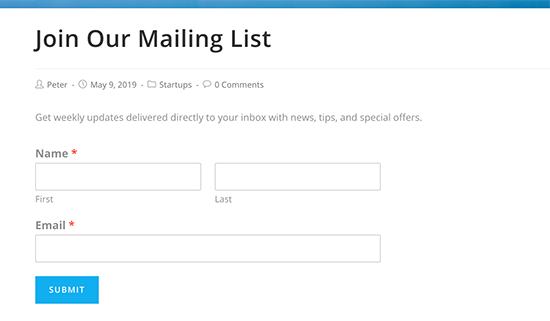
You can now visit your website to see your newsletter signup form in action.
You can also add sign up form to your blog posts or pages. Simply edit the post and add the WPForms block to the content area.
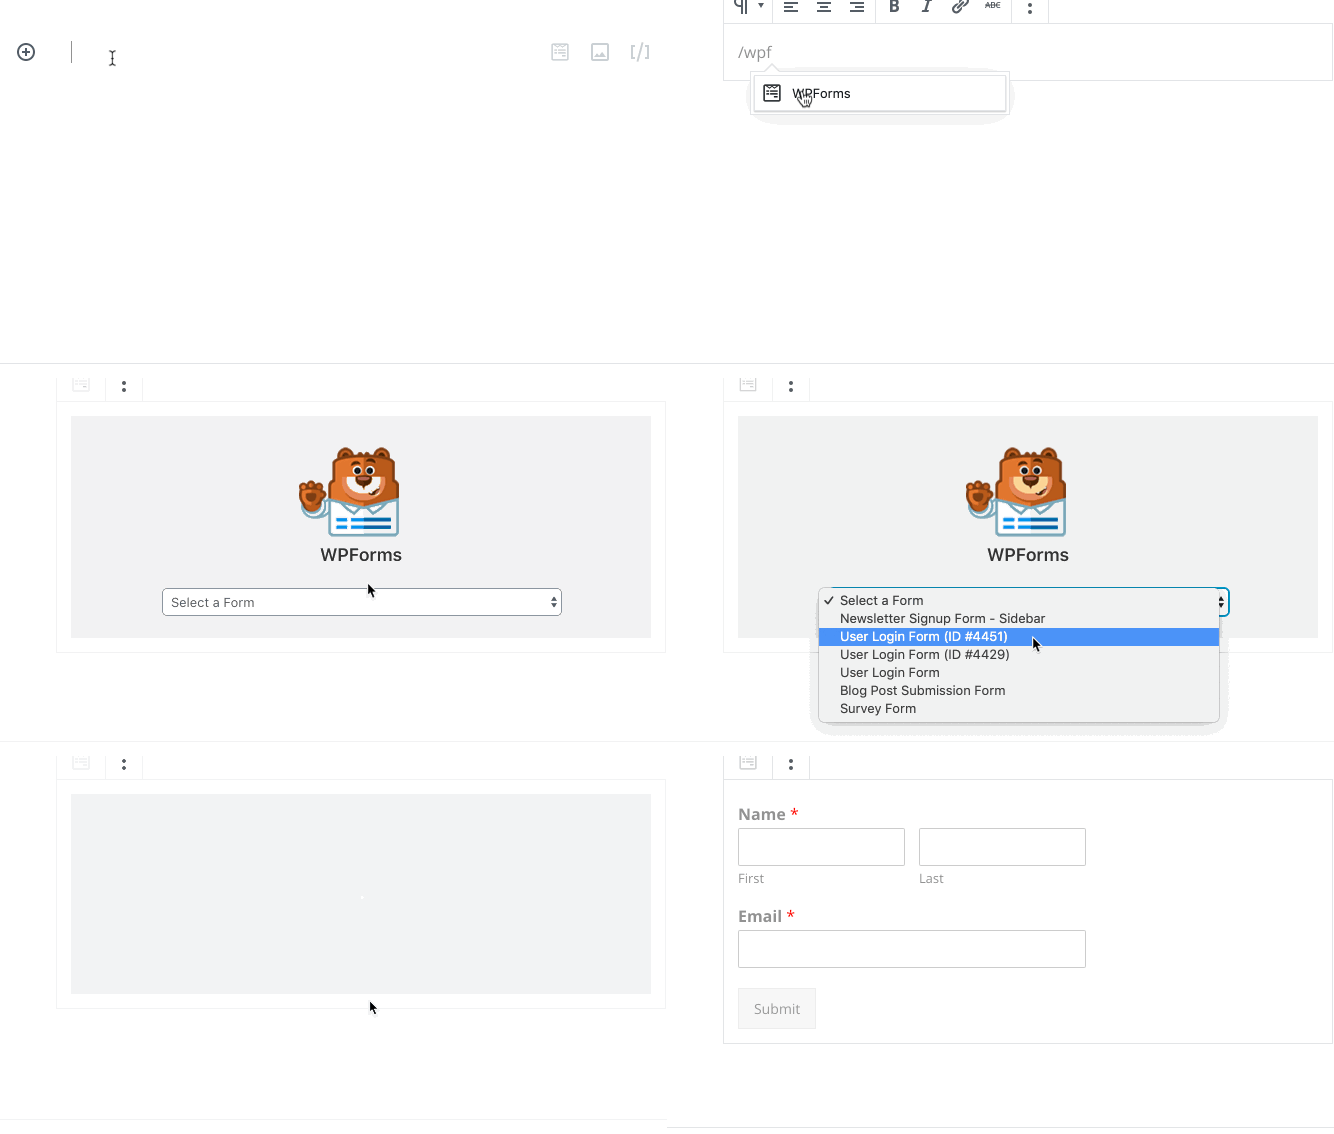
After adding the block, select the newsletter signup form you created earlier and WordPress will load it inside your post. You can now save or publish your post and visit your website to see it in action.
2. Add Newsletter Signup Form Using OptinMonster (Pro)
For this method, we will be using OptinMonster, which is the best tool in the market to help you get more email subscribers, faster!
It includes dozens of high-converting signup forms like lightbox popups with exit-intent technology, 2-step optins, slide-in forms, floating bar, and more. This gives you powerful tools that you need to quickly grow your email list.
For more details, see our complete OptinMonster case study to learn how we used it to increase our email subscribers by 600%.
First, you will need to sign up for an OptinMonster account. It is a premium service and their plans start from $9 per month.
You can use our OptinMonster coupon code: WPB10 to get 10% off your purchase.
Once you have signed up for OptinMonster, you will reach your account dashboard.
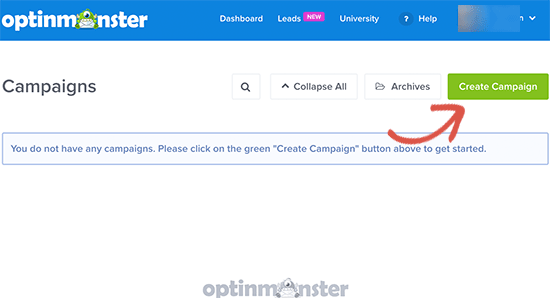
Let’s create your first OptinMonster campaign. Click on the ‘Create Campaign’ button to get started.
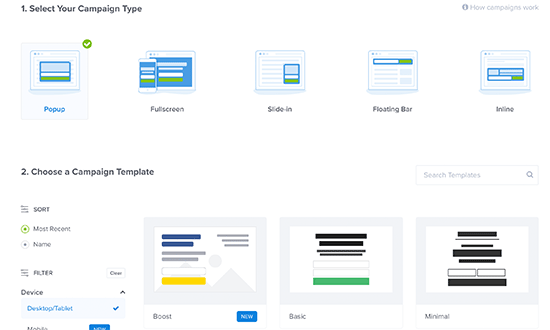
Next, you will be asked to select an optin type. For the sake of this guide, we will be creating a lightbox popup signup form. Below that you need to choose a template for your campaign.
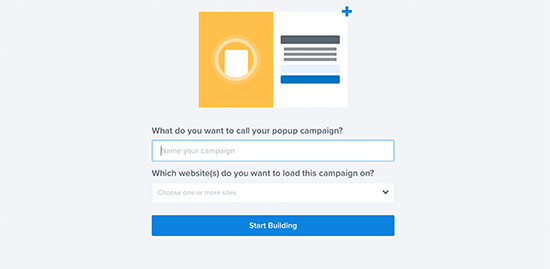
After that, you will be asked to provide a title for your campaign and enter your website address.
This will launch the OptinMonster builder interface. It is a powerful drag and drop campaign builder where you can design your optin forms.
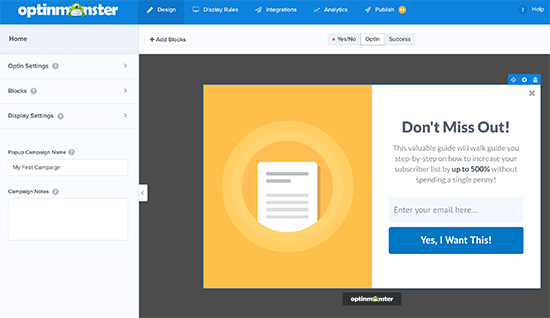
You can point and click to edit any item on the screen. You can also add new blocks to add different elements to your optin.
Once you are satisfied with the design, it is time to connect the OptinMonster campaign to your Constant Contact account.
Switch to the ‘Integrations’ tab from the top menu and then click on the ‘Add new integration’ button.
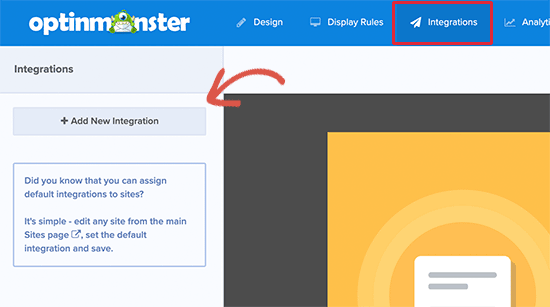
Next, you need to select Constant Contact as your ‘Email service provider’ and then click on ‘Register with Constant Contact’ button.
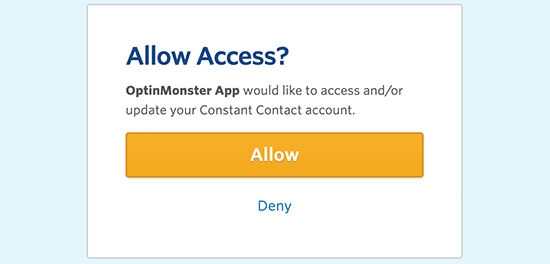
This will bring up a popup where you need to click on the ‘Allow’ button.
Switch back to the OptinMonster and provide a name for this connection. After that, click on the ‘Connect to Constant Contact’ button.
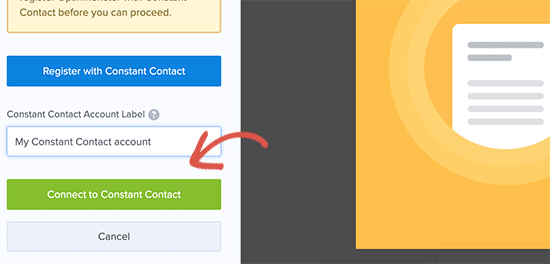
OptinMonster will now fetch your Constant Contact account details. You need to select the email list you created for your newsletter.
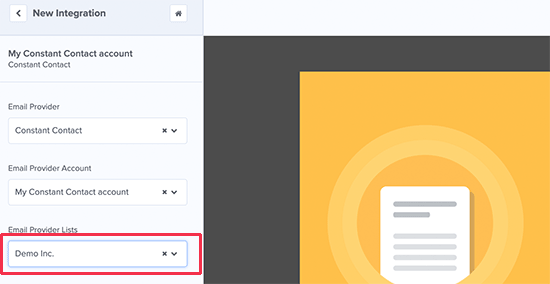
Now, we will take a look at the display rules for your campaign. Display rules allow you to choose when and where to display your campaign.
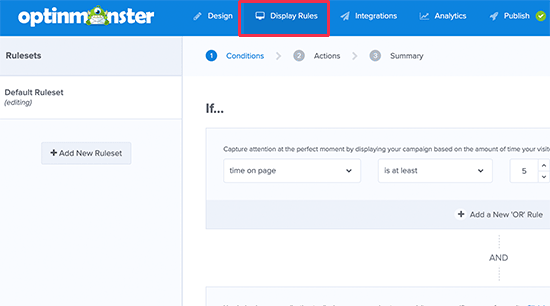
By default, OptinMonster will show the popup to any user after 5 seconds. The popup will only appear on their first pageview and will not bother your users again during the same session.
Next, you need to switch to the Publish tab and change campaign status to Live. After that, don’t forget to click on the ‘Save’ button to store all your campaign settings.
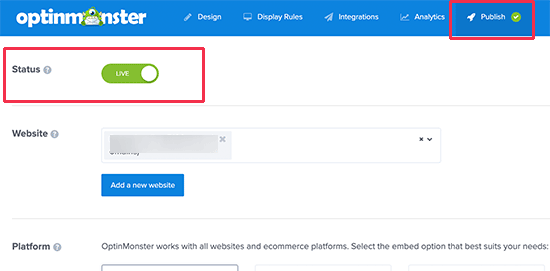
Your OptinMonster campaign is now ready, let’s add it to your WordPress site.
First, you will need to install and activate the free OptinMonster plugin on your site. This plugin acts as a connector between your WordPress site and OptinMonster.
Upon activation, you need to click on the OptinMonster menu item in your WordPress admin sidebar. On the next screen, click on the ‘Connect Your Account’ button to continue.
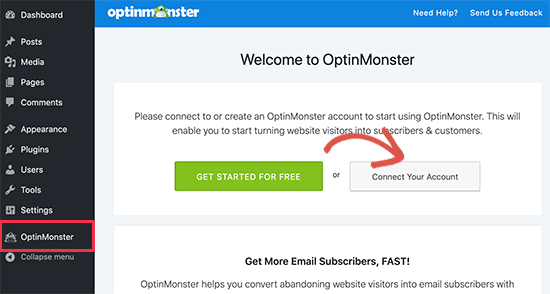
Next, you will be asked to enter your OptinMonster API key. You can find this information under your account on the OptinMonster website.
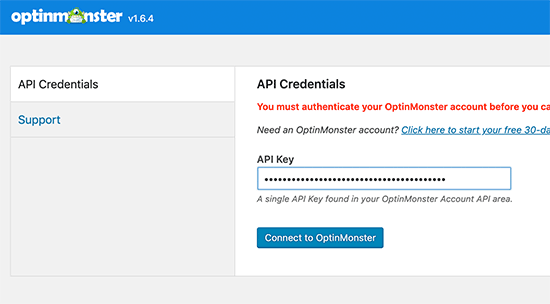
After entering the API key, click on the ‘Connect to OptinMonster’ button. The plugin will now connect your website to OptinMonster.
Next, you need to switch to the ‘Campaigns’ tab. This is where all your OptinMonster campaigns will appear. If you don’t see any campaigns here, then click on the ‘Refresh campaigns’ button.
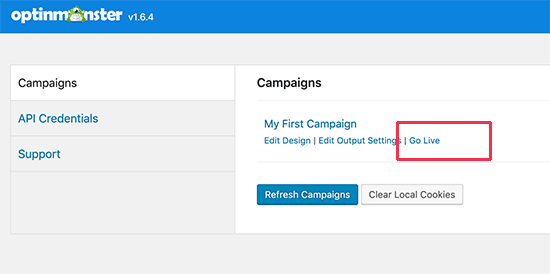
Now you need to click on the ‘Go Live’ live below the campaign you just created. After that, you can visit your website in a new Incognito browser tab to view your newsletter signup popup in action.
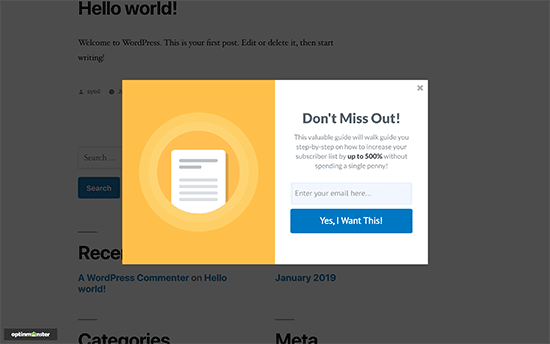
OptinMonster is an incredibly powerful tool to quickly get more subscribers for your website.
Following are a few other campaign types that you can create with OptinMonster.
- A slide-in scroll box signup form
- A sticky floating footer signup form
- Triggering FOMO with a countdown timer signup form
Step 5. Sending Your First Email Newsletter
Once you have added newsletter signup forms to your website, you will gradually start getting subscribers. After getting your initial welcome email, these new subscribers will be waiting to see what you send them next.
You are now ready to start sending newsletter emails.
Let’s create your first email campaign.
The great thing about using Constant Contact is that it comes with an incredibly easy to use email builder with tons of beautiful templates.
Creating your campaigns and sending newsletter emails is quite easy. Simply log in to your Constant Contact account and click on the Campaigns menu from the top.
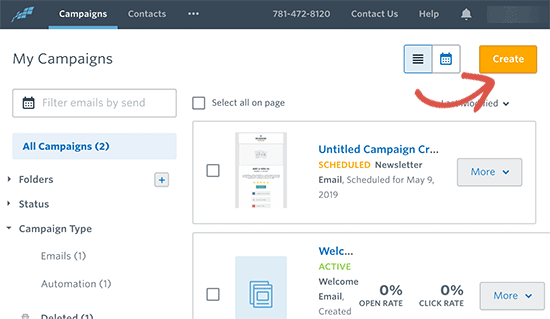
The campaigns page lists all your current, past, and automated email campaigns. Click on the create button to start a new email.
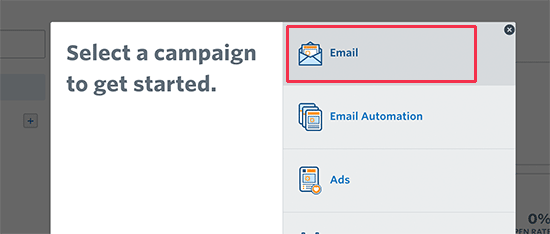
You will be asked to select a campaign type. Click to select the ‘Email’ campaign type and continue.
Next, you need to pick an email template for your newsletter. Constant Contact comes with several ready-made template for different industries, campaigns, and email types.
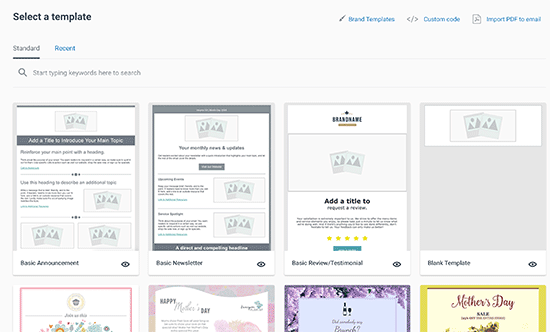
All these email templates are fully customizable, and you can add your own logo and images to customize them. Once you edit and save a template, you will be able to use it for your future campaigns.
We recommend starting with a simple newsletter template and customizing it with your own brand logo.
Simply click on a template to select it for your email newsletter. Constant Contact will then load the email builder with your selected template.
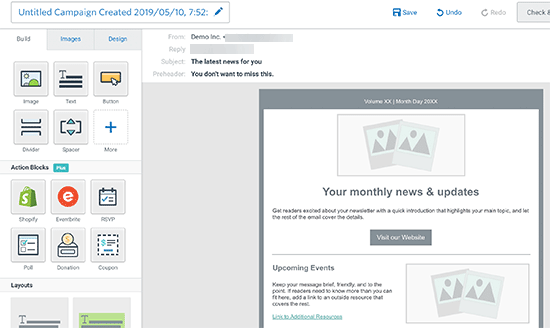
This is the same email builder that you used to create your welcome email. You can add your brand logo, point and click to add text, link, and images.
Adding your blog posts to the email newsletter
You can also fetch and add your blog posts to the newsletter. Click on the ‘More’ button in the left column and then drag and drop the ‘Read More’ block to your email.
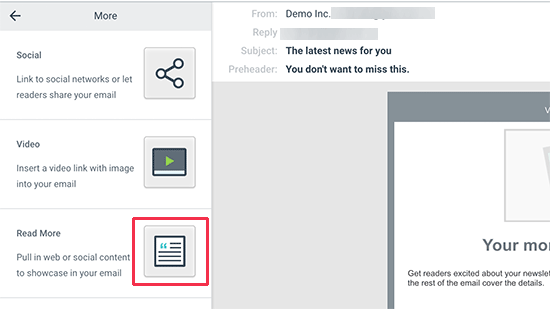
Next, you need to click on the ‘Read more’ block to edit it. This will bring up a popup where you need to enter the link of the blog post you want to add.
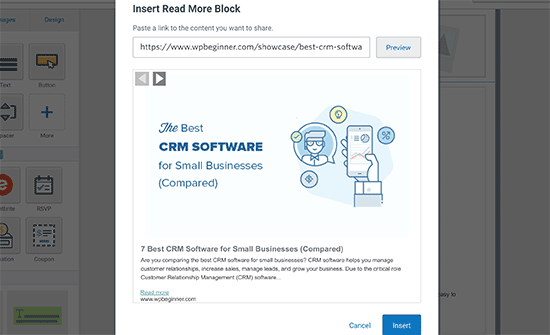
Click on the preview button to fetch a featured image and article description and then click on the Insert button. Repeat the process to add more blog posts if needed.
Once you are satisfied with your email’s design and contents, click on the ‘Continue’ button to move forward.
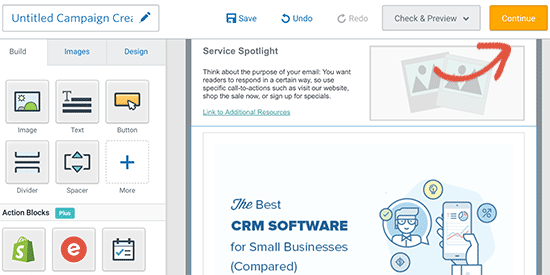
On the next screen, first, you need to select the email address you want to send this message. After that, review other email settings on the page.

Lastly, you need to select whether you want to send this email right away or schedule it to send later.
We recommend sending your emails on a fixed schedule. This helps your users anticipate the arrival of your email and sets expectations. For more on this topic, see this guide on choosing the best time to send newsletter emails.
Click on the Schedule button at the top right corner of the screen to save your email.
That’s all, you have successfully created your first newsletter email and scheduled to send it.
Need help with writing effective newsletter emails? See these tips on writing effective email newsletters.
Step 6. Tips to Get More Email Subscribers
In 2018, the number of global e-mail users amounted to 3.8 billion users.
In another study, 48% of participants said that they would like to receive email updates from their favorite brands.
This means that users prefer to get emails from their favorite businesses. Now the only question that remains is how do you get them to subscribe to your newsletter?
Luckily, email marketing has been around for a very long time. Experts are regularly experimenting, sharing, and finding new ways to grow their email lists.
Here we will share some of our own tips that are tested and proven to work.
1. Use multiple signup forms
Many beginners just add a single newsletter signup form to their website and forget about it. Add multiple signup forms to your website using a variety of placements.
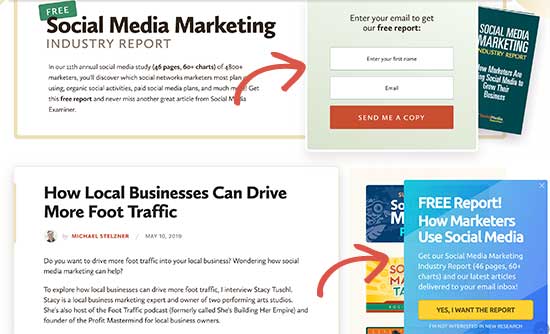
However, you need to be careful not to ruin user experience with aggressive prompts to signup.
For example, in the screenshot above, the second prompt only appears when a user scrolls down and the first signup form is no longer visible.
Social Media Examiner uses multiple sign up forms and creative strategies which has helped them get over 250,000 email subscribers (case study).
Keep experimenting with different forms and placements to find out what gets you the best results.
2. Use lead magnets to capture more subscribers
Lead Magnets are special offers used as an incentive to join your email newsletter. These special offers could be an exclusive download, an ebook, a helpful resource, discount coupon, etc.
Lead Magnets work extremely well because they offer users instant gratification and value for performing an action.
You can see a live example of lead magnets just below this article, where we offer users a free download of our ultimate WordPress toolkit as an incentive.
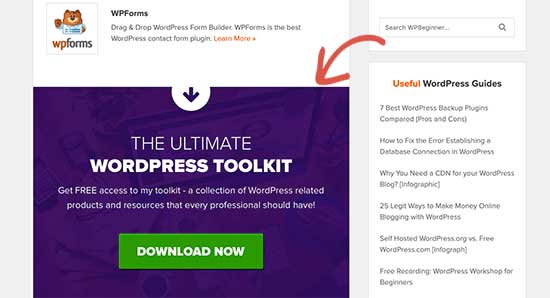
3. Offer Content Upgrades
Similar to lead magnets, content upgrades offer users an additional piece of content or bonus content, which they can download after signing up for your newsletter.
You can easily add content upgrades to your existing content. This can be a checklist, a PDF download of the article, a case study, a research report, and more.
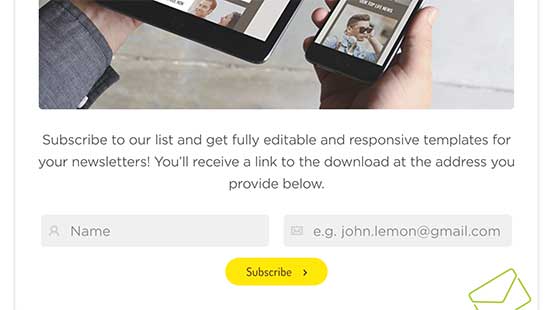
For more details, see our guide on how to add content upgrades in WordPress.
4. Use social media to grow your email list
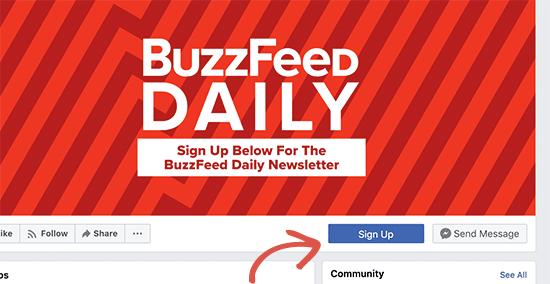
Your website is not the only place to promote your newsletter and find new subscribers. Social media platforms can be another place to convert followers into email subscribers.
For detailed tips, see our guide on how to use social media to grow your email list
Need even more tips? Check out the following email marketing guides:
- 73 proven tips to grow your email list
- How to do lead generation in WordPress
- 12 tips to grow your email list quickly
Step 7. How to Make Money from Email Newsletter
One of the popular sayings among digital marketers is that “The money is in the list”. Every dollar you spend on email marketing has a return average of $32 dollars.
As your subscriber count grows, you would want to explore opportunities to monetize your email newsletter.
Following are just some of the easiest ways to make money from your email newsletter.
1. Sell your products

First, you would obviously want to use your email list to sell your own products. You can use your email list to send special offers and discount deals exclusive to your subscribers.
You can also bring them back to your website by adding calls to action, offer members-only content, demo, and free samples.
When trying to sell your own products, keep the ‘Value Value Value Pitch’ formula in your mind.
It basically suggests that you should offer three times more value than your sales pitch. Most marketers agree that such emails work better than those that are nothing more than a plain sales pitch.
2. Upsell products and services
Upselling is a sales technique to persuade customers into buying something additional like an upgrade or add-on. As your email list grows, you can send personalized offers to existing customers.
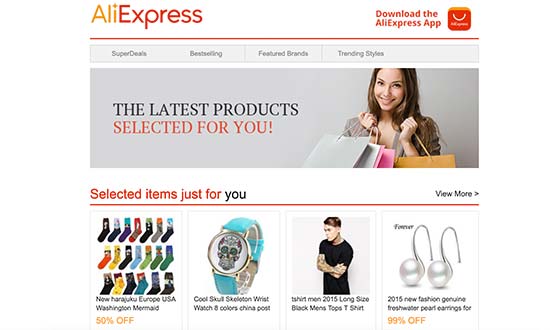
Due to its highly targeted messaging and personalized offers, upsell emails tend to perform way better. This may lead many businesses to send more such emails.
You need to remember that your emails should offer value first, otherwise those emails would soon become annoying.
3. Affiliate marketing

Affiliate marketing is a referral program where an online retailer (advertiser) pays you a commission when users purchase their product using your referral link.
You can find products and services that might interest your users and add affiliate links, reviews, and coupons in your newsletter emails.
To get started, see our beginner’s guide to affiliate marketing.
4. Advertisement or renting out your email list
If your email list grows quickly, then you can make money by renting your email list.
You see, a lot of folks don’t realize the potential of email marketing until they realize that they could benefit immensely from an email list.
Lucky for you, they are now looking for someone who may already have a list of people interested in specific products, services, or industry.
You can approach such advertisers directly, or you can find email list brokers like Info USA, List Giant, or Mailing List Direct.
Step 8. Keep Your Newsletter Emails Out of Spam
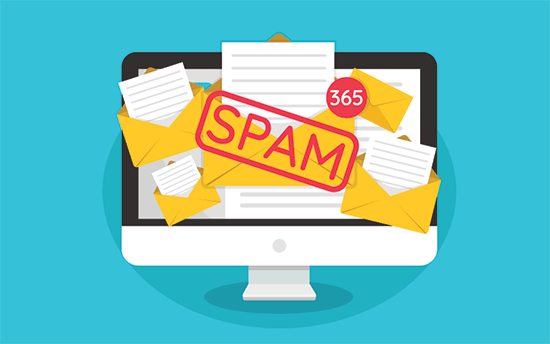
In 2012, 90% of all emails were spam. This number was reduced to 58% by the end of 2018.
The main reason for this decline was the improved spam detection and prevention technologies used by email marketing tools.
This is great news for all users and businesses. However, the AI-powered spam detection technologies are quite sensitive and can wrongfully mark your email messages as spam.
Following are the most common reasons for newsletter emails to end up in spam:
1. You didn’t use double opt-in
Basically, all email marketing services including Constant Contact require users’ consent for sending them emails. This is done by the user verifying their email address after signing up.
However, they also allow you to manually add email addresses. If you misuse this feature and add email addresses from random sources, then your messages will end up in spam.
2. Sender email address was used for spam
If your sender email address was used to send spam or malware, then your email campaigns with the same sender address will end up in spam. This is why you need to get a business email address to ensure high deliverability for your newsletter emails.
3. Misleading subject lines
Misleading email subjects are annoying and due to many users reporting such emails, spam algorithms can now identify many such lines and mark them spam.
Following are a couple of examples of common misleading subject lines.
- Urgent: Update your information
- Thanks for your order!
- You have won a prize
Need some good examples? See these 160+ excellent email subject lines for inspiration.
4. Your email must have accurate information
The anti-spam laws in many countries require the sender to provide accurate from address (sender email address), complete physical address, and an unsubscribe link in the email message.
If any of these are missing from your newsletter email, then it would most likely end up in spam.
Basically, you need to follow the rules and guidelines provided by your email marketing software and you’ll be able to avoid the spam folder.
We hope this article helped you learn how to easily create an email newsletter. You may also want to see our article on how to get a free business email address to send your newsletter emails.
If you liked this article, then please subscribe to our YouTube Channel for WordPress video tutorials. You can also find us on Twitter and Facebook.
The post How to Create an Email Newsletter the RIGHT WAY (Step by Step) appeared first on WPBeginner.
from WPBeginner http://bit.ly/2Jj24Cx
More links is https://mwktutor.com
No comments:
Post a Comment