Recently one of our users asked us how to bulk schedule posts to be published automatically in WordPress.
Scheduling a post in WordPress is extremely easy, but what if you wanted to quickly schedule multiple drafts at once? Bulk scheduling comes in handy when you have several articles waiting to be published.
In this article, we will show you how to easily bulk schedule posts in WordPress.

When Do You Need to Bulk Schedule WordPress Posts?
If you are the single author creating and managing content on your blog, then you can easily schedule your blog posts by using the default post scheduling feature in WordPress.
But if you need to edit and schedule a lot of posts from several authors, then it can get a bit time-consuming.
The native WordPress scheduling feature requires you to open each post individually to schedule and then save.
Whereas a bulk schedule option can you let schedule multiple posts at once which will save you time that you can spend on increasing traffic and growing your blog.
With that said, let’s take a look at how to easily bulk schedule posts in WordPress step by step.
Bulk Scheduling WordPress Posts (Step by Step Guide)
First thing you need to do is install and activate the Auto Post Scheduler plugin. For detailed instructions, see our guide on how to install a WordPress plugin easily.
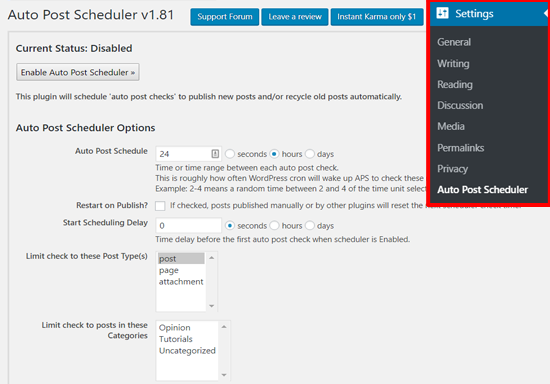
Upon activation, you need to visit Settings » Auto Post Scheduler page to set up automatic bulk scheduling.

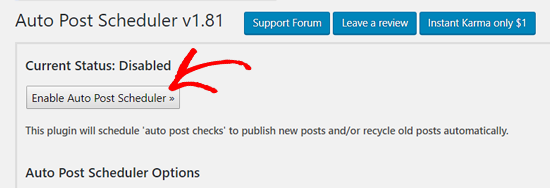
On the top, you will see the Auto Post Scheduler’s status which is disabled by default and an ‘Enable Auto Post Scheduler’ button. You can enable auto scheduling by clicking on the button, but it will enable the default plugin settings.
This is why we recommend reviewing and updating the plugin options before enabling the scheduler.
First, you need to set the auto post interval time. By default, it is set to 24 hours which means that your drafts will be automatically published in the time interval of 24 hours.
You can leave it unchanged if you want to publish one article each day. If you wish to publish two articles, you can set it to 12 hours.

Next, you will see the ‘Restart on Publish’ option. You can check this option if you want the plugin to republish your already published posts. This setting basically allows you to recycle your old content and make your blog look fresh.
After that, the ‘Start Scheduling Delay’ option lets you set a time delay before the first scheduled post goes live. It is set 0 seconds by default which means that your first scheduled post will be immediately published after the Scheduler is enabled.

Next, ‘Limit check to these Post Type(s)’ lets you choose which post types you want to schedule automatically. There is a ‘Post’ selected by default. If you want to enable auto scheduling for your pages as well, then you can add them to the selection by clicking on them with Shift key pressed on your keyboard.

Similarly, you can also select which categories to include in auto scheduling. All categories are added by default. However, you may want to exclude the ‘Uncategorized’ category. To do so, you need to select the other categories by clicking on them with Shift key on your keyboard pressed.

After that, you will see ‘Limit check to posts from these Authors’ option. You can include all or exclude any of them by selecting the ones you want to include. All authors are included by default.

You can also limit check to posts with the keyword search. If you want to exclude posts containing specific keywords, you can prepend the keywords with a hyphen and enter in the field.
Another useful feature is ‘Limit checks on certain Day(s) to’ which lets you set in which hours the posts can be published. You will need to enter time range in 24-hour format.
For example, if you want to publish your posts within 9 AM to 9 PM on Mondays, you need to enter 0900-2100 in the field for Mondays.

If these fields are left blank, all times of the day will be used.
After that, you can choose on which days you don’t want to schedule posts.

Next, you can choose the eligible post statuses. You can select posts with Draft status, Pending status or Published.
Below that, there are more settings you can use to recycle or republish your old posts. They are useful if you want to update your old posts with a new published date.
Once you review all the settings, click the ‘Update options’ button at the bottom.

Now that you have updated your scheduling options, you can go to the top and click the ‘Enable Auto Post Scheduler’ button.

That’s all! The plugin will automatically schedule all your eligible posts for future. You don’t need to open the posts manually to schedule.
However, the automatic scheduling can sometimes slow down high traffic websites because it uses the WordPress WP-Cron for scheduling. You can solve that by setting Cron checks on a schedule or by using a WordPress caching plugin.
We hope this article helped you to learn how to schedule WordPress posts in bulk. You may also want to see our guide on how to fix the missed schedule post errors in WordPress.
If you liked this article, then please subscribe to our YouTube Channel for WordPress video tutorials. You can also find us on Twitter and Facebook.
The post How to Bulk Schedule Posts in WordPress appeared first on WPBeginner.
from WPBeginner http://bit.ly/2WggQMV
More links is https://mwktutor.com
No comments:
Post a Comment