Are you looking for a way to highlight text in a WordPress post or page?
Highlighting text can help point the user’s attention to a specific part of your content. This can be great to show off a call to action, a special offer, or to simply add emphasis on specific sentences.
In this article, we will show you how to easily highlight text in WordPress.
Why and When to Highlight Text in WordPress
Text highlighting is an easy way to emphasize important information in your content. It helps you direct the user’s attention to details that you don’t want them to miss.
For instance, highlighting a discount offer on your WordPress website in a different color will draw the reader’s attention to it, helping you generate more sales.
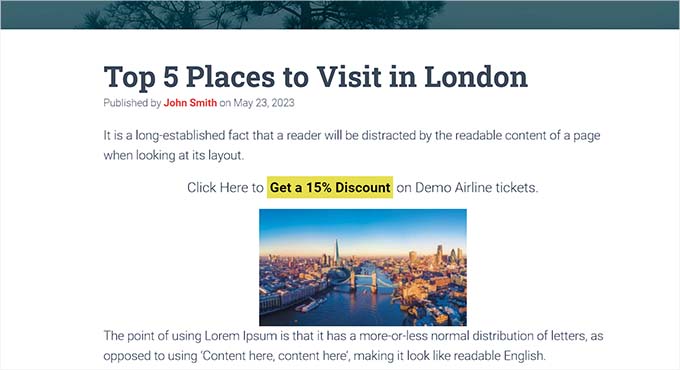
Here’s a sample of what text highlighting might look like in a blog post:
Highlighting text in a different color can also help users with visual impairments or reading difficulties to navigate and understand the content more easily. It can even enhance the appearance of your content and make it more visually appealing.
However, highlighting too much text on your page can be distracting and reduce its effectiveness. That’s why we recommend only highlighting very important text like calls to action, warnings, and other details that readers should pay attention to.
That being said, let’s take a look at how to easily highlight text in WordPress. You can use the quick links below to jump to the method you wish to use:
Method 1: Highlight Text in WordPress Using the Block Editor
This method is for you if you want to easily highlight text in WordPress using the block editor.
First, you will need to open up an existing or new post in the block editor from the WordPress admin sidebar.
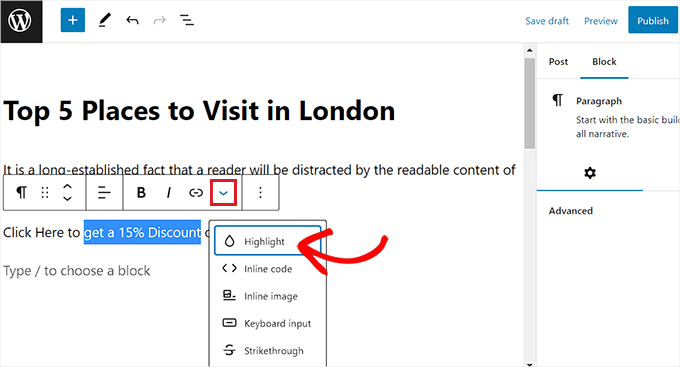
Once you are there, simply select the text that you want to highlight and then click the ‘More’ icon in the block toolbar at the top.
This will open up a dropdown menu where you must the ‘Highlight’ option from the list.
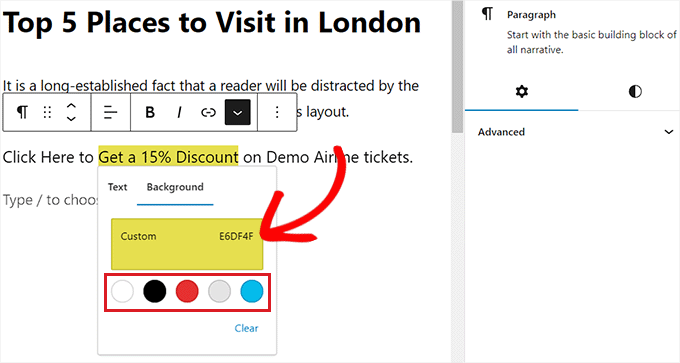
A color picker tool will now open up on your screen. From here, you will first need to switch to the ‘Background’ tab.
After that, you can choose a default highlight color from the given options.
You can also select a custom color to highlight text by clicking on the ‘Custom’ option to launch an ‘Eyedropper’ tool.
Finally, don’t forget to click the ‘Publish’ or ‘Update’ button to save your changes.
You can now visit your website to check out the highlighted text in action.
Method 2: Highlight Text in WordPress Using WPCode (Recommended)
If you want to consistently use a specific color to highlight text all over your WordPress website, then this method is for you.
You can easily highlight text in WordPress by adding CSS code to your theme files. However, the smallest error when entering the code could break your website, making it inaccessible.
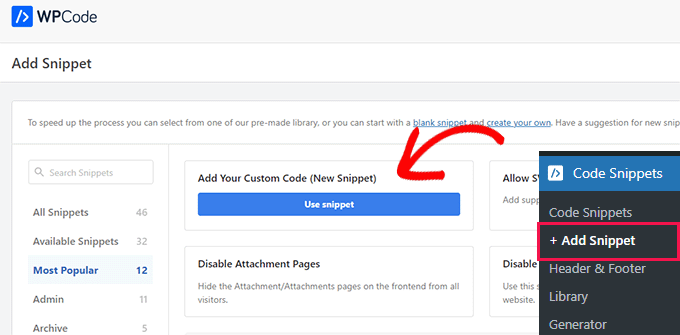
That’s why we recommend using WPCode, which is the best WordPress code snippet plugin on the market. It is the easiest and safest way to add code to your website without directly editing your theme files.
Upon activation, head over to the Code Snippets » + Add Snippet page from the WordPress admin sidebar.
Next, just click the ‘Use Snippet’ button under the ‘Add Your Custom Code (New Snippet)’ option.
This will take you to the ‘Create Custom Snippet’ page, where you can start by typing a name for your code snippet.
After that, you need to select the ‘CSS Snippet’ option from the ‘Code Type’ dropdown menu.
Note: The ‘CSS Snippet’ option is only available in the premium version of WPCode. If you are using the free version, then you will have to select the ‘Universal Snippet’ option instead.
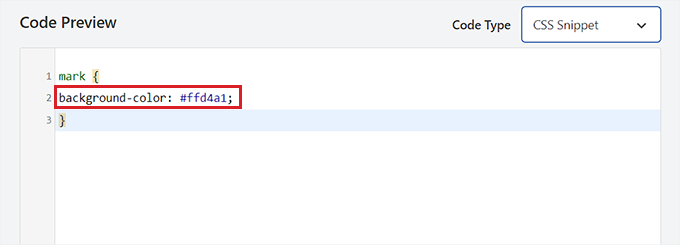
Next, click inside the ‘Code Preview box’.
Then, you have to copy and paste the following code:
mark {
background-color: #ffd4a1;
}
Once you have done that, add the hex code for your preferred highlight color next to the background-color line in the code.
In our example, we are using #ffd4a1, which is a light brown color.
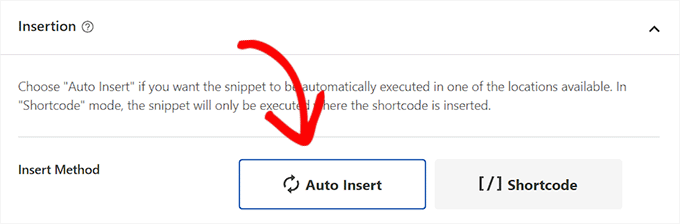
After that, scroll down to the ‘Insertion’ section.
From here, select the ‘Auto Insert’ method to automatically execute the code upon activation.
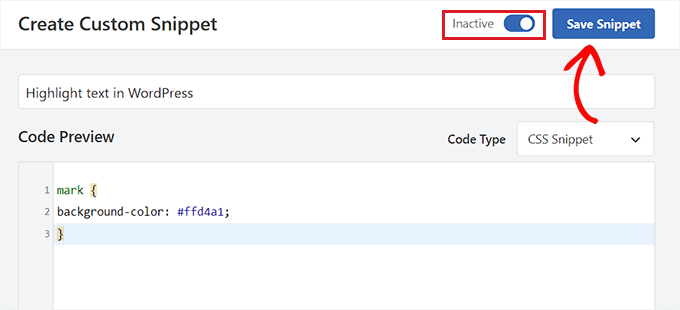
Next, head to the top of the page and toggle the ‘Inactive’ switch to ‘Active’.
Finally, click the ‘Save Snippet’ button to store your changes.
Highlight Text in the Block Editor
Now that the CSS snippet has been activated, we will have to add some HTML code in the block editor to highlight the text in WordPress.
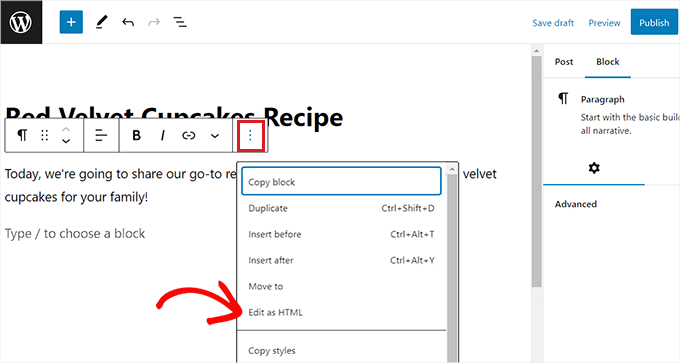
First, open up an existing or new post in the WordPress block editor.
From here, click on the ‘Options’ icon in the block toolbar at the top. This will open up a new dropdown menu where you must select the ‘Edit as HTML’ option.
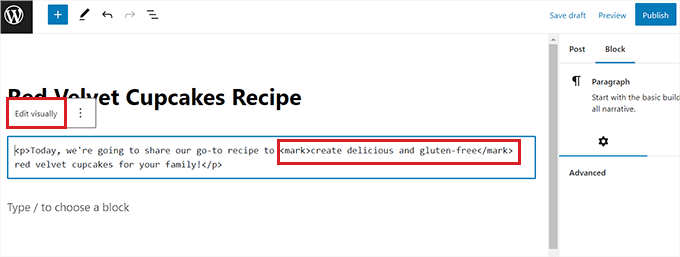
You will now see the block content in HTML format.
Here, simply wrap the text that you want to highlight inside the <mark> </mark> tags like this:
<mark>highlighted-text</mark>
This will highlight the text in the hex color that you choose in your WPCode snippet.
After that, click the ‘Edit Visually’ option in the block toolbar. to switch back to the visual editor.
Once you are done, go ahead and click the ‘Update’ or ‘Publish’ button to save your changes.
Now, you can visit your website to check out the highlighted text in action.
We hope this guide helped you learn how to highlight text in WordPress. You may also want to see our guide on how to customize colors in WordPress to make your website more aesthetically pleasing and our comparison of the best email marketing services to grow your traffic.
If you liked this article, then please subscribe to our YouTube Channel for WordPress video tutorials. You can also find us on Twitter and Facebook.
Are you looking to add site notes and annotations to Google Analytics and track them in WordPress?
You can record key changes to your WordPress website and other events that impact website traffic using annotations. These notes can help you uncover additional insights and provide context to changes in traffic on your website.
In this article, we will show you how to get GA4 site annotations and notes in WordPress.
What Are Google Analytics Annotations?
Google Analytics annotations are short notes that you can record in the analytics reports. They help you track internal changes that can impact your website traffic.
For example, you can record changes you made on a particular day, like sending out a new email campaign, posting on social media, or running an ad campaign.
You can also record when you make changes to the content on your WordPress blog, such as publishing a new landing page, editing the meta title, updating website designs, and more.
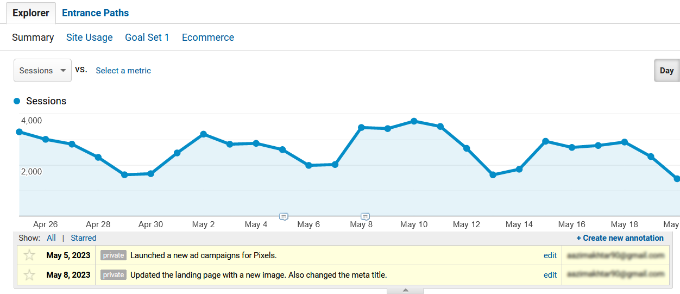
Using site notes and data from Google Analytics reports, you can exactly see what caused your website’s traffic to change.
Let’s say you launched a new ad campaign on a particular day and added an annotation in Google Analytics. The next time you view the traffic stats and see a change, you will know that it could be because of the new campaign.
This also removes the need to backtrack your moves. You don’t need to go through your notebook, social profiles, or update logs to review your changes on a particular day.
GA4 is the latest version of the popular analytics platform by Google. It lets you track visitors from your website and mobile app in the same account. Besides that, the new version also uses a different method of collecting and processing website data.
There are many differences between Google Analytics 4 vs. Universal Analytics. One of these is the lack of site notes and annotations, which was available with Universal Analytics, which no longer can be accessed from July 1, 2023.
After the sunset date, you won’t be able to add more site notes to your Universal Analytics property. This means you will need to manually make your own notes or record key changes to your website from your WordPress dashboard.
That being said, let’s see how you can get GA4 site notes and annotations in WordPress.
How to Get GA4 Site Notes and Annotations in WordPress
The easiest way to get GA4 site annotations and notes in WordPress is by using MonsterInsights. It is the best analytics plugin for WordPress and makes it super easy to configure Google Analytics without editing code or hiring a developer.
The MonsterInsights Site Notes feature lets you add annotations directly to your traffic reports and from the WordPress content editor. Plus, it offers features to easily control and manage your site notes.
For this tutorial, we will use the MonsterInsights Pro version because it includes Site Notes and more features like customizable categories, the ability to add screenshots and media to your notes, and more.
In the Pro version, you will also get advanced features like eCommerce tracking, link tracking, form conversion tracking, advanced dashboard reports, and more.
However, there is also a MonsterInsights Lite version you can use to get started and add Site Notes to your analytics reports.
First, you will need to install and activate the MonsterInsights plugin. If you need help, then please see our guide on how to install a WordPress plugin.
Upon activation, you will see the MonsterInsights setup wizard. Simply click the ‘Launch the Wizard’ button to continue.
From here, you can follow the onscreen instructions to set up Google Analytics in WordPress. For more details, please see our guide on how to install Google Analytics in WordPress.
With MonsterInsights, you can also set up dual tracking. It allows you to track data in a GA4 property and Universal Analytics simultaneously. This way, when Universal Analytics shuts down, you will have historical data in Google Analytics 4 for analysis and comparison.
Once you have set up Google Analytics in WordPress, you can now add site notes to your MonsterInsights reports.
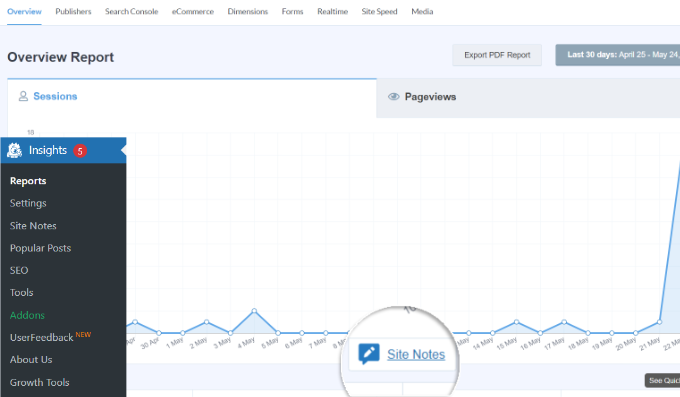
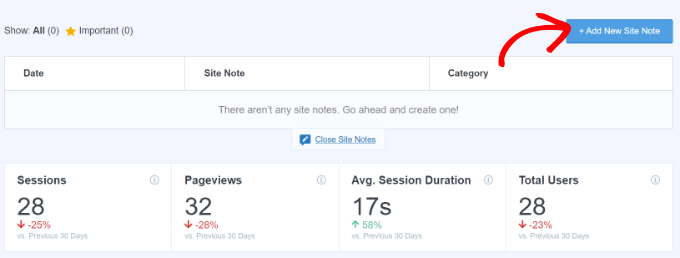
First, you need to go to Insights » Reports from your WordPress admin panel and open the ‘Overview’ report. After that, just click the ‘Site Notes’ option below the graph.
You will now see more options appear.
Go ahead and click the ‘+ Add New Site Note’ button.
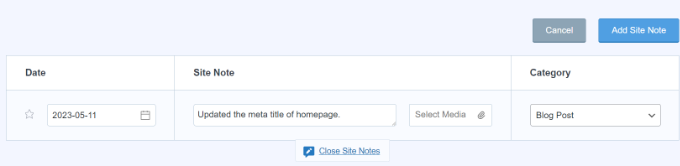
After that, you will need to enter the details of your site note.
You can start by selecting a date. Then, simply type in your site annotation details, like a change you made to a blog post or when you sent an email newsletter.
MonsterInsights also lets you select a media file that you can attach to your site note. For example, this can be a screenshot or video of your campaign uploaded to the WordPress media library.
There is also an option to select a category for your annotation. There are 3 categories offered by MonsterInsights by default, but you can add more. The default categories are Blog Post, Website Updates, and Promotion.
Once you have entered the details, simply click the ‘Add Site Note’ button.
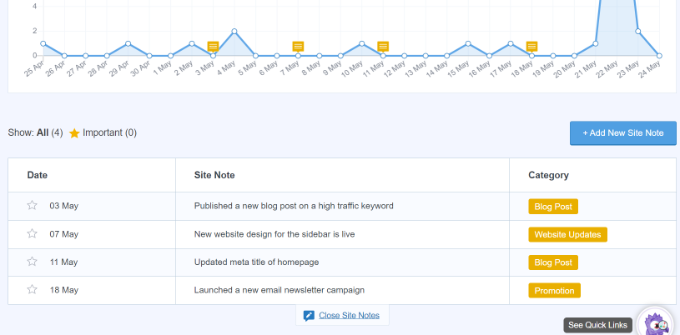
You can then view all your site notes under the graph.
Managing Your Site Notes in MonsterInsights
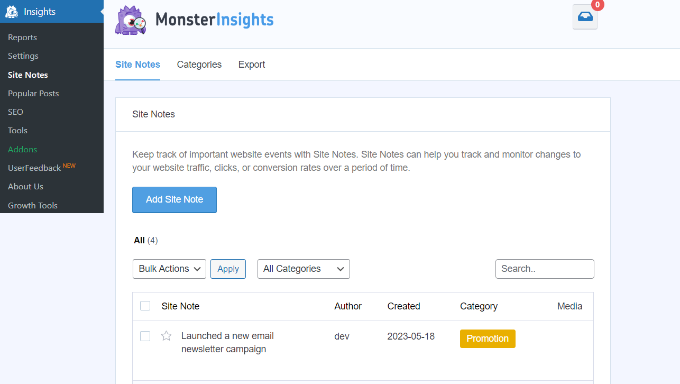
You can also manage your Google Analytics annotations by going to Insights » Site Notes from the WordPress admin panel.
Here, you will see all the site notes you have already added. Plus, you can click the ‘Add Site Note’ button to insert more annotations.
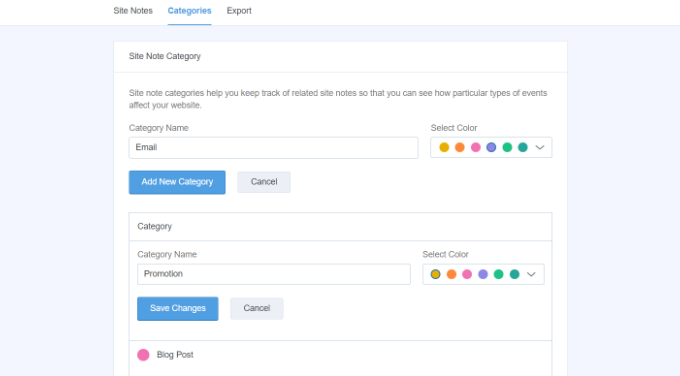
Next, you can switch to the ‘Categories’ tab and customize your site note categories.
MonsterInsights lets you add more annotation categories by clicking the ‘Add New Category’ button. Simply enter a name for your new category and select a color of your choice.
There is also the option to edit existing categories. For instance, you can edit the Promotion category, change its name, and select a new color.
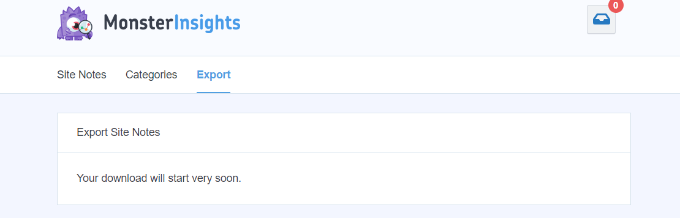
Lastly, you can switch to the ‘Export’ tab in the Site Note settings to save your annotations.
MonsterInsights will create a CSV file to save on your computer. You can then use the exported annotations for future use or analysis.
Adding Site Notes in the WordPress Content Editor
Another advantage of using the MonsterInsights Site Notes feature is that you can add notes from the WordPress content editor.
This is really useful if you are publishing or making changes to a blog post or landing page. You can quickly make a note, and it will appear in the MonsterInsights reports.
First, you will need to add a new post or page or edit an existing one.
From here, simply open the ‘Post’ settings panel on your right and scroll down to ‘MonsterInsights’. From here, you must enable the toggle for ‘Add a Site Note’. After that, you can enter your note and select a categoit.
Once the page or post is published, it will automatically create an annotation in MonsterInsights. You can then view it by heading to Insights » Site Notes in your WordPress admin panel.
Are you looking for ways to improve your SEO rankings? A higher click-through rate on your SEO titles can help.
Your title is the first thing that people will see in search engine results, and they will decide whether to click on your link based on that title. A headline analyzer helps you create engaging titles that will get more clicks.
In this article, we will show you how to use a headline analyzer in WordPress to improve your SEO titles.
What Is a Headline Analyzer Tool & Why Do You Need It?
Choosing the best titles for your blog posts and landing pages is extremely important for search engine optimization (SEO). Powerful titles can get people to click on your links in the search results and visit your WordPress website.
Of course, the more people who click on your titles, the more traffic you will get. But a higher click-through rate (CTR) can also improve your search engine rankings, getting you even more visitors.
It can be tricky for beginners to come up with a headline that instantly captures people’s attention and gets them to click a link. This is where a headline analyzer tool can help.
A headline analyzer is a tool that helps you evaluate and improve your headlines. It provides data-driven insights and suggestions for creating titles that are engaging and click-worthy.
With that being said, let’s take a look at how you can use a headline analyzer tool to improve your SEO titles in WordPress. Here are the topics we’ll cover in this article:
If you’d prefer written instructions, just keep reading.
Adding the Headline Analyzer Tool in WordPress
There are a few ways to add the Headline Analyzer tool in WordPress. When you install either the free All in One SEO or MonsterInsights plugin, it will be automatically added to WordPress.
You can also access the Headline Analyzer for free on the WPBeginner website. Read on to learn how.
AIOSEO helps you optimize your website for search engines without any technical knowledge or the need to hire an SEO expert. The plugin offers a headline analyzer inside your WordPress editor so that you can create powerful titles.
Note: This tutorial will use the AIOSEO Lite version since it includes the headline analyzer tool. There is also a Pro version that we use on the WPBeginner site because it offers powerful features like smart schema, XML sitemaps, and more.
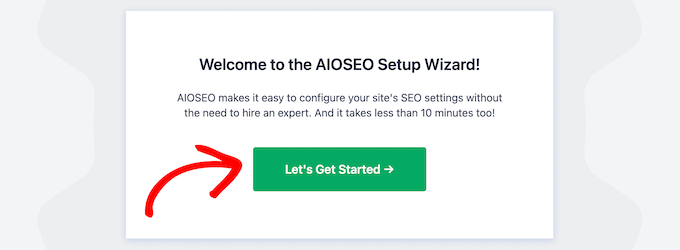
Upon activation, the Headline Analyzer will be immediately added to WordPress.
The plugin will automatically launch its setup wizard. You can go ahead and click the ‘Let’s Get Started’ button to set up the other features of AIOSEO plugin on your website.
The Headline Analyzer is also a feature of the MonsterInsights plugin. Like AIOSEO, once the plugin is installed, the Headline Analyzer will automatically become available in the post editor.
MonsterInsights is the most popular Google Analytics plugin for WordPress, used by over 3 million websites. It will help you discover the types of visitors you get on your website, and what they do once they are there. This can help you make your content more relevant.
You can use the MonsterInsights free version to analyze your headlines, but there is also a MonsterInsights Pro version. It includes additional features like advanced analytics, A/B testing, user journeys, and more.
Finding the Headline Analyzer on the WPBeginner Website
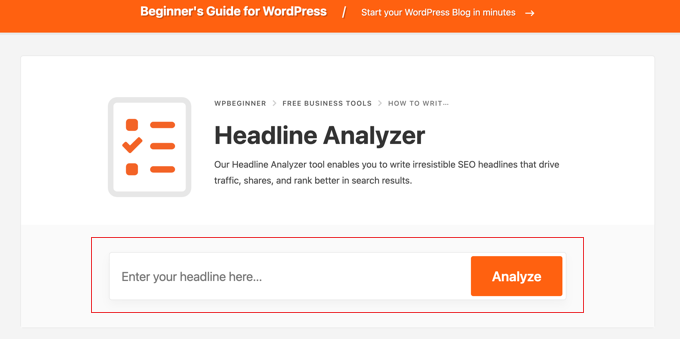
If you prefer not to install a plugin, then you can access the Headline Analyzer for free on the WPBeginner website.
Simply navigate to our Headline Analyzer page. Once there, you can type in your headline and click the ‘Analyze’ button.
You can then use the tool to improve your heading right there on the page rather than in the WordPress editor.
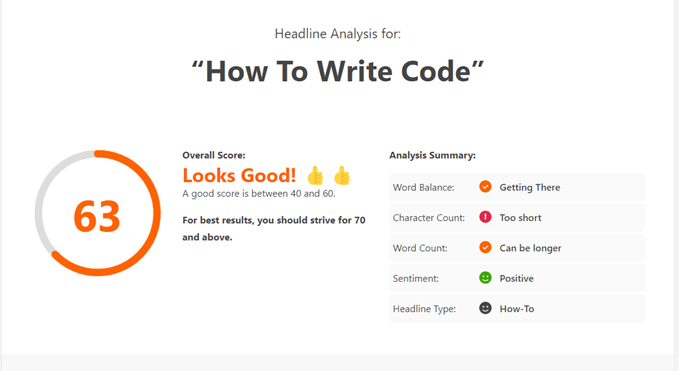
In the image below, you can see an example with an overall score and an analysis of the different parts of the headline:
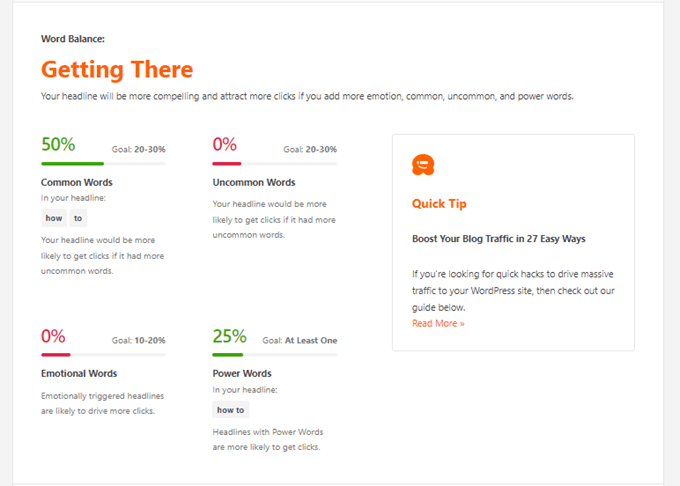
If you scroll down the page, you will also see some recommendations for how to improve your headline.
For example, the Headline Analyzer tool might recommend adding more uncommon or emotional words to your headline to get more clicks.
You can use these tips to try different headline options. Then, simply enter the new headline into the Headline Analyzer tool until you are happy with the results.
Finally, you just need to copy the headline and add it to your WordPress post.
Adding an SEO Title to Your Post
If you are using the All in One SEO or MonsterInsights plugin, then you will need to access the Headline Analyzer tool within the WordPress post editor.
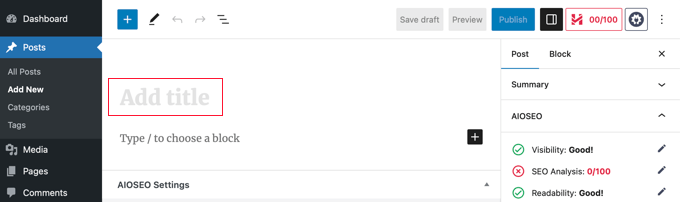
Go ahead and edit or add a new post. Once you are in the WordPress editor, you can add your blog post title at the top.
The first difference is that, behind the scenes, these titles use completely different HTML tags. Your post title is enclosed in <h1> tags, while the SEO tag uses <title> tags.
The second difference is where the titles appear. The post title will normally be displayed at the top of the page, depending on your WordPress theme. On the other hand, the SEO title doesn’t appear in the post at all.
Instead, the SEO title suggests to search engines like Google how you would like your title displayed in search results. It also displays in the browser’s title bar when viewing the post.
By default, WordPress doesn’t let you enter an SEO title. But SEO plugins like AIOSEO allow you to easily add an SEO title to your articles.
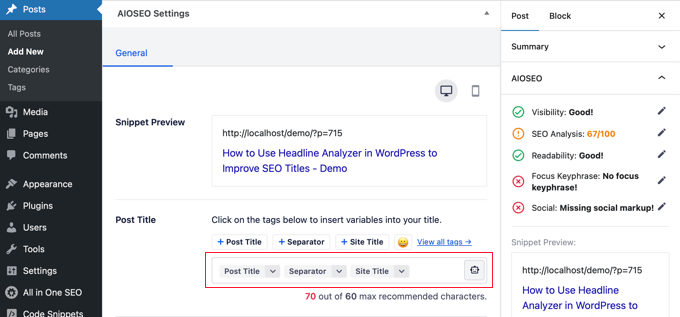
If AIOSEO is installed on your website, then you can simply scroll down to the ‘AIOSEO Settings’ meta box in your WordPress editor and then enter a headline under ‘Post Title.’
The plugin also offers smart tags, so you can automatically add information to your titles, like the post title, current year, author name, categories, site tagline, and more.
Using Headline Analyzer to Improve Your SEO Title
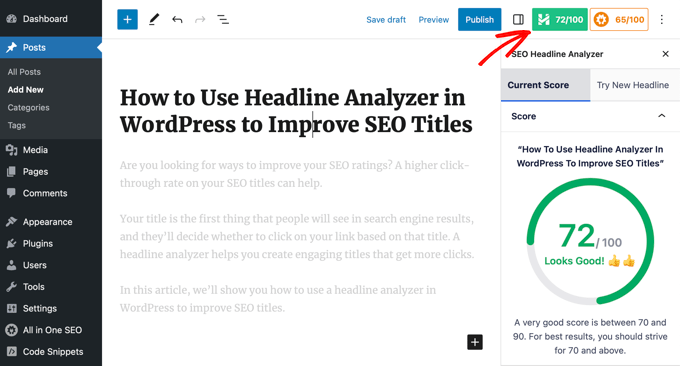
After adding a headline for your article, you can analyze it using AIOSEO or MonsterInsights. All you have to do is click the green ‘SEO Headline Analyzer’ button in the top right.
AIOSEO or MonsterInsights will show you a score ranging from 1 to 100 for your headline. A score of 70 or more shows that you have written a powerful headline.
If your score is below 70, then don’t worry. The headline analyzer will show suggestions for improving the score and making your title more engaging to get more clicks and traffic.
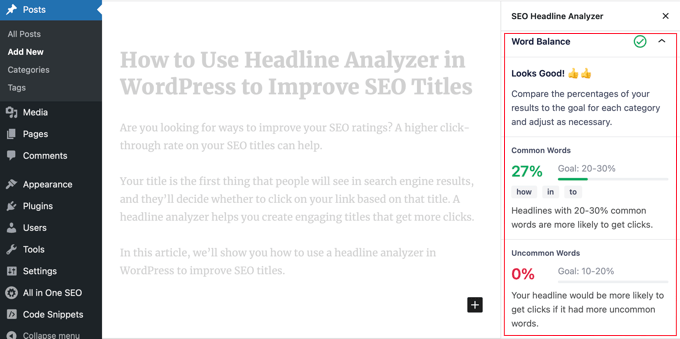
Now you can scroll down and look at the word balance of your copy. The plugin will look for common, uncommon, emotional, and power words.
These are words that help trigger a psychological or emotional response from your audience. When creating headlines, you can use these words to improve your headline score and boost their click-through rate (CTR).
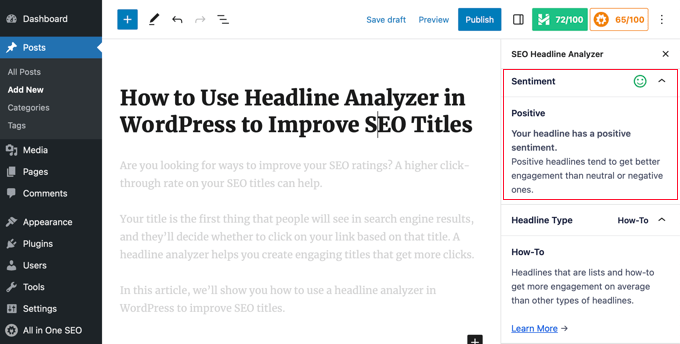
Next, you can check the sentiment of your headline. Titles with a positive feeling tend to get better engagement and more clicks than neutral or negative ones.
Besides that, the plugin will also show you the headline type. For example, you can see whether your headline type is a how-to post, list post, resource post, or more.
These types of titles tend to get more clicks than generic titles.
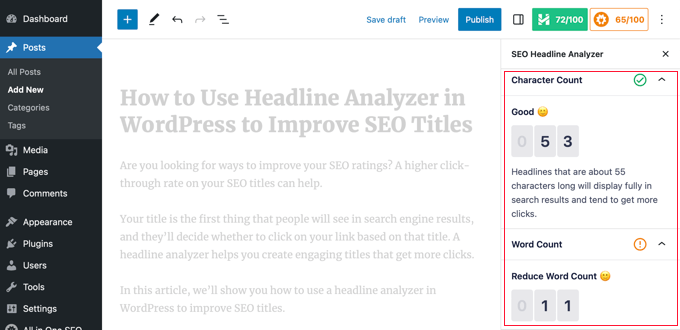
After that, you can scroll down and check the character count and word count for your title in the headline analyzer tool.
It’s recommended to write headlines that are under 55 characters so that search engines can fully show the text in the search results.
If your titles are more than 55 characters, then search engines might cut off the text at the end. This can make the meaning of your title unclear and lower your click-through rate.
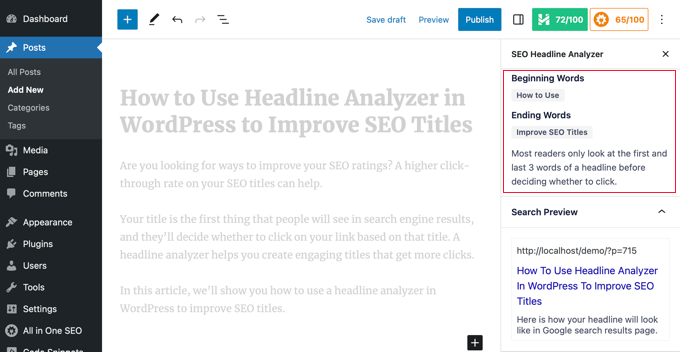
Next, you can analyze the 3 beginning and ending words of your headline. Most readers usually glance at the first 3 and last 3 words in a post title before deciding to click.
Using this information, you can place your target keyword and most important information in the beginning to capture the reader’s attention.
The Headline Analyzer also shows a preview of how your headline will appear in the search engine page results.
If your headline doesn’t get a good score, then you can easily try new headlines and analyze them before deciding on the best SEO title.
All you have to do is switch to the ‘Try New Headline’ tab in the tool, enter your new headline, and click the ‘Analyze Headline’ button.
AIOSEO or MonsterInsights will show you a score of your new headline and compare it with the current SEO title.
You can try multiple headlines for your WordPress blog post and analyze their scores to see which one works the best.
Before you hit publish, check out our blog post optimization checklist to make sure the post is fully optimized to get the most traffic possible.
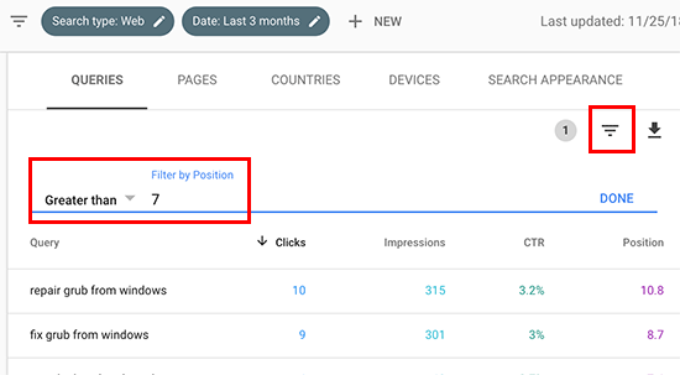
Pro Tips: Search Console + Headline Analyzer
You can take these tips even further like the Pros do and combine the headline analyzer with insights from Google Search Console.
If you look at our ultimate Google Search Console guide to grow traffic, you will see there is a section about finding low-hanging keywords where you can easily rank.
You can then try adding one of these low-hanging keywords to your SEO title and throughout your post. As your click-through rate increases, your SEO rankings will go up as well.
Do you want to optimize your website for search engines?
Ever wished there was any easy way to perform an SEO (search engine optimization) audit to find critical errors on your site WITHOUT the high costs?
If you’re like me and most other smart website owners, then you have at least wished for this solution a couple of times in your WordPress journey.
Today, I’m excited to release a new free tool, WPBeginner SEO Analyzer, which helps you make informed decisions on how to fix SEO errors and grow your organic traffic.
We built this tool because we believe everyone should be able to optimize their site for SEO regardless of their skill set.
What is an SEO Analyzer Tool?
WPBeginner’s SEO Analyzer is a powerful FREE online tool that makes it easy to run an SEO audit of your website, find critical errors, and generate a FREE SEO report with recommendations so you can fix the errors.
It’s completely FREE for all WPBeginner readers … no signup or registration is required.
Most websites fail in SEO because they don’t know what keeps their website from getting high rankings and organic traffic. While there are several advanced SEO analysis tools available on the market, most of them cost a fortune.
And not every website has the budget or resources to hire an expert SEO consultant to detect and fix their SEO errors. At WPBeginner, we want to fix it once and for all.
This is why we decided to build the SEO Analyzer tool and make it free for all WPBeginner readers.
Some of the benefits of our SEO Analyzer are…
Get an analysis of the good, bad, and the ugly part of your website’s SEO
Get instant recommendations and download the complete WordPress SEO analysis report
No signup or installation is required for SEO analysis. It’s absolutely FREE!
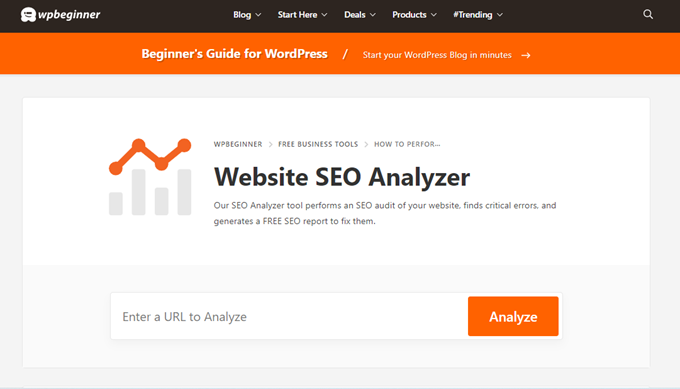
How to Use WPBeginner’s SEO Analyzer
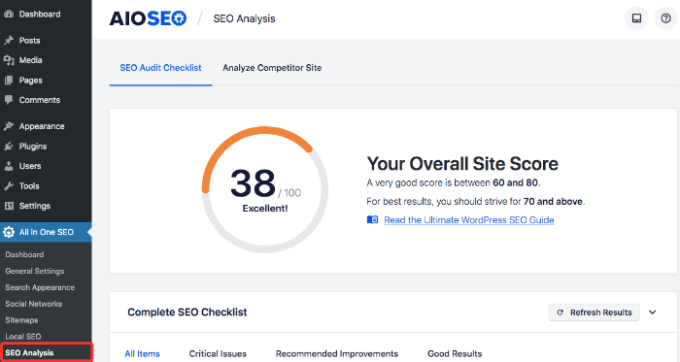
First of all, head over to WPBeginner’s SEO Analyzer tool. Next, type in your website URL to detect SEO errors and click Analyze.
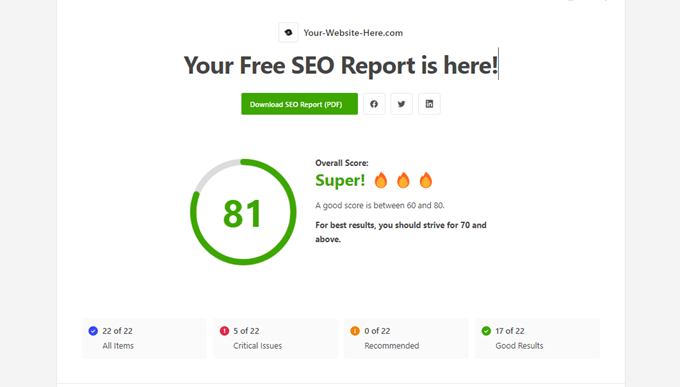
Our SEO Analyzer grades your website’s SEO on a scale of 1-100, where 1 is the least, and 100 is the perfect score.
For best results, it’s recommended to aim for a score of 70 or above.
Aside from providing you with an SEO score, it creates a detailed SEO report on what works on your site and what doesn’t. You’ll also get customized recommendations on how to make the right changes to boost your SEO score.
The SEO Analyzer gives you suggestions based on 4 primary SEO factors as follows:
Basic SEO: It analyzes if your website is following basic SEO practices, like using an SEO title, meta tag, if the site is optimized for any keywords, and so on.
Advanced SEO: Get custom-tailored advanced SEO recommendations for your site.
Site performance: It helps you monitor page loading time and provides suggestions to improve it.
Site security: It helps you ensure your website never gets blacklisted by Google and other search engines.
Improve Search Rankings and Organic Traffic
For your best interest, after doing an SEO audit, you’ll need to follow the recommendations provided by our SEO checkup tool.
Here are a few suggestions to fix your critical SEO errors:
Make sure your website is visible to search engines
Are you looking for a way to filter products by attribute in your WooCommerce store?
Filtering your WooCommerce products by attribute makes it easier for customers to locate the item they want to purchase. It helps save customers’ time and makes the shopping experience more seamless.
In this article, we will show you how to use WooCommerce filter by attribute settings in your online store.
Why Filter WooCommerce Products by Attribute?
Filters make it super easy for customers to browse products in your WooCommerce store.
They allow shoppers to narrow down their search based on different attributes, including color, price range, fabric, size, and more. Rather than scrolling through your entire collection of products, users can simply browse the products they are interested in.
Adding filters can help enhance user experience, improve search functionality, and reduce bounce rates in your online store.
They can also increase sales by enabling customers to see all of the available options for the products they are interested in, helping them make more informed purchases.
That being said, let’s see how you can easily filter the products on your WooCommerce store. We will show you how to filter WooCommerce products by attribute and custom attribute.
If you are looking for a quick and easy way to filter WooCommerce products, then this method is for you. We will show you how to set up a simple WooCommerce filter by attribute settings.
Note: There is also a free version of the YITH WooCommerce Ajax Product Filter plugin. However, we will be using the premium version of the plugin for this tutorial.
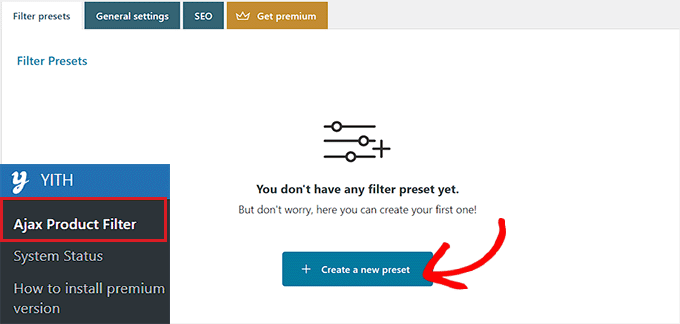
Upon activation, head to the YITH » Ajax Product Filter page from the WordPress admin sidebar.
From here, click the ‘+ Create a new preset’ button to start creating a filter preset.
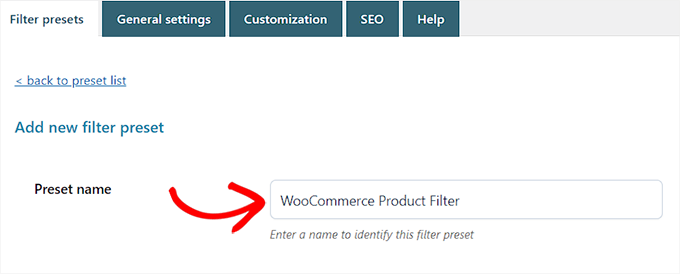
Once you are there, you can start by typing a name for the filter into the ‘Preset name’ box.
Keep in mind that the preset name won’t be displayed in your store and is only there for your reference.
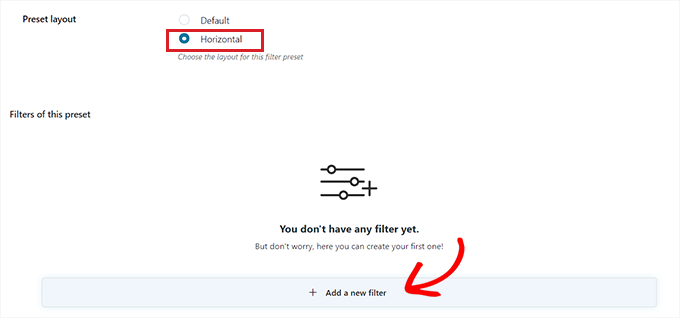
Next, simply choose ‘Horizontal’ as the preset layout and then click on the ‘+ Add a new filter button’ at the bottom.
If you are using the free version of the plugin, then this option won’t be available for you. Instead, you will have the ‘Default’ preset layout.
You can now start creating a filter for your WooCommerce products.
Create a Filter for WooCommerce Products
First, you will need to type a filter name next to the ‘Filter Name’ option.
For instance, if you are creating a filter that will help customers sort through product categories, then you can name it ‘Filter by Category’.
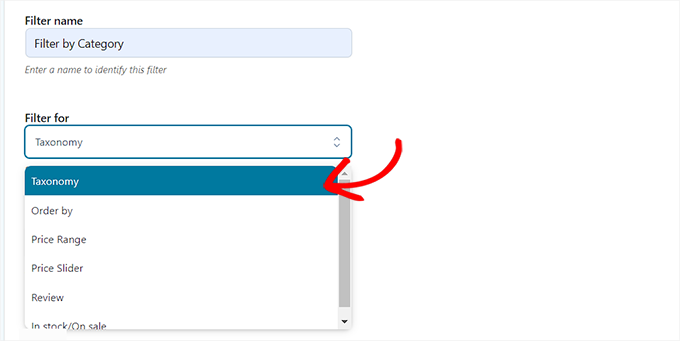
Next, you can select the parameters for the filter from the ‘Filter for’ dropdown menu. Keep in mind that the free version of the plugin only offers filters for product categories and tags.
If you are creating a filter to sort products by different price ranges, then you must choose the ‘Price Range’ option. Similarly, if you want to sort products by popularity or average rating, then you need to choose the ‘Order by’ option.
You can also choose the ‘Taxonomy’ option if you want to filter product tags, categories, colors, sizes, materials, styles, and more. For this tutorial, we will be going with this option.
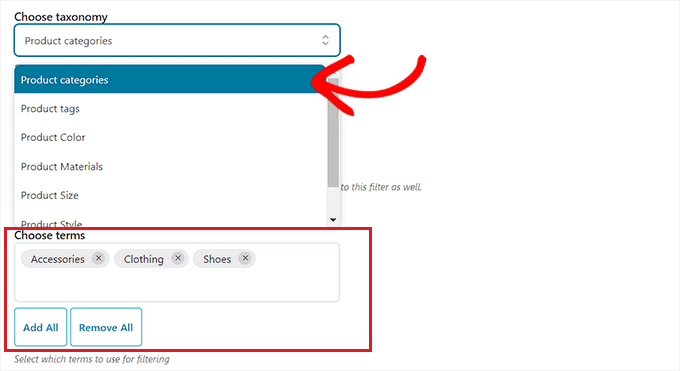
After you have done that, you must choose from the taxonomy options for the filter. For instance, if you want to filter products by color, then you will need to choose that option from the dropdown menu.
As we are creating a filter for product categories, we will be selecting the ‘Product categories’ option.
Next, you must type all the product categories on your website in the ‘Choose Terms’ section.
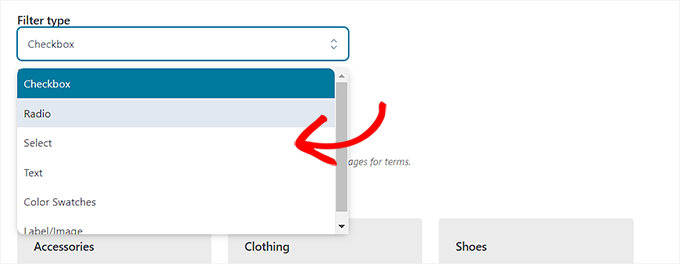
After that, you can choose how you want the filter to display on the front end of your store from the ‘Filter type’ dropdown menu.
You can display the filter as a checkbox, dropdown menu, text, color swatches, and more. For this tutorial, we will be choosing the ‘Select’ option to add a dropdown menu.
Next, you need to toggle the ‘Show Search Field’ switch if you want to enable a search box within the dropdown menu.
You can also display the filter you are creating as a toggle by activating the ‘Show as toggle’ switch. Then, customers will be able to toggle the filter on and off.
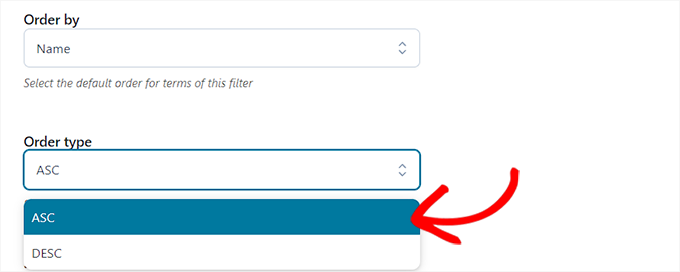
Once you have done that, just choose a default order for the filtered terms from the ‘Order by’ dropdown menu. The filter categories will be displayed in the order that you choose.
You can sort the filter categories using the name, term count, or slug. You can also choose the ‘Order type’ for the filtered terms in ascending (ASC) or descending (DESC) order.
Finally, click the ‘Save Filter’ button at the bottom to save your filter.
Now, repeat the process to create multiple filters.
After you have done that, go back to the top and switch to the ‘General Settings’ tab to configure some settings.
Configure the General Settings
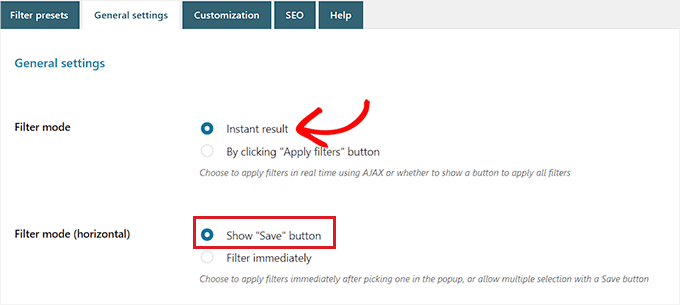
Here, you have to start by choosing a ‘Filter mode’ option. You can select if you want to apply filters in real-time using AJAX or if you want to show an ‘Apply Filters’ button on your site.
Next, you must also make a choice between showing a save button or displaying filter results immediately.
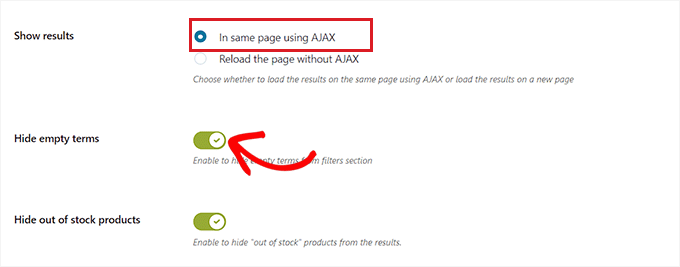
Once you have done that, choose if you want to show the filter results on the same page using AJAX or if you want to reload the results on a new page.
Next, you need to scroll down to the ‘Hide empty terms’ option and toggle the switch on if you don’t want to display filter terms that are empty.
For instance, if you have added a ‘Mugs’ category in your WooCommerce store, but it currently has no items in it, then it won’t be displayed in the ‘Filter by Category’ list.
After that, go ahead and toggle the ‘Hide out of stock products’ switch if you don’t want to display out-of-stock products in the results.
You can leave the other settings as default or configure them to your own liking.
After making your choices, click the ‘Save options’ button to store your changes and switch to the ‘Customization’ tab at the top.
Configure the Customization Settings (Premium Plugin Only)
Note: The ‘Customization’ tab won’t be available if you are using the free version of the plugin.
From here, you can choose your WooCommerce filter’s label style color, textual term color, color swatch size, filter area color, and more.
Adding colors can help your WooCommerce filter look more aesthetically pleasing and match your online store’s branding.
Once you have made your choices, click on the ‘Save Options’ button and switch to the ‘SEO’ tab from the top.
Configure the SEO Settings
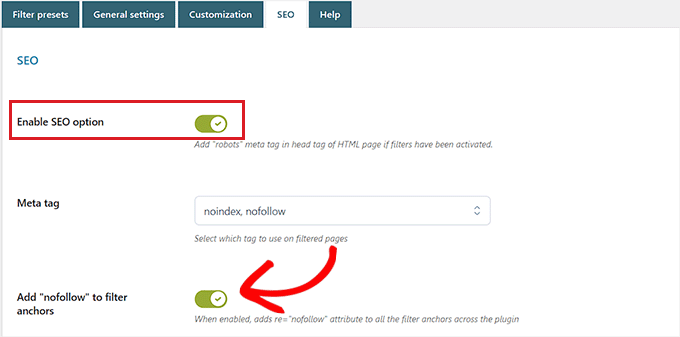
Once you are there, toggle the ‘Enable SEO option’ switch to activate the settings.
Now you can add meta tags from the dropdown menu to use on your filtered pages. This will improve the SEO of your site.
You can also automatically add the nofollow attribute to all the filtered anchors by toggling on the ‘Add “nofollow” to filter anchors’ switch. This will tell search engines not to use the filter anchors when ranking your page.
Once you are happy, click the ‘Save Options’ button to store the settings.
Add the WooCommerce Filter to the Products Page
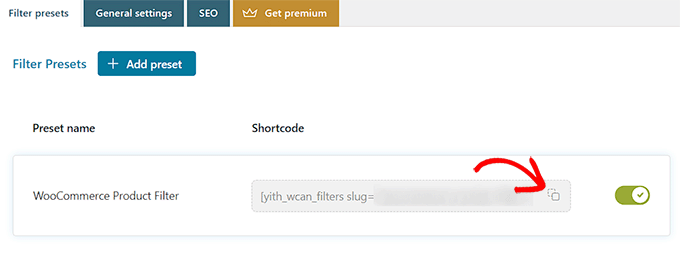
To add the filters that you have just created to your WooCommerce products page, you need to switch to the ‘Filter presets’ tab from the top.
Once you are there, simply copy the shortcode of the filter preset that you just created.
Next, simply open up your WooCommerce products page in the block editor from the WordPress admin sidebar.
Once you are there, click the Add Block ‘(+)’ button in the top left corner to find the Shortcode block.
Now simply paste the filter preset shortcode that you copied into the Shortcode block.
Finally, click on the ‘Publish’ or ‘Update’ button to save your changes.
You can now visit your website to see the WooCommerce filter by attribute feature in action.
How to Filter WooCommerce Products by Custom Attribute
If you want to create a WooCommerce products filter using custom attributes, then this method is for you.
Create a Custom Attribute
To create a custom attribute, you will need to visit the Products » Attributes page from the WordPress admin sidebar.
Once you are there, start by entering a name and slug for the attribute.
For instance, if you want to create a filter for a specific product material, then you can name the attribute ‘Filter by Material’.
Next, you must check the ‘Enable Archives’ box if you want to display all the items that share that attribute on a single page.
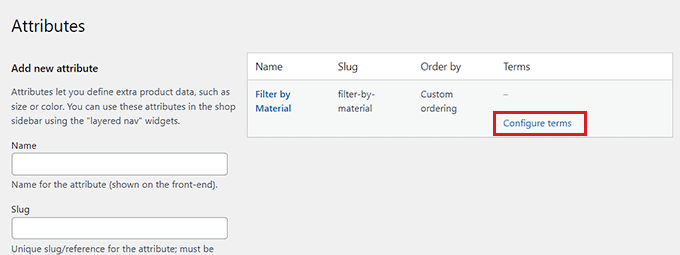
After that, click the ‘Add Attribute’ button at the bottom.
Once the attribute has been created, click on the ‘Configure Terms’ link to add terms to the attribute.
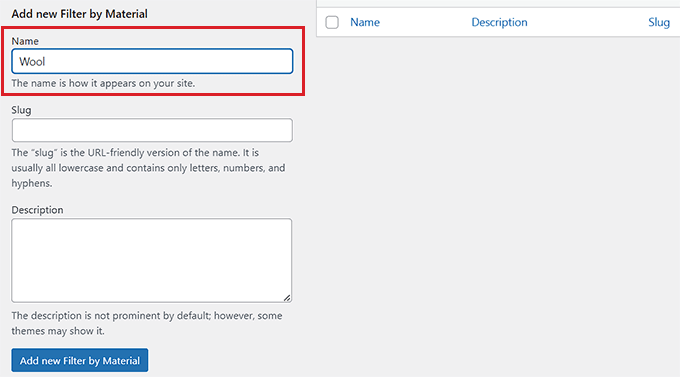
This will direct you to a new screen, where you must type a term into the ‘Name’ box.
For example, if you created an attribute called ‘Filter by Material,’ then you can add the individual materials as terms, such as wool. You can add as many terms as you want to an attribute.
Once you are done, click on the ‘Add new filter by Material’ button to save the term.
Add the Custom Attribute to a Product
After creating an attribute, you will need to add it to individual WooCommerce products.
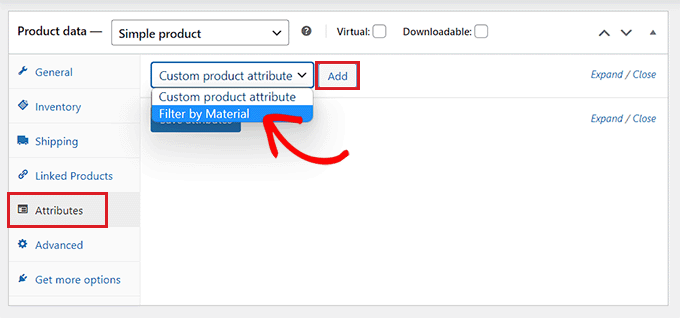
For this, you will have to open the product page that you want to edit. From here, scroll down to the ‘Product data’ section and switch to the ‘Attributes’ tab.
Next, simply open up the ‘Custom Product Attribute’ dropdown menu and select the custom attribute you just created.
Now, go ahead and click the ‘Add’ button.
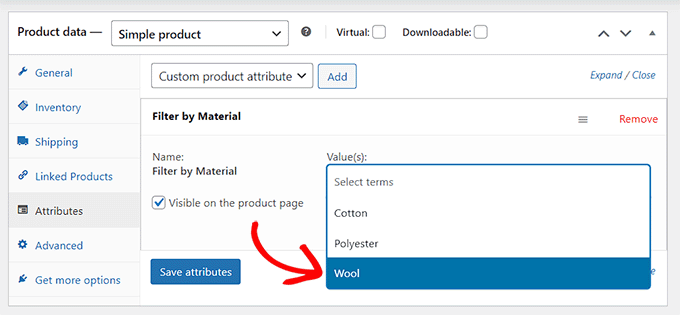
Now that the custom attribute has been added, simply search for the term that matches the product in the ‘Select Terms’ option.
For instance, if you created an attribute for material and the product you are editing is made of wool, then you will need to choose ‘Wool’ from the dropdown menu.
Once you are done, click the ‘Save attributes’ button.
Next, click the ‘Update’ or ‘Publish’ button at the top to save your changes.
You will now have to repeat the process for all the products that share the same attribute.
Note: You can use the free or premium version of the plugin to create a custom attribute filter for WooCommerce.
Upon activation, head to the YITH » Ajax Product Filter page from the WordPress admin sidebar.
From here, go ahead and click on the ‘+ Create a new preset’ button.
Next, you have to type a name for the preset that you are creating into the ‘Preset name’ box.
Once you are done, click the ‘+ Add a new filter button’ at the bottom to start creating a WooCommerce custom attribute filter.
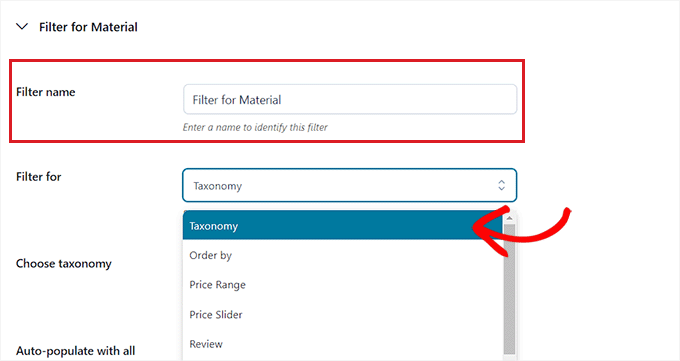
First, you will have to type a name into the ‘Filter Name’ box.
For example, if you are creating a filter that will help customers sort through different material options, then you can name it ‘Filter for Material’.
Next, simply select ‘Taxonomy’ from the ‘Filter for’ dropdown menu. If you are using the free version of the plugin, this option will be chosen for you by default.
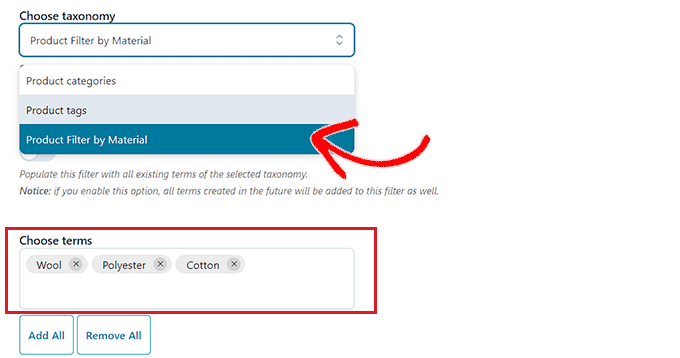
Now, the custom attribute that you created will already be available in the dropdown menu next to the ‘Choose taxonomy’ option.
Go ahead and choose the custom attribute from the dropdown list and type the attribute terms into the ‘Choose terms’ box.
Next, you must choose how you want the filter to be displayed on the front end of your store from the ‘Filter type’ dropdown menu.
The filter can be displayed as a checkbox, dropdown menu, text, color swatches, and more.
Once you have done that, choose a default order for the filtered terms from the ‘Order by’ dropdown menu.
You can sort the filter categories using the name, term count, or slug. You can also select the ‘Order type’ for the filtered terms in ascending (ASC) or descending (DESC) order.
Finally, click on the ‘Save Filter’ button at the bottom to save your custom attribute filter.
Next, you need to switch to the ‘General Settings’ tab from the top. From here, you can choose a filter mode, hide empty terms, and configure other settings according to your needs.
Once you are done, click the ‘Save options’ button to store your changes and switch to the ‘Customization’ tab at the top.
Note: If you are using the free version, then the customization settings won’t be available.
From here, you can customize how your filter preset will look on the front end of your website.
For instance, you can choose the label style color, textual term color, color swatch size, filter area color, and more.
After you have made your choices, click on the ‘Save Options’ button and switch to the ‘SEO’ tab from the top.
From here, toggle the ‘Enable SEO option’ switch to activate the settings.
You can add robots meta tags from the dropdown menu to use on your filtered pages. This will improve the SEO of your site.
You can also toggle the ‘Add “nofollow” to filter anchors’ switch to automatically add the nofollow attribute to all of the filter anchors.
Once you are satisfied, click the ‘Save Options’ button to store the settings.
Add the Custom Attribute Filter to a WooCommerce Products Page
To add the custom attribute filter to a WooCommerce products page, you will need to switch to the ‘Filter presets’ tab at the top.
From here, copy the shortcode of the custom attribute filter.
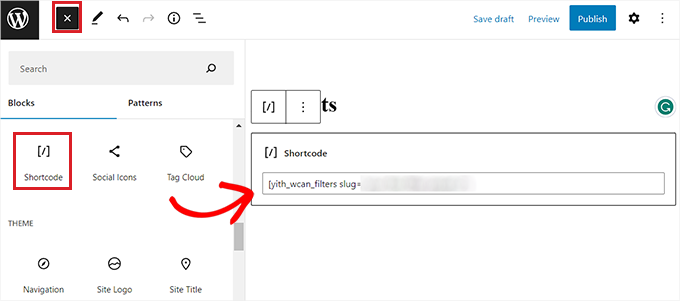
Next, open up your products page in the block editor from the WordPress admin sidebar.
Here, click the Add Block ‘(+)’ button in the top left corner to find and add the Shortcode block.
After that, simply paste the filter preset shortcode that you copied into the block.
Finally, click on the ‘Publish’ or ‘Update’ button to save your changes.
You can now visit your website to see the WooCommerce custom attribute filter in action.
We hope this article helped you learn how to filter WooCommerce products by attribute and custom attribute. You may also want to see our article on how to add fuzzy search to your website to improve search results and our top picks for the best WooCommerce themes.
If you liked this article, then please subscribe to our YouTube Channel for WordPress video tutorials. You can also find us on Twitter and Facebook.