Do you want to create a WordPress widget with your contact information?
Adding a contact info widget on your website will allow you to show your email address, phone number, address, and social media profiles. This will make it super easy for visitors to reach out to you.
In this article, we will show you how to create a WordPress widget for contact info.

Why Should You Add a Contact Info Widget
When building a WordPress website, providing contact information is crucial if you want to build an email list, generate leads, and grow your site.
A contact info widget allows you to display your email address, phone number, and social media profiles in your preferred widget section.
This way, visitors can easily approach you if they want to place an order, need support, or have any questions.
With that being said, let’s see how you can easily create a contact info WordPress in WordPress.
How to Create a Contact Info Widget in WordPress
One of the best ways to add a contact info widget to WordPress is by using Contact Information Widget. It’s a free WordPress plugin that’s very easy to use and works with very little configuration.
First, you need to install and activate the Contact Information Widget plugin. For more details, please see our guide on how to install a WordPress plugin.
With this plugin, you can add the contact info block in any of the widget-enabled areas. Upon activation, simply head over to the Appearance » Widgets in the WordPress admin dashboard.
Once you’re on the ‘Widgets’ page, simply select where you want to add the widget.

Keep in mind that the areas you can place widgets in are defined by your WordPress theme, so it could look different depending on the theme you’re using.
If you’re not sure about your theme, then you can check out our article on the best block themes for WordPress. We will be using Hestia in this article.
Now we will be adding a contact info widget in the sidebar.
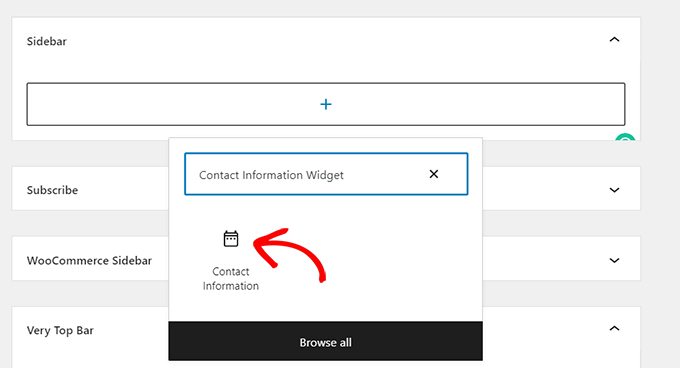
First, simply click the arrow icon in the upper-right corner of the ‘Sidebar’ box to expand it. Then you can click on the ‘+’ plus button to add a contact info widget.

This will open up a ‘Widget Block Menu’ where you can search for the contact info widget by name. Or, click the ‘Browse all’ button to bring up a menu of all the available blocks.
After locating the widget, simply click on the ‘Contact Information’ option.

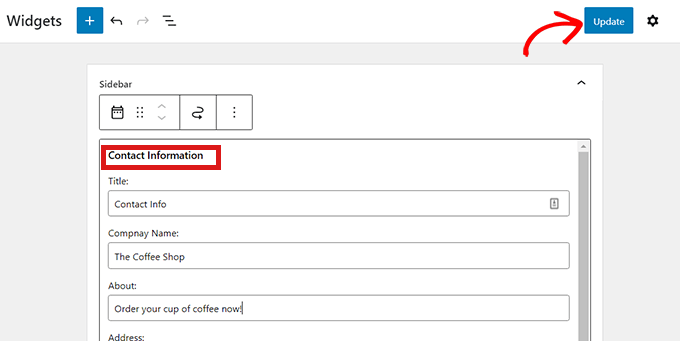
Now, simply fill in all the contact information that you want to share with your readers such as your business phone number, address, etc.
Then just click on the ‘Update’ button to save your changes.

You can also show icons beside your contact details. Simply go back to the ‘Widgets’ page and open up the ‘Contact Information’ widget.
Then, simply scroll down and check the ‘Show Icon’ box. The icon that shows will be automatically selected based on the type of information you’ve entered.
After that, simply click on the ‘Update’ button to save changes.

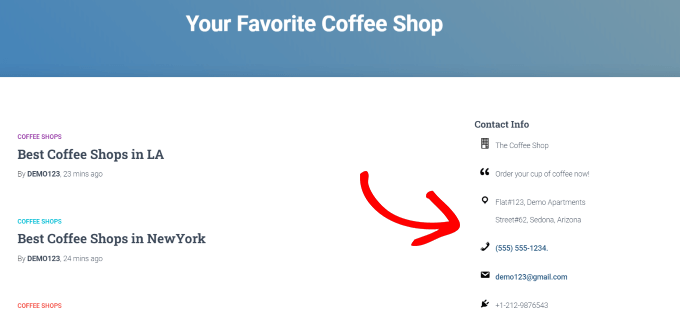
Now, when you visit your site, you will see the icon displayed beside your contact info.
For example, you will see a telephone handset next to a phone number or an envelope next to your business email address.

Final Thoughts and Next Steps
The challenge with a contact information widget is that this will be visible on all pages of your website. Typically this information is best when added in the footer areas of your website.
Often when creating a business website, you may only want to display this information on your contact page. Some website owners don’t want to reveal their business email address at all to reduce spam.
In those cases, you will need to create a contact page and then add a contact form on your site using a plugin like WPForms. You can also embed your location map and other details on that page. This is what most business websites end up doing.
We hope this article helped you learn how to add a contact info widget in WordPress. You may also want to see our guide on how to create an email newsletter and our expert pick of the best live chat software.
If you liked this article, then please subscribe to our YouTube Channel for WordPress video tutorials. You can also find us on Twitter and Facebook.
The post How to Create a Contact Info Widget in WordPress first appeared on WPBeginner.
from WPBeginner https://ift.tt/S459BRf
More links is https://mwktutor.com
No comments:
Post a Comment