Wednesday 30 November 2022

How to Remove the Sidebar in WordPress

Do you want to remove the sidebar from your WordPress site?

The sidebar is a widget-ready area in your WordPress theme where you can show information that isn’t part of the main page content. However, sidebars can be distracting and take up valuable space.

In this article, we will show you how to easily remove the sidebar in WordPress.

How to remove the sidebar in WordPress

Why Remove the Sidebar in WordPress?

Most free and paid WordPress themes come with multiple sidebars or widget-ready areas.

You can use sidebars to show a list of your recent posts, adverts, email list signup forms, or any other content that isn’t part of the main page or post.

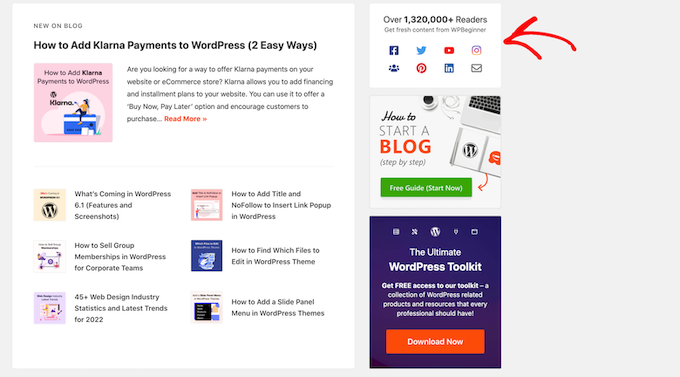
At WPBeginner, we use a sidebar to promote our social media pages and display our most popular posts.

An example of a WordPress sidebar

You can easily add items to a theme’s sidebar using WordPress widgets.

In most WordPress themes, the sidebar looks different depending on whether the visitor is seeing your site on a desktop or mobile device. Since smartphones and tablets have smaller screens, WordPress typically moves the sidebars to the bottom of the screen.

Depending on how your site is set up, this may look strange. Visitors will also need to scroll to the very bottom of the screen to see the sidebar content, which may affect the user experience and your conversion rates.

For more information, please see our guide on how to view the mobile version of WordPress sites from desktop.

Even on a desktop, there’s a chance that the sidebar may clash with your design or distract from the most important content, such as the page’s call to action.

With that being said, let’s see how you can remove the sidebar in WordPress. We’ll show you how to delete the sidebar from your entire site, and how to hide the sidebar on a specific page or post only.

Video Tutorial

If you don’t like the video or need more instructions, then continue reading. If you prefer to jump straight to a particular method, then you can use the links below.

Method 1. Removing Sidebars Using Your WordPress Theme Settings

Many of the best WordPress themes come with built-in settings to remove sidebars. Depending on your theme, you can remove them site-wide, or simply remove them from individual posts or pages.

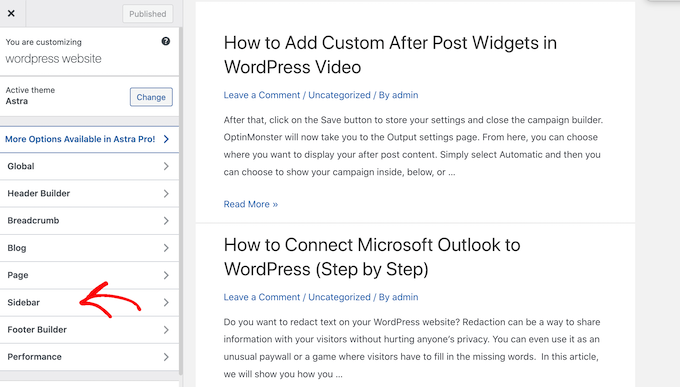
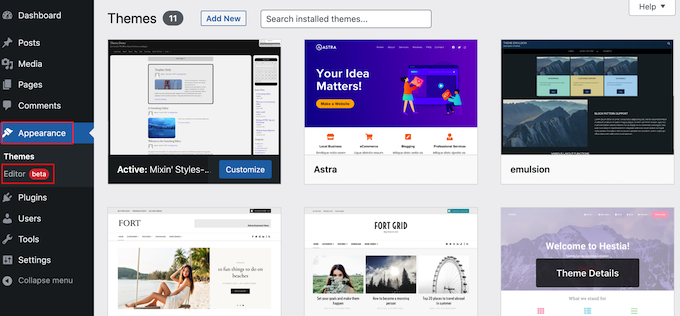
The easiest way to check whether your theme has these settings is to launch the theme customizer. In your WordPress dashboard, go to Appearance » Customize.

Launching the WordPress Customizer

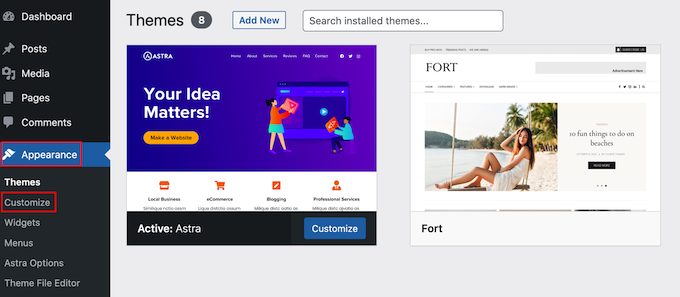
In the left-hand menu, look for a ‘Sidebar’ or similar setting.

In the following image, you can see the options for the popular Astra WordPress theme.

The theme settings for the Astra theme

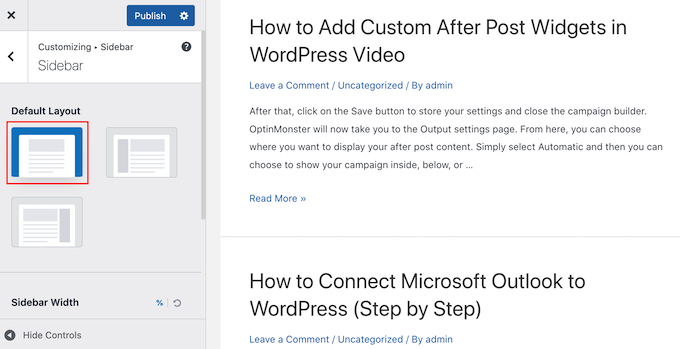
If you do see a ‘Sidebar’ option, then click on it and then look for any settings that will remove the sidebar.

This might be a dropdown menu, thumbnails showing the different sidebar layouts, or some other setting.

Removing the sidebar using the WordPress Customizer

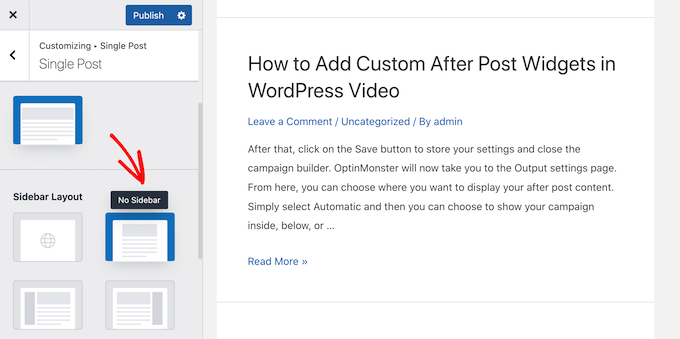
If your theme doesn’t have a ‘Sidebar’ option, then you may be able to remove the sidebar by selecting the ‘Page’ or similar section.

As you can see in the following image, Astra also has a ‘Page’ setting.

Changing the page layout in the WordPress customizer

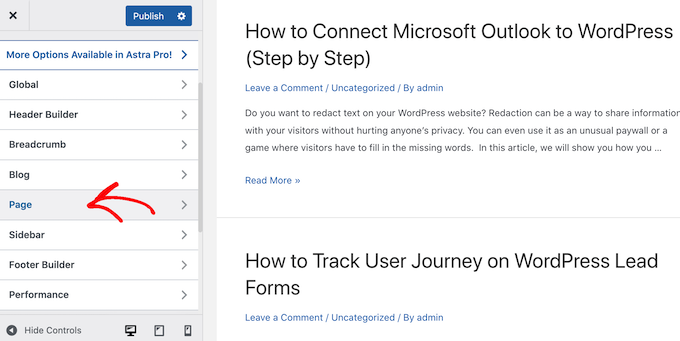
Inside this setting, you’ll see different layouts including several that remove the sidebar such as ‘No sidebar’ and ‘Full Width / Stretched.’

Simply click on the different thumbnails to apply these layouts to your site.

Deleting the sidebar using the WordPress Customizer

No matter how you remove the sidebar, don’t forget to click on ‘Publish.’

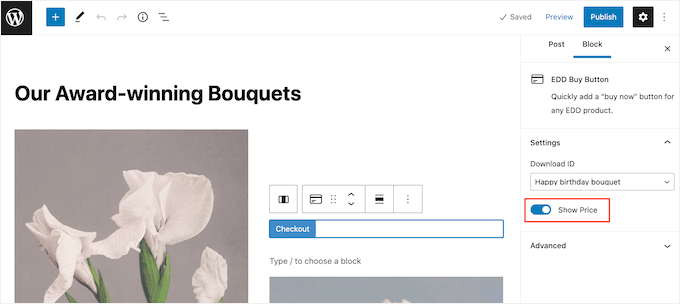
Some WordPress themes also have settings that allow you to remove the sidebar from individual posts and pages. This can be useful when designing custom pages, such as a landing page.

To see whether your theme comes with these settings, simply edit any page or post where you want to hide the sidebar. In the right-hand menu, select either ‘Post’ or ‘Page’ and then look for a ‘Post Settings’ or ‘Page Settings’ option.

The page settings for the Hestia theme

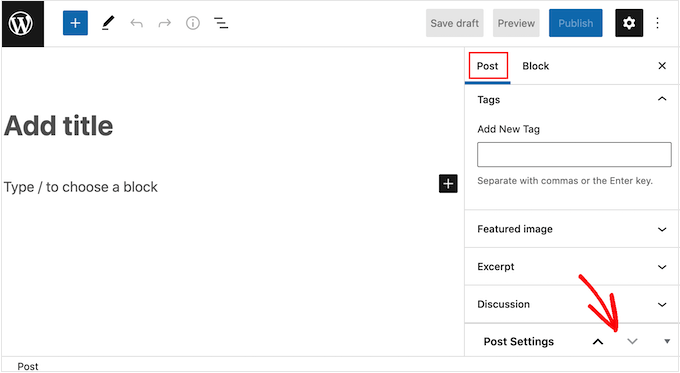
If your theme has this section, then click to expand. You can now look for any settings that allow you to remove the sidebar.

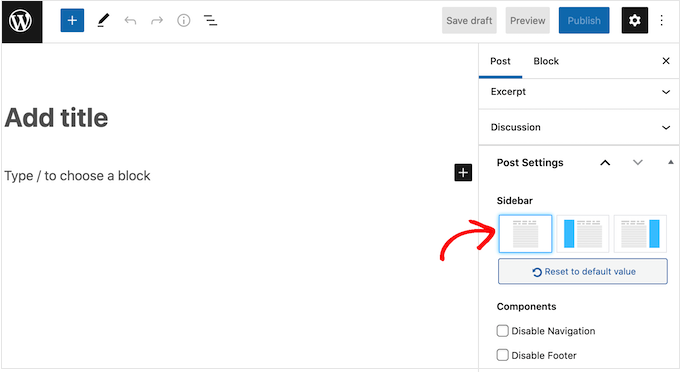
In the following image, you can see the post settings for the popular ThemeIsle Hestia theme.

The Post Settings section

Keep in mind that some WordPress themes may not allow you to easily remove the sidebar using the customizer or page editor. If this is the case, then carry on reading and we’ll show you other ways to remove the sidebar in WordPress.

Method 2. Removing the Sidebar Using the Full Site Editor

If you’re using a block theme, then you can remove the sidebar using Full Site Editing (FSE) and the block editor.

This method is a quick and easy way to remove the sidebar across your entire site, although it won’t work with all themes.

To launch the editor, go to Appearance » Editor.

How to launch the FSE

You can now click to select the sidebar.

In the small toolbar that appears, click on the dotted icon.

Customize the sidebar using the full site editor

You can now delete the sidebar by clicking on the ‘Remove Column’ or similar setting.

Once you’ve done that, you can go ahead and click on the ‘Save’ button.

Removing the sidebar using the full site editor

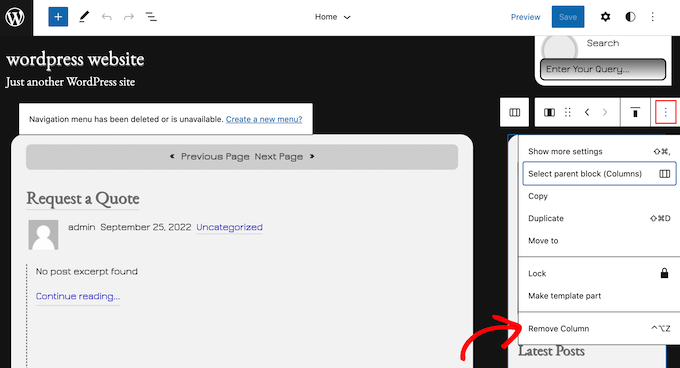
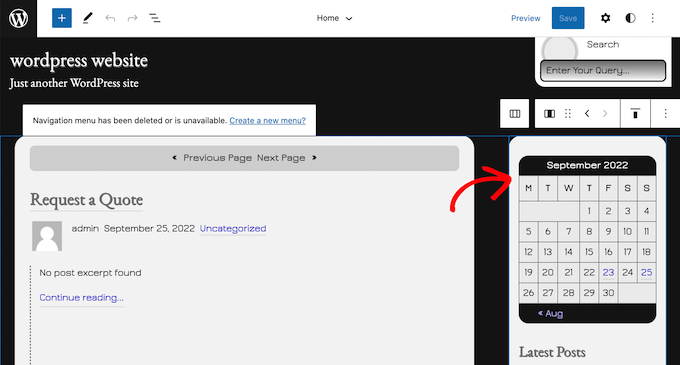
Now, if you visit the front end of your WordPress website, you’ll see that the toolbar has disappeared.

Method 3. Removing the WordPress Sidebar Using Code

This method allows you to simply remove sidebars from every page and post on your WordPress site.

You will need to edit your theme files, so it’s not the most beginner-friendly option. However, this method should work for most WordPress themes, including themes that don’t have a built-in way to hide the sidebar.

Keep in mind that if you edit your WordPress theme files directly, then those changes will disappear when you update the theme.

With that being said, we recommend creating a child theme as this allows you to update your WordPress theme without losing customization.

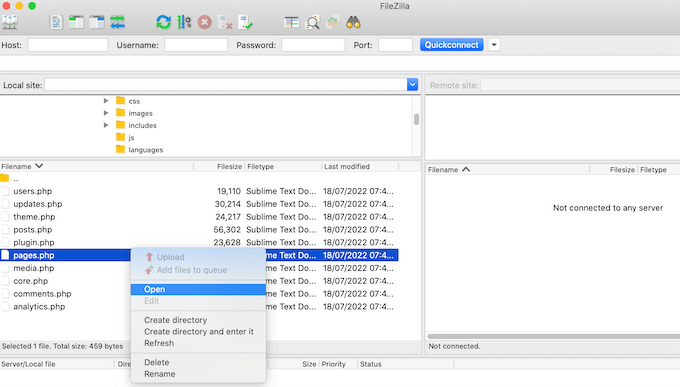
First, you need to connect to your WordPress site using an FTP client such as FileZilla, or you can use the file manager of your WordPress hosting cPanel. Or if you’re a SiteGround user, your Site Tools dashboard.

If this is your first time using FTP, then you can see our complete guide on how to connect to your site using FTP

Once you’re connected, go to /wp-content/themes/ and open the folder for your current WordPress theme.

The FileZilla FTP client

WordPress themes are made up of different templates, so you will need to edit all the templates that include a sidebar. To work out what files you need to edit, see our guide to WordPress template hierarchy.

For example, you may need to edit index.php, page.php, single.php, archive.php, home.php, and so on.

To edit a file, open it in a text editor such as Notepad. Then, find the line that looks like this:

<pre class="wp-block-syntaxhighlighter-code">
<?php get_sidebar(); ?>
</pre>

If your theme has multiple sidebars, then the code will look slightly different and there may be multiple pieces of sidebar code. Typically, this code will have a sidebar name inside the function, for example:

<pre class="wp-block-syntaxhighlighter-code">
<?php get_sidebar('footer-widget-area'); ?>
</pre>

You can simply delete the line for the sidebar that you want to remove.

Now, save and upload the file back to your WordPress hosting account. Simply repeat the process described above for all the template files that include a sidebar.

When you’re finished, you can visit your WordPress blog to see the change in action.

You may notice that although the sidebars are gone, your content area is still the same width, which leaves the sidebar area empty.

An empty space where the sidebar should be

This happens when the theme has a defined width for the content area. After removing the sidebar, you need to adjust the width of the content area by adding custom CSS to your WordPress theme.

To do this, go to Theme » Customize. In the left-hand menu, click on Additional CSS.

Adding CSS with the WordPress customizer

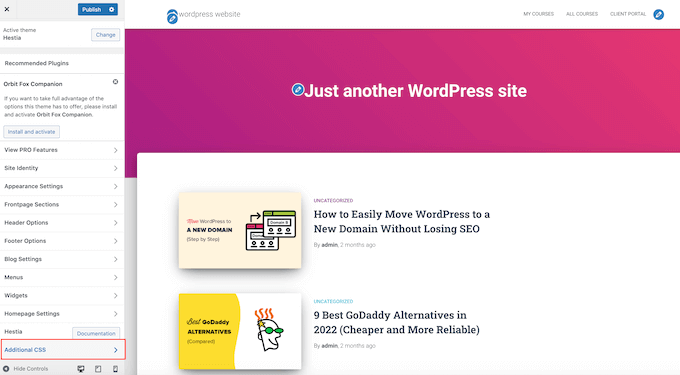
You can now go ahead and paste the following code into the little code editor:

<pre class="wp-block-syntaxhighlighter-code">
.content-area {
    width: 100%;
    margin: 0px;
    border: 0px;
    padding: 0px;
}

.content-area .site {
margin:0px;
}
</pre>

Don’t forget to click on the ‘Publish’ button. Now, if you visit your site you’ll see that the content area now takes up 100% of the available space.

Method 4. Removing Sidebars From Individual Pages in WordPress

You may only want to remove the sidebar on certain pages while showing the sidebar on other areas of your site. For example, many websites don’t show the sidebar on their sales pages, as this can distract from the page’s call to action.

If you just want to remove the sidebar from a specific page, then we recommend using a page builder plugin like SeedProd.

SeedProd lets you design any kind of page using a simple drag-and-drop editor. This makes it easy to add and remove the sidebar from any page.

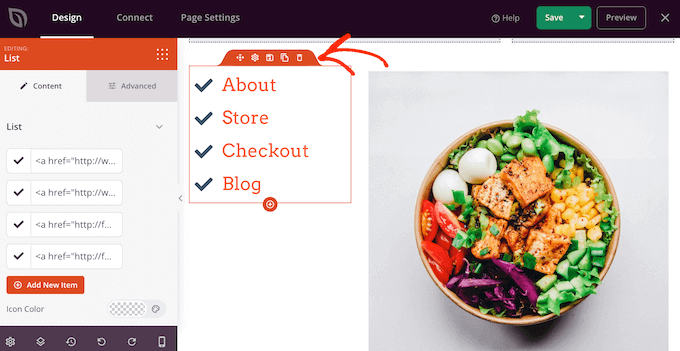
In the SeedProd editor, simply click to select the sidebar you want to remove. Then, go ahead and click on the trash can icon.

Removing a sidebar using SeedProd

If you want to remove the sidebar from your entire site, then you can also use SeedProd to easily create a custom theme that doesn’t have any sidebars.

Method 5. Removing Sidebars from a Static Page in WordPress

Some WordPress themes come with multiple templates, including full-width page templates that don’t show the sidebar on either side of the content. You can use these templates to remove the sidebar from any page.

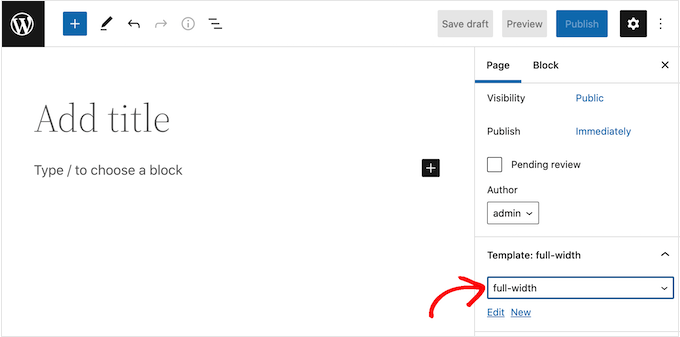
To see whether your theme has a full-width template, simply open any page. In the right-hand menu, select the ‘Page’ tab and look for a ‘Template’ section.

Changing the WordPress page template

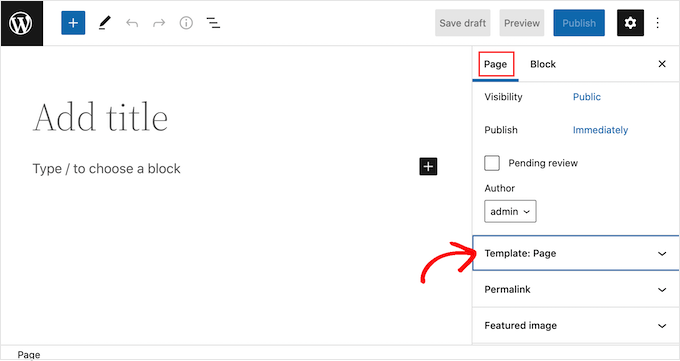
If you find this section, then click on it to see all the options available.

You can now open the dropdown menu and look for a full-width template.

How to remove the sidebar with a full width template

If your theme doesn’t have a full-width template, then you can create one manually.

Open a plain text editor like Notepad and paste the following code in a blank file:

<pre class="wp-block-syntaxhighlighter-code">
<?php
/*
*
Template Name: Full-Width
*/
get_header(); ?>
</pre>

You can now save this file with the name full-width.php.

After that, connect to your site using an FTP client or the file manager supplied by your WordPress hosting provider.

Then, go to /wp-content/themes/ and open the folder for your current theme. Inside this folder, find the page.php file and open it in any text editor.

The FileZilla FTP client

Now, copy everything that appears after the <?php get_header(); ?> line and paste it into your full-width.php file.

Once you’ve done that, find and delete the line that looks like this:

<pre class="wp-block-syntaxhighlighter-code">
<?php get_sidebar(); ?>
</pre>

You can now save your changes and upload the full-width.php file to your theme folder.

You can now use this template with any page. Simply open the ‘Template’ dropdown in the right-hand menu and select your full-width template.

A full-width template

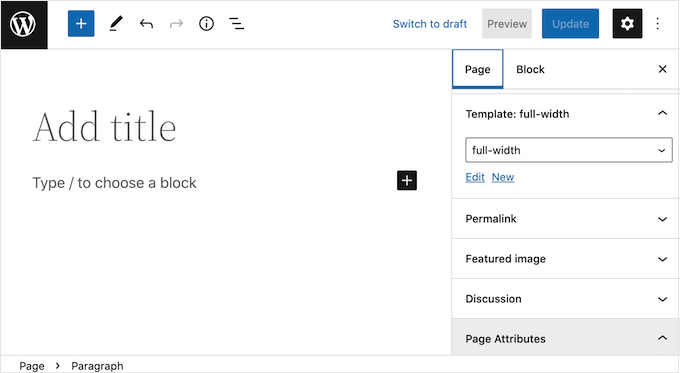
Note: If you have a page open in the content editor while creating the full-width.php file, you will have to refresh the editor for the new template to appear in the dropdown menu.

For more details, see our guide on how to create a full width page template in WordPress.

Method 6. Remove the Sidebar from a Single Post in WordPress

Just like pages, WordPress also comes with built-in support for post templates.

If you want to remove the sidebar from certain single posts, then you can create a custom single-post template. It is similar to creating a full-width page template.

First, you’ll need to create a new template file using a text editor like Notepad. Once you’ve done that, you can copy and paste the following code in that file:

<pre class="wp-block-syntaxhighlighter-code">
<?php
/*
 * Template Name: Featured Article
 * Template Post Type: post, page, product
 */

 get_header();  ?>
</pre>

This code creates a new template called ‘Featured Article’ and makes it available for any page or post, plus any product post types in your online store.

In your custom single post template, you simply need to remove the sidebar part of the code. For more information, you can follow the steps outlined in our guide on how to create custom single post templates in WordPress.

When you’re done, save this file as full-width.php.

Next, you need to upload the file to your current WordPress theme folder using an FTP client or file manager.

Once you’ve done that, you can apply this template to any post. In the right-hand menu, simply click to expand the ‘Templates’ section and then select the full-width template.

How to create a full-width template in WordPress

We hope this article helped you learn how to easily remove the sidebar in your WordPress theme. You may also want to see our step-by-step guide on how to boost WordPress speed and performance, and our comparison of the best email marketing services to grow your traffic & sales.

If you liked this article, then please subscribe to our YouTube Channel for WordPress video tutorials. You can also find us on Twitter and Facebook.

The post How to Remove the Sidebar in WordPress first appeared on WPBeginner.


from WPBeginner https://ift.tt/JsdiFNH
More links is https://mwktutor.com

How to Add a Buy Now Button in WordPress (3 Methods)

Do you want to add a buy now button in WordPress?

Whether you’re selling a service, subscription, or a physical product, having a quick buy now button helps improve the buying journey and leads to more sales.

In this article, we will show you 3 different ways on how you can add a buy now button in WordPress, step by step.

How to add a buy now button in WordPress

Why Add a Buy Now Button in WordPress?

A buy now button is a great way to reduce your cart abandonment rates. Every step in the purchasing process is another opportunity for the customer to change their mind and abandon their cart.

By taking them straight to the checkout, shoppers have less time to change their minds and give up on their purchases.

Since they speed up the purchasing process, buy now buttons can also improve the customer experience. When the buyer’s journey feels easy, customers are more likely to keep coming back to your store.

You’ll often see buy now buttons on product pages but they’re also sometimes used on landing and sales pages.

In this way, buy now buttons allow customers to kickstart the purchasing process without ever visiting the product page, which may increase the conversion rates for your marketing and advertising campaigns.

With that being said, let’s see how you can add a buy now button in WordPress. Simply use the quick links below to jump to the method you want to use.

Method 1. Adding a Buy Now Button With WP Simple Pay (No eCommerce Plugins Required)

You can add a simple buy now button to any page, post, or widget-ready area using WP Simple Pay.

This is a great option for service based business, non-profits, or anyone who’s looking for a quick buy now button option for WordPress.

WP Simple Pay is the best Stripe payment plugin for WordPress that lets you accept credit card payments, Apple Pay, Google Pay, ACH bank debit, and more without any eCommerce plugins or shopping carts. This makes WP Simple Pay the perfect choice if you want to add a buy now button to a sales page without having to install anything special.

For this guide, we will be using the free version of WP Simple Pay.

If you want to accept payments using ACH direct debit, recurring payments, do automatic tax calculations, or you want to add a buy now pay later plan to WordPress, then you’ll need to upgrade to the pro version.

First, you’ll need to install and activate the WP Simple Pay plugin. If you need help, then please see our guide on how to install a WordPress plugin.

Upon activation, the plugin will automatically launch the setup wizard. Go ahead and click the ‘Let’s Get Started’ button.

The WP Simple Pay WordPress payment plugin

In the next step, you’ll need to connect a Stripe account to WP Simple Pay. Stripe is a beginner friendly payment processor for website owners.

To get started, click on the ‘Connect with Stripe’ button.

How to connect WP Simple Pay to Stripe

On the next screen, you can either log into an existing Stripe account or create a new one.

If you already have a Stripe account, then simply type in the email address and password for that account.

Connecting Stripe to your WordPress website

WP Simple Pay will now show you how to connect your Stripe account to WordPress.

If you’re not already registered with Stripe, then type in your email address and then follow the onscreen instructions to create a Stripe account. Once you’re logged into your Stripe account, click on the ‘Create a Payment Form’ button.

If you’ve clicked away from this screen by accident, then don’t panic. You can reach the same screen by going to WP Simple Pay » Add New.

Adding a buy now button using WP Simple Pay

The free WP Simple Pay plugin has a few different templates that can help you create a payment form, fast. You can unlock extra templates by upgrading to WP Simple Pay Pro, including a template that adds a Stripe donate button in WordPress.

Since we want to create a buy now button, hover over the ‘Payment Button’ template and then click on ‘Create Payment Button’ when it appears.

Create a payment button

In the ‘Title’ field, type in a name for your buy now button.

This title is just for your reference so you can use anything you want.

Adding a title to your buy now button in WordPress

You can also use the ‘Description’ field to add some information about your button. Again, WordPress won’t show this to your site’s visitors but it can be useful for your own reference or for anyone else who shares your WordPress dashboard.

After that, click on the ‘Payment’ tab.

By default, WP Simple Pay will create your button in test mode, meaning you can’t accept real payments yet.

We recommend leaving the ‘Global Settings (Test Mode)’ radio button selected so you can test your buy now button before you start accepting payments.

Creating a buy now button in test mode

If you want to start collecting payments straight away then you can select the ‘Live Mode’ button instead.

Next, you can decide how much the button will charge the customer. Go ahead and type this number into the ‘One-Time Amount’ field.

Collecting a one-time payment using WP Simple Pay

Note: WP Simple Pay uses the dollar currency by default. If you want to accept payments in a different currency, then head over to WP Simple Pay » Settings. You can then select the ‘Currency’ tab and choose a new currency.

Once you’ve done that, select the ‘Form Fields’ tab.

WP Simple Pay's form field settings

By default, your button will have the label ‘Pay Now’, but you can change this to anything you want by typing into the ‘Button Text’ field.

You can also change the ‘Button Processing Text,’ which is the message that WP Simple Pay will show to shoppers while it’s processing their payment.

Customizing the buy now button in WordPress

By default, WP Simple Pay will use the same button style as your WordPress theme.

It also has a ‘Stripe blue’ style that you can use, as you can see in the following image. If you want to use this button style, then simply select the ‘Stripe blue’ radio button in the ‘Payment Button’ section.

The Stripe blue button style

​Next, select the Stripe Checkout tab and choose the information that WP Simple Pay will collect from visitors at checkout.

For example, if you’re selling a physical product then you can get the customer’s shipping address by checking the ‘Collect Shipping Address’ box.

Configuring the Stripe checkout page

If you think that customers may want to buy multiple products, then make sure you check the ‘Allow quantity adjustment’ box.

This adds a dropdown to the Stripe checkout page which allows customers to change how many products they’re buying.

Changing the product quantity at checkout

When you’re happy with how the buy now button is set up, it’s time to make it live by clicking on the ‘Publish’ button.

You can now add this buy now button to any WordPress page, post, or widget-ready area using the ‘Form Shortcode.’

Adding a buy now button using shortcode

For more details on how to place the shortcode, you can see our guide on how to add a shortcode in WordPress.

If you’ve published your button in test mode, then the Stripe dashboard won’t show any payments you get during this time, which makes it difficult to test your buy now button.

To see your transactions, you’ll need to enable test mode in Stripe by logging in to your Stripe dashboard and clicking on the ‘Payments’ tab.

The Stripe payment dashboard

After that, just click on the ‘Developers’ toggle in the upper right corner.

As soon as you’ve done that, you can test your buy now button and the payments will appear in the Stripe dashboard.

Testing credit card payments with Stripe and WordPress

Once you’ve finished testing your button, you can start accepting payments by going to WP Simple Pay » Payment Forms.

Here, just hover your mouse over the buy now button, and click on the ‘Edit’ link.

Editing your buy now button

You can now go ahead and select the ‘Payment’ tab, and then click on the radio button next to ‘Live Mode.’

Finally, click on ‘Update.’ Your buy now button is now live, and you’re ready to start accepting payments from your visitors.

Putting your buy now button into live mode

Method 2: How to Add a Buy Now Button to Your Digital Downloads

WP Simple Pay lets you add a straightforward buy now button to any WordPress blog or website. However, if you want to sell digital downloads on WordPress, then you’ll need an eCommerce plugin that has a buy now feature.

Easy Digital Downloads is the best platform to easily sell digital products. In fact, we use this plugin ourselves to sell many of our premium WordPress plugins.

Easy Digital Downloads gives you a few ways to add a buy now button in WordPress.

By default, Easy Digital Downloads will show an ‘Add to Cart’ button on all its product pages. However, you can replace that with a buy now button instead.

A buy now button, created using Easy Digital Downloads

When the customer clicks on the button that you can see in the image above, they’ll see a popup where they can type in their email address and credit card details.

After that, they just need to click on ‘Purchase’ to go ahead and buy the product.

An Easy Digital Downloads popup

Easy Digital Downloads also comes with an ‘EDD Buy Button’ block that you can add to any page, post, or widget-ready area.

You can connect this block to any of your downloadable products. The visitor can then simply click on this button to add the product to their basket and go straight to checkout.

The EDD Buy Block

With that in mind, let’s look at both methods.

How to Add a Buy Now Button to Any Product Page

To start, you may want to add a buy now button to your product pages. This gives the customer less time to change their mind and abandon their purchase.

If you use SiteGround as your hosting provider, then Easy Digital Downloads comes pre-installed so you can start using the plugin straight away.

If not, you can check out SiteGround EDD hosting and get started for as little as $2.99 a month!

If you’re using any other hosting provider, then you’ll need to install and activate the Easy Digital Downloads plugin. For more details, see our step by step guide on how to install a WordPress plugin.

In this guide, we’ll be using the free Easy Digital Downloads plugin as it has everything you need to create a simple buy now button. There’s also a pro version that has more advanced features including wishlists, purchase rewards, fraud monitoring, and more.

Before you can create a buy now button, you need to set up Stripe or PayPal. To configure your payment gateway, go to Downloads » Settings and then click on the ‘Payments’ tab.

Configuring payment gateways in Easy Digital Downloads

You can now check the box next to ‘PayPal’ or ‘Stripe’ depending on the payment gateway you want to use.

If you add multiple payment gateways, then you won’t be able to create a buy now button, so it’s important to only choose one gateway.

After making your decision, click on ‘Save Changes’ to store your settings.

Configuring the Stripe payment gateway for EDD

If you want to use PayPal, then click on the ‘PayPal’ tab.

You can then select the ‘Connect with PayPal in live mode’ button.

Configuring the PayPal payment gateway

This opens a popup where you can type in the email address and password for the PayPal account where you want to receive payments.

To set up Stripe instead, click on the ‘Stripe’ tab and then select ‘Connect with Stripe.’

Configuring Stripe for EDD

This opens a setup wizard, which will help you connect your website to Stripe.

After configuring your payment gateway, don’t forget to click on the ‘Save Changes’ button. You can now add a buy now button to any Easy Digital Downloads product page.

To create your first digital product, go to Downloads » Downloads. Then, click on the ‘Add New’ button.

Adding a new digital download product

You can now add a title and a description for the product, upload an image, add categories and tags, and more.

Note: By default, Easy Digital Downloads will set your product as a free download. It’s important to scroll to the ‘Product Options’ section and type in the real price for the product.

The product options settings

The next step is uploading the product. This might be an ebook download, video training, a PDF guide, digital art and graphics, or any other file that WordPress supports.

Pro Tip: If you want to sell a file type that WordPress doesn’t support, such as SVG images, PSD files, or others, then see our guide on how to allow additional file types in WordPress.

To add your downloadable file, scroll to the ‘Download Files’ section.

In the ‘File Name’ field, type in a name for the downloadable file. Once you’ve done that, click on the ‘Upload a file’ button.

Uploading a downloadable product

This will launch the WordPress media library. Here you can choose the file that you want to sell as a digital download.

When you’re happy with how your product is set up, it’s time to add a buy now button.

In the right-hand menu, find the ‘Button Options’ section. Here, click on the ‘Purchase Button Behavior’ dropdown and choose ‘Buy Now.’

Creating a buy now button using Easy Digital Downloads

You can now make the product live by clicking on ‘Publish.’ Now, if you visit this product page you’ll see the buy now button.

You can add a buy now button to any product page simply by following the same process described above.

How to Add a Buy Now Button to Any Page or Post

Sometimes you may want to use buy now buttons on other parts of your online store.

For example, if you have a landing page that promotes a particular product, then you might allow customers to start the checkout process directly from that landing page.

This can get you more sales by encouraging impulse purchases, while also removing multiple steps from the buyer’s journey.

You can do this easily using the ‘EDD Buy Button’ block. To use this block, you first need to set up a payment gateway and create at least one product following the same process described above.

After that, simply open the page or post where you want to add your buy now button in the content editor. Then, click on the ‘+’ icon and start typing ‘EDD Buy Button.’

The EDD Buy Button block

When the right block appears, click to add it to your layout.

You can now open the ‘Select a Download’ dropdown and choose the product that will be added to the customer’s cart.

Configuring the EDD Buy Button block

By default, Easy Digital Downloads will show the product’s price on the buy now button.

If you want to hide the price, then click to disable the ‘Show Price’ toggle.

Adding and remove the price from a buy now button

You can now publish or update the page to make it live. Now, if you visit your WordPress website you’ll see the buy now button in action.

Method 3. Add a Buy Now Button to Your WooCommerce Store

If you run a WooCommerce store, then you may want to add a buy now button to your product pages. This allows customers to start the checkout process directly from the product page, which often reduces cart abandonment rates.

The easiest way to add a buy now button to your online store is by using the Buy Now Button for WooCommerce. This is a simple plugin that requires no configuration, and adds a buy now button to every single one of your product pages.

A buy now button, created for a WooCommerce online store

First, you’ll need to install and activate the plugin. If you need help, then please see our guide on how to install a WordPress plugin.

Since the plugin doesn’t have any settings, simply head over to any product page on your online store. You will now see a ‘Buy Now’ button next to the standard ‘Add to Cart’ button.

We hope this article helped you learn how to add a buy now button in WordPress. You can also go through our guide on the best email marketing services and how to get a free SSL certificate for your WordPress website.

If you liked this article, then please subscribe to our YouTube Channel for WordPress video tutorials. You can also find us on Twitter and Facebook.

The post How to Add a Buy Now Button in WordPress (3 Methods) first appeared on WPBeginner.


from WPBeginner https://ift.tt/90PRAOF
More links is https://mwktutor.com