Do you want to submit your WordPress site to Bing Webmaster Tools?
Bing is among the top search engines in the world. Submitting your site to its webmaster tool helps you monitor your site’s performance and keyword rankings and fix indexing issues.
In this article, we’ll show you how to add your websites to Bing Webmaster Tools.
What is Bing Webmaster Tools?
Bing Webmaster Tools is a free service by Microsoft that allows you to add your website to Bing search engine results.
This free tool helps your WordPress SEO by optimizing your site for Bing, so you can get more traffic.
The webmaster tools help you monitor and track your site’s performance in Bing. You can find out which keywords people use to find your site, so you can optimize those search terms in the content and get more traffic.
You can also see how Bing crawls and indexes your content. This helps to uncover and resolve indexing issues that might be preventing a blog post from appearing in Bing search results.
Aside from that, Bing Webmaster Tools shows your site’s backlinks and which websites you are linking to. It also helps remove content that you don’t want to display on Bing search results and scan for potential malware or spam issues that can threaten your WordPress website security.
That said, let’s see how you can add a website to Bing Webmaster Tools using the All in One SEO (AIOSEO) and WPCode plugin. We’ll also show how you can use the webmaster tool and import your site from Google Search Console.
You can use the links below to jump to the method you want to use.
- Method 1: Add Website to Bing Webmaster Tools Using AIOSEO
- Method 2: Add Website to Bing Webmaster Tools Using WPCode
- Import Your Website from Google Search Console
- Bonus: How to Use Bing Webmaster Tools
Method 1: Add Website to Bing Webmaster Tools Using AIOSEO
The best way to add a website to Bing Webmaster Tools is using All in One SEO (AIOSEO).
It is the best SEO plugin for WordPress and helps you optimize your site search engines without technical knowledge or the need to hire an expert.
Note that we’ll use the AIOSEO Lite version for this tutorial because it is free and includes the ‘Webmaster Tools Verification’ feature. There is also an AIOSEO Pro version which includes more advanced features like link assistant, redirections, video sitemaps, and more.
Next, you’ll need to install and activate the AIOSEO plugin. If you need help, then please see our guide on how to install a WordPress plugin.
Upon activation, you can go to All in One SEO » General Settings from your WordPress dashboard. Next, head to the ‘Webmaster Tools’ tab and select the ‘Bing Webmaster Tools’ option.
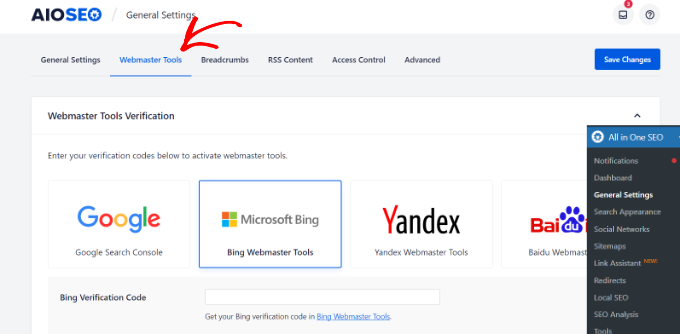
Next, you’ll need to enter the Bing Verification Code. Let’s see how you can access the code in the webmaster tool.
How to Get Verification Code in Bing Webmaster Tools
First, you’ll need to visit the Bing Webmaster Tools website and click the ‘Get started’ button.
We suggest opening the Bing Webmaster Tools website in a new browser window or tab because you’ll need to switch back to your WordPress admin dashboard to complete the verification process.

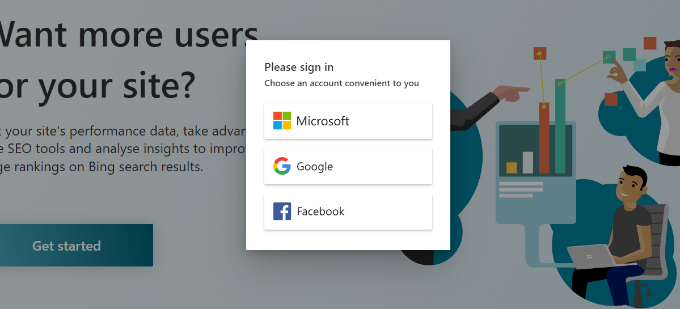
After that, you’ll need to sign in to your account.
You can use Microsoft, Google, or Facebook accounts to log in. Simply click on any options and choose your email address to sign in to the webmaster tool.
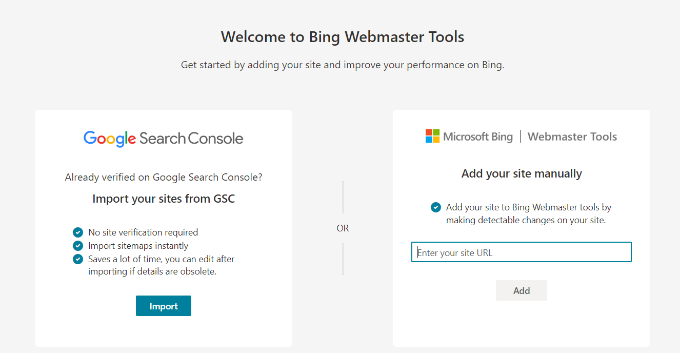
Next, Bing Webmaster Tools will show you 2 options to add your website.
You can import your sites from Google Search Console or manually add your website.
We’ll use the manual method to get the verification code.
Go ahead and enter your website address under the ‘Add your site manually’ section and then click the ‘Add’ button.
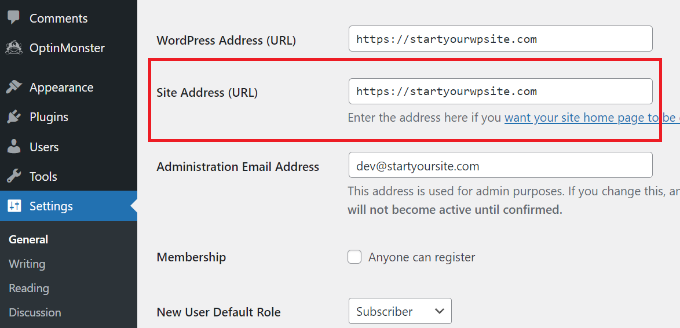
When adding your WordPress website, make sure to enter the URL used by WordPress. That’s because Bing will see HTTP and HTTPS as different sites. It will also consider your domain’s WWW and non-WWW versions as two separate websites.
To check which URL is used by WordPress, simply login to your WordPress admin area and head to Settings » General. Then look for the link in the ‘Site Address (URL)’ field.
Once you add this website URL in Bing Webmaster Tools, a window will slide in from the right.
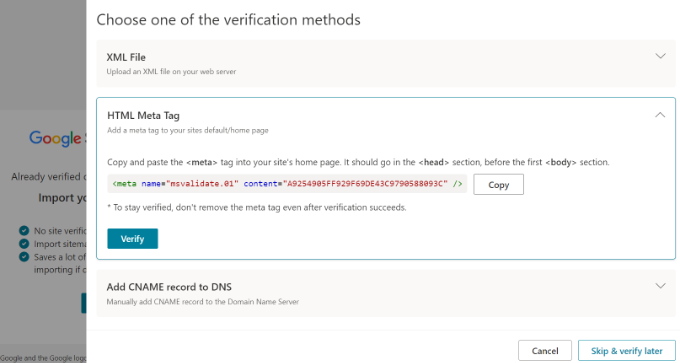
Here you will see different methods for verifying your website, including an XML file, HTML meta tag, and adding CNAME records to DNS.
For this tutorial, we’ll use the HTML Meta Tag method. When you click the ‘HTML Meta Tag’ option, Bing gives you a validation code you need to install on your website.
Go ahead and click the ‘Copy’ button to copy this line of code.
Next, you’ll need to add the code to your WordPress website.
Add Verification Code & Verify Your Site in Bing Webmaster Tools
You can now head back to the WordPress admin browser window or tab.
After that, simply go to All in One SEO » General Settings from your WordPress dashboard.
Now, head to the ‘Webmaster Tools’ tab and enter the HTML Meta Tag you copied earlier in the ‘Bing Verification Code’ field.
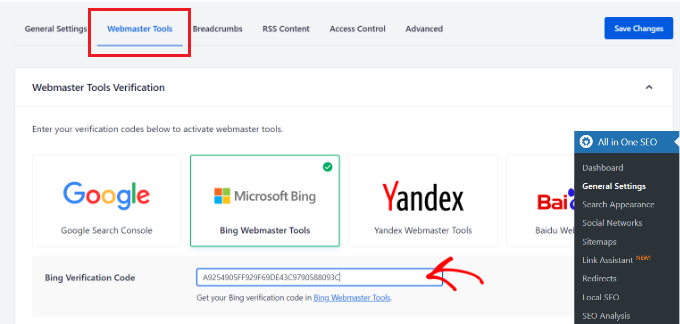
When you do that, don’t forget to click the ‘Save Change’ button at the top.
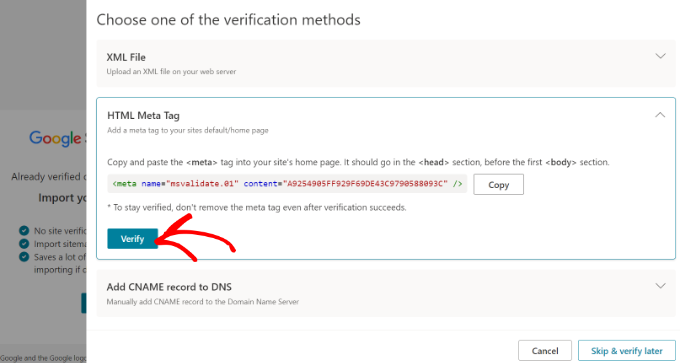
After adding the HTML meta tag to your website, go back to the Bing Webmaster Tools tab or window and click the ‘Verify’ button.
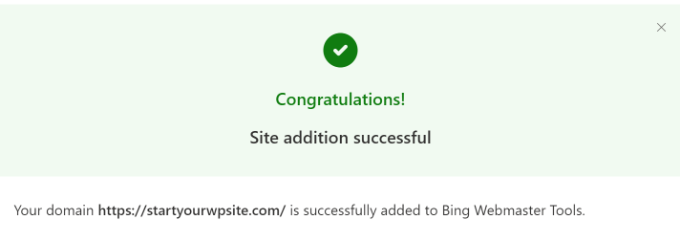
Next, you’ll see a message in Bing Webmaster Tools that your verification was successful.
You can then close the message and view your Bing Webmaster Tools dashboard.
Method 2. Add Website to Bing Webmaster Tools Using WPCode
Another method of adding your website to Bing Webmaster Tools is using WPCode. It is the best WordPress code snippet plugin and helps you manage your website’s scripts. You can easily use WPCode to add the Bing Webmaster Tools HTML code to your website.
First, you’ll need to install and activate the free WPCode plugin. For more details, please see our guide on how to install a WordPress plugin.
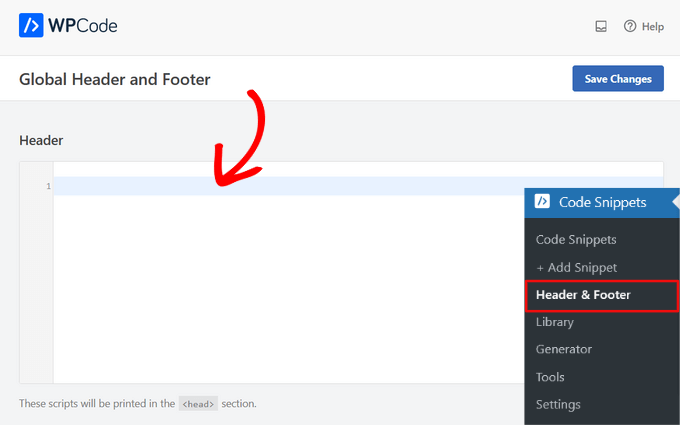
Upon activation, you can go to Code Snippets » Header & Footer from your WordPress admin panel. Here, you’ll need to add the HMTL code provided by Bing Webmaster Tools.
Access HTML Meta Tag & Verify Your Website
You can find the HTML code by going to the Bing Webmaster Tools website and logging into your account.
Once signed in, simply add your website URL under the ‘Add your site manually’ field and click the ‘Add’ button.

On the next screen, Bing will show you multiple methods for verifying your website in the webmaster tool.
Go ahead and select the ‘HTML Meta Tag’ option and copy the code.

After copying the code, you can head to your WordPress admin panel and go to the Code Snippets » Header & Footer page.
Next, you’ll need to paste the HTML meta tag into the ‘Header’ section.
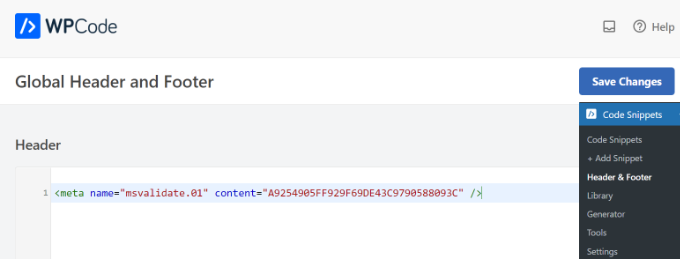
Don’t forget to click the ‘Save Changes’ button.
Now that you’ve added the HTML meta tag to your site, simply go back to the Bing Webmaster Tools tab or window and click the ‘Verify’ button.

Bing Webmaster Tools will now show a message that your verification was successful.
Simply close the message to view the webmaster tool dashboard.

Import Your Website from Google Search Console
You can also add your WordPress site to Bing Webmaster Tools by importing it from Google Search Console.
If you use this method, then you don’t have to worry about verifying your website by adding an HTML code. However, Bing will need access to your Google account, which could be a security risk if either your Webmaster Tools or Google account gets compromised.
To start, you can log in to Bing using your Microsoft, Bing, or Facebook account.
Next, go ahead and click the ‘Import’ button under the Import your site from the GSC section.

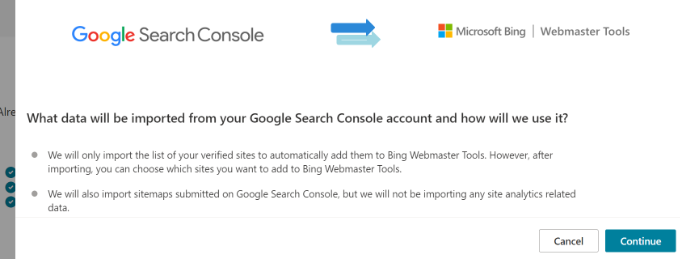
After that, you’ll see a message showing you what data will be imported from the Google Search Console account and how Bing will use it.
Simply click the ‘Continue’ button to move ahead.
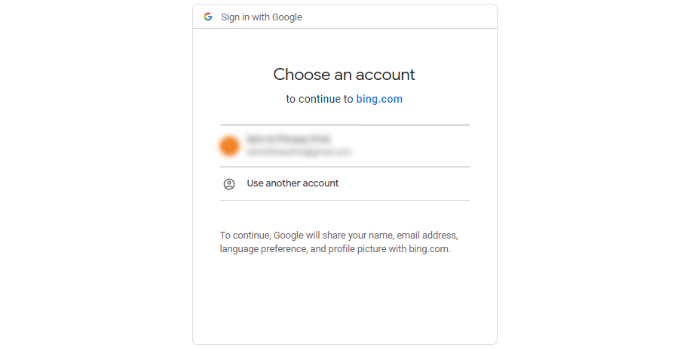
Next, you’ll need to select your Google account to sign in.
Go ahead and select the account that you use for logging into Google Search Console.
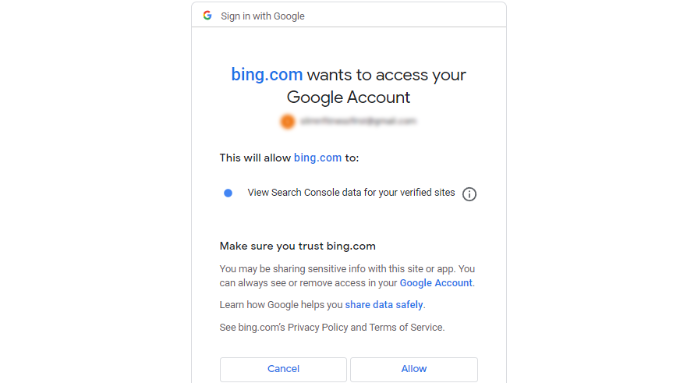
On the next screen, Bing will request access to your Google account.
Simply click the ‘Allow’ button to continue.
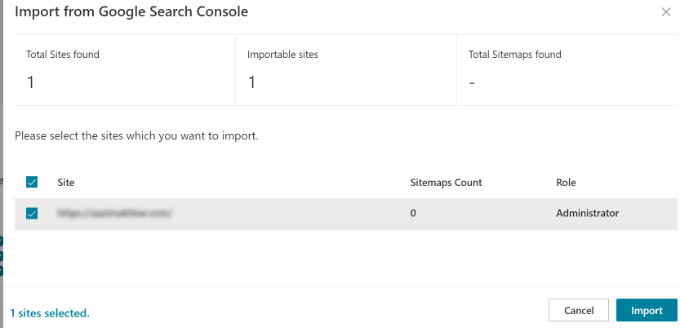
Next, you will see websites that are connected to Google Search Console.
Go ahead and select any websites you’d like to import into Bing Webmaster Tools and click the ‘Import’ button.
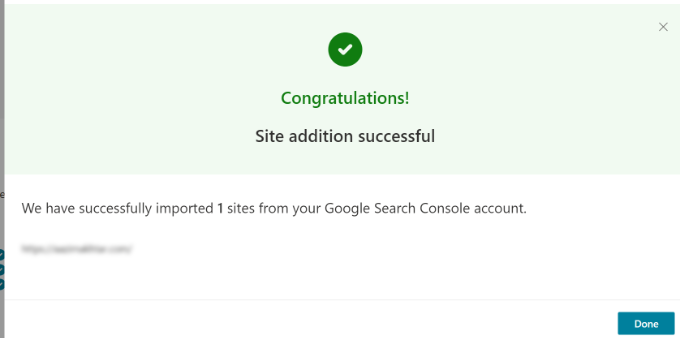
You’ll now see a message that your website has been successfully imported.
You can click the ‘Done’ button to close the window and view the Bing Webmaster Tools dashboard.
Bonus: How to Use Bing Webmaster Tools
In the Webmaster Tools dashboard, you have access to many different tools and options. Do note that Bing will take up to 48 hours to reflect data in its webmaster tools reports after setting it up on your WordPress site.
For example, you can view your site’s search performance by going to the Search Performance tab. You can then use this data to see which search terms people use to find your website and perform keyword research to develop new content ideas.
Similarly, the tool also lets you inspect a specific URL to see if there are any crawling issues. You can simply enter the post or page link in the URL Inspection tab and view the errors.

With Bing Webmaster Tools, you can submit your website sitemap in the Bing Webmaster Tools to help the search engine to discover new content quickly.
For more details, please see our guide on how to submit your site to search engines.
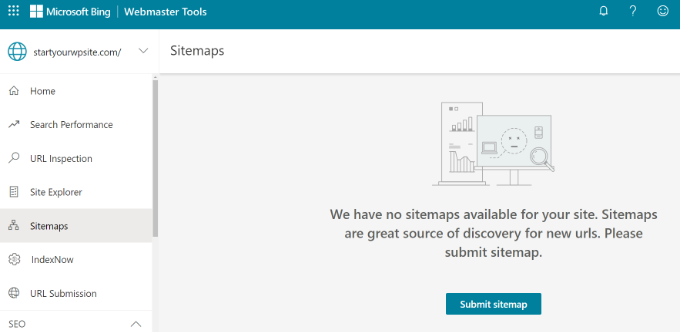
Plus, you can scan for any errors that could be preventing your content from appearing in Bing search results.
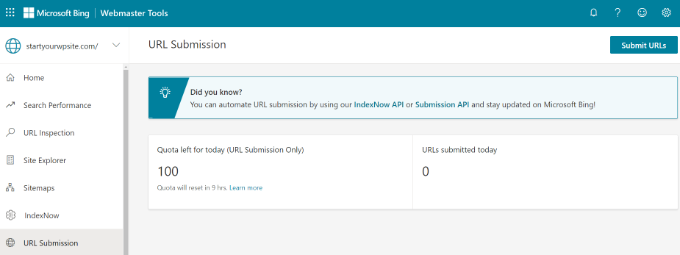
If a blog post or landing page isn’t appearing in the search results, then you can go to the ‘URL Submission’ tab and manually submit your content for indexing.
We hope this article helped you learn how to add your website to Bing Webmaster Tools. You can also see our guide on WooCommerce SEO made easy, and our expert pick of the best WordPress SEO plugins and tools to grow your website.
If you liked this article, then please subscribe to our YouTube Channel for WordPress video tutorials. You can also find us on Twitter and Facebook.
The post How to Add Your Website to Bing Webmaster Tools first appeared on WPBeginner.
from WPBeginner https://ift.tt/q8taDpG
More links is https://mwktutor.com
No comments:
Post a Comment