Do you want to curate content in WordPress automatically?
Content curation allows you to share content from third-party sources on your WordPress website.
In this article, we’ll show you how to curate content in WordPress automatically.

What Is Content Curation and How Can You Do It Correctly?
Content curation simply means collecting and sharing select content from different sources.
This lets users see the best content on a specific topic in one location.
For instance, if you run a membership website, then you can curate a section where users see industry news from third-party sources.
Or perhaps you just want to show the top sports highlights from various social media accounts on your site.
Another scenario could be a WordPress multisite where you want to curate content from all the different sites on the network.
A lot of websites are made specifically for content curation using auto-blogging tools.
Curating Content While Avoiding Copyright Infringements and SEO Penalties
Content curation is done with the intent of sharing content. It does so by giving credit to the original source and not stealing the entire copy of their work.
Basically, you can share an article with a small excerpt and an image. It should link to the original source where users can read the full article.
On the other hand, if you decide to publish an entire article with no attribution to original source, then that would be considered stealing content.
Search engines may decide not to rank your website or consider it low quality due to a lack of original content.
Sources you copy from may file a copyright infringement complaint and get those articles removed from search engines.
It may also lead to serious legal troubles, which may cost you financially.
The Internet is full of spam blogs that use content curation tools to set up auto-blogs and make money through ads. That’s not a great idea considering the potential financial and legal costs, and how unsustainable it is in the long run.
That being said, let’s take a look at how to properly set up automatic content curation in WordPress while avoiding copyright and SEO issues.
Properly Setting up Automatic Content Curation in WordPress
The easiest way to curate content on your WordPress website is to simply use the RSS feeds block.
To use this method, start by editing a post or page where you want to display curated content and adding the RSS block to your content area.
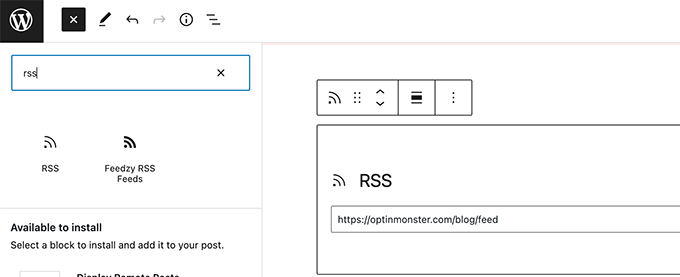
In the block settings, you need to enter the RSS feed URL of the content source that you want to display.
WordPress will then fetch that feed and display it on screen. You can use block settings to change its style, display excerpt, author, and date information.
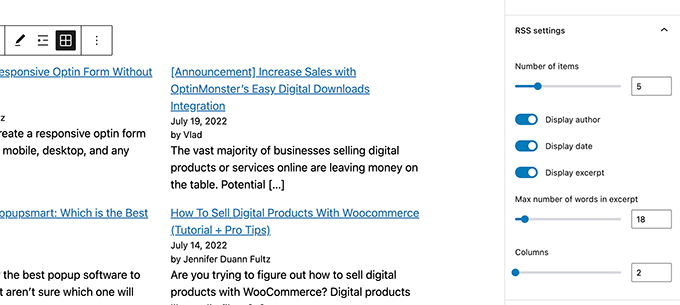
The downside of this method is that you’ll have to add RSS feed for each source separately.
It will be time-consuming and doesn’t look very pretty to the users.
What if you could automate the whole process, combine different sources, and even categorize / sort them?
Let’s take a look at how to properly automate the whole content curation process.
Using RSS Feeds to Automatically Curate Content in WordPress
First, you need to install and activate the Feedzy plugin. For more details, see our step by step guide on how to install a WordPress plugin.
There’s also a premium version of Feedzy with more features, but for the sake of this tutorial, we will use the free version.
Once the plugin is activated, you need to visit Feedzy » Feed Categories page and click on the Add Feed Category button at the top.
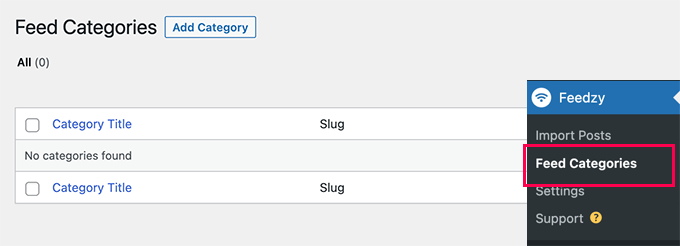
One the next screen, you need to provide a title for this category.
Below that, add the URLs of RSS feeds that you want to include. Use commas between each URL to separate them.
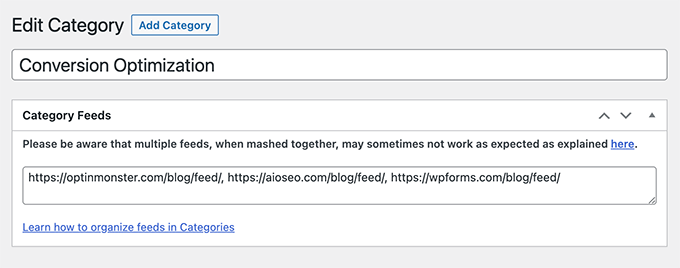
After that, click on the Publish button to store your feed category.
Repeat the process if you need to create more categories.
Import Curated Content From Feeds to Your WordPress Website
Feedzy can import blog posts from the feeds to your WordPress blog posts.
This way they will be stored in your WordPress database like regular posts and give you flexibility to do different things with the curated content.
However, if you don’t want to import them to your WordPress website, then you can skip this step.
To import blog posts, simply visit the Feedzy » Import Posts page and click on the New Import button at the top.

First, you need to provide a name for this import. This could be anything that helps you identify this import.
Below that, you can add individual RSS Feeds, or choose one of the feed categories you created earlier.
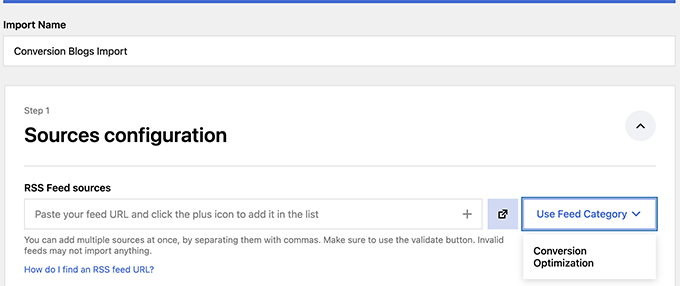
Next, scroll down a little to the ‘Map Content’ section.
From here, you can map RSS feed items to WordPress blog post settings.
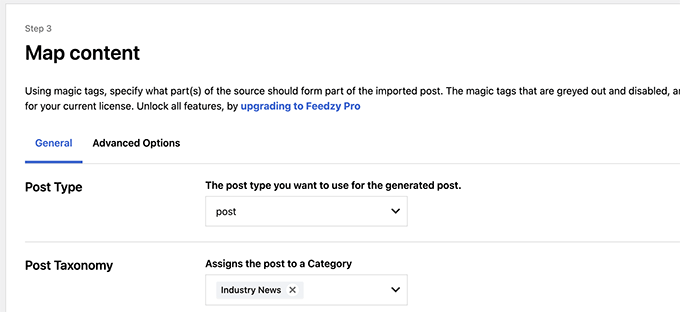
For instance, you can choose which category to assign for all imported posts.
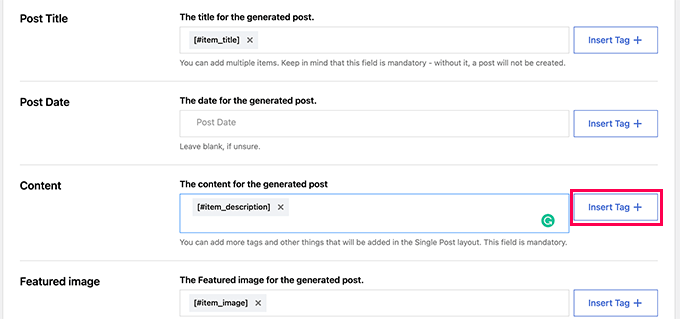
You can click on the Insert Tag button to map a Feed element to post element. For instance, you can set Item Description to be used as Post content.
Next, scroll down to the General Settings section.
From here, you can choose how many posts you want to import.
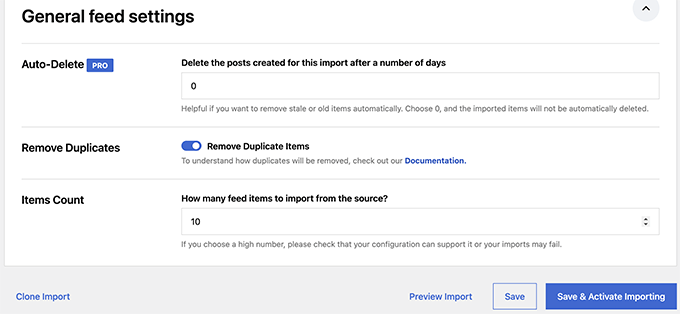
Finally, click on the Save & Activate Importing button to save your changes.
You will now be redirected to the imports page where you will see the import you just created. Simply click on the Run Now button to start importing posts.
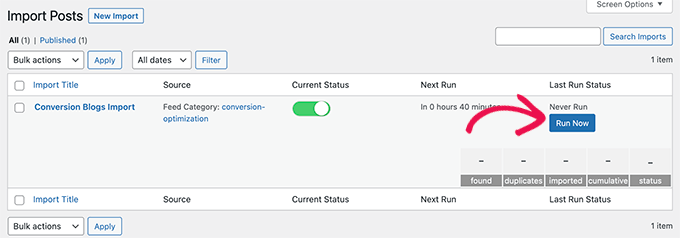
The plugin will now fetch and import posts and add them to your WordPress website in the background.
Once finished, you’ll need to refresh the page to see the import stats.
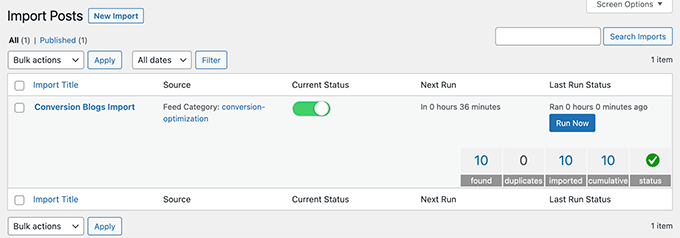
Feedzy will now automatically fetch new posts from your content sources and import them to your WordPress website.
Displaying Curated Content in WordPress
Now that you have set up and automated import mechanism for the content you want to curate, the next step is to display it on your website.
There are different ways to display curated content in WordPress via Feedzy feeds.
Method 1. Fetch Content via Feedzy RSS Feeds Block
This method is recommended if you decided not to import content to your WordPress website.
Simply edit the post or page where you want to display the curated content and add the Feedzy RSS Feeds block to your content area.
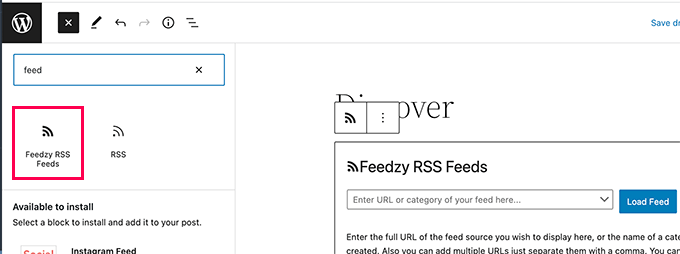
You can then enter a feed URL that you want to display or choose one of the feed categories you created earlier.
You can then use the block settings panel to choose the number of items, style, and other settings for the feed.
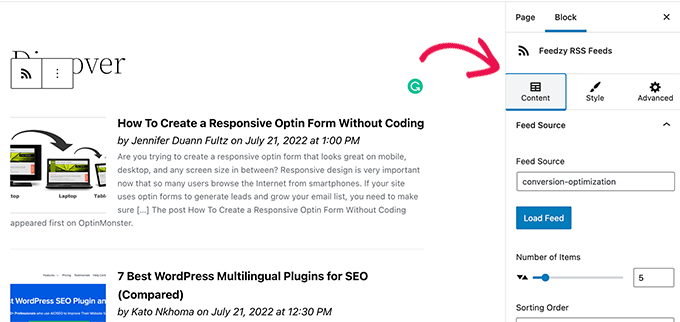
Once you are finished, don’t forget to Save or Publish the post and page.
You can now preview it to see your curated content in action.
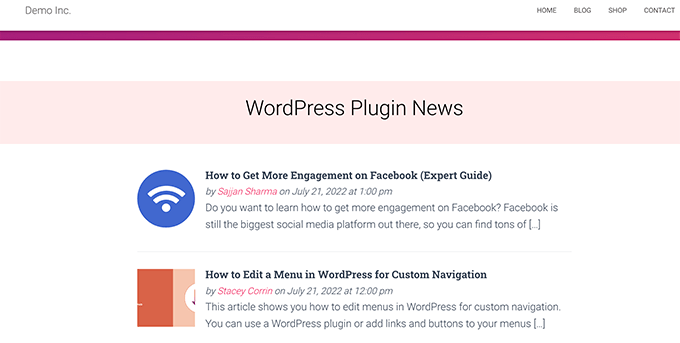
Method 2. Display Imported Content in WordPress
This method is more flexible but would only work if you decided to import content directly into your WordPress website.
Simply edit the post or page where you want to display the curated content. On the post edit screen, add the Latest Posts block to your content area.
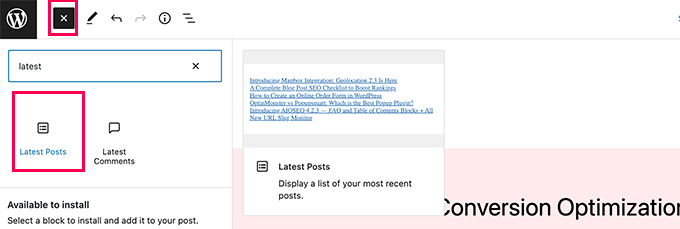
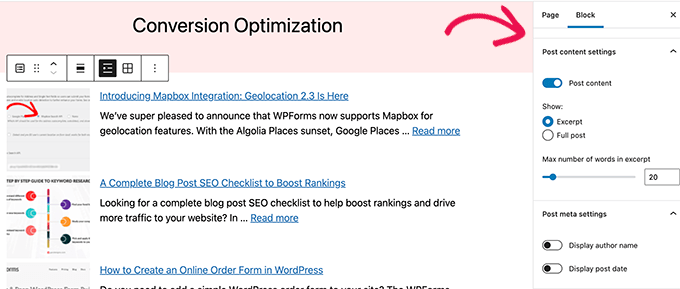
By default, the block will display your most recent articles in a plain list. You can change that under block settings.
From here, you can choose to show excerpt, featured image, number of items, and more.
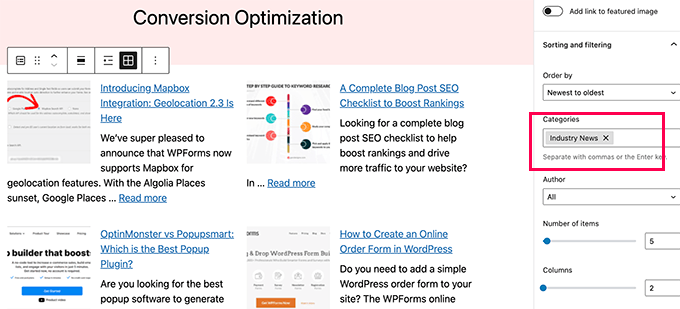
You can also switch from list to gallery view, choose number of columns, or only display posts from a specific category.
For instance, let’s say you mapped all imported content to be added to ‘Industry News’ category. Now you can just display that particular category as your curated content.
Once you are finished, you can Save or Publish your post/page and preview it in a new browser tab.
Here is how it looked on our demo website.
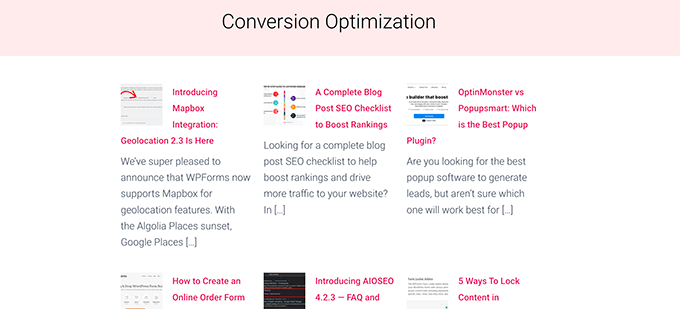
Using either of these methods will automatically display latest posts from your content sources.
Social Media Content Curation in WordPress
What if you wanted to curate content from social media platforms like YouTube, Twitter, Instagram, and Facebook?
The easiest way to curate social media content in WordPress is by using Smash Balloon.
Smash Balloon is the best social media plugin for WordPress. It allows you to display social media feeds on your WordPress website beautifully.
First, you need to install and activate the Smash Balloon plugin. For more details, see our step by step guide on how to install a WordPress plugin.
Smash Balloon comes with separate plugins for different social media feeds.
You can also buy the ‘All Access Bundle’, which includes all their plugins + social wall plugin that can combine different social feeds into one.
Upon activation, you can go ahead and start connecting your social media accounts and setting up feeds you would like to display.
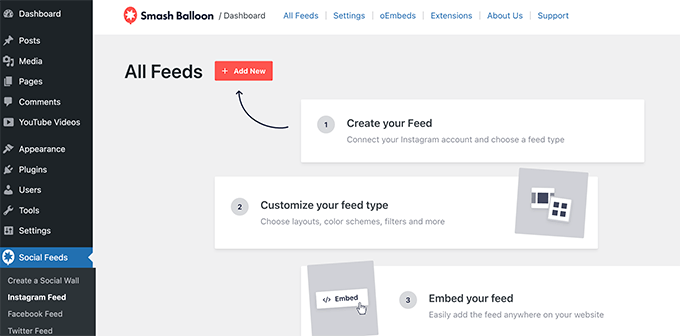
Follow the on-screen instructions to set up each feed.
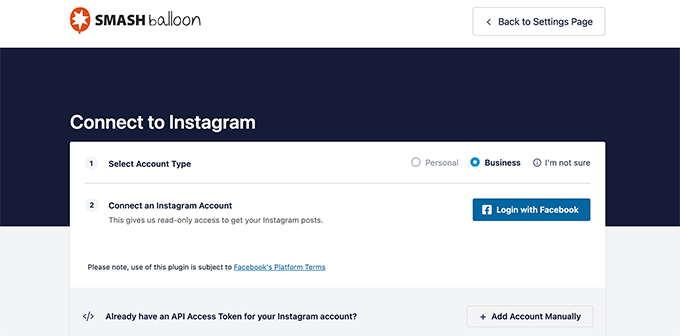
You can connect to your social media profiles, third-party sources, search terms, hashtags, playlists, and more.
Depending on what you are trying to fetch, you may be asked to connect to your social media account and give Smash Balloon permission to access your data.
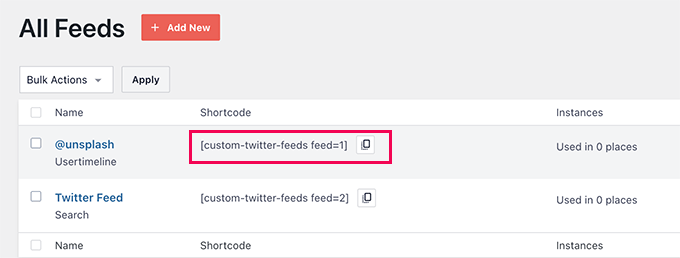
Once you have set up your social media feed, you can copy the shortcode from the feeds page.
Next, you need to add the shortcode to a post, page, or sidebar widget.
You can now visit your website to see your social feed in action.
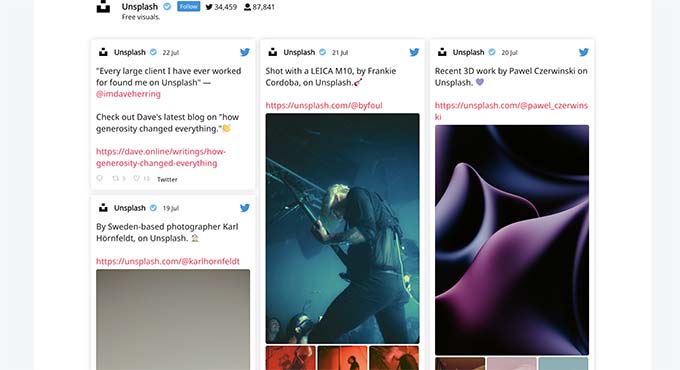
You can also create a social wall to combine different feeds and display them as one.
Simply go to the Smash Balloon » Create a Social Wall page and copy the shortcode shown on screen.
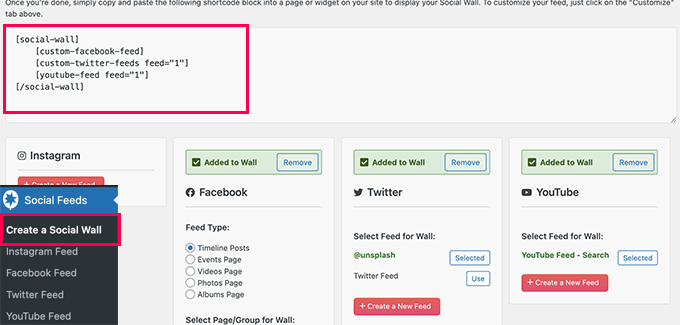
You can now add this shortcode to any WordPress post, page, or sidebar widget where you want to display your curated social feed.
Here is how it looked on our test website.
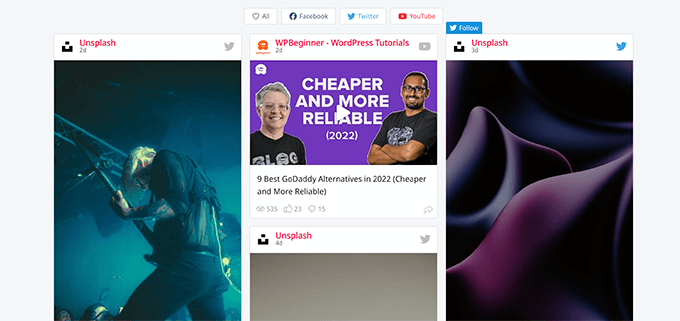
For more details, see our tutorial on how to add social media feeds in WordPress.
We hope this article helped you learn how to curate content in WordPress. You may also want to see our guide on ways to make money online from your curated content blog or see our WordPress SEO guide to optimize your website.
If you liked this article, then please subscribe to our YouTube Channel for WordPress video tutorials. You can also find us on Twitter and Facebook.
The post How to Automatically Curate Content in WordPress first appeared on WPBeginner.
from WPBeginner https://ift.tt/Trnc8Lt
More links is https://mwktutor.com
No comments:
Post a Comment