Do you want to update the PHP version of your WordPress site?
Using the latest PHP version for your WordPress website improves performance and website speed. However, sometimes your web hosting company may be using an older version of PHP.
In this article, we’ll show you how to easily update the PHP version of your WordPress website.
Why Update the PHP Version of Your WordPress Site
WordPress is developed using an open-source programming language called PHP. At the time of writing this article, WordPress requires at least PHP version 7.4 or greater. The current stable version available for PHP is 8.0.8.
Most WordPress hosting companies use PHP versions 7.4 or higher to meet the minimum WordPress requirements.
Each PHP version improves performance by more efficiently running processes and reducing memory usage. This impacts your WordPress site speed by making it faster and reducing the load on your server.
Normally, WordPress hosts automatically update PHP version in the background. These updates have no effect on most websites, and you may not notice any change at all.
Occasionally, a plugin on your WordPress website may misbehave due to incompatibility with a newer PHP version. In that case, some website owners may want to switch back to the older PHP version until a plugin update fixes that issue.
How to Check the PHP Version in WordPress?
WordPress makes it super easy to check the PHP version used by your hosting provider.
Simply login to the admin area of your WordPress website and go to the Tools » Site Health page and switch to the ‘Info’ tab.
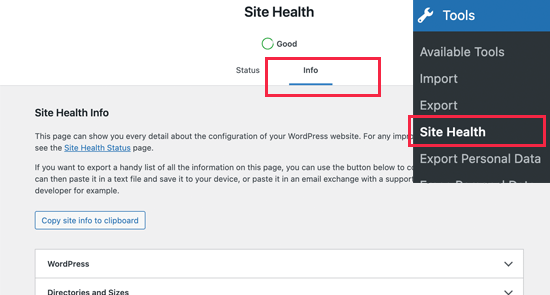
Next, you need to scroll down a little and click to expand the ‘Server’ tab. This section shows server information including the PHP version used by your server.
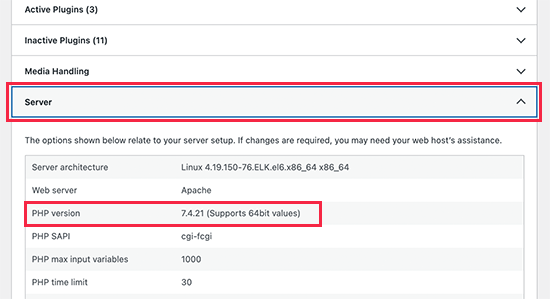
As you can see, in the screenshot above our demo website is using PHP version 7.4.21.
Updating the PHP Version on Your WordPress Site
All top WordPress hosting companies allow you to easily change the PHP version used by your website. We’ll show you a few examples from top hosting providers.
Changing PHP Version in Bluehost
First, you need to login to your Bluehost hosting account dashboard and click on the Advanced tab in the left column.
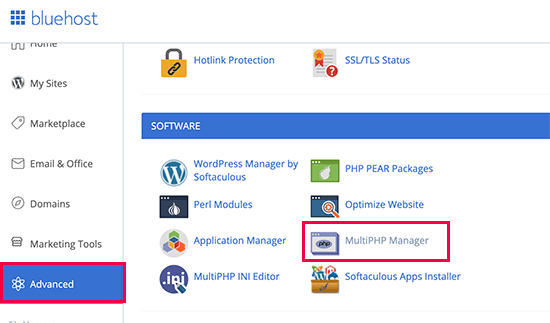
This will bring you to the advanced tools page to manage your hosting account. From here you need to click on the MultiPHP Manager icon.
On the next page, you need to select your website and then select the PHP version that you want to use.
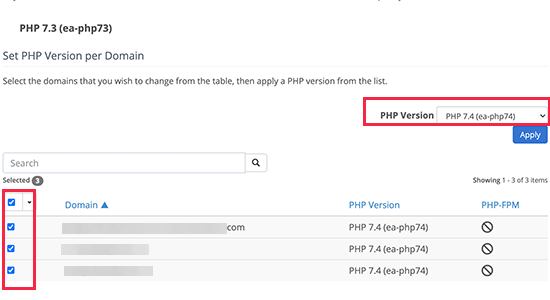
Click on the Apply button to save your changes.
Bluehost will now start using the PHP version you selected for your website.
Changing PHP Version in SiteGround
If you are using SiteGround hosting, then here is how you would update the PHP verison of your WordPress website.
First you need to login to your SiteGround account dashboard. After that, you need to switch to the ‘Websites’ page and then click on the Site Tools button next to your website.
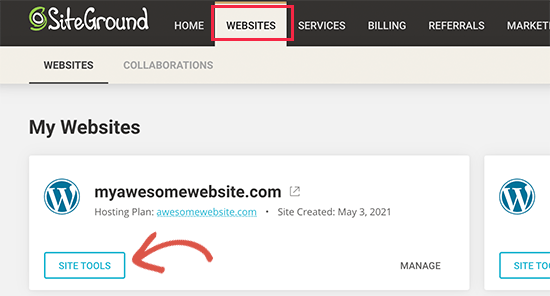
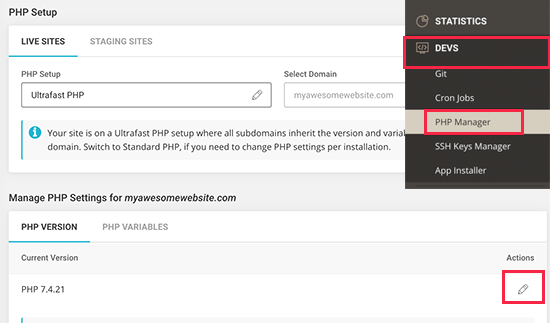
Next, you need to go to DEVS » PHP Manager from the left column. From here you can choose to use SiteGround’s Ultrafast PHP or Standard PHP. You can also change the PHP version number by clicking on the Edit icon.
This will bring up a popup where you first need to select ‘Change PHP version manually’ under the ‘Set PHP Version’ option.
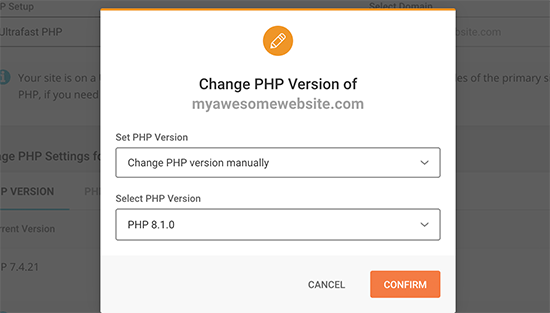
After that, you would be able to select your PHP version from a drop down menu. Don’t forget to click on the Confirm button to apply your changes.
Changing PHP Version in HostGator
First you need to login to your HostGator hosting account dashboard and then click on the Hosting section. From here you need to click on the cPanel link under your hosting account.
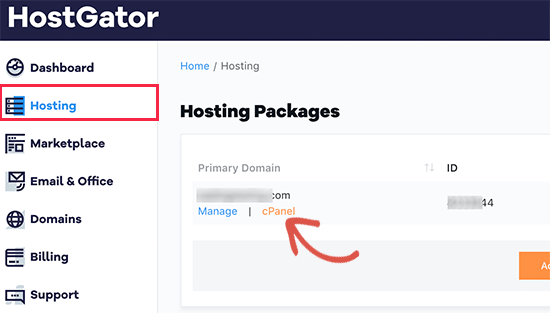
This will launch cPanel dashboard where you can manage advanced settings for your hosting account. You need to scroll down to the Software section and click on the MultiPHP Manager icon.

Next, you need to select your domain name and then choose the PHP version. Don’t forget to click on the Apply button to save your settings.
Changing PHP Version in WP Engine
WP Engine is a managed WordPress hosting company which means they automatically upgrade the PHP version for you. However, you can also manually upgrade and downgrade the PHP version for your websites.
Simply login to your WP Engine dashboard and click on the PHP version next to your website.
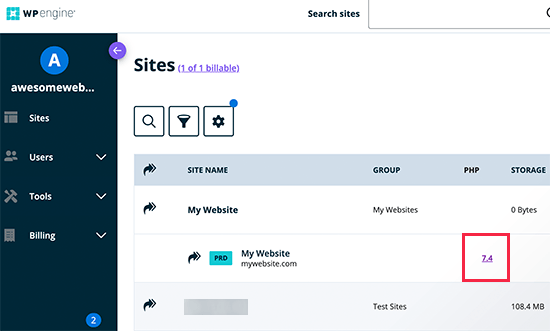
This will bring up a popup where you can choose to downgrade or upgrade the PHP version for your WordPress website.
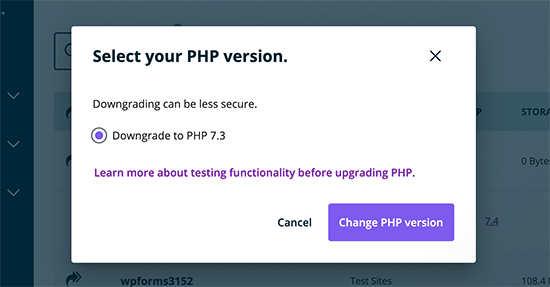
Don’t forget to click on the ‘Change PHP Version’ button to save your changes.
Changing PHP Version in Other WordPress Hosting Environments
Most WordPress hosting companies use similar hosting dashboards with some customizations. Usually, you will find the MultiPHP Manager icon in the cPanel dashboard.
If you cannot find it, then you can contact your WordPress hosting provider and ask them to change the PHP version of your website.
Things to Do After Updating PHP Version of Your Website
After updating the PHP version for your WordPress website, you may want to make sure that everything is working as expected.
We recommend visiting your website to see if there are any immediately noticeable issues.
After that, you can login to the WordPress area of your website. Make sure your website is using the latest version of WordPress and all your plugins and WordPress theme are updated. See our beginner’s guide on how to safely update WordPress.
Lastly, it is always recommended to make a complete backup of your WordPress website.
What to Do if a PHP Update Breaks Your WordPress Site?
There are very little chances of a PHP update breaking your WordPress site. However, with the abundance of free and paid plugins, there is a chance that a single line of poor code can result into an error.
The first thing you need to do is make sure that it is not a plugin or theme causing this error. To do that deactivate all your WordPress plugins and switch to a default WordPress theme.
If this does not solve your issue, then contact your web host’s support team. There is a good chance that the issue you are facing will already be in their notice, and they will be able to assist you.
If your web host is unable to help you out, then you can downgrade your PHP version using the methods described above.
We hope this article helped you learn how to update the PHP version of your WordPress site. You may also want to see our guide on how to create an email newsletter, or our comparison of the best live chat software for your website.
If you liked this article, then please subscribe to our YouTube Channel for WordPress video tutorials. You can also find us on Twitter and Facebook.
The post How to Update Your PHP Version in WordPress (the RIGHT Way) appeared first on WPBeginner.
from WPBeginner https://ift.tt/3fj7Ja4
More links is https://mwktutor.com
No comments:
Post a Comment