Are you trying to fix the WordPress updating failed or publishing failed error on your website?
Sometimes when editing a post or page, you may see the updating failed or publishing failed error. This error does not give any clues, which makes it particularly difficult for beginners.
In this article, we’ll show you how to easily fix the WordPress updating failed error. We’ll also explain what causes this issue, and how to avoid this in the future.
What Causes Updating Failed or Publishing Failed Error in WordPress?
Failure to communicate with the WordPress REST API causes the ‘Updating Failed’ or ‘Publishing Failed’ error in WordPress.
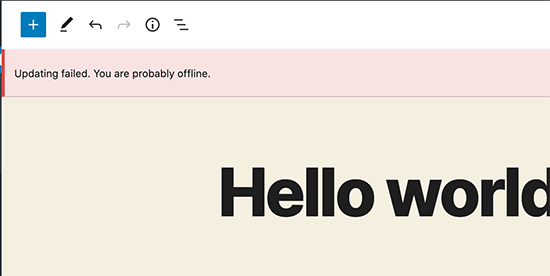
Basically, WordPress sometimes uses a set of APIs (programming methods) called ‘REST API’ to send and receive requests to the WordPress database.
If it fails to send and receive those requests, then some parts of your WordPress website may not be able to function. This includes the WordPress block editor, which uses the API to send update and publish requests to WordPress.
Why WordPress is Unable to use REST API?
Now you might be wondering, that if I didn’t make any changes to my website, then why did the REST API stop working on its own?
There are a number of scenarios that may prevent WordPress from using the REST API. For example, you may not be connected to the internet or have lost connectivity.
Other reasons may be a little more complicated. For instance, you may have accidentally changed the site URL, a WordPress plugin may be causing the issue, or a third-party service may be blocking the API calls.
That being said, let’s take a look at how to troubleshoot and fix the WordPress updating failed error.
Step 1. Check Your Internet Connection and Site URL
The most common cause for updating failed error in WordPress is losing the WiFi connection. If your computer loses the internet connection as you are writing a blog post, then WordPress will fail to save your changes.
Make sure you are connected to the internet by visiting other websites in a new browser tab.
If your internet is working fine, then the next thing you would want to check is your WordPress site URL setting.
Simply go to Settings » General page and make sure that the Site Address and WordPress Address options are correct. For most websites, you should have the same URLs in both fields.
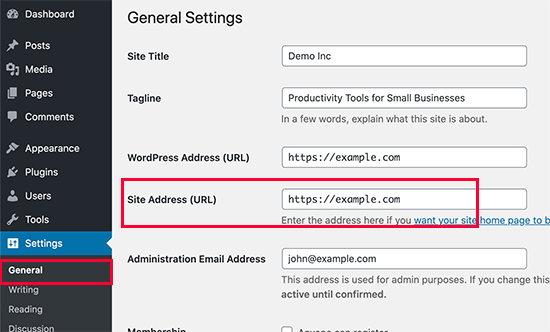
If your site URL settings look ok, and you are connected to the internet, then you can move on to further troubleshooting.
Step 2. Check REST API Status Using WordPress Site Health
WordPress comes with a built-in site health tool, which shows important information about your site’s security and performance.
Simply go to the Tools » Site Health page to view the report. If REST API is not working, then you will see it under recommended improvements as ‘The REST API encountered an unexpected result’.
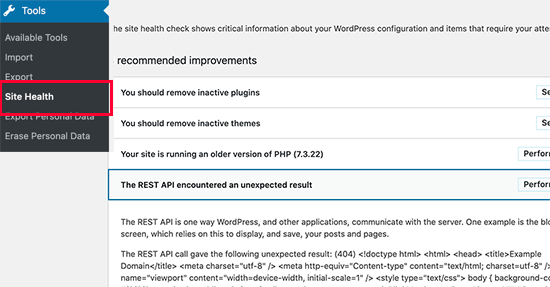
It may also show you some debugging information which may explain what happened when WordPress made the REST API call. Studying this may give you some clue on which plugin or third party service may be causing the issue.
However, if it doesn’t give you any clue, then you can move on to the next step.
Step 3. Disable All Your WordPress Plugins
If a WordPress plugin is causing the REST API to misbehave, then the easiest way to find it out is by deactivating all your WordPress plugins.
You can go to the Plugins » Installed Plugins page and check the box to select all plugins. After that, use the Bulk Actions drop down to deactivate all plugins.
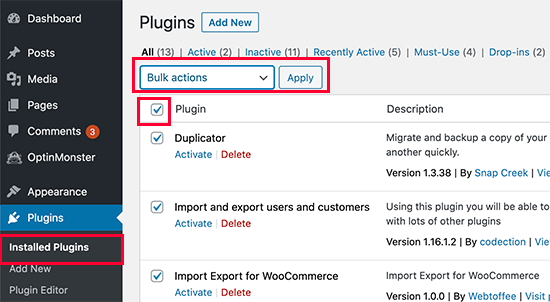
After that, you can go to the post edit screen and try to update. If the Updating Failed error disappears, then this means that one of your plugins was causing the issue.
You can now start activating your WordPress plugins one at a time and try to reproduce the error. Once you find the plugin causing the issue, you can seek support from plugin author or find an alternative plugin.
On the other hand, if disabling all WordPress plugins didn’t make the error go away, then continue to the next step.
Step 4. Check Website Firewall Service
If you are using a website firewall service like Sucuri or Cloudflare, then there is a chance that these services may block REST API requests.
This could happen if their firewall filters consider your IP address to be suspicious. They may also block REST API requests if your website is under an on going DDOS attack.
If you are using Cloudflare, then you can temporarily disable Cloudflare to see if this resolves your issue.
Normally, you’ll find Cloudflare settings under Domains section of your hosting dashboard. Bluehost users can find under My Sites » Manage » Performance tab.
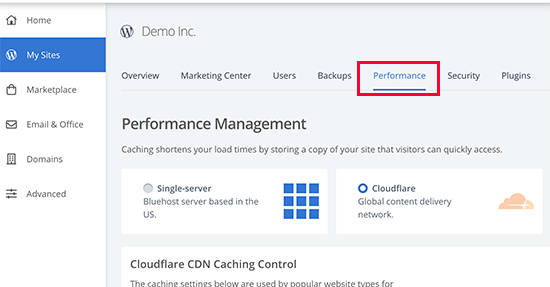
If you are using Sucuri, then you can reach out to their support team, and they can whitelist your IP address or let you know what’s causing the issue.
Plugins and Firewall services are the most common cause of the updating failed error. However, if you are still seeing the error, then there are a few more things you can do.
Step 5. Enable and Review WordPress Debug Log
WordPress comes with built-in feature to keep a log of all WordPress errors. It does not log the REST API errors, but it will help you see if there are some other issues that may be causing the error.
Simply add the following lines to your wp-config.php file.
// Change WP_DEBUG to true

define( 'WP_DEBUG', true );

// Keep a log of WordPress errors

define( 'WP_DEBUG_LOG', true );
Don’t forget to save your changes and upload the file back to your server. You can now try to publish or update a post in WordPress to reproduce the error.
After that, you can connect to your WordPress hosting account using an FTP client and go to /wp-content/ folder. From here, you can download the debug.log file to your computer.
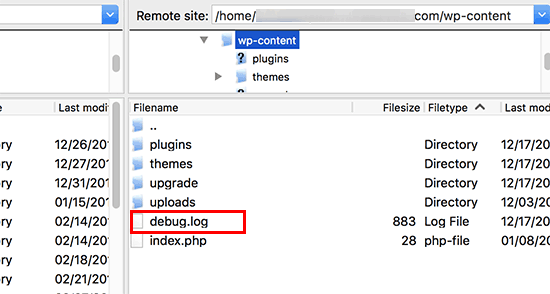
You can open the debug file in a plain text editor like Notepad. It may contain a few errors, warnings, or notices caught by WordPress as you worked on your site or a user visited it.
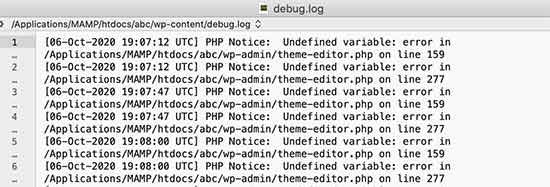
If you see something that points you to a plugin or theme file, then this can be a useful hint. You can then mention this error when asking for support on WordPress.org forums or from your hosting provider.
Step 6. Temporarily Switch to the Classic WordPress Editor
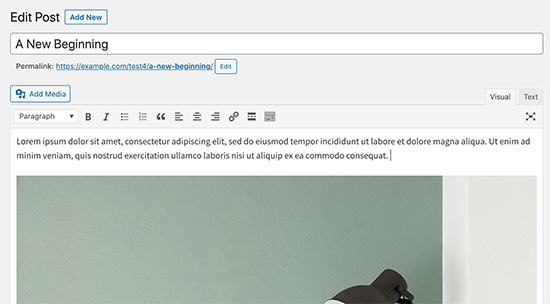
A temporary solution to this error is to enable the classic editor. It is the old WordPress editor that does not rely on REST API to update and publish content.
You can enable it by simply installing and activating the Classic Editor plugin. For more details, see our step by step guide on how to enable the classic editor in WordPress.
Upon activation, you can simply edit the post you were working on. You would be able to save and publish it without seeing the updating failed or publishing failed error in WordPress.
Final Step: Ask for Support
If all else fails, then you may need to ask for support. You can start by directly contacting your hosting provider. They do have access to server logs and additional tools. It could also be caused by a misconfigured server or glitch at their end.
You can also seek help on WordPress.org forums or WPBeginner Facebook Group where other experts and users can help you fix the error.
For more details, see our article on how to properly ask for WordPress support and get it.
We hope this article helped you fix the WordPress updating failed or publishing failed error. You may also want to bookmark our complete guide on the most common WordPress errors and how to fix them.
If you liked this article, then please subscribe to our YouTube Channel for WordPress video tutorials. You can also find us on Twitter and Facebook.
The post How to Fix WordPress Updating Failed / Publishing Failed Error appeared first on WPBeginner.
from Tutorials – WPBeginner https://ift.tt/35iL8oi
More View at https://mwktutor.com
No comments:
Post a Comment