Recently, one of our users asked us how to create a sticky navigation menu for their site?
Sticky navigation menus stay on the screen as users scroll down the page. This makes the top menu always visible, which is good for user experience because it contains links to the most important sections of your website.
In this article, we’ll show you how to easily create a sticky floating navigation menu in WordPress.

What is a Sticky Floating Navigation Menu?
A sticky or floating navigation menu is one that ‘sticks’ to the top of the screen as a user scrolls down. This makes your menu visible to users at all times.
Here’s a sticky menu in action. We’re going to show you how to create a menu exactly like this for your own site:

Why and when sticky menus can be useful?
Usually, the top navigation menu contains links to the most important sections of a website. A floating menu makes those links always visible, which saves users from scrolling back to the top. It is also proven to increase conversions.
If you run an online store, then your top navigation menu likely include links to the cart, product categories, and product search. Making this menu sticky, can help you reduce cart abandonment and increase sales.
Some of the best WordPress themes have built-in support for a sticky navigation menu. Simply see your theme settings under Themes » Customize to enable this feature.
If your theme does not have this option, then keep reading, and we’ll show you how to easily create a sticky floating navigation menu in any WordPress theme or WooCommerce store.
Method 1: Add Your Sticky Floating Navigation Menu Using a Plugin
This is the easiest method. We recommend it for all WordPress users, particularly for beginners.
If you haven’t set up your navigation menu yet, go ahead and do that using our instructions on how to add a navigation menu in WordPress.
After that, you need to install and activate the Sticky Menu (or Anything!) on Scroll plugin. For more details, see our step by step guide on how to install a WordPress plugin.
Upon activation, you need to visit the Settings » Sticky Menu (or Anything!) page to configure the plugin settings.
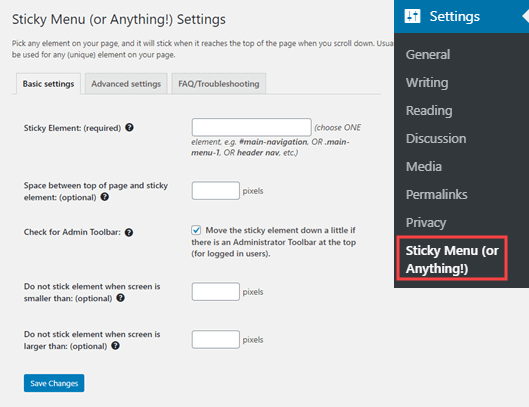
First you need to enter the CSS ID of the navigation menu that you want to make sticky.
You will need to use your browser’s inspect tool to find the CSS ID used by your navigation menu.
Simply visit your website and take your mouse to the navigation menu. After that, you need to right-click and select Inspect from your browser’s menu.
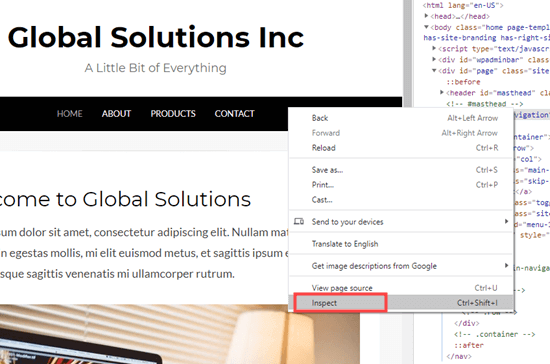
This will split your browser screen, and you will be able to see the source code for your navigation menu.
You need to find a line of code that relates to your navigation, or your site header. It will look something like this:
<nav id="site-navigation" class="main-navigation" role="navigation">
If you’re struggling to find it, bring your mouse cursor over the different lines of code in the Inspect pane. The navigation menu will be fully highlighted when you have the right line of code:
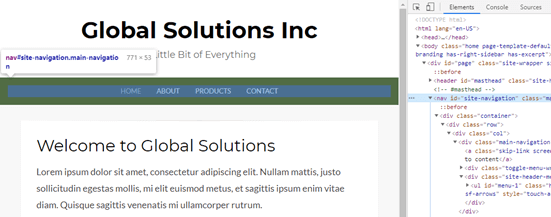
In this case, our navigation menu’s CSS ID is site-navigation.
All you need to do is enter your menu’s CSS ID in the plugin settings with a hash at the start. In this case, that’s #site-navigation.
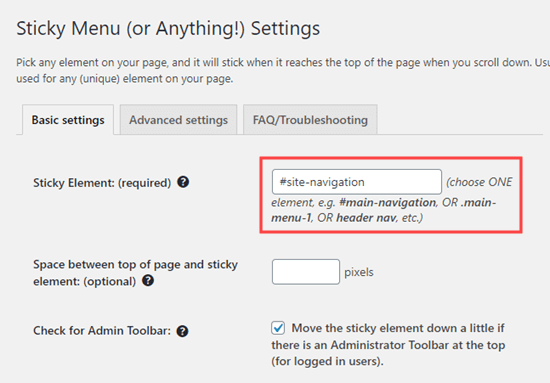
Don’t forget to click the ‘Save Changes’ button at the bottom of the page.
Now, go ahead and check out your sticky menu live on your WordPress website. It should stay on the page as you scroll down, like this:

The next option on the plugin’s settings page is to define the space between the top of your screen and the sticky navigation menu. You only need to use this setting if your menu is overlapping an element that you do not want to be hidden. If not, then ignore this setting.
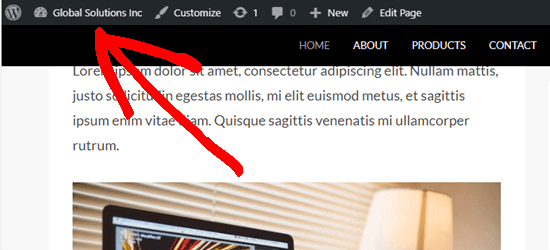
We recommend leaving the box checked next to the option: ‘Check for Admin Bar’. This allows the plugin to add some space for the WordPress admin bar, which is only visible to logged-in users.
Here, you can see that the admin bar on our test site is correctly displaying above the sticky menu:
The next option allows you unstick the navigation menu if a user is visiting your website using a smaller screen such as a mobile device:
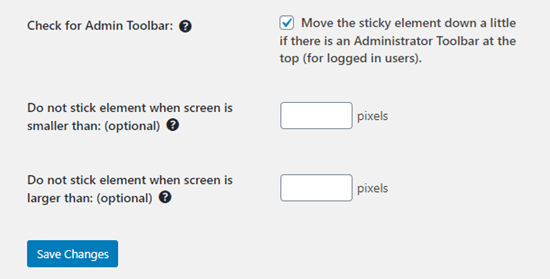
You can test how your site looks on mobile devices or tablets. If you don’t like how it looks, simply add 780px for this option.
Don’t forget to click on the Save Changes button after making any changes to your options.
Method 2: Manually Add a Sticky Floating Navigation Menu
This method requires you to add custom CSS code to your theme. We don’t recommend it for beginners.
We also recommend that you take a look at our guide on how to easily add custom CSS to your WordPress site before you begin.
First, you need to visit Appearance » Customize to launch the WordPress theme customizer.
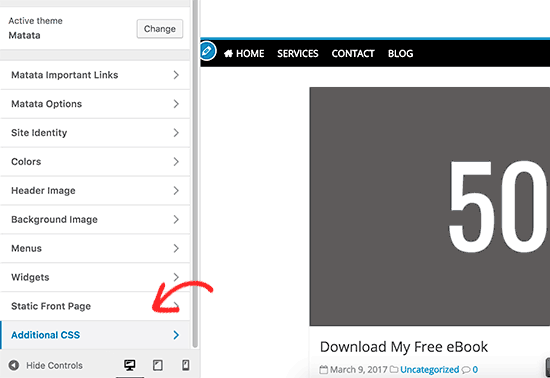
Next, click on ‘Additional CSS’ in the left pane and then add this CSS code.
#site-navigation {
    background:#00000;
    height:60px;
    z-index:170;
    margin:0 auto;
    border-bottom:1px solid #dadada;
    width:100%;
    position:fixed;
    top:0;
    left:0;
    right:0;
    text-align: center;
}
Note: This will produce a navigation menu with a black background. If you want a different color, change the number next to background. For example, using background: #ffffff will give you a white menu background.
Just replace #site-navigation with the CSS ID of your navigation menu then click on the Publish button at the top of the screen.
Go ahead and visit your website to see your sticky floating navigation menu in action:

What if your navigation menu normally appears below the site header instead of above it? If so, this CSS code could overlap the site title and header or appear too close to it before the user scrolls:

This can be easily adjusted by adding a margin to your header area using some additional CSS code:
.site-branding {
margin-top:60px !important;
}
Replace site-branding with the CSS class of your header area. Now, the sticky navigation menu will no longer overlap your header before the user scrolls down:

We hope this article helped you add a sticky floating navigation menu to your WordPress site. You may also want to see our guide on how to create a custom WordPress theme without writing any code, and our comparison of the best WordPress page builder plugins.
If you liked this article, then please subscribe to our YouTube Channel for WordPress video tutorials. You can also find us on Twitter and Facebook.
The post How to Create a Sticky Floating Navigation Menu in WordPress appeared first on WPBeginner.
from WPBeginner https://ift.tt/2GqELGV
More links is https://mwktutor.com
No comments:
Post a Comment