Have you even been asked to clear your DNS cache? It is a troubleshooting tip that helps you get to the latest version of a website, particularly after DNS changes.
DNS information tells your browser where to find a website. Your computer keeps this information in its cache to quickly point browsers in the right direction.
In this article, we’ll show you how to clear your DNS cache on Mac, Windows, and Chrome. This will allow you to easily refresh DNS records stored on your device and help you troubleshoot website issues.
Here is a quick overview of what we’ll cover in this guide:
- What is DNS cache
- How to clear DNS cache in Windows
- How to clear DNS cache in Mac
- How to clear DNS cache in Chrome
- How to check for DNS updates
What is DNS Cache?
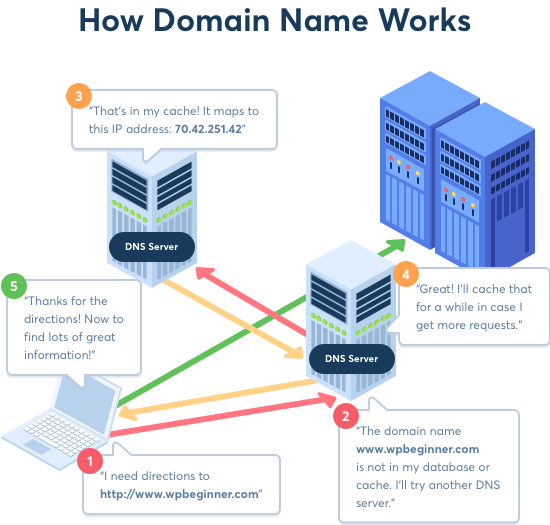
DNS cache is like an address book saved on your computer with the domain name server (DNS) information of each website you visit.
DNS or Domain Name Server is a technology that tells your computer the IP address associated with a domain name. To learn more, see our guide on how domain names work.
Saving the DNS information in a local DNS cache helps your browser quickly find a website.
Once you enter a website address in your browser, it will look for DNS information in the local cache first. If it finds the directions, then it uses the DNS cache to visit the website.
On the other hand, if the information is not in the local DNS cache, then the browser will get it from other DNS servers across the internet.
This ensures that every time you visit any website, your browser takes the shortest route to get the DNS information it needs to locate the website on the internet.
However, this may sometime cause trouble. For example, when you are moving a WordPress site to a new domain name or when you are moving WordPress to a new host.
DNS information may not get updated quickly on your computer, and you may end up visiting the old website or see a not found error. It will eventually get updated, but why wait when you can clear DNS cache right away.
Let’s take a look at how to clear DNS cache across various platforms.
How to Clear DNS Cache in Windows
If you are using a windows computer, then here is how you would clear DNS cache on your device.
First, you need to click on the start button and select the CMD (command prompt) tool.
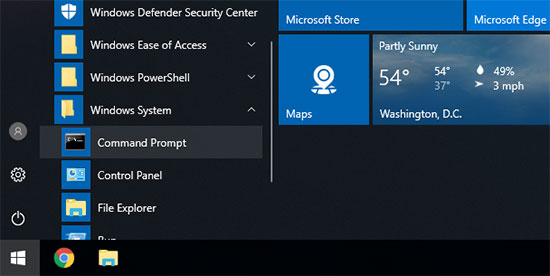
This will launch a command prompt window. Inside it you need to enter the following text:
ipconfig /flushdns
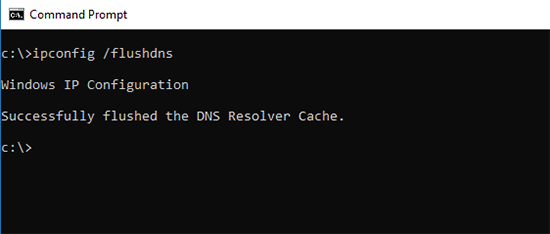
Click on the enter button to execute the command and Windows will flush the DNS cache.
That’s all, you can now resume visiting your website to fetch the updated DNS information.
How to Clear DNS Cache on macOS
If you are on a Mac computer, then follow the steps below to clear your DNS cache.
First, you need to launch the Terminal app. You can find it in the Launchpad under the ‘Other’ folder. You can also launch it by opening Finder and going to Applications » Utilities folder.
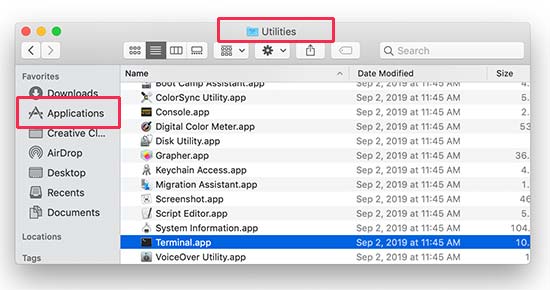
This will launch the terminal window where you need to enter the following command.
sudo killall -HUP mDNSResponder
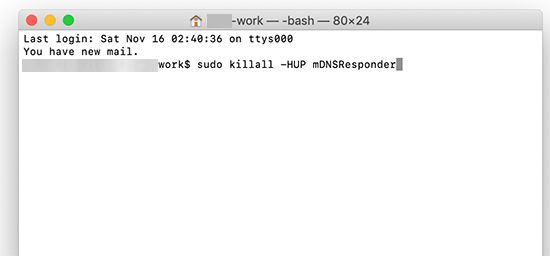
You’ll be asked to enter your macOS account password. It is the same password you use to log into your computer.
After that, your computer will flush the DNS cache. You can now visit the website to get the latest DNS information.
Clear DNS Cache in Chrome
Google Chrome also keeps a DNS cache of its own, and it is separate from the DNS cache stored by your operating system.
If you use Google Chrome as your main browser, then you’ll need to clear Chrome’s DNS cache as well.
First, you need to enter the following address in your browser’s address bar and press enter on your keyboard.
chrome://net-internals/#dns
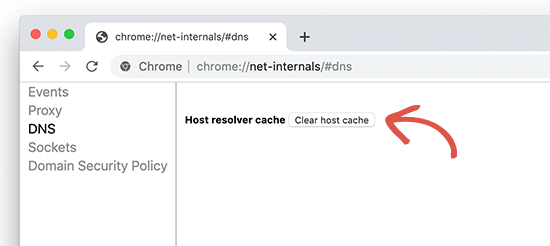
This will load Chrome’s net internal settings page. From here you need to click on the ‘Clear host cache’ button, and Chrome will clear up its DNS cache.
Now keep in mind that DNS cache is separate from the browser cache.
Your browser saves a lot of website data in a temporary cache to quickly load pages on subsequent visits.
If you are having trouble viewing a page that you updated but can’t see your changes, then you would want to clear the browser cache.
We have a step by step guide on how to clear browser cache on all major browsers that you can follow.
How to Check for DNS Updates
When you are moving your WordPress website to a host or transferring your domain registration to a new domain registrar, you’ll have to change your DNS settings and point them to the new location.
Once you apply these changes under your domain settings, it takes a while for changes to propagate across the internet. This could take anywhere between a few hours to a couple of days.
During this time, your domain will sometime point to the old location and sometimes it will point to the new location. This depends on your geographic location and which DNS servers your browser asks for directions.
You can check how these DNS changes are propagated around the world using online tools like DNS Checker.
Simply enter your domain name, and it will fetch DNS from different geographic locations spread around the world.
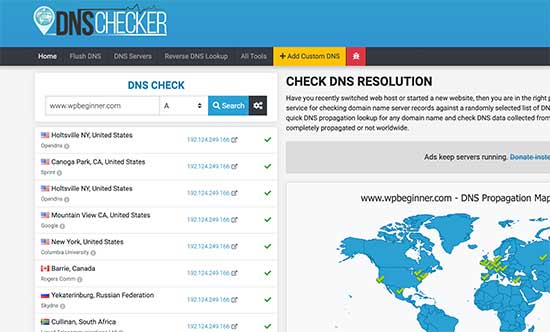
If all locations indicate the same IP address with a green checkmark, then this means the DNS changes you made are now updated all over the internet.
We hope this article helped you learn how to easily clear your DNS cache on different devices. You may also want to see our guide on how to clear your WordPress cache for beginners.
If you liked this article, then please subscribe to our YouTube Channel for WordPress video tutorials. You can also find us on Twitter and Facebook.
The post How to Clear Your DNS Cache (Mac, Windows, Chrome) appeared first on WPBeginner.
from WPBeginner https://ift.tt/354Lr4e
More links is https://mwktutor.com
No comments:
Post a Comment