Do you want to remove the author name from your WordPress blog posts? Normally, blog posts are supposed to show author name with other meta-data like date and category.
However, some blog owners may not want to display the author name next to their blog posts.
By default, WordPress does not have an option to remove author name, and you must select an author to publish a post.
In this article, we will show you two ways to easily remove author name from your WordPress posts. We will also discuss the pros and cons of each approach.
Why Would You Want to Remove Author Name?
Author name is an important type of metadata added to your WordPress posts by default. It allows your readers to learn about authors who create content on your blog.
However, there are times when you may want to hide the author name.
For example: if multiple staff members in your team collaborate on each blog post, then it may seem unfair to credit a single staff member for the work.
In another scenario, you may have several contributors/freelance writers who occasionally write articles, but you want to keep a consistent style and voice for your blog.
With that said, let’s take a look at solutions for easily removing author name from WordPress posts while still allowing multiple authors to work in the background.
Method 1: Manually Remove Author Name from WordPress Posts
Your WordPress theme decides when and how to display the author name in your blog posts. Themes use multiple approaches to do that which makes it harder for a plugin to provide a generic solution for removing author names.
You will need to edit some code to prevent your theme from displaying the author name. If you are uncomfortable editing code, then try the second method instead.
The first method requires you to edit WordPress theme files. If you haven’t done this before, then please take a look at our guide on how to copy and paste the code in WordPress.
Note: Make sure that you create backup of your theme or child theme before making any changes. If something goes wrong, then this will help you easily revert changes.
WordPress themes use different variations of code to display the author name. You will need to locate the code responsible for showing the author’s name in your theme files and delete it.
Most common locations to find this code are single.php, content.php, archive.php, and index.php files.
In many cases, you will not be able to find the code that outputs author name. Instead, you will find a template tag defined in the functions.php file or template-tags.php file.
For example, the default Twenty Nineteen theme uses the function twentynineteen_posted_by to display author name. This function is defined in template-tags.php file and uses the following code:
function twentynineteen_posted_by() {
                printf(
                        /* translators: 1: SVG icon. 2: post author, only visible to screen readers. 3: author link. */
                        '<span class="byline">%1$s<span class="screen-reader-text">%2$s</span><span class="author vcard"><a class="url fn n" href="%3$s">%4$s</a></span></span>',
                        twentynineteen_get_icon_svg( 'person', 16 ),
                        __( 'Posted by', 'twentynineteen' ),
                        esc_url( get_author_posts_url( get_the_author_meta( 'ID' ) ) ),
                        esc_html( get_the_author() )
                );
        }
endif;
Once you have located the code that outputs the author name, you need to delete it.
For example, you have to delete the code from the second line to the ninth line in the above code. After that, the remaining code will look like below.
function twentynineteen_posted_by() {
}
endif;
Don’t forget to save your changes after deleting the author name code. Then, upload the files back to your website.
You can now visit your website to see your changes in action:
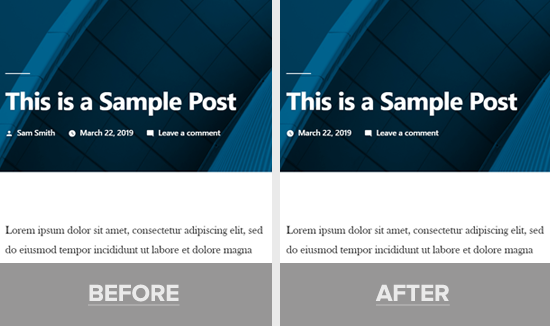
This method hides the author name on all your posts; however, the author archive pages will remain intact. An author archive page is where WordPress creates a list of all articles written by a specific user.
You can find author archive page on a URL like this:
https://ift.tt/2HYlyun
This URL is discoverable by search engines, which means you may still get traffic to those pages.
You can disable the author archives easily using the Yoast SEO plugin. Once you install and activate the plugin, go to SEO » Search Appearance your dashboard and then click the ‘Archives’ tab.
Now you can see the author archive settings. You can toggle Author Archives switch and disable author archives on your site.
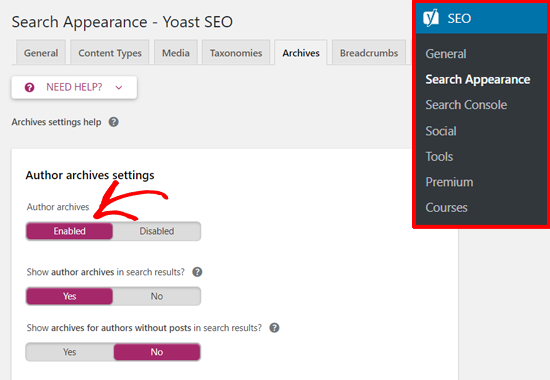
Doing so will disable author archives and hide author-sitemap.xml file created by the Yoast SEO plugin.
Method 2: Create a Generic Author Name for Publishing WordPress Posts
This method does not remove the author name, but it can be used as a workaround.
You will create a generic author name and use it for all your past and future articles. You will need to change the author name before publishing each post.
Note: This method is irreversible. If you do this and want to revert, then you will have to edit each post and assign it to the original author manually.
That being said, let’s get started.
First add a new author to your WordPress site and give it a generic username such as editorialteam.
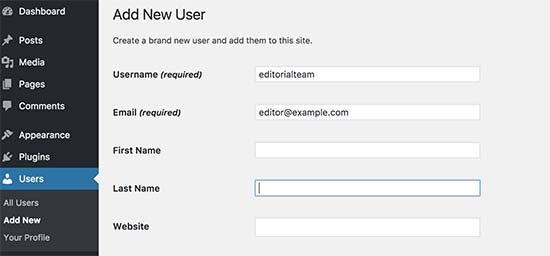
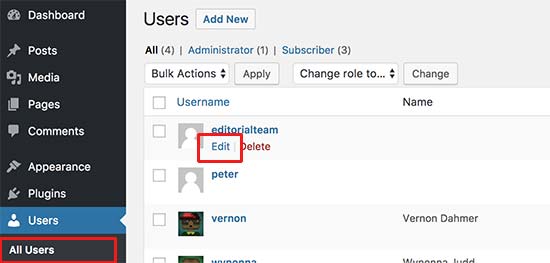
Next, you need to visit Users » All Users page and click on the ‘Edit’ link below the username you just added.
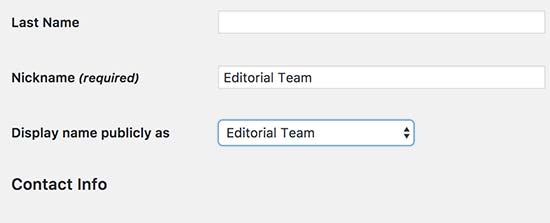
On the user profile screen, scroll down to the ‘Nickname’ option and enter the name you want to be displayed (for example, Editorial Team).
After that, click on the drop down menu next to ‘Display name publicly as’ option and select the nickname you just entered.
You can also add a generic bio and even create a gravatar for that user account.
Now go to Posts » All Posts page and click on the screen options menu at the top. Enter 999 for number of items to display.
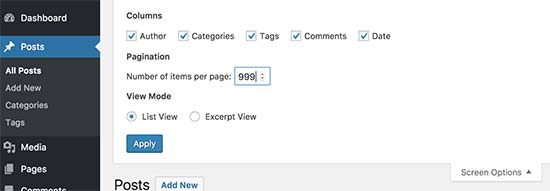
This will allow you to quickly edit and change author name for a large number of posts.
You need to select all posts using the checkbox and then select edit under the bulk actions drop down menu. After that click on the ‘Apply’ button to continue.
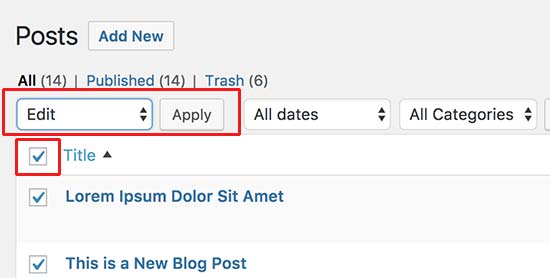
WordPress will now show you the bulk editing options. You need to change the author to the generic author name you added earlier and then click on the Update button.
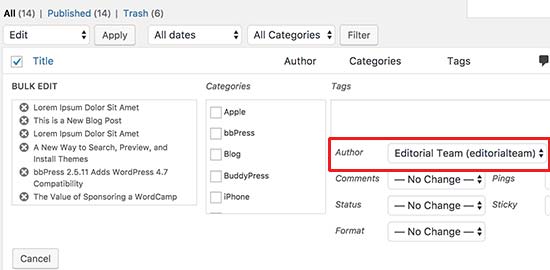
WordPress will now update all selected posts and change author name. Remember, this process may take some time depending on how fast your WordPress hosting is.
If you have more than 999 posts, then you will need to go to page 2 and repeat the process.
That’s all. You can now visit your website to see it in action.
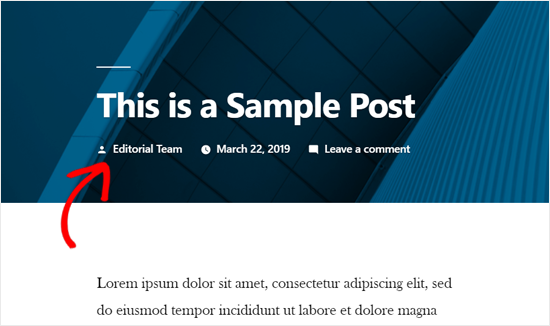
Our Recommendation
Removing author name using the coding method gets the job done, but it is not the best solution. For example, if you are not using a child theme, then a theme update will override your changes.
This is why we recommend the second method to create a generic author name.
Doing so allows you to use the built-in WordPress functionality and does not require you to edit any code. It will not remove author name or archives but will make them generic. It will also help to ensure consistency of authorship on your site.
If you are good with coding, then you can also use a combination of both approaches. You can create a generic author name to publish all your blog posts, and then hard-code author profile in a WordPress child-theme.
We use a similar approach at WPBeginner. You can see ‘Editorial Staff’ as the author for all blog posts including this one you are reading right now.
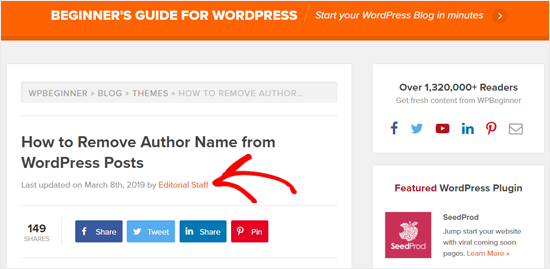
You can also see that in the author info box at the bottom of the article.

If you want to add an author info box like this, then take a look at the best free author bio box plugins.
We hope this article helped you learn how to remove author name from WordPress posts. You may also want to see our list of 30 effective ways to monetize your website.
If you liked this article, then please subscribe to our YouTube Channel for WordPress video tutorials. You can also find us on Twitter and Facebook.
The post How to Remove Author Name from WordPress Posts (2 Easy Ways) appeared first on WPBeginner.
from WPBeginner https://ift.tt/2U09QqE
More links is https://mwktutor.com
No comments:
Post a Comment