Are you looking for a way to add documentation in WordPress?
Adding documentation to your website makes it easier for users to understand how to use your products or services. This can help increase user engagement, improve SEO, and reduce support tickets on your website.
In this article, we will show you how to easily add documentation in WordPress, step by step.
Why Add Documentation in WordPress?
Documentation is content on your WordPress website that provides information on how to use your products/services, including their features, new releases, add-ons, and more.
WordPress documentation can include how-to tutorials, guides, FAQs, knowledge bases, and API documentation.
For example, if you have an online store that sells music, then you can create documentation detailing how to download the music, renew licenses, or create a playlist.
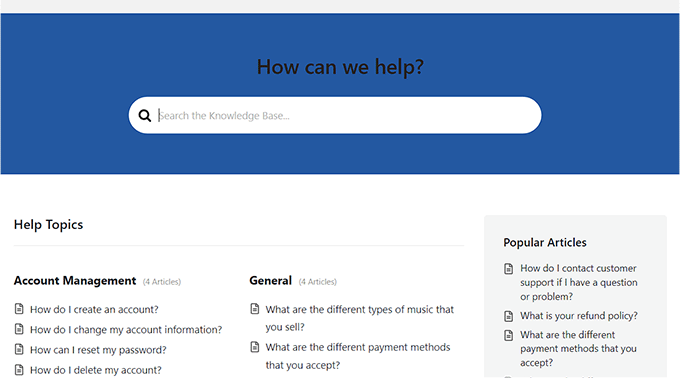
By adding documentation in WordPress, you can improve the user experience by making it easier for customers to discover different product features or find the causes of their issues and debug them themselves. This can even reduce the number of support tickets for your site.
Documentation can also improve your SEO rankings by providing additional content that Google and other search engines can index and display in the search results.
Having said that, let’s see how to easily add documentation in WordPress, step by step.
How to Add Documentation in WordPress
You can easily add documentation in WordPress using the Heroic KB plugin.
It is the best WordPress knowledge base plugin on the market that adds a searchable knowledge base to your existing site. It comes with an AJAX search feature, drag & drop content ordering, article attachments, and more.
Plus, the tool also has built-in analytics and a user feedback feature that lets you collect insights to improve your existing documentation.
Step 1: Configure Heroic KB General Settings
First, you need to install and activate the Heroic KB plugin. For detailed instructions, see our step-by-step guide on how to install a WordPress plugin.
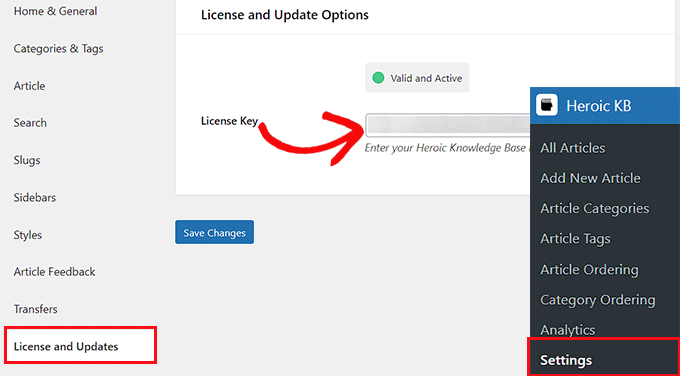
Upon activation, visit the Heroic KB » Settings page from the WordPress admin sidebar and switch to the ‘License and Updates’ tab.
Here, enter your plugin’s license key and click the ‘Save Changes’ button. You can get this information from your account on the Heroic KB website.
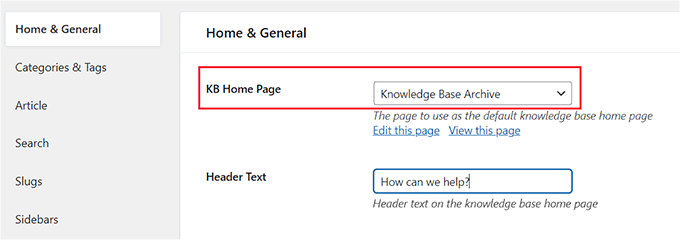
After adding the license key, switch to the ‘Home & General’ tab from the left column. You must select the documentation home page from the dropdown menu next to the ‘KB Home Page’ option.
If you pick the ‘Knowledge Base Archive’ option, then Heroic KB will create a new page for your documentation at https://ift.tt/qGsZoTh.
However, if you want to add your documentation on a page that you have already created, then you can choose that option from the dropdown menu.
Next, you can also type the header text that will be displayed at the top of your documentation page.
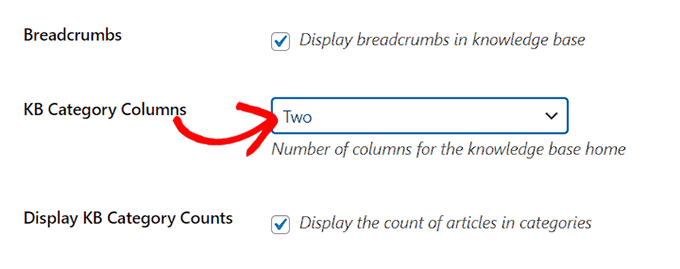
Once you have done that, just check the ‘Breadcrumbs’ option to enable it.
In a knowledge base, breadcrumbs are a type of navigation aid that allows users to see how they got to the current page and navigate back to previous pages like this: Home » Products » Installation.
Next, you can also choose the number of category columns to be displayed on your documentation page from the dropdown menu.
Then, check the ‘Display KB Category Counts’ option if you want to show the number of articles that are written for each category.
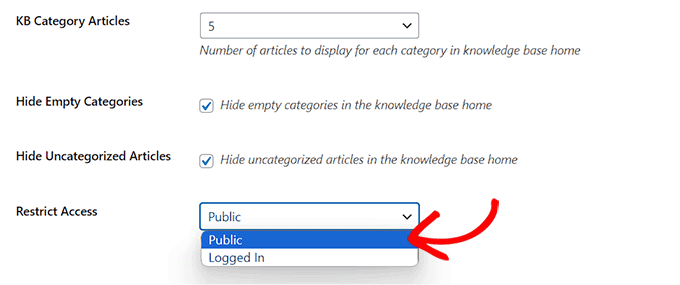
Next, choose the number of articles that should be displayed under each category on the documentation home page from the ‘KB Category Article’ dropdown menu.
Then, you can check the ‘Hide Empty Categories’ and the ‘Hide Uncategorized Articles’ boxes. This way, neither the currently empty categories nor the uncategorized articles will be displayed on your documentation home page.
Next, you can restrict your WordPress documentation access to logged-in users only from the ‘Restrict Access’ dropdown menu.
Once you are done, just click the ‘Save Changes’ button to store your settings.
Step 2: Configure Categories, Tags, and Article Settings
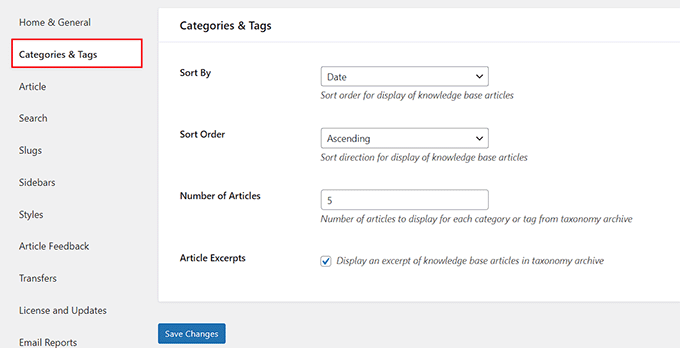
Now, switch to the ‘Categories & Tags’ tab from the left column. Here, you can choose how to sort your categories and tags and the number of articles that will be displayed for each taxonomy.
You can also check the ‘Article Excerpt’ box if you want to display an article snippet under each taxonomy archive in your documentation.
Next, simply click the ‘Save Changes’ button and switch to the ‘Article’ tab.
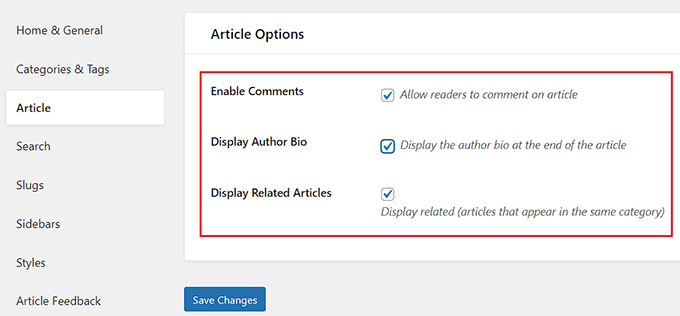
From here, you can check different boxes to activate a comments section under your documentation articles, display author bios, or show other related articles under each tutorial.
After making your choice, just click the ‘Save Changes’ button to store your settings.
Step 3: Set Up Knowledgebase Search and Slug Settings
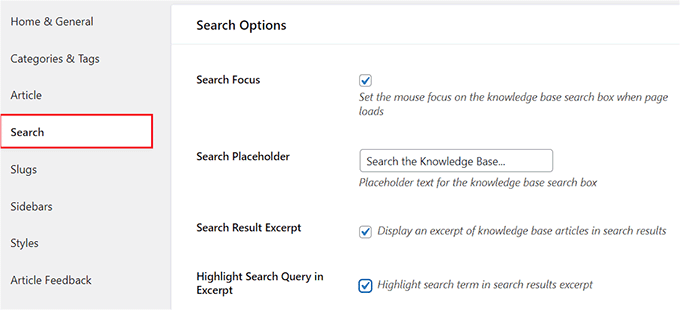
Now, switch to the ‘Search’ tab and check the ‘Search Focus’ box if you want the user’s mouse to automatically land on the documentation search box when the page loads.
Next, you can also add placeholder text for the search box, display article excerpts in the search results, and even enable the plugin to highlight the search term in the results.
Expert Tip: Are you looking for a way to set up advanced search across your entire website? Just see our guide on how to improve WordPress search with SearchWP.
Once you have done that, click ‘Save Changes’ and switch to the ‘Slugs’ tab.
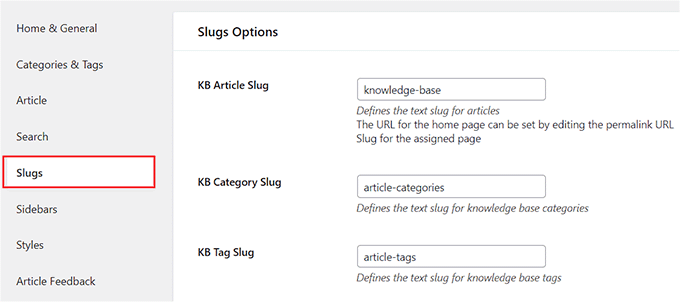
Here, you can add slugs for your documentation’s articles, categories, and tags.
Upon making your choice, go ahead and click the ‘Save Changes’ button to store your settings.
Step 4: Configure Knowledgebase Sidebar and Style Settings
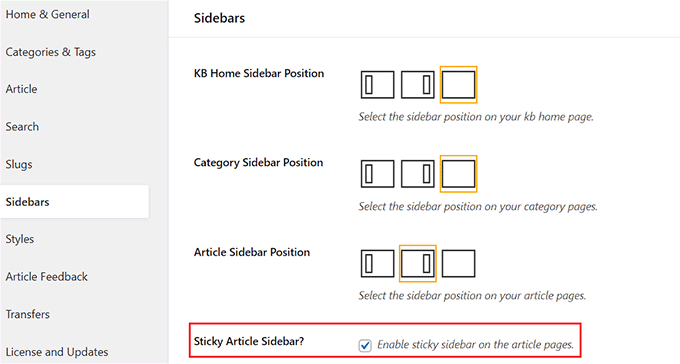
Next, switch to the ‘Sidebars’ tab to select a layout for the sidebars on your documentation pages.
You can pick different positions for the home sidebar, category sidebar, and articles sidebar. You can even check the ‘Sticky Article Sidebar?’ option to activate a sticky sidebar for pages.
Once you have done that, click ‘Save Changes’ and switch to the ‘Styles’ tab.
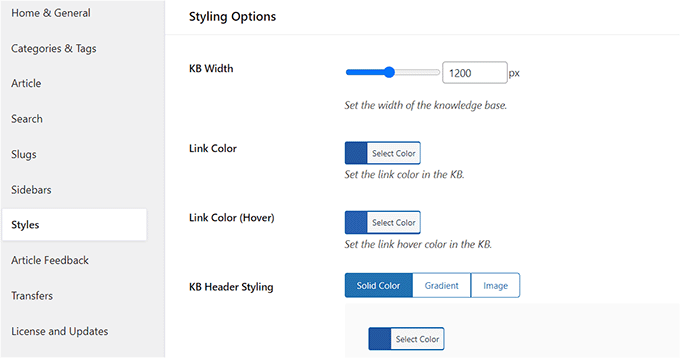
From here, you can select your documentation width, link color, header styling, and text color according to your liking.
Then, simply click the ‘Save Changes’ button.
Step 5: Set Up Article Feedback and Email Settings
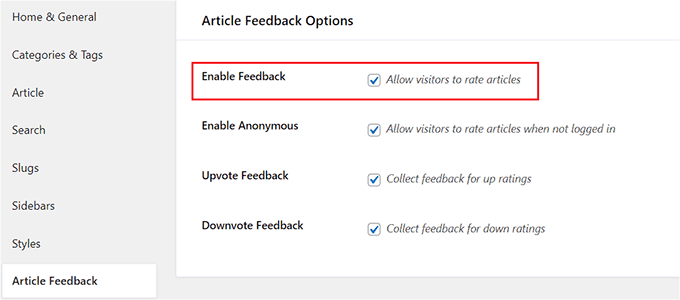
Next, you have to switch to the ‘Article Feedback’ tab and check the ‘Enable Feedback’ option to allow users to rate your articles.
You can even add an upvote/downvote system for your WordPress documentation by checking those boxes. This allows users to tell you if your documentation is helpful for solving their problems.
Now, click the ‘Save Changes’ button to store your settings.
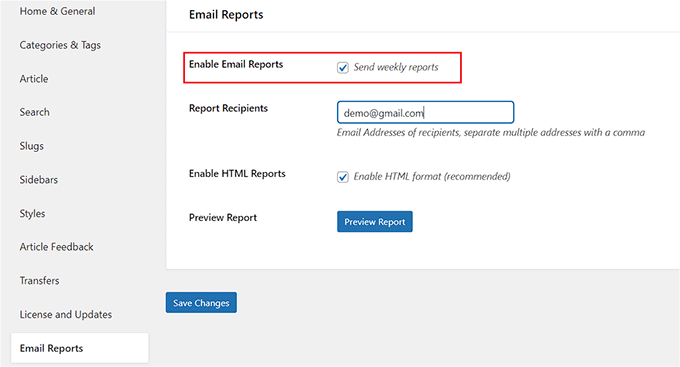
Now, switch to the ‘Email Reports’ tab from the left column and check the ‘Enable Email Reports?’ option if you want Heroic KB to send you weekly reports on your documentation.
This report will include the total views and average rating of your documentation articles and will even display a list of the top and most highly rated articles for that week.
Once you have done that, add your admin email address to the ‘Report Recipients’ field. You can even add multiple email addresses if you like.
After that, click the ‘Save Changes’ button to store your settings.
Now that you have configured all the settings for the Heroic KB plugin, it’s time to start creating documentation for your website.
Step 6: Create Documentation for Your WordPress Site
You can create how-to articles, knowledge base, guides, and FAQs for your documentation.
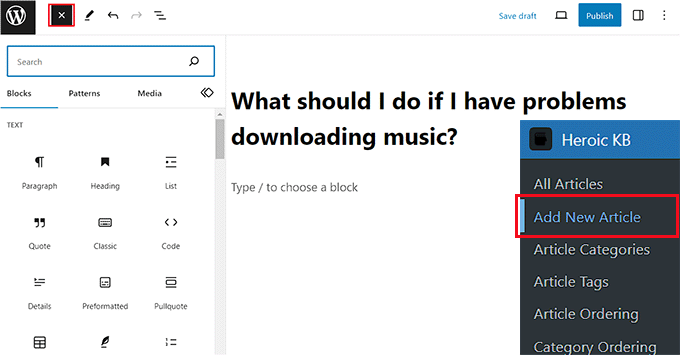
To start creating an article for your documentation, visit the Heroic KB » Add New Article page from the WordPress dashboard.
This will open the WordPress content editor, where you can add a heading for your documentation article and start writing the content. You can also click the add block ‘+’ button in the top left corner to add different blocks to your content.
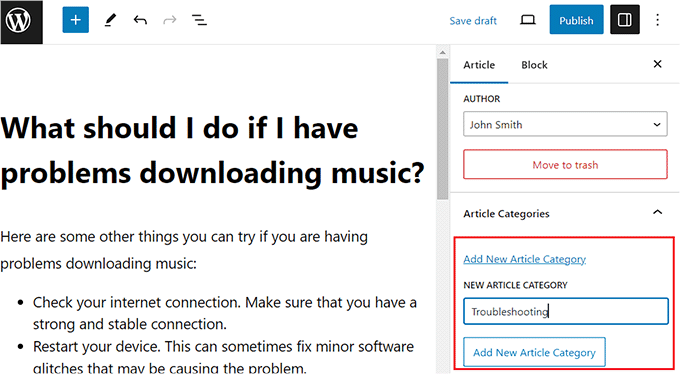
Once you have written the article for the documentation, you need to expand the ‘Categories’ tab in the block panel and click the ‘Add New Article Category’ link.
Next, simply create a category for the article that you are writing.
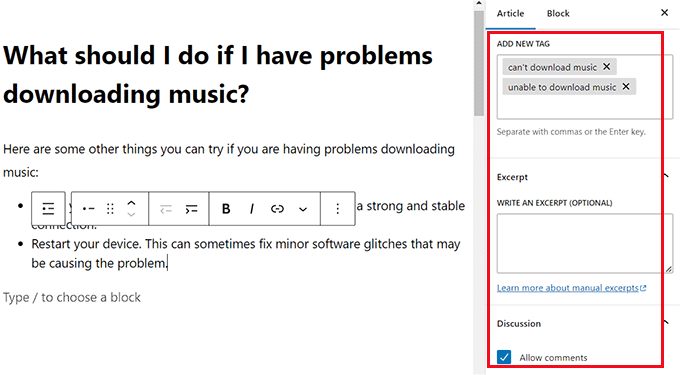
After that, expand the ‘Tags’ section in the block panel and add as many tags as you like for your documentation article.
You can even add an excerpt for the article by expanding the ‘Excerpt’ tab.
Next, expand the ‘Discussion’ tab and uncheck the ‘Allow comments’ option if you want to disable comments for this article. If you want to let users add comments, then you can leave this setting as it is.
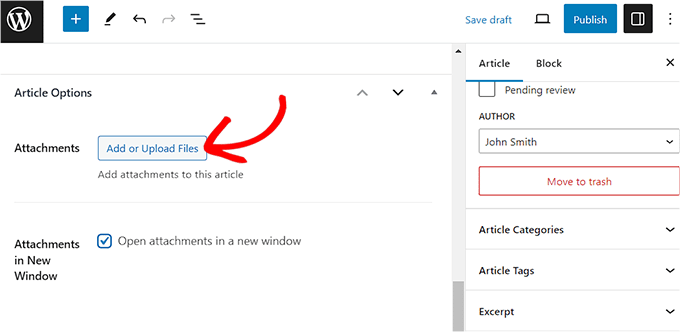
You can also add attachments to your articles in the documentation. To do this, scroll down to the ‘Article Options’ section in the block editor and click the ‘Add or Upload Files’ button.
This will launch the media library from where you can add any attachment you like.
Next, check the ‘Attachments in New Window’ box if you want the attachments in the article to open in a new window upon being clicked.
You can also disable the upvote/downvote feature for specific articles if you like by scrolling down to the ‘Voting Options’ section.
Here, check the ‘Disable Voting’ option to deactivate the upvote/downvote system for this specific article.

Finally, click the ‘Publish’ button at the top to publish your article as documentation.
Now, repeat the process again to add multiple entries for your documentation under different categories.
Once you have done that, you can easily view the documentation by visiting the https://ift.tt/qGsZoTh page, or you can visit the custom page that you chose for your documentation.

Step 7: Change the Article and Category Order of Your Documentation
With Heroic KB, you can also change the order of the articles that will be displayed in your WordPress knowledge base. To do this, you need to visit the Heroic KB » Article Ordering page from the WordPress dashboard.
Here, choose the category for which you want to change the article order. After that, simply drag and drop the articles to rearrange them according to your liking.
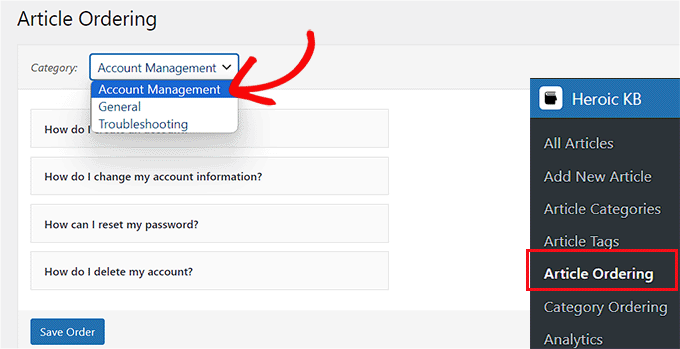
Once you are done, don’t forget to click the ‘Save Order’ button to store your settings.
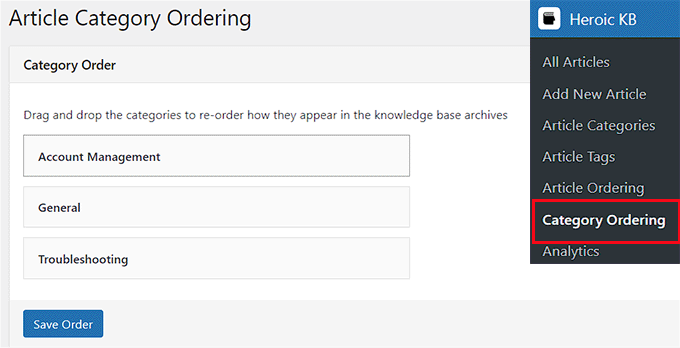
To change the order of the categories displayed on your documentation page, visit the Heroic KB » Category Ordering page from the WordPress admin sidebar.
Once you are there, you can rearrange the order of the categories by dragging and dropping them. Upon making the changes, click the ‘Save Order’ button to store your settings.
You have now successfully created documentation for your website and changed its category and article order.
Bonus: Add an FAQ Section to Your WordPress Site
Adding WordPress documentation is a great way to help your users find the information they need. You can also add FAQs (frequently asked questions) along with your blog posts to answer commonly asked questions related to your content.
This can increase user engagement on your WordPress blog and build trust and credibility with your users by letting them know that you understand their questions and worries.
Plus, FAQs can also improve your SEO rankings by allowing you to use long tail keywords that users commonly search for using search engines.
You can easily add FAQs to your website using All in One SEO (AIOSEO). It is the best WordPress SEO plugin on the market that allows you to easily optimize your website to improve search engine rankings.
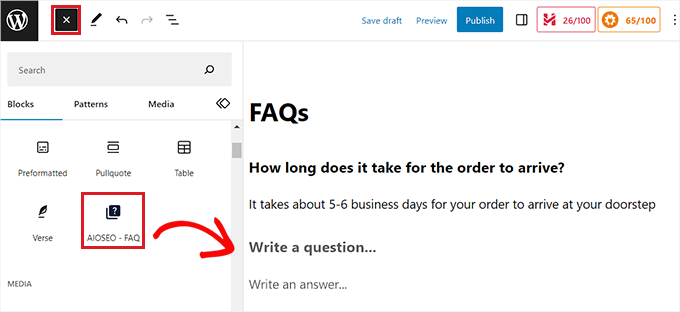
AIOSEO even comes with an FAQ block that can be directly added to the block editor, where you can enter questions and answers for your FAQ section.
The plugin also allows you to customize your FAQ section from the block panel, including its text color, background color, typography, and title wrapper, making AIOSEO the best WordPress FAQ plugin on the market.
Plus, the plugin comes with FAQ schema markup that can boost your website rankings and organic click-through rate by making your frequently asked questions appear directly in Google’s search results.
For more detailed instructions, see our tutorial on how to add a Frequently Asked Questions section in WordPress.
We hope this article helped you learn how to add documentation in WordPress. You may also want to see our beginner’s guide on how to create a questions and answers site in WordPress and our top picks for the best accordion plugins for WordPress.
If you liked this article, then please subscribe to our YouTube Channel for WordPress video tutorials. You can also find us on Twitter and Facebook.
The post How to Add Documentation in WordPress (Step by Step) first appeared on WPBeginner.
from WPBeginner https://ift.tt/0jN3mMI
More links is https://mwktutor.com
No comments:
Post a Comment