Do you want to learn how to display full-size images in WordPress?
The latest version of WordPress automatically resizes large images to improve performance. But sometimes you may need to display images with larger dimensions.
In this tutorial, we’ll share four different ways to display full-size images on your WordPress site.

Why is WordPress Scaling Large Images?
Earlier versions of WordPress allowed users to upload images with very large dimensions.
But, what happened is WordPress beginners were uploading images that were simply too large for the modern web. Large images lead to slow website loading speeds and poor performance.
To fix this issue, the WordPress 5.3 update changed how WordPress handles very large images.
For example, if you upload an image with the dimensions of 5000px by 7000px, then WordPress will resize the image to 2560px and scale the width to match the original dimensions.
Now, when a user visits a page with a previously large image, they’ll see the scaled-down version of that image.
This leads to improved website performance and happier users overall.
Reasons to Stop WordPress From Scaling Images
This new feature is useful for most WordPress website owners, but some users might need to display full-size images.
For example, if you’re a photographer or artist who sells your work, then you may want to display larger images on your website, so visitors can buy or download them.
Or, you could be running a website where larger images are a requirement, like a stock photo website or website that sells custom prints and pictures.
Maybe, you need one large image for your home page background image that’s bigger than the 2560px limits?
No matter what your reason for wanting a full-size image, we’ll show you how to do it, step by step.
How to Display Full-Size Images in WordPress (4 Methods)
There are 4 different ways you can display full-size images in WordPress.
Some methods work better for single images, while others are best for an entire image library.
You’ll want to choose the full-size image method that’s right for your goals.
Method 1. Get Full Size Image URL in WordPress
If you only want to use one or two large images on your website, then this solution is probably best.
When you upload an image to WordPress that exceeds the dimensions, WordPress will scale your image and create a new one. But, the original image is still intact.
To display the original image dimensions, you’ll need to delete ‘-scaled’ from the end of the WordPress image URL and insert the image into your site with the modified link.
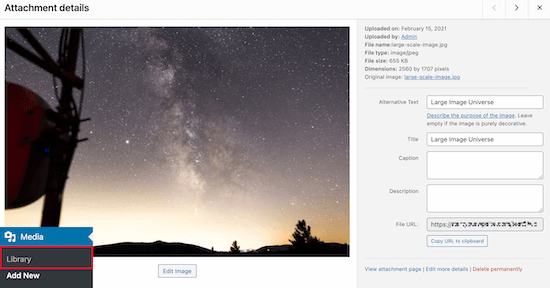
Simply head over to your media library by going to Media » Library and select your large image.

Now, locate your ‘File URL’ in the image box.
Next, you’ll want to delete ‘-scaled’ from the end of your image URL.

After that, you can copy the image URL and insert the image into your website.
Note that you’ll need to embed the image into your site using the link, minus the scaled portion.
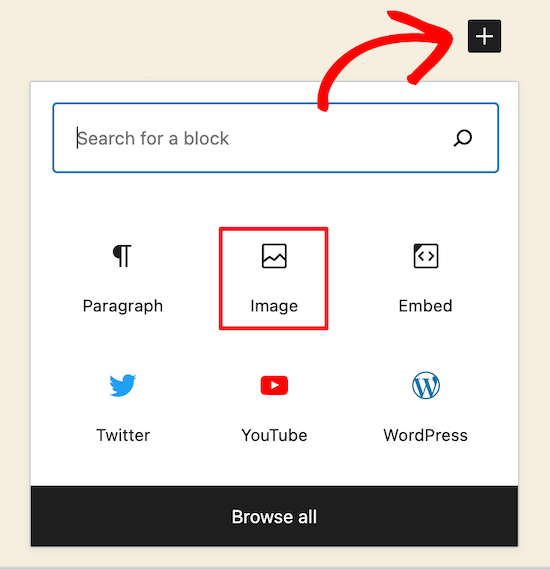
To do this navigate to a post or page you want to add the image and click the ‘+’ icon to add a new block.

Then click the ‘Image’ icon to add an image block where you can paste your URL.
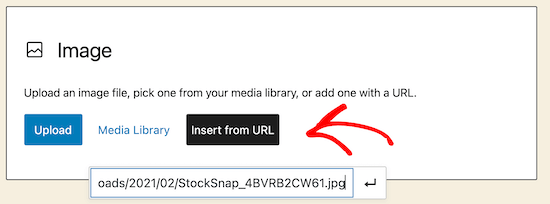
Click ‘Insert from URL’, then paste your full size image URL into the box and press the ‘Enter’.

After that, you’ll need to click ‘Publish’, or ‘Update’, if the post is already live, and your full-size image will now be viewable on your site.
You can follow this same process for every full-size image you want to add to your site. But, as long as you use the File URL minus ‘scaled,’ your WordPress images will display in full size.
Method 2. Automatically Disable Image Scaling in WordPress (with a Plugin)
The second method is using a WordPress plugin to disable image scaling across your site.
The plugin we recommend is called Disable “BIG Image” Threshold. This plugin offers one of the easiest workarounds for displaying big images on your site, and it’s entirely free to use.
First, you’ll need to install and activate the Disable “BIG Image” Threshold plugin. For more details on installing a plugin, see our step by step guide on how to install a WordPress plugin.
Once you’ve installed and activated the plugin on your site, it’ll automatically remove the big image threshold added by WordPress.
You’re free to add new images just as you were before the WordPress image update.
When this plugin is active, WordPress will not add the ‘-scaled’ attribute to any image.
Method 3. Automatically Disable Big Image Scaling in WordPress (with Code Snippet)
Another option is to add a code snippet to WordPress that accomplishes the same goal as the plugin above.
If the plugin doesn’t work for some reason, or you don’t want to install too many plugins, then you can use this method.
The new WordPress image scaling feature uses a filter called big_image_size_threshold.
You’ll want to use the following code to disable this function:
add_filter( 'big_image_size_threshold', '__return_false' );
You need add this code in your theme’s functions.php file, in a site-specific plugin, or by using the Code snippets plugin.
Method 4: Open Full-Size WordPress Images in a Lightbox
The final option is to add a full-size image lightbox to your site. With this solution, you get the best of both world.
You can load smaller image thumbnails in your blog content, gallery, or carousel, and when clicked, it will popup with your full-size image.

To do this, we recommend using the Envira Gallery plugin. It’s the best WordPress image gallery plugin in the market and lets you easily add the lightbox popup image effect.
The first thing you’ll need to do is install the Envira Gallery plugin. For more details, see our step by step guide on how to install a WordPress plugin.
After installing and activating the plugin, see our step by step guide on creating an image gallery in WordPress with the lightbox effect.
Keep in mind that before you upload full-size images for your gallery, you’ll need to disable image scaling via the plugin or child theme methods above.
Otherwise, your lightbox images will be using the scaled-down version of the image.
Finally, it’s important to note that if you add images with large dimensions, it’s essential to optimize them for the web, so you don’t slow down your website.
We hope this article has helped you display full-size images in WordPress. You may want to see our guide on optimizing images for SEO and our expert pick of 40 useful tools to manage and grow your blog.
If you liked this article, then please subscribe to our YouTube Channel for WordPress video tutorials. You can also find us on Twitter and Facebook.
The post How to Display Full Size Images in WordPress (4 Methods) appeared first on WPBeginner.
from WPBeginner https://ift.tt/3dFv5GO
More links is https://mwktutor.com
No comments:
Post a Comment