Do you want users to be able to upload images on your WordPress site?
If you want to accept guest post submissions, product reviews, or run a photo contest, then you will need to allow users to upload images. However, you may not want to give them access to your WordPress admin area.
In this article, we’ll show you how to safely allow users to upload images on a WordPress site without giving them access to WordPress admin.

Allowing Users to Safely Upload Images in WordPress
If you want to run a multi-author blog, then the easiest way to allow users to upload images is by adding them as an author on your website.
However giving users access to the WordPress admin area isn’t ideal for one-time scenarios such as guest post submission, product reviews, photo contests, etc.
Luckily there are several WordPress plugins that let users upload images, without compromising your website security or giving them access to the WordPress admin area.
Having said that, let’s take a look at some ways to easily allow users to upload images in WordPress.
Method 1. Let Users Upload Images Using a File Upload Form
This method comes in handy when you only need users to upload an image or another file such as resumes, cover letter, etc.
You can simply create a file upload form that collects the user’s name, email address, the photo / file itself, and any message they want to include.
First, you will need to install and activate the WPForms plugin. For more details, see our step by step guide on how to install a WordPress plugin.
WPForms is the best WordPress form builder plugin that’s used by over 4 million websites. It comes with a file upload field that we’ll be using in this tutorial.
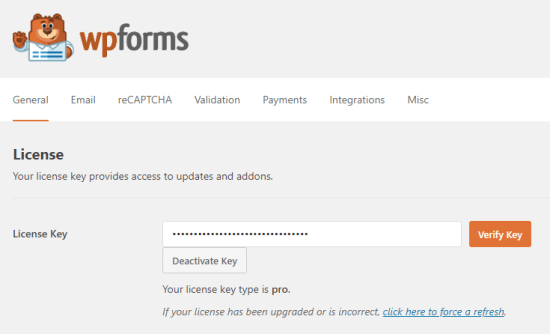
Upon activation you need to visit the WPForms » Settings page in your WordPress dashboard to enter your license key. You can find your license key in your account area on the WPForms site, under the ‘Downloads’ tab.
This is how it will look when you enter it on your site:
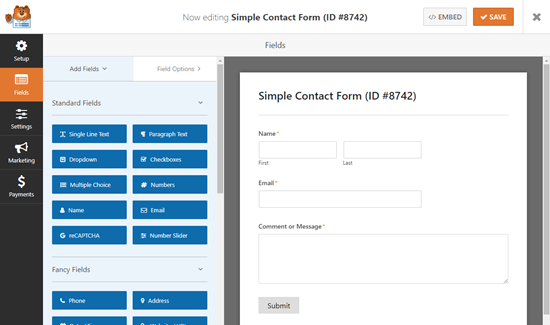
Now, go to WPForms » Add New to create your form. We’re going to use the ‘Simple Contact Form’ for this example. Click on it, and your new form will appear.
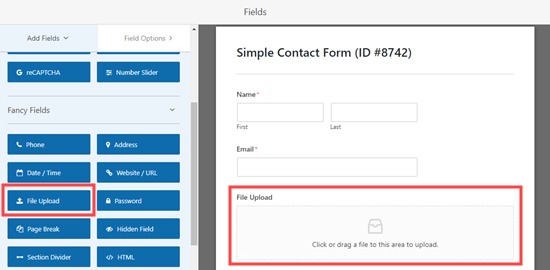
Next, drag and drop a ‘File Upload’ field onto your form. You can find this field under the ‘Fancy Fields’ section on the left.
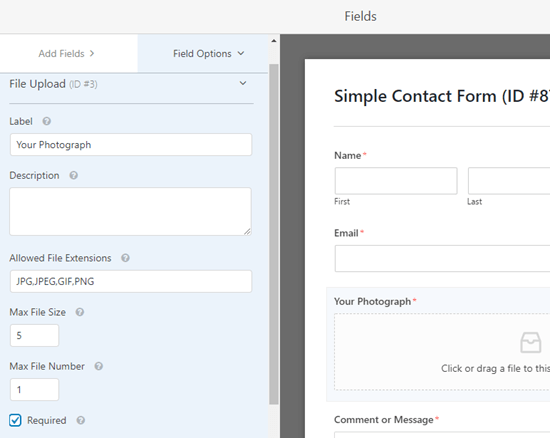
Once added, click on the File Upload field on your form to edit it.
We’ll change the name of this field (its label) to “Your Photograph” and specify which file extensions are allowed. We only want image files, so we’re going to allow JPG/JPEG, GIF, and PNG files.
Note: By default, WordPress only allows certain file types to be uploaded. For instance, users won’t be able to upload .svg images, or .zip files unless you explicitly add them to the allow list. We’re going to explain how to do that in a moment.
For now, let’s continue tweaking our field settings. We recommend specifying a maximum file size of 5 MB and check the box next to ‘Required’, so that the user can’t submit the form until they’ve uploaded an image.
The file size limit helps you save disk cost on your WordPress hosting account.
You can also set further options for this field by clicking the downward arrow next to ‘Advanced Options’.
Here, you can choose the style of your upload field. It defaults to a ‘Modern’ drag and drop field. If you want, you can replace it with a ‘Classic’ field that looks like this instead:

You can also choose to store the image in the WordPress Media Library by checking that box. This is a good idea if you’re going to collate your submitted images for a blog post or similar.
Once you are satisfied with your form, you can save and exit the form builder.
Adding Your Image Upload Form in WordPress
Next, you would want to add your form to a WordPress post or page. WPForms makes it super easy to add your forms anywhere on your website.
Simply edit the post or page where you want to add the image upload form. In the WordPress content editor, you need to add the WPForms block to your content area.

After that, you need to select the form you created earlier from the dropdown menu. WPForms will display a preview of your form inside the content area.
You can now save your post or page and view it live to see your image upload form in action.
Allowing Additional File Types to Be Uploaded
Sometimes, your users might see this error when trying to upload a file, even when you’ve allowed that file type in your upload field’s settings:
Sorry, this file type is not permitted for security reasons
The problem is that WordPress only allows certain file types by default. The easiest way to allow more file types is to use a companion plugin.
We recommend the File Upload Types plugin from WPForms.
Once you’ve installed the plugin in WordPress and activated it, go to Settings » File Upload Types.
You can then pick file types from the list that you want to allow, or you can add custom file types.
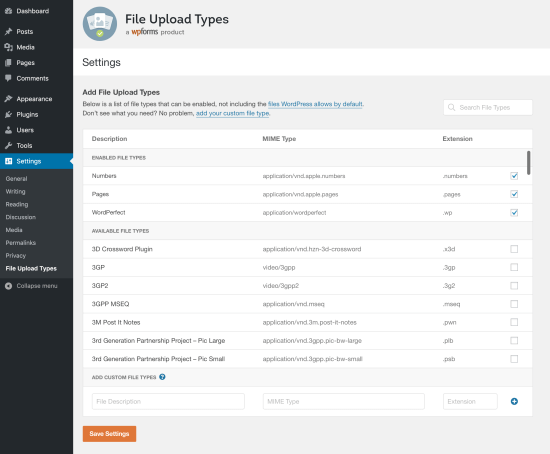
Note that the list doesn’t include the types that WordPress already allows by default.
Method 2. Allow Users to Upload Images as Guest Authors
A key reason to let users upload images is if you’re collecting guest post submissions. You could also use a very similar method for other user-generated content, like testimonials.
First, you will need to install and activate the WPForms plugin. For more details, see our step by step guide on how to install a WordPress plugin.
Note: You’ll need the ‘Pro’ version (or higher) in order to use the ‘Post Submissions’ addon.
After activating the plugin, you need to visit the WPForms » Settings page in your WordPress dashboard to enter your license key. You can find your license key under the ‘Downloads’ tab of your account on the WPForms site.
This is what you’ll see when you enter the license key on your site:

Next, go to WPForms » Addons to install the Post Submission Addon. Click the ‘Install Addon’ button. It will automatically install and activate
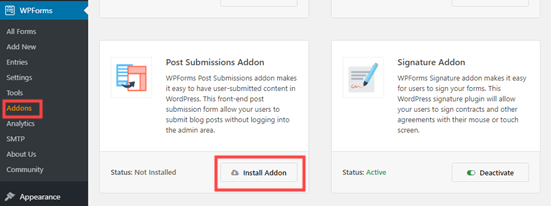
Now, you can start building your guest post submission form.
Go to WPForms » Add New, then scroll down to find the Blog Post Submissions Form.
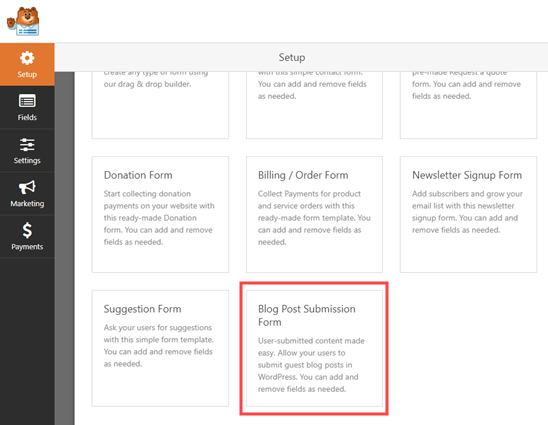
Click on it, and your new form will be created for you. This will have default fields for the guest author’s details as well as the post’s proposed title, content, featured image, post excerpt, and category.
You can add more fields (sections of your form) if you want. For instance, you might want to add a ‘Website / URL’ field where the author can enter their own blog’s URL.
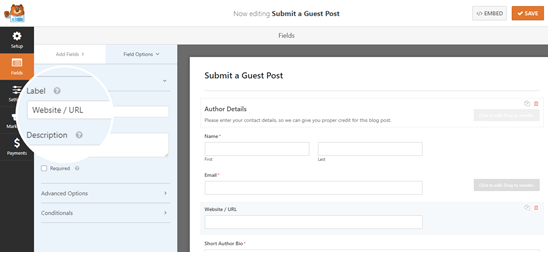
To change the label on a field or any text on the form, just click on it.
For instance, you can click on the ‘Featured Image’ box and change the ‘Description’ to give your preferred size for featured images.
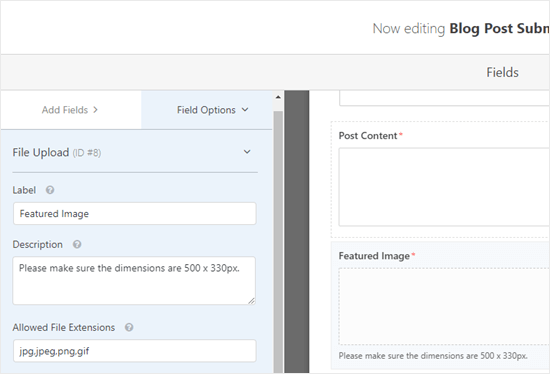
Files uploaded through the preset ‘Featured Image’ field will be stored in your Media Library within WordPress.
You can toggle this option on and off by clicking on the ‘Advanced Options’ dropdown for the field.
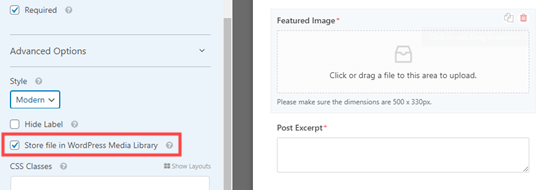
Tip: If you want to create a form from scratch, note that the ‘File Upload’ field does not store files in the Media Library by default. Make sure you switch this setting on if you want to use it.
If you want, you can change the image types that the ‘File Upload’ field will accept. For instance, you might want users to only upload PNG files.
You can also enter a maximum file size, in MB. If you want, you can allow users to upload 2 or more files.

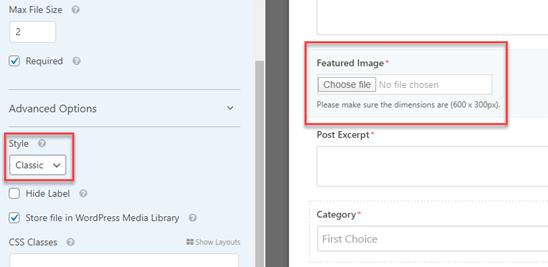
The ‘Modern’ upload field (the default) allows users to drag and drop files. If you prefer, you can change it to a ‘Classic’ field under advanced options. Note that this only allows users to upload a single file.
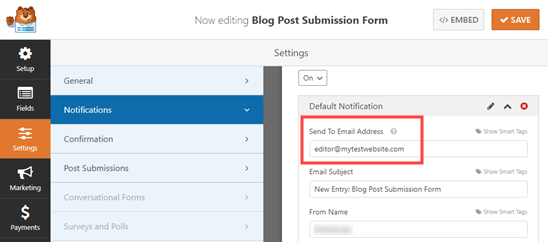
Once you’ve got all the fields you want on your form, go to the ‘Settings’ tab. You may want to change details under ‘Notifications’ here.
For instance, if your guest posts go to an editor, you’ll want their address in the ‘Send to Email Address’ box.
You might also want to change the confirmation message that a user sees after submitting the form. You can do this under Settings » Confirmation.
Once you’re happy with your form, click the ‘Save’ button at the top of the screen.
Adding the Guest Post Submission Form to Your Site
You can add your form to your site in any post or page. You might want to create a new page specifically for guest post submissions.
If you’re using the Gutenberg (block) editor, simply click the (+) icon to create a new block. Then, select ‘WPForms’ from the ‘Widgets’ section.
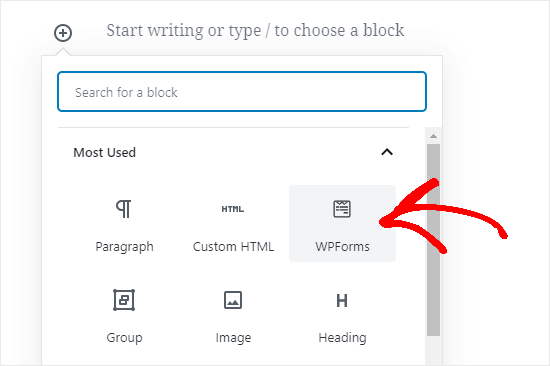
Next, you’ll see a WPForms dropdown. Select your form from the list and it’ll be added to your post.
Tip: If you’re still using the Classic editor, then you’ll see an ‘Add Form’ button next to ‘Add Media’ instead. Click this to get a dropdown list of your forms. Select the one you want, then click ‘Add Form’ to put it into your post.
You can use the ‘File Upload’ field in any form you create, of course. That means you can use the above method for any type of user-generated content you’d like to collect.
Method 3. Allow Users to Upload Photos for a Contest
While a file upload form allows users to upload any type of file, it may not be the best solution if you’re running a photo contest.
That’s because WPForms is a form builder, not a contest plugin. It doesn’t come with features like selecting winners, viral sharing, etc.
That’s where RafflePress comes in. It’s the best WordPress giveaway plugin that lets you create viral contests to grow your traffic and social media followers.
You can use it to design a contest widget that lets users upload photos, but also incentivize sharing and other engagement actions to grow your following.

We have created a detailed guide on how to create a photo contest in WordPress with RafflePress that you can follow more details.
We hope this article has helped you learn how to allow users to upload images on a WordPress site. You may also want to see our comparison of the best email marketing services and best push notification software to connect with your visitors after they leave your website.
If you liked this article, then please subscribe to our YouTube Channel for WordPress video tutorials. You can also find us on Twitter and Facebook.
The post How to Allow Users to Upload Images on a WordPress Site appeared first on WPBeginner.
from WPBeginner https://ift.tt/3cWLeau
More links is https://mwktutor.com
No comments:
Post a Comment