Are you trying to recover deleted pages in WordPress?
If you accidentally deleted a WordPress page, then it is possible to recover it from Trash.
In this beginner’s guide, we’ll show you how to easily recover deleted pages in WordPress and WooCommerce.
How WordPress Handles Deleted Pages?
Just like your computer, WordPress moves deleted items into a ‘Trash’ folder. Doing that removes those items from your website and admin screens, but they’re not deleted permanently right away.
After 30 days, WordPress automatically deletes the item permanently from the trash, and your WordPress database.
If the page you deleted is still in the trash, then you can go ahead and restore it. We’ll show you how in a minute.
However, if it has been deleted from trash too, then you will need to try other ways to restore the deleted page in WordPress.
Sometimes you may accidentally delete a page and not notice it for a while. For instance, if you have multiple pages with the same name, and you end up deleting one that you actually needed.
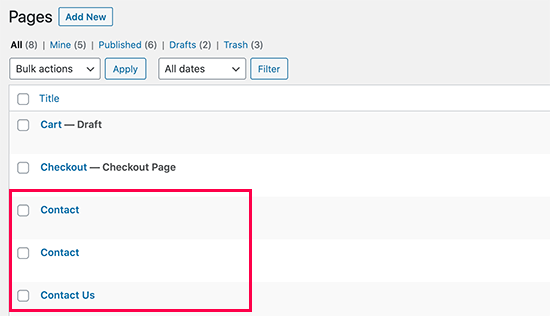
Another common scenario that we have seen is users accidentally deleting pages needed by WooCommerce or their WordPress membership plugin.
That being said, let’s take a look at how to easily restore deleted pages in WordPress and WooCommerce. Here is quick table of content, so you can jump to the section that best fit your needs.
- Recover Deleted Pages from Trash in WordPress
- Recover Deleted Pages in WordPress Using a Backup Plugin
- Recover Deleted WooCommerce Pages
- Recover Selected Pages from a WordPress Backup (Advanced)
Method 1. Recover Deleted Pages from Trash in WordPress
This method is the easiest, and you should try it first before doing anything else.
Normally, when you delete an item in WordPress, it is sent to the trash folder, and you can recover it for the next 30 days. After that, it will be automatically deleted forever.
Simply go to Pages » All Pages inside your WordPress admin area. From here, you need to switch to the ‘Trash’ tab to view all the pages that have been deleted during last 30 days.
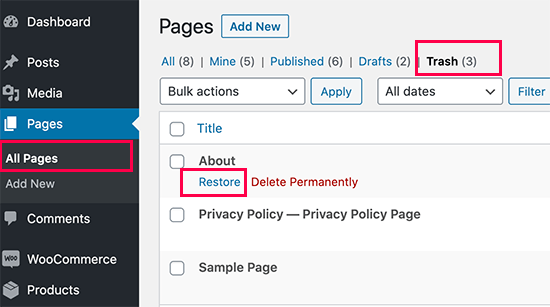
If the page(s) you want to recover is listed there, then simply take your mouse over the page title, and you’ll see the option to ‘Restore’ it.
You can also restore multiple pages at once by selecting them and then choosing ‘Restore’ from the Bulk Actions drop-down menu at the top.
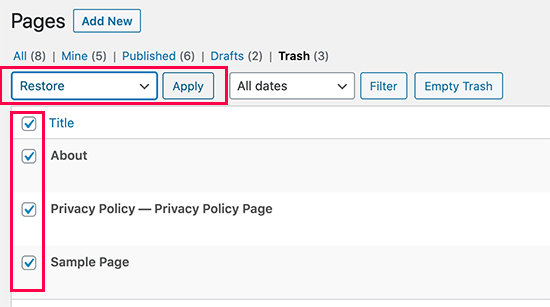
You can now go to Pages » All Pages and locate the restored page there.
That was quick and easy, but what if the page you deleted is not listed under Trash?
Don’t worry, there are other ways to restore deleted pages in WordPress.
Method 2. Restore Deleted Pages in WordPress Using a Backup Plugin
Backups are one of the best WordPress security and productivity tools. All WordPress websites must set up a proper WordPress backup plugin.
These WordPress backup plugins not just help you recover a hacked WordPress site, but they can also help you recover deleted content including pages.
Note: WordPress backup plugins allow you to restore your entire website to an earlier point. This means any other changes you made to your website after that time can be lost.
If you know when you deleted a page, then you can access the last back up before that time to restore your website.
If you don’t have a WordPress backup plugin installed, then there is still a fairly good chance that your WordPress hosting company does, and you can still restore it via cPanel.
For step by step instructions you can follow our guide on how to restore WordPress from a backup. It shows how to restore WordPress from a backup using UpdraftPlus, BackupBuddy, phpMyAdmin, cPanel, and more.
Method 3. Recover Deleted WooCommerce Pages
By default, WooCommerce creates pages for the checkout, cart, shop, and account management. These are important pages for your WooCommerce store to function properly.
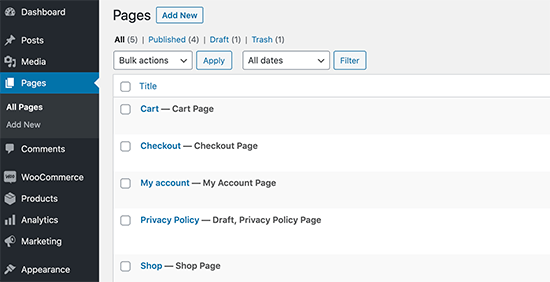
If you accidentally delete a WooCommerce page, then you can first try restoring it by looking into the Trash (see Method 1 above).
If you cannot find the page in trash, then you can simply create a new one. For instance, you can go to Pages » Add New and then create a blank page titled ‘Cart’.
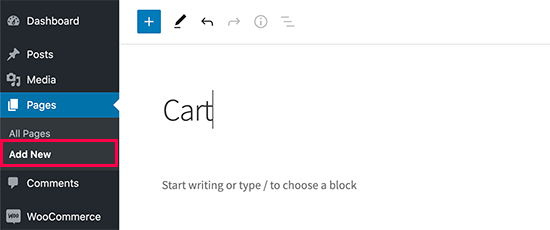
Similarly, you can create other WooCommerce pages as well for shop, checkout, and account.
After you have created new pages, you can tell WooCommerce to use these new pages instead. Simply go to WooCommerce » Settings page and switch to the ‘Advanced’ tab.

From here, you can select pages you created earlier under the Page Setup section.
For the shop page, you’ll need to switch to the ‘Products’ tab and then select the page you want to use as your Shop page.
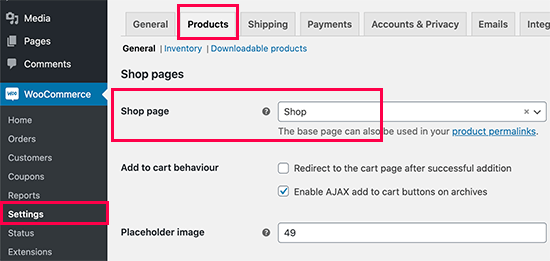
Don’t forget to click on the ‘Save changes’ button to store your settings.
Method 4. Restore Selected Pages from a WordPress Backup (Advanced)
This method is a bit complicated, unreliable, and is not recommended for beginners. However, it would be useful if you don’t want to restore a complete a website and lose any changes you made after that backup.
You can simply restore your WordPress back up to a local server installation and then copy and paste the page contents that you wish to restore.
First, you’ll need to download your WordPress backup files to your computer. Simply go to your WordPress database backup plugin page and you will be able to see recent backups.
For instance, here is how you’ll see your recent backups listed in the UpdraftPlus.
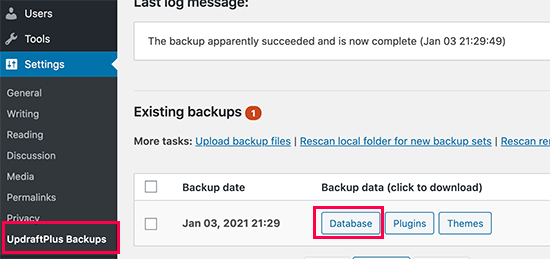
Simply click on the database backup to download it to your computer.
Next, you will need to restore your WordPress site to a local server. You can install WordPress on your computer using WAMP (or MAMP for Mac).
After that, you can use can install your WordPress backup plugin on local server installation and restore using the backup files.
Optionally, if you have only the database backup, then you can restore that using phpMyAdmin as well.
Once you have restored the WordPress database, you will need to update WordPress Site and Home URLs in the database. To do that, simply open phpMyAdmin on your local server by typing the following URL:
http://localhost/phpmyadmin/
After that, you need to select your WordPress database from the left column and then click on the wp_options table. Switch to the browse tab and locate the rows containing ‘siteurl’ and ‘home’ under the option_name column.
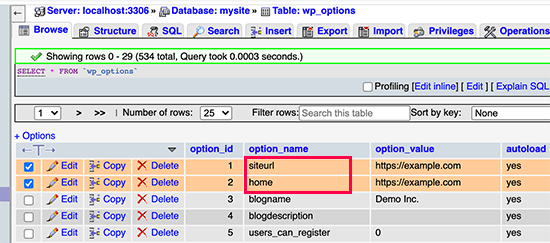
You’ll notice that the option_value column contains the URL of your live website. You need to edit both of these rows and replace your option_value to match your local server WordPress site.
After that click on the ‘Go’ button to save your changes.
You can now login to your localhost installation, and you’ll see all your old pages listed under Pages » All Pages.
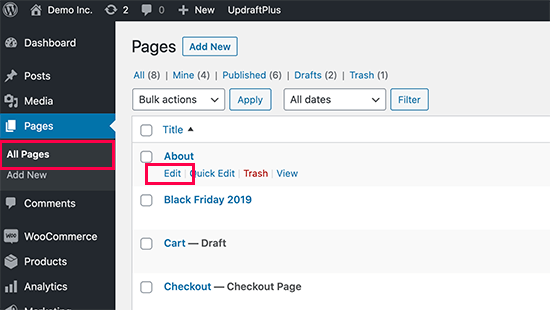
Go a head and edit the page you want to restore. All you need to do is copy the content and paste it to your live WordPress website as a new page.

Don’t forget to update or publish changes on your live website.
We hope this article helped you learn how to recover deleted pages in WordPress. You may also want to see our complete WordPress security guide to keep your WordPress site safe and secure, and our list of the must have WordPress plugins for all websites.
If you liked this article, then please subscribe to our YouTube Channel for WordPress video tutorials. You can also find us on Twitter and Facebook.
The post How to Recover and Restore Deleted Pages in WordPress appeared first on WPBeginner.
from WPBeginner https://ift.tt/3pVaVvg
More links is https://mwktutor.com
No comments:
Post a Comment