Thursday, 30 April 2020

How to Duplicate a WordPress Page or Post with a Single Click

Recently one of our readers asked if it was possible to duplicate a WordPress page with a single click?

Creating a duplicate post or page allows you to work on it without affecting the existing version.

In this article, we will show you how to quickly duplicate a WordPress page or post with all the settings.

Easily duplicate a WordPress post or page

Why Clone or Duplicate a Page / Post in WordPress?

When you are running a blog for a while, you may sometimes need to quickly copy a post or page.

For instance, a sales page that already has a lot of content that you can reuse, or an older article that can be extended as a new article.

Now, you could manually copy and paste the contents of the post or page to a new draft. However, this does not copy your featured image, post settings, SEO settings, and other metadata.

Wouldn’t it be nice if there was an easier way to automatically duplicate a post or page with all its settings and content?

With this approach, you can just edit a post and start working on it right away.

Let’s see how to easily and properly clone a WordPress post or page with just a click.

Video Tutorial

If you prefer written instructions, then continue reading.

Duplicate a WordPress Post or Page

First, you need to install and activate the Duplicate Post plugin. For more details, see our step by step guide on how to install a WordPress plugin.

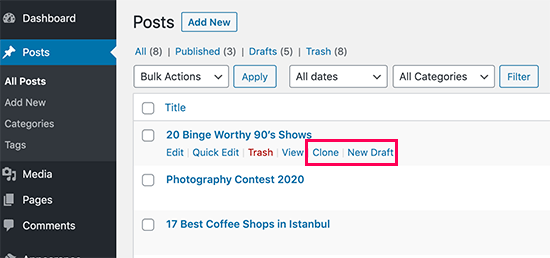
Upon activation, you need to visit Posts » All Posts page. You will notice two new links to clone or to create a new draft below each post title.

Clone post or create a new draft

Clicking on ‘Clone’ will simply create a duplicate post and will not open the duplicate post in the post editor.

The ‘New Draft’ option will duplicate the post and open the duplicate version in the post editor, so you can start working on it right away.

You will also find the same options for pages as well.

The duplicate post plugin works really well. However, if you want to use it mainly for updating old published posts, then there is a better way to do that.

See our guide on how to properly update live published posts in WordPress for more details.

If you want to use it for other scenarios such as website redesign, copying landing pages, etc, then this is where the plugin really shines.

Customizing Duplicate Post Plugin Settings

The duplicate post plugin works out of the box and supports posts and pages by default.

You can also customize the plugin to enable support for custom post types, restrict to user roles, and choose what to copy when creating a duplicate.

Let’s take a look at all these settings.

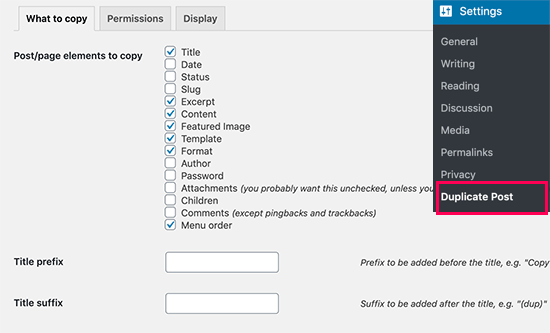
Head over to Settings » Duplicate Post page to configure plugin settings.

Duplicate post settings

The settings page is divided into three tabs. First tab allows you to choose what to copy when creating a duplicate.

The default options should work for most websites. However, you can check things you want to copy and uncheck items that you don’t want to be copied.

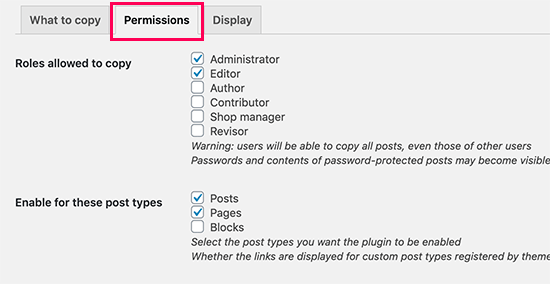
Next, you need to move on to the permissions tab.

Duplicate Post permissions

By default, the plugin allows administrator and editor user roles to create duplicate posts.

It also enables duplicate post feature for posts and pages post types.

If you are using custom post types on your website, then those post types will appear here. You can choose whether you want to enable duplicate post feature for those post types as well.

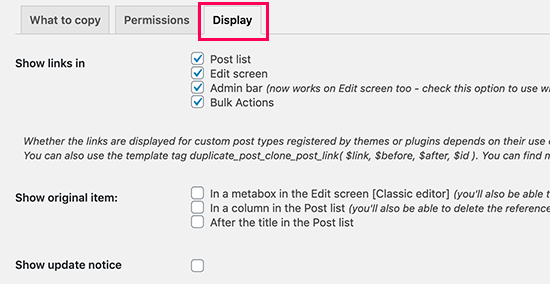
Finally, click on the Display tab to choose where you want to display the clone post links. By default, the plugin shows them on post list, edit screen, and admin bar.

Duplicate Post display options

Don’t forget to click on the save changes button to store your settings.

That’s all, we hope this article helped you learn how to easily duplicate a WordPress page or post. You may also want to see our ultimate WordPress SEO guide for beginners and our tips on how to speed up your WordPress site.

If you liked this article, then please subscribe to our YouTube Channel for WordPress video tutorials. You can also find us on Twitter and Facebook.

The post How to Duplicate a WordPress Page or Post with a Single Click appeared first on WPBeginner.


from WPBeginner https://ift.tt/2JPOxB8
More links is https://mwktutor.com

An Introduction to Parcel.js, the No-Config Web Application Bundler

This post is your introduction to Parcel.js, the self-proclaimed "blazing fast, zero configuration web application bundler." Here's everything you need to know to get started with it.

from CodeinWP https://ift.tt/3d1RQkB
More View at https://mwktutor.com

Wednesday, 29 April 2020

I’m Jitendra Vaswani, Founder of BloggersIdeas, and This Is How I Blog

Jitendra Vaswani is the founder of BloggersIdeas, a blog about Blogging, SEO, Digital Marketing, and Social Media Marketing. He is also a Digital Marketing & SEO Consultant. He started his blogging journey in 2013, now owns a lot of blogs and runs a team of 20 people. He is one of the most successful bloggers …

I’m Jitendra Vaswani, Founder of BloggersIdeas, and This Is How I Blog Read More »


from RoadToBlogging https://ift.tt/2WoBFr5
More View at https://mwktutor.com

How to Easily Add an Affiliate Program in WooCommerce

Do you want to add an affiliate program in WooCommerce?

Adding an affiliate program to your eCommerce store is a great way to encourage customers and other marketers to promote your products.

The challenge is that WooCommerce does not come with a built-in affiliate management system. Luckily, there are several affiliate plugins you can use. In this article, we’re going to show you how to easily add an affiliate program in WooCommerce.

How to easily add an affiliate program in WooCommerce

Why You Should Add an Affiliate Program to WooCommerce

Adding an affiliate program provides an incentive to your customers, fans, and other marketers to promote your products in return of a small commission per sale.

When a user signs up to be your affiliate, they get a special link to your store. This link has their affiliate tracking code within it.

When someone buys through that link, the affiliate earns a percentage of the sale price. For digital products, this is often 30%. For physical products, around 5% to 10% is normal.

This commission encourages your affiliates (brand ambassadors) to promote your products, and it helps you make more money online without any extra work.

The challenge for new online store owners is that WooCommerce doesn’t have a built-in affiliate or referral tracking feature, so they often get confused on how to add it.

Luckily, there are several WooCommerce affiliate plugins that you can use to create your affiliate program. We’re going to take you through three different methods in this article.

1. Affiliate Royale

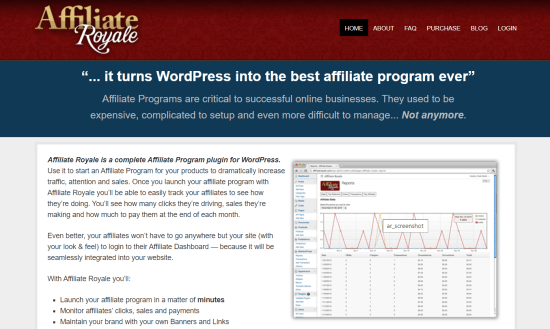
Affiliate Royale

Affiliate Royale is a premium WordPress plugin. It can be easily integrated with your WooCommerce store.

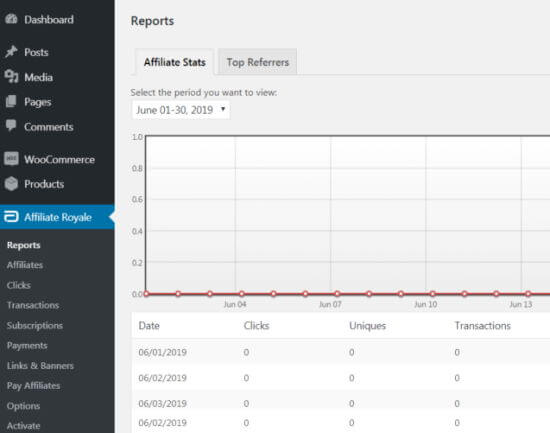
Once you’ve installed and activated the WordPress plugin, you’ll see a new Affiliate Royale tab in your WordPress dashboard.

If you click on that tab, you’ll see a screen like this:

The Affiliate Royale dashboard

With Affiliate Royale, you can can set your commission levels, customize your welcome and sales notification messages, and more.

Under Affiliate Royale » Options you can set up key pages for your affiliates.

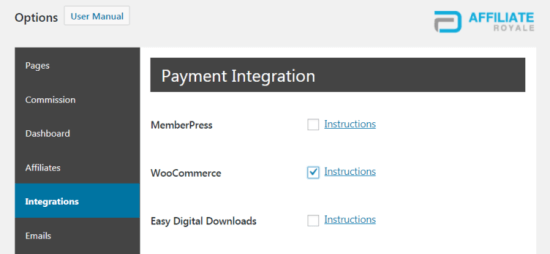
If you want to handle the affiliate payments through WooCommerce, then that’s really straightforward. Just go to Affiliate Royale » Options then select the ‘Integrations’ tab.

Integrating Affiliate Royale with WooCommerceng Affiliate Royale with WooCommerce

Check the box next to ‘WooCommerce’ and Affiliate Royale will be automatically linked to WooCommerce.

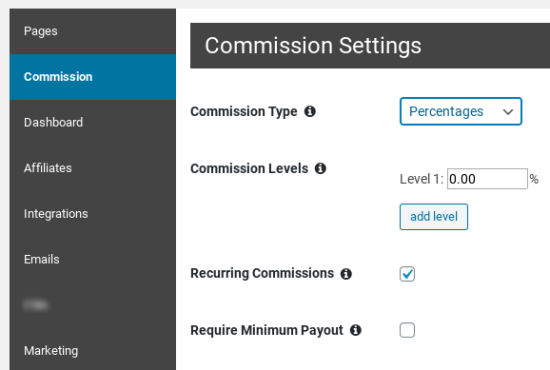
Next, you’ll want to set up your affiliate commissions. Affiliate Royale lets you set different commission tiers, if you want to.

You can do this under the ‘Commissions’ tab. Simply type in the percentage that you want to offer for each level.

You’ll need to assign different commission levels to your affiliates under the ‘Affiliate’ tab:

Setting the commission for your Affiliate Royale affiliates

Pros:

  • Affiliate Royale is quick and straightforward to get started with. You simply install the plugin and it’s ready to go.
  • Your affiliates will have access to a dashboard where they can see what they’ve earned, view their past payouts, and edit their account details.
  • As well as creating links for your affiliates, you can create advertising banners for them to use.
  • The plugin updates automatically once you’ve installed it. You don’t have to log in and download it again.
  • There are a number of built-in reports so that you can view how many sales your affiliates are making, a list of your top affiliates, and more.
  • You can set up to 99 different levels of commission. This means you can reward some affiliates with a higher commission rate if you want to.
  • Affiliate Royale doesn’t charge any fees on your sales. You just pay the annual fee for the plugin itself.

Cons:

  • Your affiliates can only link to pages you’ve specifically set up affiliate links for. This can end up being a lot of work for you or frustrating for them.
  • The 14-day money-back guarantee is quite restrictive. You can only get your money back if the plugin genuinely doesn’t work for what you want to do with it.
  • There’s no free trial or lite version available.

Pricing:

Affiliate Royale charges $85/year for their plugin. This covers you for one website, or you can pay $165/year to use it on multiple websites.

You can keep using it even if you don’t renew, but you won’t have access to updates or support.

2. AffiliateWP

AffiliateWP

AffiliateWP is another premium WordPress plugin. Once you’ve paid for the plugin, you simply download and install it.

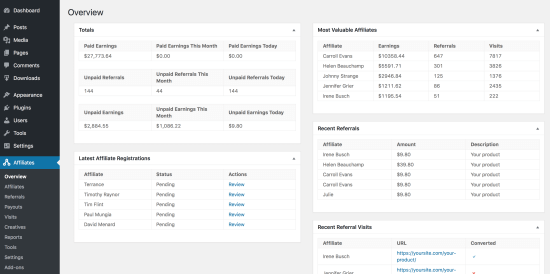
You can then go to the ‘Affiliates’ tab in your dashboard to see an overview of your affiliate sales. This example is from an affiliate program that’s been running for a while already:

The AffiliateWP dashboard

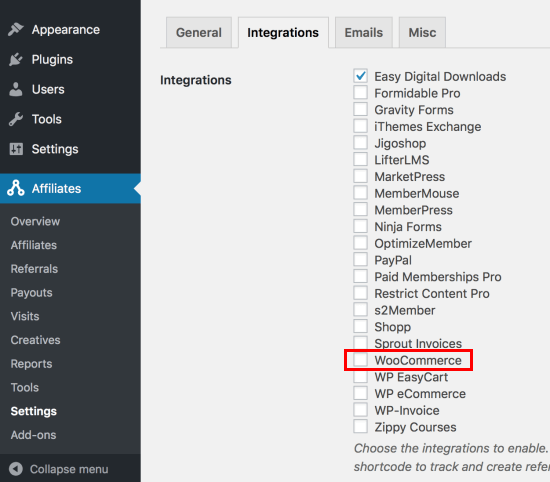
To integrate AffiliateWP with WooCommerce, go to Affiliates » Settings. Next, click the ‘Integrations’ tab at the top of the screen.

Integrating AffiliateWP with WooCommerce

Simply check the box next to ‘WooCommerce’ and then click on the ‘Save Changes’ button at the bottom. Now, AffiliateWP will automatically record affiliate referrals when anyone comes to your WooCommerce store through an affiliate link.

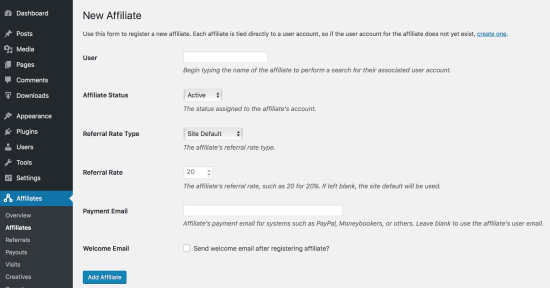
You can set a different commission rate for each affiliate, if you want, using AffiliateWP. Go to Affiliates » Affiliates in your WordPress dashboard, then search for a registered affiliate to set their commission rate.

Setting an affiliate's commission in AffiliateWP

Affiliates without a specific commission rate will have the default commission rate. You can set this up or change it by going to Affiliates » Settings (set the ‘Referral Rate’ under the ‘General’ tab).

Pros

  • You can create specific coupon codes for different affiliates. For instance, you might want to partner up with an affiliate and offer a special deal just for their audience.
  • Affiliates can generate their own referral links. You don’t have to set up all the link options manually.
  • There are lots of free and premium addons available, allowing you to extend the core AffiliateWP functionality.
  • The AffiliateWP interface is easy to use. It’s simple while also offering powerful options.
  • The refund period is a full 30 days.
  • AffiliateWP doesn’t charge you a fee on each sale. You just pay the annual fee for the plugin.

Cons

  • As with Affiliate Royale, you can’t get a refund if you simply changed your mind. There needs to be an actual issue with the plugin not working for you.
  • Some of the features you might want, like tiered affiliate commission rates, are pro addons. You have to pay for these as part of one of the higher-tier packages.

Pricing

There are several different pricing tiers for AffiliateWP. The lowest you can pay is $99/year, which covers you for a single site.

If you pay $249/year, you get all the “pro” add-ons included. You can also get these with a lifetime membership for $499.

3. ShareASale

ShareaSale is a bit different from the other two options because it’s an affiliate network, not a WordPress plugin.

When you join ShareASale as a merchant, the automatic “wizard” will walk you through the process of setting up your account.

ShareASale can be used with WooCommerce if you install a plugin like ShareASale WooCommerce Tracker.

After installing and activating the plugin, go to the ‘ShareASale WC Tracker’ tab in your WordPress dashboard. This will show your ‘Tracking Settings’ where you’ll need to enter your ShareASale Merchant ID.

Linking the ShareASale WooCommerce Tracker plugin to your ShareASale account

This is all you need to do to link ShareASale’s affiliate program with your WooCommerce store. However, you may also want to make sure that refunds are automatically deducted from affiliates’ earnings.

You can do this under the ‘Automatic Reconciliation’ tab of the plugin. Check the ‘Automate’ box:

Tracking your WooCommerce refunds on affiliate sales in ShareASalev

You’ll also need to get the ‘API Token’ and ‘API Secret’ by logging into ShareASale and going to Tools » Merchant API. There’s a link in the plugin that will take you straight to the right place.

Make sure you click ‘Save Settings’ after making these changes.

Pros

  • ShareASale is a huge affiliate network, with loads of affiliates looking for new products to promote.
  • All the software is hosted by ShareASale. You don’t need to install anything on your site, except the plugin to connect ShareASale with WooCommerce.
  • There’s no monthly or annual fee for the software, just the upfront fee.
  • ShareASale will automatically send out all the payments to your affiliates for you.
  • Affiliates are screened by ShareASale, meaning that you don’t need to worry about approving them.

Cons

  • ShareASale isn’t cheap to get started with. It costs $550 to get lifetime access plus a $100 refundable deposit.
  • You need to pay a 20% fee on all affiliate commissions. For every $1 you payout, you’ll be paying an additional $0.20 to ShareASale.
  • It takes a little more effort to set up ShareASale with WooCommerce than it does with Affiliate Royale or AffiliateWP.

Pricing

ShareASale has a lifetime cost of $550. They also charge a fee of 20% on all your affiliate payouts. When you join, you need to give them a $100 deposit too.

If the 20% fee on your payouts doesn’t reach $25 in a given month, you have to pay the difference. There is an initial grace period, though.

We hope this article helped you find out how to easily add an affiliate program in WooCommerce. You may also want to see our list of the best WooCommerce plugins and our comparison of the best WooCommerce hosting providers.

If you liked this article, then please subscribe to our YouTube Channel for WordPress video tutorials. You can also find us on Twitter and Facebook.

The post How to Easily Add an Affiliate Program in WooCommerce appeared first on WPBeginner.


from WPBeginner https://ift.tt/3bQZgqS
More links is https://mwktutor.com

Tuesday, 28 April 2020

How To Teach Online Yoga Classes with WordPress

Are you a yoga teacher who wants to teach your classes online? While it might seem complicated, it’s actually pretty easy to do.

Lots of yoga teachers are holding live classes daily. And others are offering yoga courses online that people can do at their own pace.

In this article, we’ll show you how to teach online yoga classes with some simple, yet powerful tools.

How to teach yoga classes online

When you teach yoga online, you can reach people all over the world. Instead of going to a studio, you can work from anywhere. Yes, even your living room.

If you want, you can also sell your own yoga memberships and products. This way you can make money without having to stream live classes on a regular schedule.

How to Take Your Yoga Classes Online

Starting online yoga classes may sound too technical. However, there are excellent tools available that you can use without learning any special skills.

To take your yoga classes online, you’ll need these 4 things:

  • A website or platform to teach yoga live and/or to sell products
  • Video streaming to lead your classes
  • A way to take payment
  • A method for your customers to sign an agreement

To sell your yoga products outside of the live classes, you’ll need:

  • A membership site to host your yoga videos and products
  • An email marketing service to deliver your products and to stay in touch with customers

We know there’s a lot here. But don’t worry, we’ll walk you through all the tools you need to get started teaching online yoga classes.

Here’s a list of topics we’ll be covering. You can jump to any section you’d like in the article.

Transparency disclaimer: At WPBeginner, our content is reader-supported. This means we earn a referral fee whenever you click on some of the links in this article. We only make recommendations for products we use and believe will provide value to you. You can check out how WPBeginner is funded for more details.

Create Your Platform to Teach Online Yoga Classes

People are teaching yoga online in various ways.

Some are live-streaming their classes on YouTube. And others are doing Instagram lives at set times during the week.

While these are easy options, the problem here lies in what could happen to your platform. You don’t have full control over your YouTube or Instagram account. If your account got deleted, it could be hard to get it back online

Plus, you can’t communicate directly with your customers because of how the algorithm controls who sees your feed. Knowing this, we’ve put together some ideas for you.

If you want to offer live yoga classes, you need an easy-to-use video service.

We recommend Zoom. With the free version, you can have up to 100 participants on your live stream. The primary drawback is a 40-minute time limit.

So, if you wanted your classes to last longer, their plans start at $14.99/month.

Teach yoga online with Zoom

Next, you’ll need a platform where users can learn more about your classes and sign up.

Instead of using a third-party platform that takes a cut of every transaction, we recommend making your own website using WordPress.

The benefit of this option is that you’ll not be paying a cut on every transaction to a third-party. You’ll also have a lot more freedom to grow your business any way you like.

To create your yoga website, you’ll need to set up a domain name and web hosting.

To host your site, we suggest going with Bluehost. Not only is it a WordPress recommended host, but they give WPBeginner readers a nice discount when signing up for your first year.

It’s just $2.75/month, plus you get a free domain name with your account.

Bluehost website

Another host we recommend is SiteGround. They even offer an automated WordPress installation so you can get your site up and running as soon as possible.

Would you rather skip this process and just get to work on your site? If so, check out our free WordPress blog setup service.

Once you’re up and running with your yoga website, it’s time to create some pages.

Creating Pages for Your Yoga Site

For starters, you only need a handful of pages.

Those are:

  • An about page
  • A services page
  • A yoga classes page
  • A sign up and payment page
  • A contact form page

By the way, you’ll probably want to set up more pages later. Here’s a guide to the important pages every WordPress site should have.

Your ‘about’ page is where you tell us a little bit about yourself. What makes you an expert? How’d you get into yoga? This is typically where teachers put a photo of themselves, too.

The ‘services’ page is where you describe what you do and what you offer.

Your ‘yoga classes’ page is where you can put the dates and times of your online yoga classes. You can list all the details, such as:

  • Start time
  • Duration
  • Type of class
  • Experience level
  • Any other pertinent information

Finally, you need a page where users can sign up and make payments.

Taking Payment and Agreement Signatures

First, you need to install and activate the WPForms plugin. For more details, see our step by step guide on how to install a WordPress plugin.

You’ll need the Pro version, to accept payments online. The Pro version also comes with dozens of form templates, email newsletter forms, entries management, and more.

WPForms allows you to accept payments using Stripe and PayPal. For step by step instructions, see our guide on how to how to easily accept credit card payments on your WordPress website.

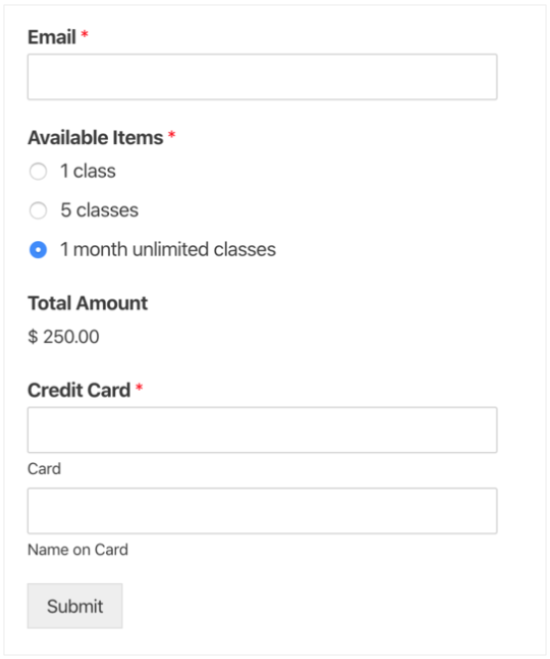
Now, you can add the form to your payment page. It will look something like this:

Take payment for online yoga classes

You can also use the WPForms signature addon to create an agreement form that your yoga students can sign digitally.

For detailed instructions, see how to create a contract agreement form with digital signatures.

Sell Yoga Classes Online with a Membership Site

Traditionally, you only get paid when you teach a yoga class. That means two things:

  • Your income is dependent on how many classes you teach per week
  • How much you make depends on your class rate and availability

So, if you want to make more money without having to do more classes, you could offer courses or products on a membership site.

We recommend the MemberPress WordPress plugin when creating a membership area for your site. It is the best WordPress membership plugin in the market.

With this plugin, you can easily create custom packages, and restrict access based on purchases.

The MemberPress deal's front page

For example, you could create 3 courses based on experience levels. Those levels could be:

  • Beginner
  • Intermediate
  • Advanced

Let’s say someone buys your beginner course. This means they would only have access to the pages you label under the beginner membership level.

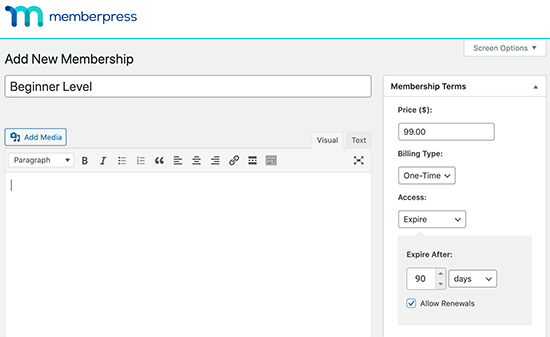
Adding membership levels

But if they bought your beginner course and your intermediate course, they would have access to both areas when they log in.

This way, your products are protected from those who aren’t paying for them.

Since you’re teaching yoga online, you’re likely using video for instruction and demonstration. You’ll need an easy way to host your videos in your membership area.

Note: You should never upload videos to your WordPress site directly because video files are large and can slow your site down.

Instead, you could host them with Vimeo and choose their basic option. Then you’d simply embed them into whatever pages you want.

For more instruction, let’s walk you through how to create a membership site.

Easily Communicate with Your Customers

Not all users coming to your website will sign up for your class. In fact, 70% of those users will never come back.

This is where you need to start building an email list. This allows you a chance to capture those users’ email addresses, offer them discounts, or reach out to them with new offers.

The easiest way to do this is with Constant Contact. It is the best email marketing service for small businesses and it is also the most beginner-friendly.

The best part is that it integrates both WPForms and MemberPress, which makes it easy to create your newsletter sign up forms.

For more details, see our guide on how to start an email newsletter with step by step instructions.

If you are looking for a free option, then Sendinblue or MailerLite both offer limited free plans.

How OptinMonster can Help You Get More Customers

As we mentioned earlier, more than 70% of users will leave your website. Those who stick around, only a small fraction of them will end up making a purchase.

This is where OptinMonster comes in. It is the best lead generation software on the market and helps you convert website visitors into subscribers and customers.

It comes with beautiful lightbox popups, countdown timers, slidein forms, and other tools to help boost your conversions and sales.

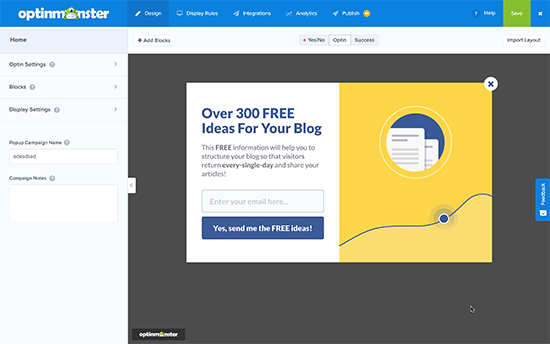
OptinMonster popup builder

For more details, see our guide on quick ways to grow your email list.

Final Thoughts for Teaching Yoga Online

We’ve given you a lot to think about in this article, so let’s recap. You can start offering yoga classes online with a WordPress website. All you need is a domain name and WordPress web hosting.

You can host live classes using Zoom. And you can record those classes to sell later if you want.

Then you can install WPForms to collect payment and have your agreement form signed digitally.

To make more money without holding more classes, you can easily create a membership site with MemberPress. You can sell courses for people to do on their own, or sell recordings of live classes you hold during the week.

And to stay in touch with your customers, email marketing software is a must. Constant Contact is a great way to get started.

We hope this article helps you learn more about how to teach yoga online. You might also like our guide on the best WordPress themes for membership sites.

If you liked this article, then please subscribe to our YouTube Channel for WordPress video tutorials. You can also find us on Twitter and Facebook.

The post How To Teach Online Yoga Classes with WordPress appeared first on WPBeginner.


from WPBeginner https://ift.tt/35cpam7
More links is https://mwktutor.com

How To Teach Online Yoga Classes with WordPress

Are you a yoga teacher who wants to teach your classes online? While it might seem complicated, it’s actually pretty easy to do.

Lots of yoga teachers are holding live classes daily. And others are offering yoga courses online that people can do at their own pace.

In this article, we’ll show you how to teach online yoga classes with some simple, yet powerful tools.

How to teach yoga classes online

When you teach yoga online, you can reach people all over the world. Instead of going to a studio, you can work from anywhere. Yes, even your living room.

If you want, you can also sell your own yoga memberships and products. This way you can make money without having to stream live classes on a regular schedule.

How to Take Your Yoga Classes Online

Starting online yoga classes may sound too technical. However, there are excellent tools available that you can use without learning any special skills.

To take your yoga classes online, you’ll need these 4 things:

  • A website or platform to teach yoga live and/or to sell products
  • Video streaming to lead your classes
  • A way to take payment
  • A method for your customers to sign an agreement

To sell your yoga products outside of the live classes, you’ll need:

  • A membership site to host your yoga videos and products
  • An email marketing service to deliver your products and to stay in touch with customers

We know there’s a lot here. But don’t worry, we’ll walk you through all the tools you need to get started teaching online yoga classes.

Here’s a list of topics we’ll be covering. You can jump to any section you’d like in the article.

Transparency disclaimer: At WPBeginner, our content is reader-supported. This means we earn a referral fee whenever you click on some of the links in this article. We only make recommendations for products we use and believe will provide value to you. You can check out how WPBeginner is funded for more details.

Create Your Platform to Teach Online Yoga Classes

People are teaching yoga online in various ways.

Some are live-streaming their classes on YouTube. And others are doing Instagram lives at set times during the week.

While these are easy options, the problem here lies in what could happen to your platform. You don’t have full control over your YouTube or Instagram account. If your account got deleted, it could be hard to get it back online

Plus, you can’t communicate directly with your customers because of how the algorithm controls who sees your feed. Knowing this, we’ve put together some ideas for you.

If you want to offer live yoga classes, you need an easy-to-use video service.

We recommend Zoom. With the free version, you can have up to 100 participants on your live stream. The primary drawback is a 40-minute time limit.

So, if you wanted your classes to last longer, their plans start at $14.99/month.

Teach yoga online with Zoom

Next, you’ll need a platform where users can learn more about your classes and sign up.

Instead of using a third-party platform that takes a cut of every transaction, we recommend making your own website using WordPress.

The benefit of this option is that you’ll not be paying a cut on every transaction to a third-party. You’ll also have a lot more freedom to grow your business any way you like.

To create your yoga website, you’ll need to set up a domain name and web hosting.

To host your site, we suggest going with Bluehost. Not only is it a WordPress recommended host, but they give WPBeginner readers a nice discount when signing up for your first year.

It’s just $2.75/month, plus you get a free domain name with your account.

Bluehost website

Another host we recommend is SiteGround. They even offer an automated WordPress installation so you can get your site up and running as soon as possible.

Would you rather skip this process and just get to work on your site? If so, check out our free WordPress blog setup service.

Once you’re up and running with your yoga website, it’s time to create some pages.

Creating Pages for Your Yoga Site

For starters, you only need a handful of pages.

Those are:

  • An about page
  • A services page
  • A yoga classes page
  • A sign up and payment page
  • A contact form page

By the way, you’ll probably want to set up more pages later. Here’s a guide to the important pages every WordPress site should have.

Your ‘about’ page is where you tell us a little bit about yourself. What makes you an expert? How’d you get into yoga? This is typically where teachers put a photo of themselves, too.

The ‘services’ page is where you describe what you do and what you offer.

Your ‘yoga classes’ page is where you can put the dates and times of your online yoga classes. You can list all the details, such as:

  • Start time
  • Duration
  • Type of class
  • Experience level
  • Any other pertinent information

Finally, you need a page where users can sign up and make payments.

Taking Payment and Agreement Signatures

First, you need to install and activate the WPForms plugin. For more details, see our step by step guide on how to install a WordPress plugin.

You’ll need the Pro version, to accept payments online. The Pro version also comes with dozens of form templates, email newsletter forms, entries management, and more.

WPForms allows you to accept payments using Stripe and PayPal. For step by step instructions, see our guide on how to how to easily accept credit card payments on your WordPress website.

Now, you can add the form to your payment page. It will look something like this:

Take payment for online yoga classes

You can also use the WPForms signature addon to create an agreement form that your yoga students can sign digitally.

For detailed instructions, see how to create a contract agreement form with digital signatures.

Sell Yoga Classes Online with a Membership Site

Traditionally, you only get paid when you teach a yoga class. That means two things:

  • Your income is dependent on how many classes you teach per week
  • How much you make depends on your class rate and availability

So, if you want to make more money without having to do more classes, you could offer courses or products on a membership site.

We recommend the MemberPress WordPress plugin when creating a membership area for your site. It is the best WordPress membership plugin in the market.

With this plugin, you can easily create custom packages, and restrict access based on purchases.

The MemberPress deal's front page

For example, you could create 3 courses based on experience levels. Those levels could be:

  • Beginner
  • Intermediate
  • Advanced

Let’s say someone buys your beginner course. This means they would only have access to the pages you label under the beginner membership level.

Adding membership levels

But if they bought your beginner course and your intermediate course, they would have access to both areas when they log in.

This way, your products are protected from those who aren’t paying for them.

Since you’re teaching yoga online, you’re likely using video for instruction and demonstration. You’ll need an easy way to host your videos in your membership area.

Note: You should never upload videos to your WordPress site directly because video files are large and can slow your site down.

Instead, you could host them with Vimeo and choose their basic option. Then you’d simply embed them into whatever pages you want.

For more instruction, let’s walk you through how to create a membership site.

Easily Communicate with Your Customers

Not all users coming to your website will sign up for your class. In fact, 70% of those users will never come back.

This is where you need to start building an email list. This allows you a chance to capture those users’ email addresses, offer them discounts, or reach out to them with new offers.

The easiest way to do this is with Constant Contact. It is the best email marketing service for small businesses and it is also the most beginner-friendly.

The best part is that it integrates both WPForms and MemberPress, which makes it easy to create your newsletter sign up forms.

For more details, see our guide on how to start an email newsletter with step by step instructions.

If you are looking for a free option, then Sendinblue or MailerLite both offer limited free plans.

How OptinMonster can Help You Get More Customers

As we mentioned earlier, more than 70% of users will leave your website. Those who stick around, only a small fraction of them will end up making a purchase.

This is where OptinMonster comes in. It is the best lead generation software on the market and helps you convert website visitors into subscribers and customers.

It comes with beautiful lightbox popups, countdown timers, slidein forms, and other tools to help boost your conversions and sales.

OptinMonster popup builder

For more details, see our guide on quick ways to grow your email list.

Final Thoughts for Teaching Yoga Online

We’ve given you a lot to think about in this article, so let’s recap. You can start offering yoga classes online with a WordPress website. All you need is a domain name and WordPress web hosting.

You can host live classes using Zoom. And you can record those classes to sell later if you want.

Then you can install WPForms to collect payment and have your agreement form signed digitally.

To make more money without holding more classes, you can easily create a membership site with MemberPress. You can sell courses for people to do on their own, or sell recordings of live classes you hold during the week.

And to stay in touch with your customers, email marketing software is a must. Constant Contact is a great way to get started.

We hope this article helps you learn more about how to teach yoga online. You might also like our guide on the best WordPress themes for membership sites.

If you liked this article, then please subscribe to our YouTube Channel for WordPress video tutorials. You can also find us on Twitter and Facebook.

The post How To Teach Online Yoga Classes with WordPress appeared first on WPBeginner.


from Tutorials – WPBeginner https://ift.tt/35cpam7
More View at https://mwktutor.com

Monday, 27 April 2020

Newspaper Theme – Full Review: Is it Worth All the Hype?

If you publish a lot of content on your WordPress site, a WordPress magazine theme is a great choice to help visitors discover all of your content. When it comes to WordPress magazine themes, there’s one name that stands out – Newspaper. With over 93000 sales at ThemeForest, Newspaper is one of the most popular […]

Newspaper Theme – Full Review: Is it Worth All the Hype? is a post from ShoutMeLoud - Shouters Who Inspires


from ShoutMeLoud https://ift.tt/2W0Tf4a
More View at https://mwktutor.com

Mobile Website Speed Test Didn’t Go Well? Here Are 10 Ways to Improve Mobile Page Speed 🏎️

Did you know that website speed is one of Google’s ranking factors? While it might not be one of the top reasons a website doesn’t rank on the first page of search, that won’t be the case for long.

from CodeinWP https://ift.tt/2Y8IGP9
More View at https://mwktutor.com

How to Set Up Email Newsletter Tracking in Google Analytics

Recently, one of our readers asked how do we measure the impact of our email newsletter?

You can use Google Analytics combined with special tracking links in your email newsletter to see how effective each email is for your business.

In this article, we will share how to set up email newsletter tracking in Google Analytics, step by step.
How to set up email newsletter tracking in Google Analytics

Why Track Your Email Newsletter Traffic in Google Analytics?

When you send out an email newsletter, it likely contains at least one link to your site. Your email marketing service should be able to tell you how many people click on a link (your click-through rate). However, most providers can’t show you what happens afterward.

That’s where Google Analytics comes in. You can use it to track what people do after clicking a link from your newsletter.

Let’s say you run a restaurant that offers home delivery. You want to see which of your weekly newsletters led to the most people filling out your online food ordering form.

Or perhaps you’re about to start an online store. It would be great to know which of your email campaigns drove the most sales.

Maybe you’re aiming to make money blogging. You want to know which campaigns got people to sign up for your online course.

With Google Analytics, it’s pretty easy to set up email newsletter tracking and see how many sales each email generates for your business.

With that said, let’s get started.

Creating Trackable URLs for Your Email Newsletter

If you want detailed insights in Google Analytics, then you need to add special tracking parameters to each link in your newsletter.

In other words, you can’t use a standard link like this:
https://www.site.com

Instead, you need to use a URL with special parameters that looks like this:
https://www.site.com?utm_source=newsletter&utm_medium=email&utm_campaign=jan_sale

The ending part of this URL, everything after the question mark, is called a UTM code.

It might look complicated, but don’t worry it’s actually quite easy to create.

Let’s take a look at two easy ways to create these trackable URLs for your email campaigns.

Method 1: Create Trackable URLs using MonsterInsights (Recommended)

MonsterInsights is the best Google Analytics plugin for WordPress. It allows you to easily install Google Analytics in WordPress and shows beautiful traffic reports inside the WordPress dashboard.

You can use the free version of MonsterInsights to access the URL builder tool. However, we recommend upgrading to the PRO plan in order to unlock eCommerce tracking features (we will talk more about eCommerce tracking later in this article).

First, you need to install and activate the MonsterInsights plugin. For more details, see our step by step guide on how to install a WordPress plugin.

Next, go to Insights » Tools page in your WordPress dashboard.
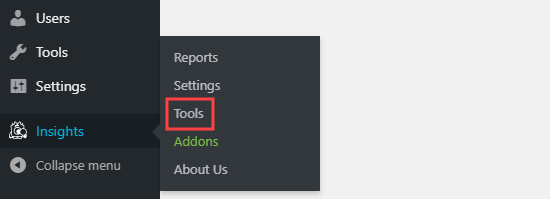
Go to Insights then Tools in your WordPress dashboard

The URL Builder tool should open up. The first piece of information you’ll need to enter is the URL you want to add in your newsletter. This might be your main website URL, if you’re linking to your home page.

In this example, we’re running a sale and linking to the website’s online store:
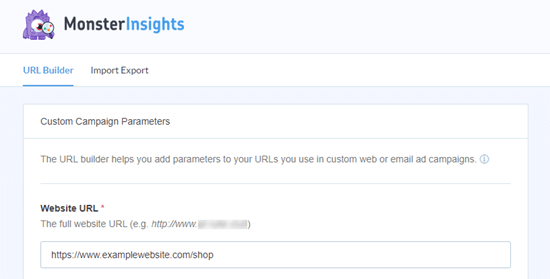
The MonsterInsights URL builder tool

Google Analytics will track your email newsletter visitors as a ‘campaign’. This is simply the term Google Analytics uses for email or advertising promotions.

You’ll need to enter the source, medium, and name for your campaign, so Google Analytics can easily track them.

Source: Set this to ‘newsletter’ or something else meaningful
Medium: This should be set to ’email’
Name: You can use whatever makes sense, e.g. ‘jan_sale’ or ‘april_tshirts_sale’

If you’re using more than one word for the source, medium, or name, make sure you use underscores between words. Don’t use spaces or hyphens.
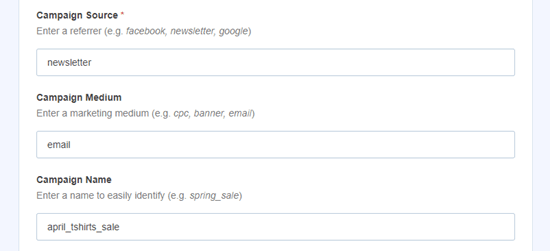
Entering the source, medium, and name for your campaign

The Campaign Term field is used if you’re running ads, so you can leave that blank. The Campaign Content can be used if you’re split testing your emails or ads. Again, you can leave it blank for this example.

At the bottom of the page, you should now see your special URL, with the tracking details included:

The URL created by the MonsterInsights URL builder tool, with UTM parameters in place

You can now use this URL in your email newsletter and later track clicks in your Google Analytics account.

Method 2: Manually Create Trackable URLs in Google Analytics

MonsterInsight’s URL builder is a handy tool for saving time, as it creates the UTM codes for you. If you prefer to create your trackable URLs manually, here’s how to do it.

First, get the URL you want to use. We’re going to use https://www.site.com/shop for this example.

Next, you’ll need to create the UTM code yourself. We’ll take it step by step.

Add a question mark to the end of your URL, like this:

https://www.site.com/shop?

Then, add the utm_source:

https://www.site.com/shop?utm_source=newsletter

Next, add the ampersand (&) symbol and the utm_medium:

https://www.site.com/shop?utm_source=newsletter&utm_medium=email

Finally, add another ampersand (&) and the utm_campaign:

https://www.site.com/shop?utm_source=newsletter&utm_medium=email&utm_campaign=jan_sale

You can use any word or phrase you want for the campaign’s name. If you’re using multiple words for the source, medium, or campaign name, you can separate the words with an underscore.

That’s it. Your tracking URL is ready to be used in your newsletter.

Using Trackable URLs in Your Newsletter Campaigns

Once you’ve created your URL, either using MonsterInsights’ URL builder or manually, you can use it in emails.

You can copy and paste the URL into your email wherever you would have used the standard URL before.

Here’s how that looks when inserting a URL in Constant Contact:
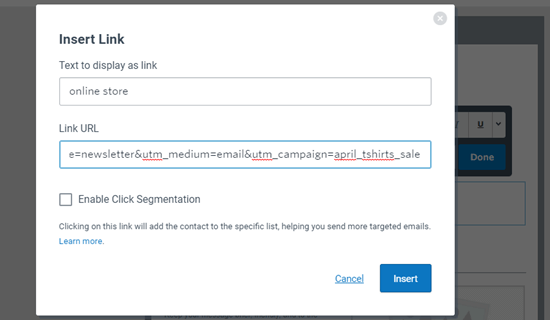
Inserting your special trackable link into Constant Contact

Tip: You can even use trackable URLs in your regular emails. This would make sense if you do a lot of email outreach. You can also create trackable URLs to use on social media, in ads, and more.

Once you are done with your email, send out your newsletter and wait for some clicks. After that, you can go to Google Analytics to view your report.

Viewing Your Email Newsletter Report in Google Analytics

Log in to your Google Analytics account and click Acquisition » Campaigns » All Campaigns link.
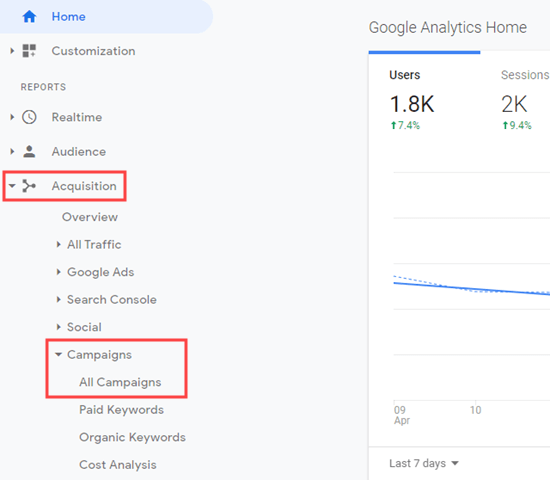
Viewing all campaigns in Google Analytics

You should then see data for the campaign(s) you’ve created.

Tip: If you’ve only just sent out the newsletter, change the date for the report to the current day. Google Analytics defaults to showing you data for the previous 7 days.
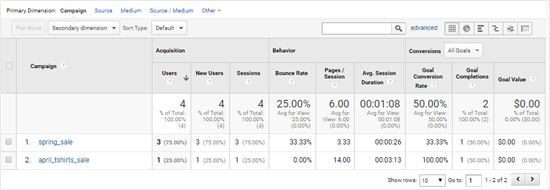
Edit Post ‹ WPBeginner — WordPress

It’s a great idea to use this report along with your Google Analytics goals. For instance, here we’re viewing how effective our newsletters were in getting people to fill in an inquiry form:
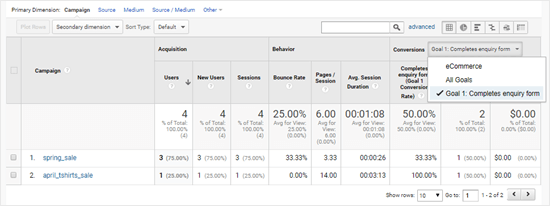
Viewing what percentage of your campaign traffic converted for different goals

Tracking Email Newsletter Conversions

The most important part of your newsletter tracking is what users do after they arrive on your website.

For instance, if you run an online store you might want to see which emails led to a sale. If you wanted users to fill out an order form, then you might want to track that.

The easiest way to do this is by using MonsterInsights to do almost all the setup for you.

Switching on eCommerce Tracking in Google Analytics

First, you’ll need to switch on eCommerce tracking in Google Analytics. This is a quick and easy process.

Login to Google Analytics. Make sure you have the correct website selected on the top left.

Check that you have the correct website selected in Google Analytics

Click the Admin link on the bottom left.

Click on the Admin option in the left hand menu of Google Analytics

Then, in the View column, click ‘Ecommerce Settings’.
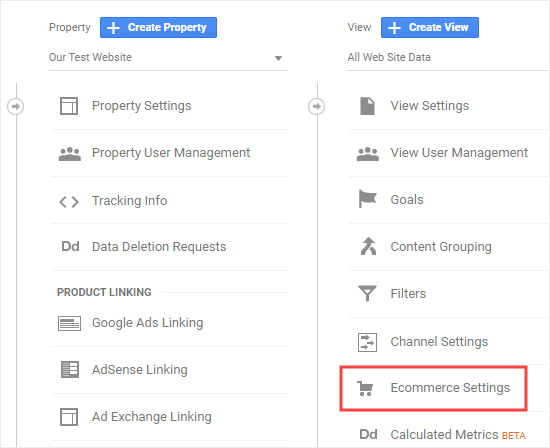
Viewing the eCommerce settings in Google Analytics

You can now toggle ‘Enable Ecommerce’ on. We recommend also enabling ‘Enhanced Ecommerce’ at this point. This will track additional data. It also lets you see eCommerce reports in MonsterInsights.

Click the Save button.

Switching on eCommerce Tracking in MonsterInsights

You’ll need the Pro version of MonsterInsights in order to use its eCommerce features. These work with WooCommerce, Easy Digital Downloads, MemberPress, and LifterLMS.

Install and activate MonsterInsights, if you’ve not done so already.

Then, enter your license key under Insights » Settings and click the Verify button.
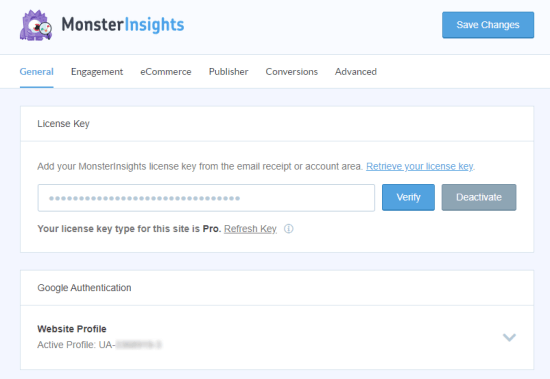
Enter your MonsterInsights license key on the Settings page

Once you’ve entered your license key for MonsterInsights, go to Insights » Addons, find the eCommerce addon, and then click the Install button below it.

Installing the Ecommerce addon for MonsterInsights

After that, you need to go to Insights » Settings and click the eCommerce tab. You should see that your eCommerce plugin (e.g. WooCommerce) has been automatically detected.

Tip: We recommend switching on ‘Use Enhanced eCommerce’ as this means you can view the MonsterInsights eCommerce report too.
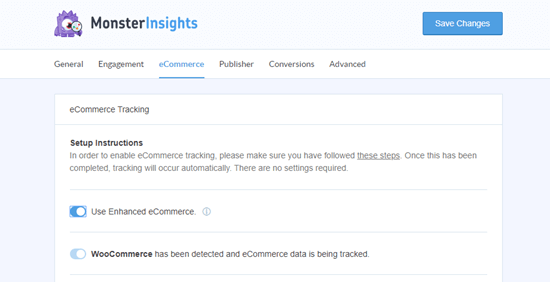
The eCommerce settings in MonsterInsights

That’s all you need to do because MonsterInsights handles everything else after that. Google Analytics will now be able to track eCommerce transactions on your site.

Now, when you visit Google Analytics, you’ll be able to see details of your eCommerce transactions.

Go to Acquisition » Campaigns then click the ‘All Campaigns’ link, as before. Next, select ‘E-commerce’ from the Conversions dropdown menu.
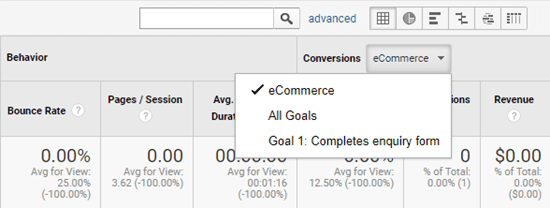
Viewing your eCommerce statistics for your campaigns in Google Analytics

For detailed instructions, see our article on how to setup WooCommerce conversion tracking.

Tracking Links, Clicks, Buttons, and Forms

Not all websites use an eCommerce platform with a shopping cart.

For instance, if you have a simple order form, then you can track which email campaigns led users to submit that form. If you have a click to call button on your website, then you can track that as well.

We have a separate detailed guide on tracking links and button clicks in Google Analytics with step by step instructions.

We hope this article helped you learn how to set up email newsletter tracking in Google Analytics. You might also want to see these tested and easy ways to grow your email list faster.

If you liked this article, then please subscribe to our YouTube Channel for WordPress video tutorials. You can also find us on Twitter and Facebook.

The post How to Set Up Email Newsletter Tracking in Google Analytics appeared first on WPBeginner.


from Tutorials – WPBeginner https://ift.tt/2KCjOqT
More View at https://mwktutor.com

How to Set Up Email Newsletter Tracking in Google Analytics

Recently, one of our readers asked how do we measure the impact of our email newsletter?

You can use Google Analytics combined with special tracking links in your email newsletter to see how effective each email is for your business.

In this article, we will share how to set up email newsletter tracking in Google Analytics, step by step.

How to set up email newsletter tracking in Google Analytics

Why Track Your Email Newsletter Traffic in Google Analytics?

When you send out an email newsletter, it likely contains at least one link to your site. Your email marketing service should be able to tell you how many people click on a link (your click-through rate). However, most providers can’t show you what happens afterward.

That’s where Google Analytics comes in. You can use it to track what people do after clicking a link from your newsletter.

Let’s say you run a restaurant that offers home delivery. You want to see which of your weekly newsletters led to the most people filling out your online food ordering form.

Or perhaps you’re about to start an online store. It would be great to know which of your email campaigns drove the most sales.

Maybe you’re aiming to make money blogging. You want to know which campaigns got people to sign up for your online course.

With Google Analytics, it’s pretty easy to set up email newsletter tracking and see how many sales each email generates for your business.

With that said, let’s get started.

Creating Trackable URLs for Your Email Newsletter

If you want detailed insights in Google Analytics, then you need to add special tracking parameters to each link in your newsletter.

In other words, you can’t use a standard link like this:
https://www.site.com

Instead, you need to use a URL with special parameters that looks like this:
https://www.site.com?utm_source=newsletter&utm_medium=email&utm_campaign=jan_sale

The ending part of this URL, everything after the question mark, is called a UTM code.

It might look complicated, but don’t worry it’s actually quite easy to create.

Let’s take a look at two easy ways to create these trackable URLs for your email campaigns.

Method 1: Create Trackable URLs using MonsterInsights (Recommended)

MonsterInsights is the best Google Analytics plugin for WordPress. It allows you to easily install Google Analytics in WordPress and shows beautiful traffic reports inside the WordPress dashboard.

You can use the free version of MonsterInsights to access the URL builder tool. However, we recommend upgrading to the PRO plan in order to unlock eCommerce tracking features (we will talk more about eCommerce tracking later in this article).

First, you need to install and activate the MonsterInsights plugin. For more details, see our step by step guide on how to install a WordPress plugin.

Next, go to Insights » Tools page in your WordPress dashboard.

Go to Insights then Tools in your WordPress dashboard

The URL Builder tool should open up. The first piece of information you’ll need to enter is the URL you want to add in your newsletter. This might be your main website URL, if you’re linking to your home page.

In this example, we’re running a sale and linking to the website’s online store:

The MonsterInsights URL builder tool

Google Analytics will track your email newsletter visitors as a ‘campaign’. This is simply the term Google Analytics uses for email or advertising promotions.

You’ll need to enter the source, medium, and name for your campaign, so Google Analytics can easily track them.

Source: Set this to ‘newsletter’ or something else meaningful
Medium: This should be set to ’email’
Name: You can use whatever makes sense, e.g. ‘jan_sale’ or ‘april_tshirts_sale’

If you’re using more than one word for the source, medium, or name, make sure you use underscores between words. Don’t use spaces or hyphens.

Entering the source, medium, and name for your campaign

The Campaign Term field is used if you’re running ads, so you can leave that blank. The Campaign Content can be used if you’re split testing your emails or ads. Again, you can leave it blank for this example.

At the bottom of the page, you should now see your special URL, with the tracking details included:

The URL created by the MonsterInsights URL builder tool, with UTM parameters in place

You can now use this URL in your email newsletter and later track clicks in your Google Analytics account.

Method 2: Manually Create Trackable URLs in Google Analytics

MonsterInsight’s URL builder is a handy tool for saving time, as it creates the UTM codes for you. If you prefer to create your trackable URLs manually, here’s how to do it.

First, get the URL you want to use. We’re going to use https://www.site.com/shop for this example.

Next, you’ll need to create the UTM code yourself. We’ll take it step by step.

Add a question mark to the end of your URL, like this:

https://www.site.com/shop?

Then, add the utm_source:

https://www.site.com/shop?utm_source=newsletter

Next, add the ampersand (&) symbol and the utm_medium:

https://www.site.com/shop?utm_source=newsletter&utm_medium=email

Finally, add another ampersand (&) and the utm_campaign:

https://www.site.com/shop?utm_source=newsletter&utm_medium=email&utm_campaign=jan_sale

You can use any word or phrase you want for the campaign’s name. If you’re using multiple words for the source, medium, or campaign name, you can separate the words with an underscore.

That’s it. Your tracking URL is ready to be used in your newsletter.

Using Trackable URLs in Your Newsletter Campaigns

Once you’ve created your URL, either using MonsterInsights’ URL builder or manually, you can use it in emails.

You can copy and paste the URL into your email wherever you would have used the standard URL before.

Here’s how that looks when inserting a URL in Constant Contact:

Inserting your special trackable link into Constant Contact

Tip: You can even use trackable URLs in your regular emails. This would make sense if you do a lot of email outreach. You can also create trackable URLs to use on social media, in ads, and more.

Once you are done with your email, send out your newsletter and wait for some clicks. After that, you can go to Google Analytics to view your report.

Viewing Your Email Newsletter Report in Google Analytics

Log in to your Google Analytics account and click Acquisition » Campaigns » All Campaigns link.

Viewing all campaigns in Google Analytics

You should then see data for the campaign(s) you’ve created.

Tip: If you’ve only just sent out the newsletter, change the date for the report to the current day. Google Analytics defaults to showing you data for the previous 7 days.

Edit Post ‹ WPBeginner — WordPress

It’s a great idea to use this report along with your Google Analytics goals. For instance, here we’re viewing how effective our newsletters were in getting people to fill in an inquiry form:

Viewing what percentage of your campaign traffic converted for different goals

Tracking Email Newsletter Conversions

The most important part of your newsletter tracking is what users do after they arrive on your website.

For instance, if you run an online store you might want to see which emails led to a sale. If you wanted users to fill out an order form, then you might want to track that.

The easiest way to do this is by using MonsterInsights to do almost all the setup for you.

Switching on eCommerce Tracking in Google Analytics

First, you’ll need to switch on eCommerce tracking in Google Analytics. This is a quick and easy process.

Login to Google Analytics. Make sure you have the correct website selected on the top left.

Check that you have the correct website selected in Google Analytics

Click the Admin link on the bottom left.

Click on the Admin option in the left hand menu of Google Analytics

Then, in the View column, click ‘Ecommerce Settings’.

Viewing the eCommerce settings in Google Analytics

You can now toggle ‘Enable Ecommerce’ on. We recommend also enabling ‘Enhanced Ecommerce’ at this point. This will track additional data. It also lets you see eCommerce reports in MonsterInsights.

Click the Save button.

Switching on eCommerce Tracking in MonsterInsights

You’ll need the Pro version of MonsterInsights in order to use its eCommerce features. These work with WooCommerce, Easy Digital Downloads, MemberPress, and LifterLMS.

Install and activate MonsterInsights, if you’ve not done so already.

Then, enter your license key under Insights » Settings and click the Verify button.

Enter your MonsterInsights license key on the Settings page

Once you’ve entered your license key for MonsterInsights, go to Insights » Addons, find the eCommerce addon, and then click the Install button below it.

Installing the Ecommerce addon for MonsterInsights

After that, you need to go to Insights » Settings and click the eCommerce tab. You should see that your eCommerce plugin (e.g. WooCommerce) has been automatically detected.

Tip: We recommend switching on ‘Use Enhanced eCommerce’ as this means you can view the MonsterInsights eCommerce report too.

The eCommerce settings in MonsterInsights

That’s all you need to do because MonsterInsights handles everything else after that. Google Analytics will now be able to track eCommerce transactions on your site.

Now, when you visit Google Analytics, you’ll be able to see details of your eCommerce transactions.

Go to Acquisition » Campaigns then click the ‘All Campaigns’ link, as before. Next, select ‘E-commerce’ from the Conversions dropdown menu.

Viewing your eCommerce statistics for your campaigns in Google Analytics

For detailed instructions, see our article on how to setup WooCommerce conversion tracking.

Tracking Links, Clicks, Buttons, and Forms

Not all websites use an eCommerce platform with a shopping cart.

For instance, if you have a simple order form, then you can track which email campaigns led users to submit that form. If you have a click to call button on your website, then you can track that as well.

We have a separate detailed guide on tracking links and button clicks in Google Analytics with step by step instructions.

We hope this article helped you learn how to set up email newsletter tracking in Google Analytics. You might also want to see these tested and easy ways to grow your email list faster.

If you liked this article, then please subscribe to our YouTube Channel for WordPress video tutorials. You can also find us on Twitter and Facebook.

The post How to Set Up Email Newsletter Tracking in Google Analytics appeared first on WPBeginner.


from WPBeginner https://ift.tt/2KCjOqT
More links is https://mwktutor.com