Recently some of our readers asked us if it’s possible to put a WooCommerce store in maintenance mode without affecting other parts of a website?
The good news is that it’s not only possible, but it’s also very easy to do.
In this article, we’ll show you how to enable maintenance mode for WooCommerce. You will have the option to restrict maintenance mode only to your store pages, or you can enable it for the entire website.
Why and When You Need to Enable Maintenance Mode for WooCommerce
There are couple of key reasons why you might want to put your WooCommerce store (but not your whole site) into maintenance mode or coming soon mode:
- Your store is still under construction and you haven’t launched it yet. This is a great time to use a “coming soon” page to build excitement while you work on your store behind the scenes.
- Something’s gone wrong with your store. If there’s a problem, being able to quickly put the store into maintenance mode will give you the time you need to fix things (without any Google penalties).
- You are adding an online store section to an existing website, but want to test it properly before opening it for the general public.
Putting your WooCommerce store under maintenance mode helps you improve overall user experience and avoid any misplaced orders as you work on your site.
That being said, let’s take a look at how to easily enable WooCommerce maintenance mode without affecting rest of your website.
Tip: If you do want to hide your entire WordPress site from visitors, check out our article that explains how to put your WordPress site in maintenance mode.
Enabling Maintenance Mode for WooCommerce
The first thing you need to do is install and activate the SeedProd plugin. For more details, see our step by step guide on how to install a WordPress plugin.
Upon activation, you’ll need to enter your license key by going to Settings » Coming Soon Pro and clicking on the ‘License’ tab:
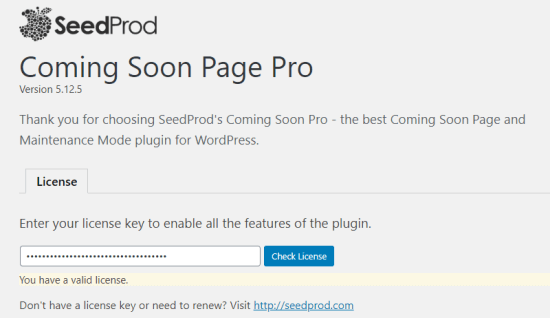
Now you’re ready to put your WooCommerce store under maintenance mode.
Creating Your Maintenance Mode or Coming Soon Page
To start designing your page, you need to visit Settings » Coming Soon Pro page and click on the ‘Edit Coming Soon/Maintenance Page’ button.
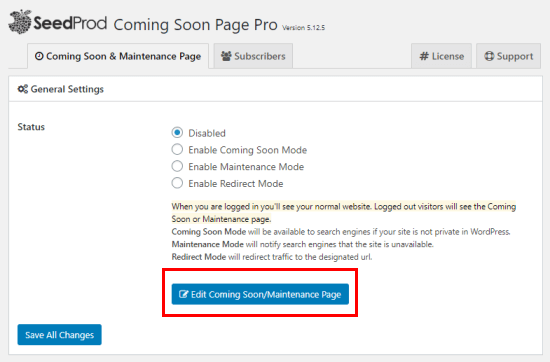
On the next page, you’ll see many different templates to choose from. Each of them can be easily customized to match your needs.
Furthermore, you can switch to a different theme at any time without losing the changes you’ve made to the text and other fields on your maintenance page.

Once you’ve chosen a theme, your page will be automatically created for you, with the header ‘Coming Soon’. We’re using the ‘Party Confetti Celebration’ theme here.

To change the text on the page, click the ‘Content’ tab on the left, and you will see the option to edit the text.
You can also change the order of the different areas of the page by simply moving them up and down under the ‘Sections Order’.
If you want to add extra sections to your maintenance page, you can do that too. Simply close the ‘Content’ tab by clicking on it, and then open the tab for the new section that you want.
Here, we’re adding a countdown timer to the page. This can be a great way to build excitement when your store is about to launch.
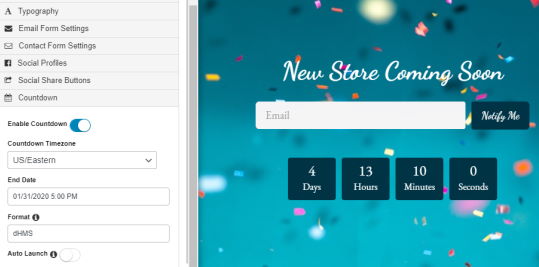
Tip: If you want to launch your store automatically when the countdown finishes, then just turn on ‘Auto Launch’ in the countdown timer settings.
The page you create can act as a type of landing page, allowing you to start building an email list straight away.
When you’re happy with how your maintenance page looks, make sure you click ‘Save’ at the top of the page.
Turn on Maintenance or Coming Soon Mode for Your WooCommerce Store
Now that you have created your custom coming soon or maintenance mode page, let’s go ahead and enable it.
In your WordPress dashboard, go to Settings » Coming Soon Pro.
Under ‘Status’ you can choose either ‘Enable Coming Soon Mode’ or ‘Enable Maintenance Mode’.
Although these terms often get used interchangeably, they each have a different meaning and purpose here.
Coming Soon Mode
If you haven’t yet launched your online shop, you should normally pick ‘Enable Coming Soon Mode’. This mode lets your page start getting indexed by Google, without potential customers being able to view any of the pages.
Coming Soon Mode is for sites that are under construction.
Maintenance Mode
If your store is genuinely down for maintenance, you should normally pick ‘Maintenance Mode’. For instance, if you installed a new plugin that’s caused problems, you might need to take your site down while you fix things.
Maintenance Mode tells search engines that your site is temporarily down, using the special header code 503.
Once you’ve chosen the appropriate option, you need to ensure that just your store is being put into coming soon or maintenance mode, not your entire site.
To do this, scroll down to ‘Advanced Settings’ and click ‘Include URLs’.
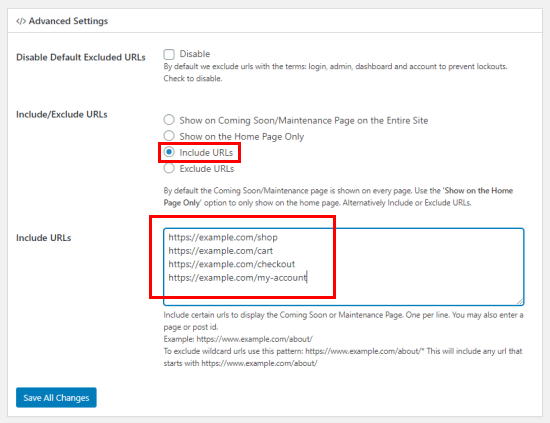
In the text box, you need to enter the URLs for your WooCommerce store. You’ll want to include all the default WooCommerce pages. (Don’t forget to replace example.com with your own domain name.)
https://ift.tt/1W0hfQd
https://ift.tt/2vkpf9T
https://ift.tt/2TanfZG
https://ift.tt/381t9Sg
If your store has products, then you’ll need to also add these URLs:
https://ift.tt/2TjlGc2
https://ift.tt/2HUvmVa
https://ift.tt/2Th6fRJ
The asterisk at the end of each of those URLs is a wildcard character. That means that the SeedProd will include all URLs that match the pattern before the asterisk.
Once you’ve done this, click the ‘Save All Changes’ button.
Checking Your Store is In Maintenance Mode
Once you’re done, we recommend opening up a guest or incognito browser window where you’re not logged in, and head to your WooCommerce store. You should see the coming soon or maintenance mode page, and not your online store.
Don’t forget to check a page that’s not part of your store, too, to make sure you didn’t accidentally put your whole site into maintenance mode.
Now you can login and work on your WordPress store without worrying about others potentially seeing a broken area on your site while it’s under construction or maintenance.
We hope this article helped you learn how to enable maintenance mode for WooCommerce. You may also want to take a look at our list of the the best WooCommerce plugins, and our complete step-by-step WooCommerce SEO guide for beginners.
If you liked this article, then please subscribe to our YouTube Channel for WordPress video tutorials. You can also find us on Twitter and Facebook.
The post How to Enable Maintenance Mode for WooCommerce appeared first on WPBeginner.
from WPBeginner https://ift.tt/37YtR2Y
More links is https://mwktutor.com
No comments:
Post a Comment