Are you looking to add Google Optimize on your WordPress site?
Google Optimize is a free tool by Google that helps website owners optimize their sites by running A/B split tests. This allows you to compare two versions of a page and see which one converts better (i.e is more successful).
In this article, we’ll show you how to easily add Google Optimize in WordPress, so you can start running split tests.

What is Google Optimize?
Google Optimize is a free tool that lets you split test your pages and personalize them for your customers. You can link it to both Google Analytics and Google Tag Manager.
Using Google Optimize, you can set up experiments to see if making changes to a page increases your conversion rate.
For instance, you might run an A/B split test where you have two versions of a sales page to see which one performs better.
You might have a different headline on each page or a different product image on your online store. By split testing, you can gradually optimize your page to get the highest conversion rate.
Google Optimize lets you create these split-tests with a drag & drop editor. After that it shows each variation to your visitors at random, so you can gather data about what works best.
What Will You Need to Use Google Optimize?
You need a Google Analytics account in order to use Google Optimize on your WordPress site. You’ll also need to have placed the Google Analytics tracking code on your site.
If you don’t already have an account, or if you haven’t put the tracking code on your site, then see our guide on how to install Google Analytics in WordPress for step by step instructions.
You’ll also need MonsterInsights, which is the best Google Analytics plugin for WordPress.
It comes with a Google Optimize addon which makes it super easy to run Google Optimize tests on your website.
MonsterInsights is a paid plugin, and you’ll need their Pro plan to access the Google Optimize addon. If you don’t want to purchase MonsterInsights, then we also have a method on how to setup Google Optimize manually using a free plugin as well.
That being said, let’s see how to add Google Optimize in WordPress like a pro.
Setting Up Your Google Optimize Account
First, you need to go to the Google Optimize website and click on the Get Started button.
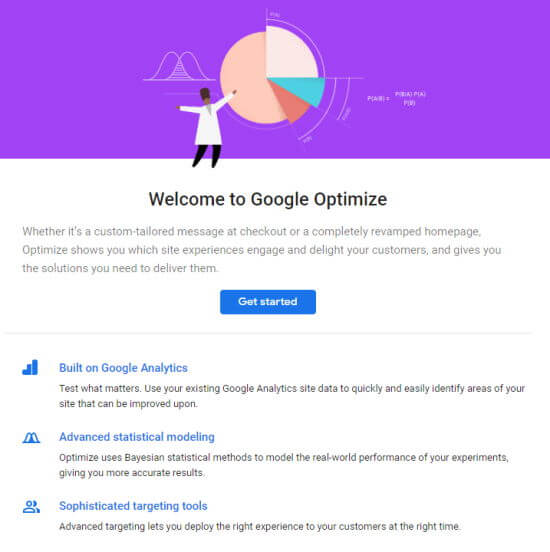
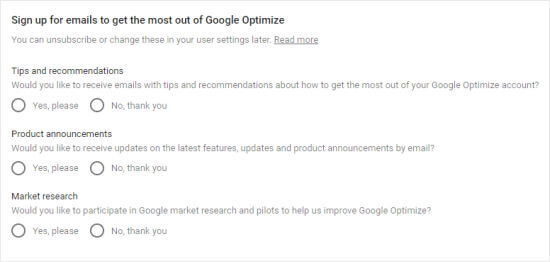
You’ll be prompted to decide whether or not you want to receive Google’s emails. After that, you need to click the options you want, and then click the Next button at the bottom of this screen.
You can now choose specific settings for your account. We suggest simply using the Recommended settings.
Make sure you select your country from the dropdown menu, so you can see the correct terms of service agreement. When you click on these to read them, they’ll open in a new tab, so you won’t lose your place during setup.
The checkboxes may also change depending on what country you select.
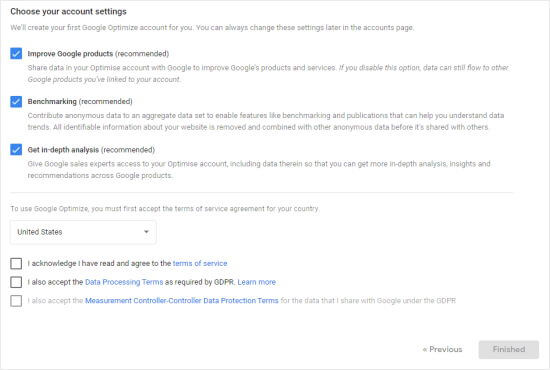
Next, you need to check the boxes once you’re ready, and then the Finished button will turn blue. Click on it, then Google will set up your Google Optimize account.
As part of this, Google has created your first container. This will contain your experiments (tests and personalizations), and it needs to be connected to your website.
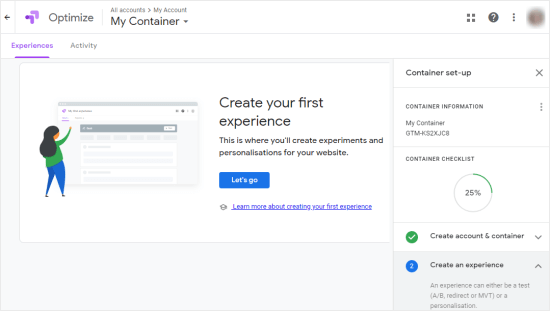
Although you’re prompted here to create your first experiment, we suggest instead that you link Google Analytics to Google Optimize at this point.
Linking Google Optimize and Google Analytics
On the right-hand side of your screen, you’ll see the Link to Google Analytics step. Click the downwards arrow here and then click Link property.
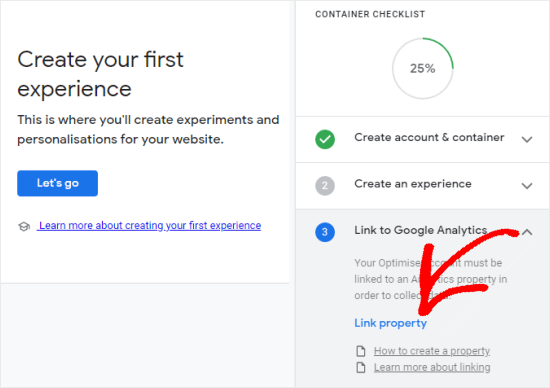
On the next screen, select the website you want to link with. If you can’t see your website here, then that could be because you’ve not finished setting it up in Google Analytics.
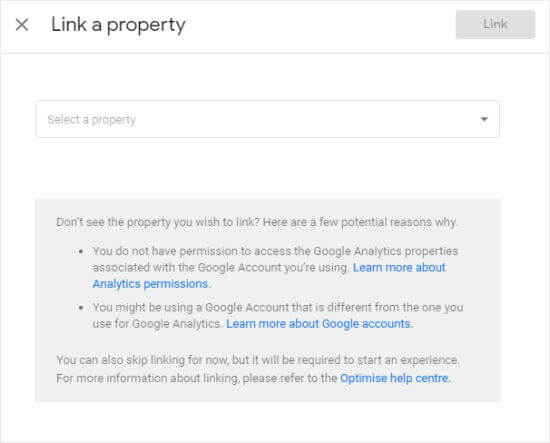
Once you’ve clicked Link, you’ll see this pop up:
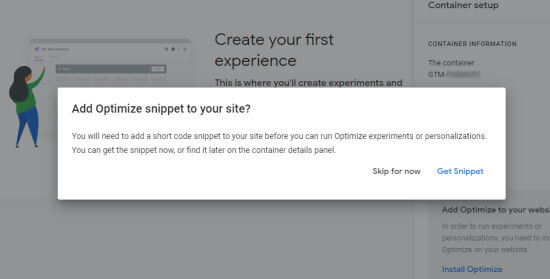
If you’re going to use MonsterInsights to add Google Optimize to your site, which is what we recommend, you can simply click Skip for now. Otherwise, you may want to view and copy the code now as you’ll need to use a line of it later on.
Add Google Optimize to Your WordPress Site (Easy Way)
The easiest way to add Google Optimize to WordPress is by using MonsterInsights. It is the best Google Analytics plugin on the market. Note: you’ll need to have a Pro subscription to the plugin in order to use the Google Optimize addon.
Installing MonsterInsights
First, you need to install and activate the MonsterInsights plugin. For more details, see our step by step guide on how to install a WordPress plugin.
Upon activation, you need to visit the Insights » Settings page and enter your license key here. You can find this information under your account on the MonsterInsights website.
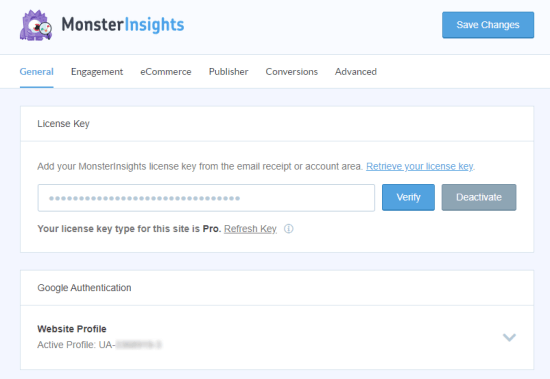
Next, you need to visit the Insights » Addons page and find the Google Optimize addon. Simply click the Install button next to Google Optimize addon, and it should automatically activate.
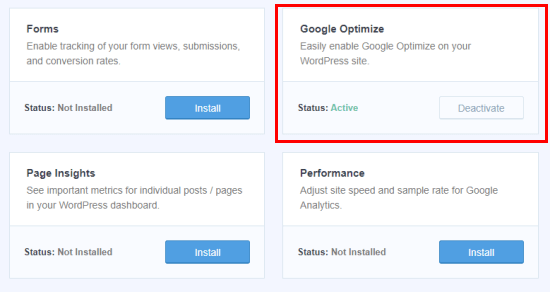
Once that addon is active, you can go to Insights » Settings » Conversions page to configure the settings.
You’ll need to enter your Google Optimize Container ID here. You can find this listed against your container under the My Account section of your Google Optimize dashboard. You can also easily find it in the Container setup panel when you’re in the process of setting up your container.
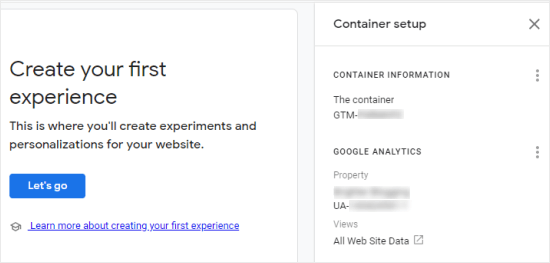
Simply enter this in MonsterInsights, and your site will be connected to Google Optimize.
You can also enable “Google Optimize’s Async Page Hide” here. This may improve users’ experience on your website, especially if they’re on a slow connection.
It hides the page for a small amount of time, so the variation you’ve created during your experiment can load. Otherwise, your regular content could load before it’s actually modified which will make the page “flicker” from your users’ perspective.
Now that you’ve connected Google Optimize to your website, you’ll want to start running some A/B tests.
Manually Add Google Optimize to Your WordPress Site
You can also add Google Optimize to your WordPress site manually. This method is not recommended for beginners as you’ll have to manually modify your Google Analytics code.
There are different ways to do this depending on how exactly you’ve added your Google Analytics code to your website.
In a moment, we are going to cover the process for adding Google Optimize to an analytics.js tag, as this is what many people will have used to set up Google Analytics.
If you set up Analytics quite recently, you might instead be using Global Site Tag (gtag.js) to deploy Google Analytics. In this case, you can find instructions for this within Google Optimize itself. Just click the blue ‘Install Optimize’ link to get the instructions and code.
If you’re using Google Tag Manager (GTM), see Google’s instructions on installing Optimize with Google Tag Manager.
Assuming that you’re using the analytics.js tag, let’s cover the installation process.
First, you need to find your Google Analytics code in your WordPress dashboard.
Note that this code must be in the header part of your pages in order for the Optimize code to work. If you’re using a plugin or theme that places Google Analytics in the footer, then you’ll need to move your code to be in the header instead.
Next, add the line ga(‘require’, ‘GTM-XXXXXXX’); to your Google Analytics code as follows, replacing GTM-XXXXXXX with your Optimize Container ID.
<!-- Google Analytics -->

<script>
(function(i,s,o,g,r,a,m){i['GoogleAnalyticsObject']=r;i[r]=i[r]||function(){
(i[r].q=i[r].q||[]).push(arguments)},i[r].l=1*new Date();a=s.createElement(o),
m=s.getElementsByTagName(o)[0];a.async=1;a.src=g;m.parentNode.insertBefore(a,m)
})(window,document,'script','https://www.google-analytics.com/analytics.js','ga');

ga('create', 'UA-XXXXXXXXXX-1', 'auto');
ga('require', 'GTM-XXXXXXX');
ga('send', 'pageview');
</script>

<!-- End Google Analytics -->
Note that UA-XXXXXXXXX-1, in your code, will show your Google Analytics property ID.
Once you are done, please make sure to save your changes.
Tip: If you’re not sure where to find and edit your Google Analytics code, then you may want to see whether you have a plugin like Insert Headers and Footers installed.
If you’re using a premium WordPress theme, then there may be a place within it where you’ve put your Google Analytics code. You can check the theme’s documentation or contact their support team for help.
If you’re using this method, then you’ll need to also manually add the anti-flicker snippet code to your site if you want to use it. You can’t just click a button to do this, like you can when using MonsterInsights.
Once you have setup Google Optimize, you’re ready to setup split tests. You can follow our guide on how to do A/B split testing in WordPress using Google Optimize.
We hope this article helped you learn how to add Google Optimize in WordPress. You may also to see our proven tips on how to increase your blog traffic, and how to create an email newsletter for your website.
If you liked this article, then please subscribe to our YouTube Channel for WordPress video tutorials. You can also find us on Twitter and Facebook.
The post How to Add Google Optimize in WordPress (2 Easy Methods) appeared first on WPBeginner.
from Tutorials – WPBeginner https://ift.tt/2SBFM0M
More View at https://mwktutor.com
No comments:
Post a Comment