Do you want to clean up your WordPress media library? WordPress makes several copies of media files that up load, and over time this leads to a ton of files in storage that are not used anywhere on your website.
Cleaning up your WordPress media library saves disk space on your hosting server and reduces backup sizes (both of which will help you save cost).
In this article, we will show you how to easily clean up your WordPress media library step by step.
Why Clean Up WordPress Media Library?
WordPress creates several copies of each image you upload to your website. WordPress themes and plugins may also request additional image sizes.
Apart from these image sizes, you may also end up uploading a ton of images that are not really used anywhere on your website.
These media files take up disk space on your WordPress hosting server. They also increase your WordPress backup sizes, which means it takes longer to backup, transfer, and restore your website.
If you have been running a WordPress website for some time, then you can benefit from cleaning up the WordPress media library.
That being said, let’s take a look at how to easily clean up the WordPress media library.
For this tutorial, we will cover two different plugins, and you can choose the one that looks easier.
Note: You will be cleaning up unused media files by deleting them forever. This action cannot be undone. Make sure that you have a complete WordPress backup in place before proceeding further.
Method 1. Clean up WordPress Media Library using Media Cleaner
For this method, we will be using the Media Cleaner plugin. It is available as a free plugin with a pro version available with some more features.
First, thing you need to do is install and activate the Media Cleaner plugin. For more details, see our step by step guide on how to install a WordPress plugin.
Upon activation, go to Media » Cleaner page to analyze your WordPress media library. The plugin may ask you to reset itself, during this process it will create a new table in your WordPress database to store data.
After that, you need to click on the Start Scan button to run the media analysis.
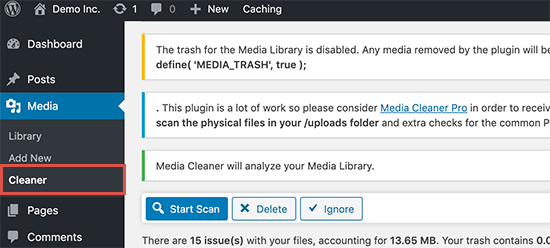
Media Cleaner will now look for files in your media library and inside your WordPress posts / pages. It will try and find the files that are in your media library but are not used on your website.
This may take a while depending on the size of your media library and the content you have.
Once finished, you’ll see a list of results. It will show you all the media files that are not currently in use on your website.
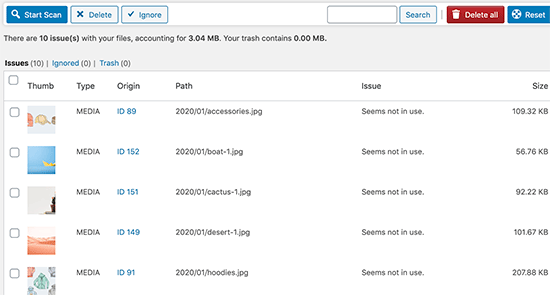
You can select the files that you don’t want to keep and delete them. You can also click on the Delete All button to instantly delete all unused media files.
Clean Up WordPress Media Library using Media Dedupper
For this method, we will be using the Media Dedupper plugin. It is also available as both a free and paid version.
However, we recommend using the pro version because it allows you to prevent deleting duplicate images in the WordPress gallery, Yoast SEO, WooCommerce, and more.
First, you need to install and activate the Media Dedupper plugin. For more details, see our step by step guide on how to install a WordPress plugin.
Upon activation, you need to visit Media » Manage Duplicates page and click on the Index Media button to analyze your media library.
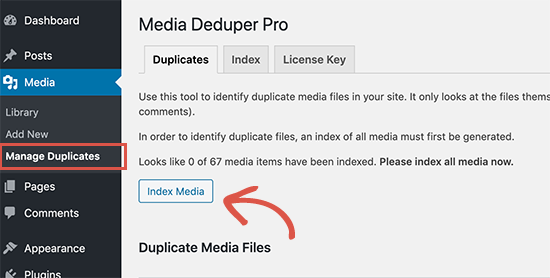
The plugin will start analyzing your media library and will list all the duplicate images. You can then see if a duplicate image is used on your website.
After reviewing the files, you can select all files or specific duplicates. Next, simply select ‘Smart Delete’ from the Bulk actions drop-down menu and then click the Apply button.
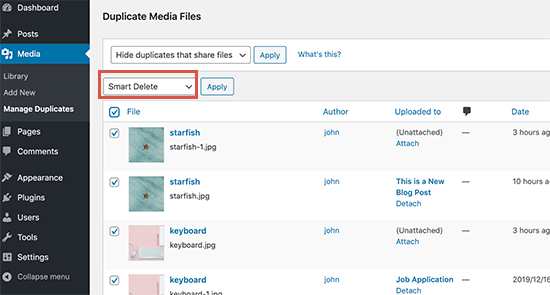
Smart Delete feature will make sure that images that are being used on your website are not deleted. It will also merge duplicate images allowing you to reuse media files without reuploading the same file.
Optimizing Your Media Files
Now that you have taken care of the duplicate images on your website, the next step is to optimize your existing media files.
A lot of beginners, directly upload images from their phones and cameras. These high-quality images are often too big in filesize. They take up disk space, increase backup sizes, and affect WordPress speed and performance.
You can use a WordPress image compression plugin to automatically optimize your media files without losing quality. You can also use our tips on how to optimize images for web performance before you upload them on your site (this is much better).
We hope this article helped you learn how to clean up the WordPress media library. You may also want to see our guide on how to clean up your WordPress database.
If you liked this article, then please subscribe to our YouTube Channel for WordPress video tutorials. You can also find us on Twitter and Facebook.
The post How to Clean up Your WordPress Media Library (2 Easy Methods) appeared first on WPBeginner.
from WPBeginner https://ift.tt/36yKwKC
More links is https://mwktutor.com
No comments:
Post a Comment