Are you looking to create peer-to-peer fundraising in WordPress?
If you have a charity organization, then you can allow your supporters to create their own fundraising campaigns on your website and raise money for the cause. This allows users to play an active role and spread awareness to their own audiences.
In this article, we will show you how to easily create peer-to-peer fundraising in WordPress, step by step.

Why Create Peer-to-Peer Fundraising in WordPress?
If you run a non-profit organization, then you can create a WordPress site and allow users to run peer-to-peer fundraising campaigns on it. This is a fundraising strategy in which individual supporters are encouraged to raise money for your organization.
This means that users can set up individual fundraising campaigns on your website to raise additional funds for your charity. They can also spread awareness among their friends and family, broadening your reach significantly.
For instance, let’s say you have a non-profit organization that cares for multiple endangered animals. By allowing peer-to-peer fundraising, individuals might create separate fundraisers for different animals, like the Blue Whale, and raise money for that specific cause.
This can boost user engagement and help your campaign go viral on social media. It can also bring in new supporters and potential donors who may be interested in saving a specific animal or weren’t familiar with your cause before.
What Do You Need for Peer-to-Peer Fundraising in WordPress?
To create a peer-to-peer fundraising campaign in WordPress, you will need to:
- Purchase web hosting
- Buy a domain name
- Create a WordPress website
- Use a non-profit theme
- Download a donation plugin
If you don’t already have a WordPress site, then you can easily create one by purchasing a hosting plan and a domain name. Web hosting is where your website lives online, while the domain name is what customers will type to visit your website.
You will notice that this is where your costs will start adding up, even though WordPress itself is free. This is because a domain name can cost you about $14.99/per year, and hosting costs start from $7.99/month.
Thankfully, Bluehost is offering a HUGE discount to WPBeginner readers along with a free domain name and SSL certificate.

Bluehost is one of the largest hosting companies in the world and an official WordPress-recommended hosting partner. To take advantage of this discount, just click on the button below.
Once you have purchased the hosting plan, see our beginner’s guide on how to install WordPress for more instructions.
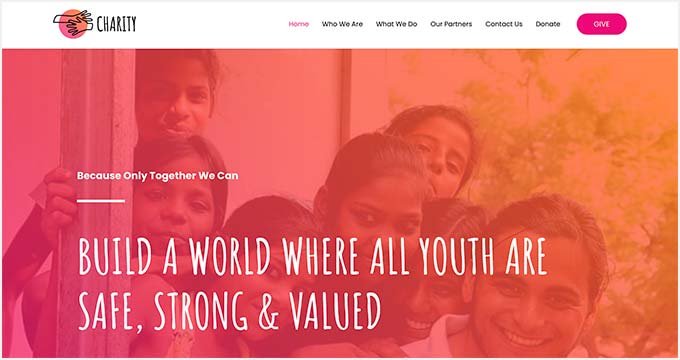
After that, you can choose a non-profit organization theme like Astra to create an authentic and visually pleasing website.
For more details, see our tutorial on how to install a theme in WordPress.
Once your basic website is up and running, you can see our tutorial below to set up peer-to-peer fundraising.
How to Create Peer-to-Peer Fundraising in WordPress
Now, it is time to start creating a peer-to-peer fundraising campaign.
To do this, we recommend using WP Charitable, which is the best WordPress donation and fundraising plugin on the market. It has a beginner-friendly interface, spam protection, and an Ambassadors addon that allows you to create peer-to-peer and crowdfunding campaigns.
First, you need to install and activate the free Charitable plugin because it acts as a core plugin for the paid version. For details, see our tutorial on how to install a WordPress plugin.
Note: You will need at least the Charitable Pro plan to install the Ambassadors addon.
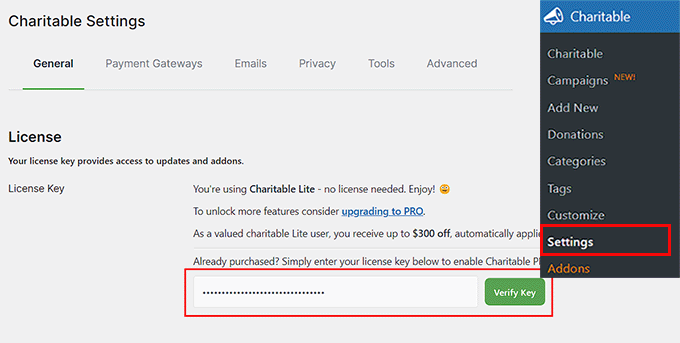
Upon activation, head over to Charitable » Settings from the WordPress admin sidebar to enter your license key. You can find this information in your account on the Charitable website.
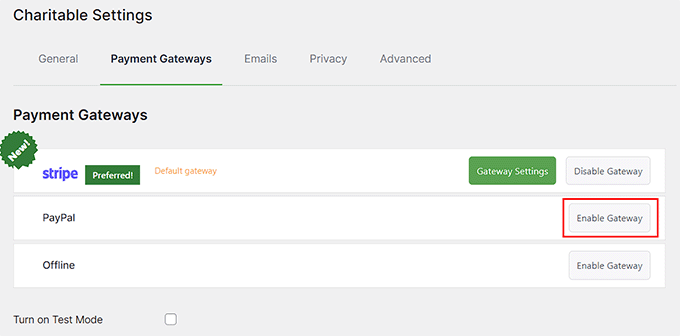
Next, switch to the ‘Payment Gateways’ tab from the top. Charitable offers Stripe and PayPal as the default gateways.
Here, click the ‘Enable Gateway’ button next to the payment options you want to activate for peer-to-peer fundraising.
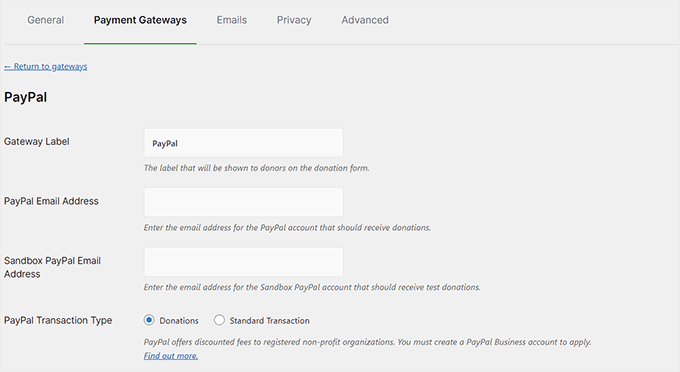
Once you do that, you will be taken to a new screen, where you must add the gateway label, email address, and API credentials.
After that, just click the ‘Save Changes’ button to store your settings.
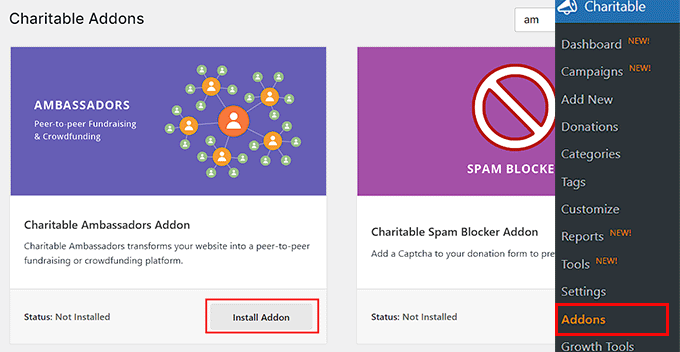
Now, head over to the Charitable » Addons page and locate the ‘Charitable Ambassadors’ addon.
Once you do that, click the ‘Install Addon’ button under it.
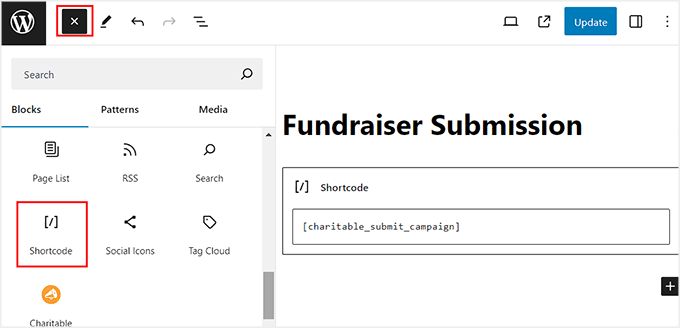
After the extension has been activated, you must create a new page in the block editor. Users will be directed to this page when they wish to create a peer-to-peer fundraising campaign.
Here, click the ‘Add Block’ (+) button to embed the shortcode block into the page. Then, add the following shortcode and click the ‘Publish’ button to store your settings:
[charitable_submit_campaign]
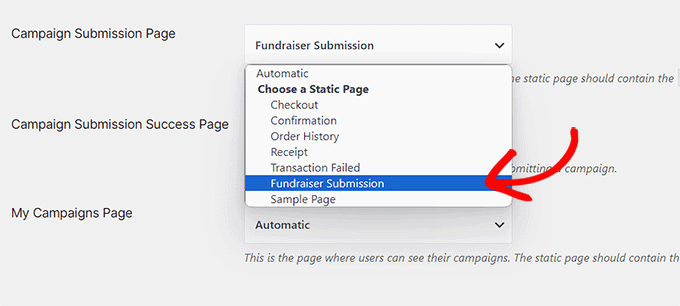
Next, visit the Charitable » Settings page from the WordPress dashboard and scroll down to the ‘Pages’ section.
Here, you need to select the page that you just created from the dropdown menu next to the ‘Campaign Submission Page’ option. Then, click the ‘Save Changes’ button.
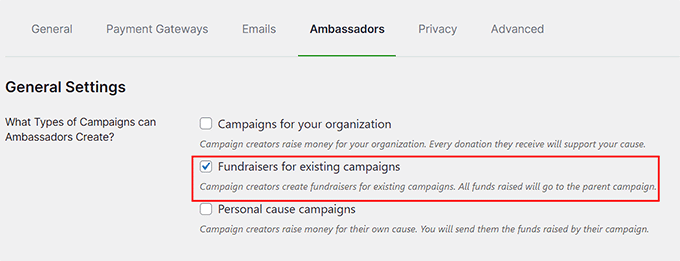
After that, switch to the ‘Ambassadors’ tab from the top.
From here, you must select ‘Fundraisers for existing campaigns’ as the campaign type.
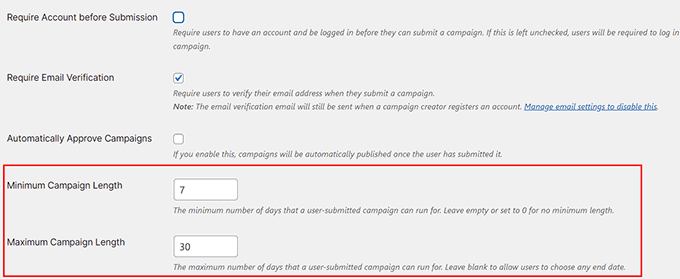
Then, you can uncheck the ‘Require Account Before Submission’ option if you don’t want to require users to register in order to create a peer-to-peer campaign on your website.
You can also set a minimum and maximum campaign length for a user-submitted campaign. For example, you can allow users to run a peer-to-peer campaign on your website for a week.
After that, you can leave the other settings as they are or configure them according to your liking. Once you are done, simply click the ‘Save Changes’ button to store your settings.
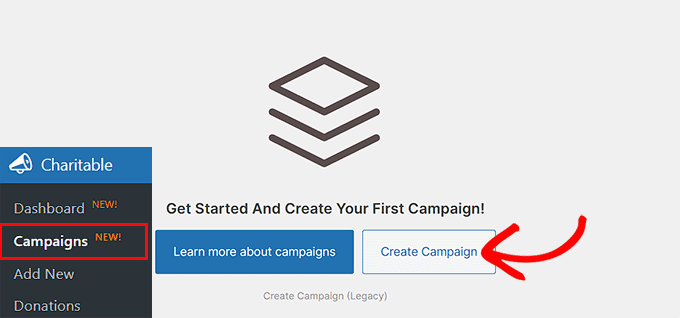
Now, head to the Charitable » Campaigns page to start peer-to-peer fundraising in WordPress.
Once there, click the ‘Create Campaign’ button.
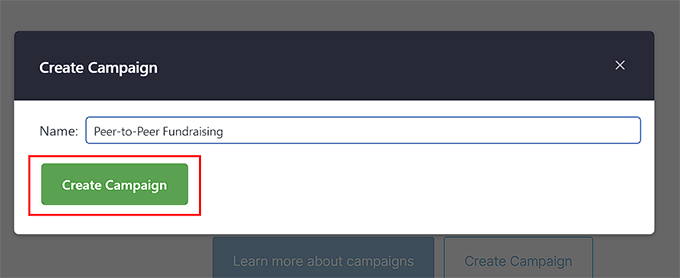
This will open a prompt on the screen, where you can add a name for the fundraising event. It will be the parent campaign through which users can create peer-to-peer fundraisers.
Go ahead and click the ‘Create Campaign’ button to move forward.
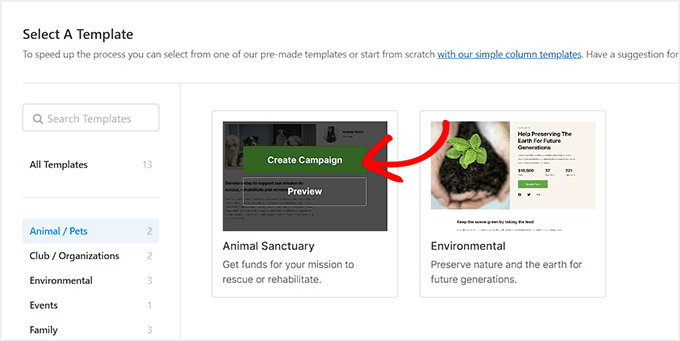
This will open a new screen where you will see a list of premade templates offered by WP Charitable, including disaster relief, animal sanctuary, medical causes, school trips, and more.
From here, click the ‘Create Campaign’ button for the template that is similar to your cause.
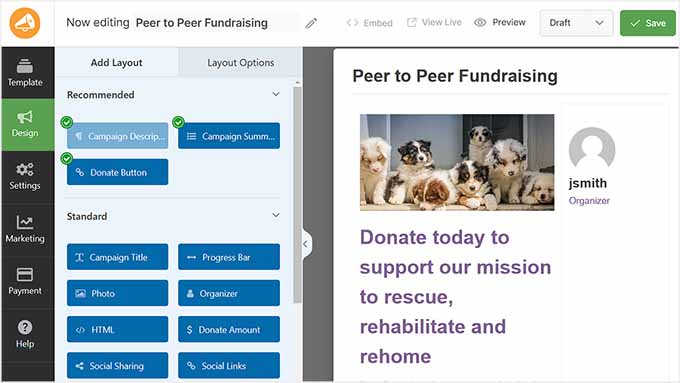
Once you do that, WP Charitable’s drag-and-drop builder will open on the screen, where you can add, remove, or rearrange blocks for the form.
You can also add an image and campaign description to make your form more attractive. For details, see our tutorial on how to create a recurring donation form in WordPress.
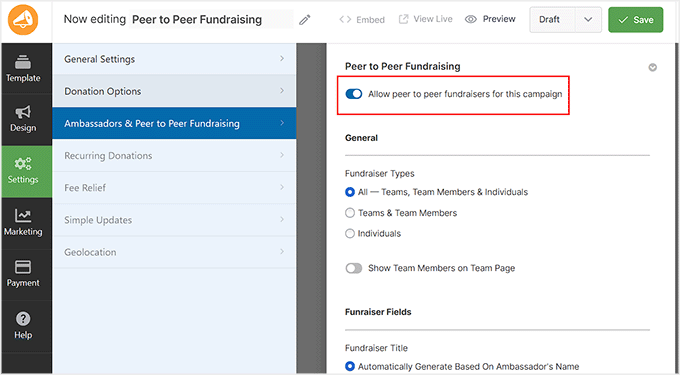
Next, switch to the ‘Settings’ tab from the left column and select the ‘Ambassadors & Peer to Peer Fundraising’ option.
This will open some new settings on the right, where you must toggle the ‘Allow peer-to-peer fundraisers for this campaign’ switch to ‘On’.
After that, you can choose whether to allow only your team members to create peer-to-peer fundraisers or whether you want users to participate as well.
You can also select if users will be allowed to select their own fundraiser title, goal, content, and image or if they can only add the default ones used by you.
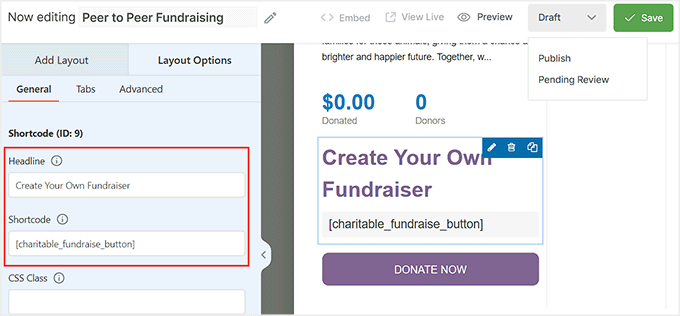
After that is done, switch back to the ‘Design’ tab and add the ‘Shortcode’ block where you want to create the ‘Fundraise’ button.
This will open the block settings in the left column. Here, add the following shortcode into the field:
[charitable_fundraise_button]
Next, you can also add a headline for the button. This button will direct users to the form submission page that you created earlier.
Then, click the ‘Save’ and ‘Publish’ buttons at the top to store your settings. WP Charitable will automatically create a page for your fundraiser form.
Finally, open the donation form on your WordPress site.
Here, you will notice the ‘Fundraise’ button that users can click to create a peer-to-peer fundraiser on your website.

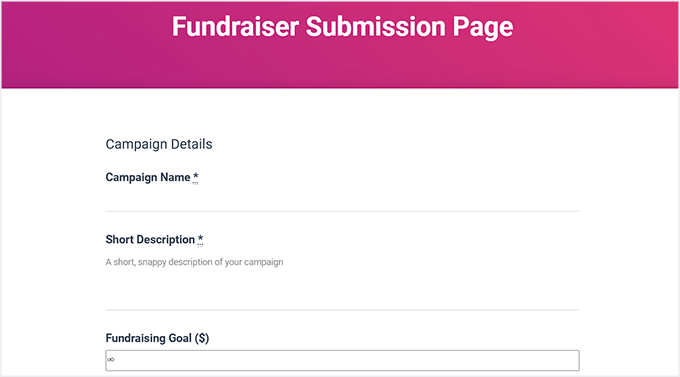
Upon doing that, users will be taken to the Fundraiser submission page that you created earlier with a shortcode.
Here, users can enter their campaign details and click the ‘Submit Campaign’ button to start a peer-to-peer fundraiser.
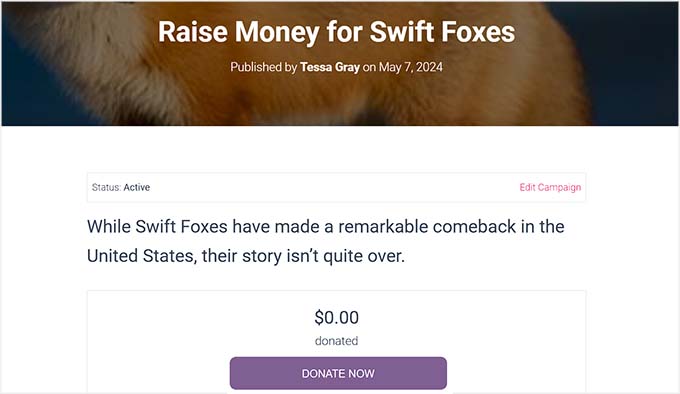
Once the users submit their campaign, it will automatically be approved and added to your site.
This is how a peer-to-peer fundraising campaign looked on our demo website.
Bonus: Pass Payment Processing Fee to Donors in WordPress
Once you have created a fundraising campaign, you may notice that most payment gateways like Stripe or PayPal charge fees for each transaction.
For example, if a user donates $50 and uses Stripe as a payment method, then you will only get $48.55 in your account. This is because Stripe collects 2.9% + $0.30 per transaction.
Luckily, Charitable comes with a Fee Relief extension that allows users to cover payment processing fees and let you collect the full donation amount.
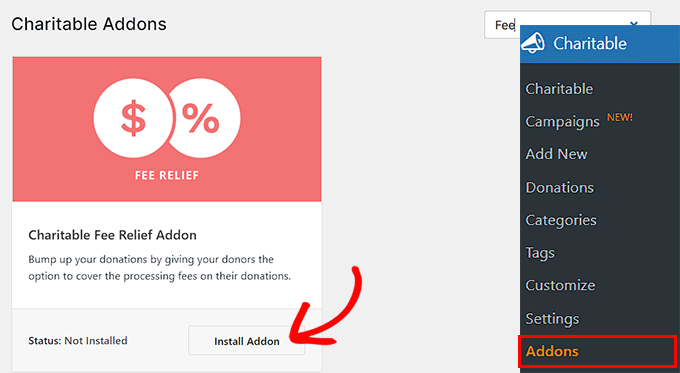
To pass the payment processing fees, visit the Charitable» Addons page from the WordPress dashboard and install the ‘Charitable Fee Relief’ extension.
After that, head over to the Charitable » Settings page and switch to the ‘Extensions’ tab.
From here, check the ‘Opt-in checkbox, checked by default’ option as a fee relief mode. This will add a checked box to the donation form for fee recovery.
If the user does not want to pay the processing fee, then they will have to uncheck this box.
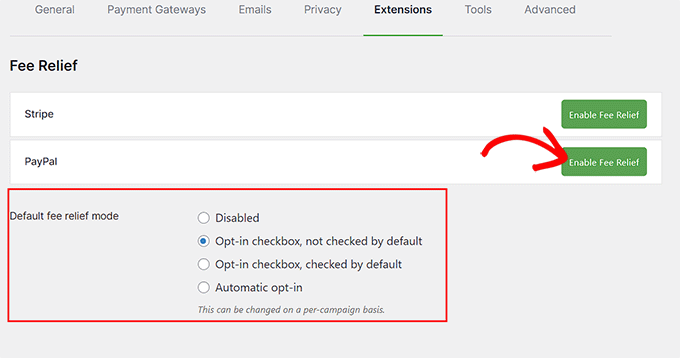
Then, click the ‘Enable Fee Relief’ button next to the payment gateways to activate fee recovery for payment processing. Once that is done, click the ‘Save Changes’ button to store your settings.
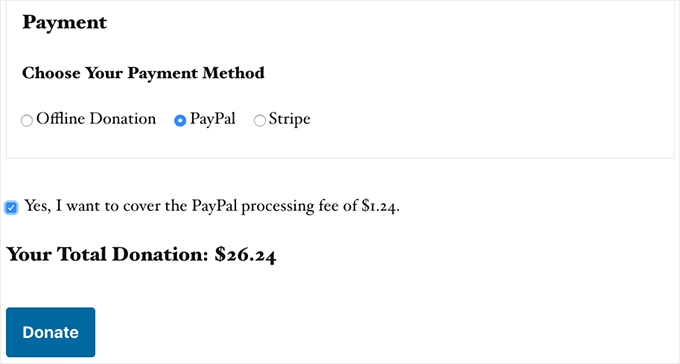
You have now successfully passed the processing fees to the donor. For details, see our complete tutorial on how to pass payment processing fees in WordPress.
We hope this article helped you learn how to create peer-to-peer fundraising in WordPress. You may also want to see our beginner’s guide on how to raise money with crowdfunding in WordPress and our expert picks for the best tip jar plugins for WordPress.
If you liked this article, then please subscribe to our YouTube Channel for WordPress video tutorials. You can also find us on Twitter and Facebook.
The post How to Create Peer-to-Peer Fundraising in WordPress (Step by Step) first appeared on WPBeginner.
from WPBeginner https://ift.tt/pvWJZDO
More links is https://mwktutor.com
No comments:
Post a Comment