Do you want to add a simple user ranking system for WordPress comments on your website?
A ranking system can gamify your comments section and motivate more users to leave their thoughts and questions on your website. This can boost engagement and build a sense of community around your brand.
In this article, we will show you how to easily add a simple user ranking system for WordPress comments.

Why Add a Ranking System for WordPress Comments?
Comments help improve user engagement on your WordPress website. By adding a ranking system for these comments, you can motivate users to leave informative and well-written discussion points on your blog.
For example, you can feature the comments you like at the top of the comment section or award badges to the comments of your choice.
Similarly, you can add an upvote/downvote system for users to control comment popularity or bury spam comments at the bottom of the discussion. This can create a sense of community around your WordPress blog and also help you moderate comments.
Having said that, let’s see how to easily add a ranking system for WordPress comments. In this tutorial, we will look at two methods, and you can use the links below to jump to the method of your choice:
Method 1: Add a User Ranking System in WordPress Comments
If you want to add a simple user ranking system to your comments section, then you can easily do this with Thrive Comments.
It is the best WordPress comments plugin on the market that helps you create an interactive comments section by featuring/burying comments, adding thumbs up/thumbs down, awarding badges, and more.
For more information, see our complete Thrive Themes review.
First, you must visit the Thrive Themes website and sign up for an account. Once you do that, head over to your member dashboard.
From here, click on the ‘Download and install the Thrive Product Manager plugin’ link.
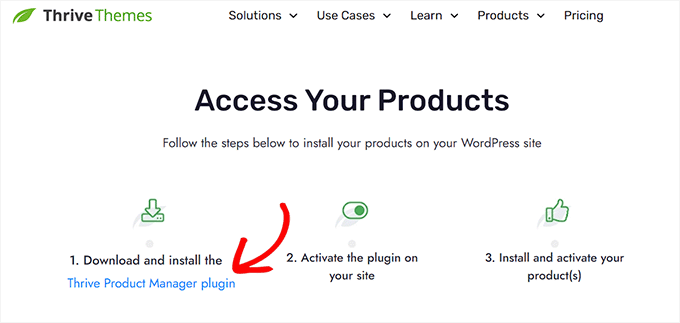
Next, open up your WordPress dashboard to install and activate Thrive Product Manager. For detailed instructions, see our step-by-step guide on how to install a WordPress plugin.
Upon activation, you must visit the Product Manager tab from the WordPress admin sidebar and click on the ‘Log into my account’ button.
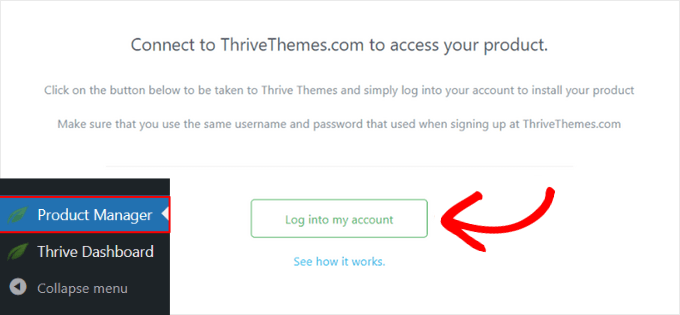
Once you have provided your login credentials, you will see your Product Manager dashboard.
From here, select the Thrive Comments plugin and click the ‘Install selected products’ button.
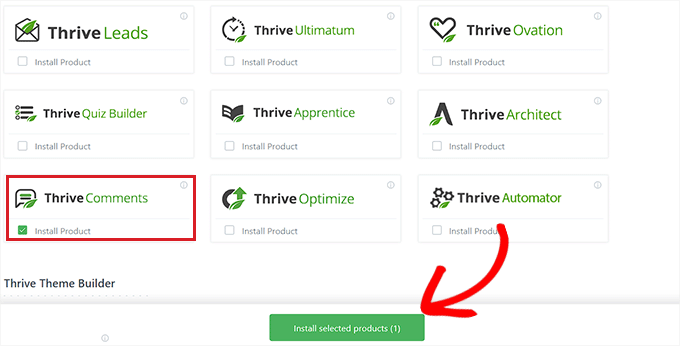
Next, you can visit the Comments » Thrive Comments Moderation page in the WordPress dashboard, where you will see a list of all the comments on your blog.
From here, you can approve, unapprove, edit, or flag the comments as spam. You can also feature a comment by opening the ‘More’ dropdown menu and selecting that option.
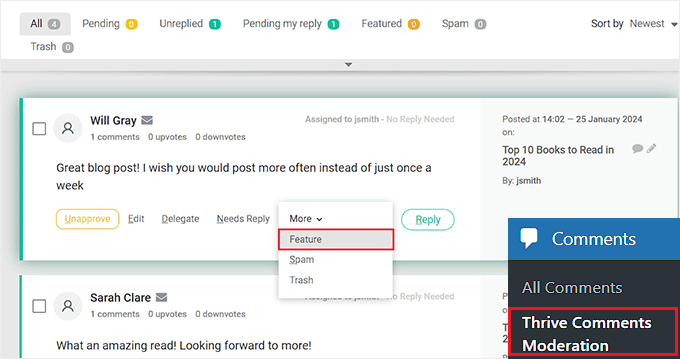
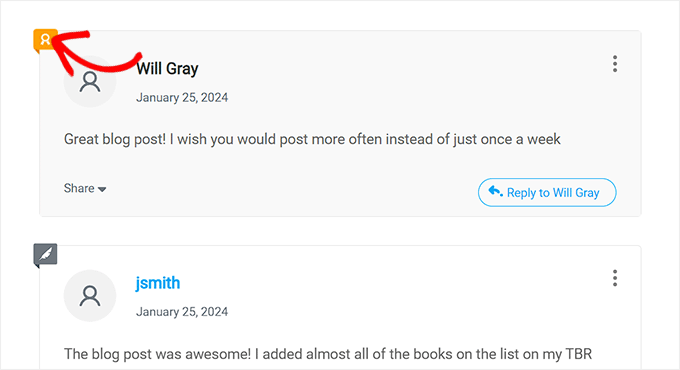
Once you do that, all the featured comments will be displayed at the top of the discussion section. These comments will also have a badge in the top left corner, which will signify their importance.
For more detailed instructions, you can see our tutorial on how to feature or bury comments in WordPress.
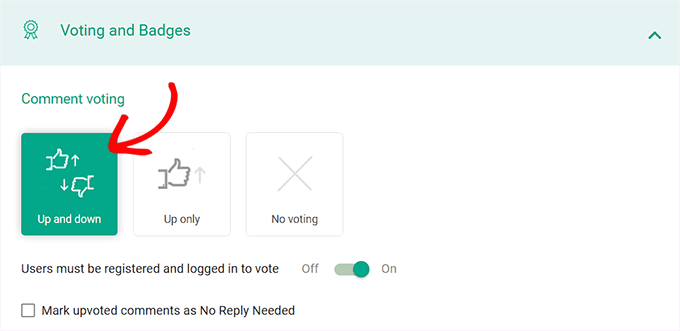
Afterward, you can visit the Thrive Dashboard » Thrive Comments page from the WordPress admin area and scroll down to the ‘Voting and Badges’ section.
From here, you can add like/dislike functionality to your comments to boost engagement. You can select the ‘Up and down’ option to add thumbs up/thumbs down icons with the comments.
You can also choose the ‘Up only’ option if you don’t want users to be able to dislike any comments on your website.
After that, you can toggle the ‘Users must be registered and logged in to vote’ switch to ‘On’ if you only want to provide this functionality to logged-in users.
For detailed instructions, you can see our tutorial on how to allow users to like/dislike comments in WordPress.
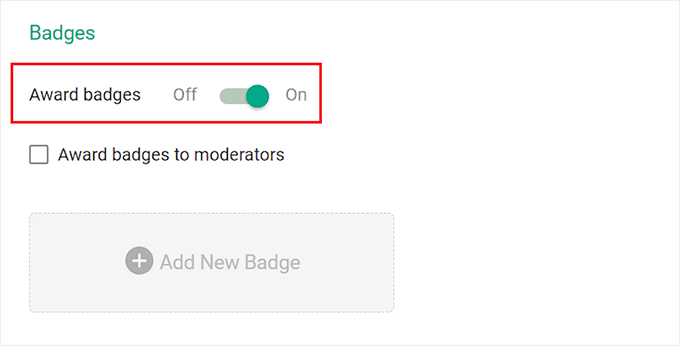
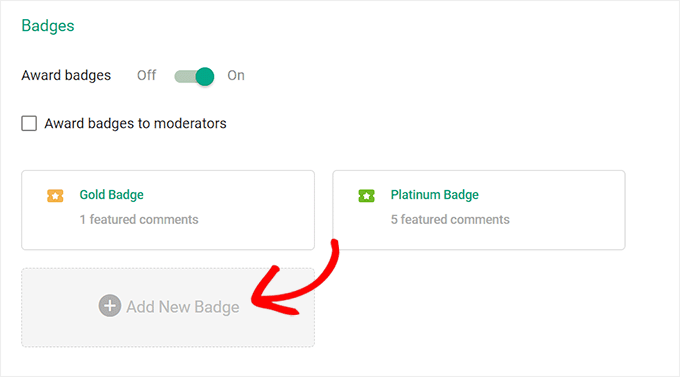
Next, you can scroll down and toggle the ‘Award Badges’ switch to ‘On.’ Once you do that, just click the ‘Add New Badge’ Button.
This will open a prompt on the screen, where you can start by adding a name for the badge. After that, you can choose when to award it from the dropdown menu.
For example, if you want to award a badge to a user when they have at least 5 featured comments on your website, then you can select the ‘Featured’ option from the dropdown menu.
Then, add 5 as the value next to the ‘reaches’ option.
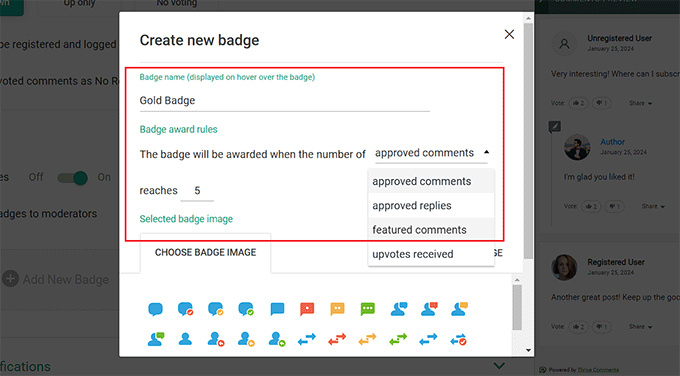
After that, you can choose a badge image or upload one from your computer.
Once you are done, simply click the ‘Save Badge’ button to store your settings.
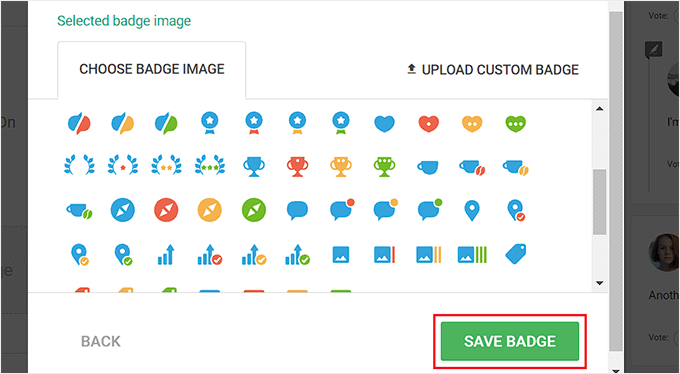
You can then click the ‘Add New Badge’ button again to create a badge awarding system for your comments.
Your settings will be saved automatically.
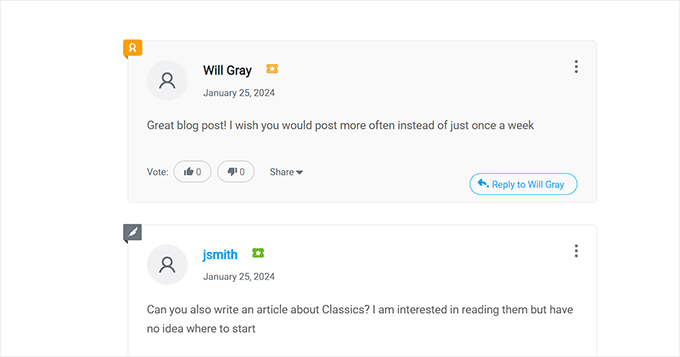
Now, simply visit your WordPress site to view the badges in action.
In our example, you can see that the comment at the top is featured because it has an icon at the top left corner. You can also see the badge awarded to the users next to their names.
Method 2: Add a User Ranking System in WordPress Forums
If you want to create a ranking system for the discussion forums on your website, then this method is for you.
First, you will need to install and activate the bbPress plugin. For detailed instructions, see our beginner’s guide on how to install a WordPress plugin.
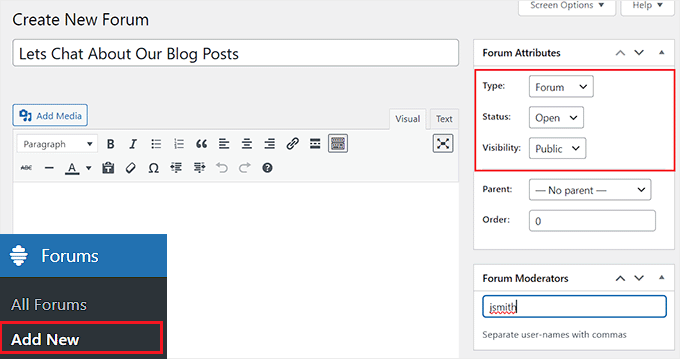
Upon activation, visit the Forums » Add New page from the WordPress admin sidebar. Here, you can add the name, description, visibility, status, and moderators for the forum you will create.
Once you are done, don’t forget to click the ‘Publish’ button to store your settings. For detailed instructions, see our tutorial on how to add a forum in WordPress with bbPress.
After that, you have to install and activate the bbp user ranking plugin. For details, see our step-by-step guide on how to install a WordPress plugin.
This plugin will show each forum member’s total rankings, the number of topics they started, and replies.
Upon activation, visit the Settings » bbp user ranking page from the WordPress dashboard and scroll down to the ‘Ranking Calculations’ section.
Here, you will see that the plugin uses the number of topics and replies a user has created to calculate rankings. You can simply check these options to add them as ranking factors.
Now, by default, the plugin offers two ranking levels for comments. However, if you want to add another ranking level, then simply enter the number of levels you want into the ‘Number of levels’ field and click the ‘Save Changes’ button to refresh the page.
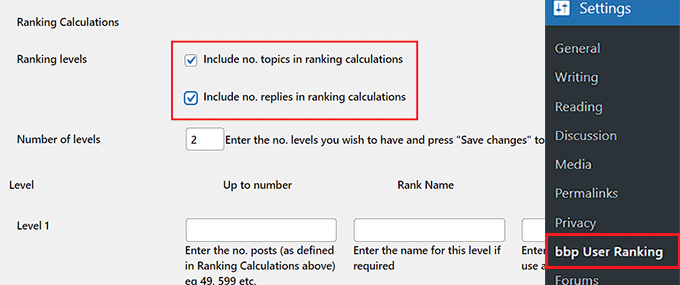
Once you have done that, it’s time to configure settings for different levels.
To do this, scroll down to the ‘Level 1’ section and type a name for it into the ‘Rank Name’ field. This will be the name that will appear on the user’s profile.
After that, you must add the number of posts that members must make to graduate from this level and move to the next level under the ‘Up to number’ option.
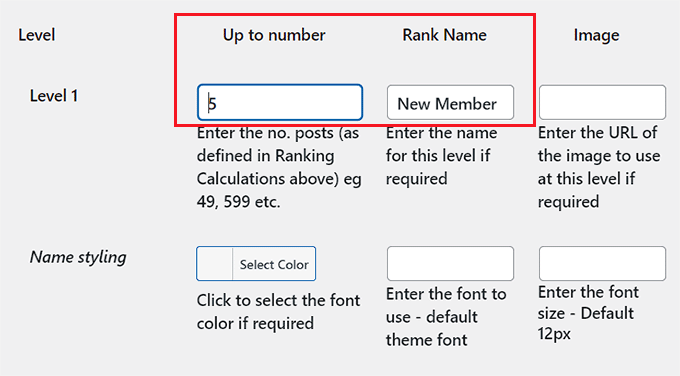
For instance, you may create a New Member level with an ‘Up to number’ value of 5. This means that anyone who posts 1-5 comments will be a New Member.
You can then also add the URL for the image that will displayed next to the name of all level 1 users. You can get the image’s URL from your media library.
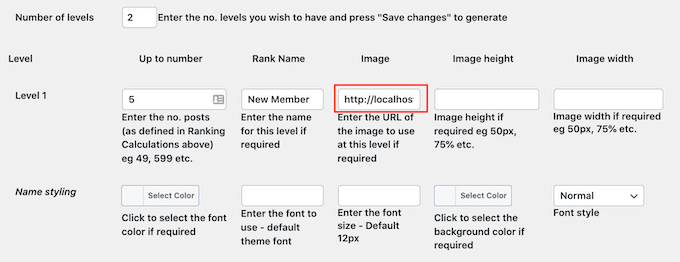
After that, you can also configure the image size, font color, and font size from different settings.
You can then repeat the process to set up other levels on your website. Once you are done, don’t forget to click the ‘Save Changes’ button to store your settings.
After that, switch to the ‘Badges’ tab from the top. Here, you can select if you want to show multiple badges earned by the users in a row or column.
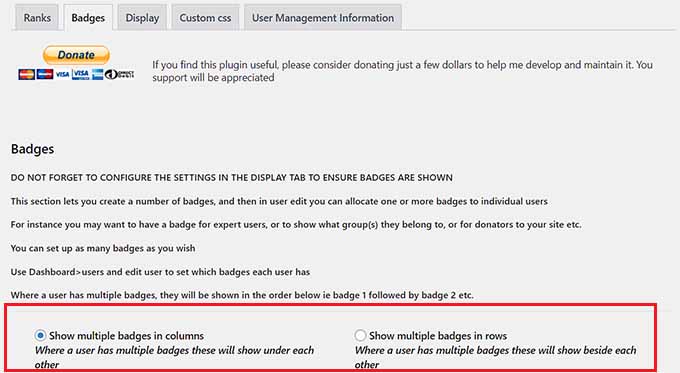
Next, scroll down to add the number of badges you want to create for your forum next to the ‘Number of Badges’ option. After that, click the ‘Save Changes’ button to refresh your page.
Then, you can add a badge name, paste the URL for the badge image, and choose a font color.
You can then also configure the image size according to your liking. If you don’t want to display an image with your badge, then you can select the ‘Click to display name’ option from the top.
However, you must select the ‘Click to display name on top of image’ option to show both the name and image for your badge.
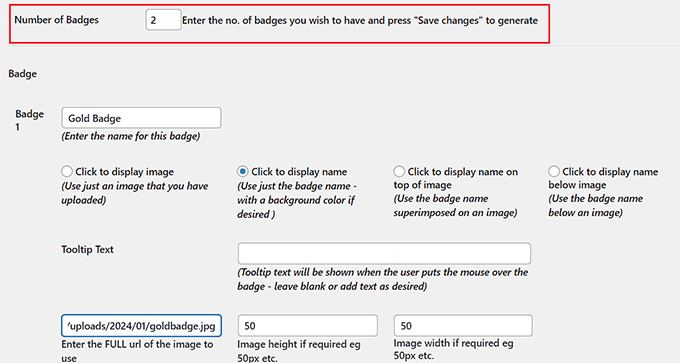
You can now repeat this process to create as many badges as you want. Once you are done, don’t forget to click the ‘Save Changes’ button to store your settings.
Next, switch to the ‘Display’ tab from the top. Here, you can configure how the user ranking information will look on your forum.
You can now choose if you want to display the topic count, reply count, level symbols, or rank names. Simply check the box next to the information that you want to showcase.
After that, you can add an optional label to help people understand what the different numbers mean.
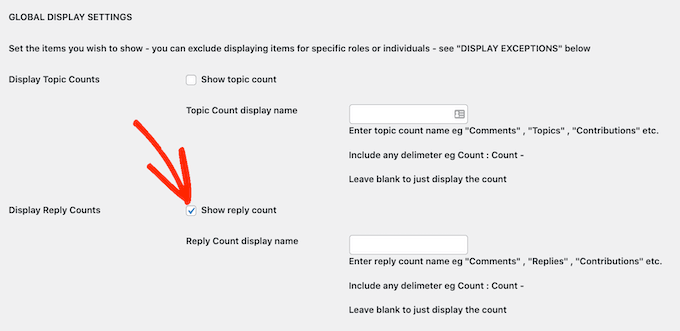
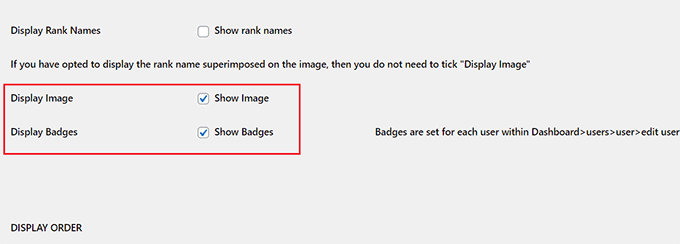
Next, you can also check the boxes to display level images and badges next to the user’s names.
After that, don’t forget to click the ‘Save Changes’ button to store your settings.
You have now successfully added a user ranking system. You can visit your website to view the users’ profiles in your forum.
Here, you will be able to see their ranking levels and calculations.
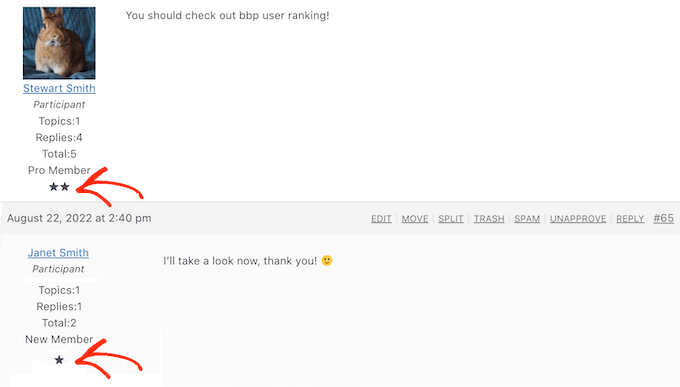
You can also award different badges that you created to users on your website. However, keep in mind that you will have to do this manually by visiting the Users menu tab.
Once you are there, click the ‘Edit’ link under any user profile of your liking.
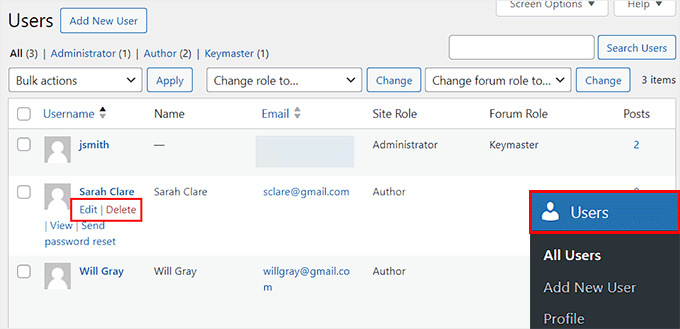
This will take you to a new screen where you must scroll down to the ‘Badges’ section.
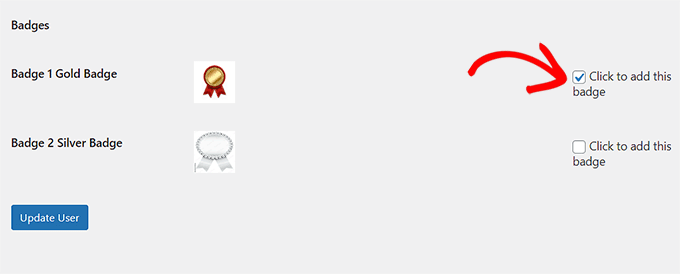
Here, check the ‘Click to add this badge’ option for any badge that you want to award the user. Once you are done, don’t forget to click the ‘Update User’ button to store your settings.
You can now repeat the process for other users as well.
Bonus: Add a Points System in WordPress
Other than adding a ranking system for comments, you can also add a points system on your WordPress site to boost engagement.
For instance, you might reward your customers with points upon user registration, purchasing a product, or as part of a loyalty program. You can then award prizes or exclusive content to visitors with the most points.
If you have a membership site, then you can also offer a level upgrade to users with a certain number of points.
You can easily add a points system in WordPress with myCred. Upon activation, simply visit the Points » Settings page from the WordPress dashboard to start choosing a label and image for your points.
For example, you can call the points earned by the audience coins, brownies, jewels, tokens, or anything else that works.
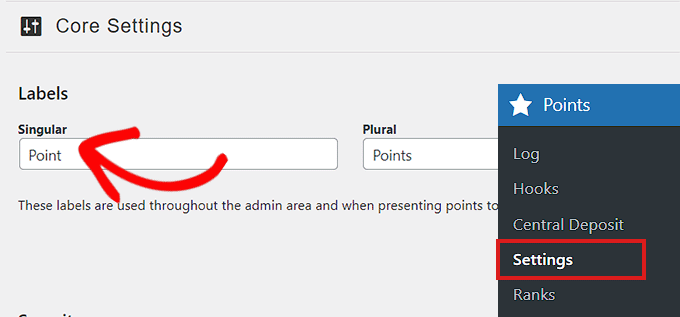
After that, you will have to create user levels, set hooks for the points system, and integrate the plugin with different tools like MemberPress or LearnDash according to your liking.
Once you are done, you can use the different blocks provided by myCred to add a points system leaderboard on your website.
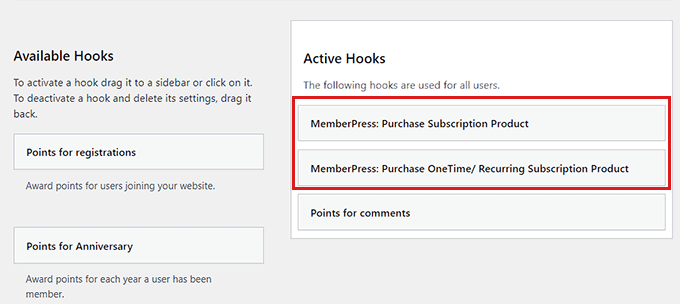
For detailed instructions, see our tutorial on how to add a points system in WordPress to ignite user engagement.
We hope this article helped you learn how to add a simple user ranking system for WordPress comments. You may also want to see our beginner’s guide on how to allow users to report inappropriate comments in WordPress and our expert tips and tools to combat comment spam in WordPress.
If you liked this article, then please subscribe to our YouTube Channel for WordPress video tutorials. You can also find us on Twitter and Facebook.
The post How to Add a Simple User Ranking System for WordPress Comments first appeared on WPBeginner.
from WPBeginner https://ift.tt/Z4hIgGR
More links is https://mwktutor.com
No comments:
Post a Comment