Do you want to add a gallery in WordPress with a lightbox effect?
Adding the lightbox effect will allow users to view your images in a distraction-free environment without leaving your website. However, the default WordPress gallery block does not support lightboxes.
In this article, we will show you how to easily add a gallery in WordPress with a lightbox effect, step by step.
Why Add the Lightbox Effect in WordPress Galleries?
By adding the lightbox effect to the galleries on your WordPress website, you can show off your images in a more professional way.
This effect allows you to display your images in a pop-up window on your website when a user clicks on them.
Lightboxes help create a more immersive viewing experience for your visitors and even make it easier for them to share your images on social media or download them on their computers.
If you have a photography website, then adding a lightbox effect will enable users to view your high-resolution images in a distraction-free mode, increasing engagement.
Similarly, if you have a WooCommerce store, then adding a lightbox effect to your product galleries can also help customers view the product up close and make an informed decision.
Having said that, let’s see how to easily add a WordPress gallery with a lightbox effect, step by step.
How to Add a WordPress Gallery With a Lightbox Effect
You can easily add a WordPress gallery with a lightbox effect using Envira Gallery.
It is the best WordPress gallery plugin that allows you to create fully responsive and modern image galleries for your website.
Envira Gallery is also super fast and has a drag-and-drop builder, professional gallery templates, and many features, including adding tags, audio, social sharing, and the lightbox effect.
Note: Envira Gallery also has a free plan that you can use for this tutorial. However, upgrading to the paid plan will give you access to more features.
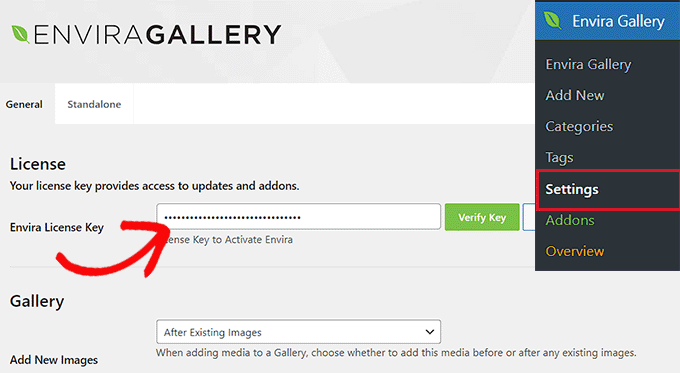
Upon activation, visit the Envira Gallery » Settings page from the WordPress admin sidebar to enter the license key.
You can get this information from your account on the Envira Gallery website.
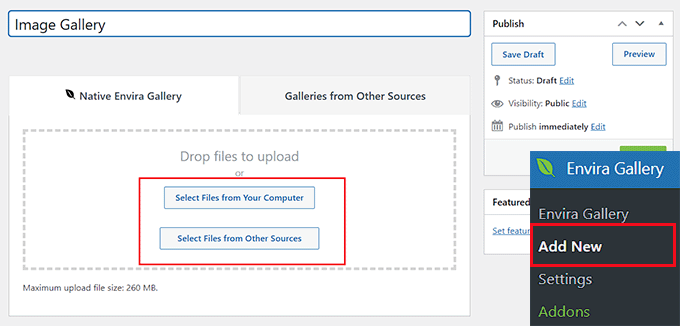
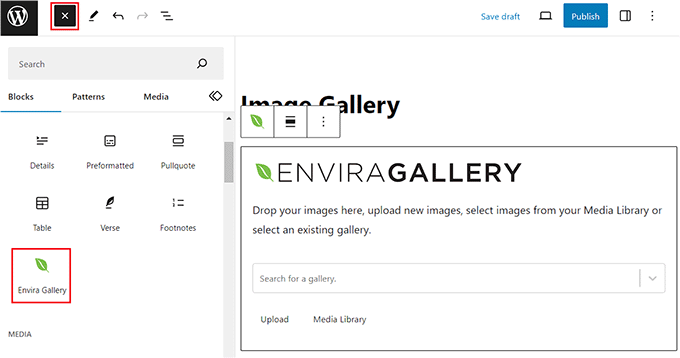
After that, you need to visit the Envira Gallery » Add New page from the WordPress dashboard to start creating your own gallery.
From here, type a title for the image gallery and click the ‘Select Files from Your Computer’ button to upload images.
Or, if you want to add media library images to your gallery, then click the ‘Select Files from Other Sources’ button. This will launch the media library from where you can upload gallery images.
Remember that you can only upload one image from the media library at a time.
Once you have done that, scroll down to the ‘Currently in your Gallery’ section, where you will see a preview of your gallery on the right with settings in the left column.
Now, click the pencil icon on top of each image to open the ‘Edit Metadata’ prompt on the screen.
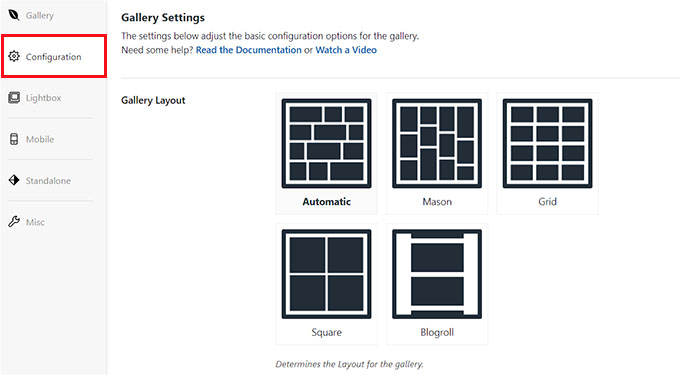
Once you have configured the gallery layout, switch to the ‘Lightbox’ tab from the left column and check the ‘Enable Lightbox?’ option.
After that, select a lightbox theme from the ‘Gallery Lightbox Theme’ dropdown menu. If you choose the ‘Legacy’ option, then the lightbox effect prompt will have an older layout.
On choosing the ‘Base (Dark)’ option, the lightbox prompt will have a dark base as its layout.
Next, you must select if you want to display the image title or its caption in the lightbox prompt. You can also display both or none of them if you like.
Once you have done that, choose the image size for the lightbox from the dropdown menu.
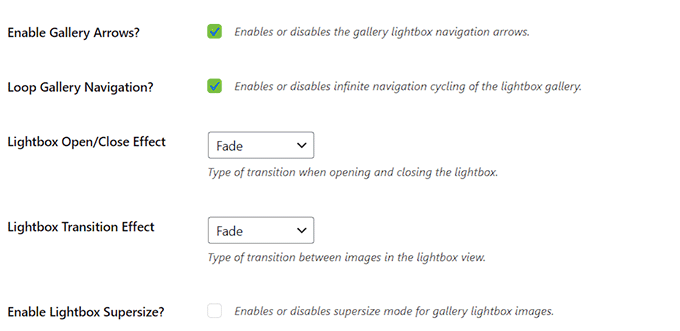
After that, check the ‘Enable Gallery Arrows’ option. The lightbox prompt will now show two arrows that the viewers can use to switch to different images in your gallery.
You can also configure other settings for your lightbox, including its transition effect, open/close effect, enable lightbox supersize, and more.
Once you are done, don’t forget to click the ‘Publish’ button at the top to store your changes.
To add your image gallery to a WordPress page/post, open the page in the block editor.
Here, you need to click the add block ‘+’ button in the top left corner of the screen to open the block menu. Next, add the Envira Gallery block to the page/post.
After that, select the image gallery that you just created from the dropdown menu in the block itself. Finally, click the ‘Update’ or ‘Publish’ button to store your settings.
Now, you can visit your WordPress blog to view the image gallery and then click on any image to see the lightbox effect.
Alternative: Use NextGen Gallery to Create Image Portfolios and Galleries in WordPress
Envira Gallery is the best option for adding lightbox images to your WordPress website. Alternatively, you can use NextGEN Gallery to create fully responsive and visually pleasing galleries and portfolios on your WordPress site.
NextGEN Gallery is the best Envira Gallery alternative because it supports a wide range of gallery types, has eCommerce-related features, and allows you to add watermarks, lightboxes, image comments, and more.
Additionally, NextGEN Gallery allows you to accept online payments via Stripe or PayPal, making it easy to sell your images online.
It is an advanced gallery plugin with features for professional photographers, graphic designers, and visual artists, making it one of the best WordPress portfolio plugins on the market.
Are you looking for the best ChatGPT plugins for WordPress?
A WordPress ChatGPT plugin allows you to integrate artificial intelligence (AI) into your website. This can provide a more interactive and personalized experience to your users, increasing engagement and traffic. It can also help you generate content and increase your productivity.
In this article, we will share our list of the best ChatGPT WordPress plugins on the market.
Why Use a ChatGPT Plugin in WordPress?
ChatGPT is a well-known AI chatbot software that is based on the GPT-3.5 and GPT-4 language models. It is developed by OpenAI, who is also responsible for software like DALL-E and Whisper.
ChatGPT allows you to generate text, translate languages, write different kinds of creative content, and answer any questions you may have about a topic.
In simple terms, ChatGPT plugins are WordPress plugins that support integration with the artificial intelligence software. When using the plugin, it will send a prompt to the ChatGPT software and show a response to your query on your website.
For example, you might use the plugin as a chatbot where the responses come directly from ChatGPT. This can increase lead generation by engaging with visitors and telling them about your products or services.
Additionally, if you have an online store, then you can also use ChatGPT plugins to provide 24/7 customer support, improve content quality, or boost the user experience.
Plus, ChatGPT plugins can help you improve your own workflows and boost your creativity. You can generate meta descriptions and post titles, come up with blog post ideas, and more.
Having said that, here is our list of the best WordPress ChatGPT plugins on the market.
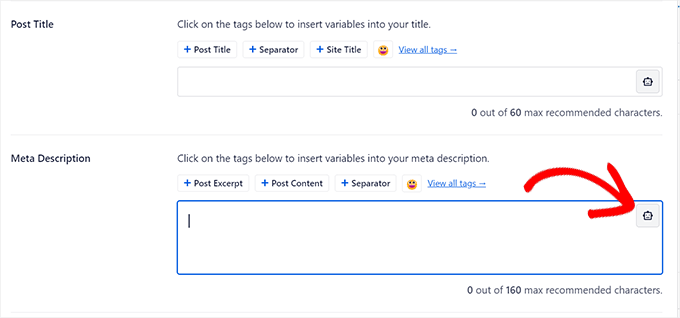
Aside from AI title generator, AIOSEO offers tons of comprehensive SEO tools to help your website rank higher in the search results. The plugin has features like a link assistant, XML sitemaps, a headline analyzer, FAQ schema, and more.
To integrate ChatGPT with AIOSEO, all you have to do is click the robot icon in the Meta Description or Post Title box in the block editor.
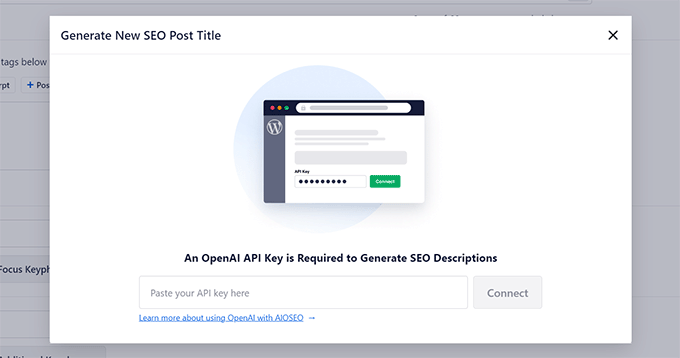
Once you do that, a prompt will open up on the screen, asking you to provide an API key to connect OpenAI with the plugin. To do this, you will need to create an OpenAI account and then generate an API key.
Upon adding the key, simply click the ‘Connect’ button to move on.
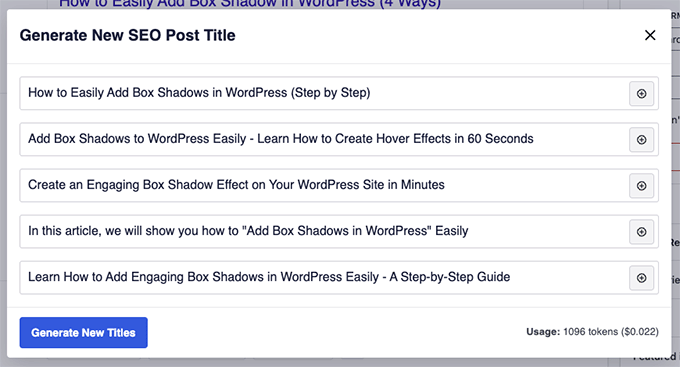
AIOSEO can now generate SEO-friendly titles and meta descriptions for your post using artificial intelligence.
You just need to click on the ‘+’ button next to a title or meta description to use it, or you can ask the software to generate more ideas.
These headlines are written to contain keywords relevant to your content, which can ultimately increase your click-through rates.
All in One SEO has a built-in headline analyzer tool to improve your headlines. It provides data-driven insights and suggestions for creating engaging and click-worthy titles.
It has on-page SEO features to improve website content and titles for search engines.
It comes with a robots.txt editor, social media integrations, and a redirection manager.
Cons
Some of the features of the plugin are only available in the pro plan.
Why we recommend using AIOSEO: We recommend using AIOSEO because it is the best WordPress ChatGPT plugin on the market. It easily integrates with OpenAI using an API key and generates suggestions for post titles and meta descriptions. It also comes with a WooCommerce integration and other SEO tools that can help your website rank higher.
Uncanny Automator is the best WordPress automation plugin that lets you connect your WordPress site with ChatGPT. It allows you to create comprehensive workflows by connecting two different platforms.
With Uncanny Automator’s ChatGPT integration, you can generate content for your blog posts from a prompt or list of keywords.
With Uncanny Automator, you can use different actions and triggers to create an AI-generated image, social media posts, personalized emails, product descriptions, and answers to customer queries.
The best part about using Uncanny Automator is that it also allows you to connect ChatGPT with other services other than your website, like Facebook, Drip, Zapier, Brevo, Instagram, Google Sheets, and more.
Uncanny Automator can connect with 140+ WordPress plugins and third-party apps to create automated workflows.
You can use Uncanny Automator and ChatGPT together for email marketing.
It has a free plan.
It has advanced features like delays, scheduling, and user creation.
Cons
The free version allows you to create only a limited number of automations with a limited number of app integrations.
Why we recommend using Uncanny Automator: We recommend using this plugin if you want to connect your ChatGPT account with third-party platforms or plugins. Uncanny Automator is a super powerful tool that you can use to generate content, publish social media posts, send emails, and so much more.
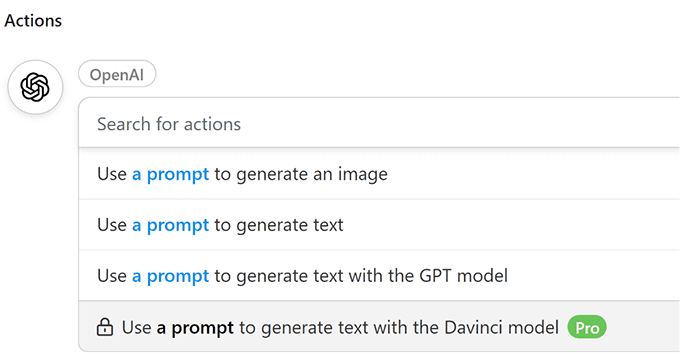
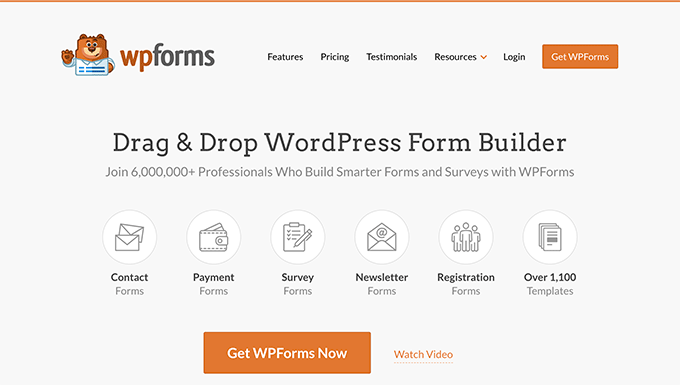
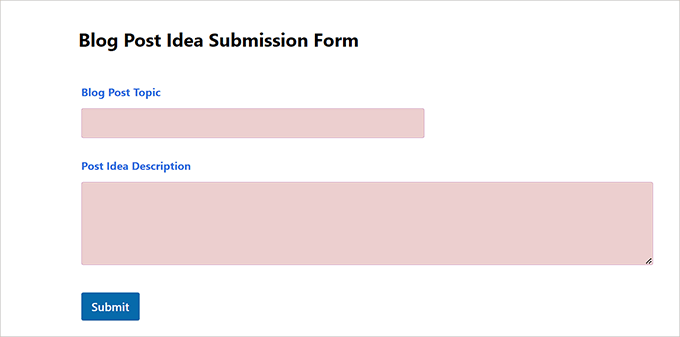
By connecting WPForms and ChatGPT using an automation plugin like Uncanny Automator, you can create smarter forms for your website.
For example, you can make a form that asks for a blog topic and a brief description for the post, and every time you submit the form, ChatGPT will automatically create a blog post for you on that topic.
You can easily connect WPForms with ChatGPT without using any code.
You can also use WPForms as an AI writing assistant after its integration with ChatGPT because it can generate content for you.
Some of its other features include spam protection, conditional logic, payment gateway integration, geolocation, and more.
Cons
You will have to use an automation tool like Uncanny Automator or Zapier to connect ChatGPT and WPForms.
Some of its premium features are locked in the free plan.
Why we recommend using WPForms: WPForms is the ideal ChatGPT plugin if you want to send automated and personalized emails to users upon form submission. Its integration with ChatGPT can further improve your form quality. You can even use both tools together as an AI writing assistant.
Formidable Forms is an advanced form builder plugin that can easily integrate with ChatGPT to help you create interactive forms.
It comes with a drag-and-drop builder and premade template that lets you create any type of form you want, including surveys, polls, quizzes, and more.
You can also add a ChatGPT field to your forms so that it will act like an AI assistant and help users through the form submission process.
This field will be able to answer customer queries in real time, generate personalized responses to user questions, provide feedback, and automate tasks based on user input. It will basically guide your users through the entire form-filling process.
It also comes with a shipping calculator feature that can estimate the total cost of a product you will have to pay with delivery.
Other than the ChatGPT field, you can also use AI templates offered by the plugin to create interactive forms.
Cons
It has limited functionality in the free plan, and its paid plan can be expensive for small businesses.
The ChatGPT field in the form cannot create content for your blog posts.
Formidable Forms has a learning curve and can be difficult to navigate for beginners.
Why we recommend using Formidable Forms: We recommend using Formidable Forms if you are looking for a ChatGPT plugin that can help your users fill out forms on your website. With its built-in ChatGPT field, Formidable Forms adds an AI assistant to your form that can provide suggestions, answer queries, and direct users to suitable options.
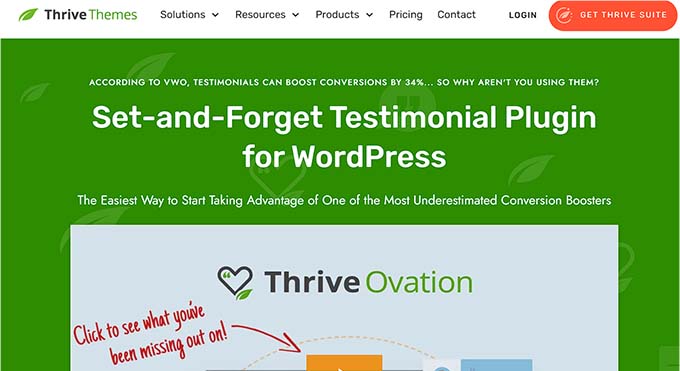
Thrive Ovation is the ideal ChatGPT plugin if you want to automatically display positive testimonials on your social media platforms.
It is part of the Thrive Suite and is a well-known testimonial plugin that allows you to easily collect, manage, and display testimonials in WordPress.
Once you connect this plugin with ChatGPT, the software will perform a sentiment analysis on each new testimonial submitted on your website.
With the help of an automation tool, ChatGPT will then automatically publish any positive testimonial on your social media platforms. This will help build social proof and encourage potential customers to check out your website.
Pros
Thrive Ovation comes with a drag-and-drop builder and also lets you turn WordPress comments into testimonials.
Using its integration with ChatGPT, the plugin can help drive traffic from social media platforms.
The tool comes with a dashboard where you can see an overview of your testimonials, including the ones that are ready for display, pending approval, or rejected.
It does not have built-in ChatGPT features. You will need to connect the plugin with ChatGPT using automation tools like Uncanny Automator or Zapier.
Why we recommend using Thrive Ovation: Thrive Ovation is the best WordPress ChatGPT plugin if you want to automatically publish positive testimonials on social media platforms. Upon integration, ChatGPT will run an analysis to find positive testimonials and use an automated workflow to share them on Facebook.
AI Engine is a free WordPress plugin that easily connects with ChatGPT to help you generate content for your website.
It is a great choice if you want to use ChatGPT for customer support. This is because the plugin lets you add ChatGPT as a chatbot using a shortcode.
The chatbot can then answer customer queries, solve any minor issues in your services, direct users to your support team, and help you provide support 24/7.
Pros
AI Engine lets you control the structure of your AI-generated blog posts by allowing you to determine the number of sections and paragraphs per section.
It also uses ChatGPT to generate meta descriptions, excerpts, images, product descriptions, and more.
If you have a multilingual website, then you can also use AI Engine for translations.
Cons
The plugin has a bit of a learning curve and can be difficult to navigate.
It relies on ChatGPT to perform most of the functions, which may have occasional outages or downtime.
Why we recommend using AI Engine: We recommend using this plugin if you want to provide customer support. AI Engine comes with premade templates for chatbots and popup models, and it makes it super easy to add chatbots to your site using a shortcode. AI Engine can also act as a writing assistant, making the plugin a good choice for a WordPress blog.
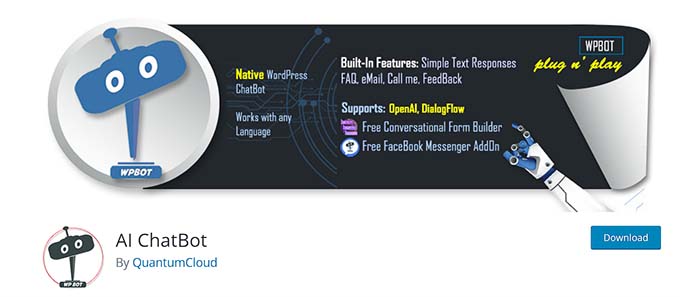
AI Chatbot is a great free ChatGPT WordPress plugin if you want to add a chatbot to your website.
This plugin easily connects with ChatGPT and shows a chatbot with text responses you created from the WordPress backend. It also displays some FAQs and asks users to provide their email or phone numbers so you can contact them later.
You can also use the AI Chatbot plugin to create a chatbot that collects user feedback for your products, services, or website.
Pros
You do not need to use any code to add a chatbot using this plugin.
Its integration with ChatGPT software is seamless.
The tool can help you build an email list by asking users to drop in their email addresses.
Cons
The plugin cannot be used to produce AI-generated content.
The chatbot is completely reliant on ChatGPT. This means that if the software is experiencing downtime, then the chatbot on your website won’t work either.
Why we recommend using AI Chatbot: Overall, AI Chatbot makes it super easy to add a chatbot that can ask for feedback or help you build an email list for your newsletter.
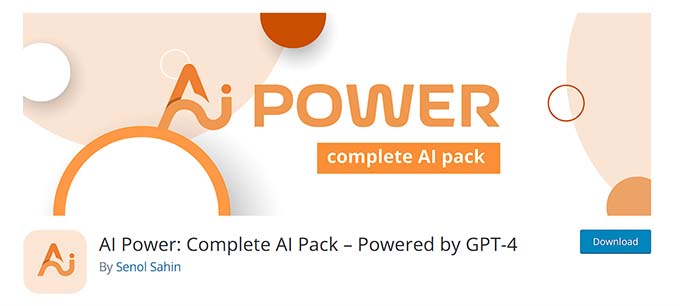
AI Power is a free WordPress plugin that connects with ChatGPT to use its content generator, image generator, and audio converter for transcripts.
It also comes with an auto content writer where you just have to provide a prompt or relevant keywords and AI Power will generate content for you.
Additionally, the plugin also offers premade ChatGPT-based form templates, which have two ChatGPT fields that can read a user’s input and provide answers to guide your users through the form-filling process.
Pros
AI Power has a WooCommerce product writer tool that creates product descriptions, titles, and marketing materials for your WooCommerce store.
It also comes with built-in SEO features to help your website rank higher. It can even integrate with tools like AIOSEO, Rank Math, and Yoast SEO.
AI Power can build and integrate chatbots on your website.
Cons
It is a complex plugin not suitable for beginners.
AI-generated content or chatbot responses used by AI Power can sometimes be misinterpreted by users, leading to confusion.
Why we recommend using AI Power: Overall, AI Power is an ideal ChatGPT plugin if you want to generate content using AI. It is also a good choice for WooCommerce stores because its product writer tool lets you generate product descriptions and titles in just a few minutes.
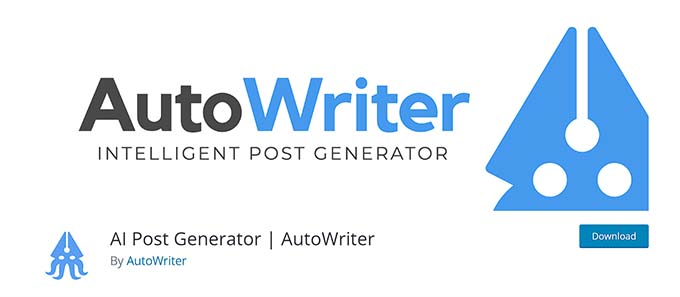
AI Post Generator is a free WordPress plugin that uses ChatGPT to generate high-quality content for your website.
It is a great choice if you run a WordPress blog because the tool makes it super easy to create relevant blog posts for your audience.
The plugin saves you a lot of time by automatically creating a new post as a draft once you enter a prompt or relevant keywords into the field.
Pros
AI Post Generator can improve your WordPress SEO by using keywords and phrases that are relevant to your target audience. It can also generate meta descriptions.
The plugin can generate content in any language, making it an ideal choice for a multilingual blog.
The plugin automatically finds and adds relevant images and heading tags to your posts.
Cons
It offers limited customization and personalization options for AI-generated content.
If you use this plugin for generating blog posts on your site, then you must verify the originality of the content first. This is because AI-generated content may contain similarities to existing text.
Why we recommend using AI Post Generator: We recommend using this plugin if you have a WordPress blog and want to publish content on your website daily.
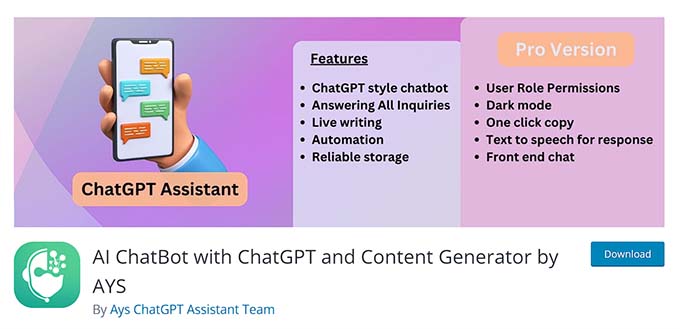
AI ChatBot with ChatGPT plugin comes with a built-in chatbot that uses ChatGPT to help you write custom code for your website right from your WordPress dashboard.
The plugin can also be used to generate content for your blog, while its chatbot can answer customer queries, showcase FAQs, and ask for user feedback on your website.
Additionally, the plugin can also use a text-to-speech response feature to give a more authentic customer support experience to the users on your WordPress website.
Pros
The plugin allows you to automate workflows for your chatbot.
It also comes with customizable options for the bot and lets you connect it to your website’s knowledge base.
The plugin uses ChatGPT to analyze user behavior and then provides personalized recommendations for products, services, or content.
Cons
The plugin’s chatbot’s responses can sometimes oversimplify complex issues with products or services.
The plugin sometimes provides incorrect information. We recommend double-checking any content you produce using this tool.
Why we recommend using AI ChatBot with ChatGPT: It is a great ChatGPT plugin for providing customer support for minor issues. Using this plugin will provide free time to your support members that they can use to focus on more complex problems.
AI Mojo is a free WordPress plugin that uses artificial intelligence to generate content, images, and forms for your website.
The plugin can easily create content for your blog posts, social media posts, or product descriptions once you provide a prompt or keyword.
Acting as a great AI writing assistant, AI Mojo can also convert audio files for easy text transcription, optimize your content for search engines, and make GPT forms that generate personalized responses.
Pros
AI Mojo has a library of pre-made prompts for a variety of content formats.
It lets you create chatbots for your website.
It can convert your existing website data into formats compatible with AI models.
Cons
The plugin does not offer great customer support.
You will need an API key to connect ChatGPT with the plugin.
It offers limited customization for AI-generated content and images.
Why we recommend using AI Mojo: The free plugin is a great choice if you want to add chatbots and generate AI content for your blog.
Which Is the Best ChatGPT WordPress Plugin?
In our expert opinion, All in One SEO is the best WordPress ChatGPT plugin on the market. It offers seamless integration with the AI software and makes it super easy to generate post titles and meta descriptions for your blog posts.
However, if you are looking for a plugin that allows you to connect ChatGPT with WordPress as well as other third-party platforms, then Uncanny Automator is the best option. The plugin can integrate with over 140 tools and automate workflows with ChatGPT.
If you have a WordPress blog and just want to easily generate content, then WPForms should be your go-to choice.
Similarly, if you are looking for a plugin that supports a ChatGPT integration in forms and allows the software to help with form submissions, then we recommend using Formidable Forms.
But if you are on a shoestring budget, then AI Engine and AI Power are great choices, too, because they use ChatGPT to generate content, images, and even a chatbot.
Frequently Asked Questions About ChatGPT WordPress Plugins
Here is a list of some frequently asked questions asked by our readers about using ChatGPT and OpenAI in WordPress.
What is the best ChatGPT SEO plugin for WordPress?
All in One SEO is the best WordPress SEO plugin on the market that also supports ChatGPT integration.
The plugin acts as a writing assistant and uses ChatGPT to create titles and meta descriptions for your blog posts. AIOSEO also optimizes your content so that it can rank high in search engine results.
Does ChatGPT generate SEO-friendly content?
ChatGPT can generate SEO-friendly content for your website by adding relevant keywords and phrases, writing concise titles and meta descriptions, structuring content, and avoiding keyword stuffing.
However, we still recommend proofreading all the content that you create using ChatGPT because the AI tool sometimes uses existing content on the internet, which can be interpreted as plagiarism. This can hurt your website rankings.
Do you want to show targeted ads to only visitors from search engines?
From our experience and the research of many industry experts, it seems that search engine visitors are more likely than your regular readers to click on targeted advertisements. By showing ads only to these visitors, you can boost the click-through rate (CTR) and increase sales.
In this article, we will show you how to display ads only to search engine visitors in WordPress.
Why Show Display Ads to Only Search Engine Visitors?
There are different ways to make money online, and showing display ads is one of them.
You can use Google AdSense to show ads on your WordPress blog and earn a set fee when a user clicks on the advertisements. This strategy is called cost-per-click (CPC).
However, getting more clicks can be a challenge if the ads aren’t targeted to the right audience. This is where limiting display ads to search engine visitors can help boost ad revenue.
Different studies, industry experts, and our own experience shows that visitors from search engines are more likely to click on ads on your site compared to other visitors. You can show the right ads to the right users and improve CPC.
This strategy also helps show ads only when they are needed. Having too many advertisements can be distracting and bad for the user experience. By displaying them to only search engine visitors, your WordPress website won’t be cluttered with ads.
That said, let’s see how you can display ads to only search engine visitors.
Showing Display Ads to Only Search Engine Visitors
To display ads to only visitors from search engines, you will need to add a custom code snippet to your WordPress website.
This might sound technical and difficult, but we will show you an easy way to add code snippets without editing code or hiring a developer.
WPCode is the best code snippet plugin for WordPress, and it helps you insert custom code anywhere on your site. It also helps you manage and organize all your code snippets.
Note: For this tutorial, we will use the WPCode Lite version, which is available for free. However, there are premium plans that offer more features like conditional logic, safe error handling, a code snippets library, and more.
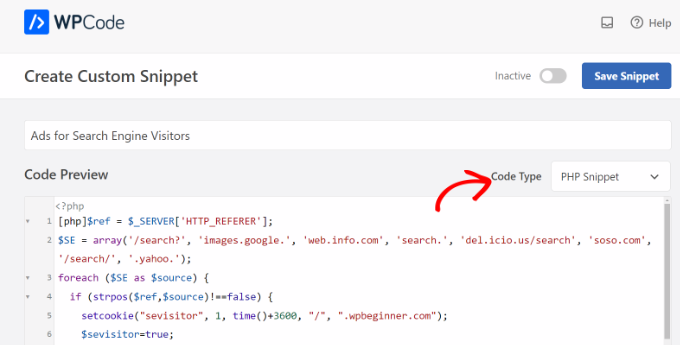
Upon activation, you need to head to Code Snippets » + Add Snippet from your WordPress dashboard. Next, click the ‘Add Your Custom Code (New Snippet)’ option.
From here, you will need to copy this code snippet:
$ref = $_SERVER['HTTP_REFERER'];
$SE = array('/search?', 'images.google.', 'web.info.com', 'search.', 'del.icio.us/search', 'soso.com', '/search/', '.yahoo.');
foreach ($SE as $source) {
  if (strpos($ref,$source)!==false) {
    setcookie("sevisitor", 1, time()+3600, "/", ".wpbeginner.com");
    $sevisitor=true;
  }
}

function wpbeginner_from_searchengine(){
  global $sevisitor;
  if ($sevisitor==true || $_COOKIE["sevisitor"]==1) {
    return true;
  }
  return false;
}
Note: In the setcookie line, be sure to change .wpbeginner.com to your own site domain.
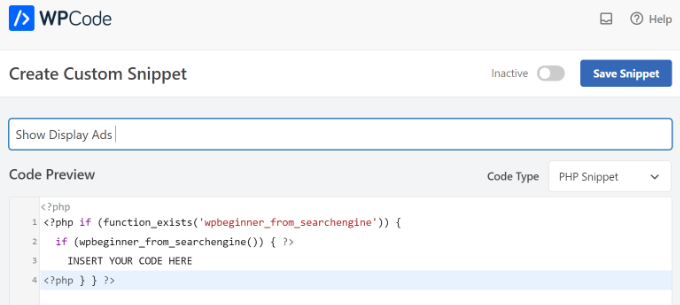
Next, you must paste the code into the WPCode ‘Code Preview’ area. You will also need to enter a name for your snippet and then click the ‘Code Type’ dropdown menu and select the ‘PHP Snippet’ option.
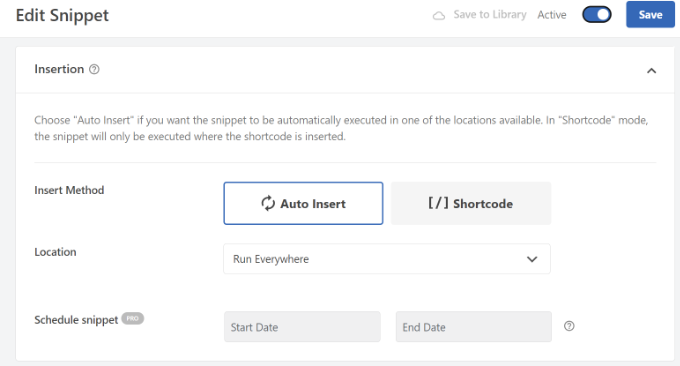
After that, you will need to scroll down and select the Insertion method for the code snippet.
WPCode will use the ‘Auto Insert’ option by default and run the code everywhere. However, you can change this and insert the custom code on specific pages, before or after content, show it on eCommerce pages, and more.
As an alternative, you can also switch to the ‘Shortcode’ insertion method and manually enter a shortcode to run the code snippet.
For this code snippet, we recommend using the Auto Insert method.
Once you are done, don’t forget to click the toggle at the top to activate the code snippet, and then click the ‘Save Snippet’ button.
Choose Where to Display Ads on Your Site
Next, you will need to add another code snippet and choose where you’d like to display the ads to only search engine users.
Simply copy the following code:
<?php if (function_exists('wpbeginner_from_searchengine')) {
  if (wpbeginner_from_searchengine()) { ?>
    INSERT YOUR CODE HERE
<?php } } ?>
Note: Don’t forget to replace ‘INSERT YOUR CODE HERE’ in the above snippet with your Google AdSense code.
The snippet above uses the first code as a reference and analyzes whether the referrer agent is from any type of search URL, which includes Google, Yahoo, Delicious, and more.
If a visitor’s browser says that the referrer agent is from any search site that you have specified, then it will store a cookie on their browser called ‘visitor’ for 1 hour from the time they visited your site.
To add the code, simply go to Code Snippets » + Add Snippet from your WordPress dashboard and select the ‘Add Your Custom Code (New Snippet)’ option.
Next, you can enter a name for your code snippet at the top and paste the code into the ‘Code Preview’ area.
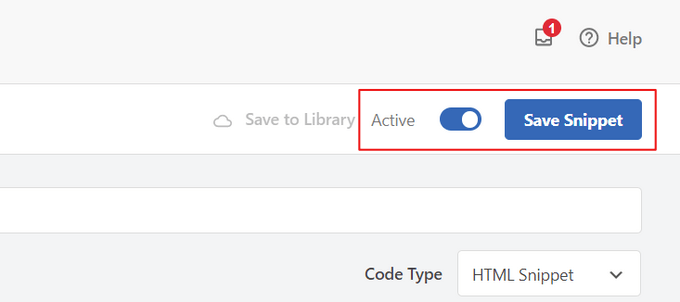
You will also need to change the ‘Code Type’ by clicking the dropdown menu and selecting the ‘PHP Snippet’ option.
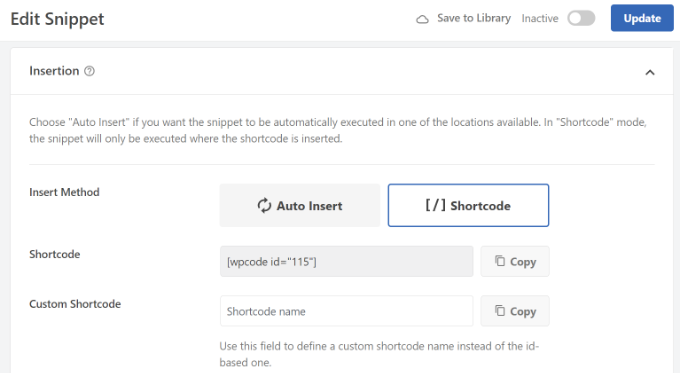
After that, you can click the ‘Save Snippet’ button and scroll down to the Insertion section.
Here, you will need to select the ‘Shortcode’ method. This way, you can easily add the shortcode to show display ads anywhere on your site.
You can copy the shortcode or write it down in a notepad file.
When you are done, don’t forget to click the toggle at the top to activate the code and then click the ‘Update’ button.
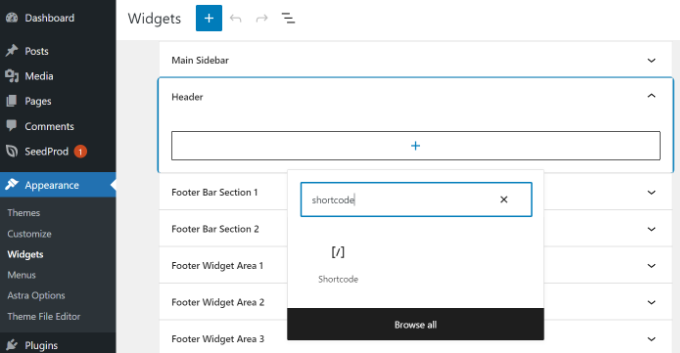
To add the shortcode, you can head to any section of your website. For example, if you want to show banner ads to search engine users in the sidebar, then just go to Appearance » Widgets from the WordPress dashboard.
From here, you can click the ‘+’ button to add a Shortcode widget block to the sidebar area.
Go ahead and enter the shortcode you just copied. Once you are done, simply click the ‘Update’ button.
WordPress will now display the search engine-specific ads that you have chosen to these users for a total of one hour from the time they first visited your site.
If this user bookmarks your site and comes back to it one day later because they like your content, then they will be considered your regular reader and will not see the search engine-specific ads.
Do you want to show Trustpilot reviews on your WordPress website?
Trustpilot is one of the most well-known online review platforms. By displaying testimonials from Trustpilot users on your site, you can easily build credibility and trust with your audience.
In this article, we will show you how to display Trustpilot reviews on your website.
What Is Trustpilot?
Trustpilot is a consumer review website. When users go to Trustpilot, they can find a business to review, write a testimonial, and give the brand a star rating on a scale of 1 to 5.
They can also read reviews for businesses they are interested in so that they can be better informed about their decisions.
For business owners, Trustpilot gives them a chance to invite their most loyal customers to leave positive testimonials for the brand. If the business receives a negative review, then they can respond to it and address the customer’s concerns.
Pros and Cons of Trustpilot Reviews
If you are interested in using Trustpilot, you may be wondering whether it’s a good fit for you. Let’s review this platform’s pros and cons.
Pros of Trustpilot
It’s a popular and reputable review website, so displaying reviews from there can boost your social proof.
It has a free plan, making it accessible for new businesses.
Besides WordPress, it can be integrated with other third-party tools like PayPal, Pinterest, Facebook, and more.
Cons of Trustpilot
Trustpilot’s free plan allows anyone to be listed on the platform, regardless of their credibility or reliability.
Trustpilot shows ads on your profile page unless you pay $250 monthly per domain.
They also restrict the number of verified review invitations you can send monthly.
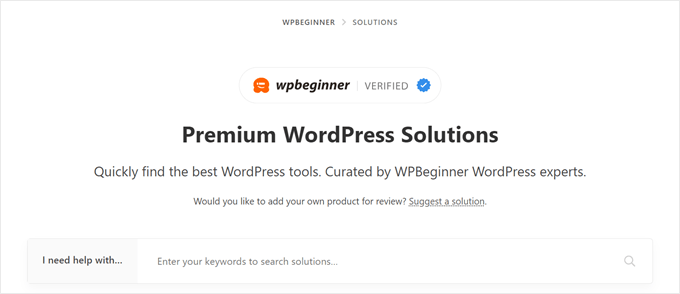
If you are looking for a platform to get more WordPress product reviews, then look no further than our WPBeginner Solution Center.
As you know WPBeginner is the largest free WordPress resource website.
WPBeginner Solution Center is your one-stop review hub for finding WordPress products, including WordPress plugins, themes, web hosting, marketing tools, etc., to help grow your business.
Unlike Trustpilot, only WordPress products are reviewed at WPBeginner Solution Center so your customers can find the best solution for their needs.
Here are a few benefits of getting your WordPress products listed on WPBeginner Solution Center:
Free expert review: Most WordPress bloggers charge $600+ for publishing a product review. With WPBeginner Solution Center, you can get it published for free.
Ad-free page: Your competitors’ ads will never be published on your product listing page.
Get a WPBeginner verified badge: Foster trust among your potential customers by displaying a WPBeginner verified badge on your website.
If you have a WordPress product and want to get listed in the WPBeginner Solution Center, then you can go ahead and submit your application here.
Now, if you still want to display Trustpilot reviews on your WordPress website, then don’t worry. We will walk you through the process using 2 methods, and you can use the quick links to skip to the one you want to use:
Note: If you don’t have a Trustpilot business account already, then we recommend creating one to list your product.
Method 1: Displaying Trustpilot Reviews With Reviews Feed Pro (Recommended)
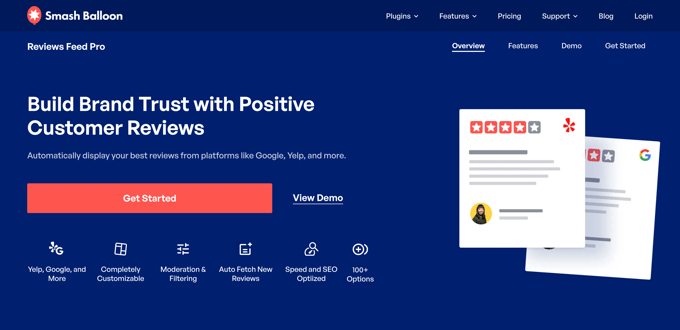
The first method for displaying Trustpilot reviews uses the Reviews Feed Pro plugin by Smash Balloon. It’s the easiest WordPress plugin for automatically showing customer reviews from various websites.
Besides Trustpilot, you can display reviews from Yelp, TripAdvisor, Google, and your Facebook page. If you use many review sites, then Reviews Feed Pro makes it easy to manage them all in one place.
For more information about Reviews Feed Pro, you can read our full Smash Balloon review.
The first step is to install and set up the Reviews Feed Pro Plugin. For this tutorial, you will need the Plus or Elite plan, as that’s where the Trustpilot feature is available. Alternatively, you can get the All Access Bundle if you want to use Smash Balloon’s social media plugins, too.
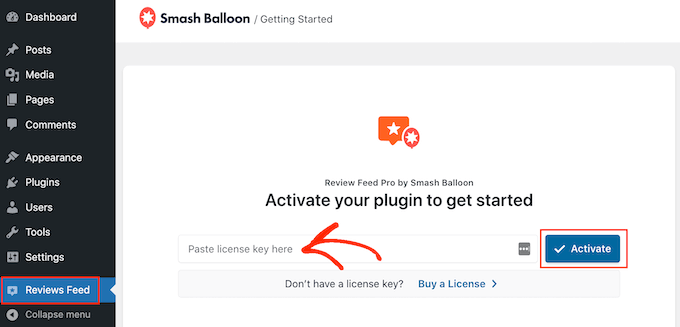
Once you have made your purchase, go ahead and install and activate the plugin. For more information, check out our article on how to install a WordPress plugin.
After the plugin is active, make sure to activate the license key. On the plugin’s Getting Started wizard, insert your license key and click ‘Activate.’
Connecting Your WordPress Website With Trustpilot
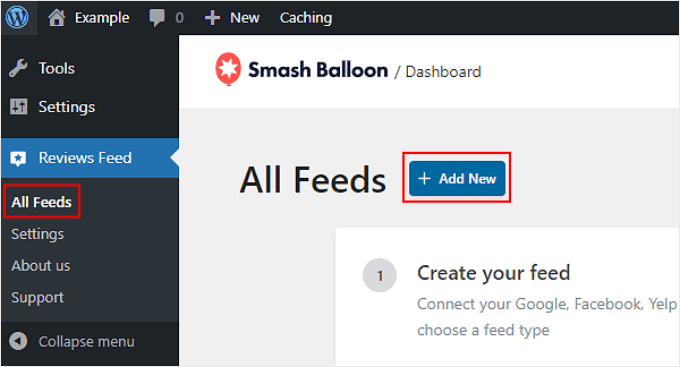
At this point, you can start integrating your WordPress website with your Trustpilot page.
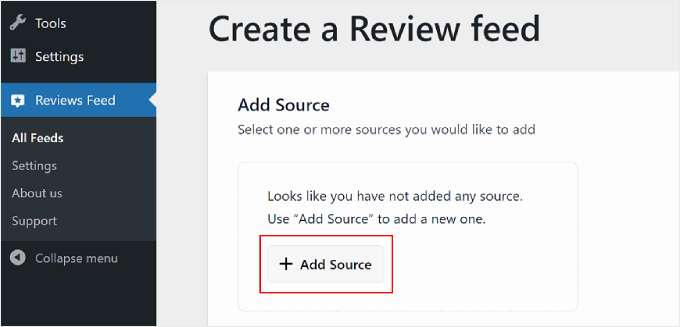
To do that, head to Reviews Feed » All Feeds and click ‘+ Add New.’
On the next page, select ‘+ Add Source.’
Note that you can choose more than one source to get your customer reviews.
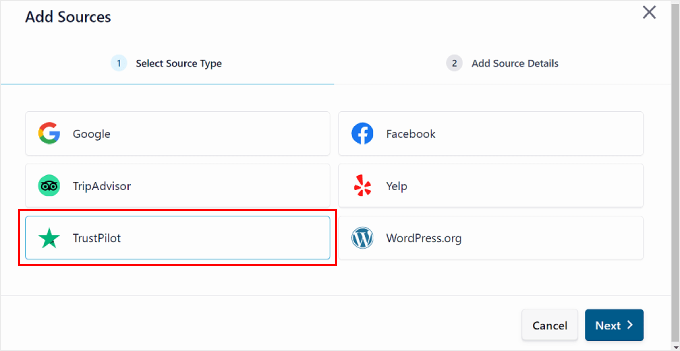
A popup will appear asking you to choose a review website.
Pick ‘Trustpilot’ and then click ‘Next’ in the bottom right corner.
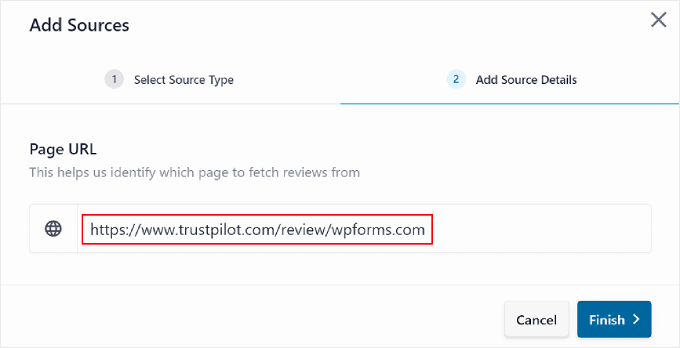
In the next popup window, simply type the URL of your Trustpilot review page into the field.
After that, hit the ‘Finish’ button.
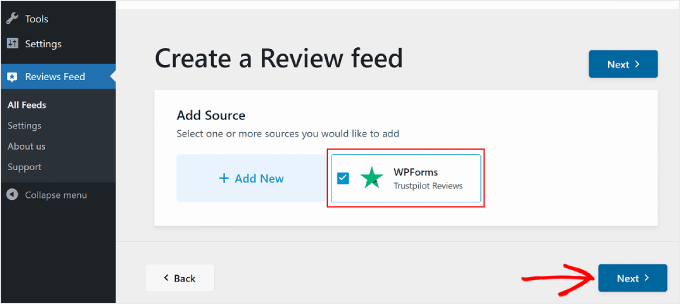
If the connection is successful, you should see your Trustpilot page listed in the Add Source section.
Now, just click ‘Next’ to continue.
Customize the Trustpilot Review Cards
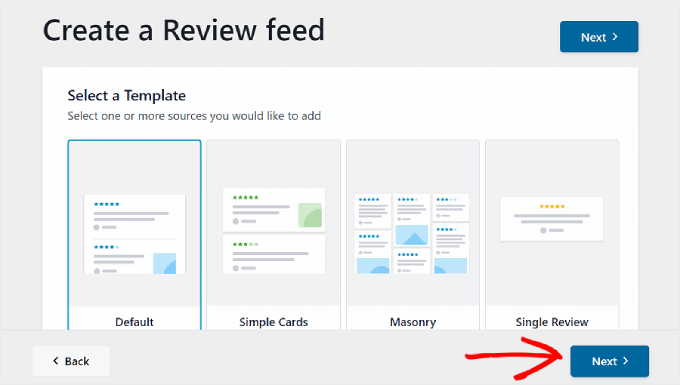
After completing the setup stage, you can select a template to display your Trustpilot reviews. There are 7 choices: Default, Simple cards, Masonry, Single review, Showcase carousel, Carousel, and Grid carousel.
All of the templates are customizable, so you can modify them to your exact needs.
Once you have made your choice, click ‘Next.’
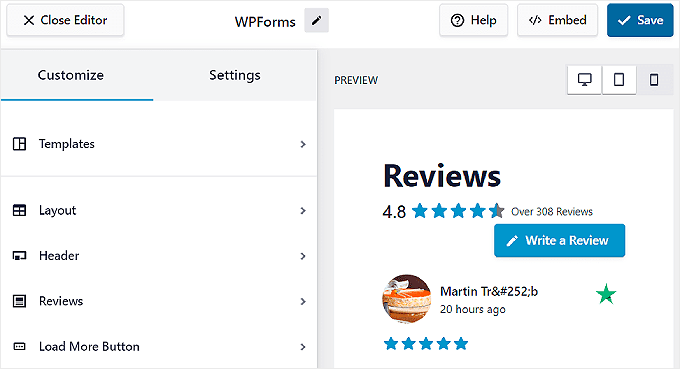
You are now inside the Trustpilot review template editor.
For this step, we will focus on the 5 settings within the Customize tab: Templates, Layout, Header, Reviews, and Load More Button.
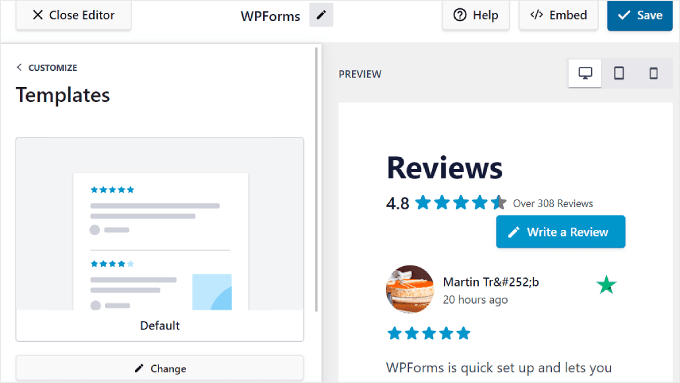
If you want to switch templates later on, you can do that using the ‘Templates’ setting.
However, note that every customization you’ve made to the previous template will be overridden.
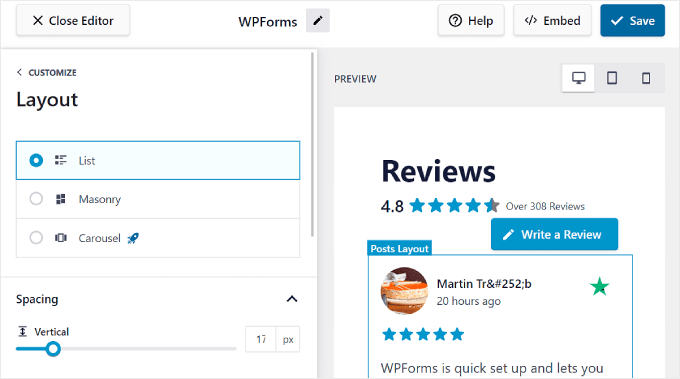
To change how the template looks, go to ‘Layout.’ In this tab, you can change the card’s layout to a List, Masonry, or Carousel.
You can also adjust the spacing between the reviews so that they are more readable.
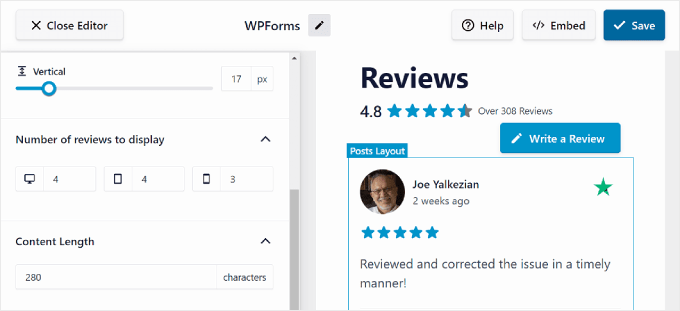
Scrolling down, you can customize the number of reviews to showcase. You can change this based on whether the website is viewed on a desktop, mobile, or tablet device.
Additionally, feel free to adjust the number of characters that each review should display at maximum.
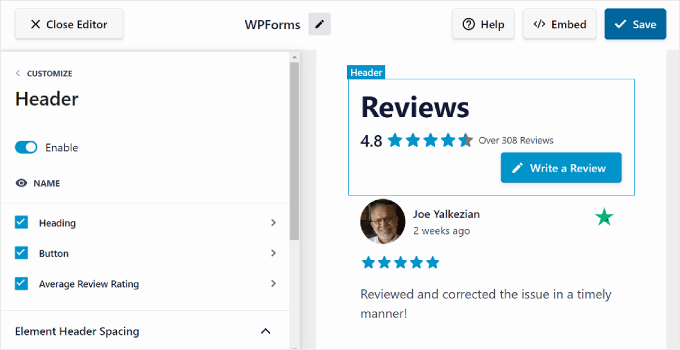
With the Header setting, you can modify the top section of the review card and select what elements to display there.
For example, you can show the average rating of all of your Trustpilot reviews to provide visitors with a quick overview of your overall reputation.
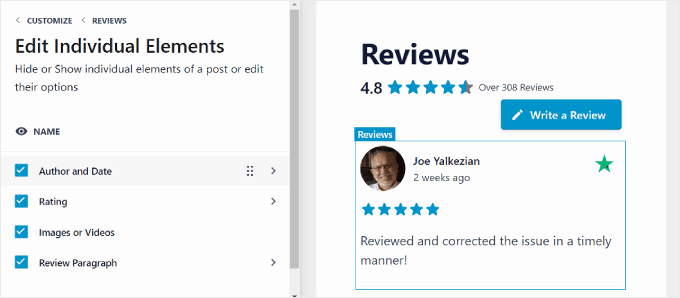
In Reviews, you can select whether to enable or disable review elements like Author and Date, Rating, Images or Videos, and Review Paragraph.
It’s also possible to rearrange them to your preferences.
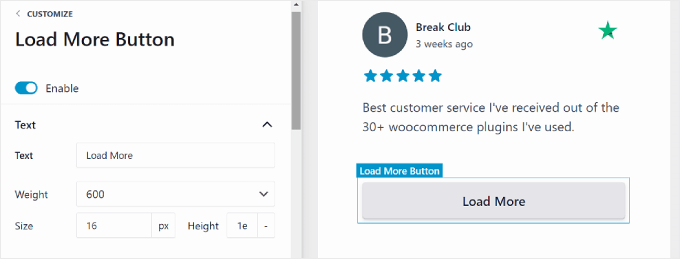
The final setting in the Customize tab is the Load More Button, which will come in handy if you have many reviews and don’t want to display them all in one list.
You can customize the button text, color, and spacing to suit your website design.
Configure the Displayed Review Settings
In some situations, you might want to choose which reviews people can see. This way, you can avoid showing too many negative reviews and create a good impression for new users.
Or you may want them to show the newest reviews first so visitors get the latest thoughts about your product or service.
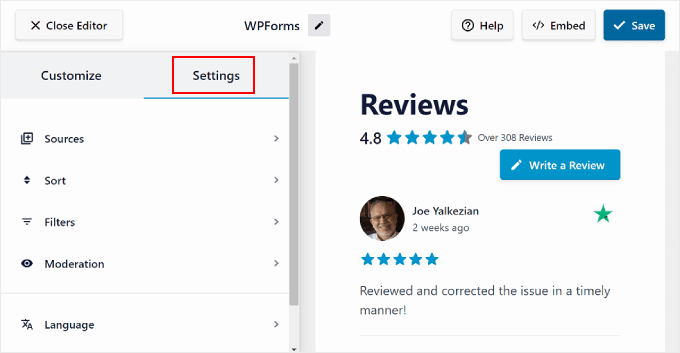
To do this, you can switch to the ‘Settings’ tab, which is next to the Customize tab. For this step of the guide, we will focus on Sort, Filters, Moderation, and Language settings.
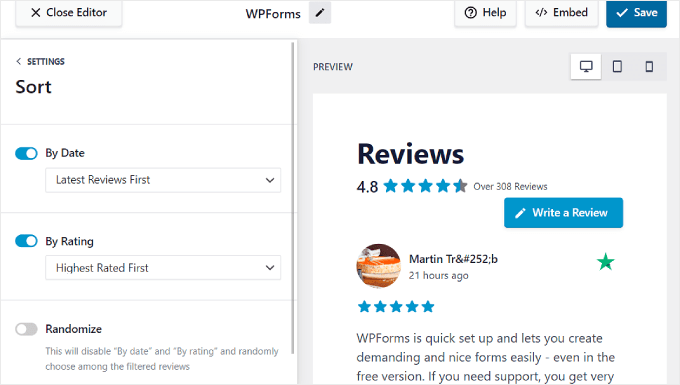
If you want to determine what type of reviews get shown at the top, you can navigate to the ‘Sort’ menu.
In this setting, you can choose to display the reviews by date, such as the oldest or newest reviews first. Or, you can show them based on the highest or lowest star rating. If you don’t have a specific preference, simply select ‘Randomize.’
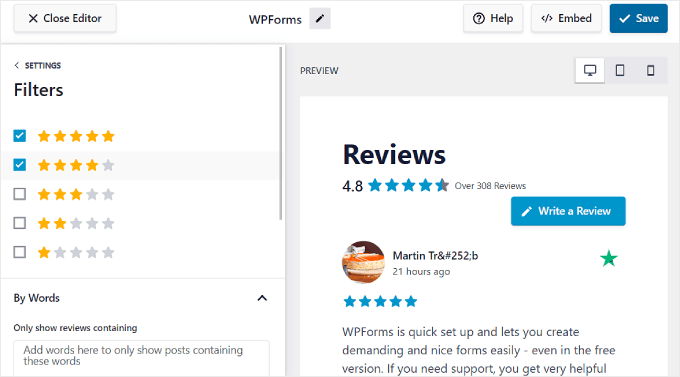
To filter what reviews are shown, go to the ‘Filters’ menu.
Here, you can choose to display reviews based on certain criteria, like star ratings and certain keywords. The latter may be useful if you are choosing to show specific product reviews for a certain product page.
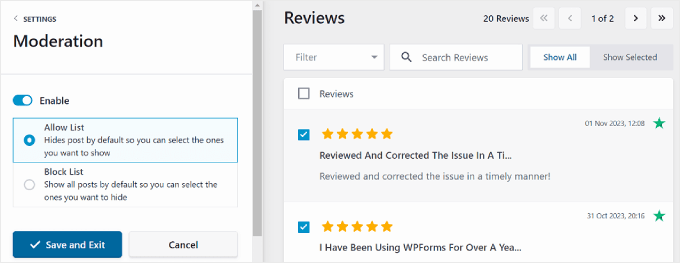
You also have the Moderation setting, which allows you to only display specific reviews on your website.
In this setting, you will need to activate the ‘Enable’ button. Then, you can select between the Allow List or Block List mode. The first lets you pick which reviews are eligible for display, while with the latter, you can choose which reviews get hidden.
Note that the reviews plugin can only show the last 100 reviews from Trustpilot due to the platform’s API limitations.
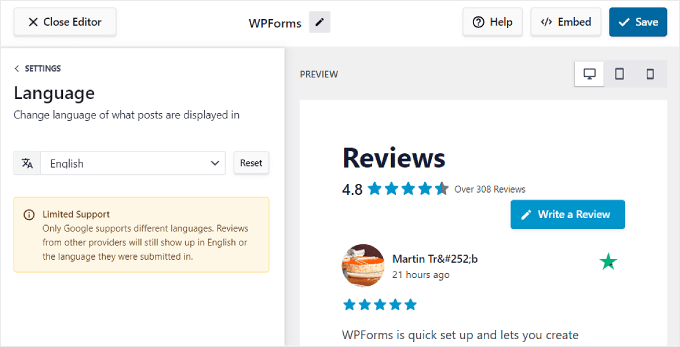
Now, let’s say you run a multilingual website and want to display reviews using a specific language.
For this, you can go to ‘Language’ in the Settings tab and choose your desired language from the dropdown menu.
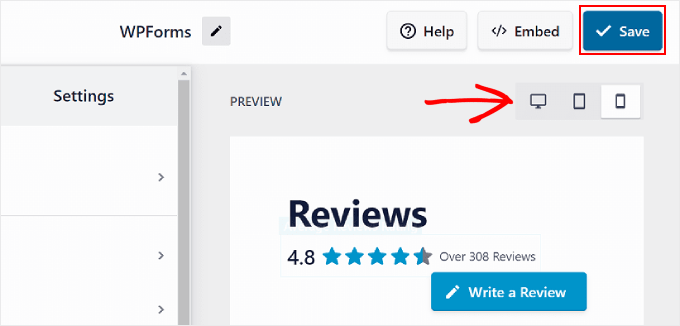
Once you are done configuring the review cards, you can use the device preview buttons near the top right corner to see what they look like on desktop, tablet, and mobile. This way, they will look good no matter what device the visitor is using.
Then, when you are satisfied with the review cards, simply click the ‘Save’ button.
Embed Trustpilot Reviews on a WordPress Page or Post
Let’s go ahead and add your Trustpilot reviews to your web pages.
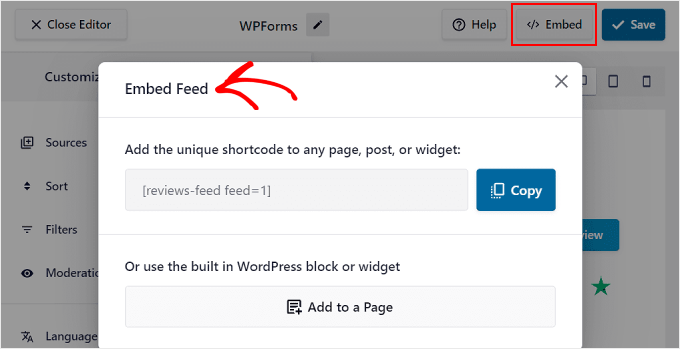
For this, you will need to click the ‘Embed’ button next to ‘Save.’ The Embed feed popup should appear.
You have two options to add your Trustpilot reviews: using a shortcode or the built-in WordPress block or widget.
Between these two, the easiest method is the block or widget route.
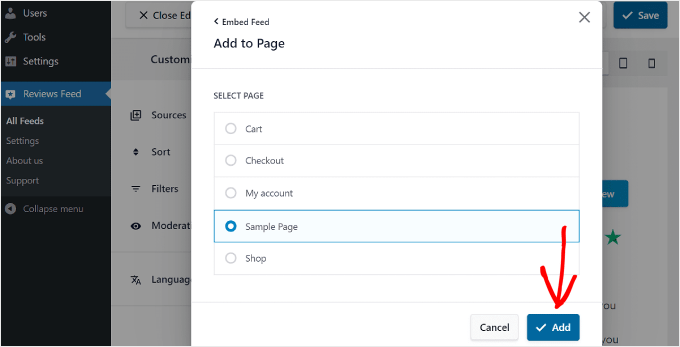
All you need to do is click the ‘Add to a Page’ button. Depending on your WordPress theme, you may also see another option labeled ‘Add to a Widget’ as well.
After that, select your desired page. Once done, hit the ‘Add’ button at the bottom of the popup.
You will then be redirected to the WordPress block editor for that page and see instructions on how to add the Reviews Feed block there.
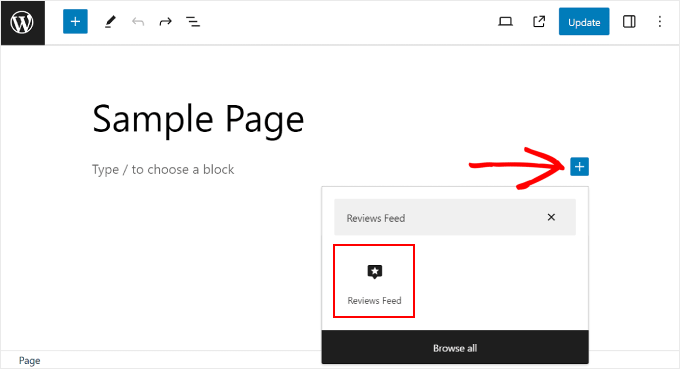
Simply click the black ‘+’ add block button anywhere on the page and search for ‘Reviews Feed.’
Once you’ve done that, just drag and drop it to wherever is best on the page.
All you need to do now is click the ‘Update’ button to finish adding the block.
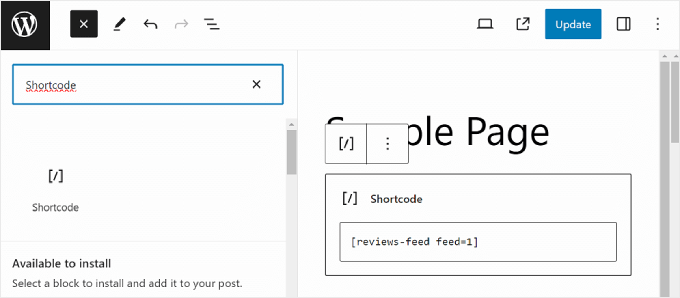
The shortcode option is ideal when you want to show reviews in a place that the plugin doesn’t automatically handle, such as a blog post. To do this, click the ‘Copy’ button and go to the page or post where you want to put the Trustpilot reviews.
Then, use the shortcode block to paste the copied shortcode there, like so:
The same as the previous method, just click the ‘Update’ button to make the changes official. And that’s it!
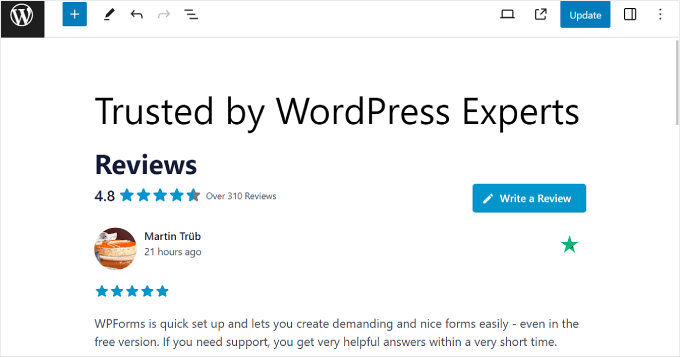
Here’s an example of what the Trustpilot review card may look like on your website:
Method 2: Displaying Trustpilot Reviews With Trustpilot Plugin (Free)
This second method uses the official WordPress Trustpilot Reviews plugin, which is available for free for Trustpilot business account owners.
Depending on which Trustpilot plan you use, however, the customization options and functions may not be as extensive as Reviews Feed Pro.
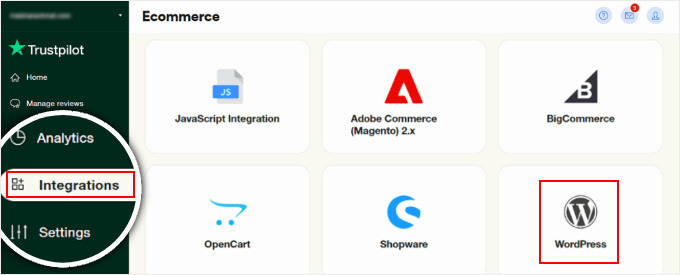
To start, simply log in to your Trustpilot account and navigate to the ‘Integrations’ menu. In the Ecommerce section, select ‘WordPress.’
You will see a ‘Download zip file’ button to access the Trustpilot plugin package.
Just click on the button and install the plugin to your WordPress admin panel. You can follow this guide on how to install and activate a WordPress plugin for step-by-step instructions.
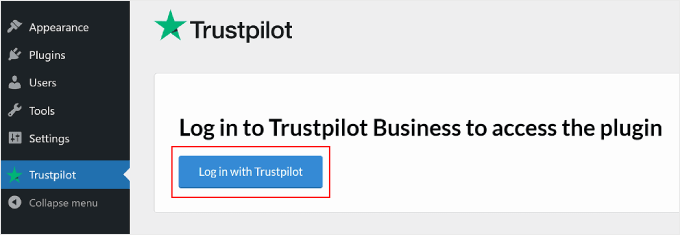
By now, you should have the Trustpilot plugin installed and activated.
Go ahead and open the Trustpilot tab on your WordPress dashboard. Then, click ‘Log in with Trustpilot’ to connect the plugin to your account.
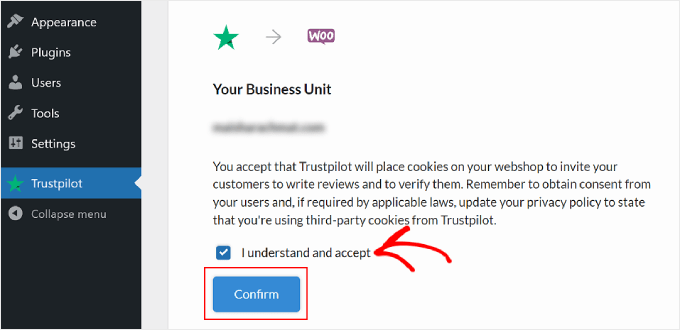
After that, you will see a cookie placement notification from Trustpilot.
Just tick the ‘I understand and accept’ box and click ‘Confirm’ to continue.
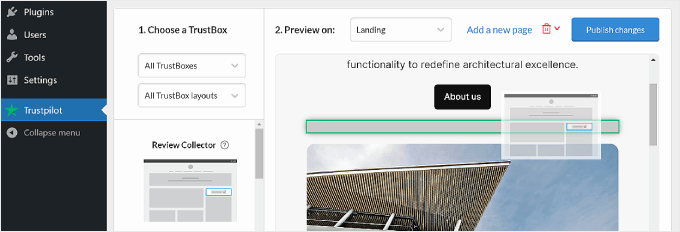
Now, you can start adding a Trustpilot review card, also called the TrustBox, to your website.
All you need to do is choose a TrustBox from the left panel and drag and drop it to the preview side of the page.
You can filter through the different available TrustBoxes using the dropdown menus below the ‘Choose a TrustBox’ section.
Note: For free Trustpilot plan users, the only TrustBox you can use is the Review Collector. This TrustBox invites users to go to Trustpilot and review your business rather than showing testimonials made by previous customers.
To get more options, you will need to upgrade to a paid Trustpilot plan.
Also, feel free to change the preview page to other pages, such as the product category or single product pages, using the menu next to ‘Preview on:’
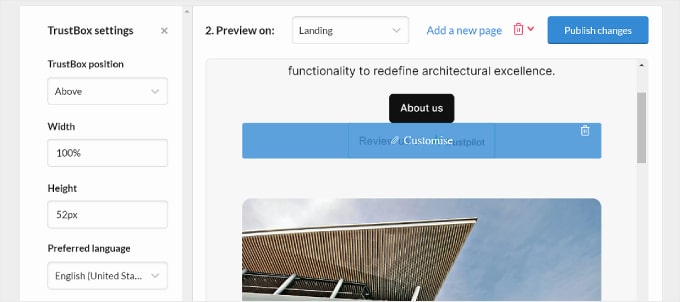
To customize the TrustBox, hover over the TrustBox element and click ‘Customise.’
You should see some TrustBox settings on the left side, allowing you to change the positioning, spacing, sizing, and language.
Once you are happy with how the TrustBox widgets look, you can click the ‘Publish changes’ button in the top right corner.
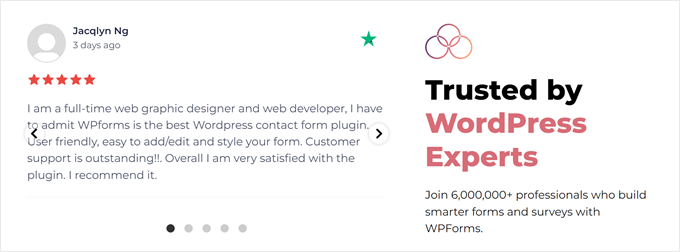
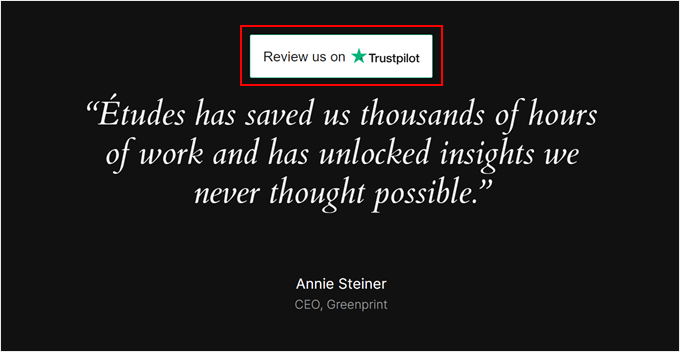
Here is what the Review Collector TrustBox looks like on our test site:
Bonus Tip: Add Social Proof Notifications to Build Your Credibility
Adding Trustpilot reviews is just one way to build your brand’s trustworthiness. Another thing you can do is add real-time social proof notifications to your WordPress website.
These are basically small notifications that appear on your website when someone makes a purchase from your business. Here’s an example:
With this, you can show potential customers that real people are making purchases from your online store. This can encourage them to do the same.
If you want to do this, we recommend using TrustPulse. It’s the best WordPress social proof plugin available. Like in the screenshot above, it can display real-time notifications of products being bought on your website.