Do you want to block a WordPress user from your blog?
The simplest way to achieve this is to delete their user profile, but this will remove them completely from your site.
In this article, we will show you how to block or disable a WordPress user without deleting their account.
When You Shouldn’t Delete a User Account
The easiest way to block a user on your WordPress website is by simply deleting their user account.
However, deleting a user account in WordPress requires you to assign all their content to another user. This will change the author information for those articles.
One way to deal with this issue is to change the user’s password and email address by editing their user profile. This will block their access, and they will not be able to log in. However, this will also change their Gravatar image.
The ability to disable a user without deleting their account is especially helpful on multi-author blogs, forums, as well as community sites.
Now, let’s take a look at how you can easily block a WordPress user without deleting their user account. We will cover three methods, and you can use the quick links below to jump to the method you want to use:
Method 1: Blocking a User by Downgrading Their Role
Your WordPress website comes with a powerful user management system that allows you to assign different roles to each user.
One way to block a WordPress user is to downgrade their role. This won’t stop them from logging in to your WordPress site, but it will restrict what they can do after they log in. If you don’t want them to be able to log in at all, then you should use Method 2 or 3 instead.
Downgrading the User Role to Subscriber
You could downgrade the user’s role to Subscriber. Once they log in, they will be given limited access to the WordPress admin area. They will only be able to change their user settings, such as their name and admin color scheme.
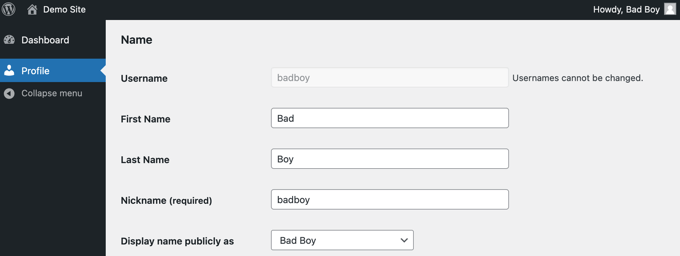
However, this can be a problem if the user has written posts on your site. If they want to cause trouble, then they can change their name to something offensive, and it will be displayed on all of their posts on your website.
Downgrading the User Role to ‘No Role for This Site’
A better role to give users you wish to block is ‘No role for this site’.
When they log in, they will not be directed to the admin area. If they try to navigate there, then they will be shown an error message stating that they don’t have access.

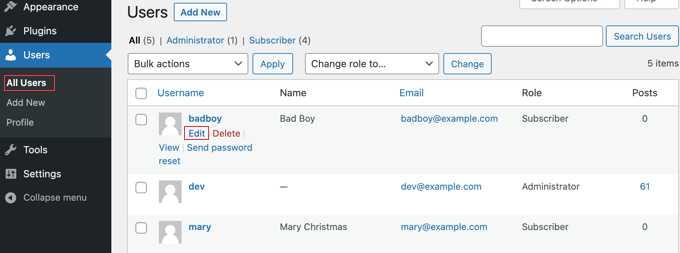
First, head over to the Users » All Users page of your admin area.
Next, you need to click the ‘Edit’ link under the user you wish to block.
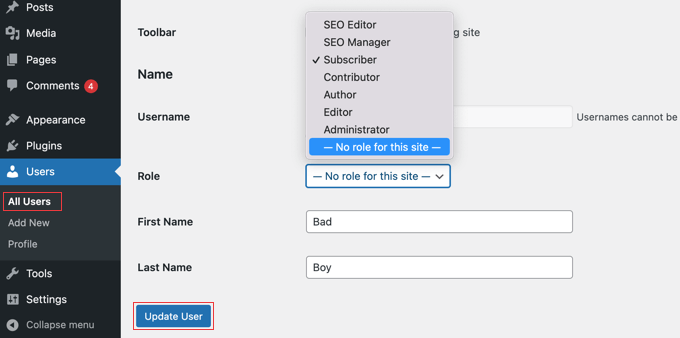
Now you need to scroll down to the ‘Role’ setting and select ‘No role for this site’ from the dropdown menu.
After that, you should click the ‘Update User’ button at the bottom of the page to store your settings.
The user will no longer be able to access any admin settings on your WordPress website.
If you wish to unblock a user in the future, then simply follow the same steps to assign them their previous role.
Method 2: Blocking a WordPress User With ‘Lock User Account’
Lock User Account is a light plugin that does just one job. Upon activation, you are ready to block users so that they can’t log in to your website.
The first thing you need to do is install the Lock User Account plugin. For more details, see our step-by-step guide on how to install a WordPress plugin.
Blocking a User
Start by navigating to the Users » All Users page of the admin dashboard. Once there, you should click the checkbox next to every user you wish to block.
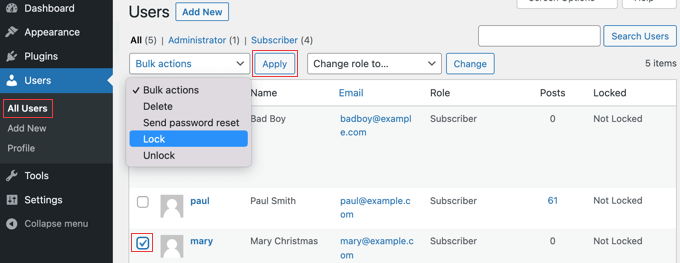
Next, simply click the ‘Bulk actions’ button, select ‘Lock’ from the menu, and then click the ‘Apply’ button.
Next time these users try to log in, they will be blocked and see the error message ‘Your account is locked!’
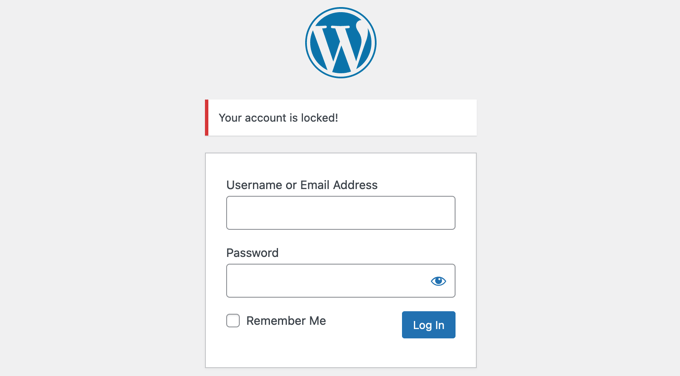
Unblocking a User
If you wish to unblock the user in the future, then simply follow the same steps but choose ‘Unlock’ from the ‘Bulk Actions’ menu.
Changing the Lock Message
You can customize the message that locked users see when trying to log in to your website.
You need to navigate to Settings » General and then scroll to the bottom of the page. You will find a Lock User Account section with a single option called ‘Locked User Message’.

Simply type the message you want locked users to see in this field, and then click the ‘Save Changes’ button to store the settings.
Method 3: Blocking a WordPress User on Certain Days or Dates
What if you don’t want to block a user permanently? Maybe you wish to ban a user for, say, 2 weeks or allow a certain team member to log in only during business hours.
In that case, you can use the User Blocker plugin. Besides being able to block users permanently, it also allows you to block them during certain times on different days of the week or over a date range.
The first thing you need to do is install the User Blocker plugin. For more details, see our step-by-step guide on how to install a WordPress plugin.
Upon activation, you should navigate to the User Blocker page in your dashboard. Here, you can choose whether to opt-in to the User Blocker mailing list and share non-sensitive data with the developer to help improve the plugin.
Simply click the ‘Skip & Continue’ or ‘Opt-In & Continue’ button.
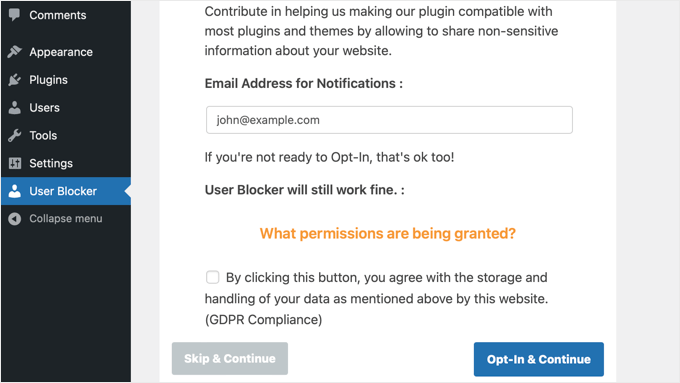
After clicking one of those buttons, you will see the User Blocker settings page.
There are three tabs, so you can block a user by time, date, or permanently. By default, you see the ‘User By Time’ tab.
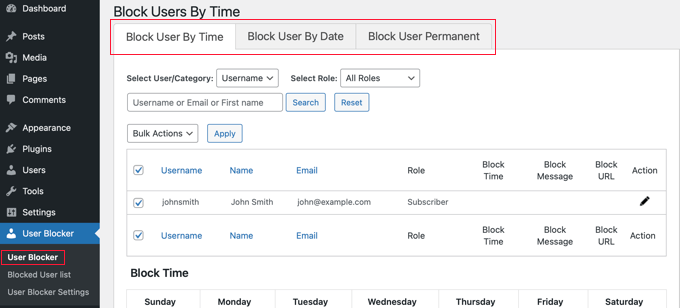
Blocking a User by Time and Day
With the ‘Block User By Time’ tab selected, simply place a checkmark next to the name of all users you wish to block by time. Alternatively, you can block users who have a certain user role by selecting ‘Role’ from the dropdown menu.
If your website has a large number of users, then you can use the search feature to find them more easily.
Then in the ‘Block Time’ section, you can enter the times you wish to block those users on each day of the week. You can type the times or choose them from a dropdown menu.
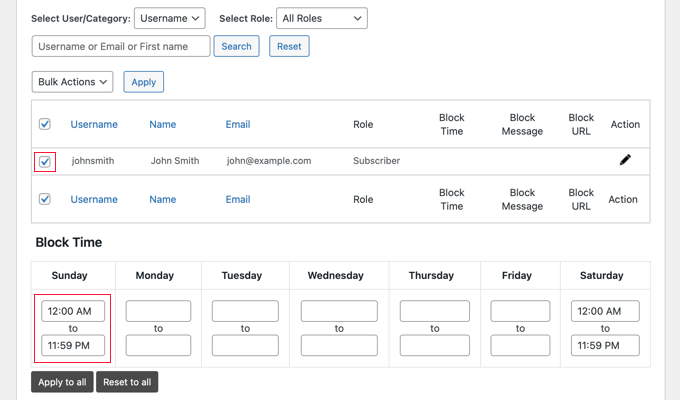
You can quickly copy the same beginning and end time to each day of the week by clicking the ‘Apply to all’ button. The ‘Reset to all’ button will clear all of the times you entered.
After that, you can scroll down to the ‘Block Message’ section. When a blocked user tries to sign in, they will see a default message. However, if you want to display a more customized block message, you can type it here.

Instead of displaying an error message when a blocked user tries to sign in, you can redirect them to another page on your website, such as your Terms of Service page or Privacy Policy. If you’d like to do that, then simply paste that page’s URL into the box provided.
When you are happy with the settings, just make sure you click the ‘Block User’ button. The users you selected will now be blocked from logging in during the times and days you selected.
By repeating these steps, you can block other users for different time periods.
Blocking a User by Date Range
If you wish to block one or more users during a certain date range, then you should click the ‘Block User By Date’ tab at the top of the screen.
You will be able to select the usernames or roles that you wish to block.
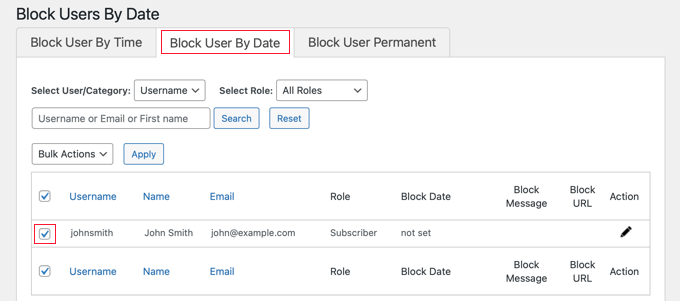
Next, you should scroll down to the ‘Block Date’ section.
You can enter the date and time the block will start and end. Simply select the starting and finishing dates and times from the dropdown menus. The time will be in a 24-hour format.
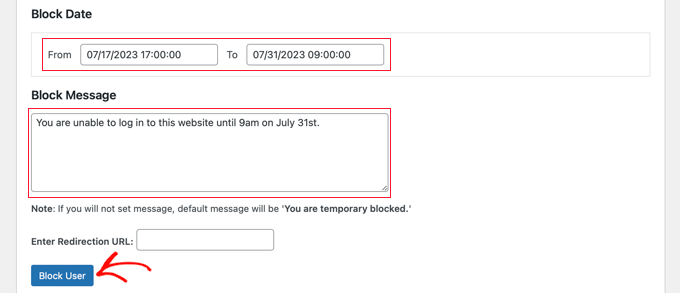
You can also add a custom message that the users will see when trying to log in. Alternatively, you can enter the URL of the page you wish to redirect them to.
When you are finished, don’t forget to click the ‘Block User’ button.
You can block other users for different date ranges by repeating the steps above.
Blocking a User Permanently
You should make sure you are in the ‘Block User Permanent’ tab, and then you can select the usernames (or roles) that you wish to block permanently.
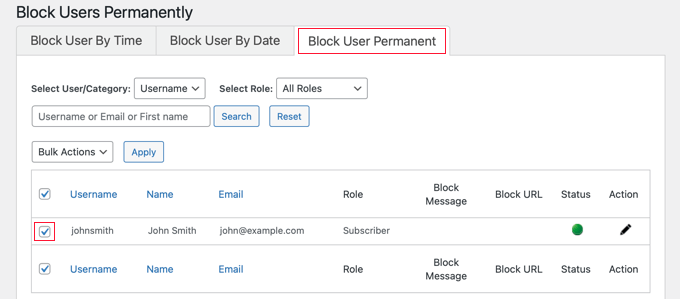
After that, all you need to do is type a custom message that blocked users will see when they try to log in to your website.
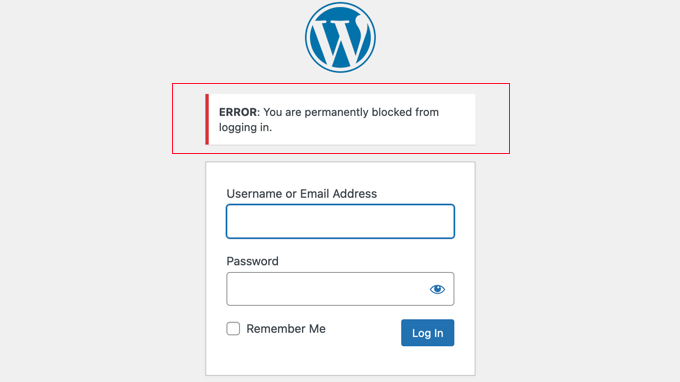
Or you can leave the box blank, and they will see the default message. This says, ‘You are permanently Blocked.’

Or, like the other options above, you can redirect the users to a web page rather than displaying a message. Simply type the page’s URL in the ‘Enter Redirection URL’ box.
Now when the blocked users try to sign in, they will see an error message.
We hope this tutorial helped you learn how to block a WordPress user without deleting their account. You may also want to see our ultimate WordPress security guide or our expert picks for the best WordPress security plugins.
If you liked this article, then please subscribe to our YouTube Channel for WordPress video tutorials. You can also find us on Twitter and Facebook.
The post How to Block a WordPress User Without Deleting Their Account first appeared on WPBeginner.
from WPBeginner https://ift.tt/Pf3BY2u
More links is https://mwktutor.com
No comments:
Post a Comment