Do you want to display different sidebars for certain posts and pages on your WordPress site?
A lot of the time, you will want to show the same sidebar across your entire website or blog. However, sometimes you may need to show different sidebar content on some of your posts and pages.
In this article, we will show you how to create and display different sidebars for each post and page in WordPress.
When Would You Need Different Sidebars in WordPress?
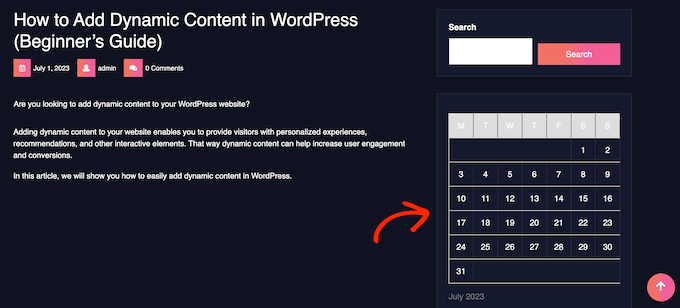
Many WordPress themes have a sidebar where you can add useful widgets and content. For example, many sites add a search bar to the sidebar or show a list of recent posts.
If your WordPress theme has a sidebar, then by default, it will look the same on all your posts, pages, categories, and archive pages.
However, you may want to display different sidebar widgets on certain posts and pages.
For example, you might show different content in the sidebar of your most popular posts or display ads that are more relevant to a particular page.
Having said that, let’s see how to create and display a different sidebar for each post and page in WordPress. Simply use the quick links below to jump straight to the method you want to use:
Method 1: Displaying Different Sidebars for Each Post and Page in WordPress (Easy)
If your theme supports sidebar widgets, then you can easily create multiple sidebars using Lightweight Sidebar Manager. This plugin lets you build as many custom sidebars as you want and then assign them to different posts and pages. You can also add them to custom post types or assign a sidebar to all the pages or posts that have a specific category.
The first thing you need to do is install and activate the Lightweight Sidebar Manager plugin. For more details, see our step-by-step guide on how to install a WordPress plugin.
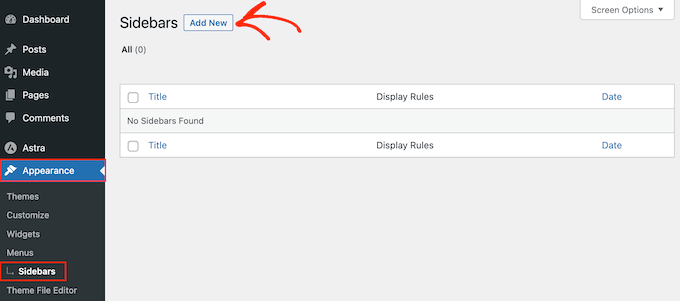
Upon activation, you need to go to Appearance » Sidebars. To create the first sidebar, click on the ‘Add New’ button.
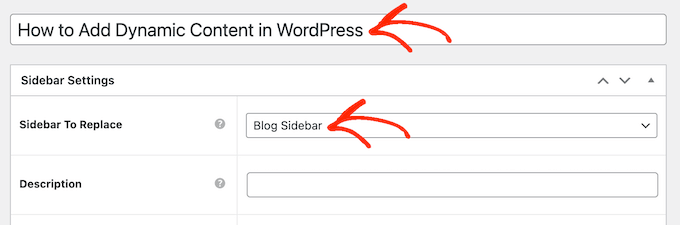
You can now type in a title for the sidebar. This is just for your reference, so you can use anything you want.
With that done, open the ‘Sidebar To Replace’ dropdown menu and choose the location where you want to show the sidebar. The options you see may vary depending on your WordPress theme.
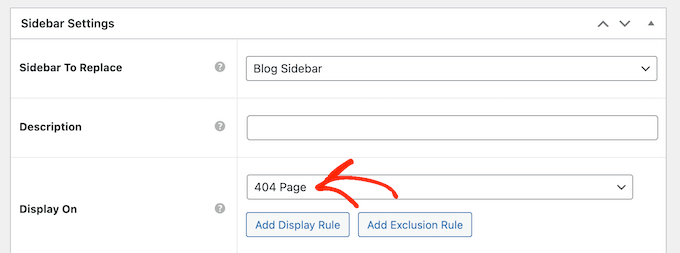
Now, you can control where the sidebar appears by creating inclusion or exclusion rules.
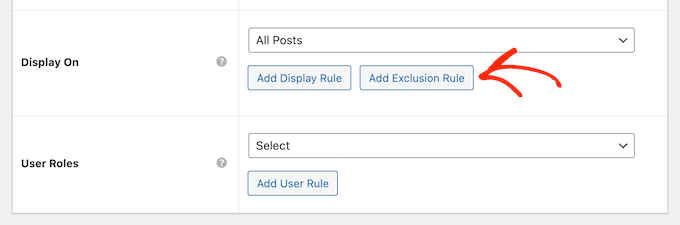
To create an inclusion rule, just open the ‘Display On’ dropdown and choose the pages, posts, custom post types, or categories where you want to use the sidebar.
For example, you might add the sidebar to a specific page, such as your 404 error page or the author archive.
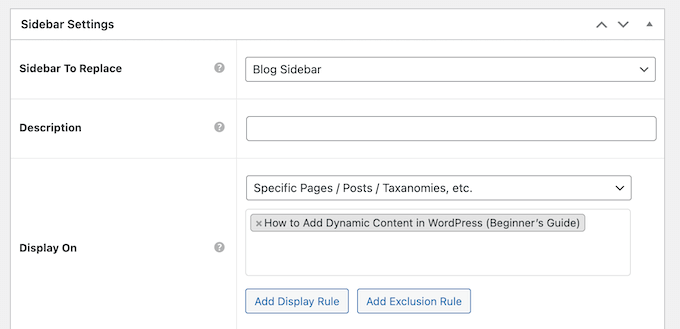
Another option is using the sidebar for a particular page, post, or category by selecting ‘Specific Pages/Posts/Taxonomies.’
This adds a box where you can type in the page, post, or category.
To create more inclusion rules, simply click on the ‘Add Display’ Rule button.
This adds a section where you can create the new inclusion rule.
If you prefer, then you can create exclusion rules instead. For example, you may want to show the sidebar on every page except the homepage.
You can also combine inclusion and exclusion rules to control exactly where the sidebar appears on your WordPress website.
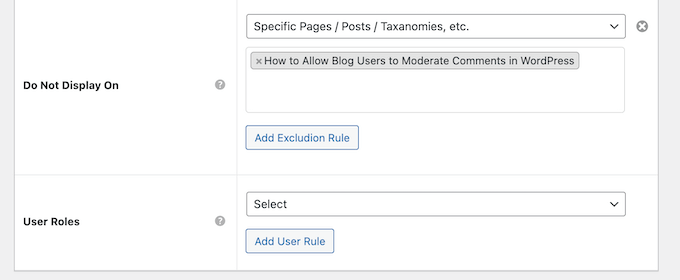
To create an exclusion rule, just click on the ‘Add Exclusion Rule’ button.
In the new ‘Do Not Display On’ section, open the dropdown menu and select the page or post that shouldn’t use this sidebar.
You can also exclude the sidebar from pages that have a specific category by following the same process described above.
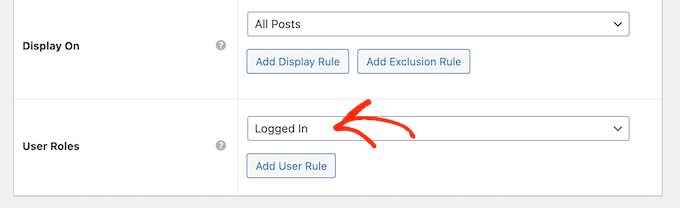
After deciding where the sidebar will appear on your WordPress blog, you may want to show different content to different users.
For example, if you have a membership site, then you might use a different sidebar for visitors compared to logged-in members.
To do this, open the ‘User’ dropdown and choose a role from the dropdown menu. Now, only people with this specific user role will see the sidebar.
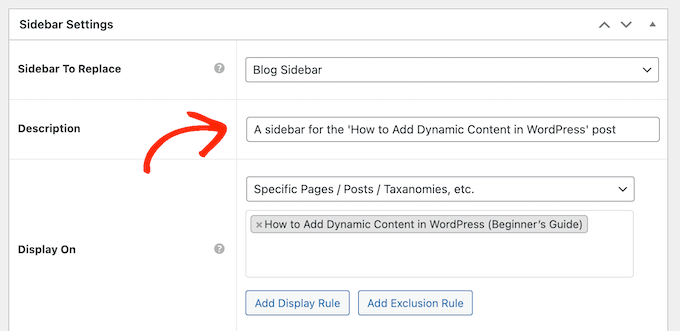
Finally, you may want to type in an optional description. This will only appear in the WordPress dashboard, so it’s a good way to share information with other admins or users on a multi-author WordPress blog.
If you are going to create lots of sidebars, then you can also use this field to leave yourself notes and helpful reminders.
When you are happy with the information you have entered, simply click on ‘Publish.’
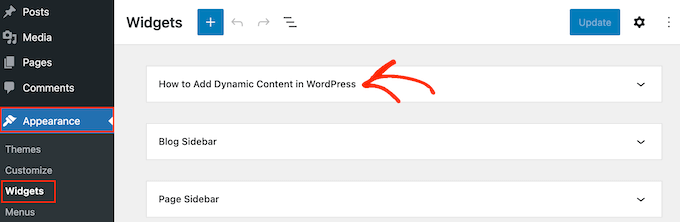
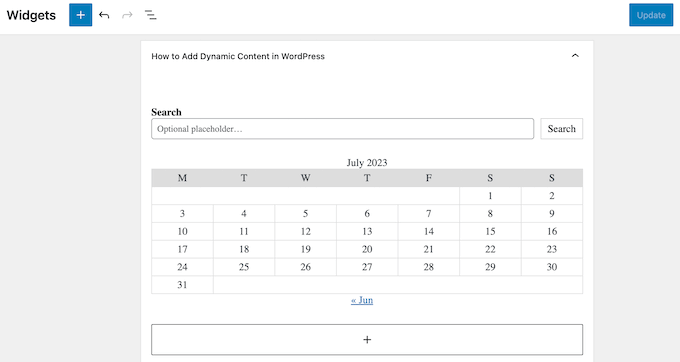
With that done, go to Appearance » Widgets. You will now see all the widget-ready areas that your theme supports by default, plus the new sidebar you created in the previous step.
You can now go ahead and add widgets to the sidebar, just like any other widget-ready area.
SeedProd is the best landing page builder plugin for WordPress. With this plugin, you can create any type of custom page without writing any code. It also has dozens of professional site kits and templates that you can easily edit and fine-tune using the drag-and-drop builder.
When designing a custom page, you can choose a layout that has a sidebar.
You then simply find the blocks you want to show in that sidebar and add them using drag and drop.
SeedProd has all the blocks and features you’d expect from a powerful page builder, such as optin forms, social profiles, countdown timers, contact forms, buttons, various content blocks, and more. This makes it easy to create powerful and unique sidebars for your WordPress blog.
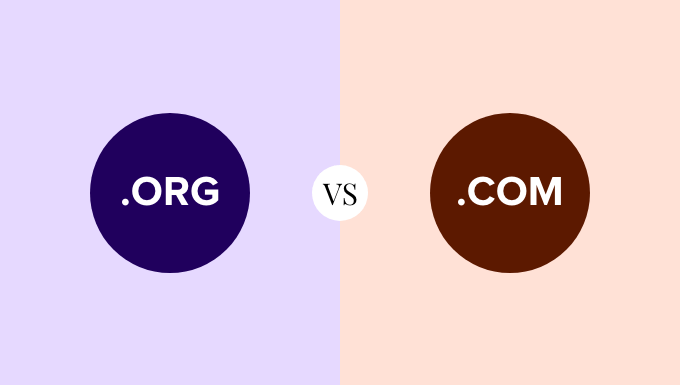
Are you trying to decide whether .org vs .com is the better domain extension?
There are many types of domains, but the most popular are .org and .com. While often taken for granted, a site’s domain extension affects how others view your brand and how easy it is for users to find your site.
In this post, we’ll compare .org vs .com and highlight when to use each. That way, you’ll know which domain extension is right for your needs.
What are Domain Extensions, and Why Should You Care?
Domain extensions, also known as top-level domains (TLDs), are the last part of a domain name, appearing after the dot.
Take WPBeginner, which uses the .com extension, while a site like WordPress uses .org. (There is a .com for WordPress, but it is a commercial product, not open source.)
To understand how a domain name works, you have to know how it interacts with the Domain Name System (DNS).
When entering a website address, the DNS looks up the URL (wpbeginner.com) and finds the hosting server’s numerical IP address where the website lives.
We use domain names rather than typing the IP address because they’re much easier for humans and search engines to use and remember. In addition to the domain name itself, the domain extension can tell visitors what your website is about.
For example, .com is designed for commercial websites, while .org is meant for non-profit organizations.
When potential customers see your web address, they might make assumptions about your business based solely on your URL.
With that in mind, we’re going to highlight the differences between a .org and .com domain extension and which is better for your website. Click on any of the links below to jump to a specific section.
The .org extension stands for organization and was created for nonprofit organizations and charities to provide valuable information.
Generally, .org websites are used to raise awareness, accept online donations, and search for volunteers. Thus, when visitors see a .org domain name, that’s what they come to expect.
That said, anyone can register a website with the .org domain extension, even if the website isn’t part of a nonprofit organization.
However, businesses can still benefit from the .org domain when linked to the company’s charitable arm, while other domain names help protect the brand.
What is a .com Domain Extension?
The .com extension is the most popular domain extension and is used by commercial businesses.
Nowadays, .com has become the default domain extension for general-purpose websites, whether or not they have commercial intent.
With that in mind, the idea of .org being only for nonprofits has stuck around a lot more than .com being only for businesses.
Differences Between .org and .com
As we said above, neither .org nor .com has special requirements to register, even though they were both made for different purposes and users expect different things from them.
Still, there are a few major differences between them that we’ll go into below.
Availability
The overwhelming popularity of .com has made it challenging to find and choose the best domain names with the extension. With many desirable domains either in use or parked, some people turn to other domain name extensions to get the URL they want.
Before you jump to other TLDs, you should start by looking at our free business name generator tool. It gives you clever ideas you can use for your domain name. Just make sure your domain name accurately represents your business and what you do.
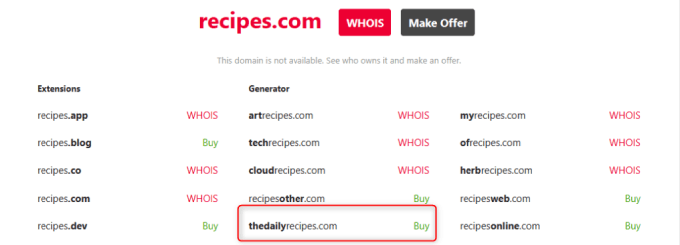
For instance, let’s say you want to start a recipe blog.
Using our handy business name generator, you can find useful domain names like thedailyrecipes.com.
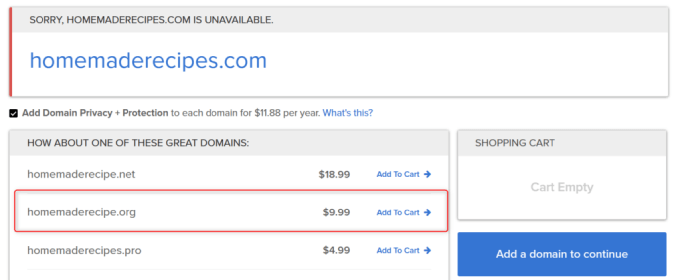
You can see in the screenshot above, that many simple .com addresses are already taken.
In contrast, far fewer .org domains are taken. In fact, there are 161.1 million .com domains registered compared to only 10.6 million .org registrations.
Because of its lower demand, .org is also much cheaper to get. That’s the opposite of many .com domain names because they are becoming more expensive because of high demand.
Credibility and Trustworthiness
Because the .org extension was intended for nonprofit organizations and is still used by many of the most well-known charities and philanthropic groups, this TLD still elicits a high degree of trust. When applied to the right site, it adds more credibility than the .com extension.
That said, it depends on what your site is used for. If you start an online store using a .org TLD, most people may be confused by your domain extension since visitors may expect to land on a nonprofit site.
This can lead to a high bounce rate and lower engagement, which also hurts your SEO.
If you own a .org site, your website should align with your target audience and their expectations of a nonprofit mission-driven organization.
The .com extension is still a more widely trusted domain than other TLDs because of its familiarity. In fact, .com domains are 33% more memorable, and when people try to remember a URL, they’re 3.8 times more likely to assume it ends in .com.
It’s also important to keep in mind that other factors determine whether a site is credible. For example, a site using HTTPS means it has active SSL encryption, which is more secure for keeping users and their data safe.
Traffic
If you’re looking specifically for branding and discoverability, .com is the best choice. If you want your potential customers to find you, .com is the most natural extension for your visitors to type in. That’s why we use the .com domain extension here at WPBeginner and for our other products.
48% of websites use .com versus only 5% for .org. Consumers view .com as the de facto default extension. Thus, you’re more likely to get people to remember a .com domain, which can increase direct traffic.
Of course, .org domains will likely rank higher for nonprofit-related keywords.
However, some mobile devices include a .com button on their keyboards, which makes them a more mobile-friendly option as well. Users can press and hold the .com button for other extensions like .org to appear.
When Should You Use a .org Extension?
While everyone can register a .org extension, it may not be the best choice for everyone. Here are a few examples of when using .org is the best choice:
Charity, community, and nonprofit organizations: .org domains have historically been linked to nonprofit and humanitarian causes. Internet users have come to associate .org domains with charities and nonprofits. This extension can enhance the credibility of an organization as it signals a commitment to serve others.
Open-source websites: While open-source software companies aren’t generally seen as nonprofits, they commonly use .org extensions. They do so to tell the public their software or user network is available for free. WordPress.org is an example of this.
Informational websites: .org websites are known for providing valuable, unbiased information that helps people learn about important issues.
When Should You Use a .com Extension?
The best domain extension mainly depends on the type of website you plan to create. Here’s a quick look at when to use .com:
Business websites: .com has a wide general appeal and is commonly used for commercial purposes making it the appropriate choice for just about any for-profit business. This works for just about any type of business and includes companies of all sizes, including small businesses and startups.
Ecommerce stores: .com is widely used and trusted, which can instill confidence in shoppers. For example, if given the choice, a user is more likely to purchase from an online store that uses .com than a .xyz or .biz.
Blogs and Personal Brands: .com is simply easy to remember and better for branding, helping you reach a broader audience.
Which Extension is Better
When running a small business, .com will do the trick. The extension generally performs better for SEO and helps to boost your online presence more than other domain alternatives.
It’s also seen as the default domain extension and is the go-to choice for online businesses, personal websites, publications, and blogs.
The only downside to .com is availability. With billions of websites on the internet, your desired URL may not be available in .com.
In that case, you have to weigh your options. Is altering your brand name or adding additional words to get the .com domain extension worth it?
For some, they rather keep their original name or idea and choose .org instead. Some even go for .net as an alternative.
With that in mind, we recommend using domain name generators or a site like Nameboy to help you find the right URL for your business. Since having a .com can affect your audience’s perception of your brand and traffic, it’s a good idea to find a .com URL that works for you.
Of course, there are also other TLD alternatives like .edu, .biz, .gov, and .net. If you’re creating multilingual websites or region-specific websites, make sure to use the right country code, such as .co.uk and .ca.
Ultimately, the choice is yours, but .com is best for most new website owners.
How to Use .org or .com Domain Extensions
Once you’ve decided which extension you’d like to use, it’s time to buy your domain and create your website.
1. Pick a Domain Registrar
You can purchase your domain at a few different places, including:
Domain name registrar: Some companies like Domain.com or Namecheap provide domain registration as their primary service. The best registrars offer low pricing discounts for multi-year registrations and free WHOIS protection (to hide your personal information from domain registries).
Web hosting service: Many hosting services will also register domain names. Sometimes, they’ll give you a great deal for choosing to bundle one with your hosting plan. For example, BlueHost offers a free domain for your first year when you choose to use their hosting services.
Website builder: Some website builders like Squarespace let you buy a domain name, host it, and build your site all in one place.
Use their search tool to find and purchase the perfect domain that aligns with your business.
In this process, you’ll also have to set up your account and provide a form of payment.
3. Choose a Web Host and CMS
Now that you have your domain name, it’s time to connect it to a website. First, you must rent server space from a web hosting provider. For those using WordPress, make sure to get managed WordPress hosting, which you can get from Bluehost.
While there’s a lot that goes into making a website, using a content management (CMS) such as WordPress can make the process much easier.
Do you want to make a custom logo for your website?
Maybe you can’t afford a professional designer, but you are worried that your graphic design skills aren’t up to the task. Your logo is a very important part of your brand’s identity. You want it to not only look high quality but also communicate your brand’s identity and values.
In this article, we will show you how to make a logo for your website. We will go through several different solutions so you can pick the one that suits you best.
To help you easily navigate the post, you can click the links below to jump ahead to the section you want to read:
Many people around the world can recognize big-name brands from their logos. When you see the iconic Golden Arches of McDonald’s anywhere in the world, you instantly recognize the brand and know what will be on the menu there.
That’s the power of branding, and a logo plays the most important role in building that reputation.
Whether you are creating a blog, making a website, or starting an online store, having a unique logo makes your brand look legitimate. It helps you build trust, recognition, and promote your business.
Often, when users want to start working on an online business idea, they start by thinking of business names and go straight to designing logos.
But before you do that, you need to make sure that your brand name idea is not already registered by someone else. See our guide on how to check domain name availability.
Once you have ensured that your business name idea is available, make sure to go ahead and register your domain so that no one else takes it (trust us, this happens more often than you think).
After you have registered your domain name, you are ready to start designing your logo. We have some excellent free logo-maker tools for beginners.
Tips for Making a Custom Logo for Your Website
Creating a custom logo for your website requires some understanding of design. However, as a beginner, you can follow these best practices to make sure that your logo looks polished and professional:
Keep your logo design simple and clean. This makes sure that your logo will look good even at a small size. Think how tiny the profile images are in your Facebook or Twitter feed.
Use a transparent background for your logo. That way, you can put it anywhere, not just on a white area of your website.
Get the highest quality file you can for your logo. You want it to look great in a large size or in print, too. You can copy it and make smaller versions for social media, blog posts, and website pages.
Use your brand and website colors in your logo to help it harmonize with the rest of your website.
There are different types of logo designs commonly used by businesses. When making your own logo, you may want to experiment with some of these.
Wordmark Logo
A wordmark logo is a distinctive text-only logo. Your unique brand name set with specific fonts and colors can make an excellent logotype.
If you are making a custom logo for your WordPress website by yourself, this is a great option as it’s simple and straightforward.
Pictorial Mark Logo
A pictorial mark is usually a brand image using an illustration or icon to represent an organization.
Famous examples of this kind of logo include Apple, Nike, Audi, and more.
Combination of Both
These types of logos are the most common ones you will see around. They combine words or letters presented in an iconic layout.
Famous examples of such logos include Dell, Pizza Hut, Doritos, and more.
Choosing the Right Style for Your Logo
If you are making your own logo, then you will need to be realistic about your design skills first. Using a wordmark might seem very simple, but it needs to be unique so that you can easily register your logo as a trademark if needed.
You can also draw an icon to be used as your logo. However, you will need strong design skills to come up with a unique idea for your brand image.
For our own brands, we use a combination of both wordmarks and icons. For example, our sister company OptinMonster’s logo has a mascot placed on a wordmark.
Let’s take a look at a few different ways to create professional-looking logos for your websites (without hiring a designer).
1. Make a Logo Using Tailor Brands (Best for Customization)
Tailor Brands’ Logo Maker is easy and straightforward to use. You also get access to a lot of customization options when creating a custom logo for your website.
It’s one of the best logo makers and is free to use. However, note that you will need to pay to download your finished logo. The minimum you can pay is $9.99 for 1 month.
To begin, go to the Tailor Brands Logo Maker and type in the name of your company. Then, click the ‘Get Started’ button.
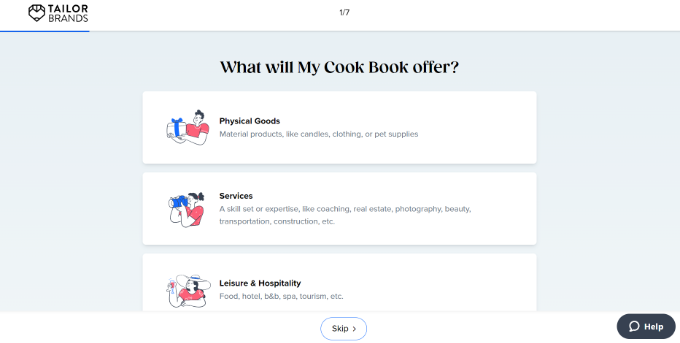
Next, Tailor Brands will launch a logo builder that asks a series of questions.
First, you will need to select what your brand is offering. For instance, is your brand selling physical goods, services, technology and software, original content, or other products?
Simply select an option and move to the next step.
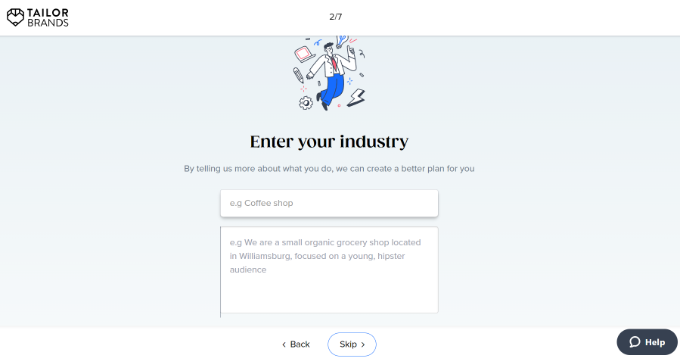
After that, you will need to enter some details about your industry. You can start by selecting an industry from the dropdown menu and briefly explaining your business.
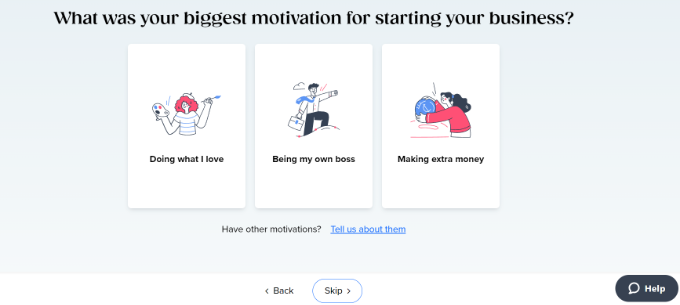
Next, Tailor Brands will ask what your biggest motivation is for starting a business.
You can select from the options and add more details.
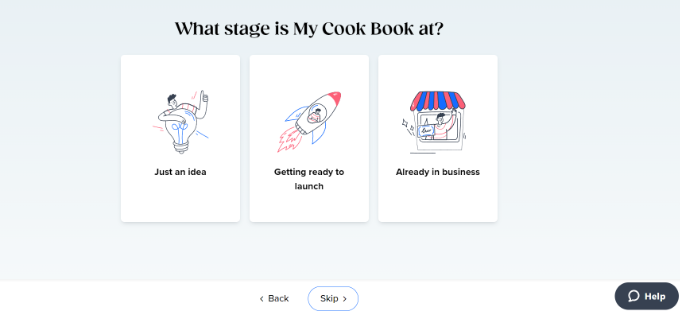
After that, you will need to select which stage your website or brand is in right now.
For instance, it is just an idea, you are getting ready to launch, or it’s already in business?
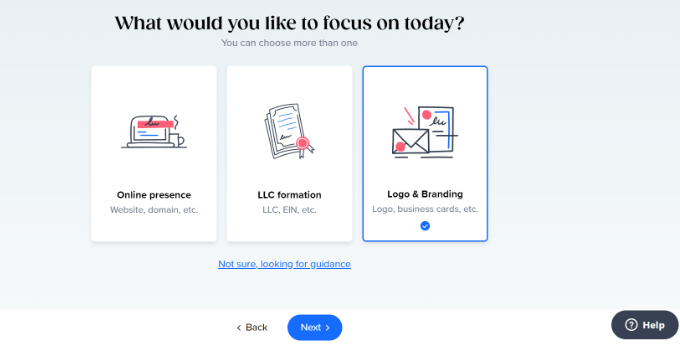
In the next step, you can choose which service you’d like to focus on.
Go ahead and select the ‘Logo & Branding’ option.
After that, you’ll need to select what you need for your brand.
Simply select the ‘Logo’ option.
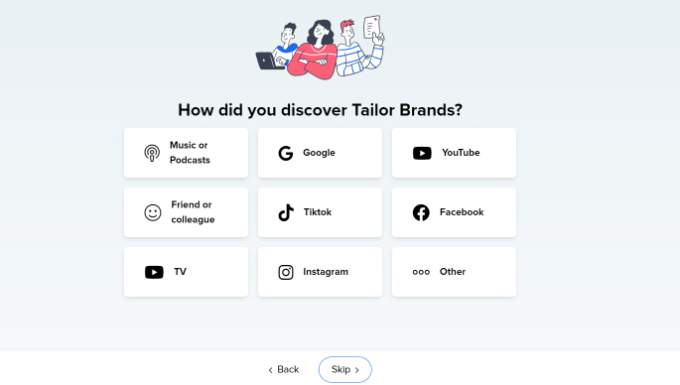
Next, you will need to choose how you discovered Tailor Brands.
You can select any option or simply click the ‘Skip’ button at the bottom.
Tailor Brands will now process the information and show you an option to create your custom logo.
Go ahead and click the ‘Create’ button.
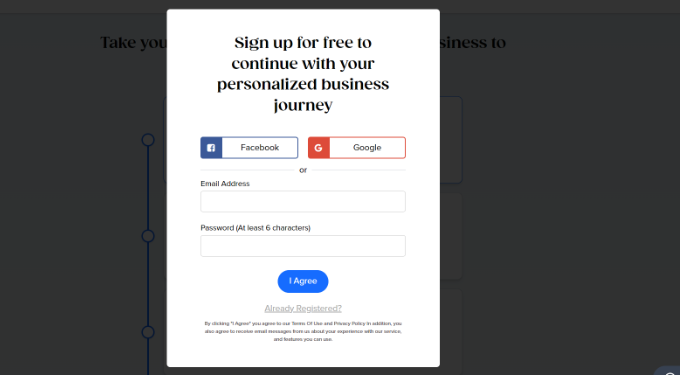
Next, you will need to sign up for a free account.
You can use your Facebook or Google account or simply enter an email address and password to get started.
After creating an account, you can build a new logo.
First, you will need to choose the type of logo you’d like to create. Tailor Brands lets you choose an icon-based, name-based, or initial-based logo.
You can only select one option, although you can always restart the logo maker again if you want to try out other possibilities.
If you select ‘Icon Based’ here, then you will be prompted on the next screen to choose an icon type. You can pick a geometric shape or search for an icon.
For this tutorial, let’s select the ‘Search For Icon’ option.
Next, you can choose up to 5 icons for your logo. There is also an option at the top to search for different icons.
When you are done, simply click the ‘Next’ button at the bottom.
After that, you will need to select 3 styles for your logo.
You can click the ‘Next’ button after selecting the styles you love.
Once you have completed this process, you will see a short animation while your logo is being created.
Next, you will be able to see your logo.
You can click ‘Love it’ to be taken to the pricing plans, ‘Customize’ to start editing it, or you can scroll down the menu on the left-hand side for more logo options.
If you choose to customize your logo, then you can pick from different styles, fonts, layouts, and more.
As you select different options, the logo will update on the right.
There are also options to change the color palette and edit the shape of your logo.
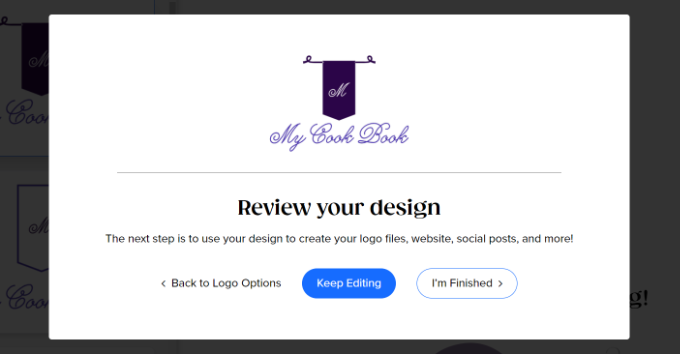
Once you are happy with your logo, you can click the ‘Finish’ button.
A small window will now open where you can review your logo design.
Go ahead and click the ‘I’m Finished’ button.
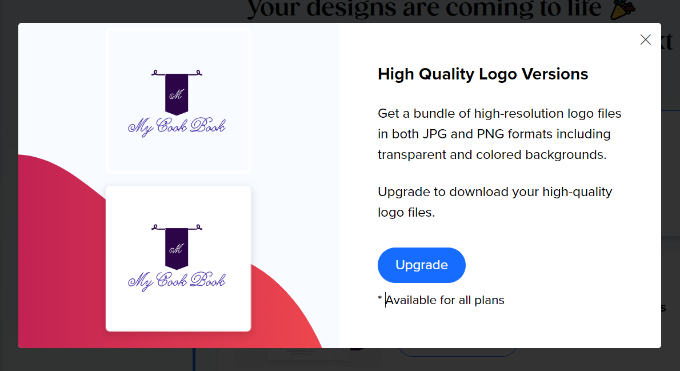
Once your logo is ready, you will see a download option on the next screen.
You can click on the ‘Download’ button.
Next, you will see a popup asking you to upgrade to a premium plan to download the logo.
Clicking the ‘Upgrade’ button will take you to the pricing page, and you will be presented with a number of different pricing plans.
These plans give you access not just to your logo but also to graphic design and website creation tools. They could be a good option if you want access to things like stock photos.
If you just want the logo, then you can click the ‘1 Month’ tab and select the ‘Basic’ plan. You only need to make one payment for your logo to be yours to keep. You can cancel the plan straight after that.
2. Make a Custom Logo for Your Site Using Looka (Quick and Easy)
Looka is a quick and easy online graphic design tool that allows you to make a logo without any design skills. It was formerly known as Logojoy.
Like Tailor Brands, Looka’s tool is free to use, but you will need to pay to download your logo. Prices start from $20. You don’t get the same level of personalization as you get with Tailor Brands, but it’s a great alternative for creating custom logos.
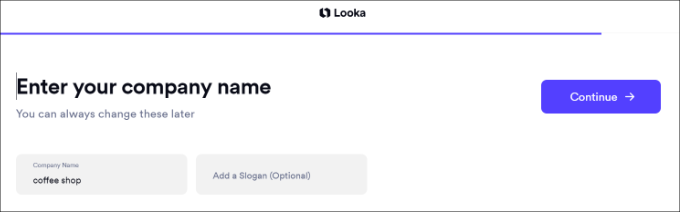
To get started, simply visit the Looka website and enter your company name in the search box.
Once that’s done, click the ‘Get started’ button.
Next, you need to select your industry from the dropdown menu.
Don’t forget to click the ‘Continue’ button to move on to the next step.
You will then see a number of logos that have been automatically generated for you.
Go ahead and select a few logos you like as inspiration.
Next, you will need to choose some colors that you like. You can pick up to 3 colors and then click the ‘Continue’ button.
After that, Looka will ask you to enter a company and a slogan (optional).
Once you have entered this information, just click the ‘Continue’ button.
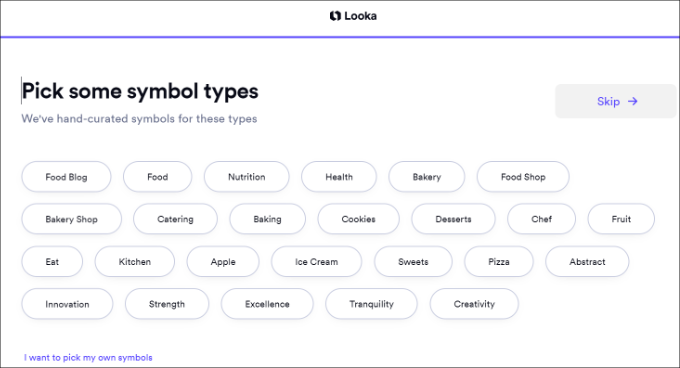
In the next step, you will need to select some symbol types for your logo.
For example, we chose different food-related symbols for our food blog logo.
Looka will now start to generate logos for you.
You will then see a bunch of variations that you can use for your website. Simply select a logo to further customize it.
After that, you will see the logo builder offered by Looka.
Using the drag-and-drop logo editor, you can adjust the font size, choose a transparent background, change the font family, add or change your icon, and more.
Feel free to edit the design as much as you like and share it with colleagues for a second opinion. Once you are happy, just click on the ‘Download’ button in the top right corner to purchase and download your logo.
Note that if you want a transparent version of your logo, then you will need to pay $65 for the Premium plan.
3. Create a Custom Logo Using Hatchful by Shopify (Free)
Shopify is a popular eCommerce platform. They also offer a free logo maker tool called Hatchful. It allows you to easily create beautiful logos for your website without any design skills.
Unlike Tailor Brands and Looka, you can download the logo free of cost. Plus, it offers different customization options and will guide you step by step through creating a logo.
First, you need to visit the Shopify Hatchful page and click on the ‘Get Started’ button.
Next, you need to choose your business type.
If you can’t find an exact match, then simply use the closest possible match.
After that, Hatchful will ask you to choose a visual style for your logo.
You need to select a style that matches your business website’s style, look, and industry.
Next, enter your business name and a slogan (optional).
You can skip this step if you want and move ahead.
After that, you will be asked to select where you plan to use the logo.
You can pick the ‘Online store or website’ option to continue.
Finally, the wizard will analyze your answers and show you several logo samples to choose from.
You can select any of these logos to further edit them.
This will launch a simple logo editor where you will see a live preview of your logo with editing tools in the left column.
You can edit the text, add an icon, add symbols, and change the background.
Once you are satisfied with your design, you can click the ‘Next’ button to download your logo files.
You will be asked to create a free account, and your logo files will be sent to your email address. The zip file will include not just your logo but a favicon or site icon and cover images for your social media profiles.
Bonus: Hire Someone to Make Your Website Logo
The online logo maker tools we have covered in this tutorial are made specifically for beginners. You can create a simple and elegant logo for your website using these tools, but they are still limited in design choices.
If you can afford it, the best option is to hire an expert graphic designer to make a logo for your website. There are several places where you can find freelance designers.
There are thousands of people offering graphic design services on these websites. How do you pick the right person for the job?
Sticking to these best practices can help you find the perfect candidate to make a logo for your business.
Look for ratings, reviews, and the number of completed jobs on the designer’s profile. These are good indications of quality services provided to previous customers.
Give a detailed brief to the designer about your specific design requirements.
Set your own price for the logo, but keep in mind that a unique and creative design will cost more than a generic logo.
Make sure that you get the original source files in vector file format. This will allow you to later resize or reuse your logo in other places like business cards, posters, t-shirts, and more.