Do you want to create a custom Instagram feed in WordPress?
An Instagram feed can keep your site fresh and engaging while also getting you more likes, shares, and Instagram followers.
In this article, we will show you how to create a custom Instagram photo feed for your WordPress website.
Why Include an Instagram Feed on Your WordPress Site?
Adding an Instagram feed on your WordPress site lets you show fresh content to your visitors without lots of extra work. It also encourages readers to follow you on Instagram.
Instead of manually adding images in the WordPress block editor, you can simply create a feed that updates automatically every time you post new photos to Instagram. You can even show other people’s photos on your site by creating a hashtag feed.
In the following image, you can see an example of a brand that uses a custom Instagram feed to show user-generated content.
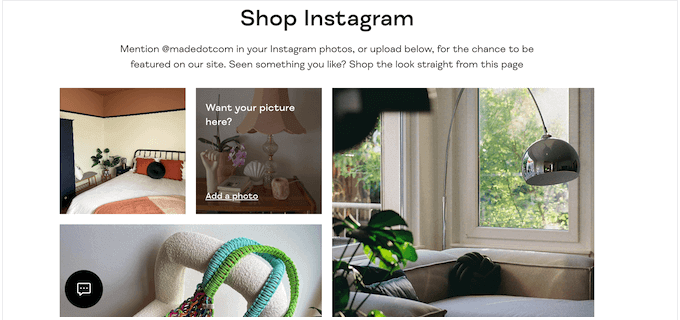
In this way, you can use a custom Instagram feed to provide valuable social proof and make more money online.
That being said, let’s see how you can create a custom Instagram photo feed in WordPress.
How to Create a Custom Instagram Photo Feed in WordPress
The easiest way to add an Instagram photo feed to your site is by using the Smash Balloon Instagram Feed plugin. It is the best Instagram plugin for WordPress that allows you to display content from your Instagram account in an instant.
It’s also the easiest way to fix the Facebook and Instagram oEmbed issue in WordPress.
We will cover several steps in our tutorial, and you can use the quick links below to jump to the different sections:
How to Connect an Instagram Account to WordPress
First, you will need to install and activate the Smash Balloon Instagram Feed plugin. For more details, see our step-by-step guide on how to install a WordPress plugin.
Note: In the guide, we are using the premium version of Smash Balloon, as it allows you to create a completely custom Instagram feed. with hashtag feeds and shoppable images. If you are just getting started or have a small budget, then there’s also a free Smash Balloon Social Photo Feed plugin.
After you’ve installed the plugin, head over to Instagram Feed » Settings.
You can now enter your Smash Balloon license key into the ‘License Key’ field.
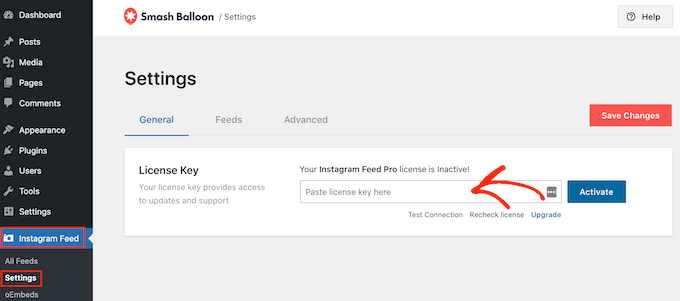
You can find this information in the confirmation email you got when you purchased Smash Balloon and also in your Smash Balloon account.
After adding your license key, go ahead and click on the ‘Activate’ button.
Once you’ve done that, you are ready to create a custom Instagram feed. To get started, select Instagram Feed » All Feeds and then click on the ‘Add New’ button.
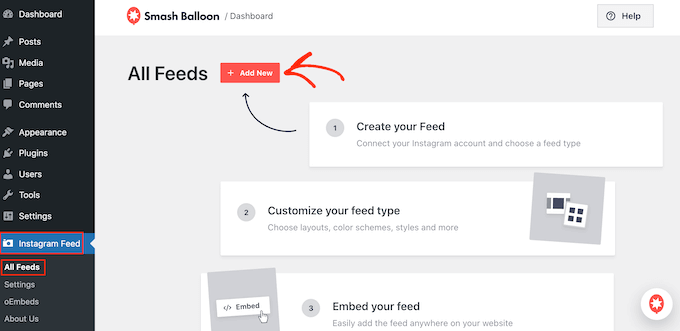
Smash Balloon will now show all the different types of Instagram feeds that you can create.
Simply select the type of feed you want to add to WordPress, and click on ‘Next’.
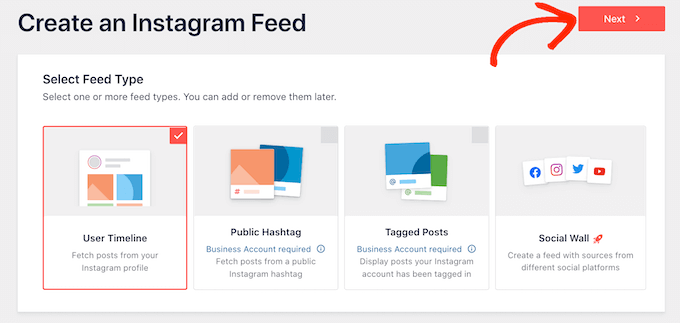
If you just want to display your Instagram photos, then you can use a Personal Instagram account. However, you will need a Business Instagram account if you want to create a hashtag feed or show the posts that your account is tagged in.
Tip: Don’t have a Business Account? To convert your Personal Instagram account into a Business Account, simply follow Smash Balloon’s step-by-step instructions.
If you select ‘Publish Hashtag’, then you will need to type in the hashtags you want to use. To show multiple hashtags in the same feed, simply separate each hashtag with a comma.

Once you have done that, just click on ‘Next’.
Do you want to show posts that your account is tagged in? You will need to select ‘Tagged Posts’ instead and then click on ‘Next’.
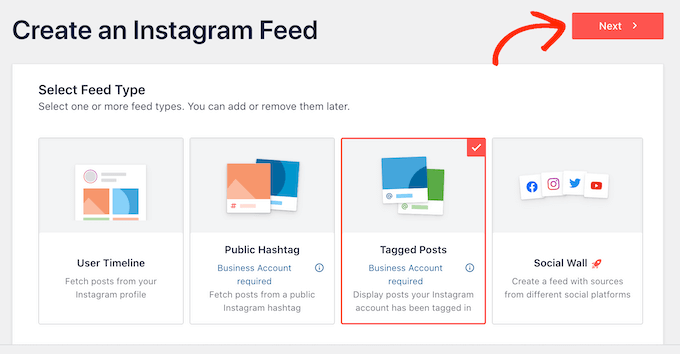
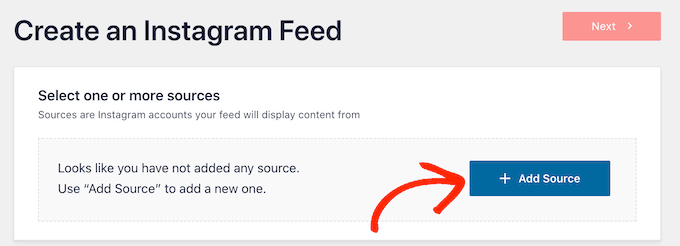
No matter what kind of feed you are creating, you will need to connect WordPress to your Instagram account.
To get started, click on the ‘Add Source’ button.
After that, choose whether you want to show images from a personal or business account.
If you select the button next to ‘Personal’, then Smash Balloon won’t include the Instagram avatar and bio in your header by default. However, you can always add the Instagram avatar and bio manually in the plugin’s settings.
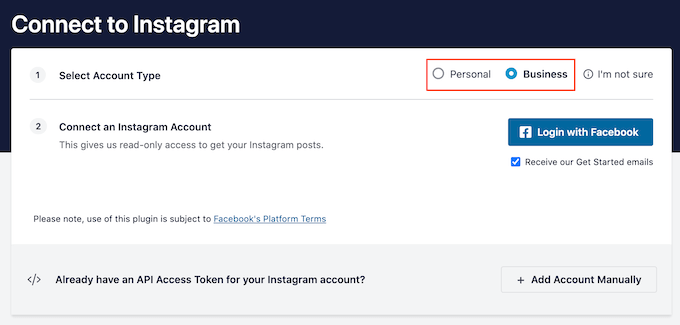
After choosing ‘Personal’ or ‘Business’, just click on ‘Login with Facebook’.
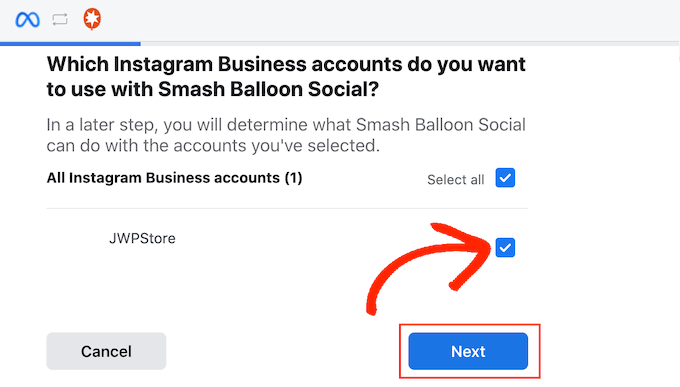
You can now select the Instagram account that you want to feature on your WordPress website and click on ‘Next’.
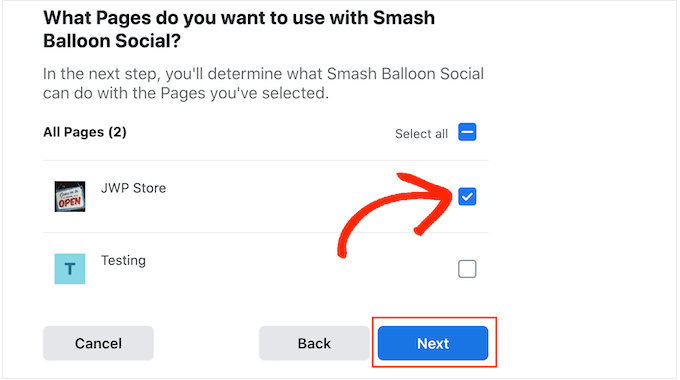
After that, check the box next to the Facebook page that’s linked to the Instagram account you want to use.
With that done, you need to click on the ‘Next’ button.
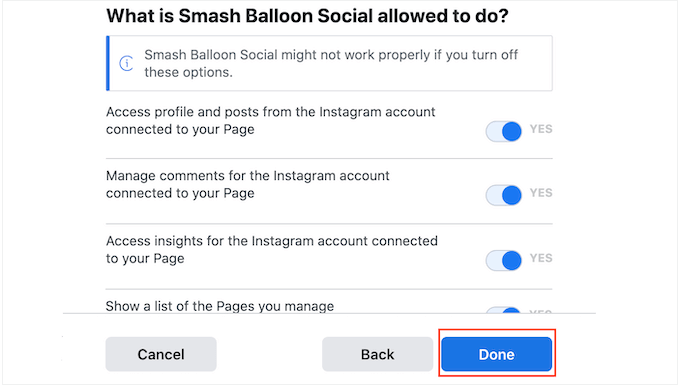
You will now see a popup with all the information Instagram Feed Pro will have access to and the actions it can perform.
To restrict the plugin’s access to your Instagram account, simply click any of the switches to turn it from ‘Yes’ to ‘No’. Just be aware that this may affect the photos that appear on your WordPress blog or website.
With that in mind, we recommend leaving all the switches enabled. When you are happy with how the feed is set up, go ahead and click on ‘Done’.
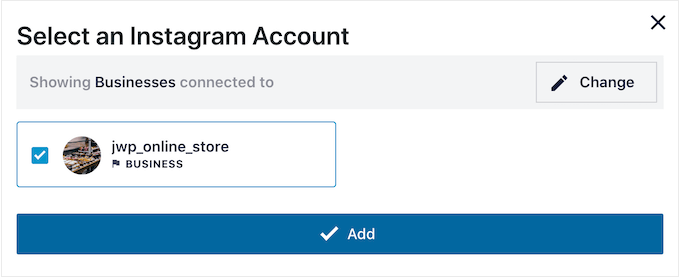
You will now see a popup with the Instagram account you just added to your website.
Simply check the box next to that account and then click on ‘Add’.
Instagram Feed Pro will now take you back to the Instagram Feeds » All Feeds screen.
To create a custom Instagram feed, just check the box next to the Instagram account that you want to use. Then, click on ‘Next’.
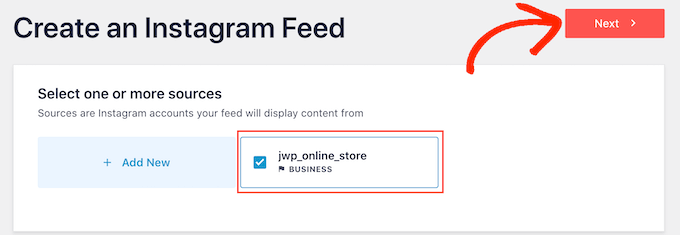
The plugin will now create an Instagram photo feed that you can add to any page, post, or widget-ready area.
How to Customize Your Instagram Photo Feed
By default, Smash Balloon will open your feed in its editor, ready for you to customize.
On the right, you will see a preview of your Instagram photo feed. On the left-hand side are all the settings you can use to customize the social media feed.
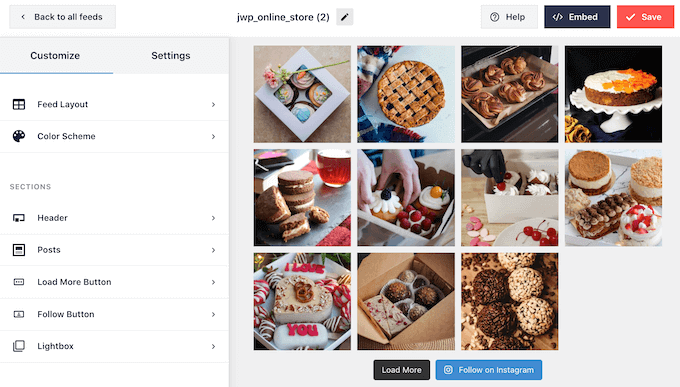
Most of these settings are self-explanatory, but we will quickly cover some key areas.
To change the layout, simply click on ‘Feed Layout’ in the left-hand menu. You can now choose from a Grid, Masonry, or Carousel layout.
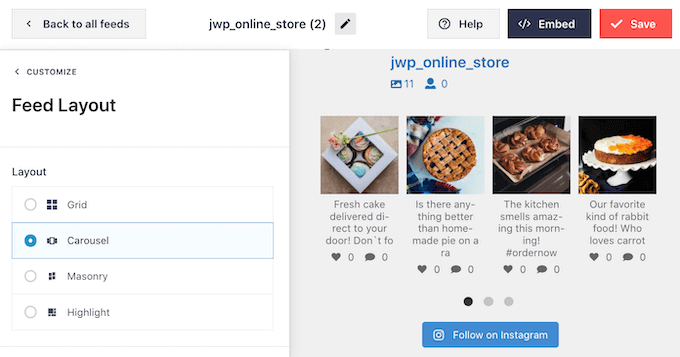
There is also a Highlighted layout that highlights every third photo by default.
As you click on the different options, the live preview will automatically update to show the new layout. This makes it easy to try different designs and find the one you prefer.
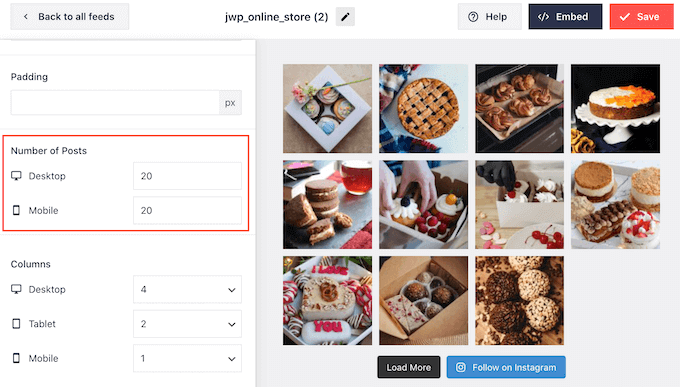
By default, Smash Balloon shows the same number of photos on desktop computers and mobile devices. You can preview how the Instagram feed will look on desktop computers, tablets, and smartphones using the row of buttons in the upper-right corner.
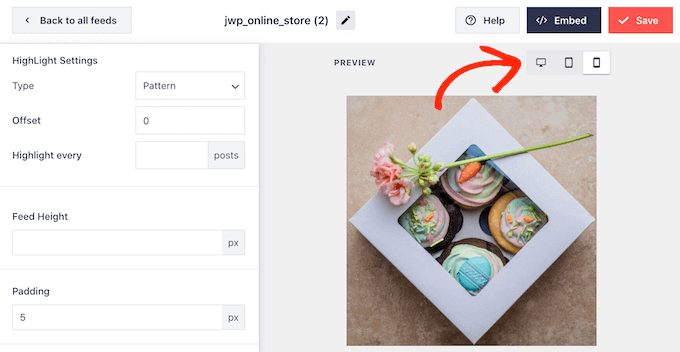
Smartphones and tablets typically have smaller screens and less processing power, so you may want to show fewer Instagram photos and videos on mobile devices.
To do this, just type a different number into the ‘Mobile’ field under ‘Number of Posts’.
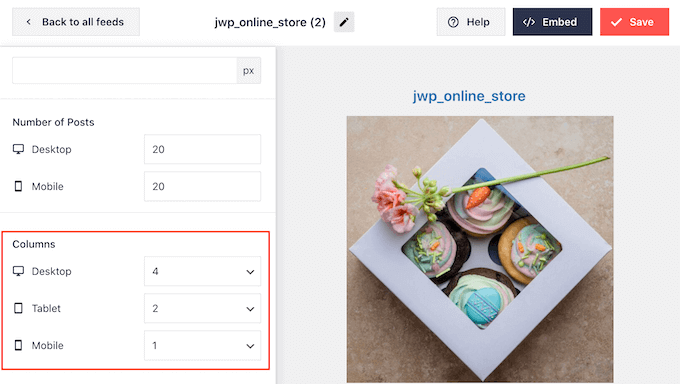
By default, Smash Ballon will split your photos into 4 columns on desktop, 2 columns on tablet devices, and a single column on mobile.
Do you want to use a different number of columns? Then just scroll to the ‘Columns’ section in the left-hand menu.
You can now type a new number into the Desktop, Tablet, or Mobile fields.
To make sure your Instagram feed looks good on mobile devices, it’s smart to view the mobile version of your WordPress website.
After making your changes, click on the ‘Customize’ link. This will take you back to the main Smash Balloon editor, ready for you to explore the next settings screen, which is ‘Color Scheme’.
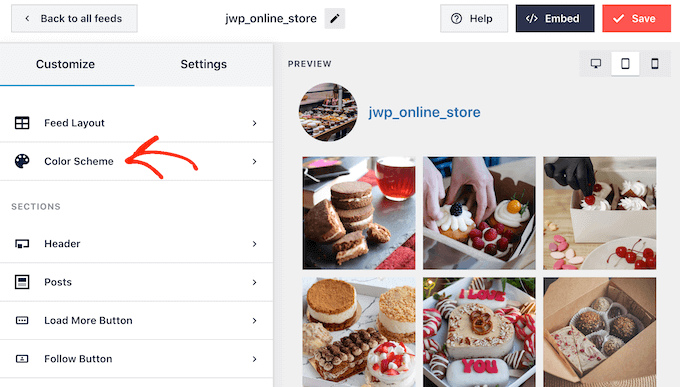
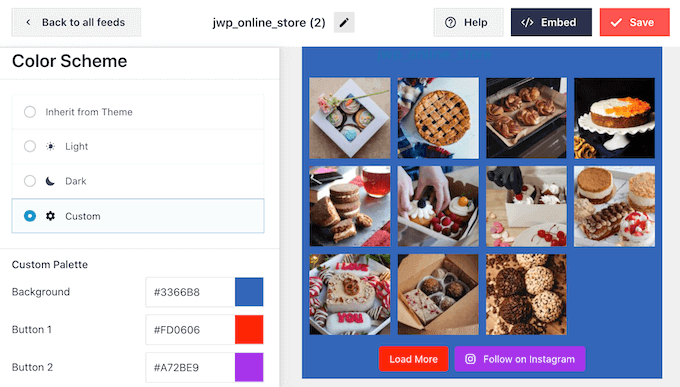
By default, Smash Balloon uses a color scheme inherited from your WordPress theme, but it also has ‘Light’ and ‘Dark’ themes that you may want to use for your Instagram feed.
You can even create your own color scheme by selecting ‘Custom’ and then using the settings to change the link color, background color, text color in WordPress, and more.
By default, Smash Balloon adds a header to the Instagram feed, which is your profile picture and the name of your page. This can provide some useful extra context so that visitors understand where these images are coming from.
To change how this section looks, return to the main settings screen and then select ‘Header’.
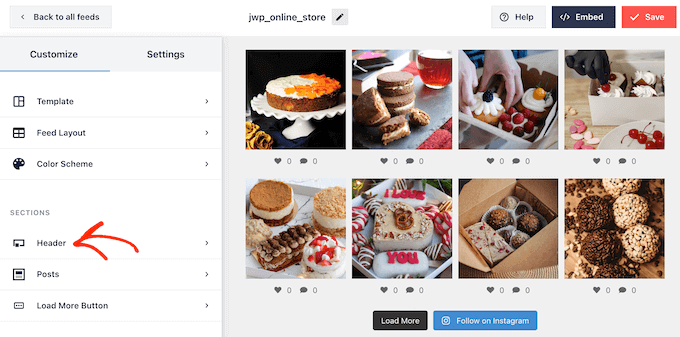
On this screen, you can change the background color, show your Instagram bio, change the header size, and more.
By default, the header includes your Instagram profile picture. However, you may want to show a different image, such as your site’s custom logo.
To change the profile picture, click on ‘Add Image’ under ‘Show custom avatar’. You can then either choose an image from the WordPress media library or upload a new photo.
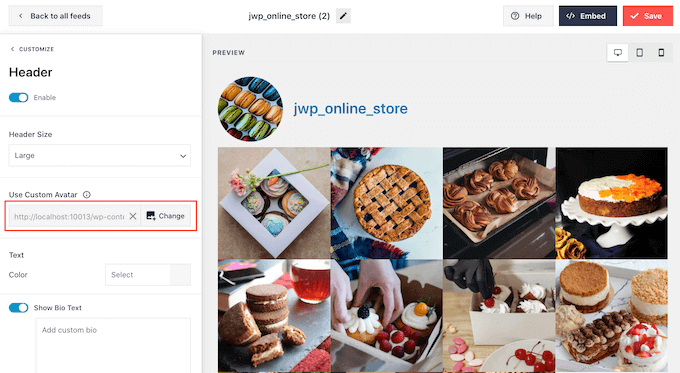
You can also add a different bio. For example, you might add a call to action that encourages people to visit your Instagram page.
To create a unique Instagram bio, simply type into the ‘Add custom bio’ box.
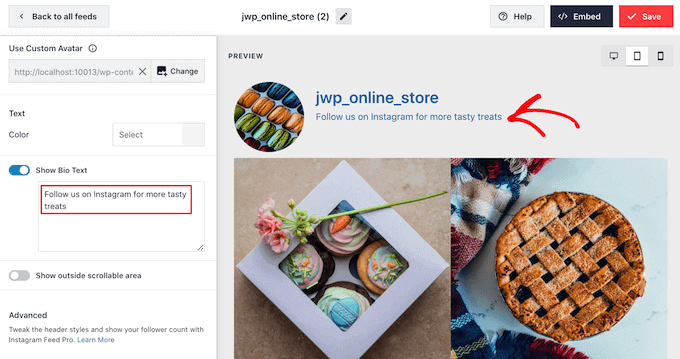
When you are happy with how the header looks, click on the ‘Customize’ link to go back to the main settings screen.
Now, you need to click on ‘Posts’.
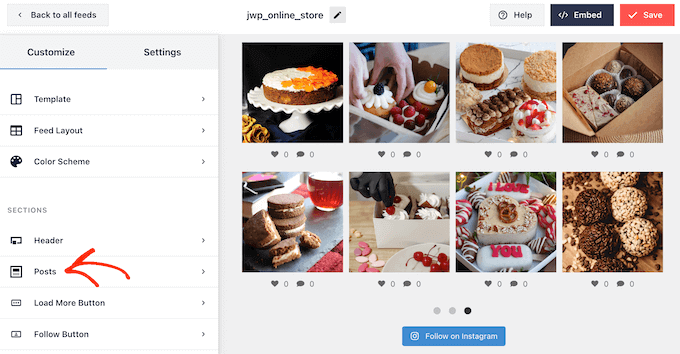
To start, you can switch between boxed and regular layouts for the individual posts inside the Instagram feed.
To do this, select ‘Post Style’.
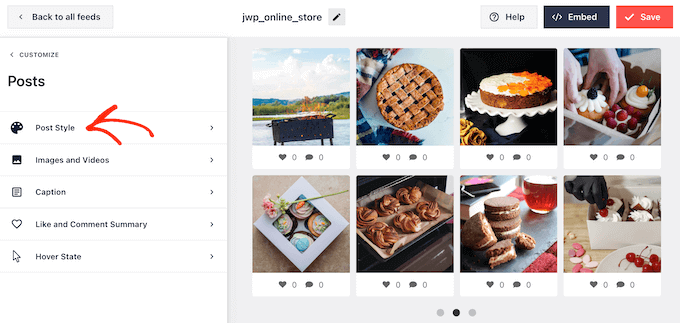
You can now click to select the layout you want to use.
If you select ‘Boxed’, then you can change the background color, add a box shadow, and increase the border radius to create curved corners.
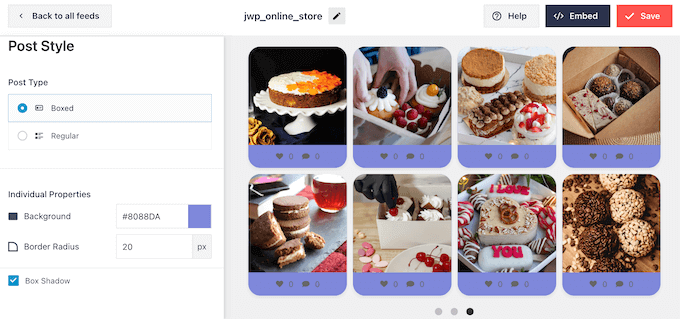
When you are happy with your changes, just click on the ‘Posts’ link to return to the previous Smash Balloon screen.
This time, select ‘Images and Videos’.
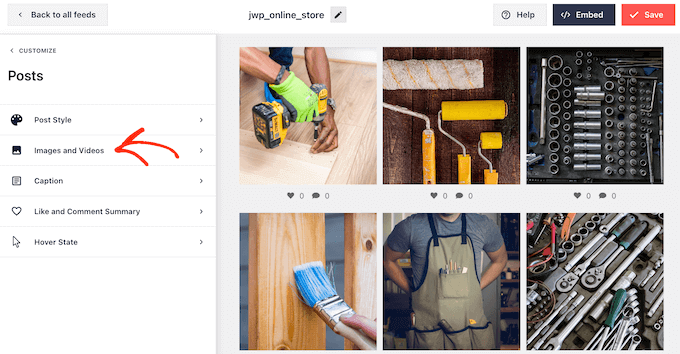
Smash Balloon automatically analyzes your Instagram photos and shows them at the best resolution. We recommend using these default settings, as they are designed to boost your WordPress speed and performance. However, you can make the Instagram images bigger or smaller if you need to.
To change the image size, simply open the ‘Resolution’ dropdown and choose one of the default WordPress image sizes from the list.
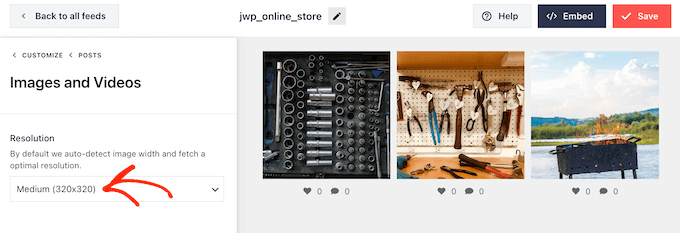
Once again, click on the ‘Posts’ link to return to the previous screen.
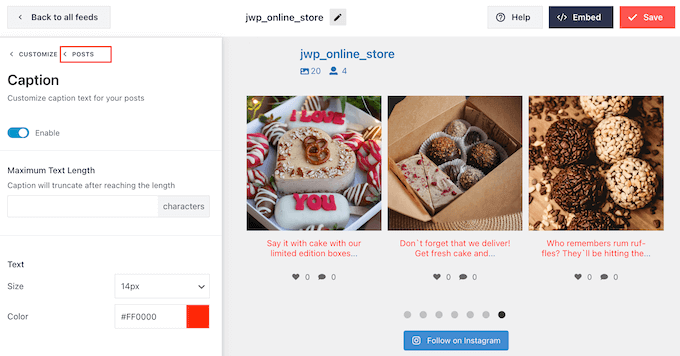
This time, select ‘Caption’. On the next screen, you can show the Instagram caption next to each image by clicking on the ‘Enable’ slider.
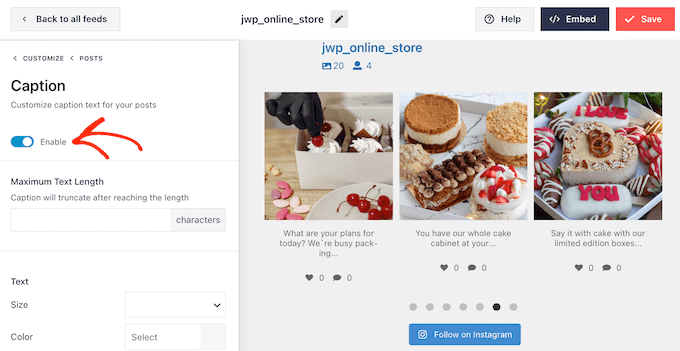
If you add Instagram captions to your feed, then you can change the text size and color and set a maximum text length.
With that done, just click on the ‘Posts’ link to return to the previous screen.
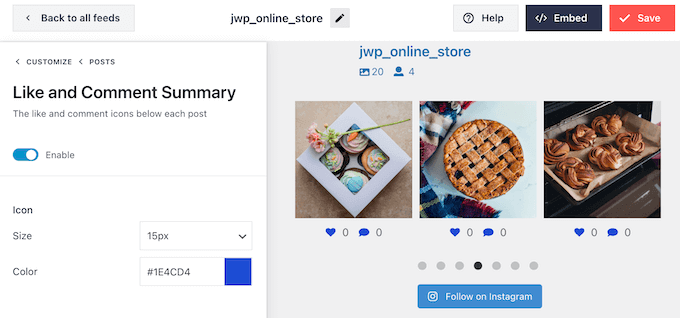
The next setting is ‘Like and Comment Summary’.
Here, you can add or hide the total number of likes and comments on each image. If your Instagram posts get a good amount of engagement, then these numbers can encourage people to visit your Instagram page or start following you on social media.
As always, you need to click on ‘Posts’ to return to the earlier screen.
The final option is ‘Hover State’, which is the overlay that Smash Balloon adds to a post when you hover your mouse over it.
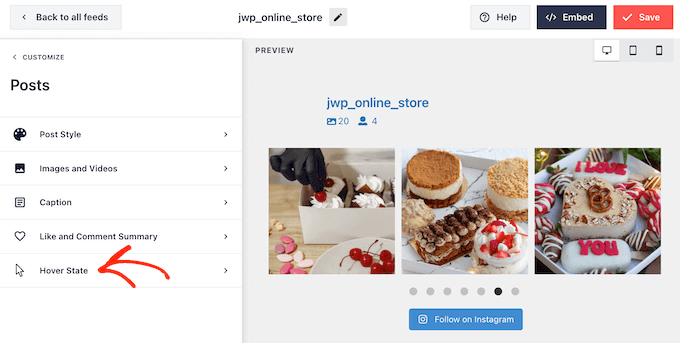
Here, you can choose the information that Smash Balloon shows when someone hovers over a post using the settings under ‘Information to display’.
You can also change the color of the hover overlay.
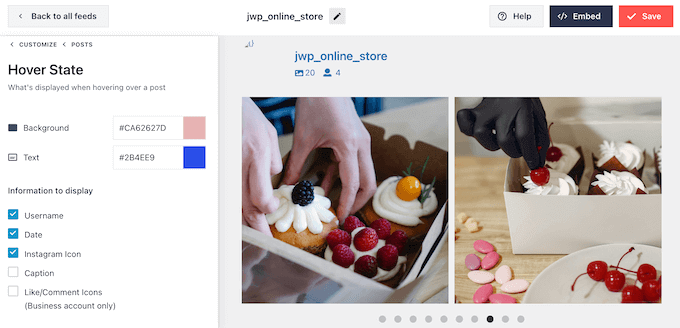
When you are happy with the changes you have made, click on the ‘Customize’ link.
This takes you back to the main Smash Balloon settings page, where you can click on ‘Load More Button’.
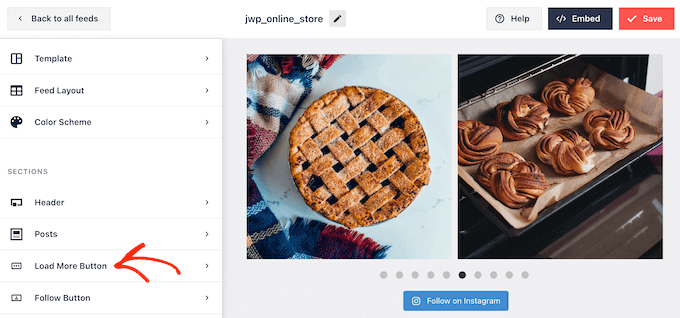
Here, you can help the ‘Load More’ button stand out by changing its background color, text color, and hover state.
You can also try adding your own messaging to the button by typing into the ‘Text’ field.
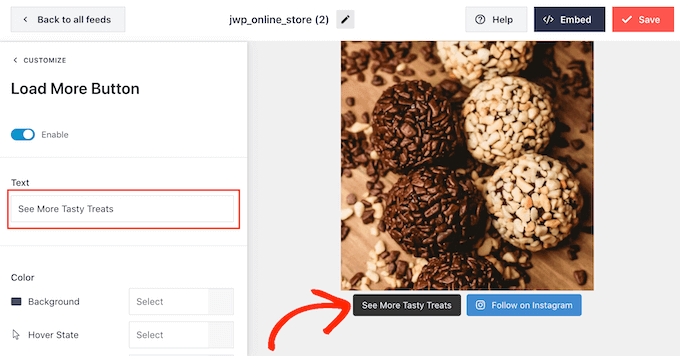
While we recommend leaving this button enabled, you can remove it. For example, you might encourage people to visit your Instagram by limiting the number of photos they can see on your site.
To remove the button, simply toggle off the ‘Enable’ slider so that it turns grey.
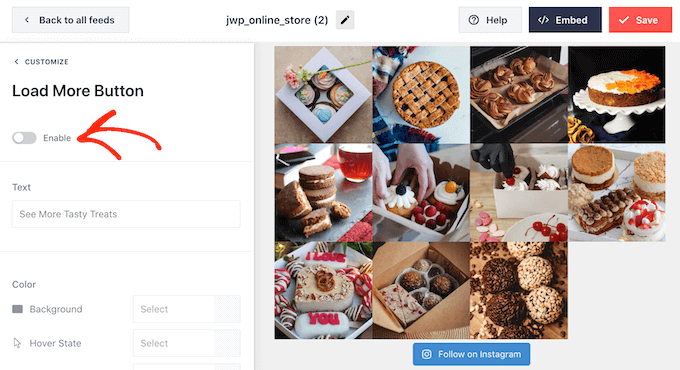
If visitors like what they see, they may decide to subscribe using the ‘Follow on Instagram’ button that appears below the embedded feed.
Since it’s such an important button, you might want to add some custom styling to help it stand out. To do this, select ‘Customize’ to return to the main settings screen. Then, select ‘Follow Button’ in the left-hand menu.
Here, you can change the button’s background color, hover state, and text color.
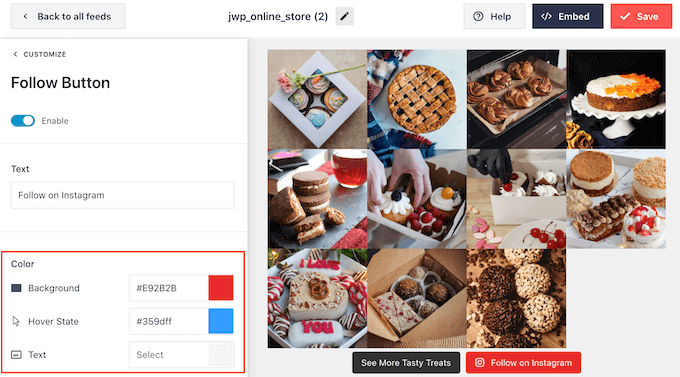
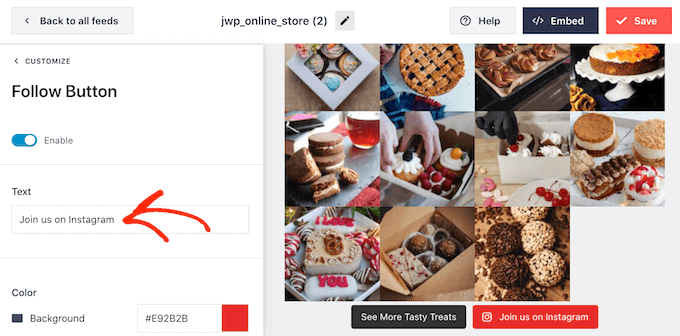
By default, the button shows a ‘Follow on Instagram’ label.
You can replace this with your own messaging by typing into the ‘Text’ field.
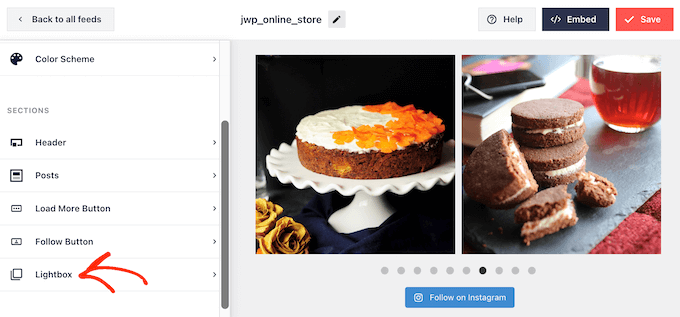
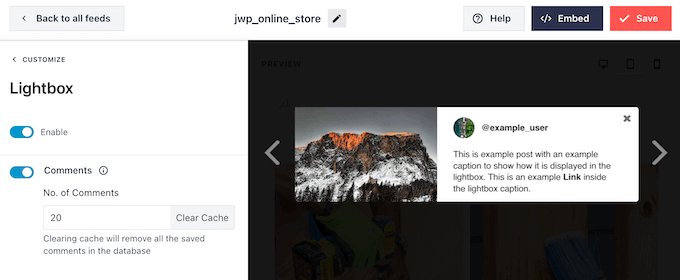
Smash Balloon comes with a built-in lightbox that allows visitors to open your Instagram photos and videos without leaving your website.
To configure this feature, go back to the main Smash Balloon settings screen and then click on ‘Lightbox’.
Here, you can change how many comments Smash Balloon will show in the lightbox.
If you don’t want to use the lightbox feature, then you can disable it using the ‘Enable’ slider.
When you are happy with how the Instagram feed looks, don’t forget to click on ‘Save’ to store your changes.
You are now ready to add the Instagram feed to your WordPress website.
Showing a Feed of Your Instagram Photos in WordPress
You can add the custom Instagram feed to your website using a block, a widget, or a shortcode.
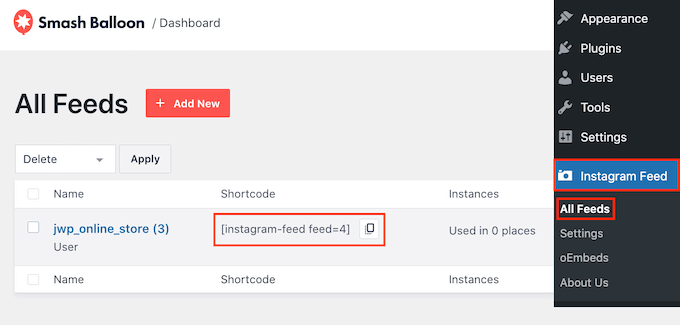
If you have created more than one feed using Smash Balloon, then you will need to know the feed’s code to use a widget or block.
To get this code, you must go to Instagram Feed » All Feeds and then copy the text under ‘Shortcode.’
In the following image, we will need to use instagram-feed feed=4.
If you want to embed the Instagram feed in a page or post, then you can use the Instagram Feed block.
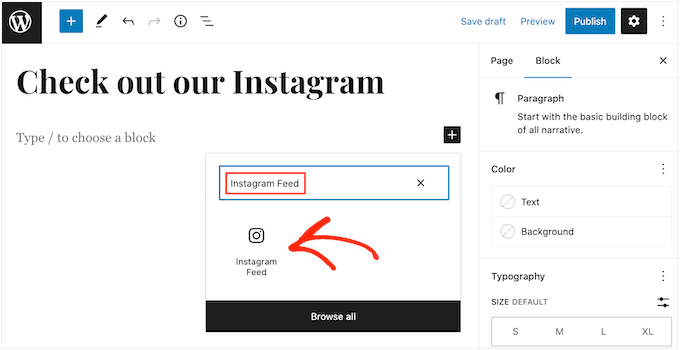
Just open the page or post where you want to embed your custom Instagram feed. Then, click on the ‘+’ icon to add a new block and start typing ‘Instagram Feed’.
When the right block appears, click to add it to the page or post.
The block will show one of your Instagram feeds by default. If you want to show a different Smash Balloon feed, then find ‘Shortcode Settings’ in the right-hand menu.
Here, simply add the shortcode and then click on ‘Apply Changes.’
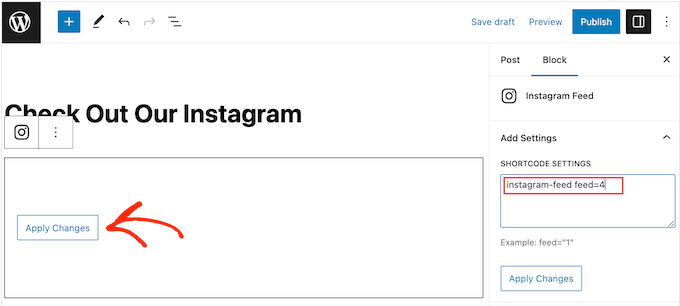
If you are happy with how the custom Instagram feed looks, then you can go ahead and publish or update the page.
Another option is to add the Instagram Feed widget to your website. This is a great way to show an Instagram feed on every page of your site. For example, you might add the Instagram widget to the WordPress theme’s sidebar or footer.
To add the Instagram Feed widget to your site, head over to Appearance » Widgets. You can then click on the blue ‘+’ icon towards the top of the screen.
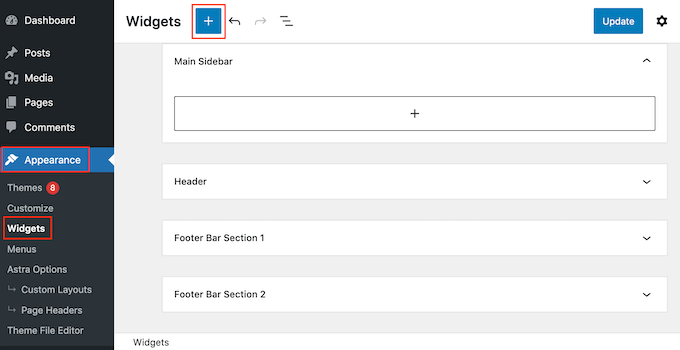
In the panel that appears, type in ‘Instagram Feed’ to find the right widget.
As you can see in the following image, there are two Instagram Feed widgets, so make sure you use the right one.
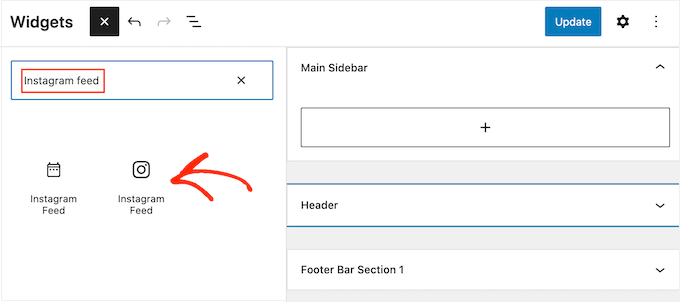
Next, simply drag the widget onto the area where you want to show the Instagram feed, such as the sidebar or similar section.
The widget will automatically show one of the feeds you created using Smash Balloon. If this isn’t the custom Instagram feed you just created, then type the feed’s code into the ‘Shortcode Settings’ box.
After that, click on ‘Apply Changes.’
You can now make the widget live by clicking on the ‘Update’ button. For more information, please see our step-by-step guide on how to add and use widgets in WordPress.
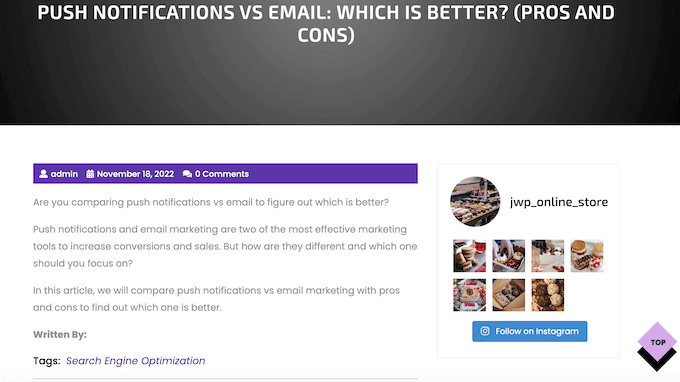
Another option is embedding the Instagram feed on any page, post, or widget-ready area using a shortcode.
Simply go to Instagram Feed » All Feeds and copy the code in the ‘Shortcode’ column. You can now add this code to any Shortcode block. For help placing the shortcode, please see our guide on how to add a shortcode.
Are you using a block-enabled theme? Then you can use the full site editor to add the Instagram Feed block anywhere on your WordPress website.
In the dashboard, go to Appearance » Editor.
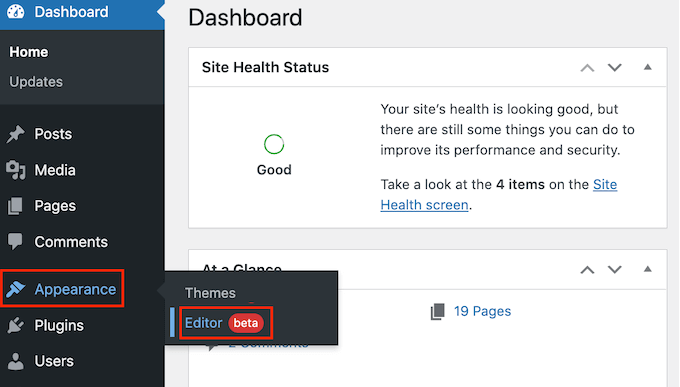
By default, the full-site editor will show the theme’s home template.
If you want to add the Instagram feed to a different area, then click on either ‘Template’ or ‘Template Parts’.
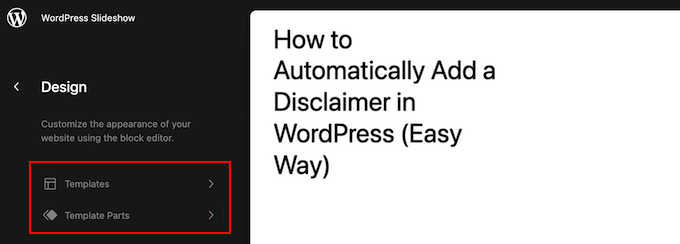
The editor will now show a list of all the template parts that make up your WordPress theme.
Simply click on the template where you want to show the Instagram feed.
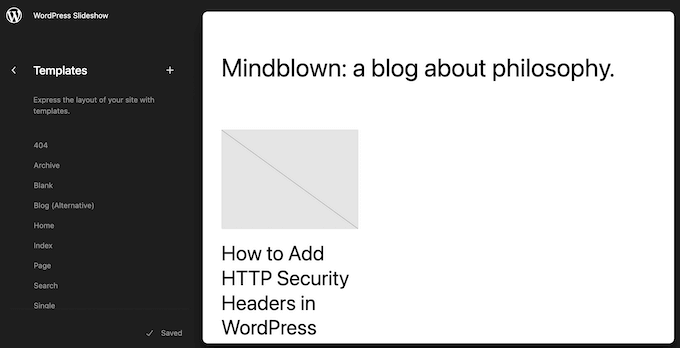
WordPress will now show a preview of the design.
To edit this template, go ahead and click on the small pencil icon.

After choosing a template, just hover your mouse over the area where you want to add the Instagram photo feed.
Then, click on the blue ‘+’ button.
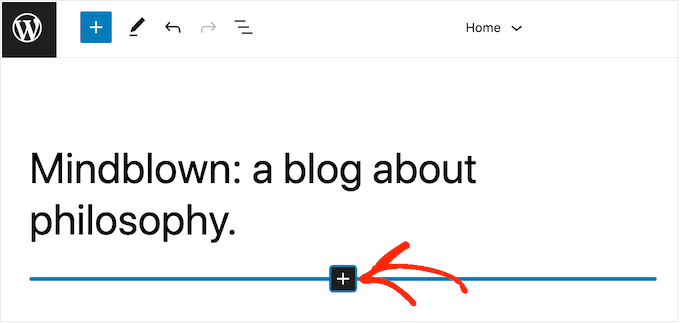
Once you have done that, you need to type in ‘Instagram Feed’.
When the right block appears, click to add it to the template.
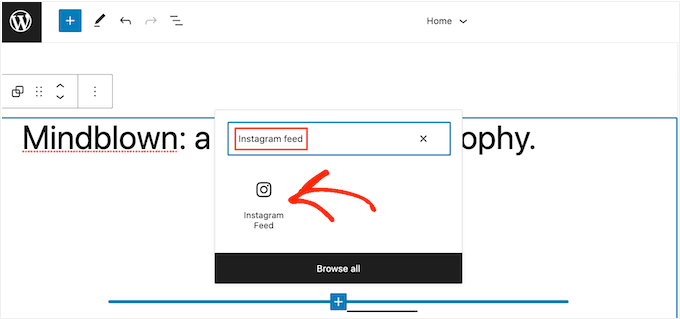
As always, Smash Balloon will show a feed by default. You can change this feed by adding a shortcode following the same process described above.
Bonus: Let Customers Buy Your Products Through Instagram
If you have an online store, then you can also use your custom Instagram feed to easily sell your products.
Smash Balloon Instagram Feed Pro allows you to tag your Instagram images with product links so that users are able to click on them and buy them directly instead of navigating through your product pages. This can increase sales and boost profits in your store.
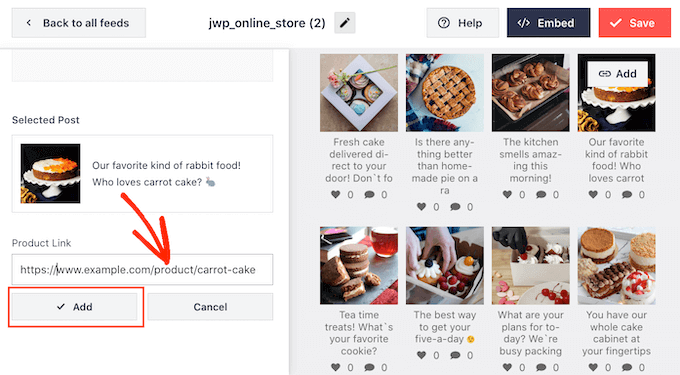
For more details, you can see our complete guide on how to add Instagram shoppable images in WordPress.
We hope this article helped you learn how to create a custom Instagram feed in WordPress. You might also want to see our comparison of the best WordPress giveaway plugins to grow your social following and learn how to create an email newsletter.
If you liked this article, then please subscribe to our YouTube Channel for WordPress video tutorials. You can also find us on Twitter and Facebook.
The post How to Create a Custom Instagram Photo Feed in WordPress first appeared on WPBeginner.
from WPBeginner https://ift.tt/jFxc2mG
More links is https://mwktutor.com
No comments:
Post a Comment