Do you want to add a mega menu on your WordPress site?
Mega Menus allow you to arrange dozens or even hundreds of links into user-friendly columns and rows. You can then add rich content like images and videos, to make your mega menus even more helpful.
In this article, we will show you how you can add a mega menu to your WordPress website, step-by-step.
Why Add a Mega Menu on Your WordPress Site?
WordPress comes with a drag-and-drop builder you can use to create a dropdown menu, header menu, and more. There are even plugins that allow you to create custom navigation menus in WordPress themes.
If your site has lots of content then you may need to create a mega menu instead. These mega menus allow you to add multi-column dropdowns to the WordPress navigation.
You can use mega menus to organize your content under different headings and subheadings, so visitors can find exactly the page they’re looking for. For example, if you create an online marketplace then you might arrange all your product categories and subcategories in a mega menu.
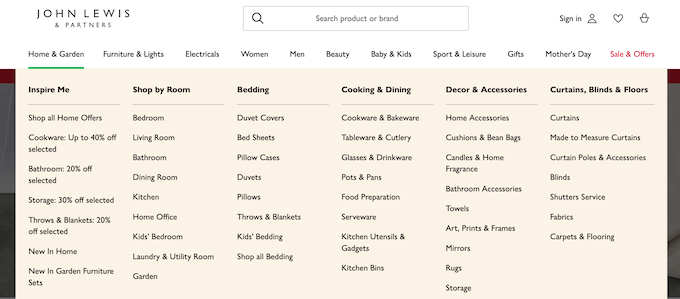
This helps shoppers find the exact product category they want, and make a purchase.
Mega menus can also show rich content to your visitors, such as videos, text, search, and recent posts.
Many websites use images, too, because they make mega menus easier to scan. Even if you’re showing dozens of menu items, dividing them into columns and then adding a relevant image can help visitors find exactly the content they’re looking for in seconds.
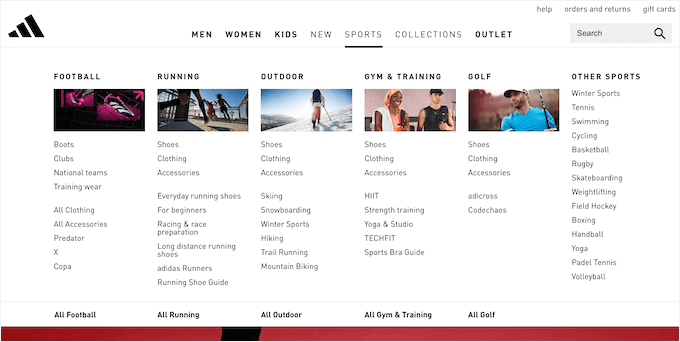
That said, let’s see how you can easily add a mega menu to your WordPress website.
How to Create a Mega Menu for Your WordPress Site
The easiest way to add a mega menu on your WordPress site is by using Max Mega Menu. This plugin allows you to add rich content to your mega menus, including images, text, galleries, and more.
In this way, you can create more engaging and helpful menus.
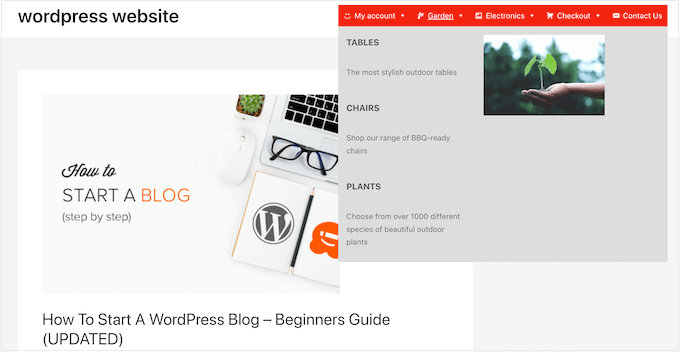
You can also style every part of the mega menu by adding different colors, changing the font size, and using different icons.
First, you’ll need to install and activate the plugin. If you need help, then please see our guide on how to install a WordPress plugin.
Enable Mega Menus on Your WordPress Website
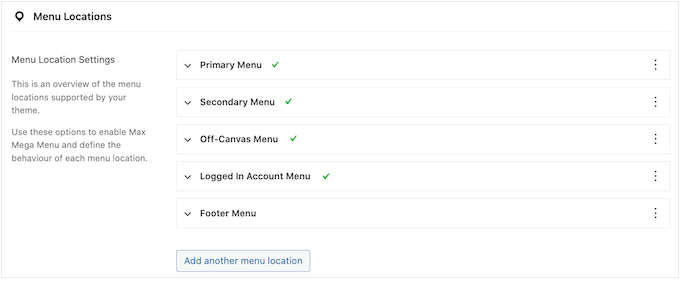
Upon activation, go to Mega Menu » Menu Locations to see all the different areas where you can add a mega menu.
You may see different options depending on your WordPress theme.
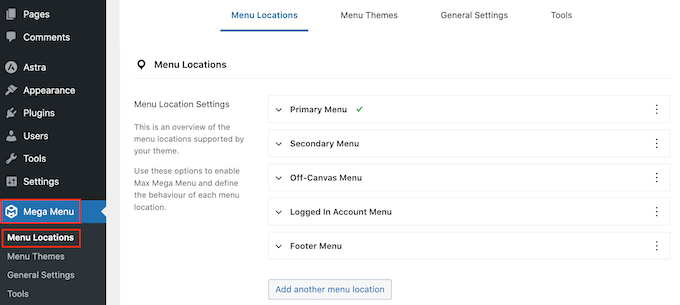
To start, you’ll need to enable mega menus in every location where you want to use them.
To do this, simply click to expand a location and then check its ‘Enabled’ box.
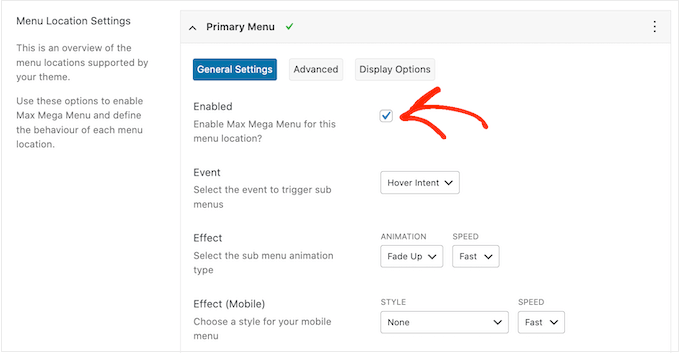
After that, you can change the ‘Event’ that’ll open the mega menu.
The default setting is ‘Hover intent,’ which means the visitor must hover their mouse over the mega menu for a few seconds. This works well for most WordPress websites, but you can also open the ‘Effect’ dropdown and choose ‘Hover’ or ‘Click’ instead.
If you choose ‘Click’ then the visitor will need to click to explore the mega menu. This can be useful if you’re worried visitors might trigger the menu by accident, which can be frustrating.
Meanwhile, ‘Hover’ will open your mega menu as soon as the visitor moves their mouse over it. This can encourage visitors to explore different areas of your site, so you may want to use ‘Hover’ on landing pages or your website’s homepage.
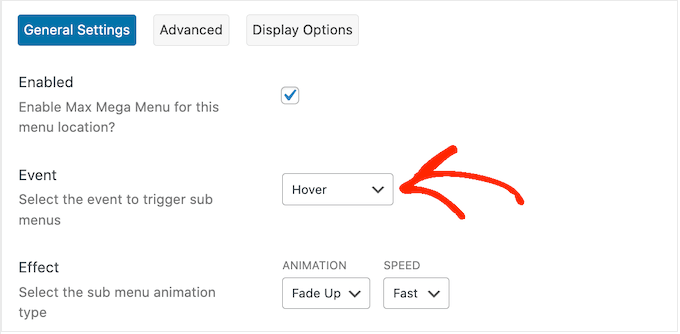
After making this decision, you can change how the menu opens using the ‘Effect’ settings.
Max Mega Menu has different animations you can try, including fade and slide up. You can also change the animation’s speed. By trying different animations, you can create a mega menu that grabs the visitor’s attention.
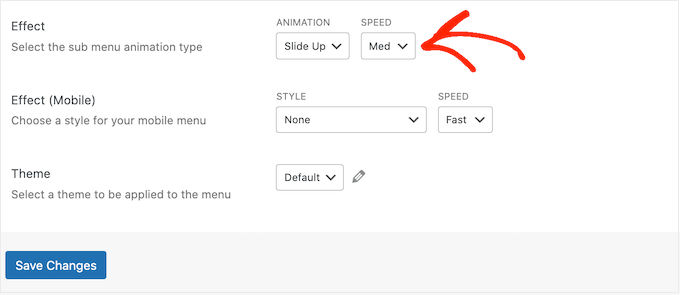
If you don’t want to use any animations, simply open the first dropdown and select ‘None.’
By default, Mega Menu doesn’t use animations on mobile devices to prevent performance issues. If you want to create a unique animation for mobile visitors, then you can use the settings in the ‘Effect (Mobile)’ area.
If you want to test your mega menus on mobile, then check out our guide on how to view the mobile version of WordPress sites from desktop.
Also, if you set the ‘Event’ dropdown to ‘click,’ then make sure you select the ‘Advanced’ tab next.
Here, you can use ‘Click Event Behavior’ to define what happens when the visitor clicks your mega menu. For example, the second click might close the menu or open a new link.
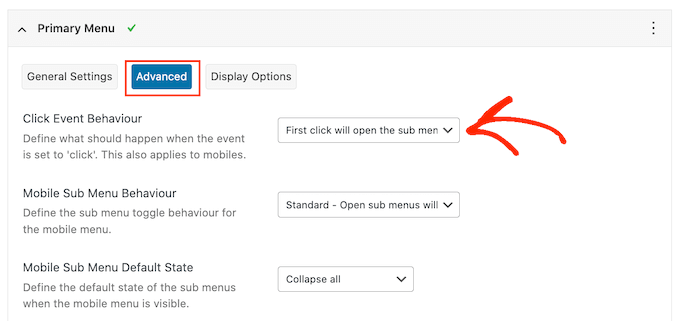
There are more settings you can look through, but this should be enough for most WordPress blogs and websites.
When you’re happy with how the plugin is configured, click on ‘Save Changes.’
To enable mega menus for more locations, simply follow the same process described above.
Customize How the Mega Menus Looks on Your Website
The next step is configuring how the mega menus will look on your website.
You can do this by selecting the ‘Menu Themes’ tab to the left of the screen.
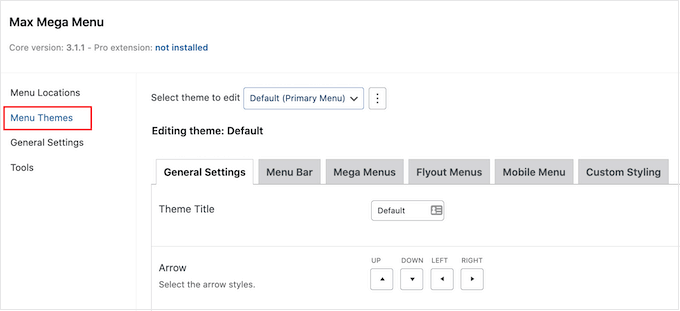
On this screen, you can change the direction of the arrow icons, use a different line height, and add a shadow.
When you’re happy with your settings, don’t forget to click on ‘Save Changes.’
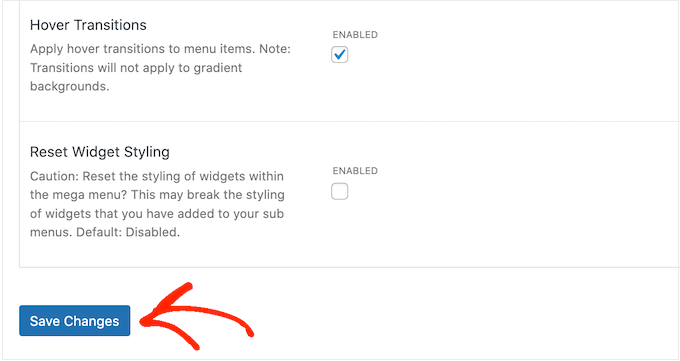
If you want to remove these changes at any point, then simply check the ‘Reset Widget Styling’ box and then click on ‘Save Changes.’
Next, you can customize the menu bar, which is the bar visitors see when the menu is in its default, collapsed state.
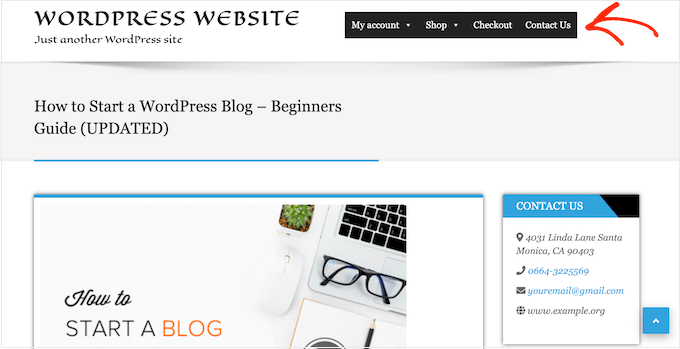
To make these changes, click on the ‘Menu Bar’ tab and then use the settings to change its background color, padding, border radius, and more.
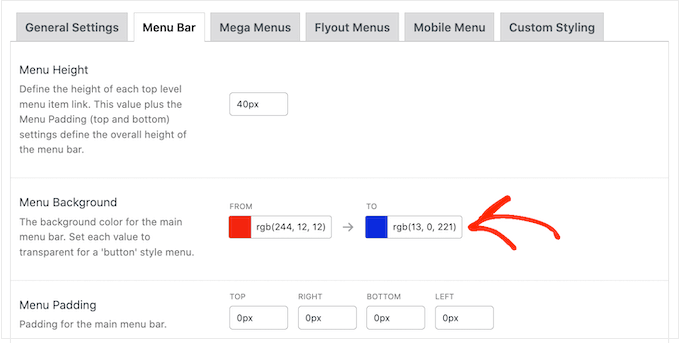
You can even create a color gradient by selecting two different colors in the ‘Menu Background’ section.
If you scroll down, then you can change how the top-level menu looks.
This is the first row of items, which is visible when the mega menu is in its collapsed state.
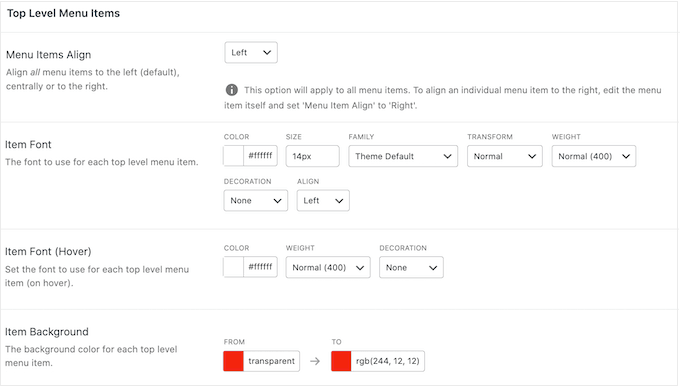
Since they’re so important, you might want to make the top-level menu items stand out.
For example, in the following image, we’re using a different background color.

In the ‘Hover State’ section you can highlight the currently-selected top-level menu item.
For example, in the following image, we’re using an underline effect.

This can help the visitor see where they are in the menu, which makes it particularly useful for sites that need to have large mega menus.
If you do add a hover state, then scroll to the bottom of the screen and check the ‘Highlight Current Item’ box.
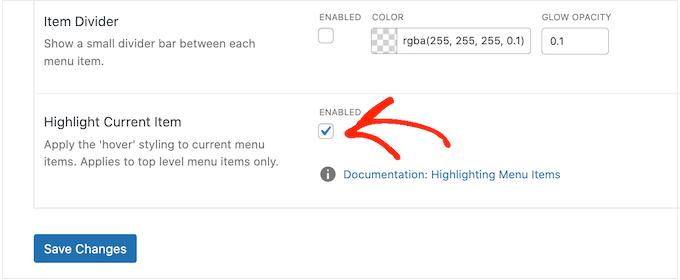
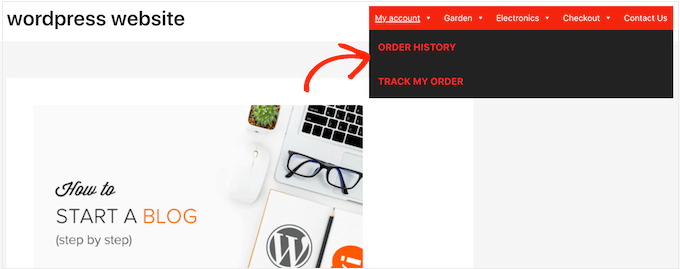
After that, you can change how the submenu looks.
This is the menu that appears under a top-level parent, as you can see in the following image.
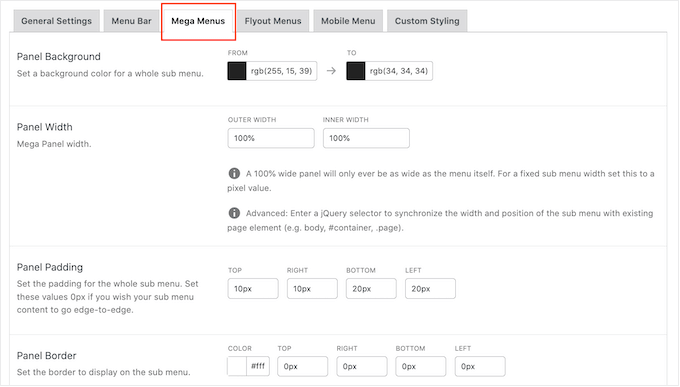
To customize the submenu, click on the ‘Mega Menus’ tab.
You can now use these settings to change the submenu’s background color, increase the radius to create curved corners, add padding, and more.
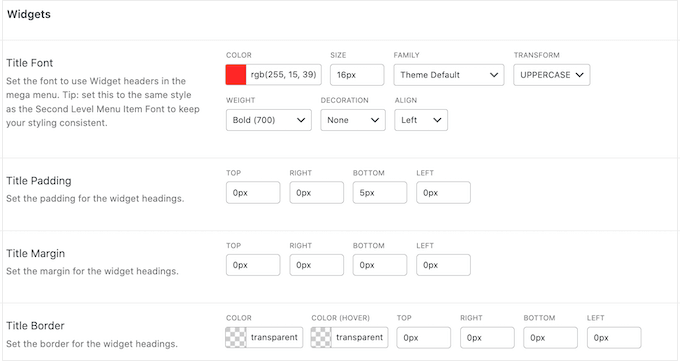
You add content to your mega menus using widgets. For example, you might add a Gallery widget and display your most popular WooCommerce products, or embed a tag cloud inside the mega menu. These widgets can provide extra information, or encourage visitors to click on certain menu items.
You can customize how these widgets will look by scrolling to the ‘Widgets’ section. For example, you might change the color of the widget’s title, increase the font size, add padding, and adjust the alignment.
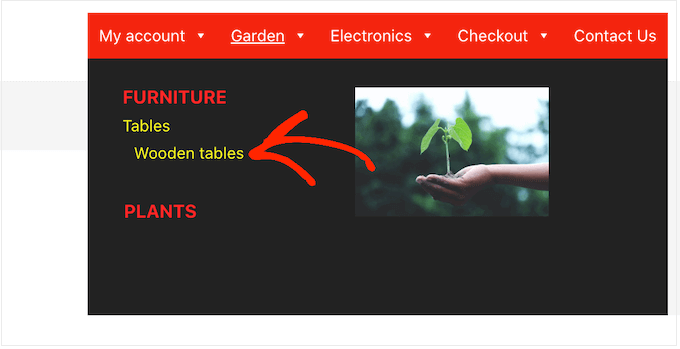
On this screen, you can also customize how the second-level menu items and third-level menu items will look on your website. These are the children of the top-level menu items.
When building your menus, it’s possible to add four or even more levels to create a nested mega menu. If you do this, then WordPress will simply use the third-level styling for all the subsequent levels.
You can see this in action in the following image. The second level has red text, and both the third and fourth levels use the same yellow text.
When you’re happy with how the menu is set up, don’t forget to click on ‘Save Changes.’
How to Add a Mega Menu on Your WordPress Site
Once you’ve finished customizing the mega menu using Max Mega Menu, it’s time to add it to your website.
Simply head over to Appearance » Menus.
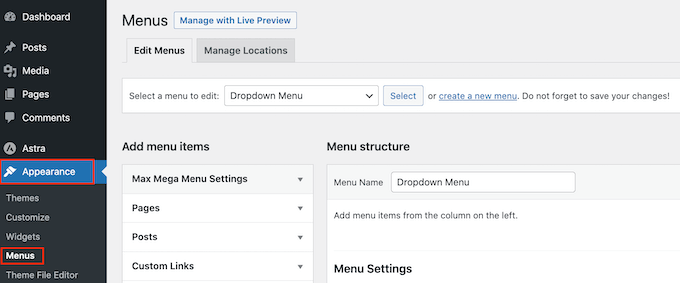
If you want to turn an existing menu into a mega menu, then open the ‘Select a menu to edit’ dropdown and choose it from the list. Just be aware the menu you choose must be assigned to a location where you’ve enabled the mega menu feature.
If you want to start from scratch, then click on ‘Create a new menu’ and then type in a title for your new mega menu.
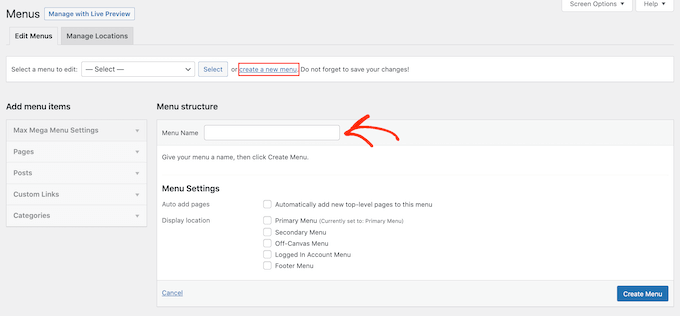
You can then select the location you want to use, and click on ‘Create Menu.’ Once again, this must be a location where you’ve enabled mega menus.
Add Content to Your WordPress Menu
After that, add all the pages, posts, and any other content you want to include in the menu. For step-by-step instructions, please see our beginner’s guide on how to add a navigation menu in WordPress.
Next, you’ll need to arrange your items into parents and submenus. To create a submenu, drag an item below the parent, and then drag it slightly to the right before releasing it.
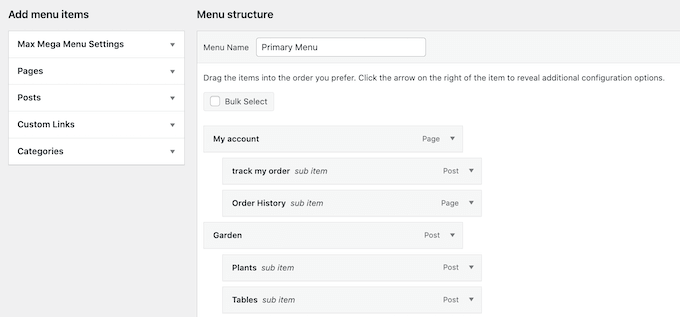
To create multiple levels, simply keep dragging items to the right so they appear indented below one another. This is similar to creating a dropdown menu in WordPress.
No matter whether you’re creating a new menu or updating an old one, at this point you’ll have all the items you want to include in the mega menu.
Enable the Mega Menu Feature
With that done, click to expand the ‘Max Mega Menu Settings’ and check the box next to ‘Enable.’
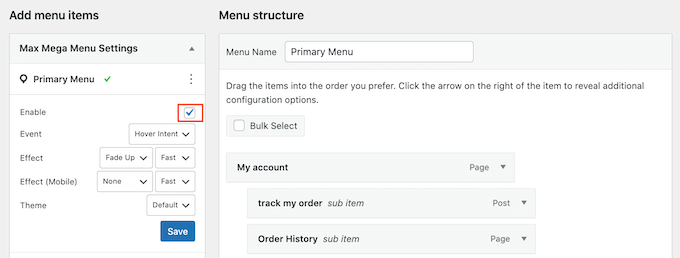
In this box, you can also override the default mega menu settings. This allows you to create unique mega menus for different areas of your site, so go ahead and make any changes.
After that, click on ‘Save.’
Create the Mega Menu Layout
Now, hover your mouse over the first top-level item and you’ll see a new ‘Mega Menu’ button. Go ahead and give the button a click.
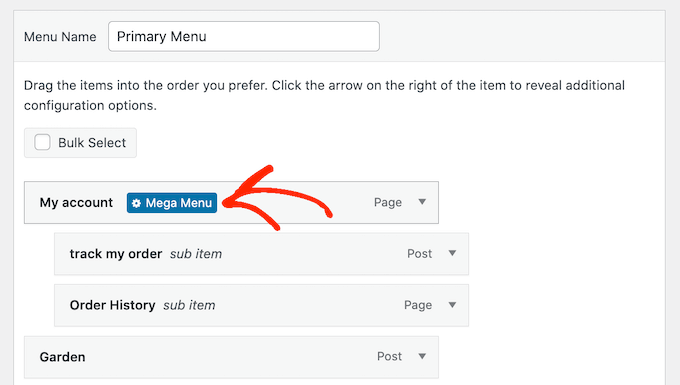
You will now see all the settings for this top-level item.
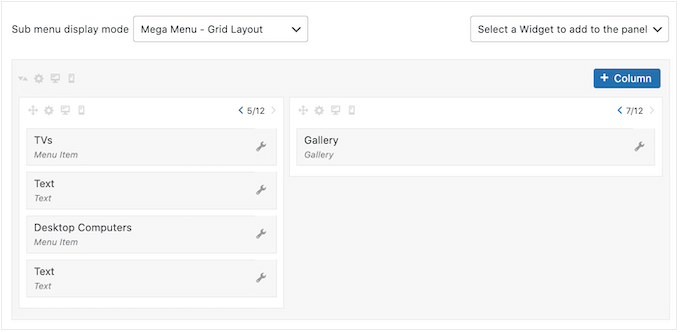
By default, Max Mega Menu will use the flyout style, where the submenus ‘flyout’ from the side. To create a mega menu instead, open the ‘Sub menu display mode’ dropdown and choose either ‘Standard Layout’ or ‘Grid Layout.’
Standard layout shows all the submenus in columns.
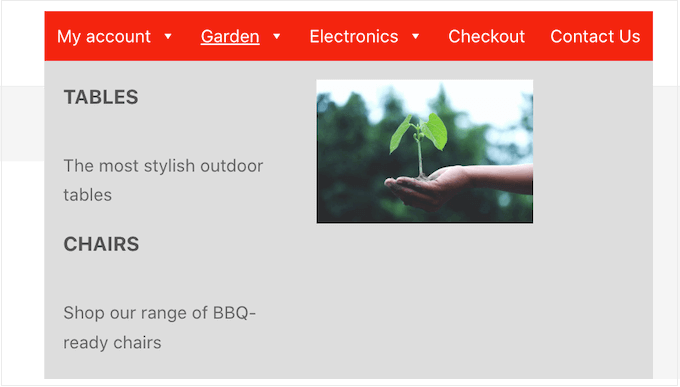
Meanwhile, grid layout allows you to organize submenu items into columns and rows.
This is ideal if you want to show lots of content, or have a very specific layout in mind.
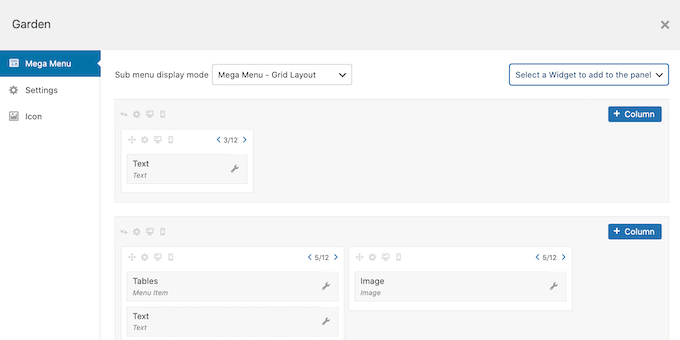
After selecting the standard or grid layout, you’ll see all the submenus assigned to this parent.
Now, you can go ahead and change how these items are arranged in the mega menu.
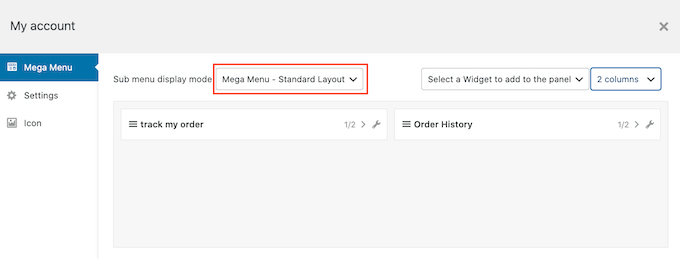
If you’re using the standard layout, then you can change the number of columns using the dropdown menu in the top right corner.
If you’re using a grid layout, then you can add columns and rows using the ‘+Column’ and ‘+Row’ buttons.
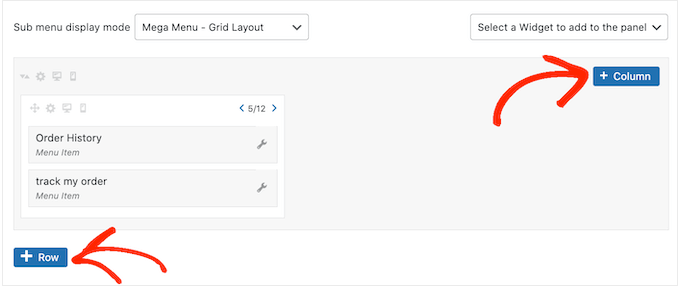
When you’re happy with the layout, you can arrange the submenu items into different columns and rows using drag and drop.
After that, it’s time to change how much space each item takes up in the column. Max Mega Menu shows the current size as a fraction of the total available width.
For example, in the following image, both columns take up half the available space.
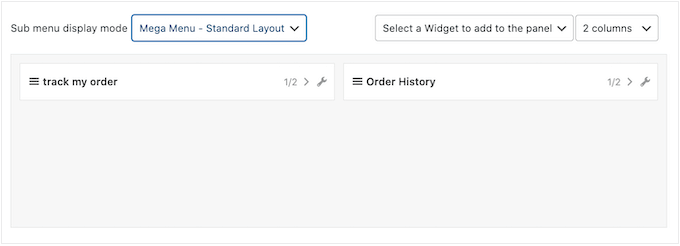
To make an item bigger or smaller, simply click on its arrow buttons to increase or decrease the fraction.
Create a Mobile-Friendly Mega Menu (Grid Layout Only)
By default, Max Mega Menu will show the same content on desktop and mobile devices. This can be a problem with grid layouts, as smartphones and tablets typically have smaller screens, and scrolling horizontally can be difficult.
If you’re using the grid layout, then you can create different mega menus for mobile devices. For example, you might use fewer columns so users don’t have to scroll horizontally.
You can hide entire columns or rows using the ‘Hidden on mobile’ icon, which looks like a small mobile phone.
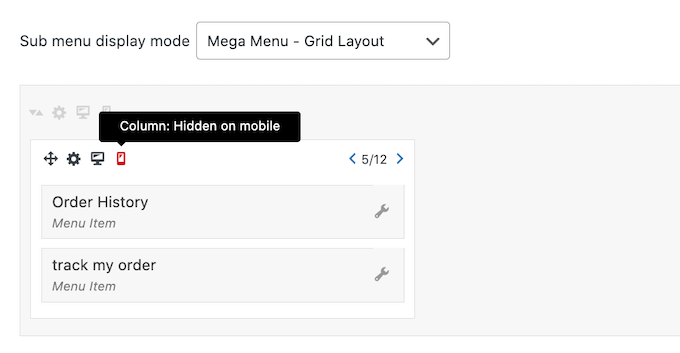
Simply toggle the icon on and off, to hide and show different content on desktop and mobile.
Add Rich Content with Mega Menu Widgets
With that done, you can start adding widgets to the mega menu. This allows you to show extra content in the submenu, such as WordPress galleries, text, videos, recent comments, and more.
For example, you might use images to promote a sale on your online store, or highlight your latest products.

To add a widget, simply click to open the ‘Select a widget….’ dropdown.
You can now choose a widget from the list.
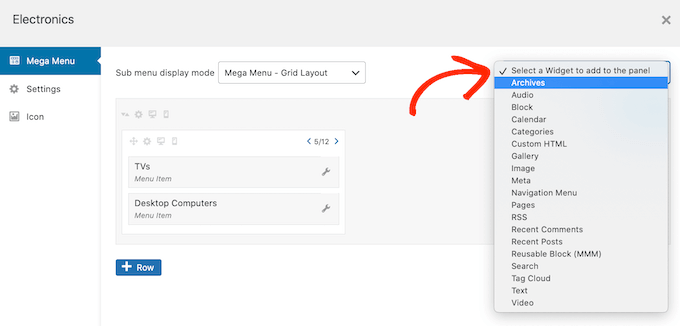
WordPress will add the widget to a column or row automatically, but you can move it to a new location using drag and drop.
To configure the widget, go ahead and click on its little wrench icon.
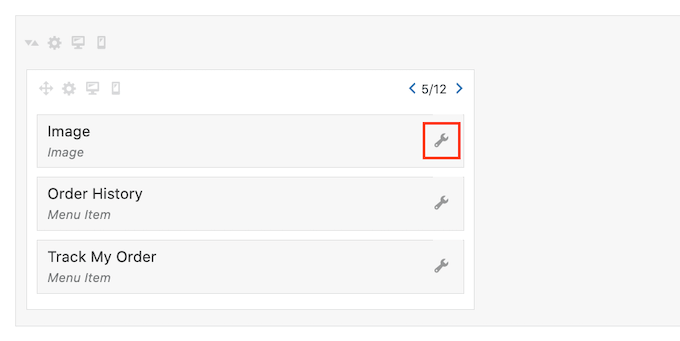
This opens a popup where you can add content to the widget and change its settings.
You’ll see different options depending on the kind of widget you’re creating.
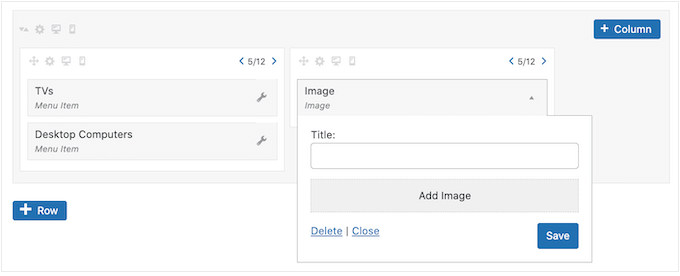
For example, if you added an Image widget, then you can click on ‘Add Image’ and either choose a picture from the media library or upload a file from your computer.
If you add a ‘Text’ widget then you’ll see a small editor where you can type in your text.
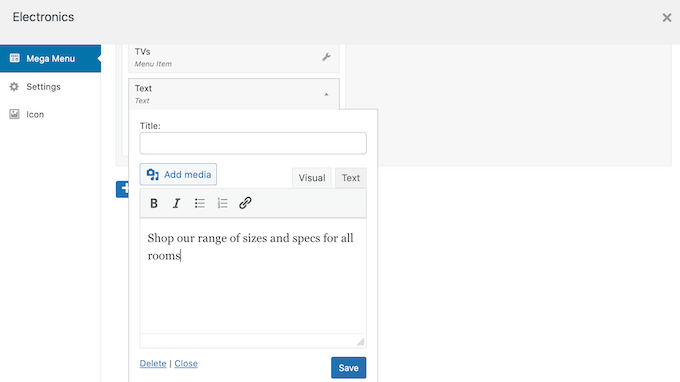
All widgets have a ‘Title’ field where you can add text that will be displayed above the widget.
When you’re finished, click on ‘Save’ to store your changes and then select ‘Close.’ To add more widgets to the mega menu, simply follow the same process described above.
Review the Default Mega Menu Settings
Next, just click on the ‘Settings’ tab.
Here, you can use checkboxes to hide or show different content in the submenu.
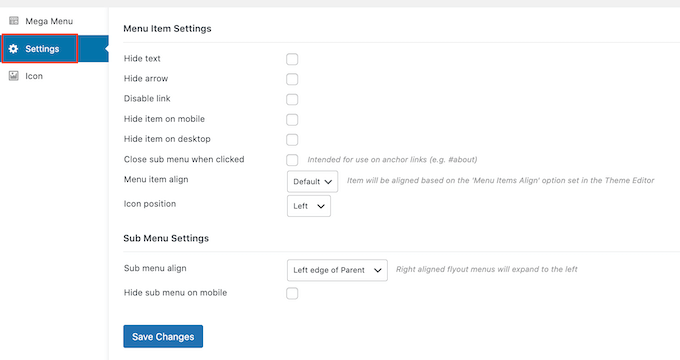
You can also hide or show the submenu on mobile devices and desktop, and change the alignment so the submenu opens to the left or right of the top-level parent.
If you make any changes to the default settings, then don’t forget to click on ‘Save Changes.’
Add Image Icons to the WordPress Mega Menu
Image icons help visitors understand what a menu item is about, without even having to read the navigation label. This is particularly useful for large menus where a visitor may prefer to scan the content quickly rather than reading each navigation label.
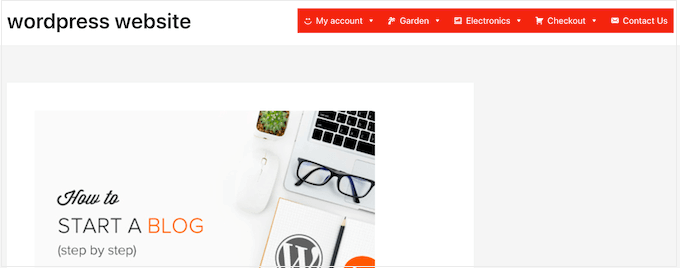
You can use icons to make the most important content stand out. For example, you might encourage visitors to complete their purchase by adding a cart icon to the ‘Checkout’ menu.
To add image icons to your navigation menu, click on the ‘Icon’ tab.
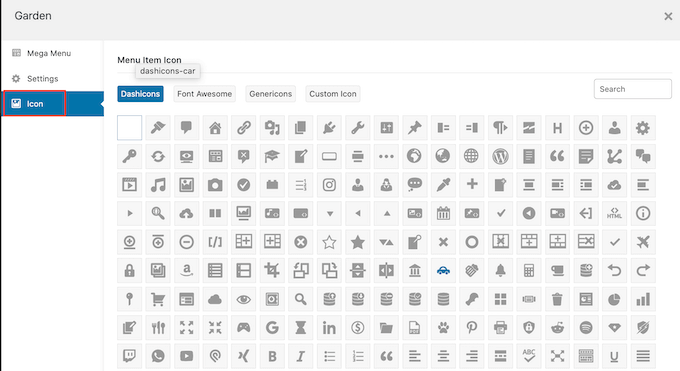
You can now choose any dashicon from the built-in library. If you upgrade to Max Mega Menu pro, then you’ll also have access to other icon fonts, Genericons and FontAwesome, or you can choose a file from your WordPress media library.
Finish Configuring the Mega Menu on Your WordPress Site
After working your way through all these settings, you can close the popup window to return to the main Appearance » Menus page.
You can now repeat this process for each top-level parent.
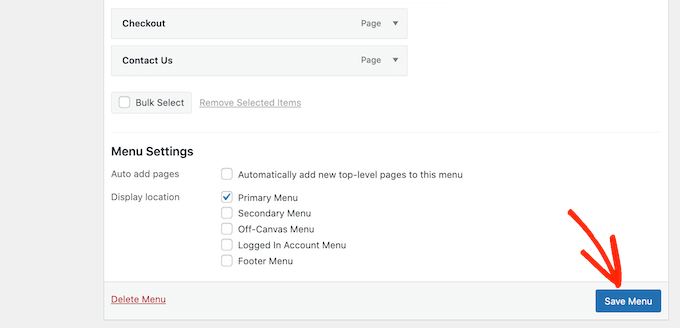
When you’re happy with how the mega menu is set up, click on the Save Menu button to make it live.
Now, simply visit your website to see the mega menu in action.
We hope this article helped you learn how to add a mega menu on your WordPress site. You can also go through our guide on the best drag and drop WordPress page builders and how to increase your blog traffic.
If you liked this article, then please subscribe to our YouTube Channel for WordPress video tutorials. You can also find us on Twitter and Facebook.
The post How to Add a Mega Menu on Your WordPress Site (Step by Step) first appeared on WPBeginner.
from WPBeginner https://ift.tt/UcOdEzT
More links is https://mwktutor.com
