Do you want to change how often your trash is emptied on your WordPress website, or stop WordPress from emptying the trash automatically?
By default, WordPress will automatically delete anything that has been in the trash for 30 days. However, some users might like the trash to be emptied more or less often, or prefer to empty the trash manually.
In this article, we will show you how to limit or disable the trash being automatically emptied in WordPress.
What Is Trash in WordPress?
WordPress added a trash feature way back in version 2.9. It works just like the recycle bin or trash on your computer.
In other words, your deleted posts aren’t removed permanently but are sent to the trash instead so they can be recovered for a time. Anyone can delete a post accidentally. That’s why WordPress makes it easy to restore deleted posts and pages.
You can view them by going to Posts » All Posts from your WordPress dashboard and then clicking the ‘Trash’ option.
Your WordPress website will automatically delete anything in the trash after 30 days so that it doesn’t pile up.
What if you don’t want WordPress to automatically delete items from the trash? Or you’d prefer it to be emptied more or less often than once a month.
Let’s have a look at how you can have it automatically emptied as often as you like. We’ll cover three methods below. The first method is the easiest for most users. You can use the links below to jump to your preferred method.
Method 1: Changing when WordPress Trash Is Emptied with a Plugin
First, you need to install and activate the Change Empty Trash Time plugin. For more details, see our step-by-step guide on how to install a WordPress plugin.
Upon activation, you should visit the Settings » General page of your admin dashboard. Once there, scroll to the bottom of the page, and you will find a new ‘Time to empty trash (in days)’ setting.
Simply type in the number of days that WordPress should take to empty the trash. For example, you can type 1 for daily, 7 for weekly, or 30 for monthly.
If you type 0, then deleted posts and pages will be deleted permanently instead of being placed in the trash.
Note: Be very careful about setting the time to empty to 0. It can be difficult to recover permanently deleted posts and pages. Make sure you’re using a backup plugin, just in case.
Don’t forget to click the ‘Save Changes’ button to store your settings.
Method 2: Changing when WordPress Trash Is Emptied with Code
You can also configure how regularly the trash is emptied by the use of a code snippet. This method is not recommended for beginners, so if you’re not familiar with code, then you should use Method 1 instead.
For this method, you’ll have to edit your wp-config.php file.
If you haven’t edited the wp-config.php file before, then take a look at our guide on how to edit wp-config.php file in WordPress.
You can simply add the following line of code to your wp-config.php file.
define('EMPTY_TRASH_DAYS', 1 ); //Integer is the amount of days
You should paste it near the end of the file, just before the line that says, ‘That’s all, stop editing! Happy blogging.’
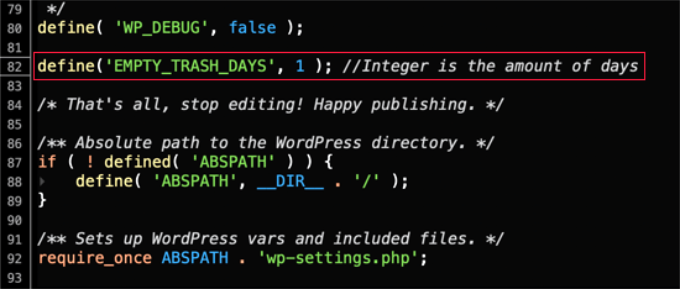
If you leave this code snippet as it is, then your trash will be emptied every day. Feel free to change the number 1 to some other number, and the trash will be emptied after that number of days.
If you don’t wish to use the trash feature at all, then you should set the number to 0. Deleted posts and pages will then be deleted permanently without being placed in the trash.
Make sure you have a backup plugin set up first, just in case you need to restore any accidentally deleted pages.
Don’t forget to save the wp-config.php file once you have made your changes.
Method 3: Stopping WordPress from Automatically Emptying Trash
Do you want to stop WordPress from automatically deleting items from the trash?
Simply add the little code snippet below into your theme’s functions.php file. If you’re not used to editing your core WordPress files, check out our guide on copying and pasting code snippets from the web.
Now, we don’t generally recommend editing your site’s theme files directly. The slightest mistake can break your website. A better way of adding code snippets is by using WPCode.
First, you’ll need to install and activate the free WPCode plugin. For more details, please see our guide on how to install a plugin.
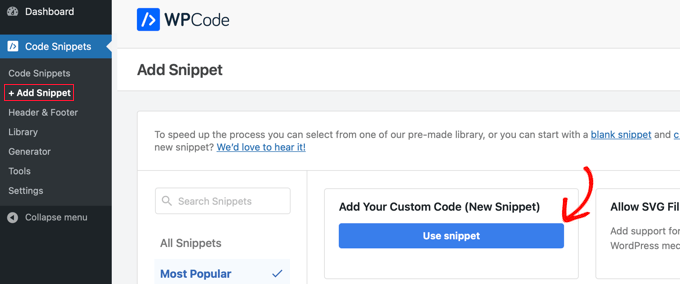
After that, you can go to Code Snippets » + Add Snippet from your WordPress dashboard and then select the ‘Add Your Custom Code (New Snippet) option.
Next, you will need to enter a title for your code snippet.
Then, copy this snippet and paste it into the box labeled ‘Code Preview.’
function wpb_remove_schedule_delete() {
    remove_action( 'wp_scheduled_delete', 'wp_scheduled_delete' );
}
add_action( 'init', 'wpb_remove_schedule_delete' );
This code simply removes the action that deletes trashed items when their time is up.
Don’t forget to click the ‘Code Type’ dropdown menu and select the ‘PHP Snippet’ option.
After that, you can scroll down to the ‘Insertion’ section to view more options, such as how and where you’d like to insert the code.
We recommend using the default options. The plugin will Auto Insert the code and run it everywhere on your site.
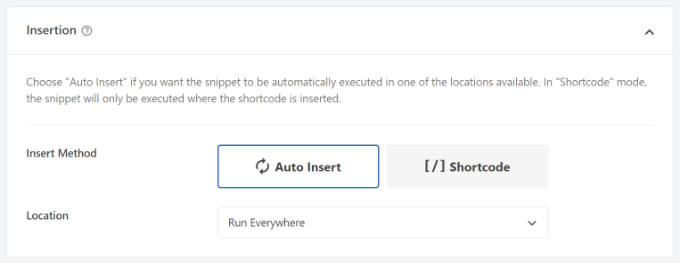
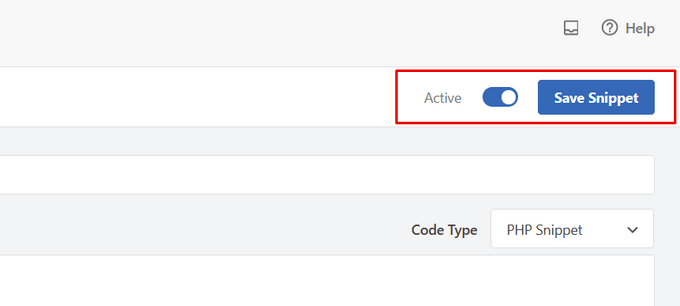
You can then click the toggle to make your code snippet Active.
Once that’s done, simply click the ‘Save Snippet’ button at the top.
Now when you send an item to the trash, it will remain there until you view your trashed files.
From here, you can manually click on the ‘Empty Trash’ button to delete any post.

We hope this tutorial helped you learn how to limit or disable automatic empty trash in WordPress. You may also want to learn how to get a free SSL certificate or check out list of must have plugins to grow your site.
If you liked this article, then please subscribe to our YouTube Channel for WordPress video tutorials. You can also find us on Twitter and Facebook.
The post How to Limit or Disable Automatic Empty Trash in WordPress first appeared on WPBeginner.
from WPBeginner https://ift.tt/QrWyJSa
More links is https://mwktutor.com
No comments:
Post a Comment