Monday 31 January 2022

How to Add Google Maps in WordPress (The RIGHT Way)

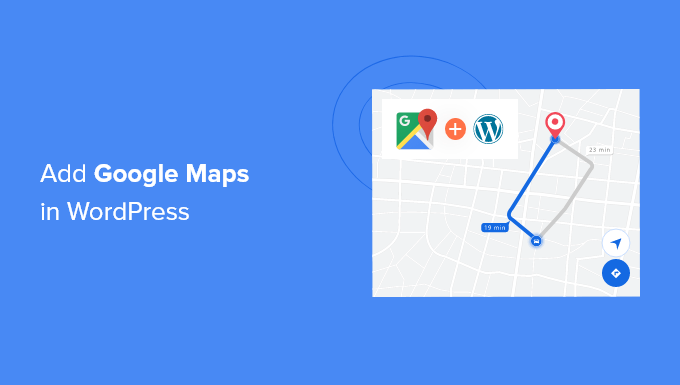
Do you want to show Google Maps on your WordPress website?

If you’re running a local business, then displaying Google Maps on your site can help users easily find your location. It can also help improve your site’s search engine visibility so you can attract more website visitors.

In this article, we will show you how to add Google Maps in WordPress.

Add Google Maps in WordPress

Why Add Google Maps in WordPress?

Did you know that Google Maps is the most popular navigational app on all platforms?

If you have an office or physical store address, then adding Google Maps to your WordPress website makes it easy for users to quickly locate your physical stores, restaurants, or retail outlets. This helps you attract more customers and generate more business.

Not only that, but embedding Google Maps can also improve your WordPress SEO. According to Google, 46% of all searches are local. Adding Google Maps to WordPress can boost your local SEO and improve your visibility in local searches.

Now there are two ways to embed Google maps in WordPress, and we will show you both of them.

The benefit of the second method is that it follows all local SEO best practices, so if you use it, then Google

will start to include your location on Google Maps. It will also display your business information like name, logo, address, phone number, open hours, and more in local search results.

Below are the quick links that you can use to go to the section you prefer:

That being said, let’s see how you can add Google Maps to WordPress.

How to Add Google Maps in WordPress without Plugin

If you just want to quickly embed Google maps in a WordPress post or page, then you can use the default iFrame method.

Simply go to the Google Maps website and type in any street address in the search area.

Find location in Google Maps and Click Share to Embed

Next, you need to click the Share icon and it will show a popup with the option to either Send a location link or Embed a map. You need to select the Embed a map option.

Copy Google Maps HTML Embed Code

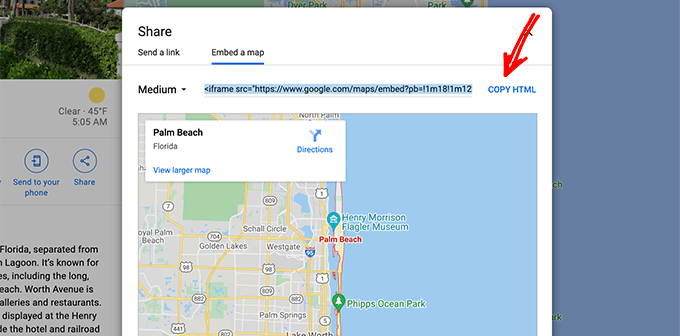
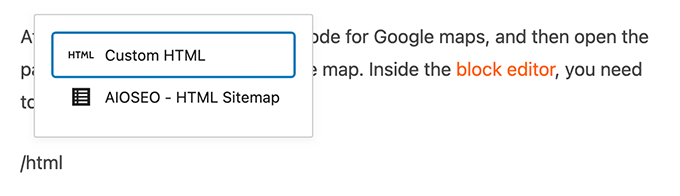
After that simply copy the HTML code for Google maps, and then open the page where you want to embed the map. Inside the block editor, you need to add a Custom HTML block.

Select Custom HTML block in WordPress

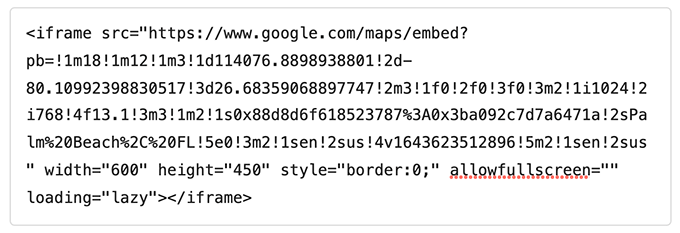
Now you can simply paste the embed code you copied from Google maps, and then update or publish the page to preview the changes.

Google Maps iFrame Embed Code in Block Editor

This method works for quickly embedding Google maps, but it doesn’t give you maximum SEO benefits.

If you’re a small business, restaurant, or online store with either a single or multiple physical location, then we recommend using the next solution to maximize your Local SEO rankings because it uses proper open graph data to help you rank higher in Google.

How to Add Google Maps to WordPress with Local SEO Plugin

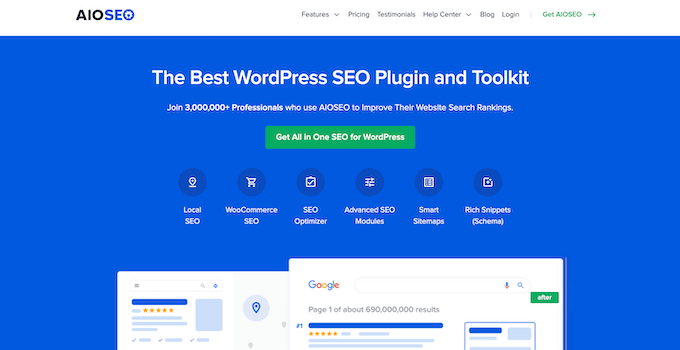
The best way to add Google Maps and optimize your site for local SEO is by using All in One SEO (AIOSEO).

It’s the best SEO plugin for WordPress because it helps you get higher SEO rankings without editing code or hiring a developer. Over 3 million professionals use AIOSEO to improve their search engine rankings.

AIOSEO

For this tutorial, we’ll be using the AIOSEO Pro version because it includes the Local SEO feature and other powerful optimization options. There is also a free version of AIOSEO that you can use to get started optimizing your site for search engines.

First, you’ll need to install and activate the AIOSEO plugin in WordPress. For more details, please see our tutorial on how to install a WordPress plugin.

Upon activation, the plugin will launch the setup wizard. You can click the ‘Let’s Get Started’ button to configure the plugin. If you need help, then please refer to our guide on how to properly set up All in One SEO in WordPress.

AIOSEO setup wizard

Next, you can head over to All in One SEO » Local SEO from your WordPress dashboard.

Then click the ‘Activate Local SEO’ button to get started configuring the local settings.

Activate local SEO

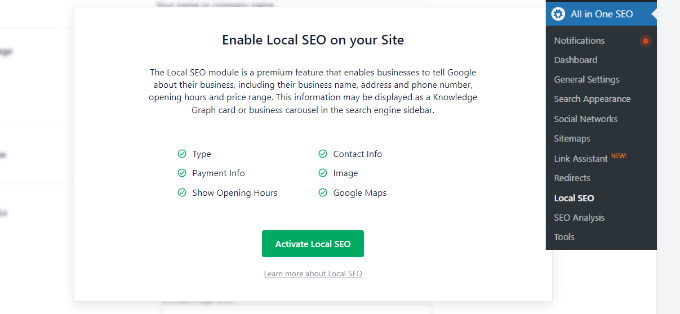
Once the Local SEO addon for WordPress is activated, you can add a single location or multiple locations in AIOSEO and display them on Google Maps. We’ll show you how to add both to your website.

Adding a Single Location

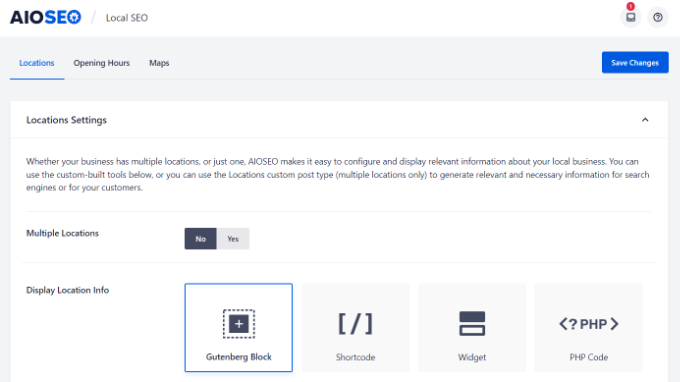
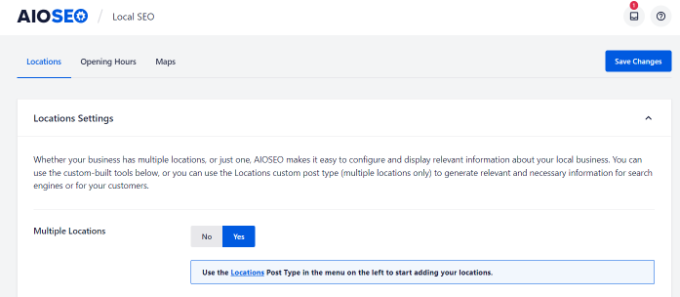
To add your locations, business information, open hours, and more, first you need to go to the ‘Location’ tab under All in One SEO » Local SEO.

If you have a single physical location, then keep the ‘Multiple Locations’ option set to No.

Location tab under local SEO

After that, scroll down to the ‘Maps’ section to pin your exact location.

Simply enter your address in the ‘Enter a query’ field and Google Maps will show your location.

Pin your store location

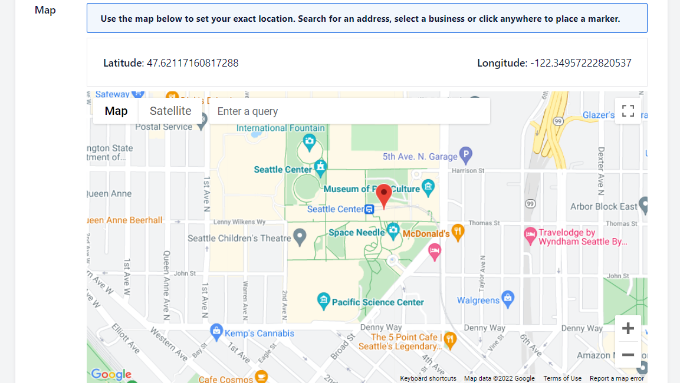
Once you’ve entered your location, don’t forget to click the Save Changes button.

Adding Multiple Locations

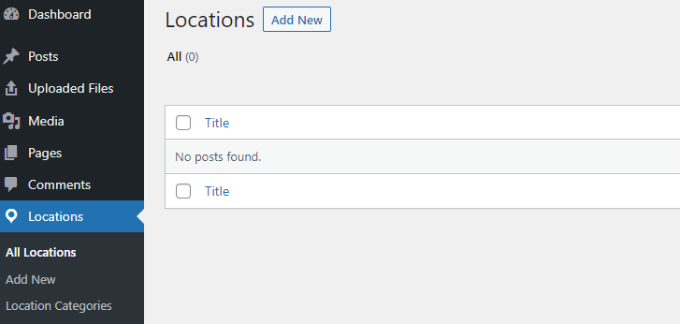
If you have more than one physical location, then you’ll need to enable the ‘Multiple Locations’ setting under the ‘Location’ tab in Local SEO.

Enable multiple locations

After that, a new Locations menu will appear in your WordPress admin panel.

Go ahead and navigate to Locations and then click the ‘Add New’ button.

Add a new location

Once you’re in the WordPress editor, scroll down to the ‘Map’ section.

Here you can enter your address in the ‘Enter a query’ field.

Add multiple map locations

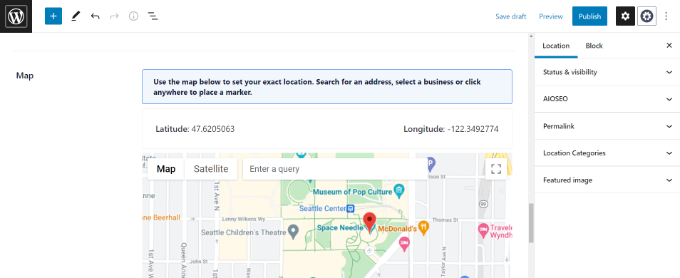
After entering your location on the map and adding location information, go ahead and click the ‘Publish’ button.

You can now repeat this step and add as many locations as you want for your business.

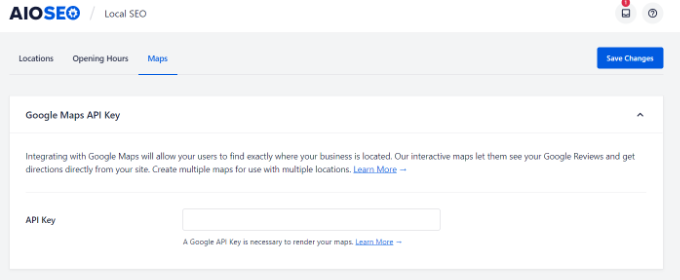
Once you’re finished adding your locations, you can go to the ‘Maps’ tab back in the All in One SEO » Local SEO menu.

Here you will have to enter a Google Maps API key.

Enter Google maps API key

Now, let’s see how to create an API key for Google Maps.

Creating a Google Maps API Key

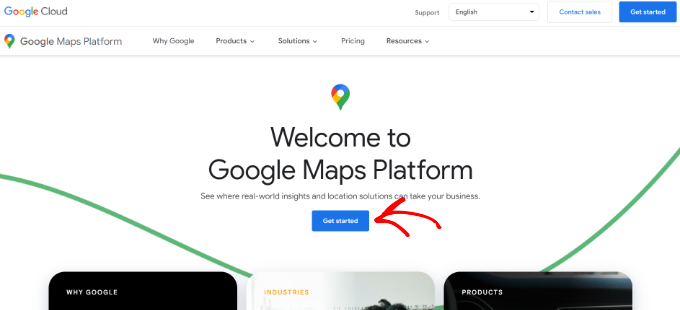
To start, you’ll need to visit the Google Maps Platform website and click the ‘Get Started’ button.

Google maps platform

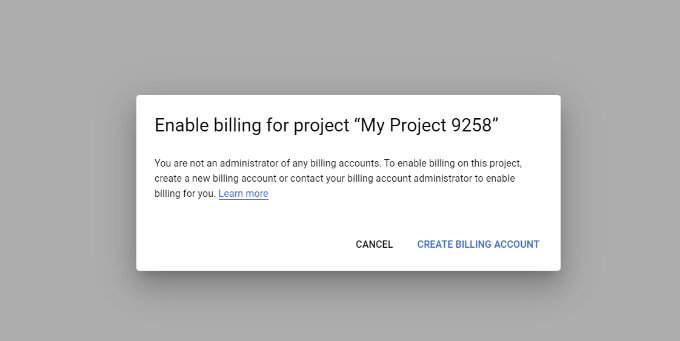
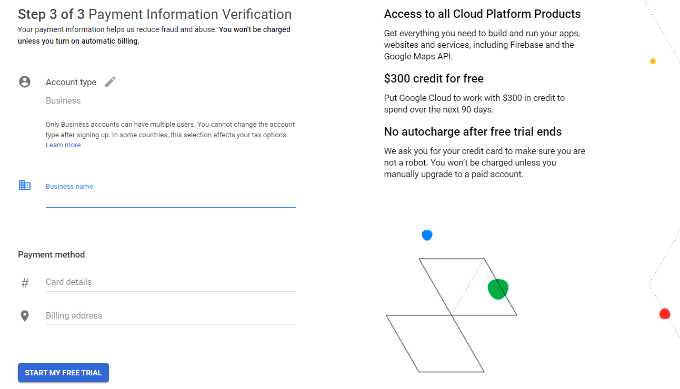
After signing in with your Google account, you’ll need to set up a billing account.

Google Maps Platform has pay-as-you-go pricing, and they offer the first $300 of monthly usage for free for all users. For most websites, that will easily cover a simple map embed like the one we’re creating in this tutorial.

Don’t worry, they will not charge you any fees unless you manually upgrade to a paid account.

To get started, go ahead and click the ‘Create Billing Account’ button.

Create a billing account

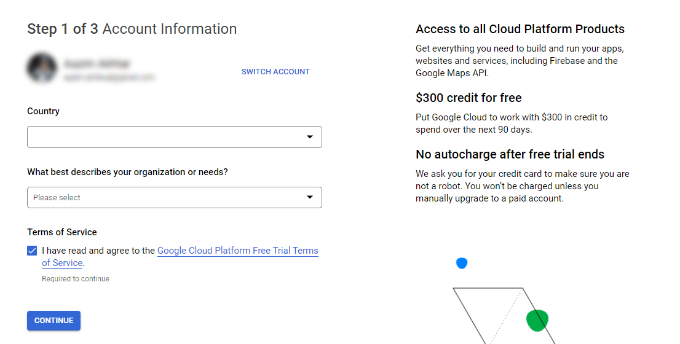
Next, you can select your country and choose what best describes your organization from the dropdown menu.

Once you’ve selected this information, click the checkbox for Terms of Service and then click the ‘Continue’ button.

Enter personal details for billing account

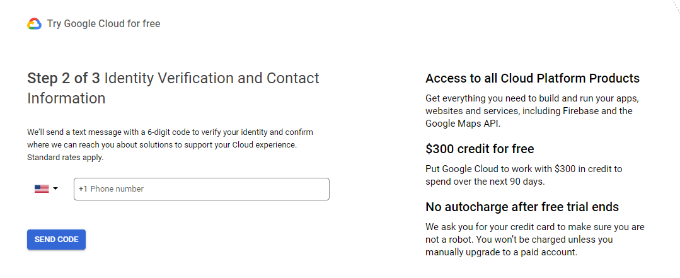
On the next screen, you’ll need to enter your phone number for verification and click the ‘Send Code’ button.

Enter mobile number

After verifying the code, the next thing to do is enter your business name, payment method details, and billing address.

Once you’ve entered these details, click the ‘Start my Free Trial’ button.

Enter business name and payment details

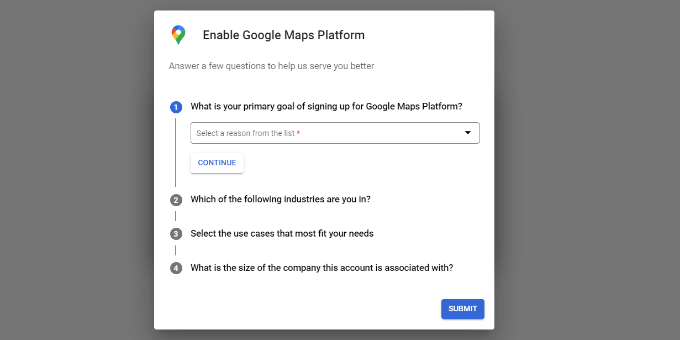
Next, you’ll be asked a series of 4 questions about your organization and how you’ll use the Google Maps Platform.

Google Maps will ask about your primary goal for using the platform, which industry you’re in, select a use case, and your company size.

After answering these questions, go ahead and click the ‘Submit’ button.

Answer few questions for google maps

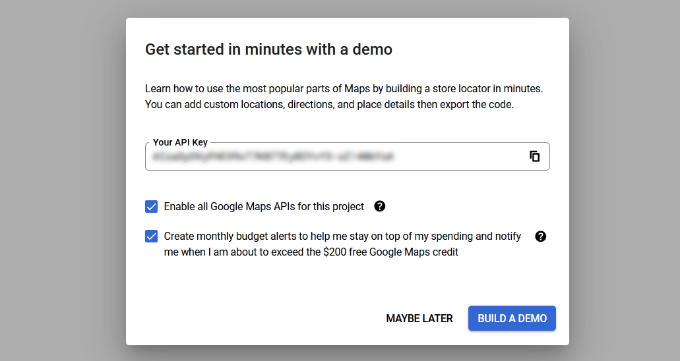
You’ll now see a popup with your Google Maps API key.

You can copy and save this key in a text file for future use.

Copy the API key

Now that you’ve created a Google Maps API key, you’ll need to head back to your WordPress dashboard to enter it in AIOSEO Local SEO settings.

Configuring Google Maps Settings in WordPress

You can now go back to All in One SEO » Local SEO from your WordPress dashboard and then navigate to the ‘Maps’ tab.

Go ahead and enter the Google Maps API Key in the ‘API Key’ field. You’ll see a preview of the map in AIOSEO as soon as you add the key.

Add API key and see map preview

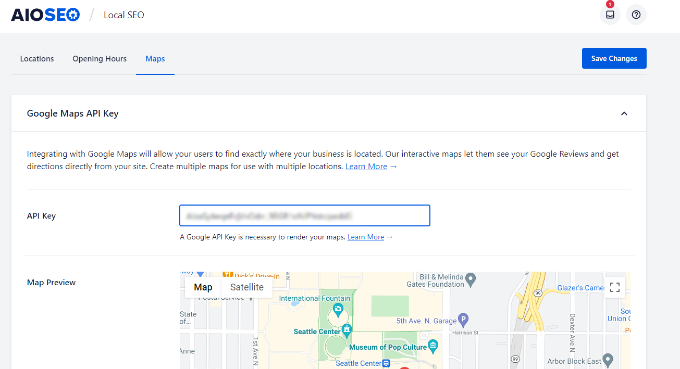
Next, you can scroll down to edit the map settings.

AIOSEO lets you display Google Maps using a Gutenberg block, shortcode, widget, or PHP code. It also lets you choose different map styles and add a custom marker to your map.

Edit map settings

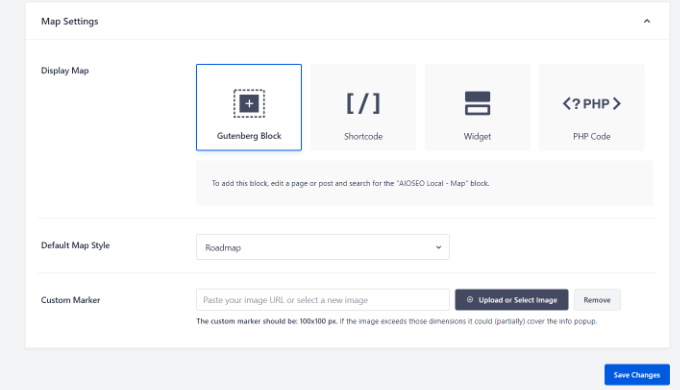
Don’t forget to click the ‘Save Changes’ button when you’re done.

Displaying Google Maps in WordPress

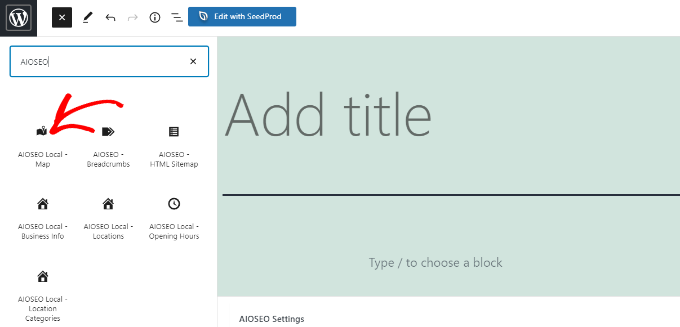
Next, you can add Google Maps to any WordPress post or page. To start, simply edit or add a new page on your website.

Once you’re in the block editor, click the ‘+’ button at the top and add the ‘AIOSEO Local – Map’ block anywhere on the page.

Add local maps block

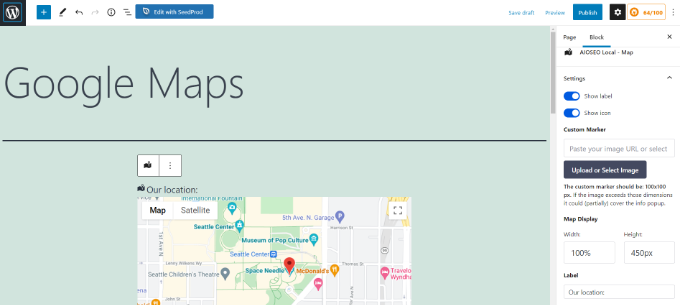
After that, your Google Map will be added to the page.

AIOSEO also lets you edit the map settings from the options on your right. For instance, you can show labels and icons, add a custom marker, and edit the map’s width and height.

Edit your map in WordPress

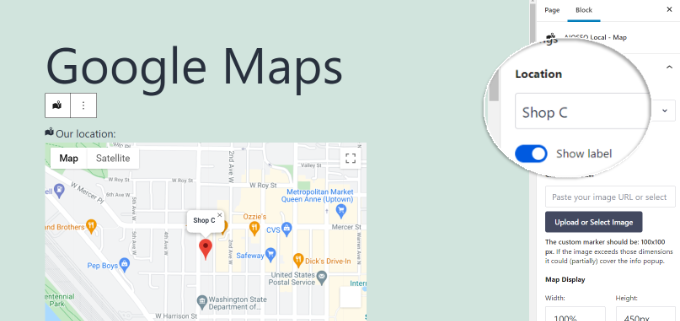
If you have multiple locations, then you can select which location to highlight by choosing from the options given in the menu on your right.

Simply click on the ‘Location’ dropdown menu and select your preferred location to display on your website.

Choose which location to display

Once you’re satisfied with your settings, go ahead and publish the page.

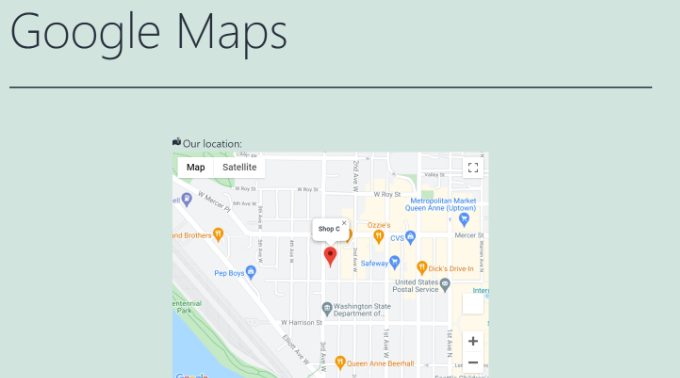
Now you can visit your website to see Google Maps in action.

Preview your map

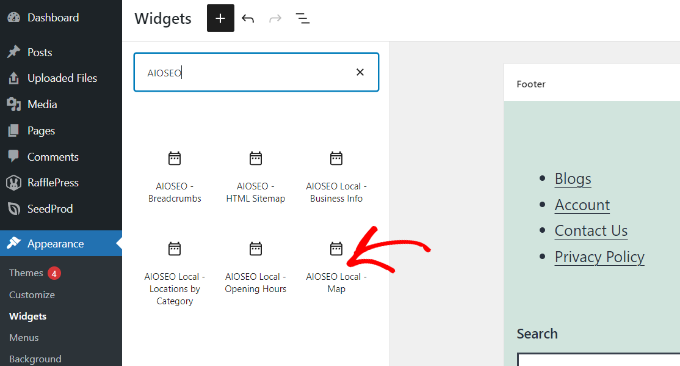
You can also add Google Maps to your site’s widget section, like the sidebar or footer.

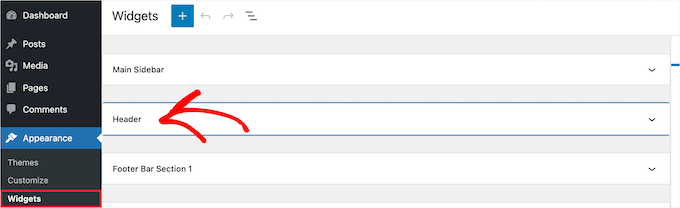
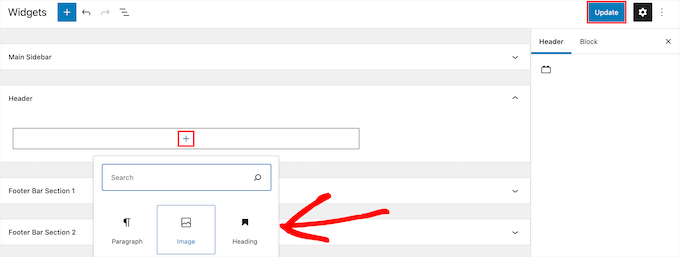
To start, head over to Appearance » Widgets from your WordPress admin panel. Next, click the ‘+’ button and add the ‘AIOSEO Local – Map’ widget block where you’d like to display your location.

Add maps widget

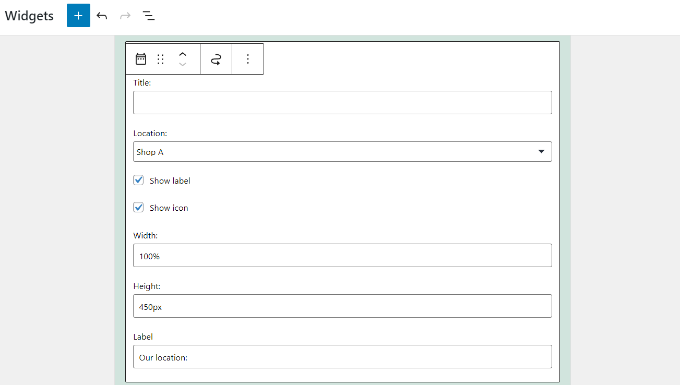
After that, you can edit the widget settings.

For example, you could add a title, change the width and height of the map, choose which location to display if you have multiple locations, and edit the label.
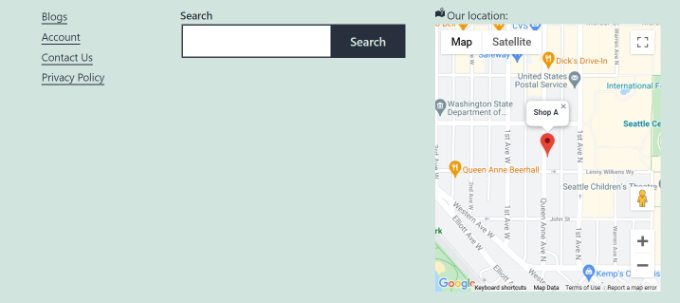
Edit map widget settings

That’s it!

Now when you update your website you’ll see Google Maps in your widgets area.

Maps preview in widget area

We hope this article helped you learn how to add Google Maps to your WordPress site. You can also check out our guide on the best WordPress plugins for small business, and our expert pick of the best identity theft protection service for entrepreneurs.

If you liked this article, then please subscribe to our YouTube Channel for WordPress video tutorials. You can also find us on Twitter and Facebook.

The post How to Add Google Maps in WordPress (The RIGHT Way) first appeared on WPBeginner.


from WPBeginner https://ift.tt/swDlJti5M
More links is https://mwktutor.com

Friday 28 January 2022

7 Best WordPress Table Plugins to Display Your Data

Are you looking for a WordPress table plugin you can use to display data?

WordPress table plugins let you store and present your data in a table format to make it easy for your visitors to read. 

In this article, we’ll show you some of the best WordPress table plugins you can use to show your data.

7+ best WordPress table plugins to store your data

Why Use a WordPress Table Plugin?

Tables are a great way to display large data sets in an easy-to-read way. You can use tables to share original data, show price comparisons, create web directories, and much more. 

WordPress has a default feature that lets you add tables to posts and pages, but it’s limited and doesn’t offer many styling options. 

Using a WordPress table plugin gives you access to additional features like drag and drop table builders, advanced sorting options, complete color and style control, and much more.

When you create engaging and interactive tables, it’s easier to keep your visitors engaged and spending more time on your WordPress website

Having said that, let’s take a look at some of the best WordPress table plugins you can use along with your WordPress site.

1. TablePress

TablePress logo

TablePress is one of the most popular table plugins for WordPress. It lets you create beautiful tables simply and easily without any code. 

If you’ve used Excel before, then you’ll be right at home using this plugin. The process for adding data is just like adding data to a spreadsheet. 

TablePress table editor

Beyond adding data manually, you can import and export your tables in Excel, HTML, CSV, and JSON format. This makes it easy to migrate your tables from another plugin. 

It also comes with a unique feature that makes your tables more interactive. Your users can engage with your tables by using pagination, filtering, sorting, and more.

For more details, see our guide on how to add tables in WordPress posts and pages.

2. Formidable Forms

Formidable Forms

Formidable Forms is one of the most advanced form builder plugins in the market. It also has features that make it a powerful table building tool.

Essentially, you can create a form using the plugin, collect data, and then use that data to make and display your tables.

You can choose from multiple different styles for your tables and have them completely match the design of your site. Plus, the table builder lets you add sorting and filtering features, pagination, and more. 

Formidable Forms table example

With Formidable Forms, you can pull data from your existing forms, so your tables will automatically be updated as new data becomes available. 

This makes it an excellent choice for real estate websites, business directories, classified listings, and more. 

3. wpDataTables

wpDataTables

wpDataTables is a premium table plugin that lets you quickly add tables to WordPress. It comes with a unique table builder that enables you to create visually appealing tables without writing any code.

wpDataTables table example

You’ll find features that let you merge cells, add star ratings, give each cell a different style, add shortcodes to each cell, and more.

Once you activate the plugin, there’s a wizard that will walk you through the steps of creating your first chart. You can enter your data directly into the table, or import data from a CSV or Excel spreadsheet, XML file, PHP, and more.

To display your table, you can use the included Gutenberg block, shortcode, or a supported page builder

4. Data Tables Generator by Supsystic

Data Tables Generator

Data Tables Generator is a flexible table plugin for users who need to create many different types of tables.

It offers support for sorting and search, and can display any type of data or media in your tables.

Similar to Excel and other spreadsheet software, you can even add equations and mathematical formulas into your tables.

Data Tables Generator table example

You can also convert the data being stored in your tables into graphics, charts, and diagrams. This data visualization can help your visitors better understand your data. 

There’s an option for your users to export data on the front end and download it in PDF, Excel, or CSV format. 

5. Ninja Tables

Ninja Tables

Ninja Tables is a great WordPress table plugin that lets you create beautiful tables with ease. This plugin has several features that make more easy customization. 

You can choose between 13 different color schemes or create your own to match the design of your site.

Ninja Tables tables builder color select

Plus, you can customize how your table will look on mobile, tablet, and desktop devices. All existing table options can be turned on or off with a single click. 

The manual data entry process can be slow since you have to enter each column and row individually. But there are data import options to help speed this up. 

It even has a unique feature that lets you add custom CSS and JavaScript to your table for those who want to add custom code. 

6. Visualizer

Visualizer

Visualizer is a feature rich and easy to use table and charts plugin. If you’re writing WordPress blog posts and need to add both tables and charts, then this can be a great choice.

You can use the plugin to create interactive tables for your site and have complete control over the design. You can also add pagination, search, sorting, scrolling, and more. 

Visualizer table example

If you want to edit your tables directly from your posts and access the data import features, then you’ll need to upgrade to the Pro version of the plugin. 

7. WP Table Builder

WP Table Builder

WP Table Builder is a drag and drop table builder that lets you create good looking and fully responsive tables. 

You can add text, images, lists, buttons, star ratings, shortcodes, and custom HTML. 

This makes it useful for more than just displaying data. You can use it to create pricing tables, list tables, comparison tables for review sites, and more. 

WP Table Builder table example

It also comes with sorting functionality, and you have complete control over the style of your tables. 

Bonus: SeedProd

SeedProd

SeedProd is the best WordPress page builder plugin in the market. You can easily create completely custom pages for your website using the drag and drop builder.

It comes with a template library with over 150+ templates you can use as a starting point when creating your pages. Plus, it includes a block library with pre-built features you drag and drop onto your page.

One of these is a pricing table block that lets you create completely custom pricing tables.

SeedProd pricing table

These can be very useful when you’re building a sales page or product page and want to highlight different price points of your products. 

We hope this article helped you learn more about the best WordPress table plugins to store your data. You may also want to see our guide on how to choose the best blogging platform and our expert picks of the best virtual business phone number apps.

If you liked this article, then please subscribe to our YouTube Channel for WordPress video tutorials. You can also find us on Twitter and Facebook.

The post 7 Best WordPress Table Plugins to Display Your Data first appeared on WPBeginner.


from WPBeginner https://ift.tt/3rWszRW
More links is https://mwktutor.com

Thursday 27 January 2022

How to Add a WordPress Widget to Your Website Header (2 Ways)

Do you want to add a WordPress widget to your website header area? 

Widgets allow you to add content blocks to specific sections of your theme easily, but not every theme includes a header widget area. 

In this article, we’ll show you how to easily add a WordPress widget to your website header.

How to add a WordPress widget to your website header (2 ways)

Why Add a Header Widget to Your WordPress Site?

Your website header is one of the first things your visitors will see when visiting your WordPress website. By adding a WordPress widget to your header, you can optimize this area to help capture reader attention.

Most website headers will include a custom logo and a navigation menu to help visitors get around your site.

You can also add a header widget above or below this area to feature helpful content, banner ads, limited-time offers, single line forms, and more. 

Here at WPBeginner, we have a header call to action directly below the navigation menu.

Header CTA example

Most WordPress themes have widget ready areas in the sidebar and footer areas of the site, but not every theme adds widget ready areas in the header. 

Editor’s Note: If your theme doesn’t have a widget-ready header area, then you can now create completely custom WordPress themes from scratch (without any coding).

But first, let’s take a look at how to add a WordPress widget to your website header in your existing theme. Simply use the quick links below to jump straight to the method you want to use.

Method 1. Add a WordPress Widget to Your Website Header in WordPress Theme Settings

Many of the best WordPress themes include a header widget area that you can customize to your liking. 

First, you’ll want to see if your current WordPress theme supports a WordPress widget area in the header.

You can find this by going to the WordPress theme customizer or the widget area of your WordPress admin panel. To do this, navigate to Appearance » Customize and see if there is an option to edit the header.

In this example, the free Astra theme has an option called ‘Header Builder’. We’ll show you how to use this feature in Astra, but keep in mind that this will look different depending on the theme you’re using.

Astra header builder

If you click this, it brings you to a screen to edit your header and add widgets. 

At the bottom of the screen, you can completely customize the header, along with the areas above and below the header. Simply hover over one of the empty areas and click the ‘Plus’ icon.

Click plus icon

This brings up a popup menu where you can select ‘Widget 1’. 

There are additional options to choose from, but you’ll need to select one of the ‘Widget’ options to make the header widget-ready.

Select widget 1 option

To add a widget area to your header, click the ‘Widget 1’ box that’s in the header customizer section.

This brings up the option to add a widget.

Click widget 1 box

Next, click the ‘Plus’ add block icon in the left-hand menu. 

This brings up a popup where you can select a widget to add to your header. 

Click plus icon and select widget

You can continue customizing your header and add as many widgets as you’d like.

Once you’re done, make sure to click the ‘Publish’ button to save your changes.

Publish header widget changes

Now you can view your header area with the widget or widgets you added.

Header widget example

Not using Astra?

Another way to see if your theme already has a WordPress header widget is by navigating to Appearance » Widgets in your WordPress admin panel.

Then, see if there’s a widget section labeled ‘Header’ or something similar. 

Go to widgets section for header widget

If there is, then simply click the ‘Plus’ add block icon to bring up the widgets menu.

Then you can add whatever widget you like by clicking on it. 

Header widget section

Make sure you click the ‘Update’ button to save your changes to the header widget area.  

Method 2. Add a WordPress Widget to Your Website Header by Adding Code to WordPress

If your WordPress theme doesn’t currently have a WordPress widget area in the header, then you’ll need to add it manually by adding code to WordPress.

If you haven’t done this before, then see our guide on how to copy and paste code in WordPress.

Then, you can add the following code snippet to your functions.php file, in a site-specific plugin, or by using a code snippets plugin.

function wpb_widgets_init() {

        register_sidebar( array(
                'name'          => 'Custom Header Widget Area',
                'id'            => 'custom-header-widget',
                'before_widget' => '<div class="chw-widget">',
                'after_widget'  => '</div>',
                'before_title'  => '<h2 class="chw-title">',
                'after_title'   => '</h2>',
        ) );

}
add_action( 'widgets_init', 'wpb_widgets_init' );

This code registers a new sidebar or a widget ready area for your theme.

If you go to Appearance » Widgets, then you will see a new widget area labeled ‘Custom Header Widget Area’.

Custom header widget area

Now, you can add your widgets to this new area. For more details, see our guide on how to add and use widgets in WordPress.

However, your header widget won’t display live on your website just yet. We’ll show you how to do that next.

Displaying Your Custom Header Widget in WordPress

Now that you’ve created the header widget area, you need to tell WordPress where to display it on your website. 

To do this, you need to edit your theme’s header.php file. Then, you need to add the following code where you want the widget to display.

<?php

if ( is_active_sidebar( 'custom-header-widget' ) ) : ?>
    <div id="header-widget-area" class="chw-widget-area widget-area" role="complementary">
        <?php dynamic_sidebar( 'custom-header-widget' ); ?>
    </div>

<?php endif; ?>

This code will add the widget area you created earlier to your website header area. 

Now, you can visit your WordPress blog to see your header widget area live.

Header widget live

Style Your WordPress Header Widget Area Using CSS

Depending on your theme, you may also need to add CSS to WordPress to control how the header widget area and each widget inside it are displayed. If you don’t know CSS, you can use a plugin like CSS Hero instead.

To learn more, see our guide on how to easily add custom CSS to your WordPress site.

Next, navigate to Appearance » Customize in your WordPress admin panel. 

This brings up the WordPress theme customizer panel. You need to click on the ‘Additional CSS’ tab.

WordPress customizer additional CSS

This lets you add additional CSS directly to your theme and see the changes in real time. 

Here is some sample CSS code to help you get started:

div#header-widget-area {
    width: 100%;
    background-color: #f7f7f7;
border-bottom:1px solid #eeeeee;
    text-align: center;
                padding: 20px;
}
h2.chw-title {
    margin-top: 0px;
    text-align: left;
    text-transform: uppercase;
    font-size: small;
    background-color: #feffce;
    width: 130px;
    padding: 5px;
    }

Simply add the CSS code to the ‘Additional CSS’ box.

Add CSS code and publish

Once you’re finished adding your CSS, make sure to click the ‘Publish’ button to save your changes. 

Here is how the custom header widget looks with the CSS changes live.

Header widget example after CSS

We hope this article helped you learn how to add a WordPress widget to your website header. You may also want to see our guide on how to choose the best WordPress hosting and our expert picks of the best live chat software for small businesses.

If you liked this article, then please subscribe to our YouTube Channel for WordPress video tutorials. You can also find us on Twitter and Facebook.

The post How to Add a WordPress Widget to Your Website Header (2 Ways) first appeared on WPBeginner.


from WPBeginner https://ift.tt/34cJ9EQ
More links is https://mwktutor.com