Tuesday, 30 November 2021

How to Clear Your Cache in WordPress (Step by Step)

Recently, one of our readers asked us how to clear cache in WordPress?

Your web browser, hosting server, and caching plugins can all serve cached content which can make it difficult for you to see the changes you made to your website right away.

Clearing your WordPress cache is also the first troubleshooting advice that you’ll often hear.

In this article, we will show you how to properly clear the cache in WordPress. We’ll cover browser cache, web hosting cache, and top WordPress caching plugins in this guide.

How to clear your cache in WordPress (4 ways)

What is Caching in WordPress?

Caching solutions will store static versions of your website in a cache. This allows WordPress to skip running heavier PHP scripts every time your site loads.

The caching process helps to improve WordPress speed and performance, and the overall user experience.

Here’s an example of what the caching process looks like:
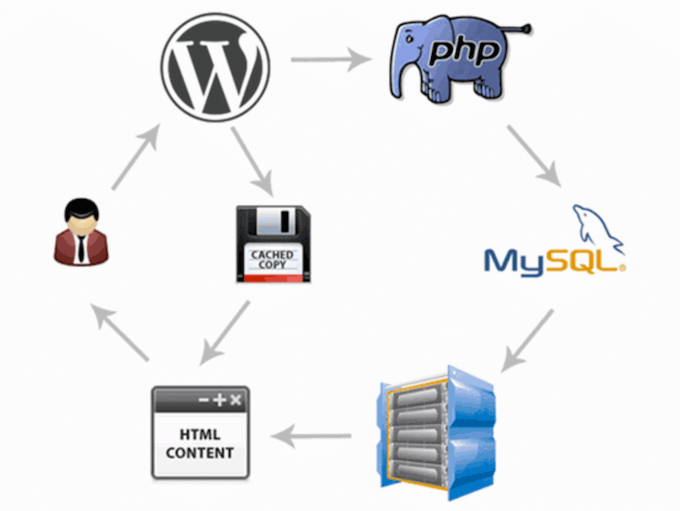
How caching works in WordPress

There are several different types of caching solutions available for WordPress. The most popular method is using a WordPress caching plugin like WP Rocket or WP Super Cache.

These plugins give you control over what files and media are cached, when the cache expires, when the cache is cleaned up, and more.

Depending on your hosting provider, you might already have WordPress caching built in. For example, managed WordPress hosting companies like WP Engine run their own caching solutions.

Popular WordPress hosts like Bluehost and SiteGround also have built in caching for their users.

If you’re using a web application firewall like Sucuri or Cloudflare to improve your WordPress security, then there’s also a cache to speed up your site and reduce downtime.

Finally, most modern web browsers will also store cached versions of pages on your web browser.

Why Clear Your WordPress Website Cache?

Sometimes the cache won’t realize that changes have been made to your WordPress website. Instead of loading the new version of your site, you’ll be stuck seeing an old version.

This will prevent both you and your visitors from seeing any updates you’ve made.

Clearing your WordPress cache ensures the most recent version of your website will always be live.

With that said, let’s take a look at how to clear your browser cache in WordPress. Simply use the quick links below to jump straight to the method you want to use.

Video Tutorial

If you prefer written instructions, then please continue reading.

Method 1: Clear Your Web Browser Cache

First, you need to clear your web browser cache. Most web browsers store static website content like stylesheets, JavaScript, images, and other website files to improve loading speeds.

But sometimes, web browsers may fail to realize a web page has changed. Instead of fetching a fresh copy, they’ll load the page from the cached version stored in your browser.

To clear your browser cache in Google Chrome, click on the menu icon, then select More Tools » Clear Browsing Data.
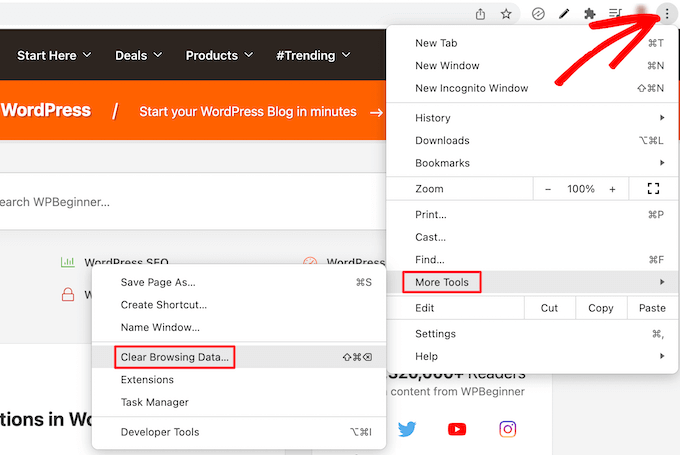
Clear browser cache

This brings up a popup where you can select the content you want to remove from the cache.

Make sure the ‘Cached images and file’ box is checked, then click the ‘Clear browsing data’ button.
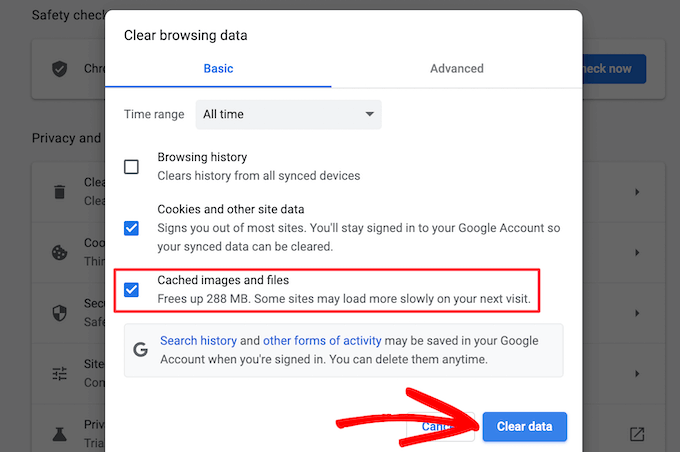
Clear cached images and files

Now, you’ve successfully cleared your browser cache. You can visit your WordPress blog to see if it’s loading the new version of your site.

For more details, see our guide on how to clear your browser cache in all major browsers.

If you’re still not seeing the changes you made to your website, then move on to the other methods in this article.

Method 2: Clear Cache in Your WordPress Caching Plugin

If you’re using a WordPress caching plugin on your site, then you need to clear your plugin cache.

Here’s how to clear your cache with some of the most popular WordPress caching plugins.

Clear Cache in WP Rocket

WP Rocket is the best WordPress caching plugin in the market. The best part about using WP Rocket is that it proactively builds your WordPress cache in the background, so your users are always served a cached version of your site.

It also makes it very easy to clear cached files with a single click.

Simply go to the Settings » WP Rocket and click on the ‘Clear Cache’ button in the plugin dashboard.
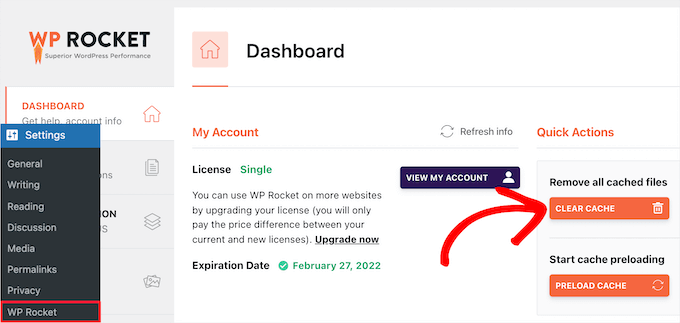
Clear WP Rocket cache

Now WP Rocket will now clear all of your cached files for you.

Clear Cache in WP Super Cache

WP Super Cache is another popular WordPress caching plugin. It allows you to clear or purge all cached content with a single click.

Simply go to Settings » WP Super Cache in your WordPress admin dashboard, and then click the ‘Delete Cache’ button in the ‘Delete Cached Pages’ section.
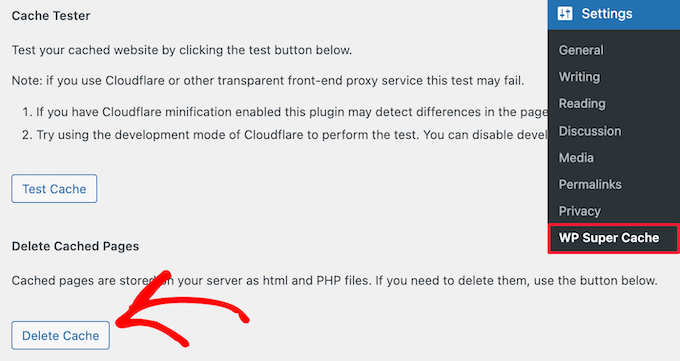
Clear WP Super Cache

Now, WP Super Cache will delete all of the cached files from your website.

Clear Cache in W3 Total Cache

W3 Total Cache is a widely used WordPress caching plugin. Like the other plugins above, you can clear all caches with a single click.

You need to go to Performance » Dashboard and then click on the ‘empty all caches’ button.
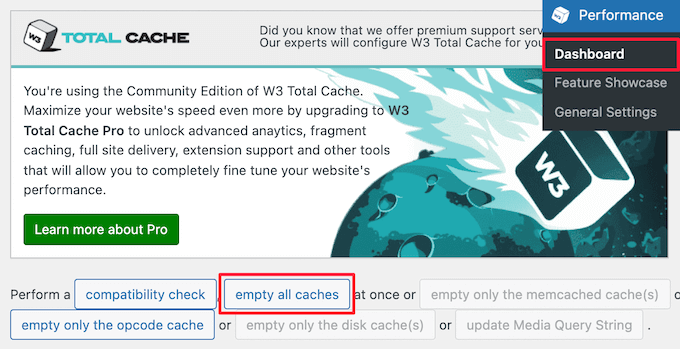
Clear W3 Total Cache

W3 Total Cache will now delete all cached content for your site.

Method 3: Clear Cache in Your WordPress Hosting

Some WordPress hosting providers have built in caching options to help speed up WordPress.

Here’s how you can clear your web host cache in some of the most popular WordPress hosts.

Clear Cache in WP Engine

WP Engine is one of the top managed WordPress hosting providers. They have their own built-in caching solution, so users don’t need to install a caching plugin.

If you’ve made changes to your site, but they aren’t showing up, then you can clear the WP Engine cache from your WordPress admin area.

You need to click the ‘WP Engine’ menu item in your WordPress admin bar, select the ‘Caching’ menu option, then click the ‘Clear all caches’ button.
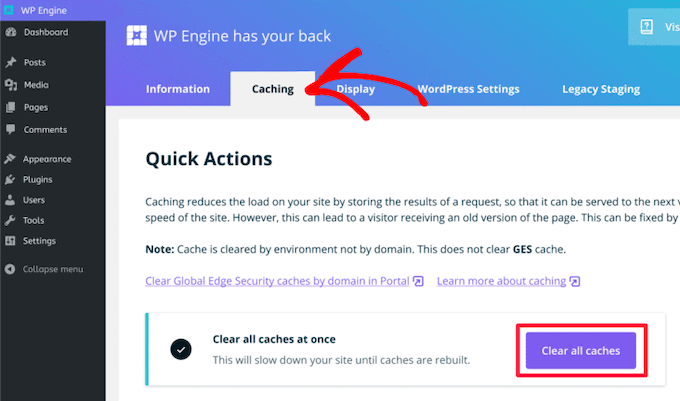
WP Engine clear cache

WP Engine will automatically purge every stored cache for your WordPress site.

Clear Cache in Bluehost

Bluehost is one of the best WordPress hosting providers and is officially recommended by WordPress. They have a built in caching solution that instantly improves your WordPress performance and speed.

Bluehost makes it easy to clear your WordPress cache from your WordPress admin area.

Simply log in to your WordPress admin dashboard, and you’ll see a ‘Caching’ button in the top admin toolbar. Hover over this, then click the ‘Purge All’ option.
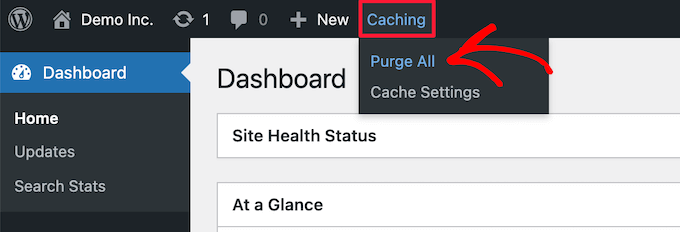
Clear Bluehost cache

Bluehost will now clear all files from your WordPress cache.

Clear Cache in SiteGround

SiteGround is a leading WordPress hosting provider that’s known for speed and top-notch customer support. They offer a built-in caching solution to improve your website performance.

You can clear the SiteGround cache from your hosting account control panel as well as the WordPress admin area.

To clear your cache from your Siteground control panel, you need to log in to your hosting account dashboard and go to Speed » Caching under the site tool section.

Then, select the ‘Dynamic Cache’ menu option. Next, click on the menu icon next to your domain name and select the ‘Flush Cache’ option from the drop down.
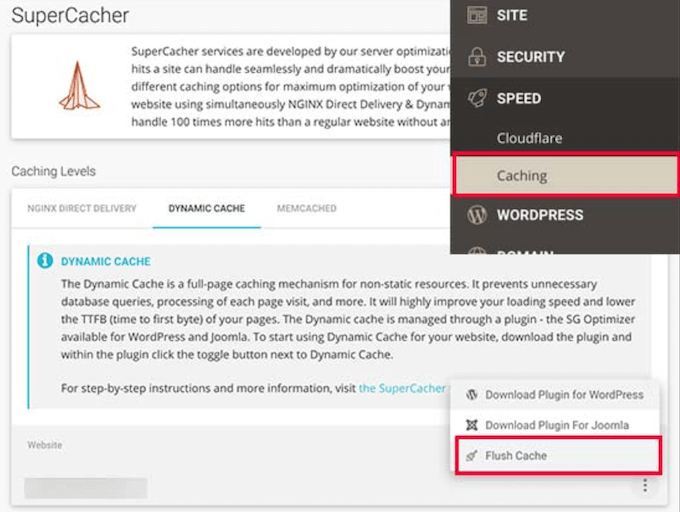
Clear SiteGround hosting cache

Another way you can manage your Siteground cache is with the SG Optimizer plugin. First thing you need to do is install and activate the plugin. For more details, see our guide on how to install a WordPress plugin.

Upon activation, you need to click the ‘Purge SG Cache’ button in your top WordPress admin toolbar.
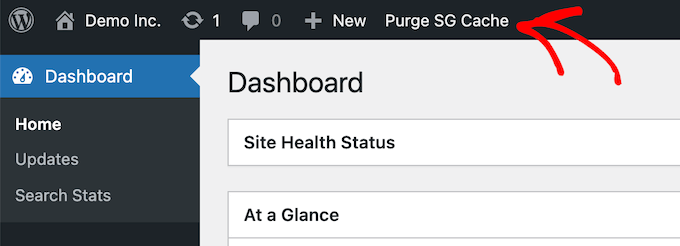
Purge SG cache

The plugin will automatically clear your SiteGround WordPress cache.

Method 4: Clear Your WordPress Firewall Plugin Cache

If you’re using a WordPress firewall like Sucuri to protect your website, then there’s another layer of caching you’ll need to clear.

You can clear your Sucuri cache by going to Sucuri » Firewall (WAF) in your WordPress admin panel.

Then, select the ‘Clear Cache’ menu option and then click the ‘Clear Cache’ button.
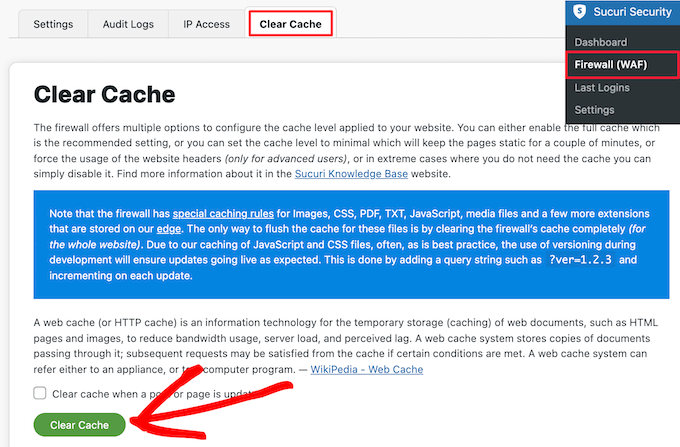
Clear Sucuri cache

Bonus tip: If you’ve recently moved your WordPress site, then you may also need to clear your DNS cache. This ensures you’re getting updated DNS information and accessing the newest version of your site. For more details, see our guide on how to clear your DNS cache.

We hope this article helped you learn how to clear your cache in WordPress. You may also want to see our step by step guide on how to create an email newsletter and our expert picks of the best live chat software for small businesses.

If you liked this article, then please subscribe to our YouTube Channel for WordPress video tutorials. You can also find us on Twitter and Facebook.

The post How to Clear Your Cache in WordPress (Step by Step) first appeared on WPBeginner.


from WPBeginner https://ift.tt/3bkGFng
More links is https://mwktutor.com
Substack vs WordPress: Which One is Better? (Pros and Cons)

Are you comparing Substack vs WordPress and wondering which one is better?

Substack and WordPress are both publishing platforms that allow you to easily publish content online and sell membership subscriptions.

In this article, we’ll compare Substack vs WordPress to find out which one is the better platform.

Comparing Substack vs WordPress

Editor’s Note: Looking for a more affordable Substack alternative? We recommend ConvertKit. It has all the powerful features without the predatory pricing of Substack which takes 10% of your newsletter revenue.

Since this is a detailed comparison of Substack vs WordPress, here’s a quick table of contents:

Overview: Substack vs WordPress

Before we start with our in-depth comparison of the two popular subscription platforms on the web, it’s important that we cover the basics and highlight what makes these platforms stand out.

What is Substack?

Substack is an online newsletter publishing platform. It allows you to easily send newsletter emails to your subscribers.

You can have both paid and free subscriptions and Substack gets a share of all your paid subscription fees. Apart from newsletters, you also get a basic website, podcast hosting, and free

What is WordPress?

WordPress is the world’s most popular website builder. It allows you to easily make any kind of website you want. It works seamlessly with almost all popular email newsletter services to send newsletter emails.

You can have both free and paid newsletter subscriptions. Plus you can use it to make a podcasting website, eCommerce store, membership website, and more.

Note: When we say WordPress, we are talking about self-hosted WordPress.org website and not WordPress.com. For more details, see our article on the difference between WordPress.org vs WordPress.com.

What to Look for in a Subscription Platform

Choosing the right platform for your subscription offering is the most important decision you’ll make. Once you start growing it will be harder to switch platforms and you may lose users in the process.

Here are a few basic pointers that you should keep in mind when choosing your subscription platform.

  • Ease of Use – How easy it is to get started on your own
  • Costs – How much would it cost
  • Integrations – Can you connect it to other apps to grow your subscriber base
  • Data Portability – Can you move your data away

Keeping these parameters in mind, let’s take a look at Substack vs WordPress in detail.

Ease of Use

Most publishers are not website designers or marketers by profession. Choosing an easy-to-use platform helps you focus on what you do best and leave the technical stuff aside.

Substack: Ease of Use

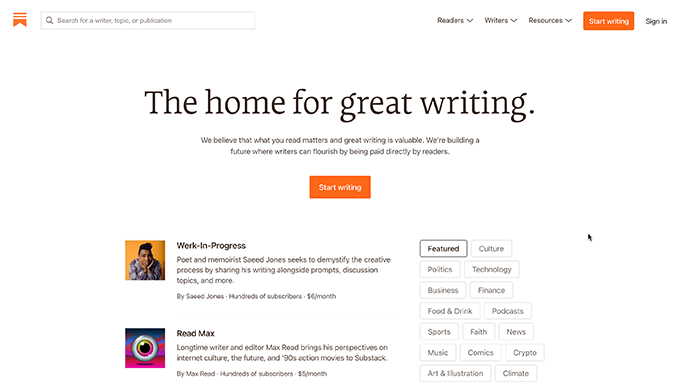
Substack is incredibly easy to use even for absolute beginners. All you have to do is sign up and you will be able to start working on your content right away.

Substack signup

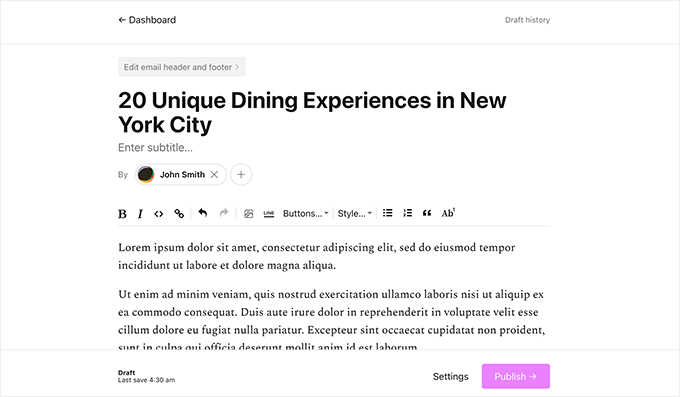
Substack is highly focused on writers and easy publishing. It comes with a minimalist editor where you can create your newsletter emails, articles, and upload podcast episodes.

Substack editor

You can choose whether you want an article to go to paid subscribers or everyone on a post-by-post basis.

Even though writing a post is incredibly easy. There is not much room for any creativity in the default substack editor.

WordPress: Ease of Use

WordPress is open-source software, which means you install it yourself and manage updates and backups. While this may sound a bit technical, WordPress is incredibly easy to install and use.

You’ll need a domain name and a hosting account to install WordPress.

We recommend using Bluehost, which is one of the biggest hosting companies in the world and officially recommended WordPress hosting provider.

They are offering a free domain name + a generous discount on hosting to WPBeginner readers. Basically, you can get started for $2.75 per month.

→ Click Here to Claim This Exclusive Bluehost Offer ←

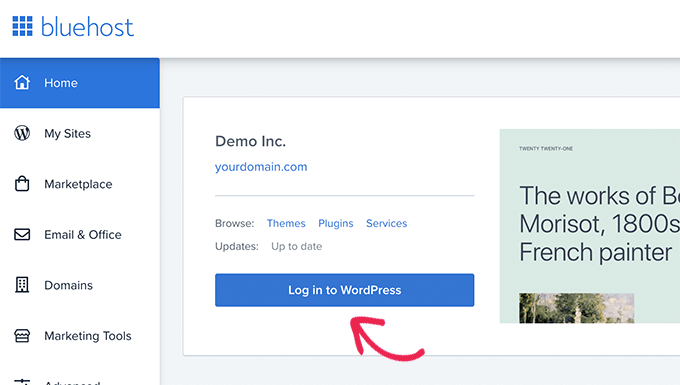
Bluehost will automatically install WordPress for you and you can simply login to your WordPress dashboard under your account.

Login to your WordPress site

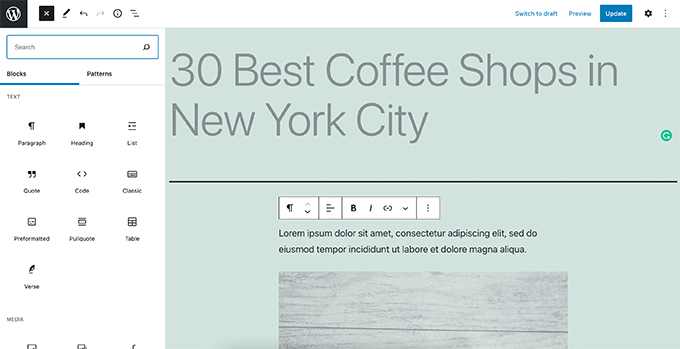
WordPress comes with an incredibly easy-to-use and powerful block editor. This allows you to create content on your website and design it any way you like.

WordPress editor

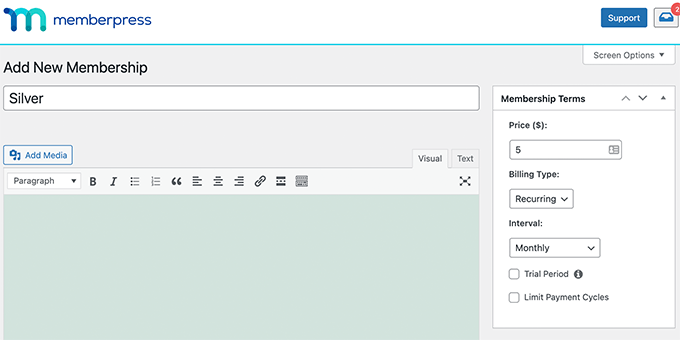
To lock your premium content behind a paywall, you’ll need MemberPress. It is the best WordPress membership plugin and allows you to easily restrict content based on a user’s subscription plan.

Unlike Substack where you can have only one subscription plan for all users, you can create multiple subscription levels with different benefits.

Add memberships

To send our newsletters, you’ll need to connect WordPress to an email marketing service. We recommend using Constant Contact which is the best email platform for small businesses.

However, with WordPress, you can choose any email newsletter platform like Sendinblue, Drip, Convertkit, and more.

For details, see our article on how to create a paid newsletter in WordPress which has step by step instructions for beginners.

Winner: Substack

Cost of Running a Paid Subscription Service

The next important factor to consider is that how much it would cost to run a paid subscription service. Higher costs and low profitability could make it difficult to scale your business as you grow.

True Cost of Substack Paid Newsletter

You can send the free newsletter to your free subscribers. This helps you grow your audience and build a subscriber base. However, having only free subscribers is not very profitable in the long run.

You can remedy that by adding paid subscription option for your newsletter. This allows you to send exclusive content to your paid subscribers.

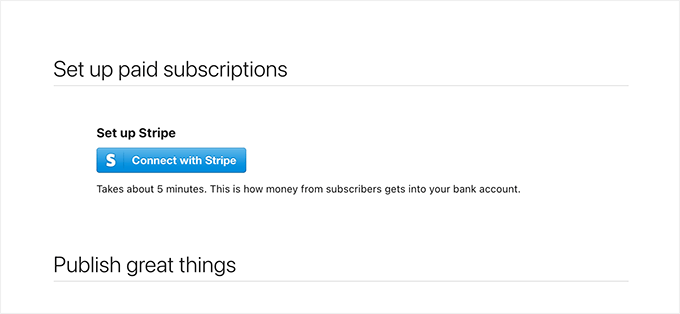
Turn on paid subscriptions in Substack

Substack allows you to use Stripe to accept payments. Stripe is available in select countries if you are not located in one of those countries then you cannot receive payments.

Both Substack and Stripe take their cut from each transaction. Substack charges 10% and Stripe charges 2.9% + 30 cents on each transaction.

This means if you charge $10 per subscriber then the Substack + Stripe fee will be 1.59.

This may not sound a lot but let’s suppose you have 100 paid subscribers each paying $10 per month. You’ll be paying $159 each month and $1908 each year.

Cost of a Paid Newsletter using WordPress

WordPress gives you the freedom to choose your own email platform, website hosting, plugins and tools. This gives you control over the costs and you can choose how much you are willing to spend on your paid newsletter subscription.

You can get website hosting with a free domain name via Bluehost for just $2.75 per month.

Start WordPress website with Bluehost

Pricing for email platforms varies. For instance, Constant Contact plans start from $20 per month and the pricing varies based on the number of contacts.

Similarly, you can start for free with Sendinblue which allows you to send up to 300 emails per day. After that, you can upgrade to their lite plan which allows you to send up to 10,000 emails per day for $25.

Apart from email marketing, you will need MemberPress to sell subscriptions which costs $179 for their basic plan.

You can use Stripe, PayPal, Authorize.net as your payment gateway. These payment gateways will have their own fees.

In the long run, WordPress gives you more freedom to cut down costs and increase your profits.

Winner: WordPress

Integrations Available to Grow Subscribers

In order to promote your paid newsletter, you’ll want to use third-party tools to grow your business. Let’s see how Substack vs WordPress perform in this category.

Substack Integrations

Substack is an all-inclusive platform with limited to no integrations.

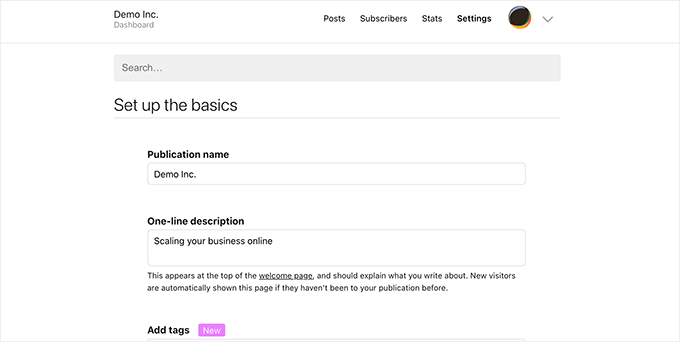
It comes with limited SEO features built-in the platform. You can connect your own custom domain name, Google Analytics tracking ID, and social media profiles from the settings page.

Substack settings

To grow your subscribers, you will need to promote your Substack on social media platforms. This makes it a bit tricky for new writers to start earning right away.

Limited integrations also limit your potential to access other tools that may help you convert more visitors into paying subscribers.

WordPress Integrations

WordPress is an open-source platform with thousands of third-party integrations available. This allows you to easily get more subscribers for your paid newsletter.

With more than 59,000+ free plugins and thousands more paid integrations, WordPress gives you the freedom to use any tool you like to grow your business.

Following are some of the popular integrations and add-ons that will help you grow your paid newsletter.

  • All in One SEO for WordPress – A complete SEO solution for WordPress websites that helps you improve your website SEO and get more free traffic to your website from search engines.
  • OptinMonster – The best conversion optimization software on the market that helps you convert website visitors into paying subscirbers
  • WPForms – The best form builder plugin to easily create newsletter signup forms, contact forms, with its own payment and email marketing integrations.
  • MonsterInsights – An easy-to-use Google Analytics plugin for WordPress. It shows where your visitors are coming from and track how users interact with your website.
  • SeedProd – Need a quick landing page for a new campaign? SeedProd lets you easily design landing pages for your website.

Need even more extensions? Take a look at our pick of the essential WordPress plugins for any new business.

Winner: WordPress

Data Portability

Both WordPress and Substack allow you to download your data and use it elsewhere.

Substack Data Portability

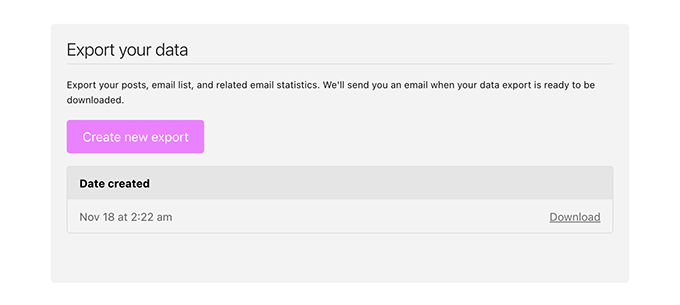
Substack makes it super easy to download all your posts, pages, and email list subscribers. You can simply go to the Settings page and scroll down to the ‘Export your data’ section.

Exporting data in Substack

From here you can download all your Substack data to your computer.

You newsletter email subscribers list is in CSV format which allows you to easily import subscribers into other email services. However, most email services will require users to opt-in again and many users may not resubscribe.

For posts data, you can use the Substack importer for WordPress to import the data into a WordPress website.

WordPress Data Portability

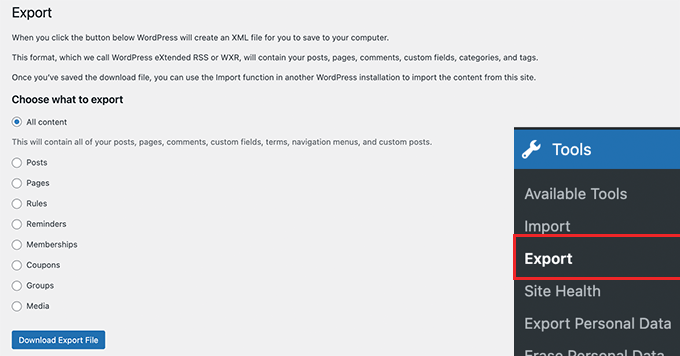
WordPress allows you to export all your data using the built-in export tools. This includes all your posts, pages, comments, users, etc. Simply go to Tools » Export page to download your export file.

Export WordPress data

Your newsletter subscriber data is safely stored with your third-party email service provider. Almost all reliable email companies let you easily export your email list which you can then use elsewhere.

Once again, if you import your email list into a new email service, then they may require users to opt-in again.

Winner Tie

Conclusion: WordPress vs Substack which one is better?

WordPress is better than Substack in terms of flexibility, scalability, and profitability. It gives you the freedom to grow your newsletter in different ways and unlocks access to much better tools and extensions to do just that.

On the other hand, Substack is better if you only want to easily send newsletter to non-paying subscribers.

You will not have the same flexibility as WordPress and if you want to switch to paid newsletter, then you will pay a significant amount to Substack.

If you don’t want to use WordPress, but still want a more affordable Substack alternative? We recommend ConvertKit. It has all the powerful features without the predatory pricing of Substack which takes 10% of your newsletter revenue.

We hope this article helped you compare Substack vs WordPress. You may also want to see our guide on how to get more traffic to your site or see how to create an online store to your existing website.

If you liked this article, then please subscribe to our YouTube Channel for WordPress video tutorials. You can also find us on Twitter and Facebook.

The post Substack vs WordPress: Which One is Better? (Pros and Cons) first appeared on WPBeginner.


from WPBeginner https://ift.tt/3E9QB0M
More links is https://mwktutor.com
Monday, 29 November 2021

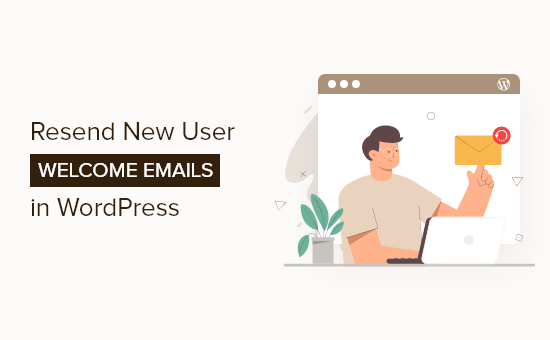
How to Resend New User Welcome Emails in WordPress

Do you want to resend welcome emails to your WordPress users?

A welcome email helps build trust with new users and ensures that people remember your website. However, your welcome emails can sometimes end up in spam, or users didn’t receive the email. That’s why it’s important to resend welcome emails.

In this article, we’ll show you how to resent new user welcome emails in WordPress.

How to Resend Welcome Emails to New Users in WordPress

Why Resend Welcome Email to New Users in WordPress?

Creating welcome emails is a great way to customize the emails that new users receive when they register on your website. This helps build your brand and makes your site memorable for new users.

However, it’s possible that the welcome emails that you sent didn’t make it to your user’s inbox. Plus, email providers like Gmail can also flag your emails as spam.

One of the reasons for this issue is that WordPress hosting services don’t configure the mail function properly. As a result, your welcome emails fail to reach your users or land in the spam folder.

To overcome this issue, you can use an SMTP (Simple Mail Transfer Protocol) service. It allows you to use an SMTP server to send WordPress emails and ensure your emails reach your users.

An SMTP service also allows you to log any emails that don’t get delivered, so you can easily resend them.

That said, let’s look at how you can log welcome emails that didn’t reach new users in WordPress.

Set Up Email Logs in WordPress

WP Mail SMTP is the best SMTP service for WordPress. It’s super easy to use and easily conencts with popular email services like Sendinblue, Gmail, Office 365, and more.

With WP Mail SMTP, you can track email deliverability in WordPress. The plugin keeps a record of every email sent from your website and lets you resend emails that aren’t delivered.

Note: You’ll need the WP Mail SMTP Pro version to use the Email Log feature and resend welcome emails to new users. There is also a free version of WP Mail SMTP that you can use to get started.

First, you’ll need to install and activate the WP Mail SMTP plugin on your website. For more details, please see our guide on how to install a WordPress plugin.

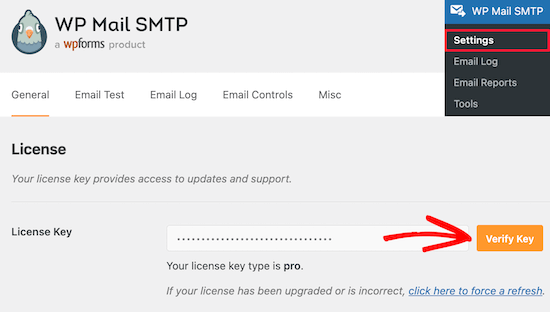
Upon activation, you can head over to WP Mail SMTP » Settings from your WordPress dashboard and then enter the license key. You can find the key in your WP Mail SMTP account area.

Enter WP Mail SMTP license key

After entering the license key, go ahead and click the ‘Verify Key’ button.

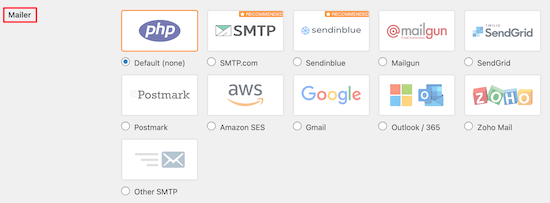
Next, you can scroll down to the Mailer section and choose how you’d like to send your WordPress emails.

Select SMTP mailer

All you have to do is select your preferred mailer. The PHP mail will be selected by default, but we don’t recommend using this method as it’s not reliable.

You can follow our detailed guide on how to use free SMTP server to send WordPress emails.

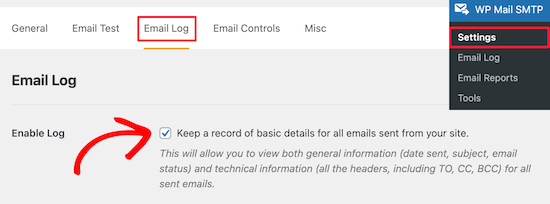
After that, you can go to the ‘Email Log’ tab in WP Mail SMTP settings and check the box for the ‘Enable Log’ option. This way, you’ll be able to track email deliverability in WordPress.

Enable email log tracking

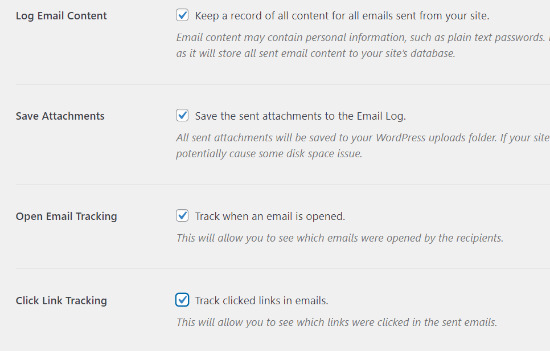
When you enable the option, you’ll see additional email tracking settings under the Email Log tab.

Go ahead and check the boxes for Log Email Content, Save Attachments, Open Email Tracking, and Click Link Tracking, so you have more data about email deliverability.

Additional email log settings

Next, you can select the time period to retain the email logs. Simply choose an option from the dropdown menu for ‘Log Retention Period’ and click the ‘Save Settings’ button.

Select log retention period

Resending New User Welcome Emails

After setting up email logs, you can now see which welcome emails didn’t reach your users and which need to be resent.

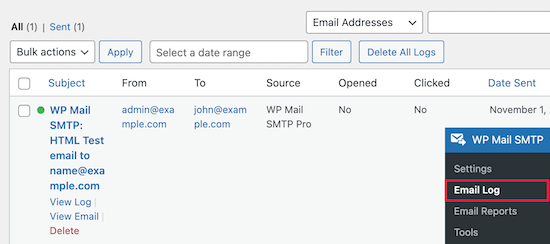
To start, simply navigate to WP Mail SMTP » Email Log from your WordPress admin area.

View email log opens and clicks

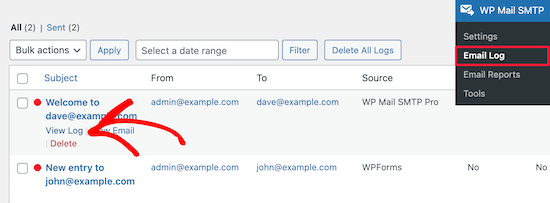
The plugin will show all your emails under this section. You can see the email subject, who it’s been sent to, the source, and whether users opened and clicked the email.

If you see a red dot for any email, then it means it wasn’t delivered. On the other hand, a green dot shows the email has reached the user’s inbox.

To resend a welcome email that didn’t get delivered, go ahead and click the ‘View Log’ option.

View email logs for resend

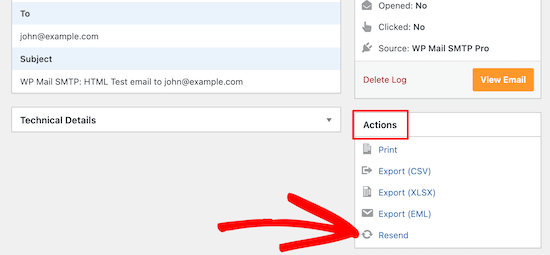
Now, you’ll see logs for the individual email. After that, navigate to the ‘Actions’ tab and click the ‘Resend’ button.

Click resend button

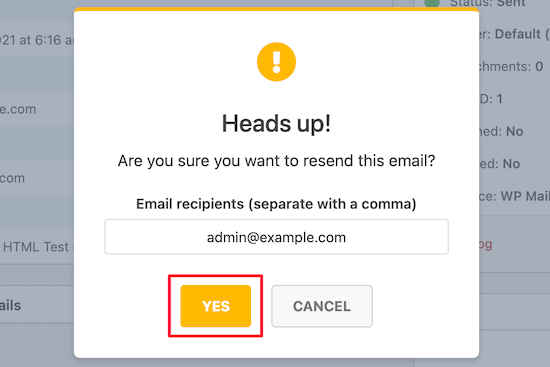
A popup window will now appear. Simply enter the recipient’s email address and click the ‘Yes’ button to resend the email.

Click yes to resend email

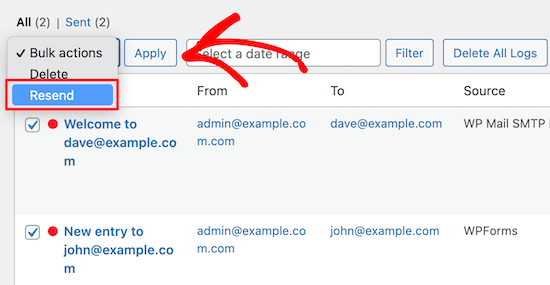
Next, if you see multiple emails that failed to deliver, then you can use the bulk resend feature from the email log screen.

Go ahead and check the box next to the emails that you want to resend. After that, select the ‘Resend’ option from the dropdown menu for Bulk Actions.

Resend multiple emails

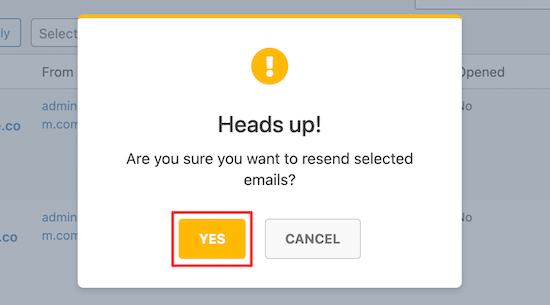
When a popup window appears, you can click the ‘Yes’ button to resend multiple emails.

Click yes to resend multiple emails

That’s it! WP Mail SMTP will resend welcome emails and any other email that fails to reach the new users.

We hope this article helped you learn how to resend new user welcome emails in WordPress. You may also want to check out our guide on how to choose the best website builder and the best WooCommerce plugins.

If you liked this article, then please subscribe to our YouTube Channel for WordPress video tutorials. You can also find us on Twitter and Facebook.

The post How to Resend New User Welcome Emails in WordPress first appeared on WPBeginner.


from WPBeginner https://ift.tt/3xzyzCx
More links is https://mwktutor.com
Friday, 26 November 2021

How to Add and Customize Admin Columns in WordPress

Are you looking for a way to add and customize admin columns on your website?

WordPress shows built-in columns by default for posts, pages, comments, users, and more. However, you can make your editorial workflow faster and smoother by adding more admin columns.

In this article, we will show you how to add and customize admin columns in WordPress.

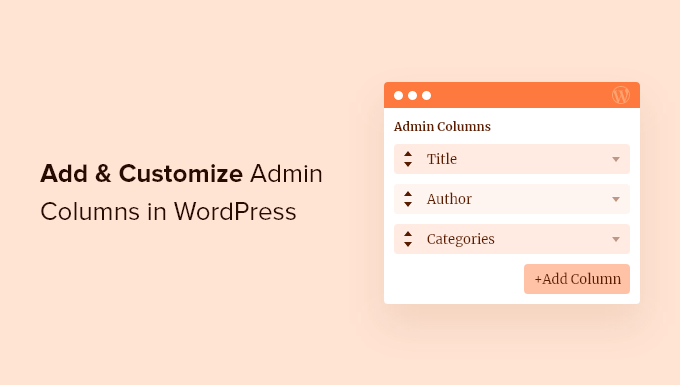
Add and customize admin columns in WordPress

Why Add Admin Columns in WordPress?

By default, WordPress only shows a few built-in columns. For instance, in the posts section, you can only view the post’s title, author, categories, tags, and date.

Managing a WordPress site with lots of content or multiple authors means more tasks for admins to perform.

Admins of growing WordPress sites are always looking for tools and plugins to improve their editorial workflow.

A lot of the tasks that need to be performed can be done quicker if you can see all the useful information on one screen.

That’s when admin columns come in handy.

You can display additional columns in the WordPress admin area and have complete control over all columns for pages, posts, media, comments, and users.

Let’s look at how you can add and customize admin columns in WordPress.

Adding and Customizing Admin Columns in WordPress

The easiest way to add more columns in the admin area is by using the Admin Columns plugin.

It’s a free WordPress plugin that lets you manage and organize columns in the WordPress admin panel and get a clear overview of your editorial workflows.

First, you’ll need to install and activate the Admin Columns plugin on your website. For more details, please see our guide on how to install a WordPress plugin.

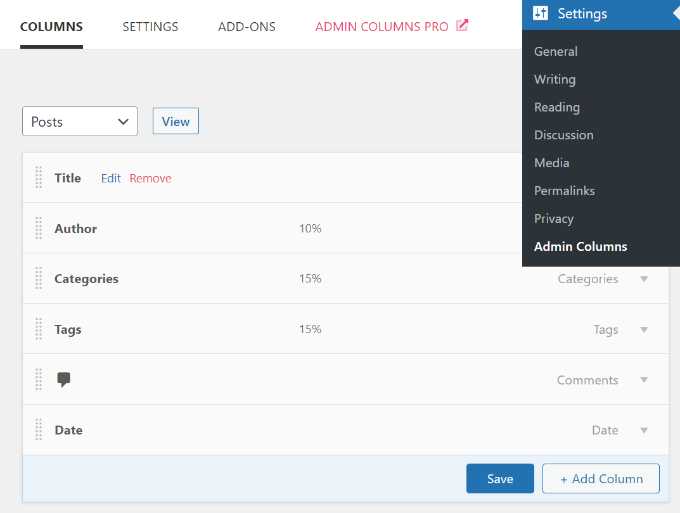
After activation, you can navigate to Settings » Admin Columns to configure admin columns.

Edit existing columns

You can customize existing admin columns by simply using the drag and drop interface and rearranging items in the order you want.

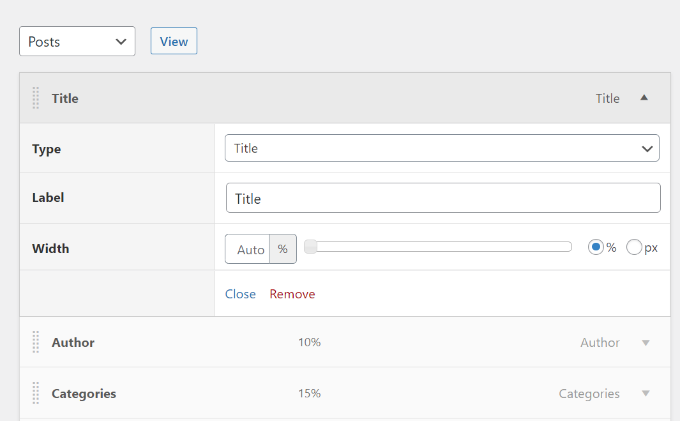
The plugin also lets you edit existing columns. For instance, you can click the ‘Edit’ button for any column and then change its type, label, and width.

Editing admin columns

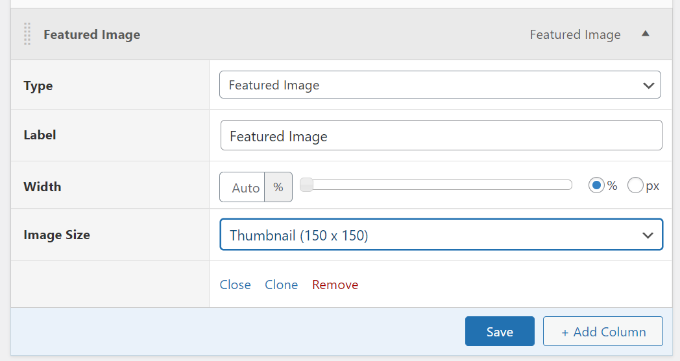
In addition to the default columns, you can add more admin columns by clicking the ‘+ Add Column’ button.

Add new admin column

For example, we added the featured image admin column for the posts screen. Admins will now see the featured images of all the blog posts in the admin panel and won’t have to view each article individually.

It’s important to note that if your thumbnails appear too big or in the wrong size, then you will need to regenerate thumbnails for new image sizes in WordPress.

After adding columns for the posts section, don’t forget to click the ‘Save’ button.

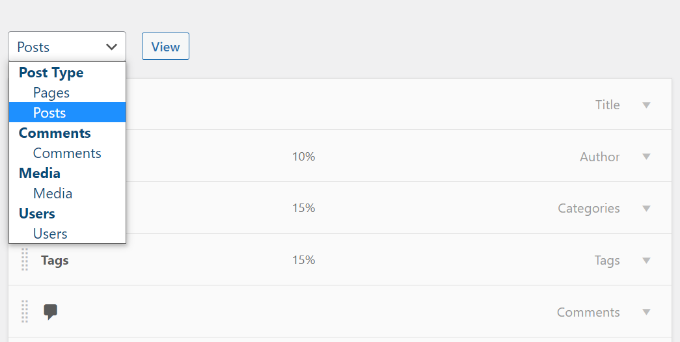
You can now do the same for other sections on your WordPress website. Simply click on the dropdown menu at the top and select a section for your site.

Add columns to other sections in WordPress

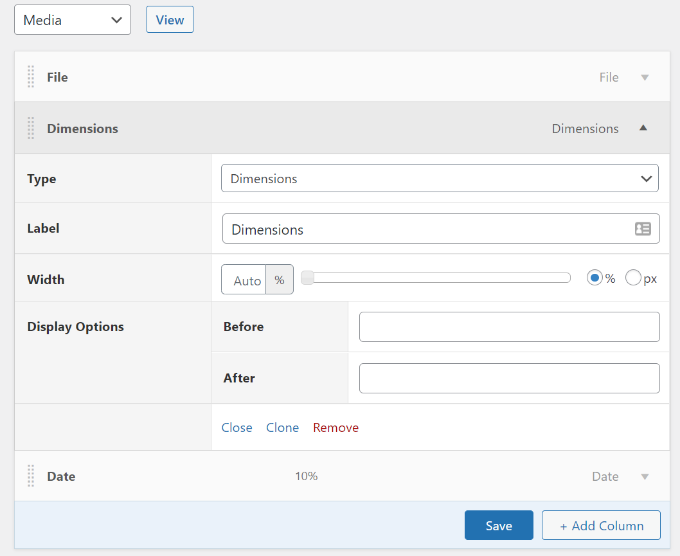
For example, on the media screen, you can add image dimensions, EXIF data, Alt text, and caption.

Dimensions column in media

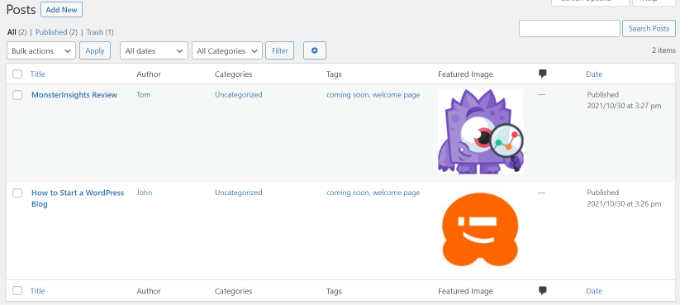
After adding these columns in the plugin, you can now head over to the WordPress admin panel to see them in action.

Here’s a preview of how a featured image column will look like in the posts section on our demo website.

Admin columns preview

Customize Other Admin Columns in WordPress

Certain popular WordPress plugins All in One SEO for WordPress and others will also automatically add columns in the admin area.

This can help you bulk edit SEO titles, meta descriptions, and more right from the post edit screen.

All in One SEO Bulk Edit Meta Description

If you see any plugin that’s adding an admin column that you do not want, then you can easily hide it by clicking on the Screen Options menu on the top right.

This will slide down a menu where you can simply uncheck the column that you don’t want to see.

Hide admin columns in WordPress using Screen Options

We hope this article helped you customize and add admin columns in WordPress. You may also check out our guide on how to choose the best web design software and the best WooCommerce plugin.

If you liked this article, then please subscribe to our YouTube Channel for WordPress video tutorials. You can also find us on Twitter and Facebook.

The post How to Add and Customize Admin Columns in WordPress first appeared on WPBeginner.


from WPBeginner https://ift.tt/3FJ39MS
More links is https://mwktutor.com
Thursday, 25 November 2021

How to Limit the Number of Posts in WordPress RSS Feed

Do you want to limit the number of posts in your WordPress RSS feed?

By default, WordPress displays the ten most recent posts in the main RSS feed. You can change that to include more or fewer articles in the feed.

In this tutorial, we’ll show you how to easily limit the number of posts in the WordPress RSS feed. We’ll also show you how to easily create an RSS sitemap for search engines as well.

Limit number of posts in WordPress RSS feed

Video Tutorial

If you don’t like the video or need more instructions, then continue reading.

Change Posts Limit in WordPress RSS Feed

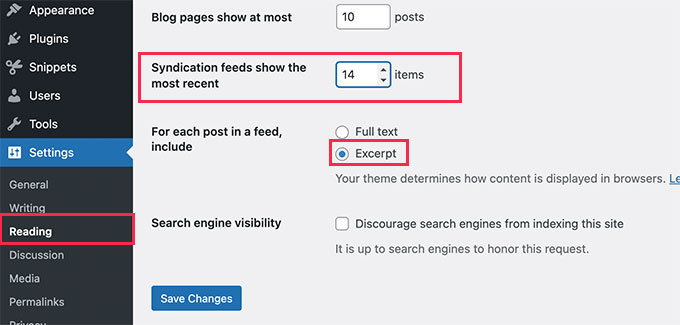
First thing you need to do is go to Settings » Reading page in your WordPress admin dashboard.

From here, you need to change the value next to the ‘Syndication feeds show the most recent’ option. Simply enter the number of posts you want to be shown in your RSS feed.
Change posts limit in RSS feed

Below this option, you’ll also see the option to show either the full text or excerpt of your posts in RSS feeds.

We recommend using the Excerpt option because it reduces the feed size and increases your page views.

After that, don’t forget to click on the Save Changes button to store your settings.

That’s all, you have successfully limited the number of posts displayed in RSS feed of your site.

Create RSS Sitemap for Search Engines

If you only want to change the number of posts in your RSS feeds for more search engine visibility, then increasing posts in your main WordPress RSS feeds is not the best way to do this.

Many popular search engines like Google and Bing support RSS sitemaps.

Unlike XML sitemaps which contain most of your content, an RSS sitemap provides search engines with the latest posts on your site.

This helps search engines quickly find the updated posts on your website. You can set a different limit of posts that you want to include without affecting your main WordPress RSS feed.

The easiest way to add an RSS sitemap in WordPress is by using All in One SEO for WordPress. It is the best WordPress SEO plugin on the market and allows you to easily optimize your website without any SEO skills.

First, you need to install and activate the All in One SEO for WordPress plugin. For more details, see our step-by-step guide on how to install a WordPress plugin.

AIOSEO setup wizard

This will bring up the All in One SEO setup wizard. Follow the on-screen instructions or check out our tutorial on how to properly set up All in One SEO for WordPress.

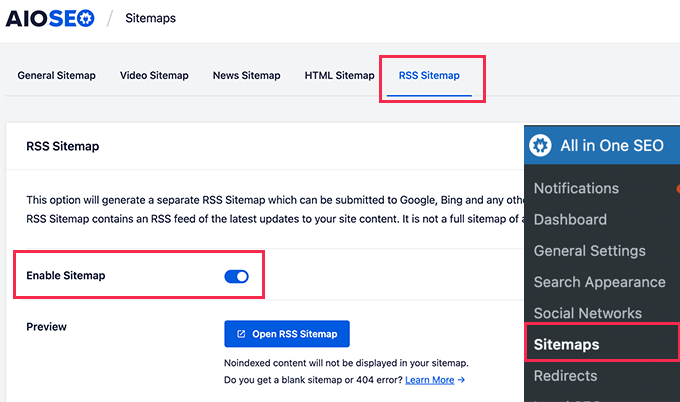
After that, you need to go to the All in one SEO » Sitemaps page and switch to the RSS Sitemap tab.

Enable RSS sitemap

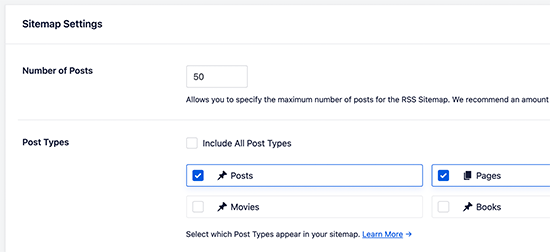
From here you can enable the RSS Sitemap and also set the number of posts you want to include in the sitemap.

Set post limit for RSS sitemap

This sitemap includes all your post types. This means it will include posts, pages, products, or any custom post types you may have.

If you only want to include blog posts, then uncheck the ‘Include All Post Types’ and then select ‘Posts’.

Once you are satisfied, don’t forget to click on the Save Changes button to store your settings.

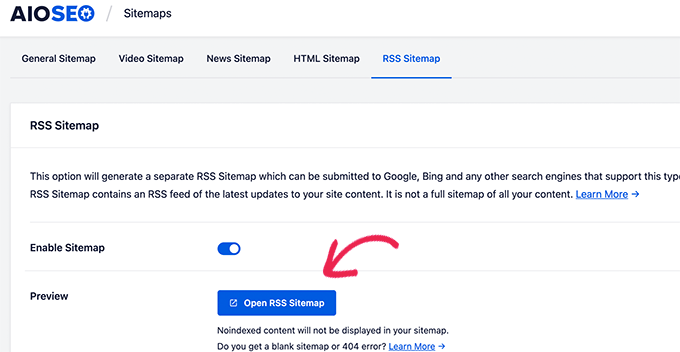
You can now click on the Open RSS Sitemap button to copy the URL of your RSS sitemap.

View RSS sitemap

Next, you need to submit your RSS sitemap to Google Search Console. See our step by step tutorial on how to add your WordPress site to Google Search Console.

We hope this article helped you limit posts in your WordPress RSS feed. You may also want to see our guide how to choose the best business VoIP provider and our expert pick of the must have WordPress plugins for your website.

If you liked this article, then please subscribe to our YouTube Channel for WordPress video tutorials. You can also find us on Twitter and Facebook.

The post How to Limit the Number of Posts in WordPress RSS Feed first appeared on WPBeginner.


from WPBeginner https://ift.tt/3CQkhhO
More links is https://mwktutor.com