Did you know that optimizing your images before uploading to WordPress can have a huge impact on your website speed?
When starting a new blog, many beginners simply upload images without optimizing them for web. These large image files make your website slower.
You can fix this by using image optimization best practices as part of your regular blogging routine.
In this article, we will show you how to optimize your images for faster web performance without losing quality. We will also share automatic image optimization plugins for WordPress that can make your life easy.
What is Image Optimization? (Optimized vs Unoptimized Images)
Image optimization is a process of saving and delivering images in the smallest possible file size without reducing the overall image quality.
While the process sounds complex, it’s actually quite easy these days. You can use one of the many image optimization plugins and tools to automatically compress images by up to 80% without any visible loss in image quality.
Here’s an example of optimized vs unoptimized image:
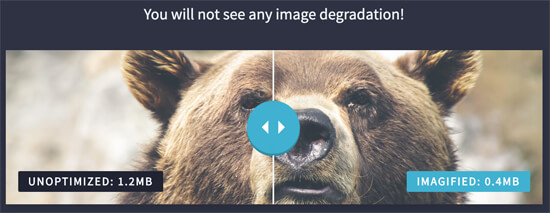
As you can see, when optimized properly the same image can be 75% smaller than the original without any loss in quality.
How does Image Optimization work?
In simple terms, image optimization work by using compression technology like “Lossy” and “Lossless” which helps reduce the overall file size without any noticeable loss of quality.
What does it mean to Optimize Images?
If you ever received a recommendation to optimize images by your WordPress hosting support or by a speed test tool, then all it means is that you need to reduce the file size of your images by optimizing them for web.
Why is Image Optimization Important? What are the Benefits of Image Optimization?
While there are many benefits of optimizing your images, below are the top ones that you should know:
- Faster website speed
- Improved SEO rankings
- Higher overall conversion rate for sales and leads
- Less storage and bandwidth (which can reduce hosting and CDN cost)
- Faster website backups (also reduces cost of backup storage)
Outside of video, images are the next heaviest item on a web page. According to HTTP archive, images make up on average 21% of a total webpage’s weight.
Since we know fast websites rank higher in search engines (SEO) and have better conversions, image optimization is something that every business website must do if they want to succeed online.
Now you might be wondering how big of a difference can image optimization really make?
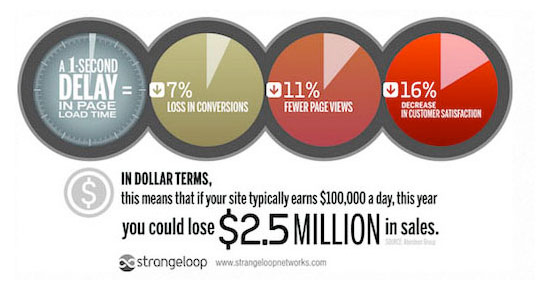
According to a Strangeloop study, a one-second delay in website load time can cost you 7% of sales, 11% fewer pageviews, and 16% decrease in customer satisfaction.
If these aren’t enough reasons to speed up your website, then you should know that search engines like Google also give preferential SEO treatment to faster loading websites.
This means that by optimizing your images for web, you can both improve website speed and boost WordPress SEO rankings.
How to Save and Optimize Images for Web Performance?
The key to successful image optimization for web performance is to find the perfect balance between lowest file size and acceptable image quality.
The three things that play a huge role in image optimization are:
- Image file format (JPEG vs PNG vs GIF)
- Compression (Higher compression = smaller file size)
- Image Dimensions (height and width)
By choosing the right combination of the three, you can reduce your image size by up to 80%.
Let’s take a look at each of these in more details.
1. Image File Format
For most website owners, the only three image file formats that really matter are JPEG, PNG, and GIF. Choosing the right file type plays an important role in image optimization.
To keep things simple, you want to use JPEGs for photos or images with lots of colors, PNGs for simple images or when you need transparent images, and GIF for animated images only.
For those who don’t know the difference between each file type, PNG image format is uncompressed which means it is a higher quality image. The downside is that file sizes are much larger.
On the other hand, JPEG is a compressed file format which slightly reduces image quality in order to provide a significantly smaller file size.
Whereas GIF only uses 256 colors along with lossless compression which makes it the best choice for animated images.
On WPBeginner, we use all three image formats based on the type of image.
2. Compression
The next thing is image compression which plays a huge role in image optimization.
There are different types and levels of image compression available. The settings for each will vary depending on the image compression tool you use.
Most image editing tools like Adobe Photoshop, On1 Photo, GIMP, Affinity Photo, and others come with built-in image compression features.
You can also save images normally and then use a web tool like TinyPNG or JPEG Mini for easier image compression.
Although it’s a bit manual, these two methods allow you to compress images before uploading them to WordPress, and this is what we do on WPBeginner.
There are also several popular WordPress plugins like Optimole, EWWW Image Optimizer, and others that can automatically compress images when you first upload them. Many beginners and even large corporations prefer to use these image optimization plugins because it’s easy and convenient.
We will share more about these WordPress plugins later in the article.
3. Image Dimensions
Normally, when you import a photo from your phone or a digital camera, it has a very high resolution and large file dimensions (height and width).
Typically, these photos have a resolution of 300 DPI and dimensions starting from 2000 pixels and more. These high-quality photos are well-suited for print or desktop publishing. They are not suitable for websites.
Reducing file dimensions to something more reasonable can significantly decrease image file size. You can simply resize images using an image editing software on your computer.
For example, we optimized a photo with 1.8 MB original file size, 300 DPI resolution, and image dimensions of 4900×3200 pixels.
We chose jpeg format for higher compression and changed dimensions to 1200×795 pixels, and it reduced the image file size to 103 KB. That’s 94% less than the original file size.
Now that you know the three important factors in image optimization, let’s take a look at various image optimization tools for website owners.
Image Optimization Tools and Programs
As we mentioned earlier, most image editing software come with image optimization and compression settings.
Outside of the image editing software, there are also several powerful free image optimization tools that you can use to optimize images for web (with just a few clicks).
We recommend using these tools to optimize images before you upload them to WordPress, specially if you are a perfectionist.
This method helps you save disk space on your WordPress hosting account, and it guarantee the fastest image with the best quality since you manually review each image.
Adobe Photoshop
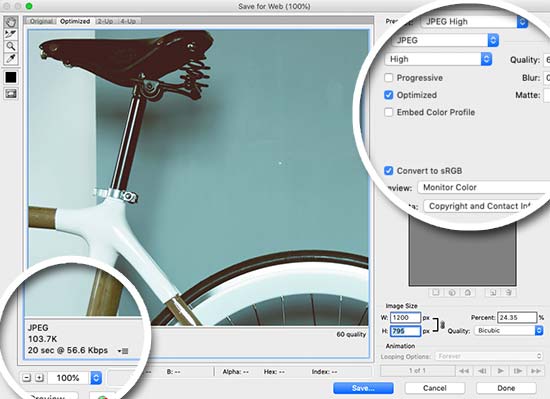
Adobe Photoshop is a premium software that comes with a feature to save images optimized for the web. Simply open your image and click on the “File » Save for Web” option.
This will open a new dialog box. On the right, you can set different image formats. For JPEG format, you will see different quality options. When you select your options, it will also show you the file size on the bottom left.
GIMP
GIMP is a free and open source alternative to popular Adobe Photoshop. It can be used to optimize your images for the web. The downside is that it is not as easy to use as some other solutions on this list.
First, you need to open your image in GIMP and then select File » Export As option. This will bring up the save file dialog box. Give your file a new name and then click on the export button.
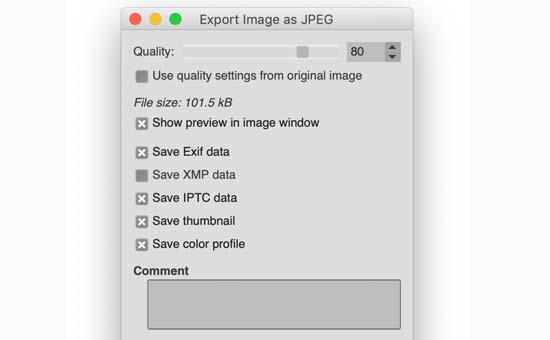
This will bring up image export options. For jpeg files, you can select the compression level to reduce file size. Finally, click on the export button to save the optimized image file.
TinyPNG is a free web app that uses a smart lossy compression technique to reduce the size of your PNG files. All you have to do is go to their website and upload your images (simple drag & drop).

They will compress the image, and give you the download link. You can use their sister website, TinyJPG, for JPEG image compression.
They also have an extension for Adobe Photoshop which is what we use as part of our image editing process because it combines the best of TinyPNG and TinyJPG inside Photoshop.
For developers, they have an API to convert images automatically, and for beginners they have a WordPress plugin that can automatically do it for you (more on this later).
JPEGmini uses a lossless compression technology which significantly reduces the size of images without affecting their perceptual quality. You can also compare the quality of your original image and the compressed image.
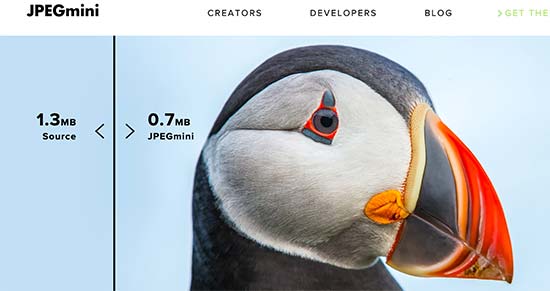
You can use their web version for free, or purchase the program for your computer. They also have a paid API to automate the process for your server.
ImageOptim is a Mac utility that allows you to compress images without losing any quality by finding the best compression parameters and removing unnecessary color profiles.
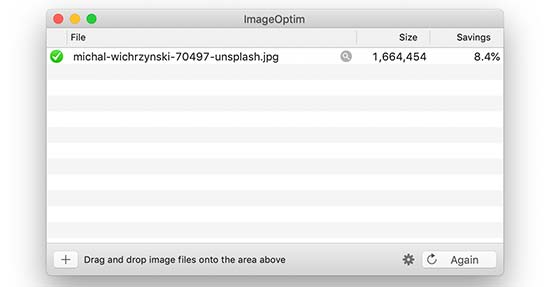
Windows alternative to this is Trimage.
Image Optimization Plugins for WordPress
We believe that the best way to optimize your images is by doing it before uploading them to WordPress. However, if you run a multi-author site or need an automated solution, then you can try a WordPress image compression plugin.
Below is our list of the recommended WordPress image compression plugins:
- Optimole – popular plugin by the team behind ThemeIsle.
- EWWW Image Optimizer
- Compress JPEG & PNG images – plugin by TinyPNG team mentioned above in the article.
- Imagify – plugin by the popular WP Rocket plugin team.
- ShortPixel Image Optimizer
- WP Smush
- reSmush.it
Using any of these WordPress image optimization plugin will help you speed up your website.
Final Thoughts and Best Practices for Image Optimization
If you’re not saving images optimized for web, then you need to start doing so now. It will make a huge difference on your site speed, and your users will thank you for it.
Not to mention, faster websites are great for SEO, and you will likely see an increase in your search engine rankings.
Outside of image optimization, the two things that will significantly help you speed up your website is using a WordPress caching plugin and using a WordPress CDN.
Alternatively, you can use a managed WordPress hosting company because they often offer both caching and CDN as part of the platform.
We hope this article helped you learn how to optimize your images in WordPress. You may also want to see our guide on how to improve your WordPress security and the best WordPress plugins for business websites.
If you liked this article, then please subscribe to our YouTube Channel for WordPress video tutorials. You can also find us on Twitter and Facebook.
The post How to Optimize Images for Web Performance without Losing Quality appeared first on WPBeginner.
from WPBeginner https://ift.tt/2GruMxQ
More links is https://mwktutor.com
No comments:
Post a Comment