Everyone agrees that broken links are bad for user experience. But did you know that broken links can significantly hurt your WordPress SEO rankings?
Yes, it’s proven that having broken internal links on your website negatively impacts SEO rankings.
In this article, we will show you how to easily find and fix broken links in WordPress, so you can improve your user experience and SEO rankings.

What is a Broken Link?
A broken link, also known as dead link, is a link that no longer works. Broken links can happen for many reasons, but the most common reason is when a page is either deleted or moved to a different location which causes the server to show a 404 not found error.
On WordPress sites, broken links typically occur when moving a site to new domain name, or when deleting a post or page without proper redirection.
Sometimes broken links can also happen due to a typo, and they can go unnoticed for months if not years.
This is why it’s extremely important to regularly monitor broken links on your site and fix them, so you can keep them from hurting your SEO rankings.
In this guide, we will share top four methods to find broken links in WordPress. After that, we will show you an easy way to fix those broken links.
Here’s a table of content for easy navigation:
- Finding Broken Links using SEMRush
- Finding Broken Links using Ahrefs
- Finding Broken Links using Google Search Console
- Finding Broken Links using Broken Link Checker Plugin
- How to Fix Broken Links in WordPress
Ready? Let’s get started.
Method 1. Finding Broken Links using SEMRush
SEMRush is one of the best SEO tool on the market. It allows you to easily monitor your website’s SEO rankings and overall health.
It also includes a powerful site audit tool that crawls your website to find common errors and prepare a detailed report for you.
First, you’ll need to sign up for a SEMRush account.
It is a paid service, but they do offer a limited free account which allows you to crawl up to 100 pages on one domain name. Paid plan limits start from 100,000 pages a month.
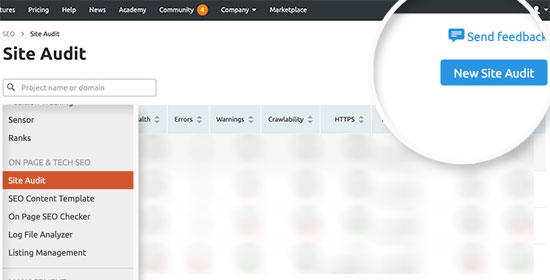
Once you are logged in, you need to click on the ‘Site Audit’ link from the left menu.
This will bring you to the Site Audit page. From here, click on the ‘New Site Audit’ button at the top to add your website.
You will be asked to enter your domain name. After that, you will be asked to configure site audit settings. You can select the number of pages to crawl and choose a crawl source.
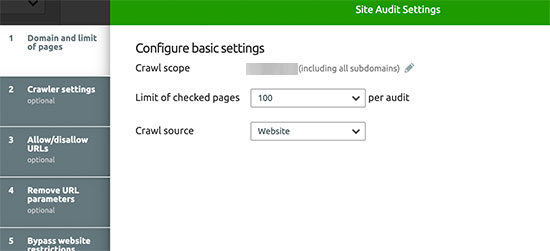
Click on the start crawling button to continue.
SEMRush will now begin crawling your website for the site audit. This may take a few minutes depending on how many pages you selected for the crawl.
Once finished, you can click on your domain Under the Site Audit section to view your report.
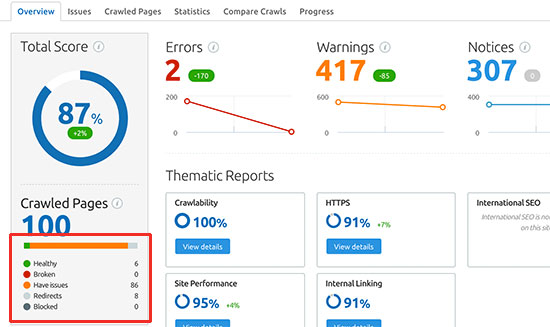
To see the broken links on your site, you will need to click on the ‘Broken’ link under the report overview.
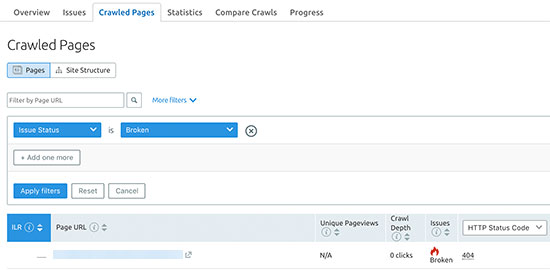
You can now click on the Export button at the top right corner of the screen to download your crawl report. You will need it when fixing broken links on your website (more on this later in the article).
Method 2. Finding Broken Links using Ahrefs
Ahrefs is an excellent all-in-one SEO tool for marketers, businesses, and SEO professionals. It offers detailed SEO insights into your own website or any of your competitors.
You can use it for keyword research, competition analysis, organic and paid keyword ideas, and site health monitoring including broken links.
First, you’ll need to sign up for an Ahrefs account. It is a paid service with plans starting from $99 per month. They also offer a full featured 7 day trial for $7.
Once you are logged into your Ahref’s dashboard, you need to enter your domain name under the Site Explorer tool.
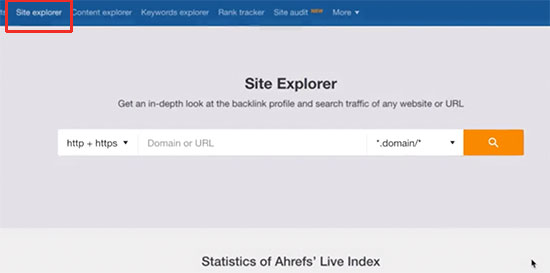
Site explorer tool will now crawl your website to prepare reports. This may take some time depending on how much content you have on your website.
Once finished, you’ll see an overview of your site explorer results. From here, you need to click on the Pages » Best by Links menu and then sort your report by 404 status.
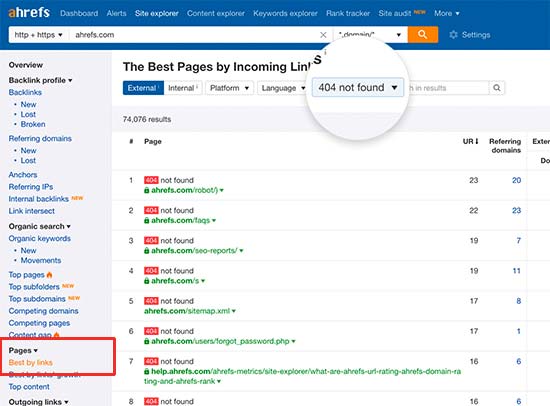
You can now export your report in CSV format to fix the broken links on your WordPress site.
Method 3. Finding Broken Links in WordPress using Google Search Console
Google Search Console is a free tool offered by Google to help webmasters manage their site’s visibility in search results. It also notifies you about errors including 404 errors which are caused by a broken link.
For more details, see our ultimate Google Search Console guide with step by step set up instructions.
After you have logged in to your Google Search Console account, click on the ‘Coverage’ link from the left menu.
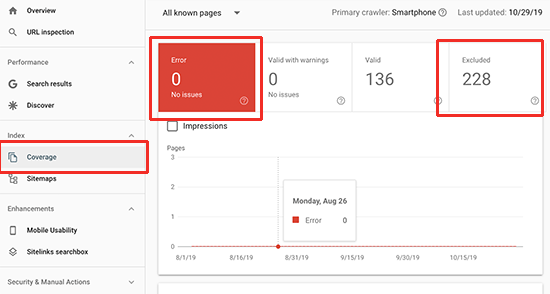
You’ll find 404 errors either under Errors or Excluded tabs. Clicking on them will show you a list of errors or issues Google encountered while visiting your website.
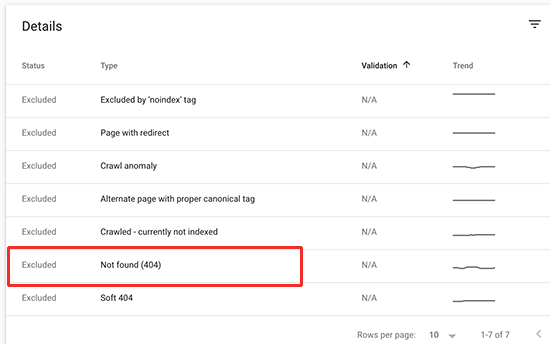
Clicking on the 404 error will show you all the links on your website that are broken links and return a 404 error.
You can now click on the download button to get the list of all 404 errors on your website. You’ll need this to fix broken links on your website.
Method 4. Finding Broken Links in WordPress using Broken Link Checker
For this method, we’ll be using the Broken Link Checker plugin. However, this method is not recommended because it is resource-intensive and will slow down your website. Managed WordPress hosting companies like WP Engine already block users from installing this plugin on their servers.
The plugin checks for broken links on your website including both internal and external links that are resulting in a 404 error.
First, you’ll need to install and activate the Broken Link Checker plugin. For more details, see our step by step guide on how to install a WordPress plugin.
Upon activation, the plugin will start working in the background to find links in your posts, pages, and comments. You can now go to Tools » Broken Links page to view the full report.
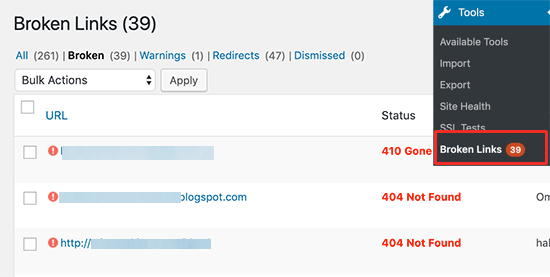
If you have been running your WordPress blog for a long time, then this report will include broken links to third-party websites as well.
You will have to manually sort the list to find broken links on your website.
You will need to keep Broken Link Checker active on your website until you fix broken links. After that, you can deactivate the plugin because it will keep checking for broken links which will slow down your server.
How to Properly Fix Broken Links in WordPress
We have shown you four different methods to find broken links in WordPress. Now let’s talk about how to easily fix broken links in WordPress.
The best way to fix a broken link is to redirect it to another page. For example, if you moved the contents of an article to a different address, then you will need to redirect it to the newer article.
Similarly, if an article does not exist anymore, then you would want to point users to a similar page that is closely related to the contents of the old article.
You can do this by setting up 301 redirects.
First, you will need to install and activate the Redirection plugin. For more details, see our step by step guide on how to install a WordPress plugin.
Upon activation, you need to visit Tools » Redirection page to set up redirects. You need to add the old broken link in the ‘Source URL’ field and the new URL in the ‘Target URL’ field.
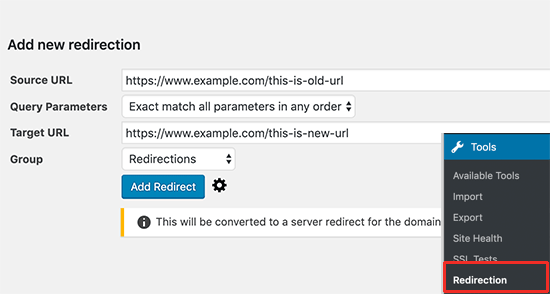
After that, click on the ‘Add redirect’ button to save your changes.
You can now test this by visiting the old broken link, and you’ll be redirected to the new page.
Repeat the process for all broken links on your website.
For more information, see our guide on how to set up redirects in WordPress for beginners.
We hope this article helped you learn how to easily find and fix broken links in WordPress. You may also want to see our actionable tips on how to optimize your images for web, and our pick of the best WordPress membership plugins to create a membership site.
If you liked this article, then please subscribe to our YouTube Channel for WordPress video tutorials. You can also find us on Twitter and Facebook.
The post How to Find and Fix Broken Links in WordPress (Step by Step) appeared first on WPBeginner.
from WPBeginner https://ift.tt/34luPVB
More links is https://mwktutor.com
No comments:
Post a Comment