Crafting your blog posts is a creative process that requires attention to details and concentration. Many writers feel distracted by the on-screen elements of the WordPress writing interface like buttons, columns, toolbars, etc.
WordPress comes with a built-in distraction-free mode for writing. It hides unnecessary elements and gives you a fullscreen canvas to create content.
In this article, we will show you how to use the distraction-free fullscreen editor in WordPress. You will be able to switch between regular and distraction free mode without affecting your content.
The first thing you need to do is log in to your WordPress dashboard and go to Posts » Add New to create a new post. You’ll see the post editor with the toolbar and settings columns.
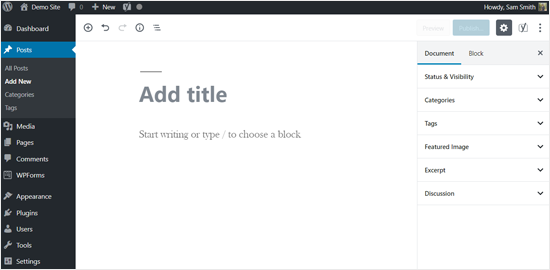
As you can see in the screenshot above, a WordPress editor screen has the dashboard menu on the left, the document (post) settings on the right, and toolbar on the top.
While these options are important, you don’t need them all the time.
The distraction free editor allows you to hide them while writing and show them only when needed.
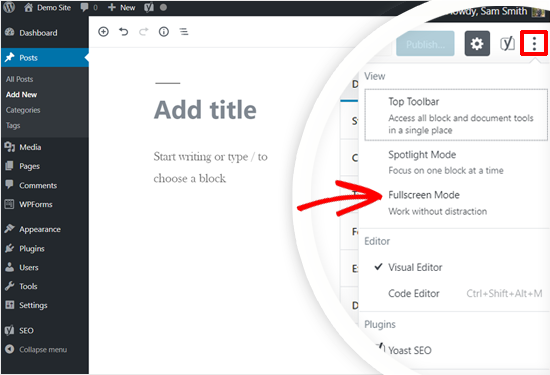
To enable the fullscreen mode, you need to click on the three dots icon on the top right corner of the screen. You will see the hidden options and tools including View modes, Editor options, plugin options, and more.
Simply click on the ‘Fullscreen Mode’ option.
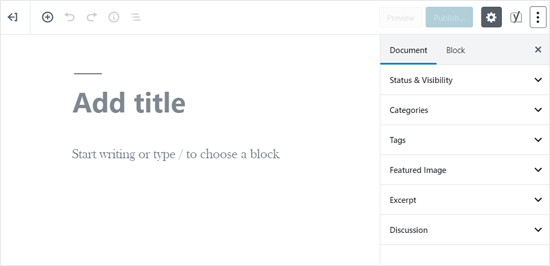
It will hide the WordPress menu on the left and the top toolbar. Now your screen would look much cleaner.
The new WordPress editor is a block-based editor where you need to use a new block for every piece of content.
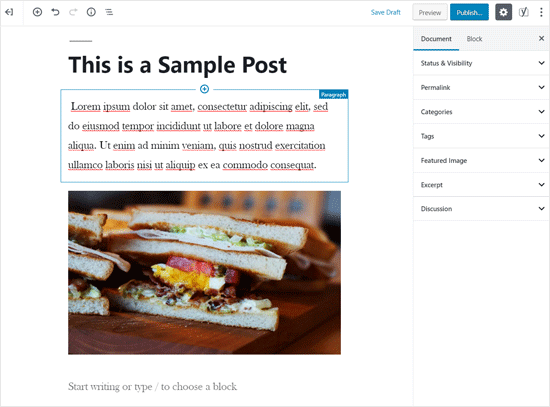
If you make a content-heavy post, then there will be several blocks visible on the screen at one time.
But what if you wanted to simplify it even further?
This is where ‘Spotlight Mode’ comes in handy. Enabling Spotlight mode will highlight the current block you are working on and dim all other blocks.
Simply click on the three dots icon on the top right corner of the screen and then select the Spotlight Mode.
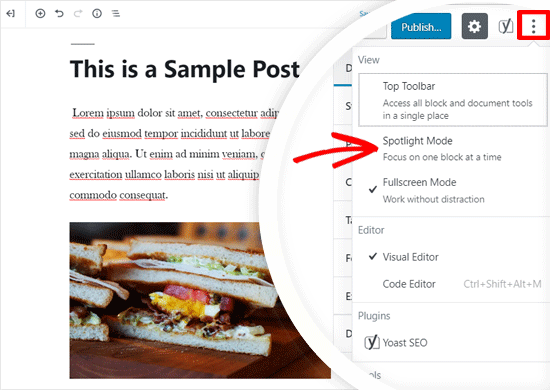
Now you can add / edit content on your block without any distractions around. For example, in the screenshot below you will only see the Paragraph block in full color while others are faded out.
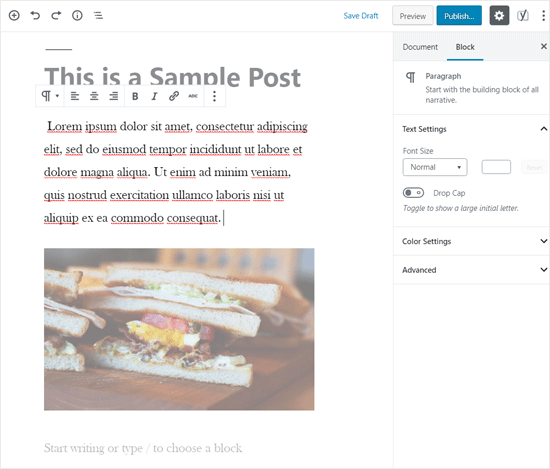
There are two toolbars you will still see on the screen. The one on the top allows you to add new blocks, undo changes, and show an outline of your article.
The second toolbar is the one that appears on top of each block. Most of the times, the block toolbar overlaps with the other block just above it. This can be confusing.
To clean this up, you can move the block toolbar to the top as well. Simply click on the 3 dots icon on the top right corner and then select the ‘Top Toolbar’ option.
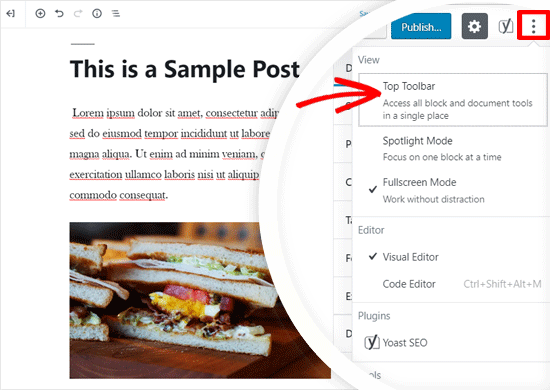
Now your block tools for every block will in a single place, on the top.
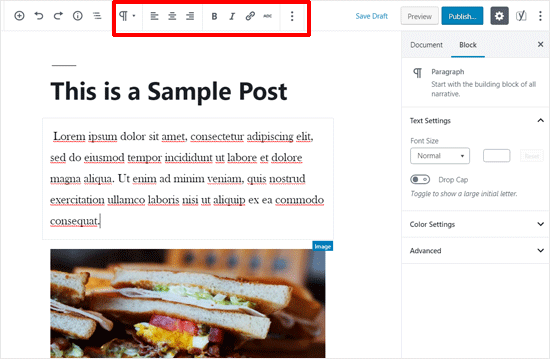
You can also hide the Document/Block Settings box on the left. The box includes important metadata fields like categories, tags, featured image, etc. for your post and block style settings.
But if you don’t need it, then simply click on the Settings icon to hide the Document/Block Settings box.
![]()
You can show it again by clicking on the same icon.
Also, you can use the keyboard shortcut Ctrl +Shift + , (Command + Shift + , for Mac) to hide or show the Document/Block settings.
Using Distraction Free Editor in Classic WordPress Editor
If you have not upgraded your website to WordPress 5.0 or a later version, then your post editor looks and works differently. It’s called the Classic Editor.
To launch the full-screen mode in the Classic Editor, you need to click on the ‘Distraction-free writing mode’ button in your post menu bar.
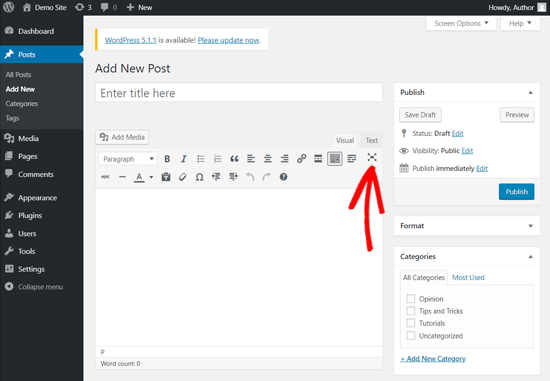
WordPress will now gracefully convert the post edit screen into a clutter-free full-screen editor.
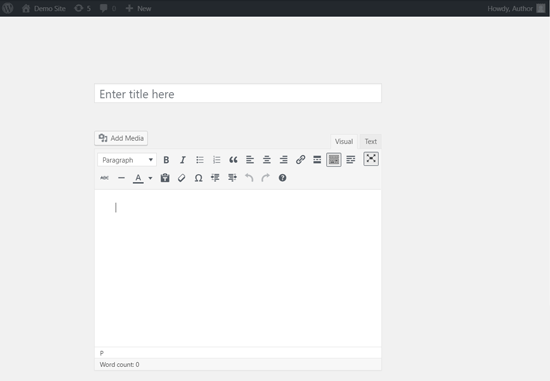
The full-screen editor has a minimalist layout. It has a menu bar on top of the screen with the text formatting options.
Just like the regular post edit screen, full-screen editor is also available in both visual and text editor.
The visual editor in full screen mode allows you to make text bold or italic, create lists, add links, and insert media using the buttons. Most WordPress keyboard shortcuts will work just like they did on the default edit screen.
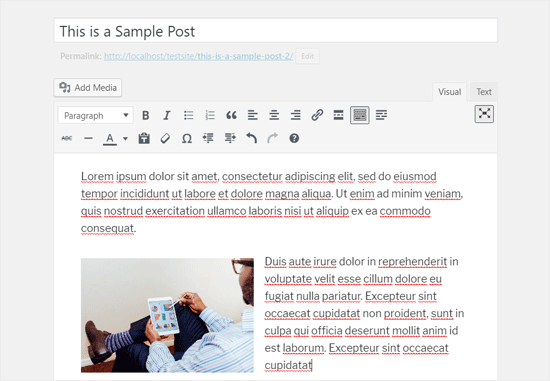
Switching to text editor will hide all those buttons. You will only see buttons to add links or insert media.
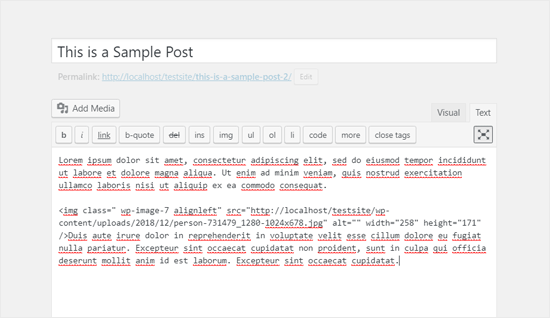
Full screen editor does not have a Publish button or any meta boxes to choose categories and tags. After writing your post, you can exit the full screen mode to select your post options.
You can click the same ‘Distraction-free writing mode’ icon to exit the full-screen mode. Alternatively, you can use the keyboard shortcut Shift+Alt+W to enable or disable the full-screen mode in WordPress Classic editor.
In our experience, the full-screen mode allows us to write faster. Several students have told us that they use this distraction free mode in WordPress when writing research papers.
We hope this article helped you to use distraction free full screen editor in WordPress. You may also want to see our guide on how to check grammar and spelling mistakes in WordPress.
If you liked this article, then please subscribe to our YouTube Channel for WordPress video tutorials. You can also find us on Twitter and Facebook.
The post How to Use Distraction Free Full Screen Editor in WordPress appeared first on WPBeginner.
from WPBeginner http://bit.ly/2W4KCEq
More links is https://mwktutor.com
No comments:
Post a Comment