Wednesday, 31 October 2018
How to Easily Add a Client Feedback Form in WordPress (Step by Step)
Do you want to add a client feedback form on your website? Client feedback is very helpful in improving your products and services. In this article, we will show you how to easily add a client feedback form in WordPress.

Why Do You Need a Client Feedback Form?
A client feedback form or a customer feedback form is a contact form that your customers can use to give direct feedback about your product or service.
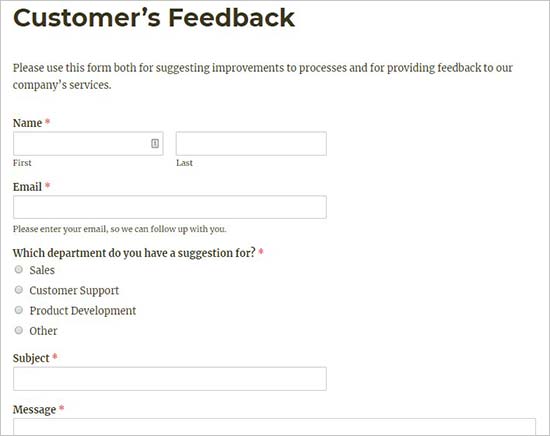
Basically, it helps you gain insight into how your clients evaluate your processes, services, products, and brand. You can then use this feedback to make improvements to your business and win even more customers.
Client feedback form is different than Net Promoter Score® (NPS) surveys which are a popular method of measuring customer loyalty.
That being said, let’s take a look at how to easily add a client feedback form in WordPress.
Step 1. Selecting the Best Feedback Form Plugin
The first thing you need to do is to select a WordPress feedback form plugin.
We recommend using WPForms, which is the best WordPress contact form plugin on the market.
WPForms drag & drop form builder makes it easy for anyone to create an online form (yes even the non-technical folks can use it). That’s why it’s being used on over 1 million websites now.
Since feedback forms are simple forms, you can use the free WPForms Lite plugin to build your form.
Now that you have chosen a plugin, the next step is to install it and start creating a client feedback form.
Step 2. Install a Feedback Form Plugin in WordPress
First thing you need to do is install and activate the WPForms plugin. For more details, see our step by step guide on how to install a WordPress plugin.
Upon activation, you need to visit WPForms » Add New page to create your feedback form.
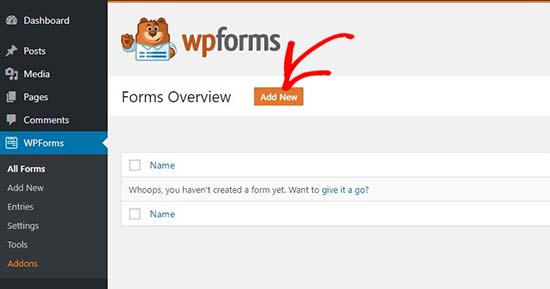
It will launch the WPForms form builder. Simply start by adding a name for your feedback form and then select the ‘Suggestion Form’ template.
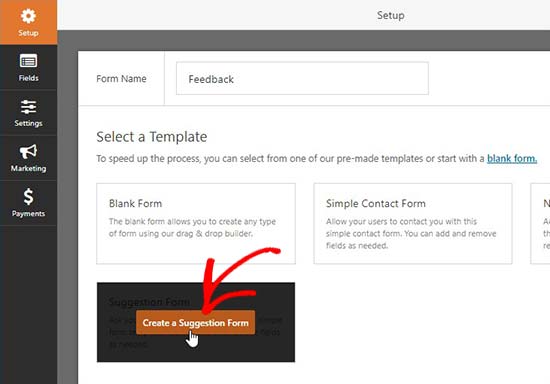
WPForms will now load the form template with basic feedback form fields already added to it. You can click on any field to edit it or drag & drop to change their order.
If you want to add a new field, then you can simply select it from the left side of the screen and drag it over.
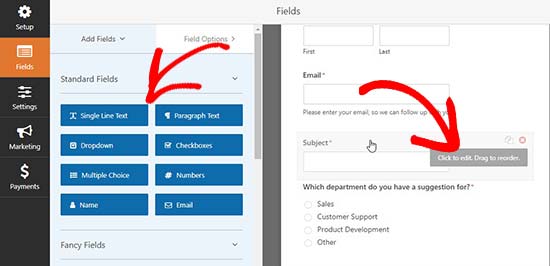
Once you are done, click on the ‘Save’ button to store these settings.
Step 3. Configuring Form Notifications and Confirmation
After creating the feedback form in WordPress, the next step is to configure the form notifications and confirmation.
While confirmation is for the user, form notifications will be for you. You’ll receive an email when a client submits the feedback form on your website.
WPForms allows you to manage both of these settings and customize them as you want from the ‘Settings’ tab within WPForms builder.
First, you can edit the form confirmation settings. Simply go to ‘Confirmation’ tab and select a confirmation type from the dropdown to change the settings.
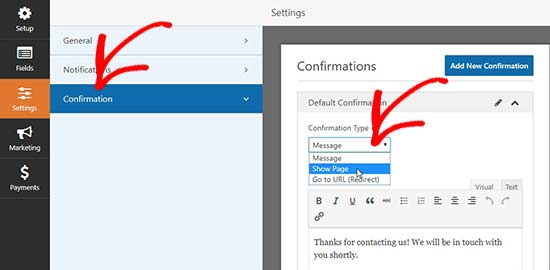
If you choose to display a thank you message, then there’s a pre-built message below the confirmation type section. You can change this message to add your own. You can also redirect users to a separate thank you page or a different URL from the confirmation type dropdown.
Next, you can go to the ‘Notifications’ tab. It has the default settings that are ideal for a feedback form and may not need any changes.
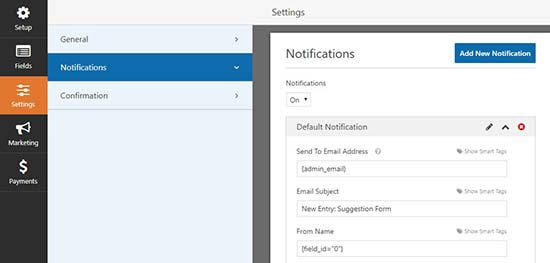
By default, it will send all the feedback form notifications to the admin email of your WordPress website. If you want to send the notifications to another email address, then you can simply add it in the notifications setting. You can also add comma separated emails to send notifications to multiple email addresses.
Step 4. Adding the Client Feedback Form to Your Website
Now your feedback form is ready, and you can add it to your WordPress website.
Simply edit a WordPress post or page where you want to add the form or create a new one.
On the post edit screen, you’ll notice the new ‘Add Form’ button above the text editor. Clicking on it will bring up a popup where you need to select the feedback form you created earlier.
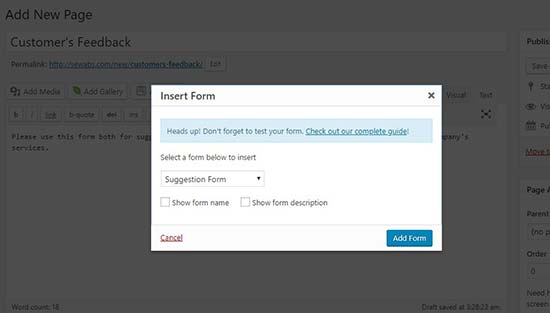
When you click on the Add Form button in the popup, it will add the feedback form shortcode to the post editor. You can go ahead and save or publish your post / page.
Next, you can visit your website to see the client feedback form in action.
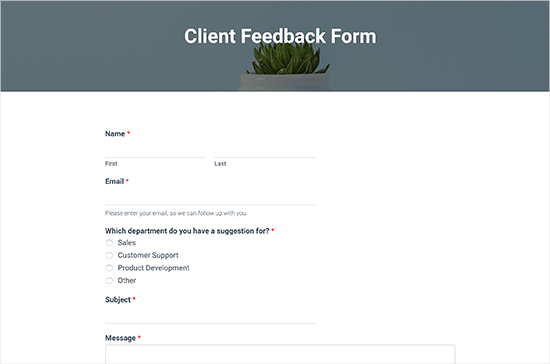
Step 5 (Optional). Adding Client Feedback Form in the Sidebar
WPForms comes with a widget that you can use to add your client feedback form in the sidebar or any other widget area in WordPress.
You need to go to Appearance » Widgets page in your WordPress admin area. On this page, you can drag and drop the WPForms widget in the sidebar widget area.
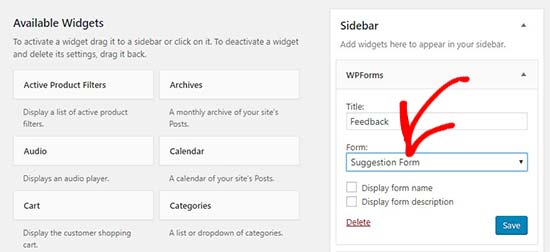
Simply add a title for the feedback form widget and select your form to show it in the sidebar. Make sure to click on the ‘Save’ button.
You can now visit your website to see your client feedback form displayed in a sidebar widget.
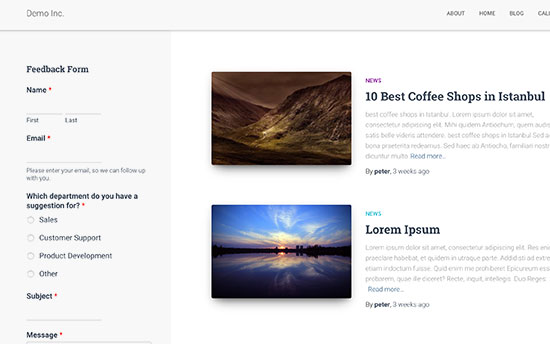
We hope this article helped you learn how to easily add a client feedback form in WordPress. You may also want to see our guide on how to create a donation form or how to create a survey in WordPress.
If you liked this article, then please subscribe to our YouTube Channel for WordPress video tutorials. You can also find us on Twitter and Facebook.
The post How to Easily Add a Client Feedback Form in WordPress (Step by Step) appeared first on WPBeginner.
from WPBeginner https://ift.tt/2DeoAcn
More links is https://mwktutor.com
Growsumo Review: Affiliate Marketplace For SAAS Products And Growing Companies
You may be somewhat like me. A busy person who is always juggling, getting everything done while also enjoying life. One mantra to achieve this is by doing things that are working for others.
Here at ShoutMeLoud, I only share stuff which works for me and others. And today is the day when you should learn about this not-so-new affiliate marketplace called Growsumo.
I have talked about Growsumo earlier in my mega post of top affiliate marketplaces and how to earn money from blogging. Today, I’m sharing this dedicated post about Growsumo given they have now built a considerable amount of affiliate program in the SAAS and web app niche.
Moreover, my revenue has been growing slowly and steadily from Growsumo, which gives me more confidence to let you and other Shouters know about it. As I said, I only share stuff that works for me 🙂
Also, read:
- Affiliate Link Cloaking: Importance & Benefits For Affiliate Marketers
- How to Choose the Best Affiliate Product for Your Blog
What is Growsumo?
Growsumo is an affiliate marketplace which connects brands with affiliates/publishers. Brands like Evernote, Crowdfire, Freshbooks are using Growsumo to run their partner programs.
If you are an experienced affiliate marketer who has used a marketplace like ShareASale, CJ.com, Clickbank or something similar, you will be able to start using Growsumo in no time. The interface is different compared to others, more modern. In fact, I find it to be the fastest among the ones mentioned above and for someone like you and me who care about speed and a nice UI, you might fall in love the first time itself.
As a blogger, affiliate marketer, you have the option to quickly join the affiliate program offered by many of the companies listed there. You can start by creating an account for yourself using the below link.
Once your account is created, you can click on Marketplace to start browsing the available brands and join their affiliate program.

Once you have joined a program, you can click on the top left to switch between various programs. Clicking on links will let you grab your exclusive affiliate link and you can also grab marketing material by clicking on the Assets section.
Payout: PayPal

Once you have accumulated enough payout, you can use Paypal to receive payment. This part is not automatic like others affiliate marketplaces; you have to request payout manually. Minimum payout is $25.
Pros and cons of Growsumo
What I enjoy most about Growsumo is the unique set of affiliate programs. Also, the intuitive interface gives a modern experience. Minimum payout of $25 is reasonable enough for entry-level affiliates to cash out with a just a few sales.
At the same time, I believe they could do much better in terms of getting more brands on board. I see a lot of brands become inactive which could be because of the lack of publishers. However, I believe they keep attracting new and also popular brands and more affiliates, this could be a thriving affiliate marketplace.
Video Guide for Growsumo
You can learn more about Growsumo by watching this video guide about Growsumo:
Over to you
Alright, it’s your time to try out Growsumo and let me know your first-hand experience of this marketplace. Also, if you know similar affiliate marketplaces that should feature on ShoutMeLoud, let me know in the comments below.
Here are a few other hand-picked guides for you to read next:
- Must-Know Things Before Joining Any Affiliate Program
- The Extra Money I Earned By Growth Hacking Amazon Associate Program: A Case Study
- How to Monetize Self-Hosted WordPress Blogs
Subscribe on Youtube
Growsumo Review: Affiliate Marketplace For SAAS Products And Growing Companies is a post from ShoutMeLoud - Shouters Who Inspires
from ShoutMeLoud https://ift.tt/2Oh5Aex
More View at https://mwktutor.com
Tuesday, 30 October 2018
When is it Worth It to Buy Premium WordPress Plugins? (Explained)
We are often asked by users when is it worth investing in premium WordPress plugins? One of main reasons why WordPress is the popular website builder in the world is because it gives you access to thousands of free and paid plugins (also known as premium WordPress plugins). In this article, we will explain when is it worth buying premium or paid WordPress plugins.
What are Premium WordPress Plugins?
Premium plugins are paid version of WordPress plugins that come with additional features, priority support, documentation, and regular updates.
You can learn more about WordPress plugins by reading our beginner’s guide on what are WordPress plugins and how do they work.
WordPress has become the most popular blogging platform in the world because it has a healthy ecosystem of both free and paid plugins. At the time of writing this article, there are more than 55,000 free plugins available in WordPress.org directory. You can use these free plugins to access various features without paying anyone.

Often beginners wonder how does WordPress make money if the plugins are free. Well, WordPress does not own all these plugins.
Since WordPress is open-source, majority of these free plugins are written by third-party developers who want to give back to the WordPress community and build a brand for themselves, so they can get more client-work.
But the issue is that like any other software, WordPress plugins also need to be properly maintained and updated. Although the individual developer is not required to offer support, most of them go above and beyond to help users and even add new features as requested.
As you can imagine, all these things take a lot of time and resources. Plugin authors are often unable to give free plugins proper attention as they grow and get a larger user base.
For some plugin developers, it becomes difficult to take time out of their work and personal life to maintain a free product over a long period.
This is where premium WordPress plugins come in.
For a small licensing fee, you get access to dedicated support, guaranteed updates, and premium features. The license fee provides plugin authors steady income, so they can improve the product and dedicate more time to growing their WordPress plugin business.
On the other hand, it gives you, the customer, a more refined product with reliable support and updates.
That being said, let’s talk about when you should consider buying premium WordPress plugins.
Are Premium WordPress Plugins Worth the Money?
If you have read our guide on controlling the cost of a WordPress website, then you would know that we are not a fan of unnecessary spending.
We believe that most beginners can control their costs by using free WordPress plugins whenever they can. There are free versions for many of the the best WordPress plugins on the market. Following are just a few examples of great premium WordPress plugins offering free or lite versions.
- WPForms Lite is the best free contact form plugin.
- MonsterInsights Lite – The free version helps you easy install Google Analytics in WordPress.
- Yoast SEO – The best free WordPress SEO plugin.
- WooCommerce – WordPress ecommerce plugin to start an online store.
- SeedProd – The best a coming soon page and maintenance mode plugin.
However as your website or business grow, you will want access to more features, priority support, and reliable plugins that you can count on for regular updates.
To help you decide, we have added the top reasons that justify investing in a premium WordPress plugin.
1. Solutions Specific WordPress Plugins

There are some WordPress plugin categories that cater to very specific solutions. For example, building a membership website or selling online courses are hard work.
Free plugins alone cannot do justice to these complex solutions. Even if you find a free plugin for the job, you will likely have to purchase paid addons to support their business.
If you are building a website that requires a very specific / advanced functionality, then you will be better off with a premium WordPress plugin.
2. Advanced Features

While there are free plugins for most basic tasks, you will only find advanced features in paid plugins. That’s mainly because building and maintaining advanced features take a lot of resources.
For example, while WPForms Lite is the most beginner-friendly WordPress contact form plugin, the pro version of WPForms comes with advanced features like user registration form, surveys and polls, payment forms, etc.
3. Dedicated Support from Plugin Developers

Support is not guaranteed with free WordPress plugins because free plugin authors are not required to offer support. If you are new to WordPress with no programming skills, then support becomes crucial for you. Premium WordPress plugins give you faster email responses for your support questions.
4. Extensive Documentation and Tutorials

Premium and paid WordPress plugins provide extensive documentation to help you get started without even contacting support. Many premium WordPress plugins have docs or resources sections where you can find guides, tutorials, and video instructions. These resources help you use the plugin without waiting for someone to help you out.
5. Regular and Frequent Updates
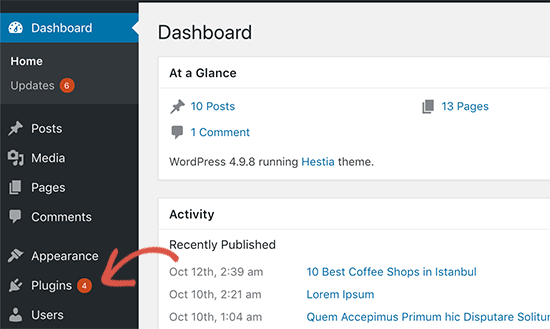
Free WordPress plugins are sometimes abandoned by their developers. This leaves your website open to security vulnerabilities and bugs. Sometimes you might not even realize that a plugin has been abandoned until you see your site behaving strangely after updating WordPress.
Premium WordPress plugins give you regular updates to address bugs, glitches, and most importantly any security issues. You don’t have to do anything as those updates would automatically appear in your WordPress dashboard, and you can install them with just a few clicks. See our guide on how to properly update WordPress plugins for detailed instructions.
6. New Features and Enhancements
Free WordPress plugins usually don’t have an incentive to enhance and improve something that is already working for many websites.
On the other hand, paid WordPress plugins are businesses with competition. In order to stay on top, they continuously work on their products by adding new features and improving existing features. Depending on your license terms, you will get access to those features right away.
7. Supporting The WordPress Ecosystem
Premium WordPress plugin companies are small businesses. By purchasing a license, you help them build a sustainable business that provides for their families and even creates new jobs all over the world.
Your small payment helps those developers create killer products for other small businesses like yours and improve the WordPress ecosystem (See: Most influential companies in WordPress).
Frequently Asked Questions about Premium Plugins
We have answered a lot of questions about premium WordPress plugins via email. To help you find the answer quickly, we have compiled the list of the most frequently asked questions.
1. Should I only use all premium plugins on my website?
No, there is no need to only use paid WordPress plugins on your website. You should only buy premium plugins when you actually need them. There are a lot of great free plugins that have no premium alternative or are much better than their paid alternatives.
2. How do I find premium WordPress plugins?
Premium WordPress plugins are not sold on the official WordPress.org website. You can buy them from their own websites. Now the problem is that all those websites are scattered, so how do you know which plugin is good?
This is where WPBeginner can help. We are the largest WordPress resource site on the internet. We regularly write how-to’s about different free and premium WordPress plugins. We do the research for you by actually testing the plugin and breaking down their features with pros and cons.
Following are just a few plugin showcases that you’ll find on WPBeginner (they contain both free and paid WordPress plugins).
- Best contact form plugins for WordPress
- Best WordPress SEO plugins and tools
- Best WordPress security plugins
- Best WordPress backup plugins
- Best free WooCommerce plugins
- Best WordPress caching plugins
- Best WordPress membership plugins
- Best WordPress LMS plugins
- Best WordPress drag & drop page builder plugins
- Best WordPress plugins for small business
Need more recommendations? Just type in your keyword in Google and add wpbeginner.com at the end of your search term.
Another way to find great premium WordPress plugins is by upgrading to the paid plans of a free plugin that you already love and use.
3. Are all premium WordPress plugins good?
No, not all of them are great. In fact, some paid plugins can be quite terrible. That’s why you need to carefully evaluate them before making the purchase. Find out who are the people behind the plugin, what kind of reputation they have, what other people are saying about the plugin on the internet.
Whatever you do, DO NOT buy a paid plugin from an unofficial source like Fiverr. Always buy the plugins from the official author website to make sure that you’re buying the secure version of the plugin.
4. Do I need to keep paying premium WordPress plugins every year?
Once you purchase a WordPress plugin, you can keep using it for as long as you want. Premium WordPress plugins come with different licensing terms. The most common licensing term is for 1 year of updates and support. If you are on a yearly license plan, then your plugin will continue to work, but you will not get updates and support after your license is expired.
If you like the plugin you are using, then you should definitely renew your license when it expires.
We hope this article helped you learn when you should buy premium WordPress plugins. You may also want to see our guide on free vs premium WordPress themes for a similar discussion regarding WordPress themes.
If you liked this article, then please subscribe to our YouTube Channel for WordPress video tutorials. You can also find us on Twitter and Facebook.
The post When is it Worth It to Buy Premium WordPress Plugins? (Explained) appeared first on WPBeginner.
from WPBeginner https://ift.tt/2CPyEYq
More links is https://mwktutor.com
Best Blogging Platforms of 2018 – Here’s Where to Launch Your Next Blog
from CodeinWP https://ift.tt/2SvE7sW
More View at https://mwktutor.com
Monday, 29 October 2018
How to Show Google, Facebook, and Yelp Reviews in WordPress
Do you want to display social media reviews on your WordPress website? You may have business reviews from your customers on different social sites like Google, Facebook, etc. These reviews are excellent social proof that you can use to attract new visitors towards your business. In this article, we will share how to display business reviews from Google, Facebook, and Yelp in your WordPress site.

Why You Should Display Business Reviews in WordPress?
Your customers often leave positive reviews about your business on social platforms like Google, Facebook, or Yelp. These reviews are excellent social proof and can be used alongside customer testimonials on your website.
You can show these business reviews on your WordPress site to build trust and boost conversions (Bonus: see 29 more ways to use social proof to increase conversions).
Normally, you would need to install separate WordPress plugins to show reviews from multiple social platforms. Each plugin has different settings, and it may even conflict with each other.
We recommend using WP Business Reviews plugin by WordPress. It’s an all-in-one solution to show Google, Facebook, and Yelp business reviews.
That being said, let’s take a look at how to easily show Google, Facebook, and Yelp reviews in WordPress.
Showing Google, Facebook, and Yelp Reviews in WordPress
First thing you need to do is to install and activate the WP Business Reviews plugin. For more details, see our step by step guide on how to install a WordPress plugin.
Upon activation, you need to go to Reviews » Settings page in your WordPress admin area. Under the ‘License’ tab, you need to add your license key and activate it.
You can get the license key from your account on WP Business Reviews site.
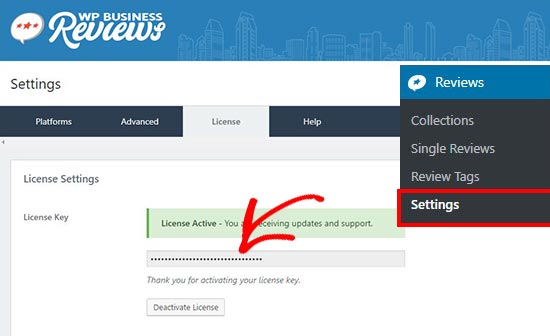
Once the license key is successfully activated, you need to go to the ‘Platforms’ tab and select the review platforms from where you want to display business reviews in WordPress.
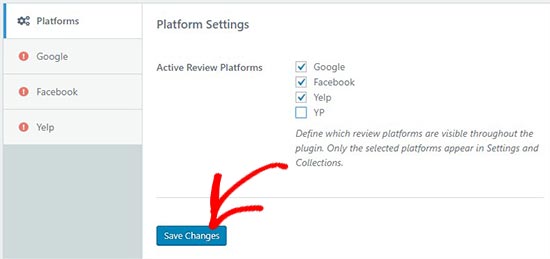
Once you have selected the platform, click on the ‘Save Changes’ button to store the settings.
For the sake of this tutorial, we will select Google, Facebook, and Yelp to pull reviews from. You can choose the platforms that you like.
Next, you need to go to the ‘Google’ tab on the left side and add the Google Places API Key to show Google reviews on your website.
You can login to your Google account and click on the visit Google Places API documentation link to get your key.
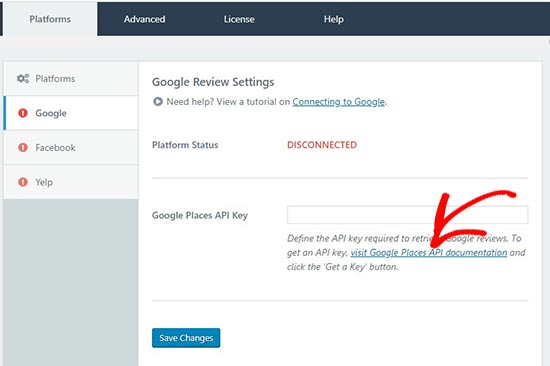
It’ll change the platform status from disconnected to connected. Make sure to click on the ‘Save Changes’ button to continue.
After that you need to head over to the ‘Facebook’ tab and click on the ‘Connect with Facebook’ button. It will ask you to login to your Facebook account.
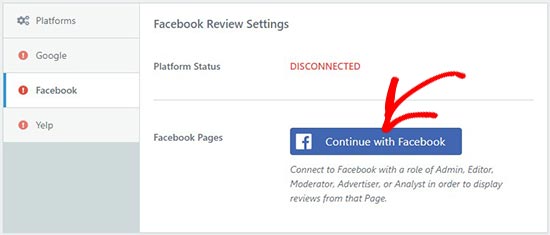
Once logged in, you need to give permissions to Facebook for the connection. Don’t forget to click on the ‘Save Changes’ button.
Now, go to the ‘Yelp’ tab and click on the create a Yelp App link to get your Yelp API Key.
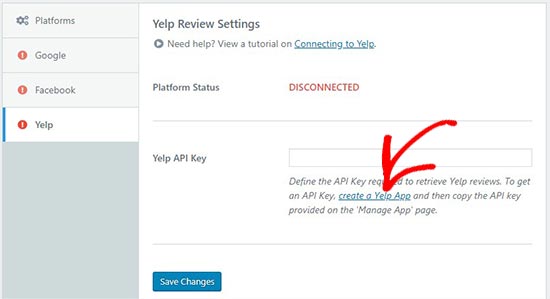
Click on the ‘Save Changes’ button to change the platform status form disconnected to connected.
After connecting all the platforms successfully, you can go to Reviews » Collection page in your WordPress admin area. From here you need to create the collection of your business reviews.
You can do this by clicking on the ‘Add Collection’ button on any platform to create your reviews collection.
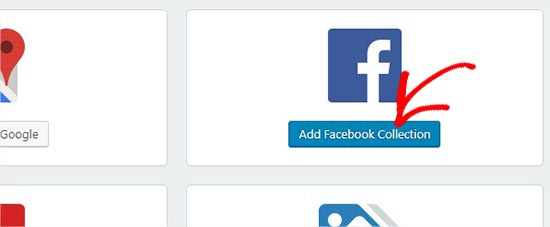
It’ll take you to a new page where you can build a reviews collection.
Start by adding a title and selecting a review source on the right side. After that you need to click on the ‘Get Reviews’ button on a resource to retrieve reviews from the source.
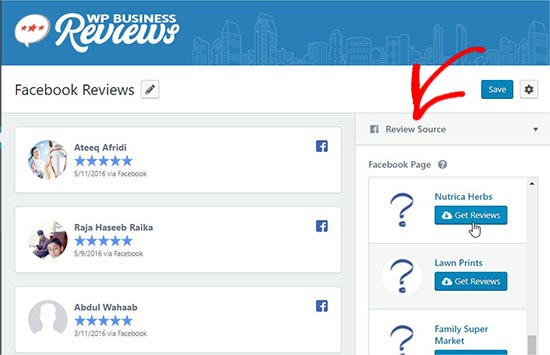
It’ll show all the reviews from this source on the left side of your screen.
Next, you can open the ‘Presentation’ options on the right side. In these options, you can select style, format, maximum columns, and maximum reviews for the collection.

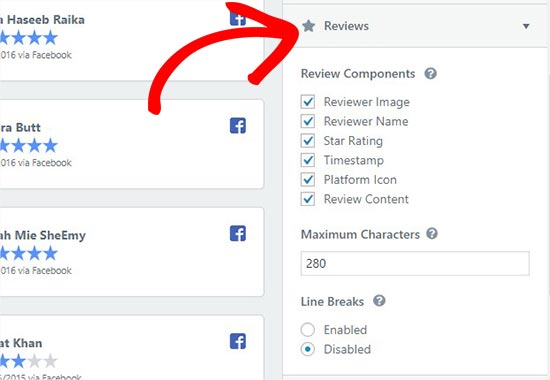
Nextx, you can go to the ‘Reviews’ tab to enable / disable the review components like reviewer image, name, star rating, etc. You can also define the maximum number of characters for each review.
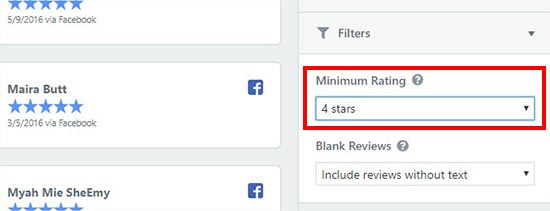
Lastly, you can go to the ‘Filters’ tab. There you’ll find Minimum Rating and Blank Reviews filters. You can select the star rating and show your best reviews to the new visitors.
Once you are satisfied with all these settings, click on the ‘Save’ button and then click on the ‘Copy Shortcode’ button.

You can add this shortcode anywhere on your WordPress site to display the business reviews collection.
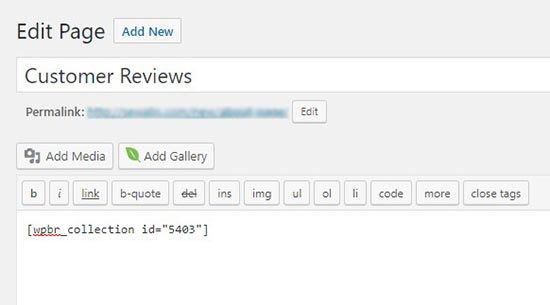
This shortcode will show the complete collection of reviews that you created above.
If you want to show a single review on your WordPress post, page, or sidebar widget, then go to Reviews » Single Review page and copy the shortcode of the preferred single review.
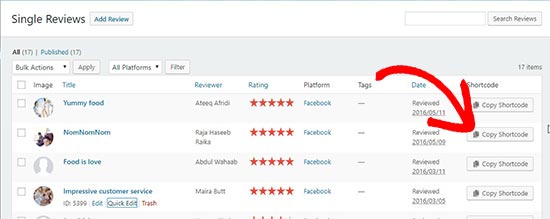
You can paste this shortcode anywhere on your posts, pages, or template files to display the single review instead of the complete reviews collection. It also allows you to manually add custom reviews in WordPress.
If you want to show the reviews in a widget area of your website, then you can do this by heading over to the Appearance » Widgets in your WordPress admin and draging the WP Business Reviews Collection widget to the preferred widget area.
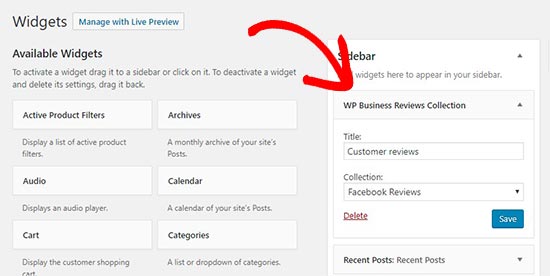
Next, simply select the reviews collection in the widget dropdown to show business reviews in your sidebar.
Once you are done, you can head over to your website to see the business reviews in action.

You can create multiple collections of Google, Facebook, and Yelp reviews for different pages in WordPress. It lets you customize the style and presentation of all your reviews, so they appear beautifully on your website.
That’s all. We hope this article helped you learn how to show Google, Facebook, and Yelp reviews in WordPress. You may also want to see our guide on how to add a customer reviews page in WordPress.
If you liked this article, then please subscribe to our YouTube Channel for WordPress video tutorials. You can also find us on Twitter and Facebook.
The post How to Show Google, Facebook, and Yelp Reviews in WordPress appeared first on WPBeginner.
from WPBeginner https://ift.tt/2SsUXbK
More links is https://mwktutor.com
How to Make Your Marketing Campaigns Shine Brightest This Diwali – The Smart Marketer’s Guide
Diwali is upon us.
No longer is Diwali just India’s most widely celebrated festival – over the past few years, it has turned into our biggest online shopping festival too!
Welcome to this special festive season article for marketers.

While businesses rub their hands in glee at the prospect of oncoming sales, marketers know that with every passing year, the battle to win customers online goes higher and higher uphill. Especially in India, where shoppers are loyal to only one thing: price.
In order to beat the competition in such a scenario, deep pockets are simply not enough. You need data – accurate, timely and actionable data – if you harbor any hopes of cracking it during the ultra-competitive Diwali sale period.
Digital marketing tool suite SEMrush has come up with a just-in-time guide that helps marketers do perfect their holiday campaigns in the run up to Diwali with the help of big data analytics on search and social that the tool pulls from a variety of sources.
Here’s the long and short of SEMrush’s approach to high stakes online marketing:
- Look at seasonal factors
When your revenue depends on the success of a short campaign or burst of advertising, the timing and relevance of your messaging become all the more important.
For example, during seasonal events festivals like Diwali, you might start out with the assumption that people would be looking for greeting messages, images, wallpapers, shopping deals and so on. You can combine this with season-specific items like lights, crackers or gifts to get more context into the general purchase intent of users. For this, you need to
- know exactly what customers are actively searching for and the search volume for those terms
- conduct accurate keyword research in order to determine factors like keyword difficulty and prioritize primary and secondary keywords to target
- dig into historical data to find out what is likely to sell during that time of the year

Finally, you get down to the details and identify the metrics that you need to pursue in order to maximize sales.
- Analyze your niche
Since the New Year follows Diwali in some parts of India, traditionally, people have bought new apparel and gifts for each other during this season (in addition to lights and firecrackers, of course). However, making any assumptions with regard to possible bestselling products without attempting to assimilate and analyze market data is the biggest mistake you can make.
With the rise of e-commerce in India, the Electronics niche has replaced Apparel as the biggest selling product category during Diwali.
And why is that?
Not just because people strangely feel the urge to replace their phones and TVs during this time, but possibly because this is when online retailers offer their biggest discounts on electronics (forcing physical retailers to follow suit).
Thus, the trends in your niche may not just depend on traditional factors, but also owe their shifts to competitive tactics and changing consumer preferences. Which brings us to…
- Understand audience behavior
The key to targeting your customers better is to understand what makes them buy what they want and how they go about the purchase.
In emerging markets like India, a large chunk of the market has skipped the desktop devices on their way to becoming e-commerce consumers and directly made the mobile phone their sole instrument of online shopping. Four out of five people use their mobile devices to access the internet (with most of the country now having access to 3G/4G connections).

COD (Cash On Delivery) as is a surprisingly common, elemental and necessary payment option that Indian retailers offer, in order to gain the trust of consumers who’ve not been online for much time.
Once you have an idea of the devices, software, and apps your customers like to use while shopping, you can zero in on their actual preferences and interests. You have options like remarketing, platform-specific analytics (like Facebook Insights or Google Analytics), and good old email marketing to help you do that better.
- Know your competition
At critical times like Diwali, your competition is always snapping at your heels like hungry crocodiles. Again, with the widespread availability of big data as well as analytics tools that deliver actionable information that helps decision makers formulate and regulate their strategy, no singly company can boast of an exclusivity advantage based on resources or market intelligence.
Your best bet, therefore, is to get access to more real-time, updated, relevant and processed data than your competitors can lay their hands on, and act quickly by developing or changing tactics based on this data.
For your SEO and PPC campaigns, SEMrush is an invaluable tool that gives you access to invaluable competitive data, including
- the backlinks their site has got, along with the value of each
- their best performing content
- the keywords their webpages rank for, and how that compares to those that yours rank (or don’t rank) for
- their ad copies
- their web traffic broken down by digital channels

- Create a foolproof plan
Given the limited time, huge budgets and intense competition, seasonal marketing campaigns give you no room for failure. One small mistake in planning or execution, and you stand to lose out an entire year’s worth of efforts.
To avoid this scenario, you need to start by knowing your market inside out. Changes in browsing and buying behavior, competitors’ budgets and strategies, new market entrants, breakthroughs or shifts in the industry, the influence of technology, government regulation… nothing should pass you by while planning and running your campaign.
Follow that up by monitoring your progress every single day (or more frequently) through the duration of the campaign. Dissect every spike or dip and try to iron out inconsistencies and uncertainties.
 Light it up!
With careful planning and meticulous evaluation of business intelligence, you have a good shot at coming out on top this Diwali. Once more, here’s the link to SEMrush’s Diwali Marketing Guide, which contains first-hand insights from industry experts as well as charts and stats that will help you take informed decisions on how to structure and implement your 2018 Diwali campaign.
Do let us know in the comments how it works out for you. Good luck!
Here are a few hand-picked guides for you to read next:
- Growth Hacking Tactics For Beginners (How To Use Them To Grow Your Business)
- How To Earn Millions From Your Blog with John Chow – Pro Affiliate Marketer
- 11 Powerful Strategies For Explosive Business Growth
Subscribe on Youtube
How to Make Your Marketing Campaigns Shine Brightest This Diwali – The Smart Marketer’s Guide is a post from ShoutMeLoud - Shouters Who Inspires
from ShoutMeLoud https://ift.tt/2StoPol
More View at https://mwktutor.com
Sunday, 28 October 2018
12 Best Single Property WordPress Themes 2018
There are lots of excellent real estate themes for WordPress that cover a wide range of projects, from creating websites for self-employed realtors to building an online presence for large agencies. However, if you have just one property to promote, this collection of the best single property WordPress themes make launching a professional looking website […]
The post 12 Best Single Property WordPress Themes 2018 appeared first on aThemes.
from aThemes https://ift.tt/2JkWInb
More View at https://mwktutor.com
12 Best Contact Form WordPress Plugins Compared 2018
Looking for the best contact form plugins to create some forms at your WordPress site? In this post, I've collected 12 of the best form plugins to help you create everything from a simple contact form to a payment form, custom user registration form, or lots more. For each plugin, you'll learn: How the interface […]
The post 12 Best Contact Form WordPress Plugins Compared 2018 appeared first on aThemes.
from aThemes https://ift.tt/2qdJm3v
More View at https://mwktutor.com
Friday, 26 October 2018
How To Choose The Best WordPress Hosting For Your Blog
There are thousands of WordPress hosting companies out there yet it’s difficult to choose one. It doesn’t have to be this way. Choosing WordPress hosting should be easy and straightforward. But if you are new to WordPress hosting, it might be a bit difficult to choose the best WordPress hosting service as thousands of companies […]
The post How To Choose The Best WordPress Hosting For Your Blog appeared first on RoadToBlogging.
from RoadToBlogging https://ift.tt/2yDSNha
More View at https://mwktutor.com
6 Best Accounting Software for Small Businesses (Compared)
A lot of readers on WPBeginner are web professionals, and one of the questions we recently received was: which is the best accounting software for web professionals? Working on your own business requires you to maintain your accounts, track earnings, expenses, taxes, invoices, and more. Luckily, there are some really great software that can help you streamline the process. In this article, we have hand-picked the best accounting software for small businesses and web professionals.

Why Use an Accounting Software?
When you’re just starting out, you can use a simple spreadsheet to manage your finances. However as your income and expenses grow, things get more complicated.
You will need to keep track of invoices, online payments, other income, expenses, and taxes. If you don’t streamline the process, then you will end up spending more time on these things and still not get them done properly.
An accounting software helps you easily keep track of your finances, manage invoices, do the bookkeeping, and help you calculate taxes. This helps you save a ton of time while enabling you to manage your money more efficiently.
That being said, let’s take a look at some of the best accounting software for web professionals, freelancers, and small businesses.
Best Accounting Software for Professionals
We will be looking at the top accounting software used by thousands of professionals around the world. Our goal is to highlight the ones that are easy to use, affordable, and offer the necessary features.
1. QuickBooks
QuickBooks is one of the most popular accounting software for web professionals and freelancers. You can easily connect it to your bank accounts, PayPal, and credit cards to automatically capture all your transactions.
It also allows you to send invoices to your customers and track them inside the app. Your customers can also directly pay by clicking on the payment button on their invoice.
QuickBooks make accounting easier for non-accountants. It comes with beautiful reports that give you a quick overview of your finances as well as detailed reports of all your expenses, earnings and invoices.
Another benefit of using QuickBooks is the ability to manage taxes. If you are using software like TurboTax, then QuickBooks can save you a ton of time when filing your taxes.
It comes with easy to use apps for mobile devices which allows you to capture receipts, manage finances, and view reports on the go.
Pricing: Small Business plans start at $10 / month, Self Employed plans start from $5 / month.
2. Godaddy Bookkeeping
Most of you probably know GoDaddy as one of the biggest domain name registration companies in the world. However, they offer a ton of other services including a cloud-based bookkeeping software for small businesses.
GoDaddy Bookkeeping allows you to sync your bank, credit card, Amazon, Etsy, eBay or PayPal seller accounts to their bookkeeping platform. It then automatically tracks all your transactions and displays them with your total profit and loss report always visible on the top.
It also includes easy invoice management, with recurring invoices, and integrated payments via Stripe or PayPal. It is great for freelancers and small businesses who are looking for simpler bookkeeping solution however it lacks some advanced features that you will find in other apps on the list.
Pricing: Starting from $3.99 per month.
3. Freshbooks
FreshBooks is an ideal software for freelancers. It is one of the easiest apps to send and track invoices for freelancers and self-employed professionals.
It also allows you to track your expenses, capture receipts, manage projects you are working on, and accept payments from clients. It connects with your bank accounts to deposit payments directly.
There are beautiful reports inside the FreshBooks dashboard which makes accounting dead simple for everyone. It has a mobile app which gives you the freedom to see and manage things on the go.
Pricing: Starting from $15 / month.
4. Xero
Xero is another powerful web-based accounting software for professionals and small business websites. It offers plans and features that grow as your business needs grow.
Xero helps you easily send invoices, accept payments, view bank transactions, manage contacts, and more. You can create multi-currency accounts, manage payroll if you have employees, and even manage your projects within the app.
It offers a simple and easy to use interface with beautiful reporting tools. It is packed with a lot of features many of which you’ll probably never use as a freelancer, but you may need them as your business grows.
Pricing: Starter plan costs $9 per month, but it is too limited. You will need the standard plan which costs $30 per month.
5. Wave
Wave offers a free accounting software for small business. It allows you to easily manage all your finances by connecting your bank and credit card accounts to the app. It then tracks all your transactions and presents them in an easy to understand reports.
It also allows you to send manual, automatic, and recurring invoices. With the mobile app, you can capture receipts on the go and keep track of things from anywhere.
The basic software is free to use. However, there are transaction fees for credit card payments 2.9 % + 30 cents per transaction, and for ACH transfers 1% per transaction. If you have employees, then you should know that their payroll software is paid and not included in the free plan.
Pricing: free accounting software, transaction charges, and paid payroll software.
6. Zoho Books
Zoho is a well-known CRM software. With Zoho Books, they add professional accounting software to their suite of apps. The biggest advantage you’ll get by using Zoho is when you are using their CRM apps.
It connects well with other apps in their ecosystem as well as several payment gateways, bank accounts, and your credit cards. This allows you to completely automate your bookkeeping.
You can also share transactions with your customers by giving them access to their client portal. You can even enable Bulk payment feature to get paid faster by your clients.
Pricing: Starting from $9 per month.
Conclusion
If you’re looking for the most comprehensive solution, then we recommend using QuickBooks.
If you’re a small business owner who just wants a simple solution, then we recommend taking a look at GoDaddy Bookkeeping.
We hope this article helped you find the best accounting software for small businesses, professionals and freelancers. You may also want to see our article on best businesses phone services and best email marketing services for small businesses.
If you liked this article, then please subscribe to our YouTube Channel for WordPress video tutorials. You can also find us on Twitter and Facebook.
The post 6 Best Accounting Software for Small Businesses (Compared) appeared first on WPBeginner.
from WPBeginner https://ift.tt/2JlB96g
More links is https://mwktutor.com
Thursday, 25 October 2018
Things Are Not Always What You Think They Are – Transparency Report #44
from CodeinWP https://ift.tt/2O65V3x
More View at https://mwktutor.com
How to Check If Your WordPress Blog Posts Are Ranking for the Right Keywords
Do you want to check if your WordPress posts are ranking for the right keywords? Most beginners manually check rankings for their articles by typing keywords in Google. This does not give you an accurate idea of where your articles stand for the target keyword. In this article, we will show you how to easily check if your WordPress blog posts are ranking for the right keywords.
Why Check Keyword Rankings for Your WordPress Posts?
If you follow our complete WordPress SEO guide, then you will learn how to optimize each article on your website for specific keywords. This helps you get more traffic to your website.
Most beginners simply search on Google to see if their posts are appearing for those keywords. Even then, they usually only check the first page or probably the second page at best.
The issue is that sometimes your article might be ranking way below the first two pages or worst it may not even be ranking for the keyword that you want.
If you rely on manually checking your keyword rankings, then you are missing out useful information that you can use to improve your SEO rankings and increasing traffic.
That being said, let’s take a look at how to properly check keyword rankings for your WordPress blog posts,
1. SEMRush
SEMRush is one of the best SEO and Keyword research tool on the market. It is a comprehensive SEO suite with all the useful tools you’ll need.
It comes with a powerful organic research tool that can show keyword rankings for any domain name. You don’t need to type in URLs for individual articles. It will automatically fetch results for all URLs of that domain name.
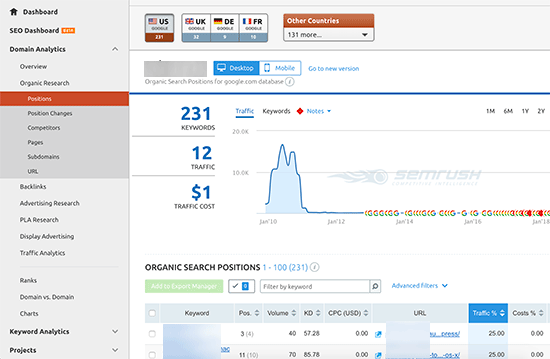
Simply enter the domain name you want to look up and SEMRush will get a ton of information. After that, click on the organic research tab to view the full list of all keywords your website is ranking for.
You can sort the results by position, URL, traffic, and more. You can also export the results to a CSV file and research offline using your favorite spreadsheet program.
You can also track specific keywords with SEMRush, and they track those keywords on your dashboard, so you can instantly see their performance.
SEMRush can do the same things for any domain name which means you can enter your competitor’s domain name and see which keywords they are ranking for. You will also be able to see their paid search traffic, paid keywords, and other useful information that you can utilize to outrank them.
2. Google Search Console
Google Search Console (formerly Webmasters Tools) is a set of tools offered by Google to help webmasters improve their website for search. See our guide on how to add your website to Google search console.
You can see your website’s performance in search results, impressions, click through rate, position, and more. It also allows you to submit XML sitemap which helps Google crawl your website more intelligently.
To view your keyword positions, click on the Performance report and then click on average position score.
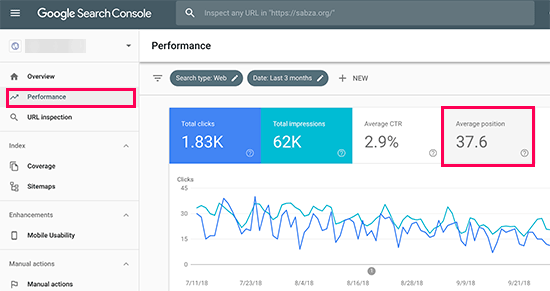
Search Console will now load your reports with average position column included. Next, you need to scroll down a bit to see the full list of keywords your site ranks for.
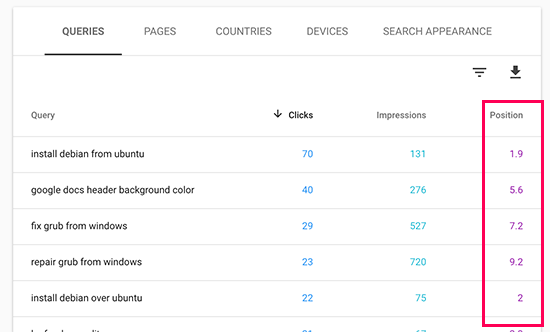
Next to each keyword, you will see how many clicks it gets, impressions, and position in search results.
You can sort the results by clicks, impressions, and position columns. By sorting using position, you will be able to see your top ranking keywords. As you scroll down, you will be able to see keywords where your site appears deeper in search results.
You can also export this data and open it with your favorite spreadsheet software.
3. Ahrefs
Ahrefs is another popular SEO Tool among professional marketers. It comes with an easy to use interface and tries to make information understandable even for new users.
Simply enter your website domain name in the search box, and it will create a neatly organized report with beautiful graphs and charts.
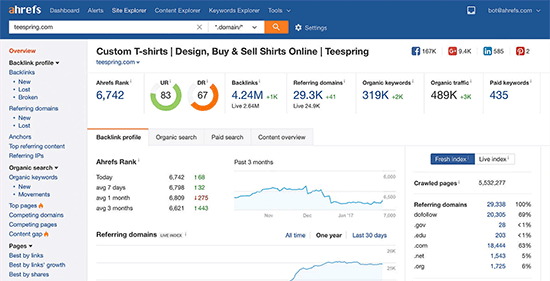
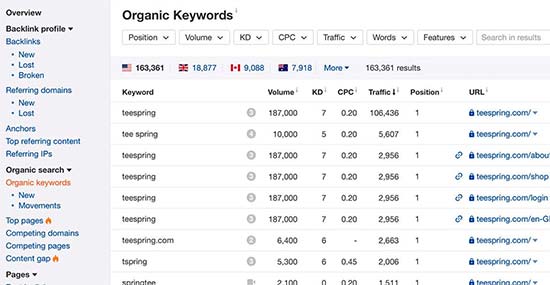
You will find all your keyword rankings under the organic keywords report. Next to each keyword, you’ll be able to see its search volume, keyword ranking position, keyword density, and more.
Using Keyword Rankings to Get More Traffic in WordPress
Now that you have learned how to check keyword rankings for your WordPress site, let’s talk about improving your rankings.
Analyzing which keywords need improvement
It’s important to note that not all keywords are created equal.
For example, ranking #5 on a high traffic keyword is way better than ranking #1 for a low traffic keyword.
There are certain aspects to this data which you may want to consider.
For example, appearing on #1 position may not always bring you the most traffic. You will see some of your keywords ranking pretty well but not getting significant clicks or impressions.
During this research, you might also find some surprise keywords that you didn’t know you were ranking for. If these keywords have significant impressions and search volumes, then you should see if you can make strategic changes to your content to improve rankings for those keywords as well.
Improving rankings for specific keywords
After you have decided which keywords you will be working on, you can go ahead and see which of your articles are ranking on those keywords and what you can to optimize them better.
Here are a few tips:
Keyword density: See how many times the keyword appears in your content. You can do that using Yoast SEO plugin. Simply enter the ‘Focus Keyword’ in SEO meta box and it will show you the analysis including the keyword density.
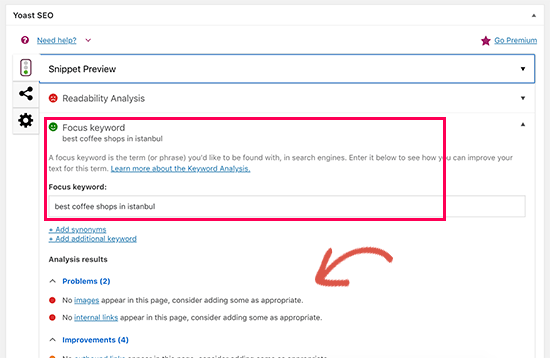
Outdated Information Your article can be old, not have enough content, or contains outdated information. Updating it with newer information and just improving the content can give it an SEO boost.
Internal Linking Internal linking is when you link an article from other pages of your site. Linking to an article in other related content can give it an SEO bump. Use your target keyword as the anchor text when linking to it from other articles on your website.
For more details on this topic, please see our article on how to optimize your WordPress blog posts for SEO.
Learn What Your Visitors are Doing on Your Website
SEMRush and Google Search Console can help you find your keyword positions, but they can’t show you how many visitors are coming to your articles, where they are from, and what they do when they are on your website.
All of this information is crucial when planning your content strategy to rank for certain keywords.
This is where Google Analytics comes in. It shows you the number of pageviews for your articles, your top content, your visitor information, and more.
Google Analytics can be difficult to setup for beginners, that’s why we recommend using MonsterInsights. It is a Google Analytics plugin for WordPress that will help you easily install Google Analytics and see all reports inside your WordPress dashboard.
We hope this article helped you check if your WordPress posts are ranking for the right keywords. You may also want to see our guide on actionable tips to drive traffic to a new WordPress site.
If you liked this article, then please subscribe to our YouTube Channel for WordPress video tutorials. You can also find us on Twitter and Facebook.
The post How to Check If Your WordPress Blog Posts Are Ranking for the Right Keywords appeared first on WPBeginner.
from WPBeginner https://ift.tt/2qbMWuT
More links is https://mwktutor.com
