Do you want to block disposable email addresses in WordPress?
Some of our readers are concerned about protecting their websites against problematic users who can abuse their services. Disposable email addresses are one source of this problem, so it’s important to block them on your website.
In this article, we will show you how to block disposable email addresses in WordPress to keep your website secure.
Why Block Disposable Email Addresses in WordPress?
Disposable email addresses are temporary and free email accounts that users can use to register on your website without revealing their actual email addresses.
Some users use these disposable addresses for harmless testing to avoid potential spammers or promotional emails. That said, many people have misused them by creating fake accounts, exploiting free trials, or tricking online systems for deceptive purposes.
When fake emails are used in forms, it becomes hard to know who your real users are. For people running a membership site, this confusion can mess up the data and performance of your website because you can’t be sure which registrations are genuine.
If you run a WooCommerce store, then these temporary emails can also allow bad actors to exploit your payment system, create fake orders, and cause you to lose money.
Plus, important emails like order confirmations won’t reach customers who use these disposable emails.
With that in mind, let’s look at how you can block disposable email addresses in your WordPress website. You can use these quick links to navigate through our guide:
Method 1: Block Temporary Email Addresses in WordPress Opt-Ins
If you use popups or opt-ins on your website to generate leads or grow an email list, then we recommend using OptinMonster to block disposable email addresses.
This lead generation platform uses the TruLead® Lead Verification feature to block any disposable email addresses from signing up on your campaigns. TruLead® is a paid add-on, but there is a 30-day free trial so that you can try out the service with no risk.
To get started with OptinMonster, you need to visit the OptinMonster website to create an account. After that, click the ‘Get OptinMonster Now’ button to get started.
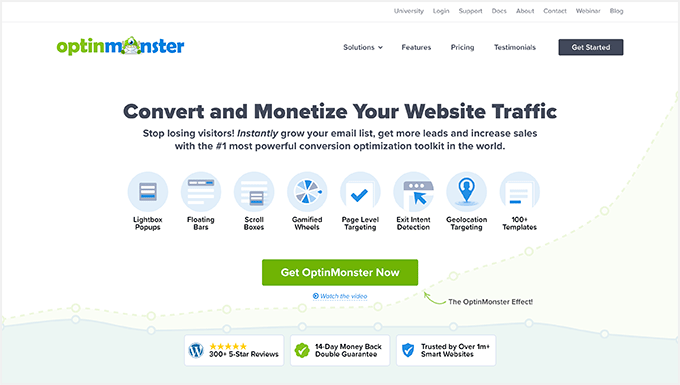
You will need a Pro plan or higher because they offer the Lead Verification feature as an optional paid add-on.
After that, you need to install and activate the OptinMonster plugin on your WordPress site. For more details, see our step-by-step guide on how to install a WordPress plugin.
Now, you can go ahead and create your first OptinMonster campaign. You can read our article on how to build your email list in WordPress with OptinMonster for guidance.
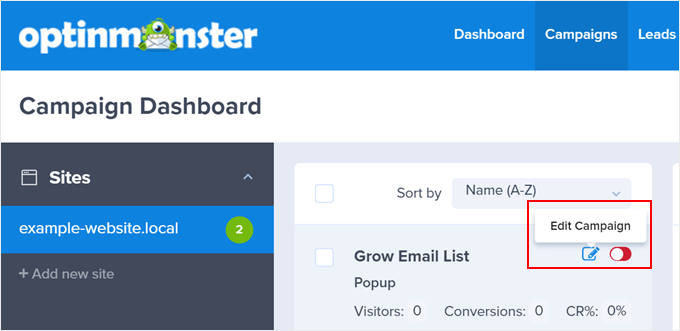
To use the Lead Verification feature, log in to the OptinMonster campaign dashboard. After that, select a campaign and click the ‘Edit Campaign’ button.
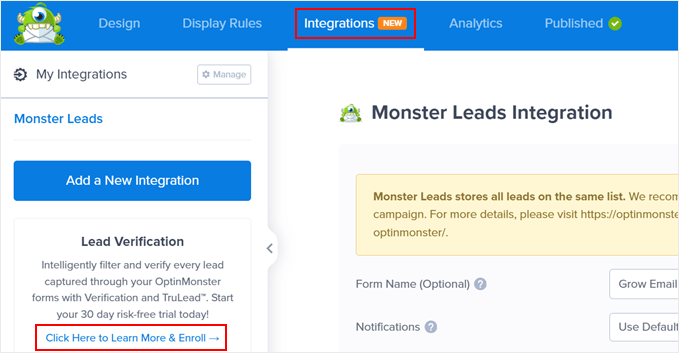
Next, navigate to the ‘Integrations’ tab. You should then see some explanation about the Lead Verification feature on the left-hand side.
Select ‘Click Here to Learn More & Enroll.’
Once you’ve done that, you will complete the payment for the add-on.
At this stage, you can return to the Campaign Dashboard and go to Leads » Lead Verification.

You will now arrive at the Lead Verification page.
Once you are there, simply click ‘Create New Filter.’
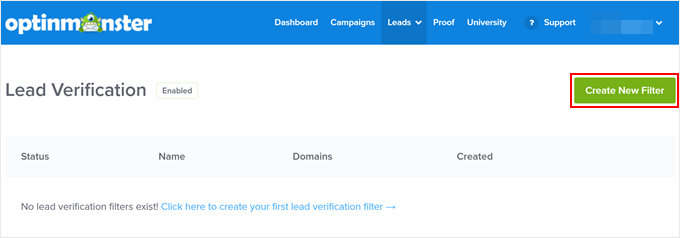
Let’s go ahead and create a new email verification filter to block temporary or throwaway email addresses.
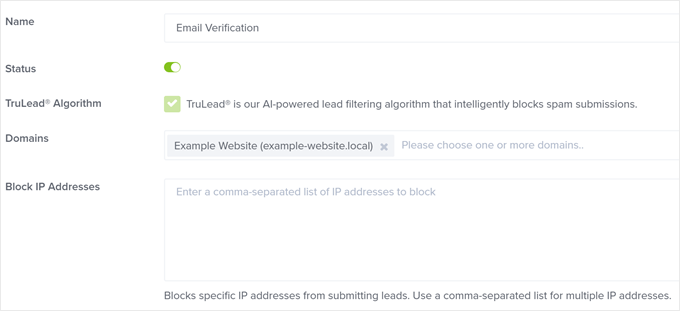
First things first, you can give this filter a name. It can be something like ‘Email Verification.’ Then, toggle on the Status setting to make the filter active.
After that, choose a domain name where you are running an OptinMonster campaign and want the filter to be implemented.
Besides email validation, the TruLead® feature can block specific IP addresses from signing up for your campaigns. Feel free to list them here if you have any.
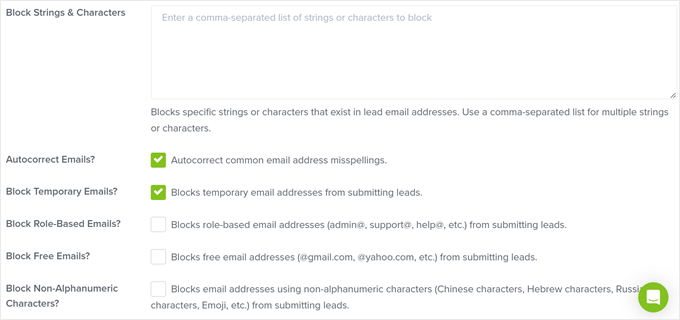
Scrolling down, you will find more options to configure the filter. We recommend enabling the ‘Block temporary email addresses’ setting to prevent disposable email addresses from being used.
You can also choose to block free email addresses like Gmail, Yahoo, or Outlook. This means only business email addresses can be used on your site.
We only recommend enabling this option if you run a business-to-business website. Otherwise, you can skip it.
Other than that, you can block role-based addresses (like admin@example.com or editor@example.com) if needed so that only people outside of your team can become leads.
Besides these settings, you also have options to block specific characters that exist in lead email addresses, autocorrect common email address misspellings, and block email addresses using non-alphanumeric characters.
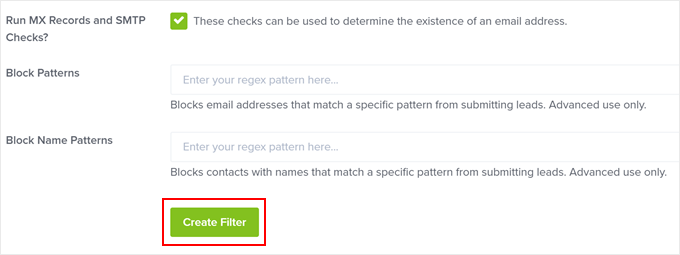
The last few settings are quite advanced, but we recommend checking the box next to the ‘Run MX Records and SMTP Checks?’ option. This setting can block temporary email domains further by checking to see if they actually exist.
Once you are happy with the filter settings, click the ‘Create Filter’ button.
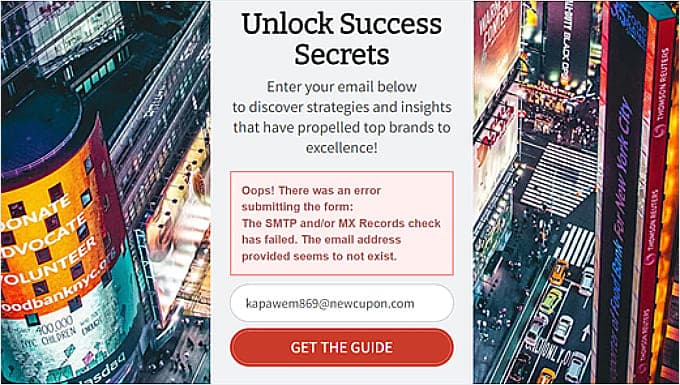
Now, go ahead and visit your website to test if the filter works on your campaign. To do this, just fill out the form with a fake email address from a temporary email provider.
If it works, then you should see this notification:
Method 2: Block Temporary Email Addresses in WordPress Forms
If you are looking to block disposable email addresses in your contact forms or registration forms, then we recommend using Clearout Email Validator.
This WordPress plugin will automatically block domains by temporary email providers from being used in registration forms or contact forms. It’s also compatible with WPForms, which is the best form builder plugin in WordPress.
The first thing you will do is install and activate the plugin. For step-by-step guidance, check out our article on how to install a WordPress plugin.
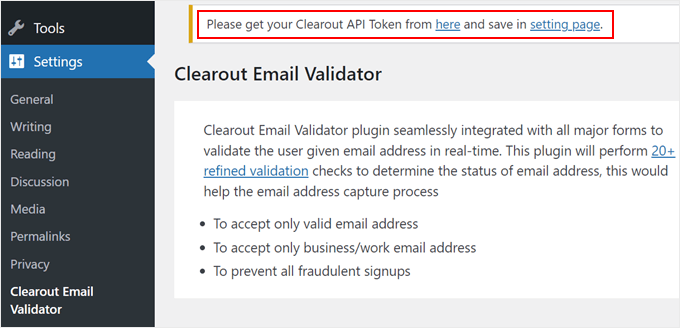
Once you have activated the plugin, you can go to Settings » Clearout Email Validator from your WordPress admin panel. You will notice that there is a notification message saying, ‘Please get your Clearout API Token from here and save in setting page.’
What you need to do now is click the ‘here’ link, but keep the plugin settings page open.
After that, create a Clearout account or sign in using your Google credentials.
By default, you will get a free Clearout account with 100 email validation credits. This amount may not be a lot when you receive tons of signups or contact messages every day, but you can upgrade to a paid Clearout plan if needed.

Now, you will arrive at the Apps dashboard.
Go ahead and click the ‘+ Create App’ button to get the API key.

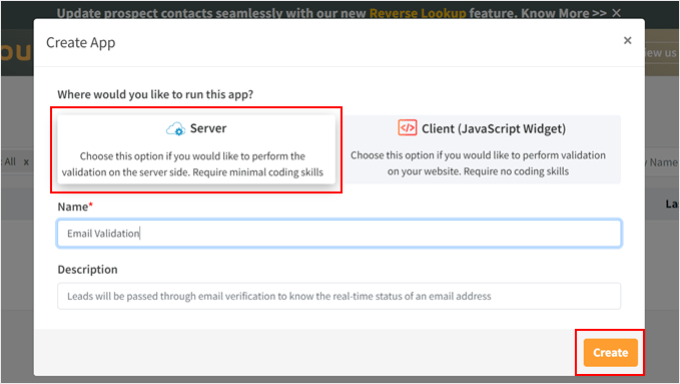
Once you’ve done that, a popup will appear, asking you to choose where to run the app. Here, simply click ‘Server.’
You can then give a name to your app like ‘Email Validation.’ Optionally, you can write a description to differentiate between your apps.
After that, simply click the ‘Create’ button.
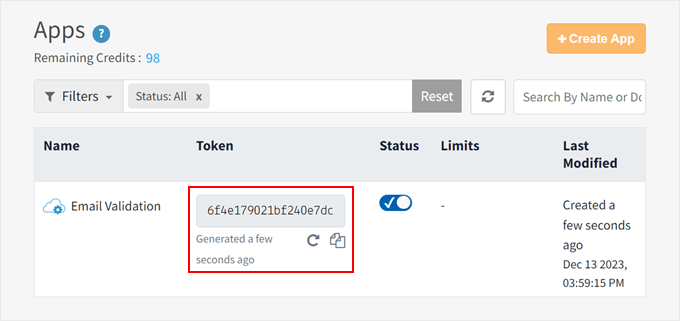
You will now go back to the Clearout dashboard and see your new app and API token.
Go ahead and copy the token, and return to the Clearout Email Validator plugin settings page in WordPress.
In the plugin settings page, paste the token in the appropriate field.
Once you’ve done that, you can start configuring the email validation settings in the next step.

Configure Settings to Block Temporary Email Addresses
By default, Clearout Email Validator will blacklist any email domain names that look suspicious or disposable. But there are several settings you can configure if needed.
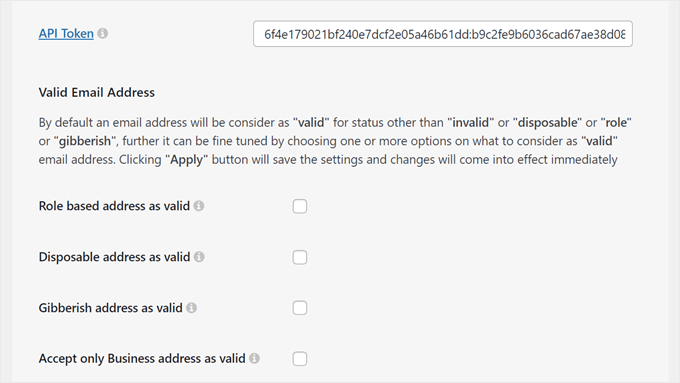
In the ‘Valid Email Address’ section, you can choose whether to consider role-based addresses (like admin@example.com or editor@example.com) as valid.
Then, there are options to make disposable addresses and gibberish addresses valid. To ensure maximum safety against all kinds of temporary email addresses, we recommend not checking these boxes.
If you tick the ‘Accept only Business address as valid’ setting, that means addresses using non-custom email domains like Gmail, Yahoo, or Outlook will be considered invalid.
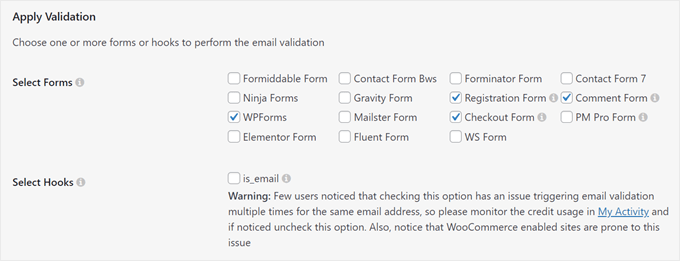
Let’s move down to the ‘Apply Validation’ section. As you can see, Clearout Email Validator is compatible with many major form builders, including WPForms. If you use any of these plugins, then you can check them off in the ‘Select Forms’ setting.
You can also enable email validation in WordPress registration forms, comment forms, and WooCommerce checkout forms.
Up next, you can choose to apply email validation in the WordPress is_email hook, which is used to verify that an email is valid.
Be sure to read the warning message for this because it may cause validation issues on your site. But during our testing, the plugin works fine even if you don’t enable this setting.
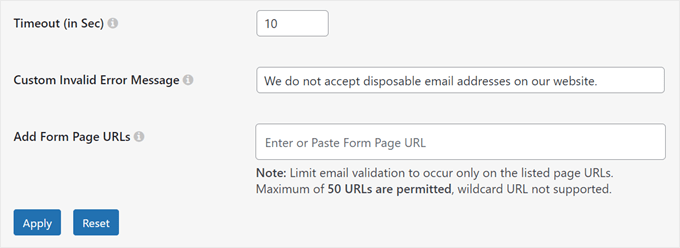
Scrolling down, you can set the timeout period for the validation to perform.
The default time is 10 seconds. This means that the plugin will wait for 10 seconds after the form is submitted before validating the email address. During this time, the plugin will perform real-time validation to ensure the email address is legitimate.
Below that, you can set a custom invalid error message, but you can leave it empty if you want to use the plugin’s default notification text.
Finally, you can specify which form page URLs you want the plugin to do email validations on. This will essentially limit the email validation to specific pages only.
But if you have many forms and want the plugin to check the email addresses entered in all of them, then you can leave this field empty.
Once you have configured all of the settings, go ahead and click the ‘Apply’ button.
See if the Clearout Email Validator Plugin Works
At this stage, you are ready to test if the WordPress plugin will actually block temporary email addresses on your WordPress site.
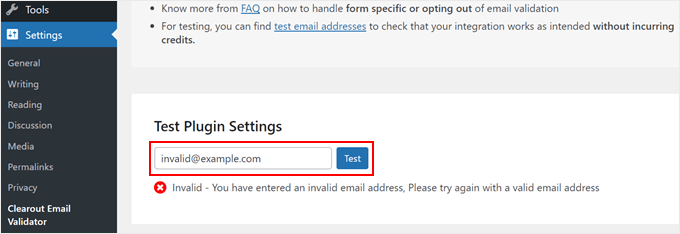
One way to do this is to scroll all the way down on the plugin page to the ‘Test Plugin Settings’ section. After that, enter a fake email address in the field and click ‘Test.’
If the email is invalid, you will see an ‘Invalid – You have entered an invalid email address, Please try again with a valid email address’ notification.
Beware that doing this can decrease your free credits. So, if you want to do this without incurring credits, then you can use one of Clearout’s test email addresses.
Another way to test the plugin is by going to your registration, comment, checkout, or contact form page URL and entering a fake form entry.
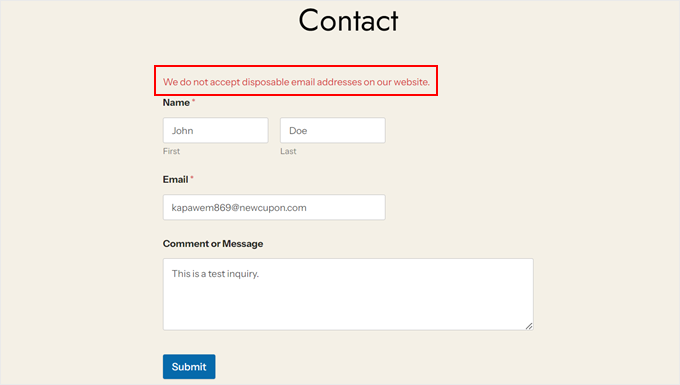
If the plugin works, then you should see an error message.
Here’s what it looks like on our WPForms contact form:
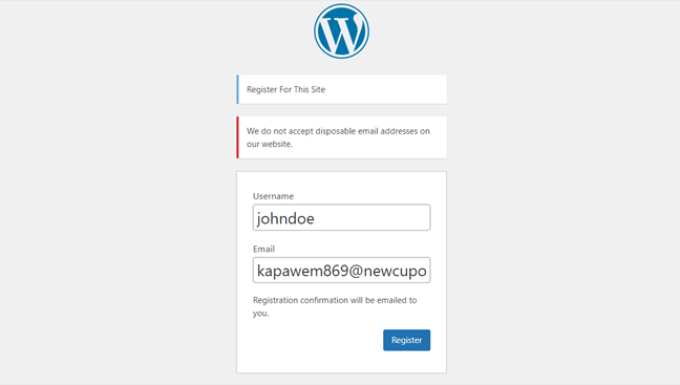
We also tried to see if the plugin works on our test site’s login URL.
This is the error message we received:
Bonus Tip: Use a Form Plugin With Anti-Spam Protection
Blocking disposable email services is one of the best ways to keep your site secure and make sure that you only get legitimate form submissions.
But unfortunately, new burner email accounts are generated every day, and it may be hard for any email validation plugin to keep up with these new addresses.
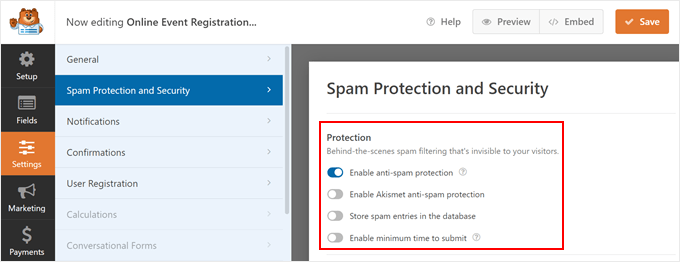
To protect your site further, we recommend installing a form plugin with a built-in feature to block spam entries, like WPForms.
With WPForms, you can prevent spam bots from hijacking your forms and sending you malicious links, even if their email address looks legitimate. WPForms uses a secret anti-spam token that is unique to each form submission and invisible to all visitors, including spam bots.
Since the token is created automatically, the spam blocker won’t have any impact on the user experience.
To learn more about WPForms, just check out our full WPForms review and our article on how to create a secure contact form in WordPress.
We hope this article has helped you learn how to block disposable email addresses in WordPress. You may also want to check out our list of the best email marketing services for small businesses and our guide on how to create an email newsletter.
If you liked this article, then please subscribe to our YouTube Channel for WordPress video tutorials. You can also find us on Twitter and Facebook.
The post How to Block Disposable Email Addresses in WordPress (2 Methods) first appeared on WPBeginner.
from WPBeginner https://ift.tt/M1nBW5D
More links is https://mwktutor.com
No comments:
Post a Comment