Tuesday 31 October 2023

How to Disable New User Notifications in WordPress (Easy Way)

Do you want to stop receiving new user email notifications in WordPress?

If you have enabled user registration on your site, then WordPress sends a notification email to the admin email address every time a new user registers. As your site grows, you will get many new users joining every day, which can make these emails annoying to deal with.

In this article, we will show you how to disable new user notifications in WordPress.

Disable new user notification in WordPress

Why Disable User Notification Emails in WordPress?

Allowing user registration in WordPress has a lot of benefits. If you have a multi-author blog, online store, or membership website, then user registrations are necessary.

However, there is also a downside. WordPress will send an email by default to the admin email address, notifying you whenever a new user registers.

While these emails are good for keeping an eye on who is registering on your website and keeping out spam registrations, they can be annoying to deal with if you have several people joining each day.

Having a lot of new user notifications can clutter your email inbox, making it difficult to spot important emails from your clients and customers.

This is where disabling emails about new users can come in handy. We will look at two beginner-friendly ways to help you turn off email notifications. The best part is that you won’t have to know how to write code.

Let’s look at how to disable new user notifications in WordPress using WP Mail SMTP and WPCode:

Method 1: Disable New User Notifications Using WP Mail SMTP

If you are take better control of your WordPress emails, including new user notifications, then this method is for you.

WP Mail SMTP is the best WordPress SMTP plugin on the market that can dramatically improve your email deliverability.

The plugin fixes the problem of emails not being delivered to your customers. That means that all your emails will reach your users instead of ending up in their spam folders or being blocked completely.

WP Mail SMTP website

WP Mail SMTP also offers different settings to take control of your WordPress emails, such as disabling automatic update notifications. Among these settings is the option to disable new user notification emails sent to the admin’s email.

Note: For this tutorial, we will be using the WP Mail SMTP Pro version since it includes the Email Control options. There is also a free version of WP Mail SMTP that you can use to fix email deliverability issues on your site.

First, you will need to install and activate the WP Mail SMTP plugin on your WordPress site. If you need help, then follow our step-by-step guide on how to install a plugin.

Upon activation, go to WP Mail SMTP » Settings from your WordPress admin panel and then enter your license key. You can find the license key in your WP Mail SMTP account area.

WP Mail SMTP verify key

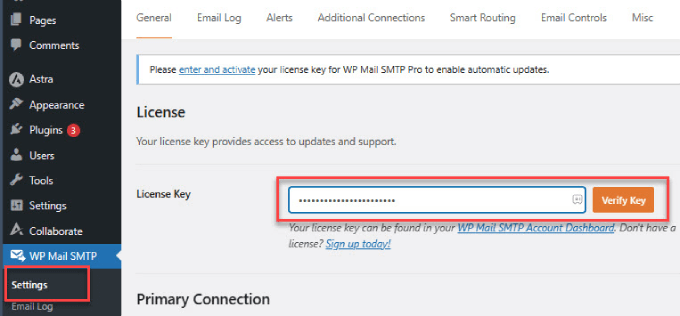
After entering the key, go ahead and click the ‘Verify Key’ button.

You will now see a popup showing that you have successfully verified the key, and your WordPress website will receive automatic updates.

verification key confirmed

Next, you can head over to the ‘Email Controls’ tab from the menu on the top in WP Mail SMTP.

This is where you can customize your new user registration email notifications.

Email controls

After that, simply scroll down to the New User section.

Then, you need to click on the toggle to disable the ‘Create (Admin)’ option. And don’t forget to hit ‘Save Settings’ when you are done.

New user

Once this setting is toggled off, the admin won’t receive the default WordPress email from new users. However, the new user who registered will still get an email confirmation.

That’s it! You’ve successfully disabled new user notification emails for admins using the WP Mail SMTP plugin.

Method 2: Disable New User Emails in WordPress Using WPCode

If you don’t want to use an SMTP plugin, then you can add a code snippet to your theme’s functions.php file or use a code snippet plugin to disable email notifications:

<?php
function wpcode_send_new_user_notifications( $user_id, $notify = 'user' ) {
        if ( empty( $notify ) || 'admin' === $notify ) {
                return;
        } elseif ( 'both' === $notify ) {
                // Send new users the email but not the admin.
                $notify = 'user';
        }
        wp_send_new_user_notifications( $user_id, $notify );
}

add_action(
        'init',
        function () {
                // Disable default email notifications.
                remove_action( 'register_new_user', 'wp_send_new_user_notifications' );
                remove_action( 'edit_user_created_user', 'wp_send_new_user_notifications' );

                // Replace with custom function that only sends to user.
                add_action( 'register_new_user', 'wpcode_send_new_user_notifications' );
                add_action( 'edit_user_created_user', 'wpcode_send_new_user_notifications', 10, 2 );
        }
);

We don’t recommend editing your functions.php file directly. That’s because even the tiniest of mistakes in the code snippet can make your site inaccessible.

The easiest way to add custom code in WordPress without breaking your site is with the free WPCode plugin. It is the most popular code snippets plugin, used by 2 million+ WordPress websites.

The first thing you will need to do is install and activate the WPCode plugin in WordPress. For more detailed instructions, see our step-by-step guide on how to install a WordPress plugin.

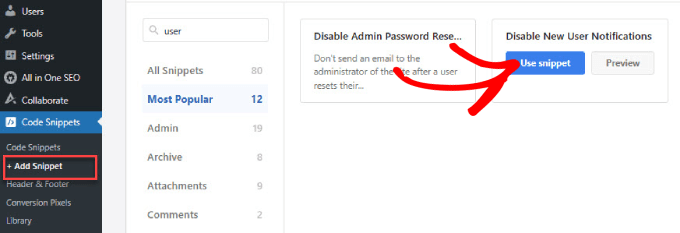
Head over to Code Snippets » + Add Snippet in the WordPress site admin area. There, you will see a library of code snippets to choose from.

The good news is that WPCode has a pre-made template for disabling new user notification emails. Just type in ‘user’ in the search bar and click ‘Use snippet’ under the ‘Disable New User Notifications’ snippet.

Add disable new user notification snippet

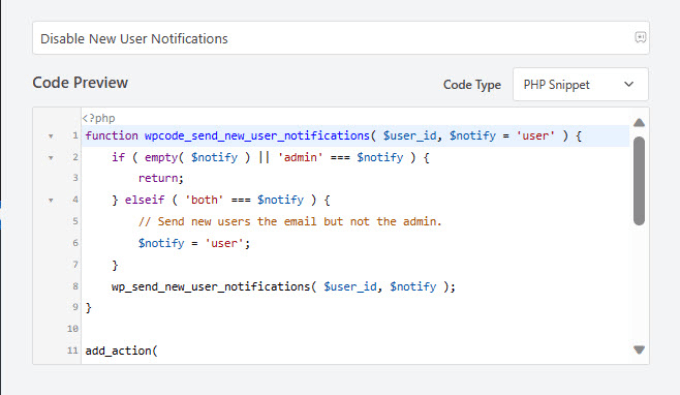
Since the template already has the code inside, you don’t have to write your own.

You will see the code already in place with the ‘Code Type’ set as a PHP snippet.

Disable new user notifications code snippet

If you want to adjust where this code runs, you can scroll down. The Insertion method should be set to ‘Auto Insert’.

You can open the dropdown menu to decide where you want the code to be executed or even set a schedule for when you want the code to be active.

Insertion method in WPCode

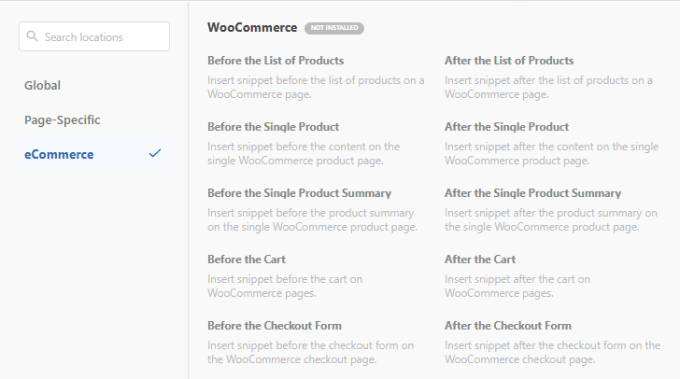
For example, you can set the code snippet to disable user registrations from certain pages. This could be handy if you have custom user registration pages for different membership programs.

You can even choose to have the code only disable user registrations from WooCommerce, Easy Digital Downloads, or MemberPress.

Woocommerce auto insert

But for most website owners, leaving the default setting to ‘Run Everywhere’ is the way to go.

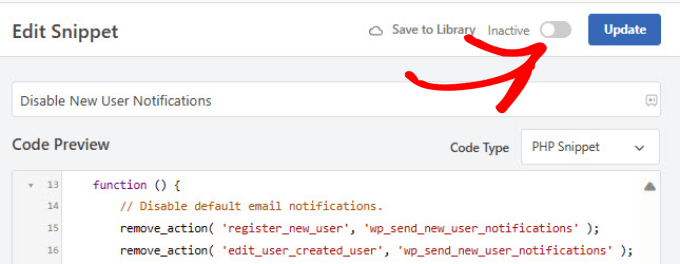
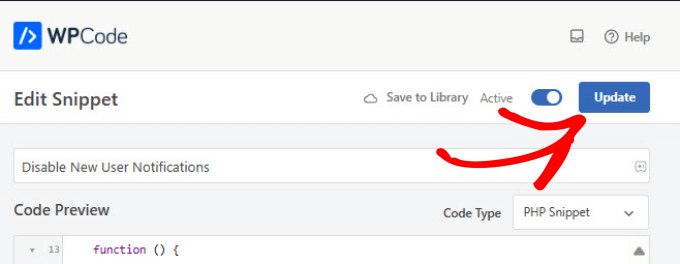
Once you are done configuring where to execute the code snippet, you can scroll to the top right corner and toggle the ‘Inactive’ button to ‘Active’ to activate the code.

Inactive button in WPCode

You have now successfully disabled the new user notification emails.

Don’t forget to click the ‘Update’ button to save your changes.

Update button in WPCode

Bonus: Turn Off Comments Notifications in WordPress

WordPress notifications can be super annoying. If your website receives a high volume of traffic, particularly on older posts, then you may also be flooded by comment notification emails.

The good news is that there’s a quick fix for this.

All you have to do is go to Settings » Discussion. The comment notification emails are automatically enabled by default in WordPress.

Turn off comments notifications in WordPress

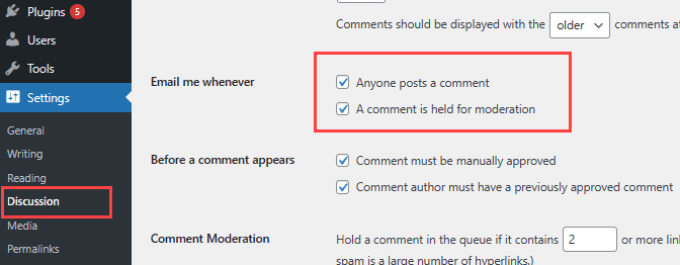
You can disable comment notifications by unchecking the boxes next to ‘Anyone posts a comment’ and ‘A comment is held for moderation’. That way, you won’t receive emails when someone posts a comment or when a comment is held for moderation.

For more details, check out our post on how to turn off comments notifications in WordPress.

We hope this article helped you disable new user notification emails in WordPress. You may also want to see our guide on how to disable WordPress admin email verification notices or our expert comparison of the best email marketing services to grow your audience.

If you liked this article, then please subscribe to our YouTube Channel for WordPress video tutorials. You can also find us on Twitter and Facebook.

The post How to Disable New User Notifications in WordPress (Easy Way) first appeared on WPBeginner.


from WPBeginner https://ift.tt/WjJHefm
More links is https://mwktutor.com

How to Do a SEO Content Gap Analysis (Beginner’s Guide)

Are you looking to do an SEO content gap analysis to improve your website’s content?

If you’re struggling to find good topics to blog about or want to boost your existing posts to the top, then a content gap analysis is a surefire way to steal competitor traffic. That’s because you’ll be covering topics your target audience is looking for, allowing you to create more relevant blog posts.

In this article, we’ll outline the steps to perform an SEO content gap analysis so you can gain an edge over your competitors’ sites.

How to do a SEO content gap analysis

What is a Content Gap Analysis, and Why is it Important?

Content gap analysis is the process of finding what topics are missing from your website. You compare the content you have versus what the target audience is looking for, and then you can create content to fill those gaps.

A content gap analysis can be a great keyword research strategy to find content ideas that you may not have otherwise considered.

Imagine you have a website about cooking, and you want to make it as helpful as possible for your visitors. Content gap analysis would involve looking at what cooking topics people are searching for online and seeing if your website covers those topics.

If you find that your website doesn’t have information about popular topics like ‘healthy dessert recipes,’ ‘quick dinner ideas,’ or vegetarian cooking,’ then those are content gaps you might want to fill with articles related to those topics.

This analysis ensures that your website stays relevant and useful to your audience.

But the content gap analysis also helps your existing content perform better.

For example, if you have a post on how to start an online store, but it isn’t ranking, a keyword gap analysis could help. You would study the top-ranking posts to what sections or key information your article is missing that the leaders have

But as time passes, you may experience content decay as the information becomes outdated and less relevant. You’ll need to refresh your content and keep the information up-to-date. Otherwise, your competitors may move ahead.

Performing a content gap analysis is a simple process. Let’s look at how you can do a content gap analysis in a few simple steps.

To do this at scale and get the right information, you’ll want to have a few tools at your disposal and make sure you approach it the right way.

1. Analyze Your Competitor’s Content

The first step to conducting a content gap analysis is to find out which keywords your competitors are ranking for, but you’re not.

The data will provide good examples of potential keywords that may be valuable to your business and the content types your competitors are using to rank for those keywords.

With SEMrush, you can determine who your top competitors are and how many keywords you share in common with them.

Find the ‘Organic Research’ entry under the ‘SEO’ heading in the left-hand sidebar, and then click on the ‘Competitors’ tab to find all of your main competitors.

SEMRush competitor research

You can scroll down on the page where you’ll see a list of your top organic competitors.

If websites have a large number of common keywords, the tool will consider that site as your competitor.

SEMRush organic competitors

Next, you’ll need to head over to your SEMrush account.

In the left side panel, under Competitive Research, you can select Keyword Gap.

Keyword gap tool

Enter the competitors you’ve found from the previous step so that you can find missing keywords that you’re site isn’t ranking for but your competitors are.

Then, hit the ‘Compare’ button.

SEMRush keyword gap

From here, you can filter the keyword list by ‘Missing’ to see all the keyword opportunities.

This will give you some seed keywords that can be used for content ideas. You may want to look at the intent of these keywords and prioritize the keywords labeled as ‘T’ for Transactional or ‘C’ for Commercial keywords. That way, you can focus on ranking for keywords that lead to purchases.

Missing keywords

You can also further refine this list by changing the keyword position. This will filter the list by only showing you keywords you’re missing that rank within a specific Top 10, 20, or 50 for a given query.

In this case, we filtered the list by keywords where our competitors rank in the Top 20, but we aren’t ranking in at all. You’ll want to add these missing keywords to a list so you can come up with new content ideas later.

Narrow keyword positioning

If you filter by ‘Weak’ instead of ‘Missing,’ you’ll get a list of keywords where you rank lower than your competitors.

From this list, you’ll be able to find blog posts that need improvement to compete with your main competitors.

Make sure to hit the ‘Add to keyword list’ to save all of the keywords that you find most relevant to your audience.

Weak keywords in SEMRush keyword gap tool

Note: SEMRush isn’t the only tool that has a content gap tool. We also recommend using Ahrefs to find all the keywords your competitors rank for that you’re missing.

2. Generate Ideas for New Content

Take the list from your ‘Missing’ keywords and use those to come up with blog post ideas. Rather than trying to brainstorm the ideas yourself, you can use WPBeginner’s Blog Post Idea Generator.

This tool is completely free to use and will give you over 250 blog post ideas to work with each time you search.

In the image below, we’ve taken one of our missing keywords from above and hit ‘Get Ideas.’

WPBeginner blog post idea generator

Go through the list of blog title ideas and see which ones are most relevant to your audience.

It’s a good idea to add these to a spreadsheet or even to a project management system where you can assign them to a team of writers.

Blog title ideas

Store these blog post ideas and add them to your content calendar so you can begin ranking for keywords that your competitors are ranking for.

3. Track Underperforming Website Keywords

Next, take the list from your ‘Weak’ keywords and get ready to look at what content isn’t performing well on your site.

A simple Google search for your blog post will give you a good idea about your current search engine position, without needing a special tool.

Note: If you do this manually, you’ll have to open a new incognito window. A private browser means Google won’t use your browser history to deliver personalized search results.

However, performing these searches manually is rather time-consuming. Instead, you can use the Google Search Console.

For a more in-depth guide on using Google Search Console, read our tutorial on how to see the keywords people use to find your WordPress site.

Under the queries tab, you see a list of keywords with the number of clicks, impressions, and position of that keyword in the search results.

Keyword positions

If you go to the ‘Pages’ tab, you can find specific blog posts or pages and their position.

You should specifically look at the keywords that correspond to your ‘Weak’ keyword list that you found from SEMrush because those weak keywords are specifically ones that your main competitors are ranking higher for.

If you’re able to rank higher than them, you can effectively steal their traffic.

Another way to find underperforming website keywords is to use the All in One SEO (AIOSEO) plugin. It is one of the best WordPress SEO plugins on the market, used by over 3 million professionals.

You’ll need to install and activate the plugin first. For more details, check out our blog on how to install a WordPress plugin.

With this plugin, you can check your keyword rankings right inside WordPress. So, you will save time by not having to manually check Google Search Console.

To start, you’ll need to head over to All in One SEO » Search Statistics in your WordPress dashboard.

AIOSEO search statistics dashboard

For more information, check out our guide on how to connect AIOSEO’s Search Statistics feature with Google Search Console.

Under the ‘Keyword Rankings’ tab, you will see the top keywords your content is ranking for.

It will also show the winning and losing keywords that have seen the biggest position changes in the Google search results.

Keyword rankings tab search statistics

From there, you can scroll down to the ‘Keyword Performance’ table to see all of your site’s top-performing keywords.

For any content that is losing position in the rankings, it’s worth doing a content refresh, whether it’s small changes to the article or a complete rewrite.

Keyword performance table

On top of that, if you click on any keyword in the table, you’ll be able to see the specific content that is ranking for that keyword.

You’ll be able to view important stats such as clicks, average CTR and more.

View content stats in AIOSEO

We recommend performing both methods, as you’ll be able to get a comprehensive list of underperforming blog posts that can be improved. Take note of this list and add it to a Google Sheet or project management system.

4. Optimize Your Existing Blog Posts to Fill In Gaps

Now, we’ll be working through each blog post and filling in the gaps to help it rank higher.

Start by going through each blog post one by one and analyzing how your page can be improved upon.

Check out the first page of Google for each of those main keywords.

Sometimes, you’ll come across a first page with rock-solid results. The content is legit, and there aren’t many gaps. In this case, you want to ensure that your content includes similar headings and matches the search intent of what users are looking for.

If you notice the content on the first page is full of holes, you can then create or update your content to be something that is way better.

There’s no specific formula for guaranteeing a higher ranking when you update a blog post. That said, we’ll cover the different ways to improve your content and tell you what to look for when analyzing your competitor’s articles.

Update Your Title Tag and Meta Description

A well-crafted title tag and meta description should pique searchers’ interest and promise a solution to their query. This can improve your blog’s click-through rates, which directly impacts your SEO rankings.

With AIOSEO’s TruSEO On-Page Analysis, you can easily add title tags, meta descriptions, and keywords for proper on-page SEO optimization.

In your content editor, just scroll down to the AIOSEO settings. Then, add your post title and meta description. It will tell you the recommended characters you have.

It’s a good idea to get close to that number to maximize your post visibility and provide a preview of what visitors can expect.

Post title and meta description example

Add More Value to Your Readers

When filling in content gaps, you want to find areas of improvement that will add value to your readers.

One way is to add relevant keywords so more readers can find your content or related topics to include in your blog.

Using the free WPBeginner Keyword Generator Tool, you’ll get over 300 keyword ideas that people are searching for related to your topic.

Enter your main keyword and hit ‘Analyze.’

WPBeginner keyword generator tool for content updates

You’ll get a long list of keyword suggestions. You can organize the list by alphabetical order, prepositions, or questions.

The questions filter is a good way to get heading or frequently asked question ideas to add to your blog post. You can hit the ‘Download Spreadsheet’ button since the keyword list could also be used for new article ideas as well.

keyword-suggestions

Add a FAQ Schema

A great way to crack into the first page of Google is by ranking in the People Also Ask section.

Ranking in this section will bring more traffic to your website and make your blog look like an authority on a given topic.

People-also-ask-in-Google

Also, the FAQ schema makes your content more helpful to users who prefer a question-and-answer approach. If your competitors aren’t answering the searcher’s most important questions, it can help your piece of content stand out.

In the blog editor, you’ll navigate to the AIOSEO Settings. Then, under the Schema tab, click on ‘Generate Schema.’

Generate-schema

From there, a Schema Generator pop-up will appear.

You’ll want to click on the ‘+’ icon next to the FAQ.

add-faq-schema

Then, you add the Questions and Answers for your post. You can click on the ‘Add Question’ to add another question to your schema.

When you’re done, go ahead and click ‘Add Schema.’

Add schema to blog post

Using the All in One SEO FAQ Schema generator adds a smart markup code to your blog post so that Google can easily identify that this is an FAQ section.

For a more detailed tutorial, check out our post on how to add an FAQ schema in WordPress.

Bonus: Write a Great Blog Post Outline

Now that you’ve successfully performed a content gap analysis, it’s important that you know how to properly write the blogs for the keywords you’ve picked.

Writing a strong blog outline line saves you time and also ensures you’re creating the best piece of content possible.

It helps guarantee that you include the important things, such as the right keywords and that you address the most common questions. On top of that, it helps ensure all the ideas are organized and flow properly, making the post easier to read.

The key is to analyze the top-ranking content on Google to determine what headings and information to cover.

For example, an outline about ‘How to Keep Pests Out of Your Garden’ should include the types of pests and all the different ways to remove them.

Blog-outline-in-WordPress

For a step by step tutorial, read our post on how to write a blog post outline.

We hope this article helped you learn how to create a content gap analysis. You may also want to check out the “must-have” WordPress plugins and tools for business sites or our guide on how to increase your blog traffic the easy way.

If you liked this article, then please subscribe to our YouTube Channel for WordPress video tutorials. You can also find us on Twitter and Facebook.

The post How to Do a SEO Content Gap Analysis (Beginner’s Guide) first appeared on WPBeginner.


from WPBeginner https://ift.tt/OLQmRtu
More links is https://mwktutor.com

Monday 30 October 2023

How to Move Comments Between WordPress Posts (Easy Method)

Are you looking for an easy way to move comments between WordPress posts?

You might be writing a new version of a post and plan to redirect it from the original post. Redirects are great for avoiding broken links and preserving your WordPress SEO, but the original comments won’t be moved to the new post.

In this article, we will show you how to easily move comments between WordPress posts.

How to Move Comments Between WordPress Posts

Why Move Comments Between WordPress Posts?

By default, any comments you get on your WordPress site are attached to a specific post or page and can’t be moved.

However, sometimes, you might need to move comments to another post or page.

For example, you might decide to combine several posts together into a new post and then delete the individual ones. Or you may decide that a post would work better recreated as a page or vice versa.

Redirecting those deleted posts is good for your website’s search engine optimization, but it won’t save the comments.

In these scenarios, it would be helpful to move comments from one post or page to a new one instead of losing them or having to recreate them all manually.

How to Move Comments Between WordPress Posts

You can easily move comments between WordPress posts using the free Copy or Move Comments plugin. 

Note: We recommend making a backup of your site before moving the comments since it can’t be reversed. See our expert pick of the best backup plugins for WordPress to get started.

First, you’ll need to install and activate the Copy or Move Comments plugin. If you need help, then please see our guide on how to install a WordPress plugin.

Upon activation, click on Copy/Move Comments in the WordPress sidebar. 

How to move comments between WordPress posts

This WordPress plugin lets you choose between moving or copying comments.

If you choose ‘Copy,’ then it will duplicate all of the original comments and then add them to the new page or post.

When you copy the comments, the original comments won’t be deleted. This means you will end up with duplicate comments on your WordPress blog

If you choose ‘Move’, then the plugin will delete the original ‘source’ comments and then add them to the new ‘target’ page or post. This helps you avoid duplicate content.

Once you have made your decision, open the Action dropdown. You can now select either ‘Copy’ or ‘Move’.

Choosing whether to copy or move comments between WordPress posts

Your next task is choosing the Source. This is the location from where you want to copy your comments.

To get started, click on the ‘Source’ dropdown. 

You can now choose the post type. For example, if you wanted to copy comments from a specific WordPress post, then you would choose ‘post’.

Choosing a source page or post

Next, click on the ‘Select Post’ dropdown. Depending on your selection, this will show all of your pages or all of your posts. 

You can now simply click to select the page or post that you want to use as your source. 

Selecting a source WordPress page or post

The next step is opening the ‘Select Comment Type’ dropdown.

You can choose whether you want to see comments that have replies or ‘Single’ comments. These are comments that have no replies.

How to choose a WordPress comment type

The plugin will show all of the comments that fit your criteria.

Now, you can simply click to select every comment that you want to move or copy. If you want to move all of the comments, then you can click on the checkbox at the top of the column to select them all at once.

A list of WordPress comments

Your next task is to tell the plugin where it should move these comments to.

To do this, scroll down to the Target section at the bottom. After that, open the ‘Select Post Type’ dropdown and choose the destination’s post type. 

How to choose a target WordPress post

Next, click on the ‘Select Post’ dropdown. 

Here, you can choose your target, which is the post or page where you want to move these comments to. 

How to move comments between WordPress posts

After choosing your target, just click on the ‘Perform Action’ button. 

The plugin will now move or copy all of the selected comments to this page.

If you check out the target page or post, you will see that all of your comments have been added to this page.

It’s also worth checking the source page or post. If you chose ‘Copy’, then you should still see all of your original comments. However, if you chose ‘Move’, then all of the original comments should have vanished from this page or post. 

After moving your comments, you may want to change the order in which WordPress displays these comments. By showing newer comments first, you can keep the conversation fresh and get more comments on your WordPress blog.

You can learn how to do this in our step-by-step guide on how to display the most recent comments first in WordPress.

Bonus: Improve WordPress Comments Using Thrive Comments

Now that you know how to move comments to a different post, you might be wondering how to improve your comments section in other ways. The best way to do that is with Thrive Comments, which is a powerful and easy-to-use WordPress comments plugin.

It can save your team time with its flexible comment moderation features. Besides being able to approve comments or mark them as spam, you can also feature positive comments and even mark them as testimonials that can be displayed somewhere else on your website.

Feature comment from dropdown menu

You can show appreciation to your commenters by displaying a message or redirecting them to a Thank You page. You can also award your commenters badges when they reach certain milestones.

Another benefit of this plugin is that you let your users upvote comments by clicking Like and Dislike buttons. This can create a sense of community and increase user engagement without users needing to leave a comment of their own.

We hope this article helped you learn how to move comments between WordPress posts. You may also want to see our guide on how to allow user registration on your WordPress website or our expert pick of the best WordPress comments plugins.

If you liked this article, then please subscribe to our YouTube Channel for WordPress video tutorials. You can also find us on Twitter and Facebook.

The post How to Move Comments Between WordPress Posts (Easy Method) first appeared on WPBeginner.


from WPBeginner https://ift.tt/MNxdZAS
More links is https://mwktutor.com

Welcome Seahawk Media to the WPBeginner Growth Fund

Today, I’m extremely excited to announce that WPBeginner Growth Fund has taken an investment stake in Seahawk Media, a global WordPress services provider, that is a trusted partner of popular web hosts and agencies around the globe.

Over 1,000+ brands, like DreamHost, GoDaddy, and others partner with Seahawk to offer custom WordPress development, website maintenance, and other services for their clients.

Seahawk Media joins WPBeginner Growth Fund

About Seahawk Media

Seahawk Media is a premier WordPress services company, founded by Ryan James and Gautam Khorana.

They provide a wide range of WordPress services, like WordPress development, design, maintenance, migration, support, and more.

Seahawk Media WordPress

With Seahawk Media, you can:

  • Hire WordPress experts: Hire reliable WordPress experts for any WordPress related services, like custom website design, website migration, site optimization, WordPress maintenance, and more.
  • Hire SEO and content marketers: If you want to do an SEO audit of your site or create high-quality content, then you can rest assured you’re in safe hands.
  • White-label partnership: If you’re an agency, you can outsource your work to Seahawk Media and / or offer additional services to your clients without hiring additional resources into your agency. It’s a great way to build recurring revenue for your agency.

Best of all, Seahawk is trusted by the top managed WordPress hosting and technology companies, like DreamHost, GoDaddy Pro, Alibaba Cloud, Pressable, and more.

Seahawk Media Services

In a nutshell, if you’re looking for a WordPress design and development agency to outsource your next WordPress project, then Seahawk Media is the best bet.

Background Story

In our annual WPBeginner reader survey, one of the user suggestions that we always get is to build a company that offers affordable WordPress development and website maintenance services.

Now as you know, my focus has entirely been on building our WordPress plugins and software products, but I wanted to solve this problem for our users.

So I started talking with some of my friends who own WordPress development agencies to see if we could start referring customers to them in a more official capacity.

Most of them told me that they are always fully booked for months out, and asked me if I knew of smaller agencies or freelancers to whom they can refer clients because they were only looking for projects with larger budgets.

So at WordCamp US this year, I talked with several freelancers and boutique WordPress agency owners, and each of them told me that they too were fully booked.

In these conversations, I learnt that most reputable WordPress agencies and freelancers were not interested in projects that involved small website customization, website maintenance services, website migration, or even low budget custom website design projects.

Instead everyone wished that there was a company that they can use to offer white-label services to build recurring revenue streams while offering high-quality services to their clients.

At the same WordCamp US, I also met with Ryan and Gautam, the co-founders of Seahawk Media. They have been doing exactly this – white-label WordPress development services at revolutionary prices.

Syed Balkhi with Ryan and Gautam from Seahawk Media

As I learnt more about what they were doing, I knew this was going to be a perfect partnership. Seahawk already has an amazing team that’s experienced in offering white-label WordPress development services to customers of big name companies like Dreamhost, Alibaba Cloud, Vendasta, Pressable, GoDaddy, and many more.

And they have a wide range of services from custom WordPress development to smaller one-off tasks like WordPress site migration, website maintenance & care package, hacked site repair, and others.

So I decided to invest in Seahawk Media with two primary goals:

1. Offer a reliable WordPress Pro services partner to small business owners that can handle all their website’s technical needs at affordable prices.

2. Offer our freelancer and WordPress agency audience a great solution to build recurring revenue by adding white-label services to their clients.

Many agency owners and WordPress freelancers are already using Seahawk Media to offer additional white-label services to their clients and adding extra recurring revenue in their businesses. 

Along with agencies, many web hosting companies also use Seahawk’s white-label development services to activate and retain customers through professional website design services, website optimization packages, and more. 

I am looking forward to working with Ryan & Gautam through the WPBeginner Growth Fund, and I will be advising the team on how to expand their business.

At Awesome Motive, we have years of experience building popular WordPress plugins that are used by over 25 million websites, including OptinMonster, WPForms, MonsterInsights, and many more.

Not to mention, our WPBeginner growth fund portfolio companies like MemberPress, Formidable Forms, Pretty Links, Wholesale Suite, Uncanny Automator, and others have seen tremendous growth over the years.

Sharing our combined knowledge with Seahawk Media will help all of us better serve the larger WordPress community.

They will be joining me at our next Mastermind.

Awesome Motive and WPBeginner Growth Fund Mastermind 2023

As always, thank you so much for your continued support of WPBeginner.

WPBeginner and Awesome Motive would not be here without YOU, and I just want to say how much I appreciate all of you.

And I look forward to continuing serving you and the larger WordPress / web ecosystem for years to come.

Sincerely,

Syed Balkhi
Founder of WPBeginner

P.S. Want us to acquire or invest in your WordPress business? Learn more about the WPBeginner Growth Fund.

The post Welcome Seahawk Media to the WPBeginner Growth Fund first appeared on WPBeginner.


from WPBeginner https://ift.tt/vbS60JH
More links is https://mwktutor.com