Do you want to change how often your trash is emptied on your WordPress website, or stop WordPress from emptying the trash automatically?
By default, WordPress will automatically delete anything that has been in the trash for 30 days. However, some users might like the trash to be emptied more or less often, or prefer to empty the trash manually.
In this article, we will show you how to limit or disable the trash being automatically emptied in WordPress.
What Is Trash in WordPress?
WordPress added a trash feature way back in version 2.9. It works just like the recycle bin or trash on your computer.
In other words, your deleted posts aren’t removed permanently but are sent to the trash instead so they can be recovered for a time. Anyone can delete a post accidentally. That’s why WordPress makes it easy to restore deleted posts and pages.
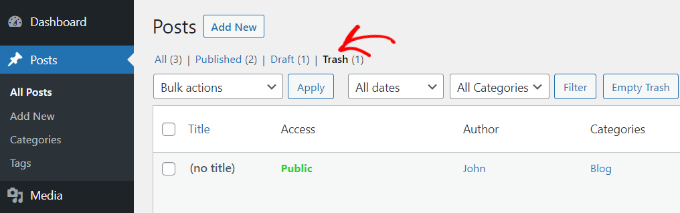
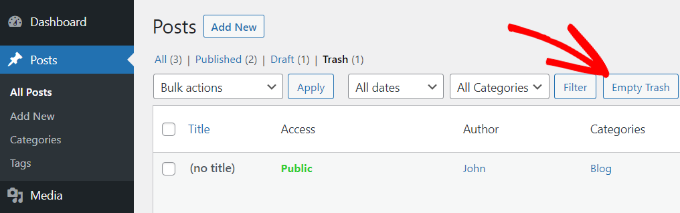
You can view them by going to Posts » All Posts from your WordPress dashboard and then clicking the ‘Trash’ option.
Your WordPress website will automatically delete anything in the trash after 30 days so that it doesn’t pile up.
What if you don’t want WordPress to automatically delete items from the trash? Or you’d prefer it to be emptied more or less often than once a month.
Let’s have a look at how you can have it automatically emptied as often as you like. We’ll cover three methods below. The first method is the easiest for most users. You can use the links below to jump to your preferred method.
Upon activation, you should visit the Settings » General page of your admin dashboard. Once there, scroll to the bottom of the page, and you will find a new ‘Time to empty trash (in days)’ setting.
Simply type in the number of days that WordPress should take to empty the trash. For example, you can type 1 for daily, 7 for weekly, or 30 for monthly.
If you type 0, then deleted posts and pages will be deleted permanently instead of being placed in the trash.
Note: Be very careful about setting the time to empty to 0. It can be difficult to recover permanently deleted posts and pages. Make sure you’re using a backup plugin, just in case.
Don’t forget to click the ‘Save Changes’ button to store your settings.
Method 2: Changing when WordPress Trash Is Emptied with Code
You can also configure how regularly the trash is emptied by the use of a code snippet. This method is not recommended for beginners, so if you’re not familiar with code, then you should use Method 1 instead.
For this method, you’ll have to edit your wp-config.php file.
If you haven’t edited the wp-config.php file before, then take a look at our guide on how to edit wp-config.php file in WordPress.
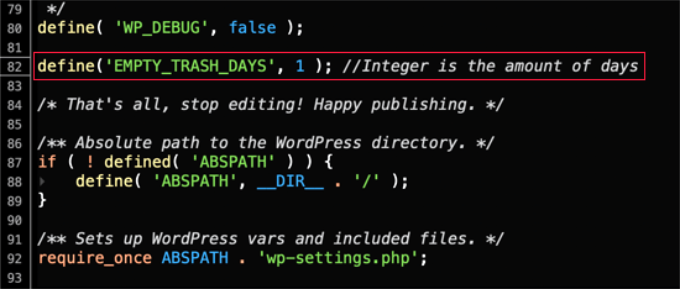
You can simply add the following line of code to your wp-config.php file.
define('EMPTY_TRASH_DAYS', 1 ); //Integer is the amount of days
You should paste it near the end of the file, just before the line that says, ‘That’s all, stop editing! Happy blogging.’
If you leave this code snippet as it is, then your trash will be emptied every day. Feel free to change the number 1 to some other number, and the trash will be emptied after that number of days.
If you don’t wish to use the trash feature at all, then you should set the number to 0. Deleted posts and pages will then be deleted permanently without being placed in the trash.
Make sure you have a backup plugin set up first, just in case you need to restore any accidentally deleted pages.
Don’t forget to save the wp-config.php file once you have made your changes.
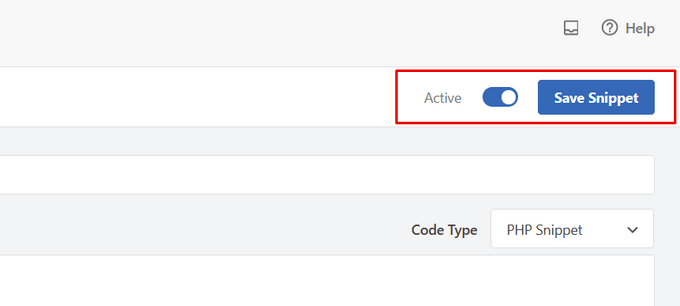
Method 3: Stopping WordPress from Automatically Emptying Trash
Do you want to stop WordPress from automatically deleting items from the trash?
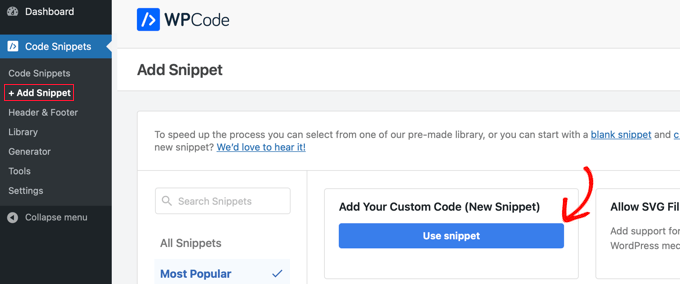
Now, we don’t generally recommend editing your site’s theme files directly. The slightest mistake can break your website. A better way of adding code snippets is by using WPCode.
Are you wondering which marketing data you should be tracking on your WordPress website?
After launching a website, most small business owners rely on their best guesses to make important marketing decisions. Not only does that add huge risk, but it also significantly slows down growth.
In this guide, we will share the top website marketing data that you must track on every WordPress site, so you can make data-driven decisions to grow your business.
Why Do You Need to Track Marketing Data in WordPress?
We believe it’s easy to double your traffic and sales when you know exactly how people find and use your website. Most business owners do not realize how easy it is to track important marketing metrics on your WordPress site.
For example, with a few clicks, you can find out who your visitors are, where they are coming from, and what they do on your website. You can learn which of your articles are getting more visits and which pages on your site are not getting any views.
If you run an online store, then you can see what’s your website conversion rate, which page drives the most sales, what are your top referral sources, and more.
You can use all this marketing data to make informed business decisions and grow your business with confidence.
That said, let’s take a look at the top website marketing stats that you must track on every WordPress site. You can click the links below to quickly jump to any section you’re interested in:
The best way to track marketing data on your WordPress website is by using Google Analytics. It is the most popular website analytics software in the world and is loved by businesses, bloggers, and marketers because it provides a treasure trove of information.
For example, you can use Google Analytics to learn:
The number of visits and pageviews on your website
Who is visiting your website (visitor location, browser, operating system, screen size, and more)
How they found your website
How users interact with your website
And a whole lot more
Google Analytics is an essential tool in our own business. However, you’ll need to add a tracking code to your website, which requires editing code. This can be tricky for beginners, and the slightest mistake can mess up your tracking.
An easier way of setting up Google Analytics is using MonsterInsights. It is the best WordPress Analytics plugin and helps you set up advanced tracking in WordPress without editing code.
Any link that takes users away from your website is called an outbound link. If you use affiliate marketing to make money from your website, then those outbound links are also known as affiliate links.
Tracking these outbound links help you see how much traffic you are sending to other sites, and you can use this data to build stronger partnerships with those sites.
As a blogger, you can see which affiliate links are clicked more often by your visitors. This information can help you make a proper affiliate marketing strategy and boost your referral earnings.
The easiest way to track affiliate links in WordPress is by using MonsterInsights. It tracks outbound links and affiliate links on your site out of the box.
You also get easy-to-understand reports inside your WordPress dashboard, including your top affiliate and outbound links.
Checkout behavior and tracking the abandoned cart information
Product lists performance
Uncover top conversion sources
Sales performance
Setting up enhanced eCommerce tracking on your WordPress store can be difficult. However, MonsterInsights makes it easy for you and it literally takes a few clicks to configure with no coding needed.
The best part is that you get to see eCommerce reports in your dashboard. It shows how your online store is performing, which products are getting the most sales, where your customers are coming from, and more at a glance.
4. Track User Engagement Data with Google Analytics
User engagement shows you what users do when they arrive on your website. It helps you identify patterns of highly engaged user behavior which leads to more conversions and sales.
For example, you may find out that users visiting a specific page are 10 times more likely to make a purchase. You can then use this insight to send more users to that page, or replicate a similar experience on other pages of your website.
Basically, you will be tracking data about how users interact with your website. For example:
Google Analytics is really good at tracking where your website traffic comes from. It can even categorize your traffic based on their source, including organic search, organic social, referral, email, and more.
However, when you’re running paid ad campaigns, email marketing campaigns, or social media promotions, you need detailed campaign tracking.
That’s where UTM tracking comes in.
Campaign-level tracking allows you to see exactly which email, ad, or specific call-to-action link helped you get the most traffic or sales.
To make it easy for you to generate UTM links, MonsterInsights comes with a free campaign URL builder, so you can get more detailed reports. You can enter custom campaign parameters like the source, medium, campaign name, and more to create a custom URL.
These tags include native analytics parameters which are tracked by Google Analytics and are included in your reports. You can then see exactly which link users clicked and how your campaigns are performing.
6. Track and Improve Facebook Retargeting Campaigns
Did you know that Facebook allows you to display targeted ads to people who have visited your website in the past? Yes, it’s called retargeting.
You can install a Facebook pixel and display targeted ads to anyone who visits your website. However, if you install Facebook retargeting pixel today, then you will only be able to show your ads to people who visited today and onward.
Even if you are not running a Facebook advertising campaign right now, we recommend installing the retargeting pixel, so you have a built-in audience when you’re ready to get started.
If you run pay-per-click (PPC) campaigns using Google AdSense, then you can easily see how your ads are performing in the AdSense dashboard. However, these reports only tell you how users interact with your ads not what they do after that.
For that, you’ll need Google Analytics which comes with built-in integration with your AdSense account. This integration enables you to easily track your paid traffic conversions.
Google Search Console is a set of free tools offered by Google to give publishers a look at how their website is seen by the search engine.
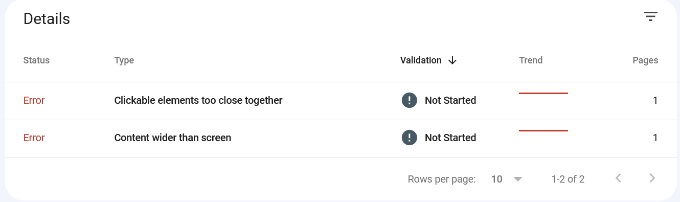
It provides immensely useful information like how your pages rank for different keywords (more on this later), the overall performance of your site in search engines, and any errors Google crawler found on your website.
For example, here is a report showing errors that occur when a user views the site on their mobile devices. Without Google Search Console, it will be very difficult to pinpoint such issues and quickly resolve them.
Keywords are the phrases users enter in search engines to find what they’re looking for. To get more traffic from search engines, you need to know exactly which keywords are bringing you the most traffic to your website, so you can focus on what’s working.
We have a complete WordPress SEO guide that you can use to learn how to optimize your content for specific keywords.
Normally, beginners rely on manually entering keywords in Google search to see if their site is ranking. This is highly inefficient as you would miss out on thousands of keywords where your site can be easily ranked.
Google Search Console is a free tool that provides you with valuable keyword data with the average position. You can see which search terms are ranking high, search impressions, and how many average clicks you get.
If you’re using MonsterInsights, then you can view the Search Console report inside your WordPress dashboard.
However, it only allows you to see your own site’s keyword data. If you want to research your competitors, then you’ll need SEMRush. This incredibly powerful SEO tool allows you to view in-depth keyword data for any website.
Most popular email marketing services come with stats and insights that you can track. These reports provide useful data like open rate, click-through rate, unsubscribe rate, and more.
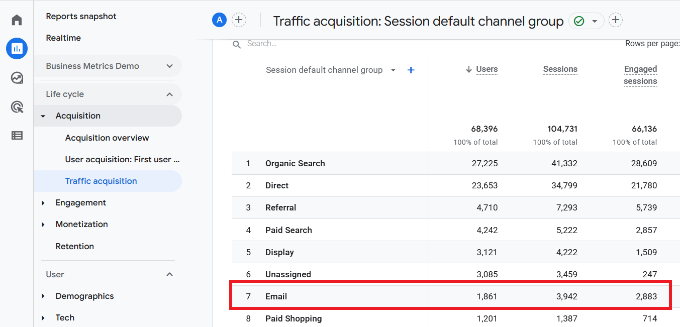
You can also see the traffic coming from your email campaigns to your website in your Google Analytics 4 reports under Acquisition » Traffic acquisition.
From here, you can see how well your email newsletter traffic converts, and what you can do to improve.
Tracking email marketing data helps you grow your email list. You can create new email forms, change form placements, and use popups to boost subscribers.
While there are definitely other marketing metrics that you can track, we believe these are the top marketing data that every business owner must track on their WordPress site.
Do you want to prevent fraud and fake orders on your WooCommerce store?
Fraud and fake orders can cause serious losses for an online store. Luckily, there are effective tools to prevent spam and block fraudulent orders.
In this article, we’ll show you how to easily prevent fraud and fake orders in WooCommerce.
Why Do You need to Prevent Fraud and Fake Orders in WooCommerce?
Fraudulent and fake orders can cause serious financial losses to a business. This is why you need to monitor your online store and prevent fraud and fake orders.
Last year, online stores lost more than $20 billion in revenue due to fraudulent payments, chargebacks, and fake orders.
For some eCommerce stores, the total fraudulent order costs were higher than 4% of total revenue.
A large number of fake orders are usually spam that can be easily prevented. Some orders are more malicious and are placed just to annoy or harass an online business.
The rest of the fraudulent orders are scammers trying to make a few quick bucks.
That being said, let’s take a look at how to prevent fraud and fake orders in WooCommerce.
Here is a quick overview of all the tips we’ll cover in this guide.
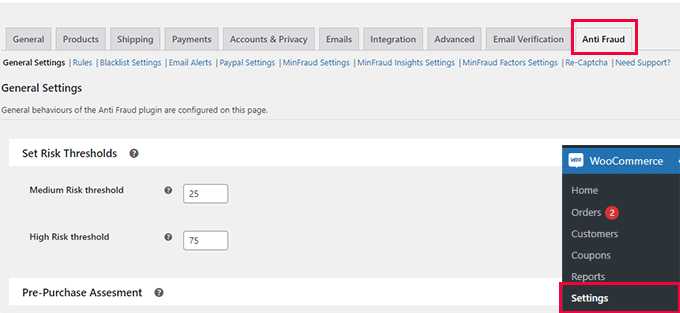
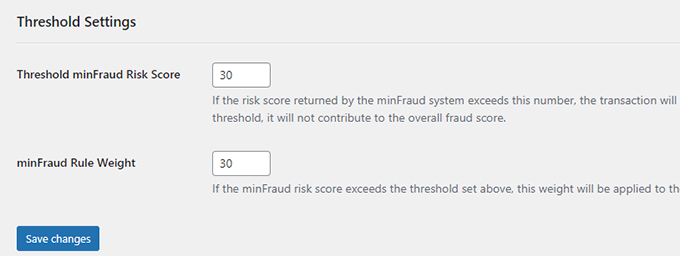
Upon activation, you need to visit WooCommerce » Settings page and switch to the Anti-Fraud tab.
From here, you can set a minimum and high-risk threshold score.
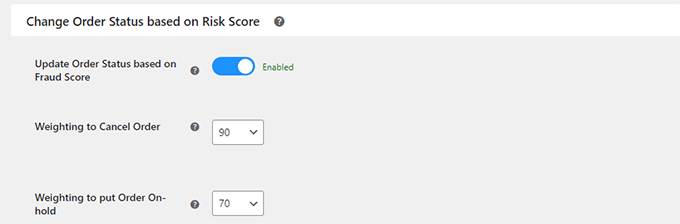
Below that, you can change the order status based on the risk score. For instance, you can set the score when an order will be automatically canceled and set a score to put an order on hold.
Don’t forget to click on the ‘Save Changes’ button to store your settings.
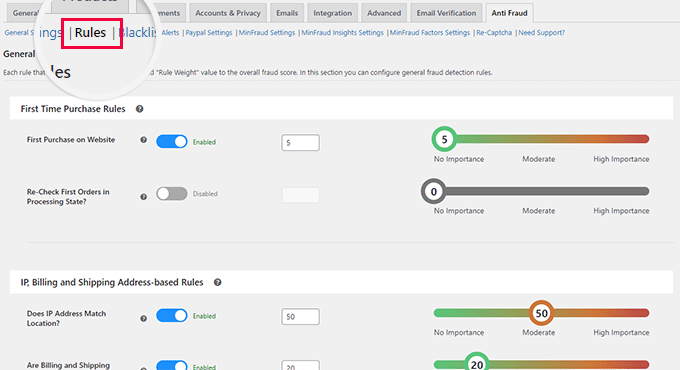
Next, you need to switch to the Rules tab. From here, you can configure the rules and assign them a risk score.
For instance, you can set a 5-point score for a customer who is placing their first order.
You can set scores for suspicious IP addresses, emails, unsafe countries, matching IP addresses to geographic locations, and more.
Carefully review the rules and their assigned scores and make changes if necessary. If you are unsure, then default settings would work for most eCommerce websites.
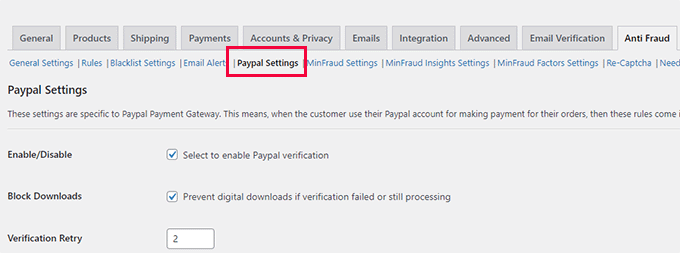
If you are using PayPal as a payment option on your store, then you can switch to the PayPal tab. From here, you can require users to verify their PayPal email addresses.
The plugin also allows you to connect with third-party fraud detection service Maxmind.
This paid service uses a global database to collect data about suspicious payment details, emails, IP addresses, and more.
You can then add this score to your plugin risk score and choose what to do when this score is higher.
Once you are satisfied with your settings, don’t forget to click on the ‘Save Changes’ button to store them.
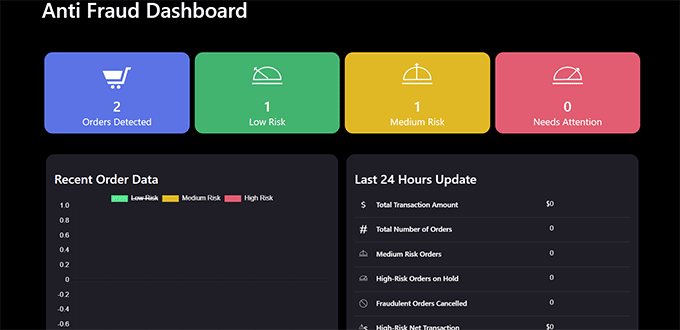
Viewing Fraud Detection Activity
The plugin comes with an easier dashboard where you can see plugin activity in an easy-to-understand format.
Simply click on the Anti Fraud menu item in your WordPress admin sidebar. From here, you can see statistics about all your orders.
The anti-fraud plugin will help you catch most of the fake and fraudulent orders on your WooCommerce store.
However, if you need more strict measures then continue reading for additional WooCommerce fraud prevention tips.
2. Use Stripe Radar and 3D Secure to Automatically Block Fraud
Stripe is the most popular online payment solution in the world. There is a WooCommerce Stripe gateway by FunnelKit that helps you properly connect WooCommerce with Stripe, so you can take advantage of SCA as well as 3D Secure payments option by default.
This method would require you to use Stripe as your main payment gateway in WooCommerce. First you’ll need to install and activate the Stripe for WooCommerce plugin by FunnelKit. Once that’s configured, it will guide you to set up Apple Pay, Google Pay, and other settings to help you protect against fraud transactions.
Aside from that, Stripe also offers a feature called Stripe Radar to help fight against fraudulent transactions. This is a powerful set of algorithm that reduces chargeback risks for your business.
Basically Stripe uses machine learning to block orders. Their machine learning is trained on data across millions of companies worldwide that use Stripe.
We use Stripe Radar on our own eCommerce websites to help reduce fake and fraudulent orders.
Aside from their machine learning algorithm, you can also set custom rules with allow and block lists, and more.
Unfortunately not all WooCommerce gateways have these robust features. If you’re looking to switch to Stripe, then we recommend talking with FunnelKit team as they’re WooCommerce experts who can help.
3. Using the Cash on Delivery Payment Option Carefully
In many countries, ‘Cash on Delivery’ is a popular payment option. However, these stores find themselves more vulnerable to fake and fraudulent orders.
Users are able to place an order with a fake address, refuse to accept the order, or cancel an order that is already shipped.
Once you have shipped an order, you will pay out of pocket for shipping and return of that package.
We recommend not using the ‘Cash on Delivery’ option when possible, as that can lower the number of fake orders you may get.
Try to offer alternate payment options for users to pay before you can ship the order.
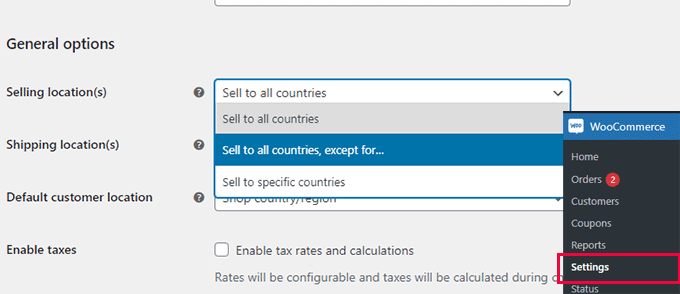
4. Sell in Specific Countries
WooCommerce allows you to easily restrict orders from specific countries. This helps you prevent fake orders from countries where you don’t sell or ship to.
Simply go to the WooCommerce » Settings page and select the countries you want to sell / ship to under the General tab.
Note: Geographical restrictions may reduce fake orders but users can simply use VPN to change their location and provide fake information to place an order.
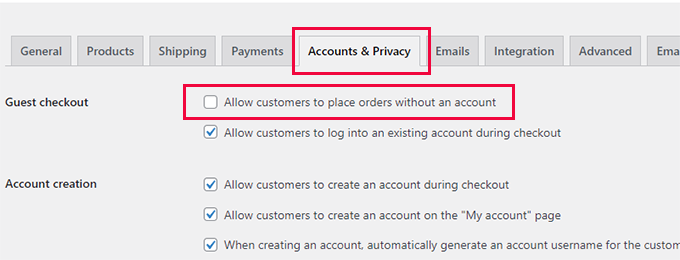
5. Require Users to Create an Account
Another useful trick to slow down and prevent fake orders is by requiring users to create an account before they can checkout.
Simply go to WooCommerce » Settings page and switch to the Account and Privacy tab. From here, you need to uncheck the box next to the ‘Allow customers to place orders without an account’ option.
Below that, you can check options that allow users to create an account during checkout or from the My Account page.
Asking users to create an account also allows you to easily block customers who placed fraudulent or fake orders.
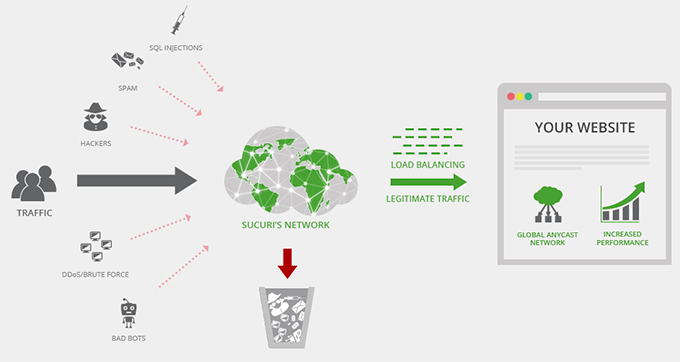
6. Use a Web Application Firewall and Custom Rules
Many scammers use disposable email addresses, fake IP addresses, and dummy data to place spam or fake orders.
A WordPress firewall helps you block this before it even reaches your website.
We recommend using either Sucuri or Cloudflare, both are among the best WordPress firewall plugin on the market. They comes with powerful security features, CDN servers, and a malware removal service.
In Cloudflare, you can also setup custom page rules to trigger CAPTCHA, or even automatically block users with suspicious activity. We use Cloudflare enterprise on our larger eCommerce stores which comes with all bots anomaly detection and threat response.
If you’re running a large eCommerce store, then it’s worthwhile exploring Cloudflare Enterprise tools.
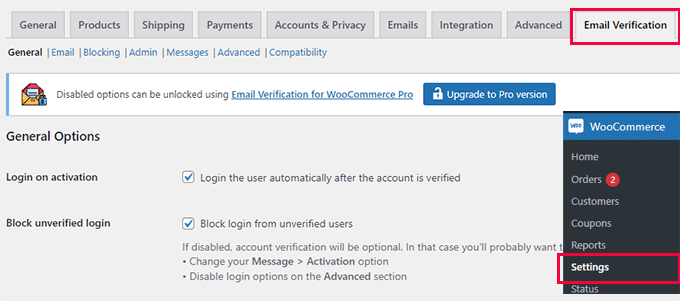
7. Require Customers to Verify Their Email Addresses
Another way to reduce fake orders and fraudulent activity is by requiring new customers to create an account and then require them to verify their email addresses.
Upon activation, you need to visit the WooCommerce » Settings page and switch to the Email Verification tab.
From here, you can configure the plugin settings to your own requirements.
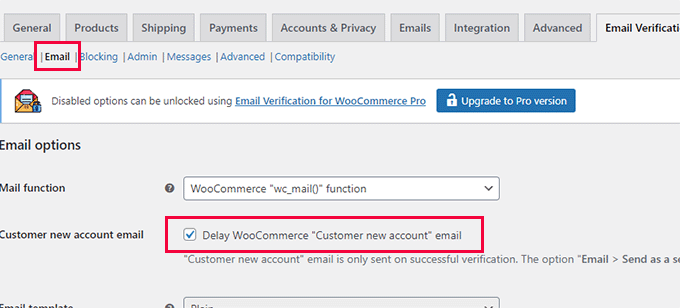
For instance, you can switch to the Email tab and delay the default WooCommerce new user email until the user verifies their account.
Don’t forget to click on the ‘Save Changes’ button to store your settings.
The plugin will now send a verification email to new WooCommerce customers to verify their email addresses.
It’s important to make sure that if you’re setting up email verification that your WooCommerce store actually have reliable email deliverability. Otherwise this can block real customers from purchasing your products.
There’s also a free version of WP Mail SMTP that you can use as well.
We hope this article helped you prevent fraud and fake orders in WooCommerce. You may also want to see our complete WordPress security guide to make your online store more secure or take a look at our expert pick of the best WooCommerce plugins to grow your store.
If you liked this article, then please subscribe to our YouTube Channel for WordPress video tutorials. You can also find us on Twitter and Facebook.
Are you looking for a Squarespace vs WordPress comparison to figure out which one is better?
Squarespace and WordPress are two popular website builders that allow you to easily make a website without coding.
In this article, we will compare Squarespace vs. WordPress with the list of pros and cons for each platform. Hopefully, it will help you decide which one is better for your needs.
Note: This comparison is between Squarespace vs self-hosted WordPress (not WordPress.com). See the difference between self-hosted WordPress vs WordPress.com.
Since we want to create the most detailed WordPress vs Squarespace comparison, we have broken down the article into multiple in-depth sections.
We will look at each section and see which platform offers the most benefit to a beginner-level user.
WordPress is the best website builder on the market. More than 43% of all websites on the internet use WordPress
While WordPress is fairly intuitive and easy to use, there is a slight learning curve.
Beginners will need to familiarize themselves with WordPress terminology and concepts such as the difference between posts vs pages, categories vs tags, and understanding themes and plugins.
It comes with blocks to add common content elements to your pages so that you can build beautiful layouts with media-rich content.
Despite the slight learning curve, in our experience, most users quickly adapt to WordPress.
Need an even more flexible way to create pages?
WordPress gives you access to drag-and-drop page builder plugins like SeedProd. This allows you to create your own custom designs from scratch without writing code.
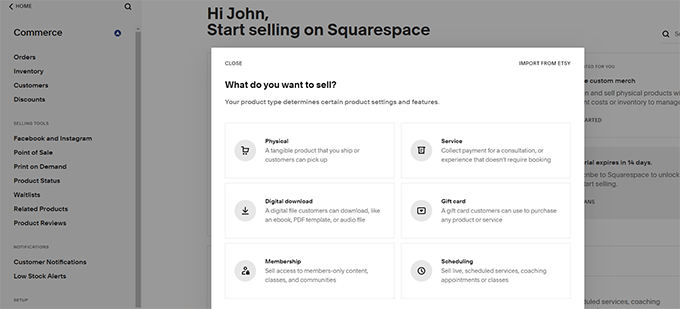
Squarespace
Unlike WordPress, Squarespace does not come with a lot of choices.
This lack of choice makes it very simple and user-friendly. Even absolute beginners can quickly write content and publish it.
Squarespace also uses a block editor similar to WordPress. Adding images, videos, and audio files is simpler than WordPress.
There are plenty of content blocks, and each block has multiple layout control choices.
Squarespace lets you customize your templates and pages using a visual editor.
However, you are limited to the options available in the customizer, since it is a controlled environment.
Conclusion
Squarespace fares a little better than WordPress out of the box in terms of ease of use for absolute beginners. However, its limited features might not be ideal for all business owners.
On the other hand, WordPress users will get a lot of options right from the beginning, which might be confusing at first, but it is a lot more flexible in the long run.
Winner: Tie
Costs of Using Squarespace vs WordPress
Knowing how much each platform cost is important in making a business decision.
Let’s look at how much Squarespace costs vs. how much WordPress costs.
WordPress
WordPress itself is free. You are free to download, use, and build upon WordPress. It is open-source software with a GPL license which gives you all the freedom and control.
In order to build your website with WordPress, you will need to register a domain and signup for a web hosting account.
The cost of web hosting and domain name vary depending on your hosting provider. You are in charge of how many resources you need for your website and how much you will pay for it.
For instance, you can start with Bluehost. They are offering WPBeginner users 60% off and a free domain name with SSL certificate.
If you can spend a little more, you can upgrade to SiteGround.
One of the reasons for WordPress’ popularity is that the overall cost of building your website with WordPress is very low.
Apart from that, you can change your hosting plan as your site grows. This means you will only pay for the resources you use, so it’s easier to control the cost of your website.
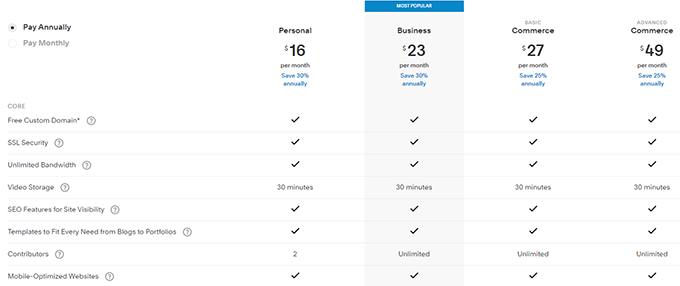
The personal plan for Squarespace starts from $16 per month (billed annually) or $23 month to month. That’s a little more than a shared hosting plan for WordPress.
However, unlike a shared WordPress hosting service, this Squarespace plan comes with limited features.
You can only add only two contributors to your site, and you cannot sell products.
Squarespace business plan starts from $23 per month (billed annually) or $33 month to month.
It includes eCommerce support, but they charge a 3% fee on each transaction. This is separate from the fee charged by your payment processor.
The business plan comes with unlimited contributors, pages, and additional advanced features.
They also have separate plans for online stores starting from $27 per month with no additional transaction fee.
Conclusion
As an open-source platform, WordPress beats Squarespace with flexible pricing plans available from a variety of web hosting providers. Squarespace pricing is higher than WordPress and with less flexibility.
The cost depends on how many resources you use, and you get access to all WordPress features right out of the box.
Winner: WordPress
Design and Templates
WordPress and Squarespace come with ready-made templates and design tools to make it easy for you to create a custom website.
Let’s see which offers you more choices and tools to create well-designed websites.
WordPress
WordPress offers access to thousands of free and premium themes (website templates). These templates are highly customizable, allowing you to use your website logo, colors, upload your own images, and more.
Many WordPress themes come with multiple layout choices, a drag-and-drop editor, sliders, photo galleries, and tons of other features.
No matter what kind of web design you need, you will find hundreds of professionally designed templates for the job.
Many beginners find this abundance of choices a bit overwhelming. Here are some of our expert picks of the best WordPress themes for different kinds of websites.
Alternatively, you can also start with the SeedProd. It is a drag-and-drop WordPress website builder that allows you to design a custom WordPress theme from scratch without coding.
Squarespace
Squarespace offers ready-made website templates neatly organized into different categories.
There are Squarespace templates for all popular website categories, with professional designs that look good on all devices.
You can easily select a template for your Squarespace website and modify it using the built-in customizer.
However, this is a big area where Squarespace seriously falls behind.
The number of pre-made templates is very limited, and your design options are also limited to the set of features available in the Squarespace customizer.
Themes come with a limited number of layout choices with each template. You can still tweak colors, fonts, website logos, and other things, but these templates are not as customizable as WordPress themes.
Conclusion
WordPress comes out as a clear winner in terms of design choices, customization options, and flexibility. Squarespace offers great-looking templates, but they are limited in numbers and are not very flexible.
Winner: WordPress
Extensions and Integrations
All website builders come with a collection of built-in features. As your website grows, you would want to add more features and connect your site to work with third-party tools and services.
Let’s see how WordPress and Squarespace perform in this regard.
WordPress
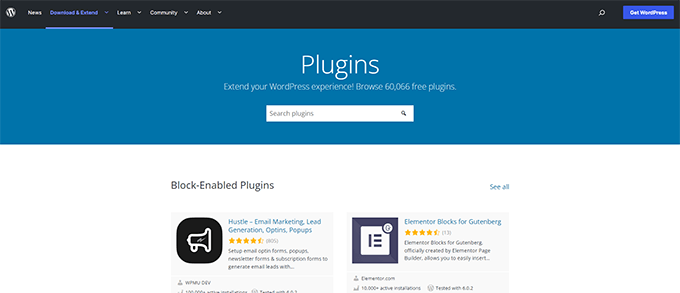
The real power of WordPress comes from its massive ecosystem of plugins. These plugins are like apps for your WordPress site that you can install to add new features or change the default behavior of your site.
There are currently more than 60,000+ free WordPress plugins listed in WordPress.org plugin directory alone. There are also thousands of premium WordPress plugins available from third-party websites.
If you can think of a feature, there is a good chance that you’ll easily find a WordPress plugin that does it.
WordPress plugins are so robust that many of them are full-fledged platforms with their own add-on plugins and a thriving community built around them.
Because WordPress is the most popular website builder, most third-party services and tools have their own WordPress plugins which integrate their services to a WordPress website.
Squarespace comes nowhere close to WordPress when it comes to extensibility and integrations.
They do offer a very limited set of extensions and integrations. However, unlike WordPress, Squarespace doesn’t have powerful APIs that developers can build upon.
The available integrations are often limited in functionality and you cannot use them as freely on Squarespace as you can do on WordPress.
For eCommerce, you can use their built-in platform, but you cannot extend it in any way.
Squarespace lacks the functionality to allow custom websites you might need for your online business idea.
Conclusion
WordPress is the clear winner with an incredible ecosystem of thousands of plugins and integrations at your fingertips.
Squarespace, on the other hand, has very few integrations and many of them are very limited.
Winner: WordPress
E-commerce Comparison – Squarespace vs WordPress
Are you building an online store? Let’s compare the eCommerce functionality of WordPress vs. Squarespace.
WordPress
WordPress allows you to integrate and use any payment processor or platform.
Many WordPress plugins allow you to easily accept online payments using credit cards via Stripe, PayPal, Google Checkout, 2Checkout, Payoneer, Skrill, and even Bitcoin.
WordPress has plenty of eCommerce plugins that can turn your website into an online store within minutes.
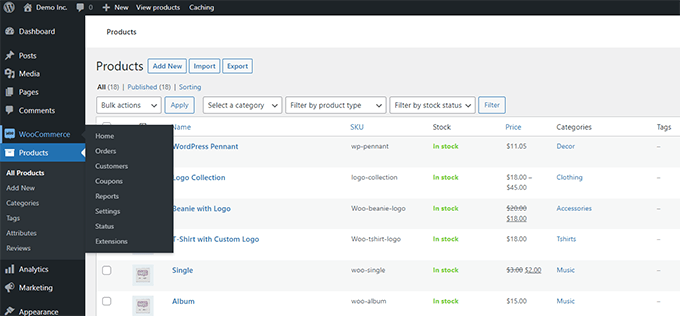
The world’s most popular eCommerce platform, WooCommerce, is a WordPress plugin.
Ecommerce features are quite limited on Squarespace. You can only use Stripe and PayPal for payment processing, both of which are only available in select countries.
There is no other payment system available, which restricts your ability to accept payments from a larger global audience.
For a growing business, starting with such limitations is not a great idea.
Apart from that, you can only sell products in Business or Commerce plans. Due to transaction fees, Squarespace users need to upgrade to an eCommerce plan to save on that.
Let’s say you want to sell only one product, you will still have to pay for the Business plan, and the yearly costs of hosting a site with just one product to sell will be way higher than a shared hosting plan or VPS for WordPress.
As for third-party services, there are very few external services that you can integrate with your Squarespace site.
This affects how you promote your website and the things you can do to make more sales and grow your business.
Conclusion
WordPress is way ahead of Squarespace when it comes to running an eCommerce website. The limitations of Squarespace can affect the growth of an online business.
The neat part about WordPress is that you can also use it alongside Shopify. See our comparison of Shopify vs WooCommerce.
Winner: WordPress
Data Portability
When signing a business agreement, you always have safety clauses such as, if you’re not happy, then you can leave without any hassle.
This concept extends to online businesses as well, and it is called data portability.
If you’re not happy with the platform, then you should be able to take all your work and move it somewhere else.
Let’s look at how WordPress and Squarespace compare in data portability and the freedom to switch.
WordPress
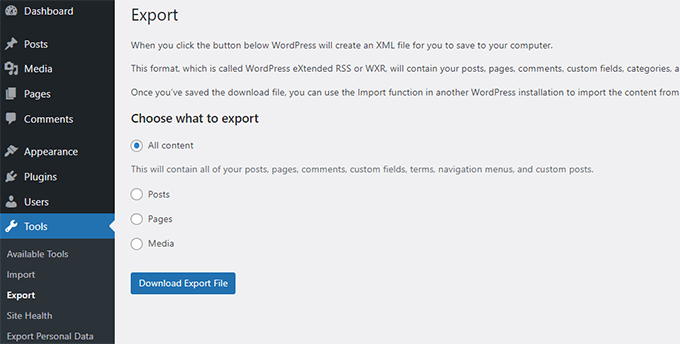
WordPress comes with built-in tools to easily export all your data.
Not just your content and images, but you can also back up your themes, plugins, and the entire database. See our list of the best WordPress backup solutions.
You can then easily move this content to any other Content Management System you want. You can store your content anywhere else and change web hosts at any time you want.
Squarespace
Just like everything else, the export feature on Squarespace is also very limited.
You can only export certain parts of your content in an XML file. This includes your pages, galleries, and one blog page with all its posts.
Your product pages, album pages, text, audio, and video blocks will not be exported.
Conclusion
The content you create on your site is yours, and you should have the freedom and tools so that you can move it elsewhere.
WordPress again beats Squarespace with easy-to-manage tools to export your entire site.
Winner: WordPress
Languages and Internationalization
We live in a global world and many businesses cater to a multilingual audience in different geographical locations.
Let’s see how Squarespace and WordPress handle languages, multi-lingual content, and geographical locations.
WordPress
WordPress is fully translated into dozens of languages. Users on a WordPress site can choose their own language from their profile settings.
You can build a WordPress website in any language you want. You can even translate WordPress yourself if your language is not yet available.
WordPress does not come with multi-lingual functionality out of the box. However, there are excellent plugins to create multilingual websites that are SEO-friendly and incredibly feature-rich.
Squarespace
The Squarespace platform is fully translated into six languages (English, German, French, Spanish, Italian, and Portuguese). It also partially supports a few more languages.
You can change your site language and choose a different timezone / country.
You can only use currencies supported by Stripe or PayPal for your store products.
You can create multilingual pages by basically duplicating your pages. You will have to manually create a site structure or different sites for each language (You will be billed for each site separately).
Alternatively, you can pay for Weglot, a third-party service to manage translations. Pricing for Weglot starts at $9.99 per month for one language.
Conclusion
WordPress is way ahead in terms of languages and localization options. Squarespace again comes out as very limited and not suitable for creating multilingual websites.
Winner: WordPress
Summarizing Squarespace vs WordPress Comparison
WordPress is a far superior platform to Squarespace when it comes to building a website. Our CMS market share report shows that WordPress powers over 43% of all websites while Squarespace is only used by 2.1% of websites.
Here is a quick breakdown of pros and cons of both platforms.
Pros of using Squarespace
Easier to use for small websites
Polished user experience
Hassle-free website setup
Customer support via Twitter, Live Chat, and email support.
Weighing the pros and cons, we can confidently say that WordPress is a better platform to start a website.
The freedom to grow your website as you see fit is important for all businesses.
You should not trade that for any cost. WordPress provides this freedom at a much lower cost than all other platforms.
Frequently Asked Questions about Squarespace vs WordPress
Following are some of the most commonly asked questions about Squarespace vs WordPress.
1. Is WordPress better than Squarespace?
Yes, WordPress is better than Squarespace because it gives you more freedom and flexibility to build any kind of website.
Squarespace is easy to use but it offers a free limited set of features and flexibility. It is comparable to platforms like Wix or Weebly which are also fully hosted site builders with similar limitations.
2. Is WordPress better for SEO than Squarespace?
Yes, WordPress is better for SEO (Search Engine Optimization) than Squarespace. With WordPress you can use SEO plugins like All in One SEO for WordPress, which allows you to add powerful sitemaps, schema markup, meta title and descriptions, and more.
With Squarespace, you are limited to the SEO functionality baked into the platform and cannot extend it.
3. How can I move my site from Squarespace to WordPress?
Squarespace offers limited export options but you can still switch from Squarespace to WordPress. See our tutorial on how to easily move from Squarespace to WordPress for step-by-step instructions.
4. Squarespace vs WordPress which one is better for bloggers?
WordPress is the better platform for bloggers. It started out as a blogging platform and still has the best blogging tools than any other site builder on the market.
We hope this article offered you a side-by-side comparison of WordPress vs Squarespace. You may also want to see our complete WordPress review for a detailed overview of the platform.
If you liked this article, then please subscribe to our YouTube Channel for WordPress video tutorials. You can also find us on Twitter and Facebook.