Do you want to add a custom login URL in WordPress?
Adding a custom login URL in WordPress can help improve your WordPress security and offer your visitors a better experience.
In this article, we’ll show you how to add a custom login URL in WordPress, step by step.
Why Add a Custom Login URL in WordPress?
WordPress is the most popular CMS platform and powers over 40% of websites. Because it’s so popular, it’s often a target of hackers who use techniques like brute force attacks to try to log in to your dashboard.
Bots and hackers trying to get into your site know the common login URLs like wp-admin and wp-login and will try to get access to your site using these URLs first.
By changing the WordPress login page URL, you improve your site’s security and make it more difficult for hackers to get access to your WordPress website.

Another reason to add a custom login link in WordPress is to offer a better user experience. You can customize the URL and design of your login page so it matches your branding and existing WordPress theme.
With that said, let’s show you how to add a custom login URL in WordPress in just a few simple steps.
How to Add a Custom Login URL in WordPress Using SeedProd
The simplest way to add a custom login URL in WordPress is by using a WordPress plugin. This lets you simply change your WordPress login URL without editing any core WordPress files.
We recommend using the SeedProd plugin. It’s the best drag and drop WordPress page builder used by over 1 million sites. With this plugin, you can easily customize your SeedProd login page and change the URL.
The first thing you need to do is install and activate the plugin. For more details, see our step by step guide on how to install a WordPress plugin.
Note: There is a free version of SeedProd, but we’ll be using the premium version for this tutorial since it has the login page templates we need.
Upon activation, first you’ll need to go to SeedProd » Settings and enter your product license key.
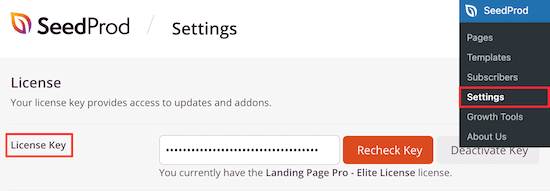
You can find your product license key under your account information on the SeedProd website.
After that, navigate to SeedProd » Pages and click the ‘Set up a Login Page’ button.
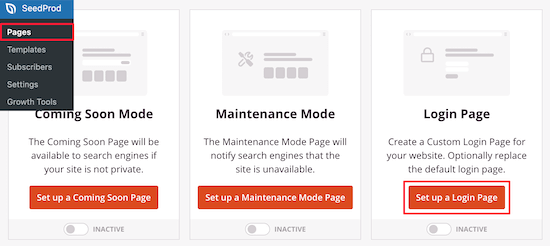
Then, you’ll be taken to a screen that has all of the login page templates.
You can choose one of the pre-made professional templates or select the ‘Blank’ template to build a login page from scratch.

For this tutorial, we’ll choose the ‘Geo Login Page’ template.
Simply hover over the template you want to use and click the check icon.

This brings up a popup where you can name your new login page and enter a custom login page URL.
Next, click the ‘Save and Start Editing the Page’ button.
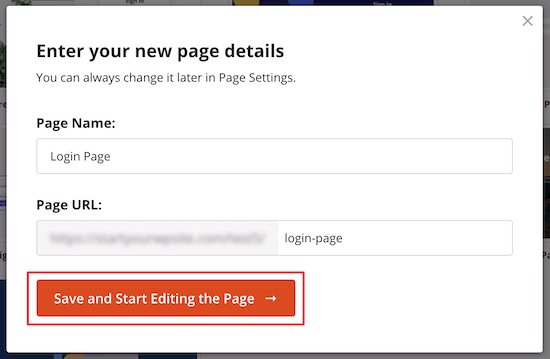
This will take you to the page editor screen.
You can customize every element of the page with the drag and drop builder.
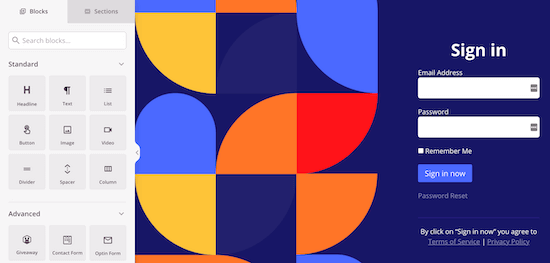
The left side has blocks and sections you can add to the page, and the right side shows a real time preview of what it looks like.
When you click on any page element, it will bring up a menu to customize it further.
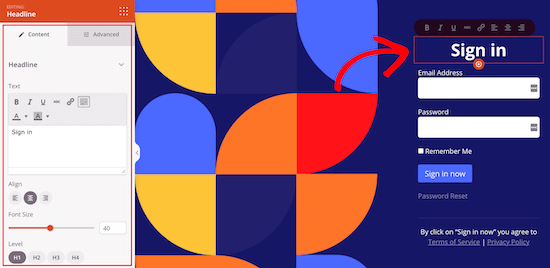
You can customize your login page as much as you want, but we’ll leave the default settings for this tutorial.
For more details on all the customization options, see our ultimate guide on how to create a custom WordPress login page.
Next, you need to click the arrow next to the ‘Save’ box and select ‘Publish’ from the drop down.
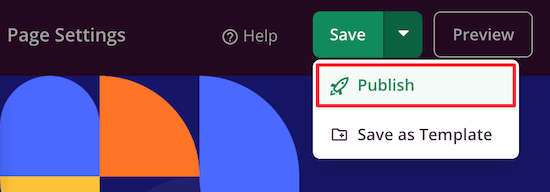
Now, it’s time to change the default login URL to your new login page.
First, click the ‘Page Settings’ menu option at the top of the page.
Then, scroll down the page until you see the ‘Redirect the Default Login Page’ option. Simply click the ‘Enable’ toggle, and you’ll see it turn orange.

This will redirect the default WordPress login page to the new page you just created.
Don’t forget to click the ‘Save’ button again to make sure all of your changes are now live.
Change WordPress Login Page URL with a Free Plugin
We recommend using the SeedProd plugin above because it also lets you easily customize your login page to match the design of your site.
However, some users will want to keep the default WordPress login page and only change the login page URL.
To do this, you can use the free plugin called WPS Hide Login. This plugin lets you simply change the login URL without customizing the page.
Once the plugin is installed and activated, navigate to Settings » WPS Hide Login.
Then, add your new login page URL in the ‘Login url’ box.
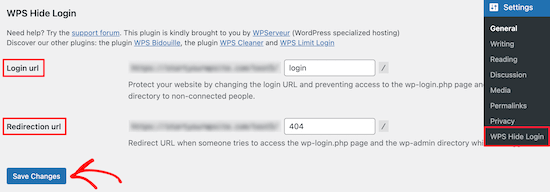
You can also add a redirect URL in the ’Redirection url’ box.
This will redirect people to another page on your WordPress blog when they try to access the default wp-login.php page, and they aren’t logged in.
After that, click ‘Save Changes’.
Now, all visitors will automatically be sent to your new login page URL.
We hope this article helped you learn how to add a custom login URL in WordPress. You may also want to see our guide on how to choose the best web design software, and our list of the best email marketing services for small businesses.
If you liked this article, then please subscribe to our YouTube Channel for WordPress video tutorials. You can also find us on Twitter and Facebook.
The post How to Add a Custom Login URL in WordPress (Step by Step) appeared first on WPBeginner.
from WPBeginner https://ift.tt/3AXqWap
More links is https://mwktutor.com
No comments:
Post a Comment